3D Creation of Celing, Roof, Architectural plan, Structural plan, Sectional view, Elevation view and Camera specific view for a house plan using REVIT
1.
Aim:- Based on the project saved from Week 3, proceed from the First Floor Level. Model a Ceiling from the architecture tab above the walls at the first-floor level
Introduction:- Ceiling is an over head interior surface that covers a upper limit of a room
- False ceiling are essential used to conceiling wires, fire safety, sound proofing and helps in moisture and sag resistance
Procedure:-
Step1:-
- Open the week 3 project file
- Click on the first floor level then select the ceiling option in the architectural tab
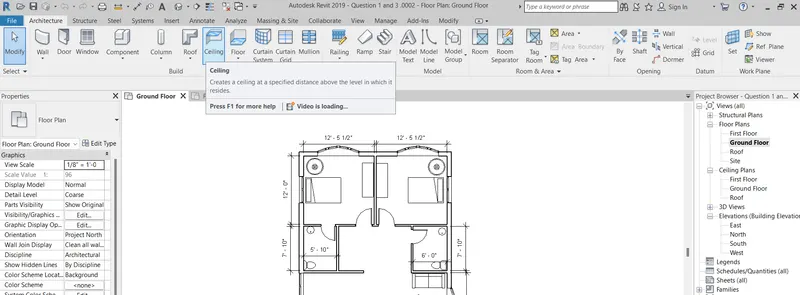
Step2:-
- After selecting the ceiling option
- Select the pick line option to set the ceiling
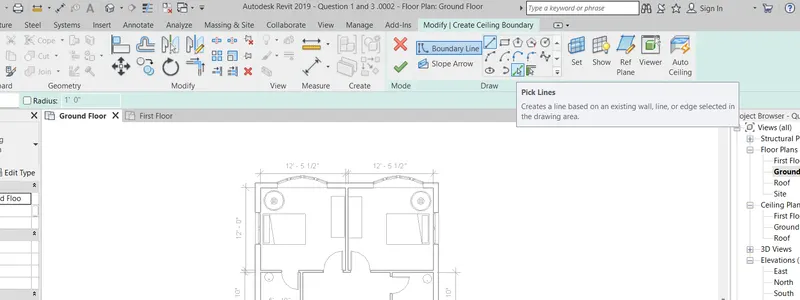
Step3:-
- After selecting the pick line option click on the inner portion of the wall to create the ceiling
- The height of the ceiling is 9'-6"
- After completing the ceiling sketch
- Click on right mark
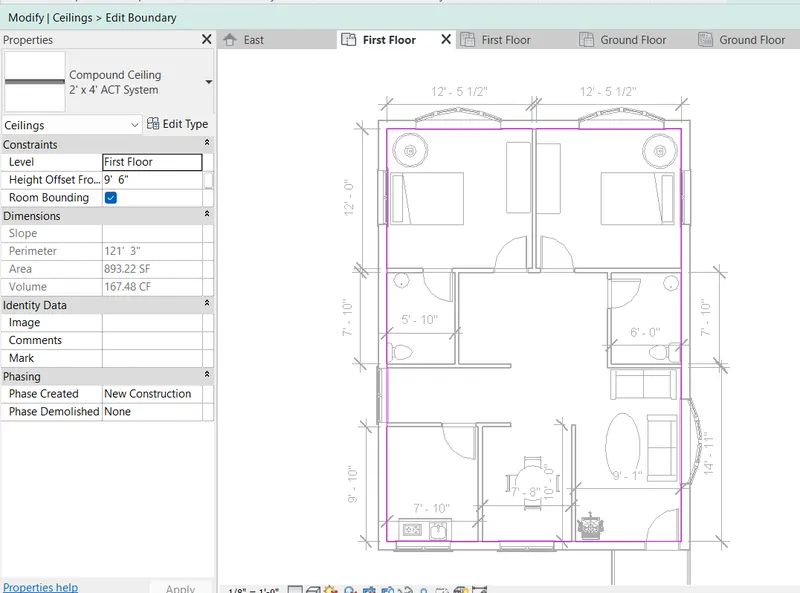
Step4:-
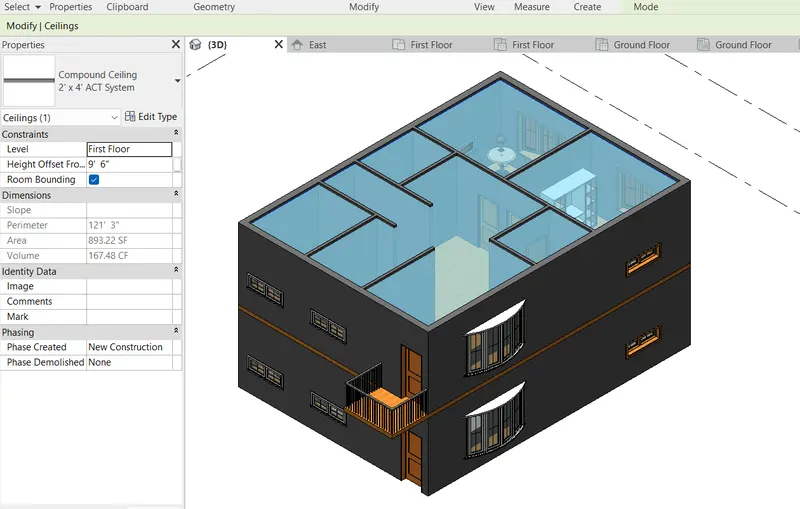
- After clicking on the right mark ceiling is created
- Go to the 3D view to see the 3D model of the drawing
- Finally the 3D model looks like this
Result:-
3D model of the building with ceiling
2.
Aim:- Model a roof above the ceiling by selecting the footprints of the ceiling. Using the adjustment toolbars appearing on-screen adjust the roof slope to 10 degrees
Introduction:- Roof is a top covering of a building
- It provides the protection against rain, snow and sunlight
Procedure:-
Step1:-
- Open the week 3 project file
- Click on the first floor level then select the roof option in the architectural tab
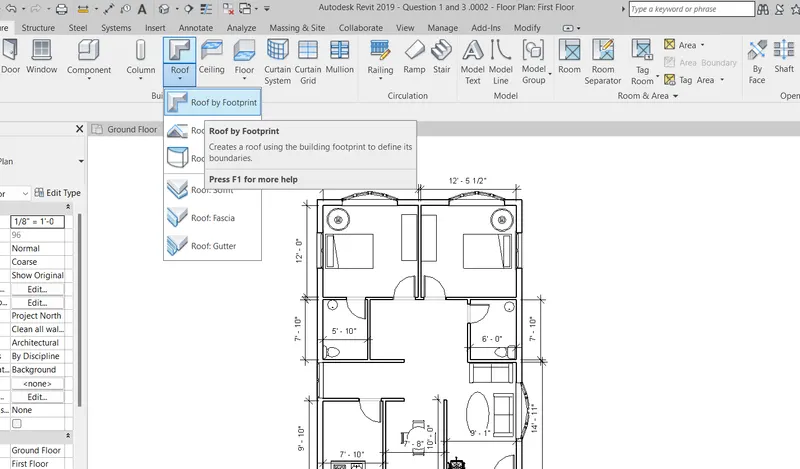
Step2:-
- After selecting the roof option
- Select the pick line option to create the roof with angle
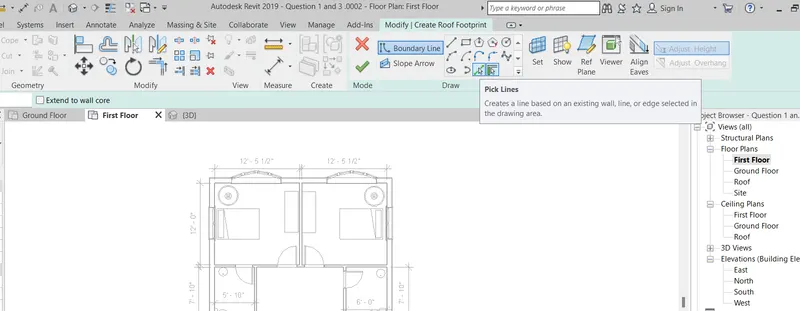
Step3:-
- After selecting the pick line option click on the outer portion of the wall to create the roof
- After completing the roof sketch
- Click on right mark
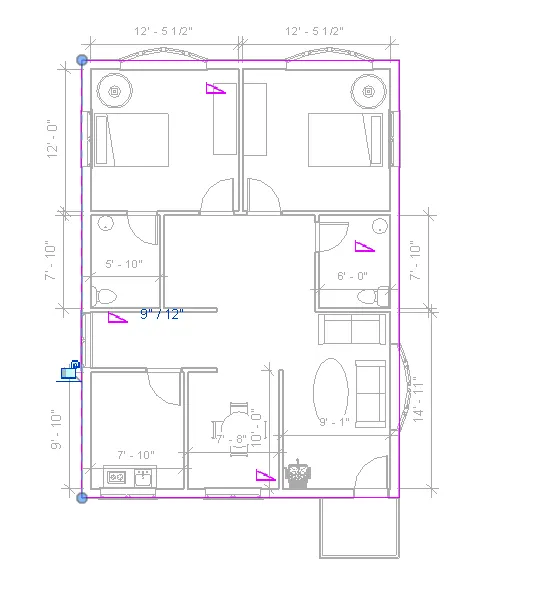
Step4:-
- After clicking on the right mark roof is created
- Go to the 3D view to see the 3D model of the drawing
- Finally the 3D model looks like this
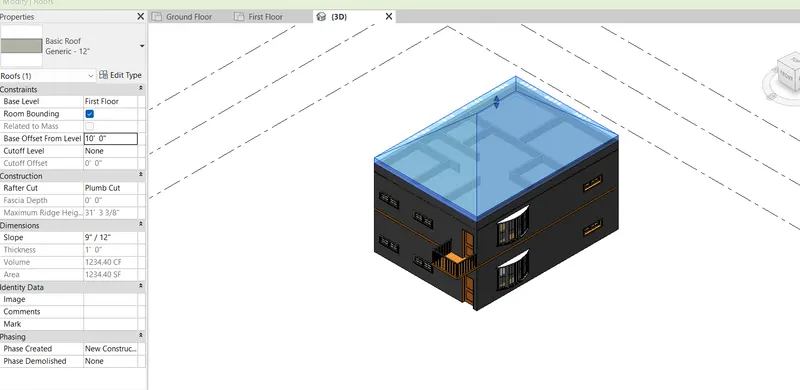
Step5:-
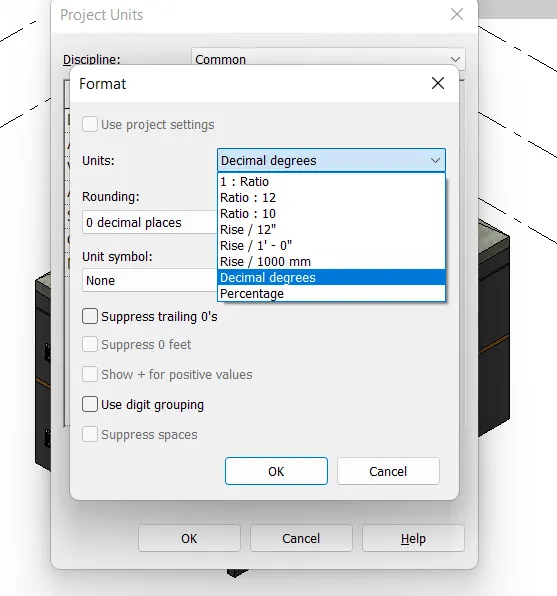
- Here we need to make the slope as 10 degree but the slope in imperial unit
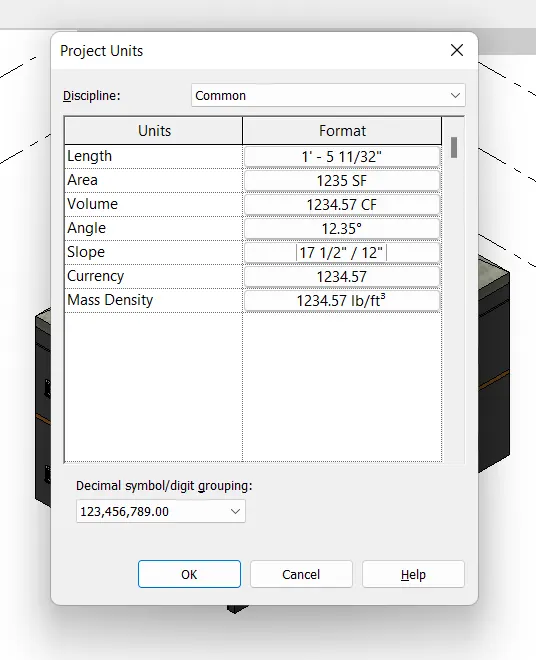
- To change the unit of the slope go to the unit by giving a command un
- Then the project unit dialouge box opens then click on the slope values which is in formate column
Step6:-
- Then change the slope from imperial to decimal degree
- Then click OK
Step7:-
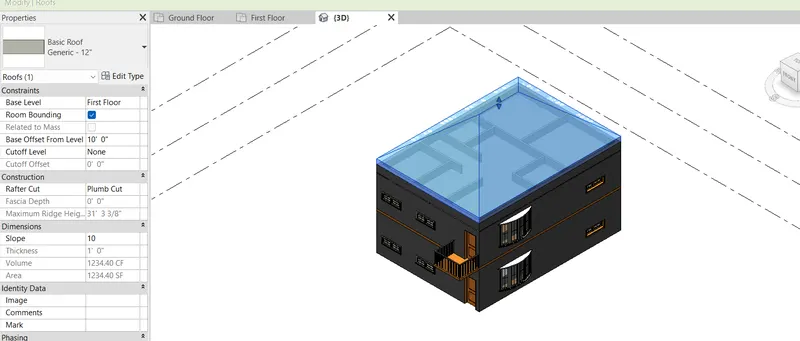
- After selecting the decimal degree then change the slope value to 10 degree in the property tab
- Click on Apply in thr property tab
- Go to the 3D view to see the 3D model of the drawing
- Finally the 3D model looks like this
Result:-
3D model of the building with sloped roof
3.
Aim:- Using the file saved from weeks 2 to 4, create plan views for ground floor level and first-floor level including all the walls, floors, and components. Separate them to
architecture and structural plans
a. Architecture plan must have walls, floors, and all the components placed within the building
b. Structure plan must have details of only walls, floors, and columns
Introduction:-
- Floor Plan :- It is a plan that consists of all the components like walls, columns, family components, doors, windows etc.,
- Structural Plan :- It is a plan that consists of only structural components like walls, floors, columns.
Procedure:-
Step1:-
- Open the week 3 project file
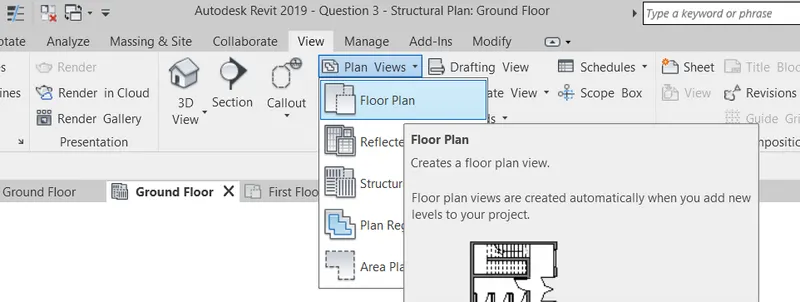
- Go to the view tab
- To get the floor plan Go to the Foor Plan in the Plan view at Architectural tab
Step2:-
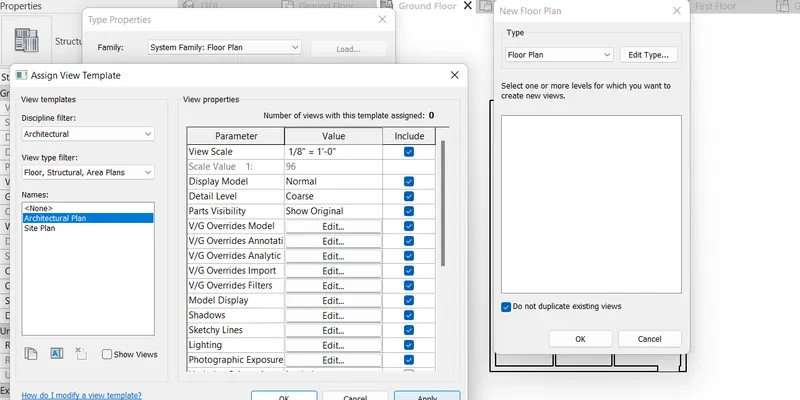
- Then the new floor plan dialouge box open click on the edit type and click on view template applied
- Assign view templates dialouge box opens then select the options which is in this tab
- Then click on apply and click on OK
Step3:-
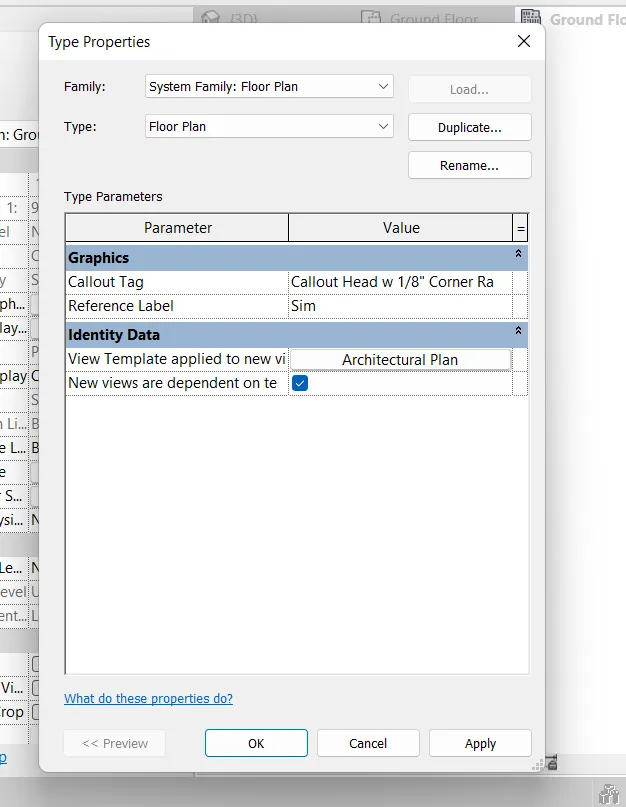
- After click OK then this dialouge box opens
- Then click on Apply and click on OK
Step4:-
- After setting all the settings
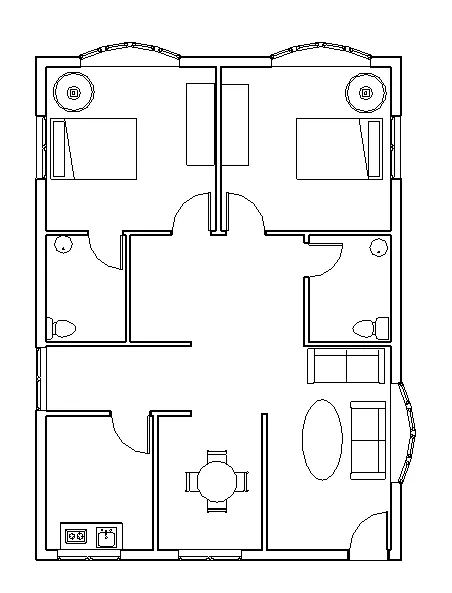
- Select the Ground floor in the new floor plan
- Then the ground floor plan appears
Step5:-
- After setting all the settings
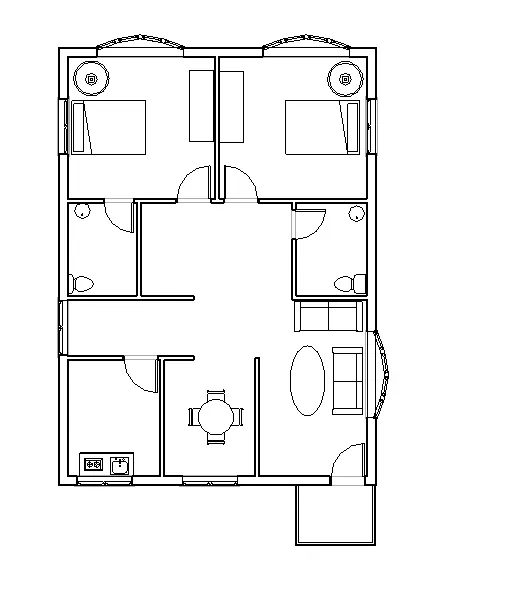
- Select the First floor in the new floor plan
- Then the first floor plan appears
Step6:-
- Go to the view tab
- To get the structural plan Go to the Structural Plan in the Plan view at Architectural tab
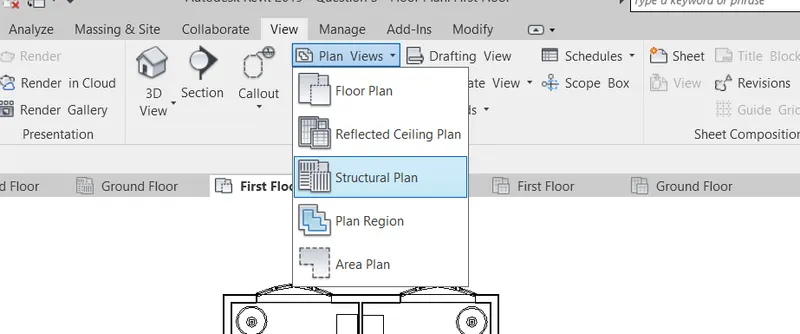
Step7:-
- Then the new floor plan dialouge box open click on the edit type and click on view template applied
- Assign view templates dialouge box opens then select the options which is in this tab
- Then click on apply and click on OK
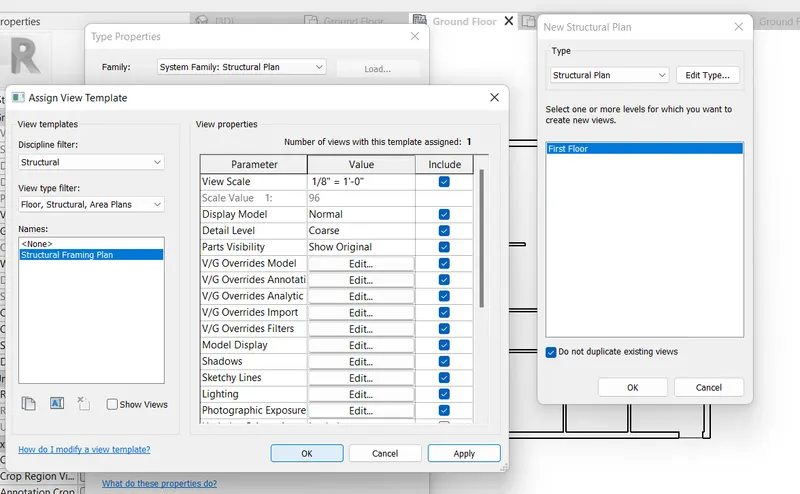
Step8:-
- After click OK then this dialouge box opens
- Then click on Apply and click on OK
- After setting all the settings
- Select the floor in the new floor plan
- Then the floor section appears
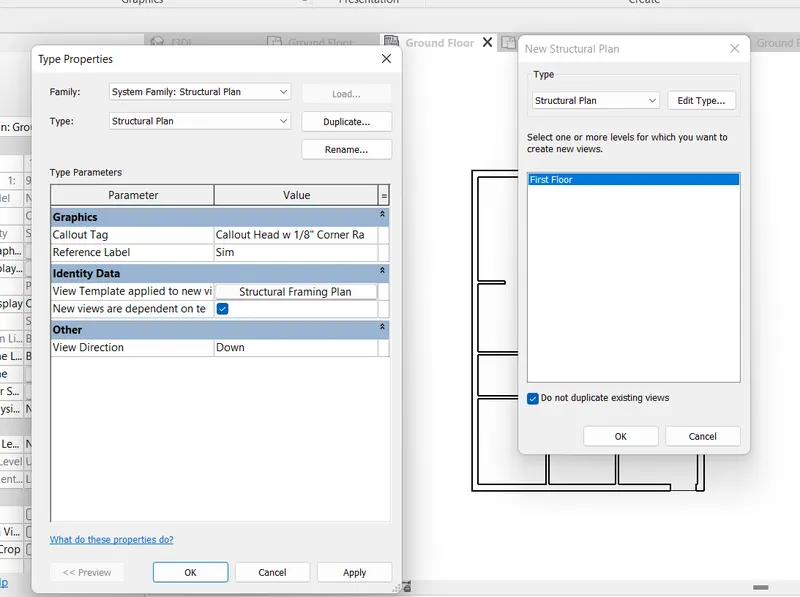
Step9:-
- After setting all the settings
- Select the Ground floor in the new floor plan
- Then the Ground floor structure plan appears
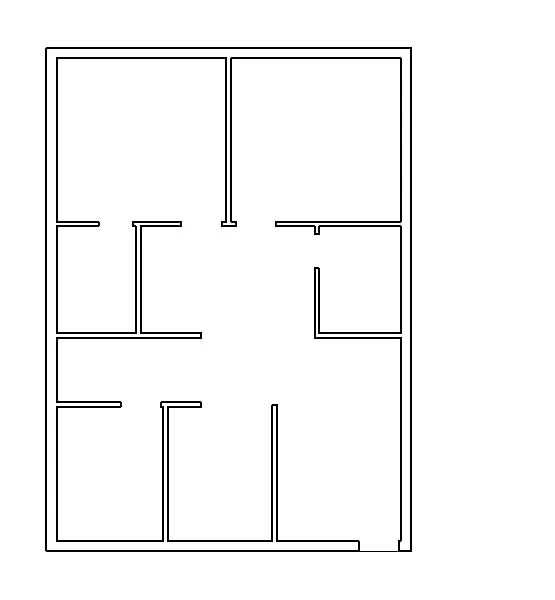
Step10:-
- Select the First floor in the new floor plan
- Then the First floor structure plan appears
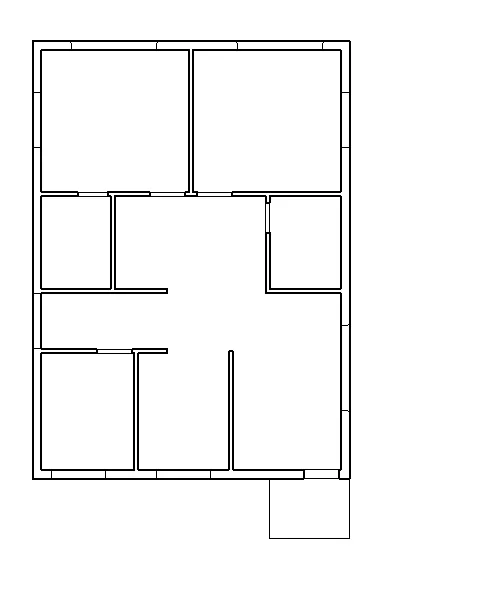
Step11:-
- Select the Roof floor in the new floor plan
- Then the Roof floor structure plan appears
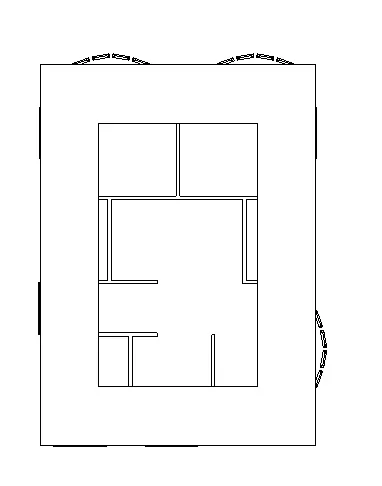
Result:-
Ground Floor Architectural Plan
First Floor Architectural Plan
Ground Floor Structural Plan
First Floor Structural Plan
Roof framed structural Plan
4.
Aim:- Using annotate toolbar add dimensions to all the walls and floors with reference to the longitudinal and transverse grids created in the project file
a. The architecture plan dimensions include details on where the components are placed within the buildings with relation to grids. Overall dimensions are sufficient for architecture plans
b. The Structure plan dimensions must include details on the position of all the walls and interior walls with reference to grids. Locate all the framing components of the building with reference to a fixed point using Structural plans
Introduction:-
Dimensions :-
- It is a important parameter in the civil engineering because the dimension is a specification of length, width and height/depth
- Without a dimension the construction of a building is impossible
Procedure:-
Step1:-
- Open the week 3 project file
- Click on the annotate tab to give the dimensions
- Click on the Linear dimension
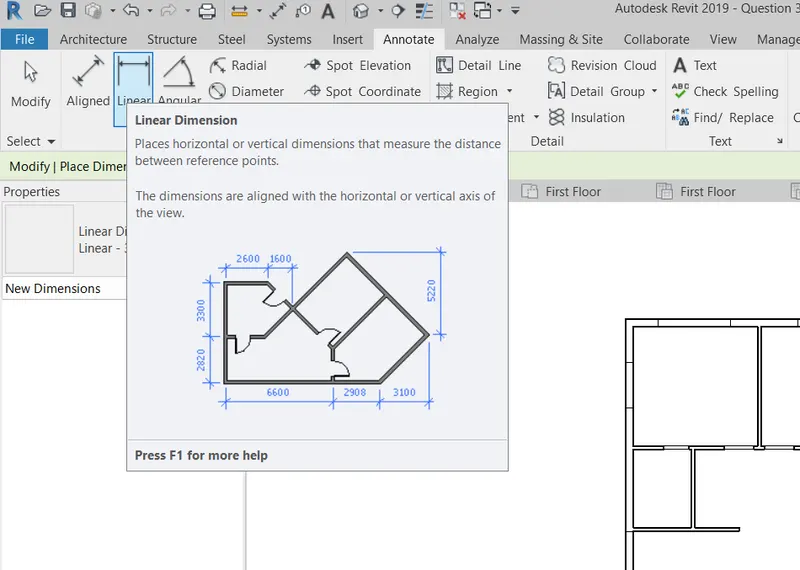
Step2:-
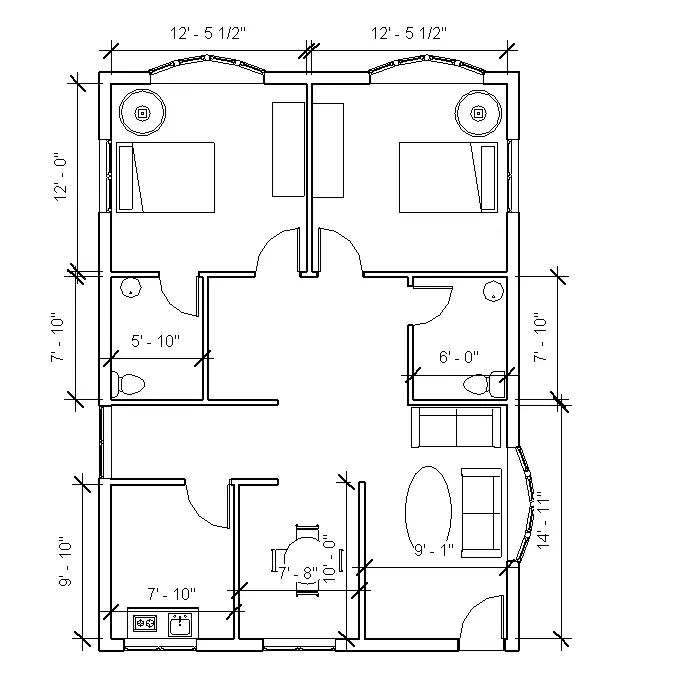
- Select the linear dimension option then
- Select the corner of the wall which has appear in the blue dot
- Dimension all the rooms of the building
Step3:-
- Select the linear dimension option then
- Select the corner of the wall which has appear in the blue dot
- Dimension all the rooms of the building
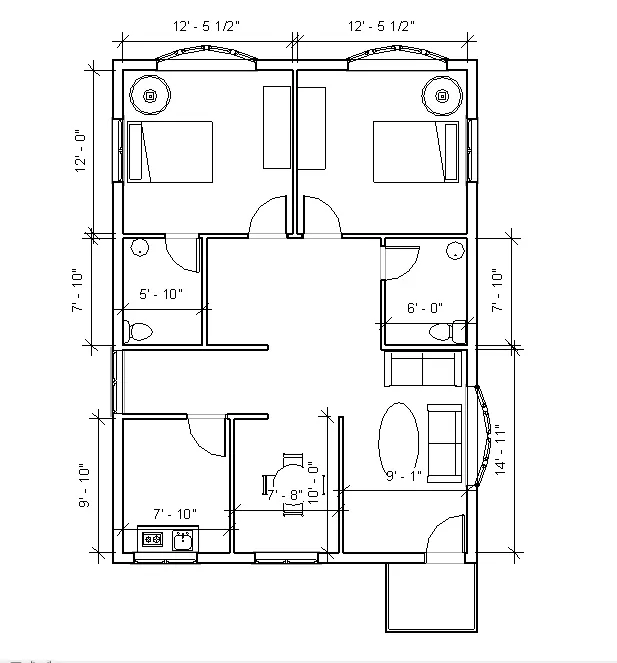
Step4:-
- Select the linear dimension option then
- Select the corner of the wall which has appear in the blue dot
- Dimension all the rooms of the building
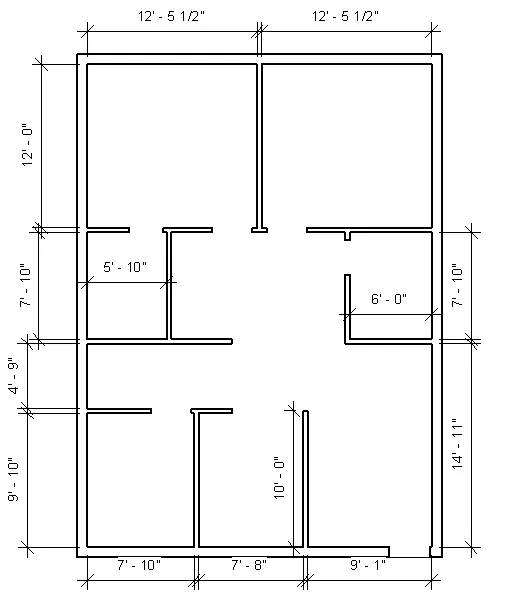
Step5:-
- Select the linear dimension option then
- Select the corner of the wall which has appear in the blue dot
- Dimension all the rooms of the building
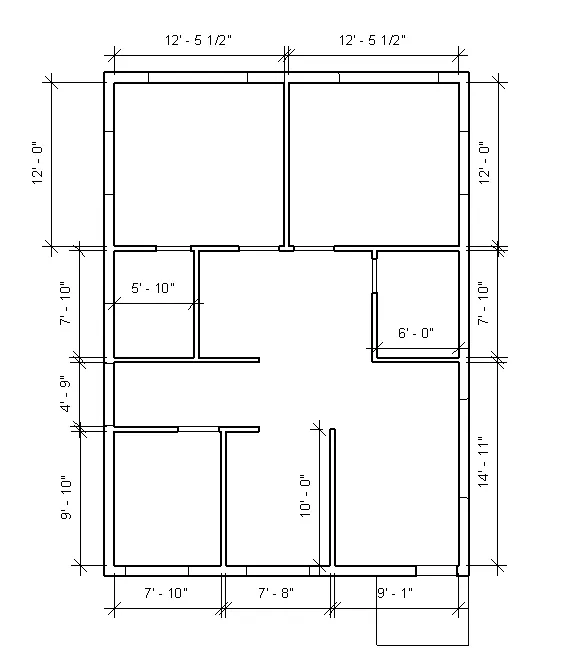
Result:-
Dimension for Ground Floor Architectural
Dimension for First Floor Architectural
Dimension for Ground Floor Structural
Dimension for First Floor Structural
5.
Aim:- Create a sheet template from the view tab and adjust the parameters on the sheet to add appropriate views
Introduction:-
Sheets :-
- Sheets are used to set the page to place the drawings or images in that sheet
- The drawing/sheet informations should be changed while creating the sheets
Procedure:-
Step1:-
- Open the week 3 project file
- Then go to the sheet which is in the view tab
- Then the new sheet dialouge box opens
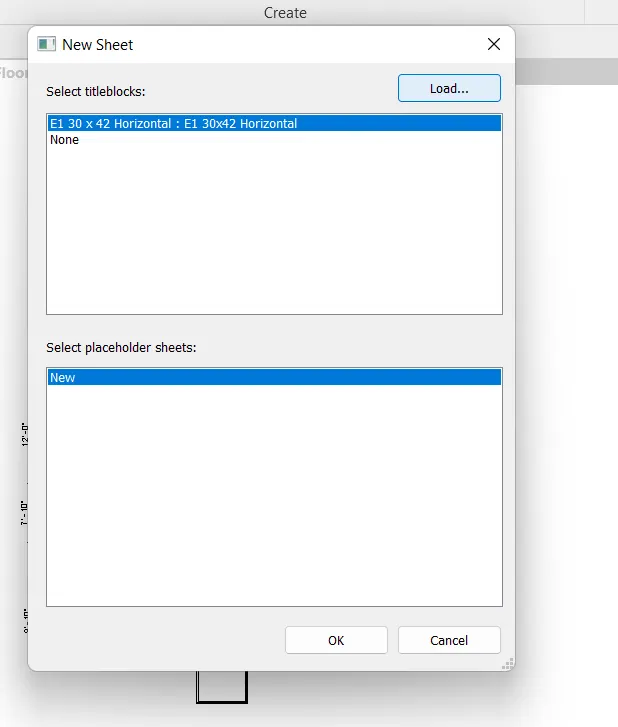
Step2:-
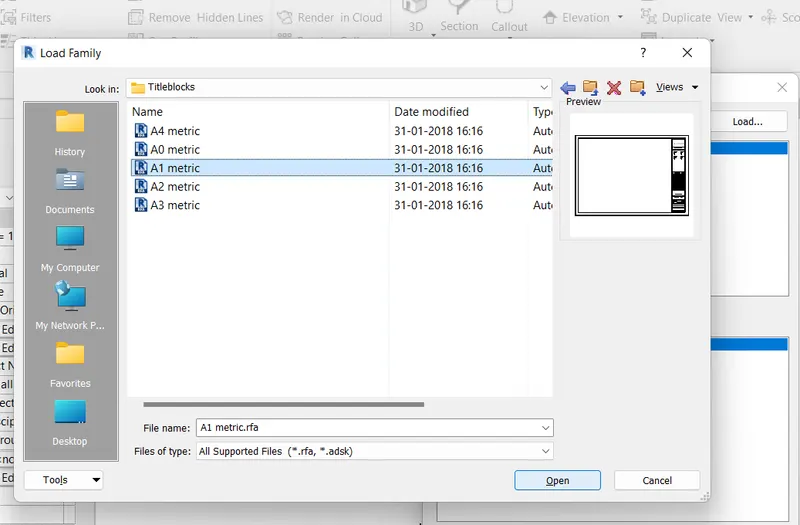
- To select the different sheet setup
- Go to the load family then go to the title block and select the A1 metric
- Click on open
Step3:-
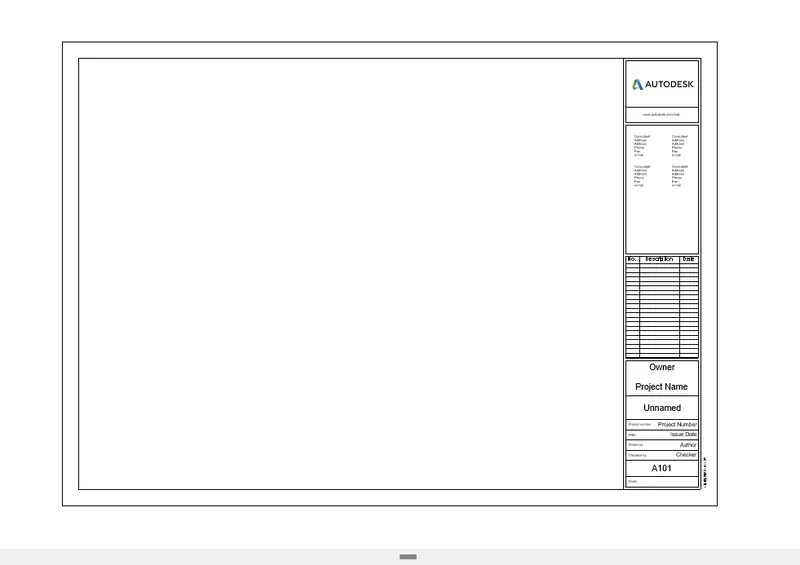
- After opening the A1 metric sheet
- Then the default sheet opens
- This sheet is loaded by Autodesk Revit
Step4:-
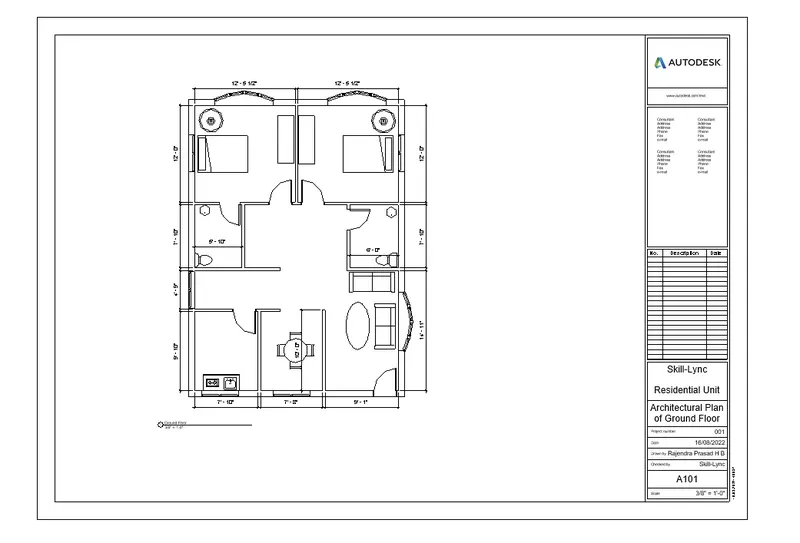
- After opening the default sheet which is A1 metric
- Drag the plan of Architectural plan Ground floor plan in to the sheet
- Then change the information in the sheet
Step5:-
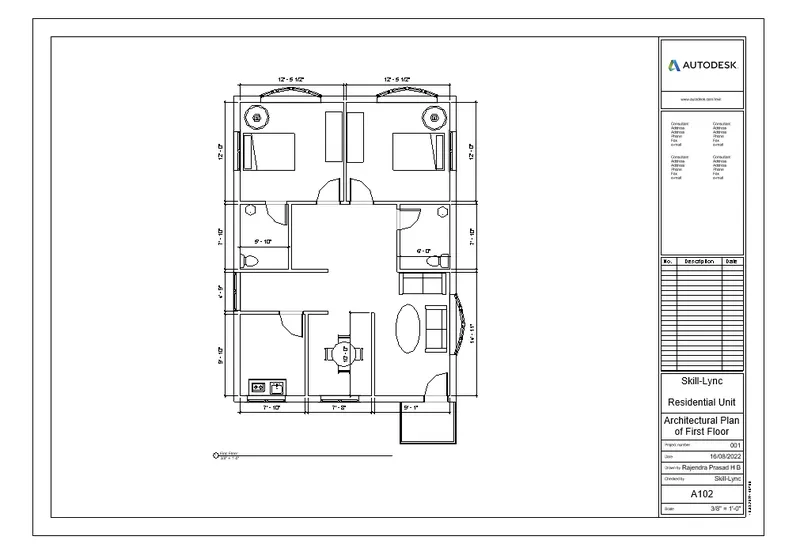
- After opening the default sheet which is A1 metric
- Drag the plan of Architectural plan of First floor plan in to the sheet
- Then change the information in the sheet
Step6:-
- After opening the default sheet which is A1 metric
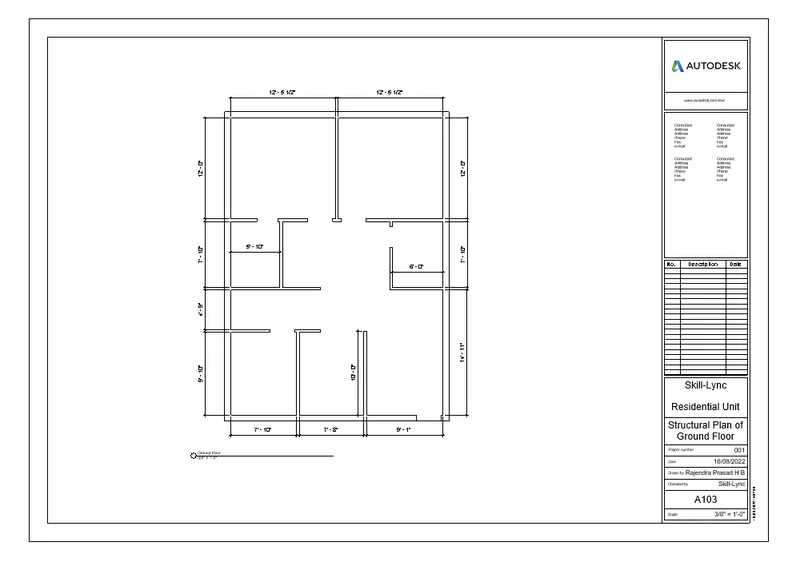
- Drag the plan of Structural Plan of Ground floor in to the sheet
- Then change the information in the sheet
Step7:-
- After opening the default sheet which is A1 metric
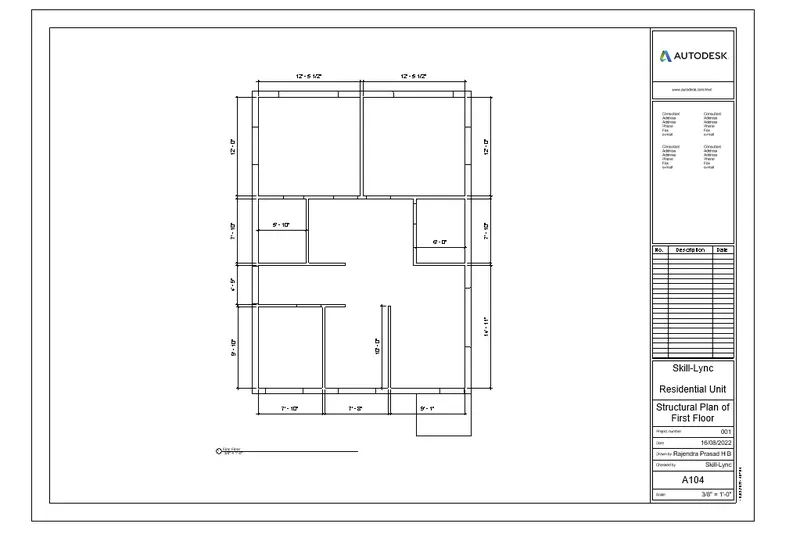
- Drag the plan of Structural Plan of First floor in to the sheet
- Then change the information in the sheet
Result:-
Sheet template of Architectural Ground Floor
Sheet template of Architectural First Floor
Sheet template of Structural Ground Floor
Sheet template of Structural First Floor
6.
Aim:- Using the elevation tab create the elevation views, looking at your building from East, North, South, and West
Introduction:-
Elevation:- Elevation is the entire side of the building from ground level to roof level
- In Revit there are 4 default level are there they are
- North, South, West, East
Procedure:-
Step1:-
- Open the week 3 project file
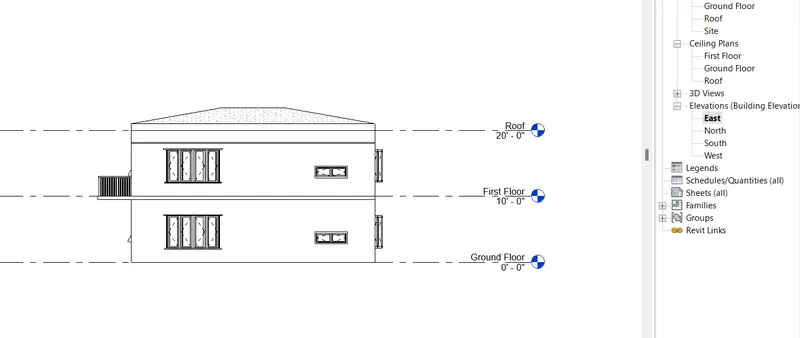
- Then click on the East elevation which is in the project browser
- This is the view of East elevation
Step2:-
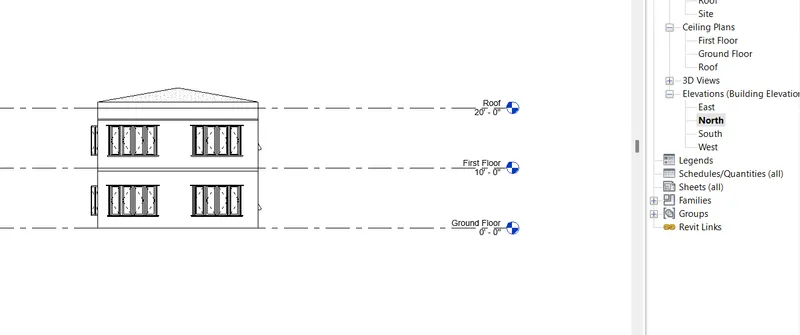
- Then click on the North elevation which is in the project browser
- This is the view of North elevation
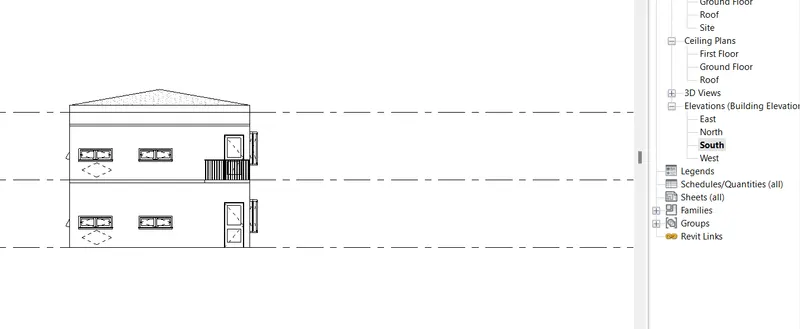
Step3:-
- Then click on the South elevation which is in the project browser
- This is the view of South elevation
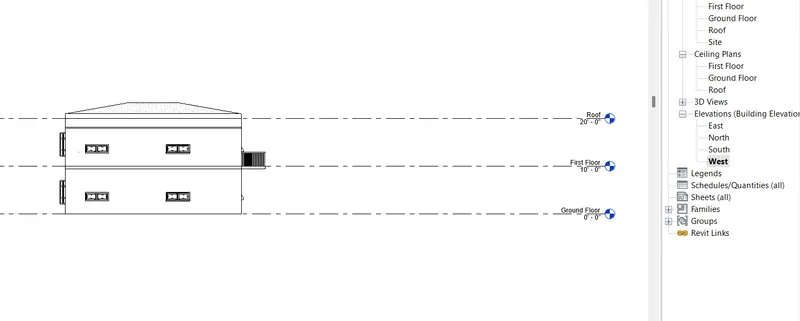
Step4:-
- Then click on the West elevation which is in the project browser
- This is the view of West elevation
Result:-
East Elevation
North Elevation
South Elevation
West Elevation
7.
Aim:- Produce section cut through each room either cutting across longitudinally or in a transverse direction
Introduction:- Section is a slicing of a building by using a imaginary line from one region to another region
- The view of the building in the section is perpendicular to the imaginary line
Procedure:-
Step1:-
- Open the week 3 project file
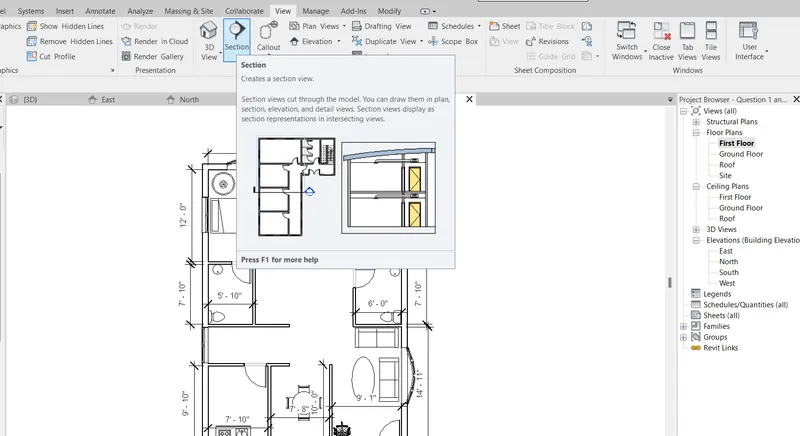
- Select the section which is in the view tab
- Then start take a section of the building
Step2:-
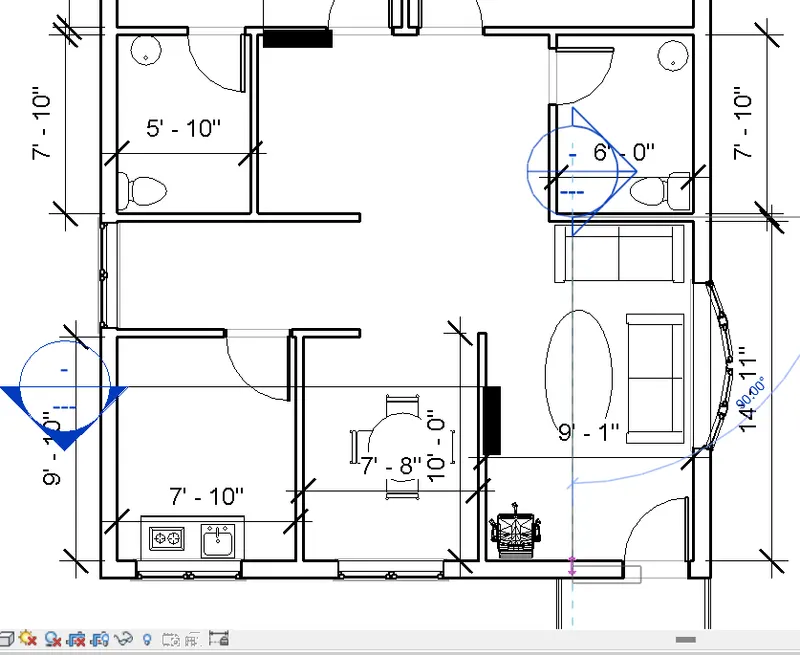
- Take a section of bedroom 1, bed room 2, living room, kitchen and dining
- Select the section region where you need to cut
Step3:-
- Go to the section view in the project browser
- Then open the bedroom 1 section
- Go to the 3D view to get 3D visualisation
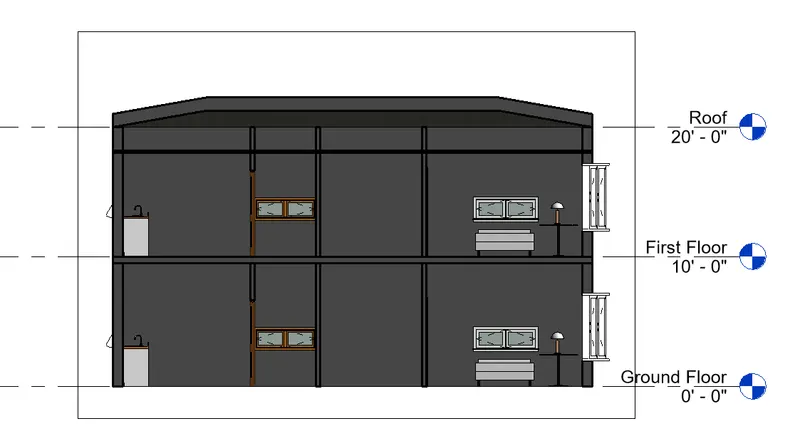
Step4:-
- Go to the section view in the project browser
- Then open the bedroom 2 section
- Go to the 3D view to get 3D visualisation
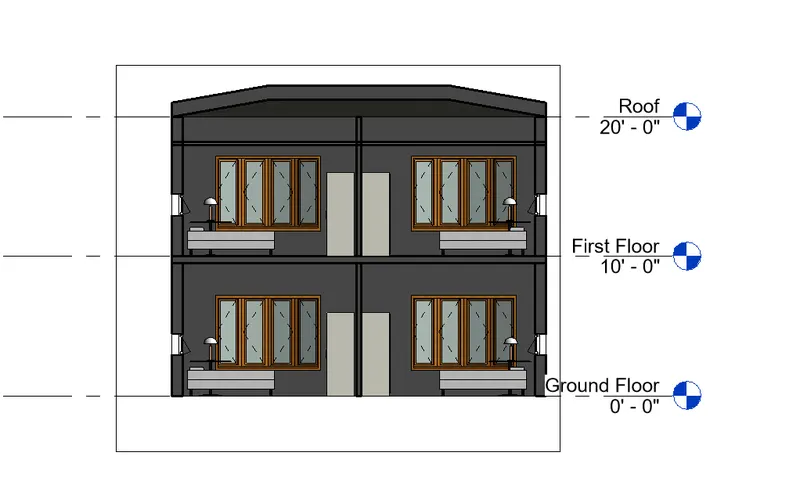
Step5:-
- Go to the section view in the project browser
- Then open the kitchen and dining section
- Go to the 3D view to get 3D visualisation
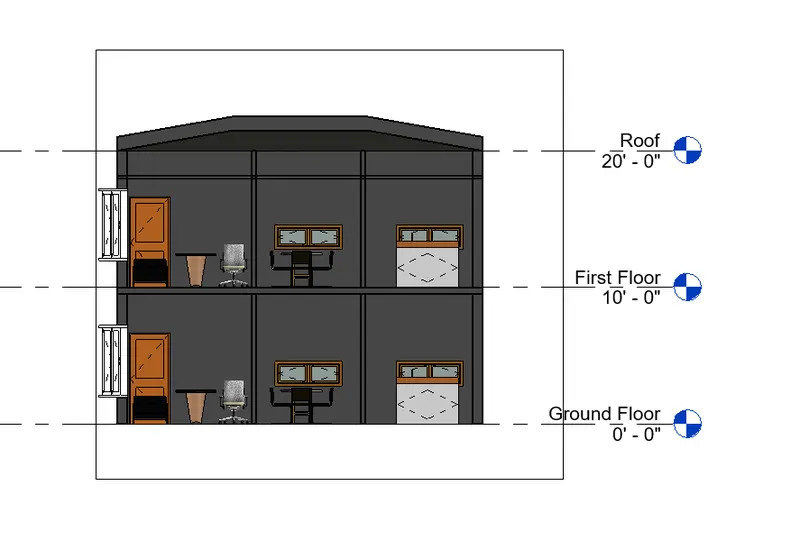
Step6:-
- Go to the section view in the project browser
- Then open the living room section
- Go to the 3D view to get 3D visualisation
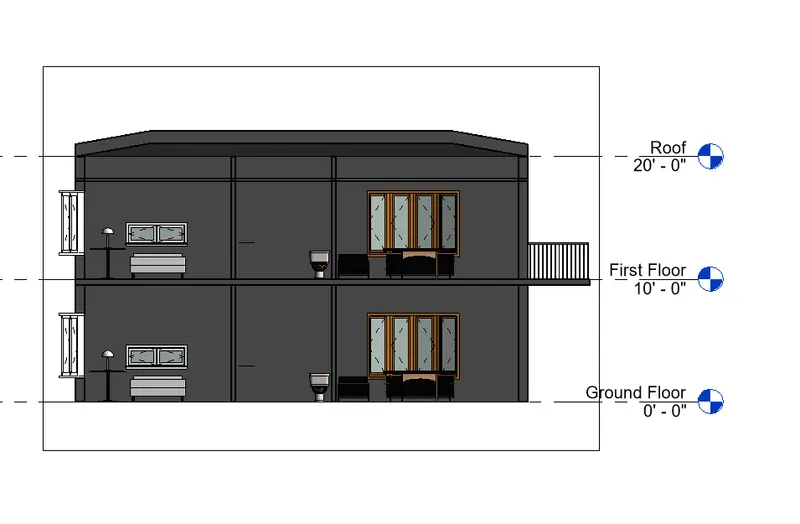
Result:-
Section view of the Bed room 1
Section view of the Bed room 2
Section view of the Kitchen and dining
Section view of the Living room
8.
Aim:- Classify the views, Plan Views, Section Views, and Elevation views to either Design or Documentation category using Properties browser
Introduction:-
Plan view :- The top view of any building which cuts at the sill level
- Plan is 2D view of a building
- It is the 1st step of the construction without a plan the construction is impossible
Section view:- Section is a slicing of a building by using a imaginary line from one region to another region
- The view of the building in the section is perpendicular to the imaginary line
Elevation view:- Elevation is the entire side of the building from ground level to roof level
- In Revit there are 4 default level are there they are
- North, South, West, East
Procedure:-
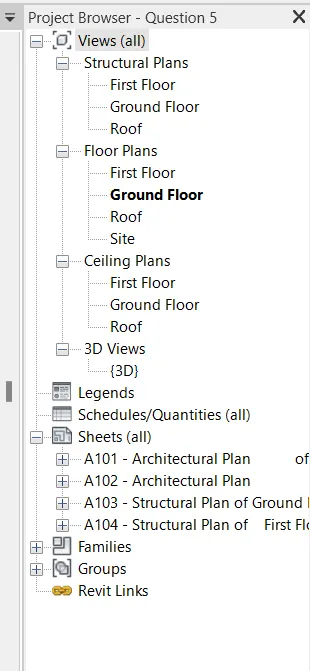
- In this question they asked to take a screen shot of the views which is in the project browser
- This views consists of a Structural plans, Floor plans, Ceiling plans, 3D views
- This is the snap shot of the views
Result:-
Snap shot of the project browser which contains all the views
9.
Aim:- Using the sheet template produced create multiple sheets as follows
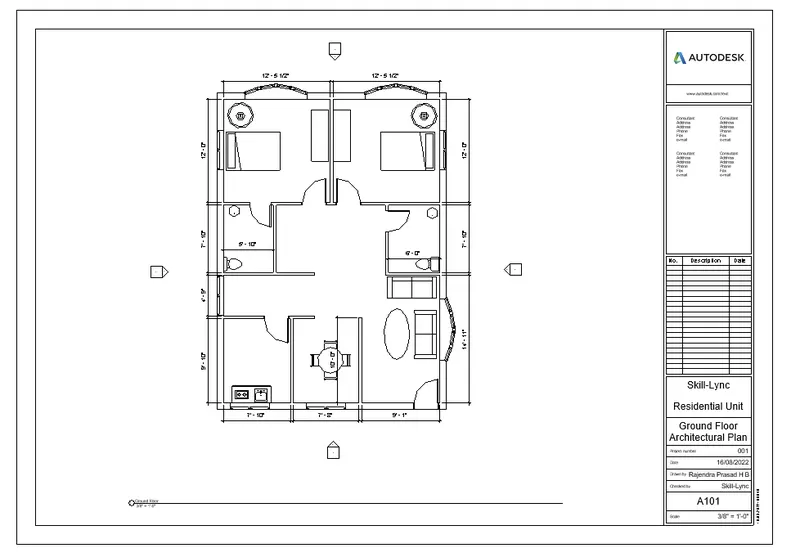
a. A 101- Ground Floor Architecture Plan
b. A 102- First Floor Architecture Plan
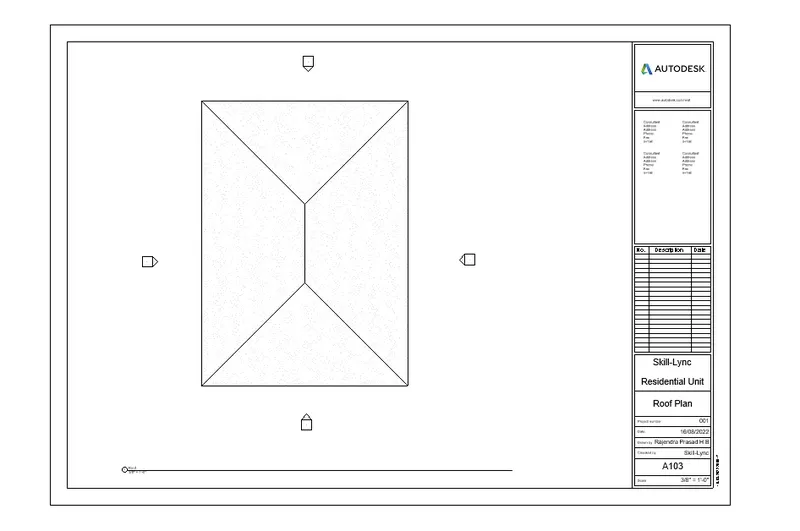
c. A 103- Roof Plan
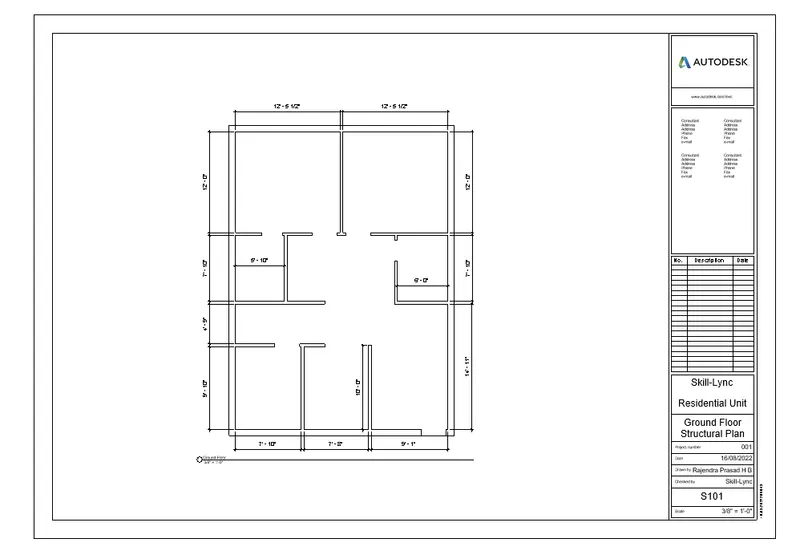
d. S 101- Ground Floor Structural Plan
e. S 102- First Floor Structural Plan
f. S 103- Roof Framing Plan
g. A-201- North-South Elevations
h. A-202- East-West Elevations
Introduction:-
Sheets :-
- Sheets are used to set the page to place the drawings or images in that sheet
- The drawing/sheet informations should be changed while creating the sheets
Procedure:-
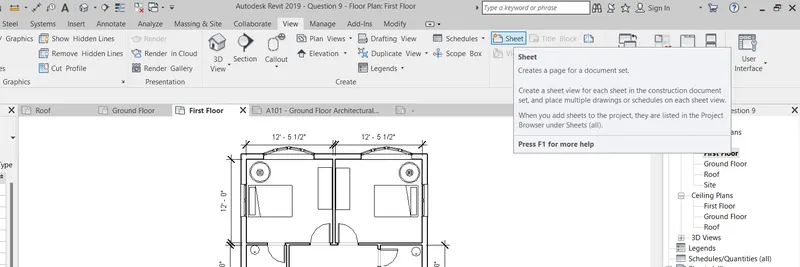
Step1:-
- Open the week 3 project file
- Then go to the sheet which is in the view tab
- Then the new sheet dialouge box opens
Step2:-
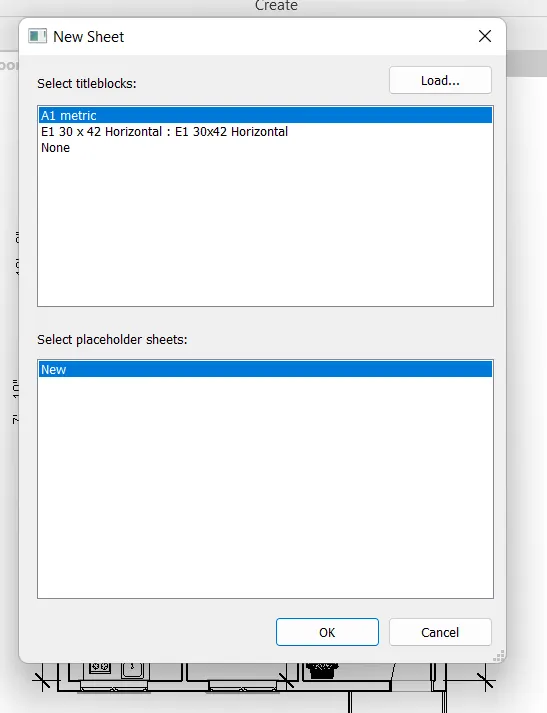
- To select the different sheet setup
- Go to the load family then go to the title block and select the A1 metric
- Click on open
- Then select the A1 metric click on OK
Step3:-
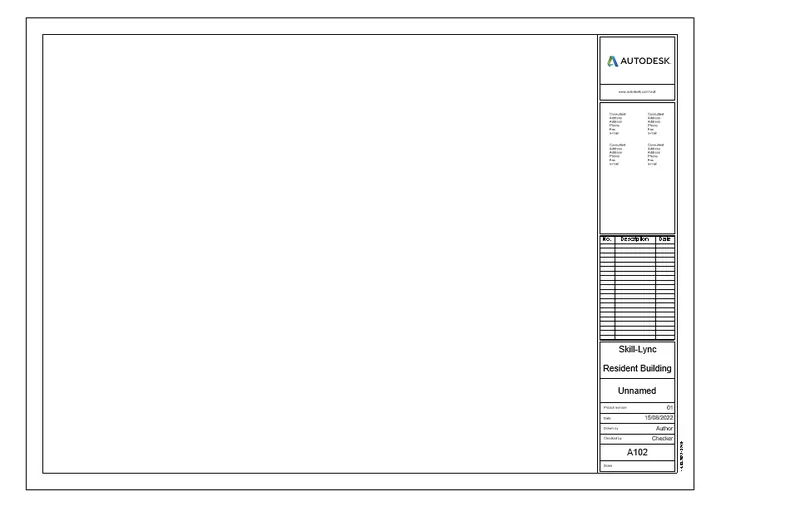
- After opening the A1 metric sheet
- Then the default sheet opens
- This sheet is loaded by Autodesk Revit
Step4:-
- After opening a new sheet
- Click on the any floor which you want then that floor appears on the screen
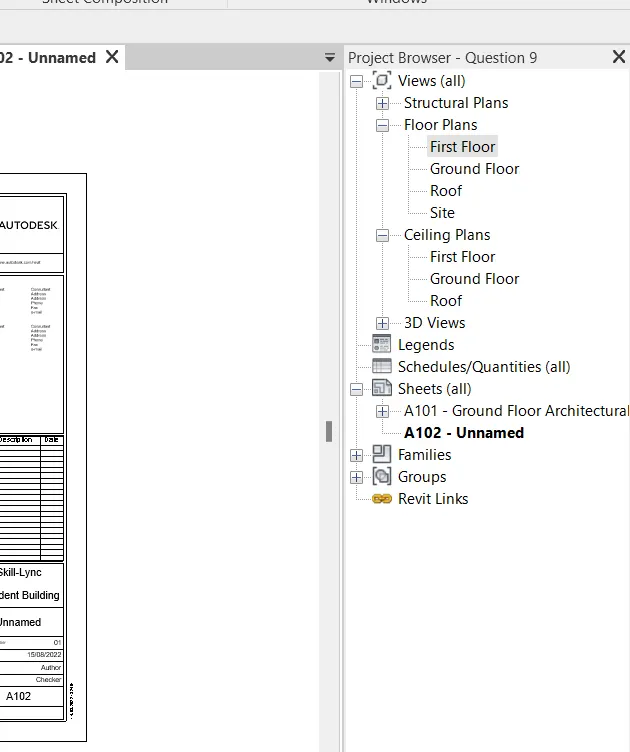
Step5:-
- After opening the default sheet which is A1 metric
- Drag the plan of Architectural plan Ground floor plan in to the sheet
- Then change the information in the sheet
Step6:-
- After opening the default sheet which is A1 metric
- Drag the plan of Architectural plan First floor plan in to the sheet
- Then change the information in the sheet
Step7:-
- After opening the default sheet which is A1 metric
- Drag the plan of Roof plan in to the sheet
- Then change the information in the sheet
Step8:-
- After opening the default sheet which is A1 metric
- Drag the plan of Ground floor structural plan in to the sheet
- Then change the information in the sheet
Step9:-
- After opening the default sheet which is A1 metric
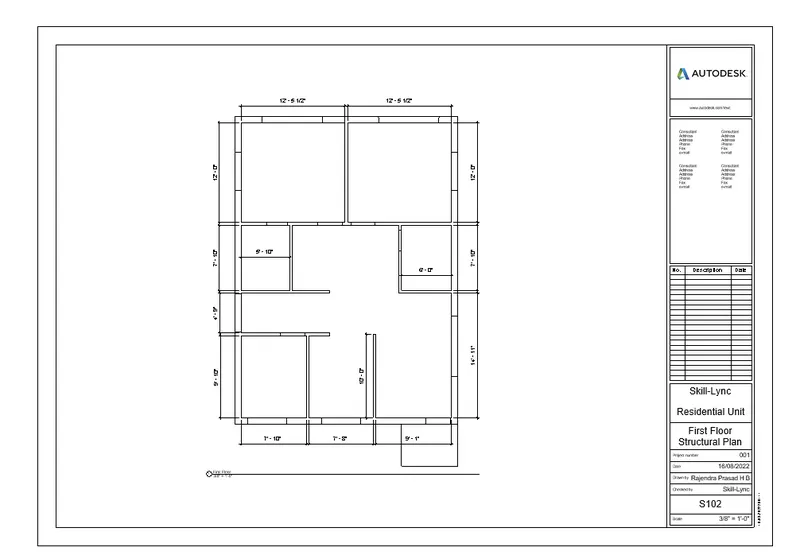
- Drag the plan of First floor structural plan in to the sheet
- Then change the information in the sheet
Step8:-
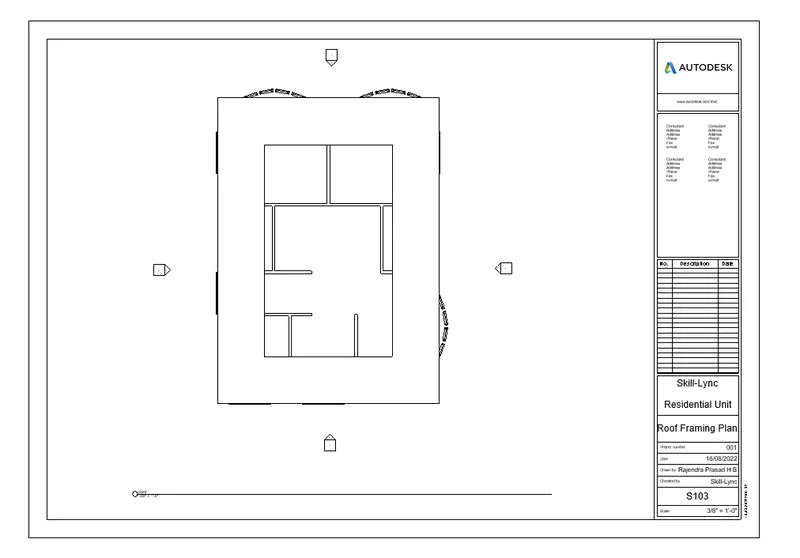
- After opening the default sheet which is A1 metric
- Drag the plan of Roof framing plan in to the sheet
- Then change the information in the sheet
Step9:-
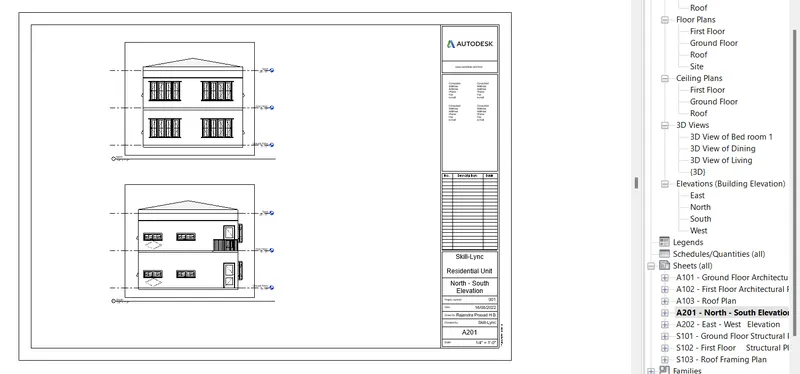
- After opening the default sheet which is A1 metric
- Drag the plan of North-South Elevation in to the sheet
- Then change the information in the sheet
Step10:-
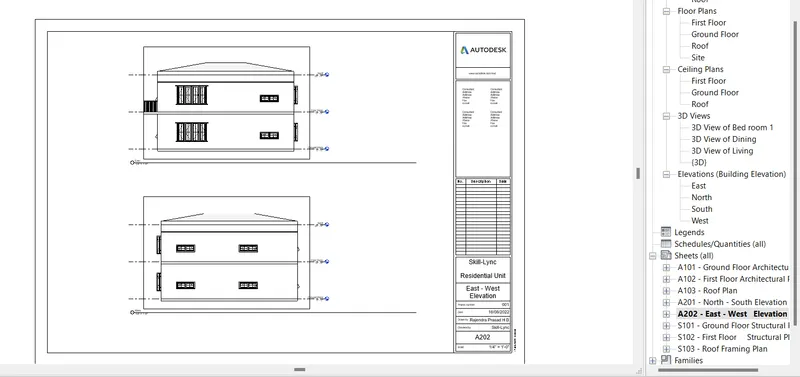
- After opening the default sheet which is A1 metric
- Drag the plan of East - West Elevation in to the sheet
- Then change the information in the sheet
Result:-
Ground Floor Architectural Plan
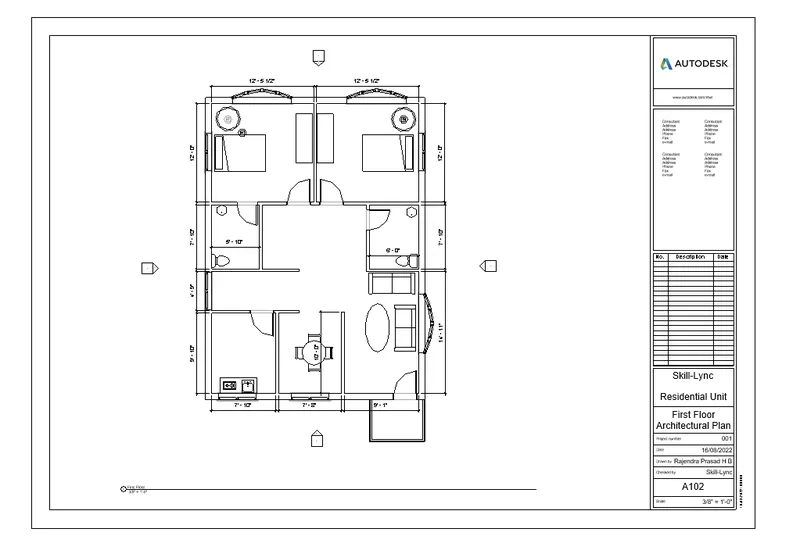
First Floor Architectural Plan
Roof Floor Architectural Plan
Ground Floor Structural Plan
First Floor Structural Plan
Roof Frame Structural Plan
North - South Elevation
East - West Elevation
10.
Aim:- Create a camera-specific view or a 3D view in each room ( living, dining, bedroom). Based on the views create a new set of sheets starting A-501 (you can add as many sheets after, 502, 503.. n)to place the 3D view images. Produce the sheets as a part of project drafting.
Introduction:-
Camera view :- It is the view that gets when the camera is created and target is set
- Camera view gives the 3D visualise realistic view of the camera created region
Sheets :-
- Sheets are used to set the page to place the drawings or images in that sheet
- The drawing/sheet informations should be changed while creating the sheets
Procedure:-
Step1:-
- Open the week 3 project file
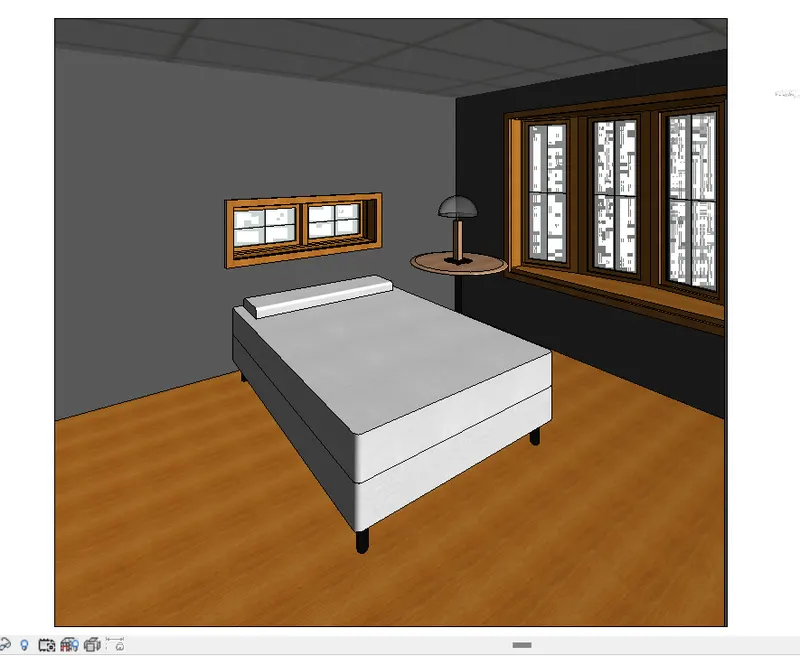
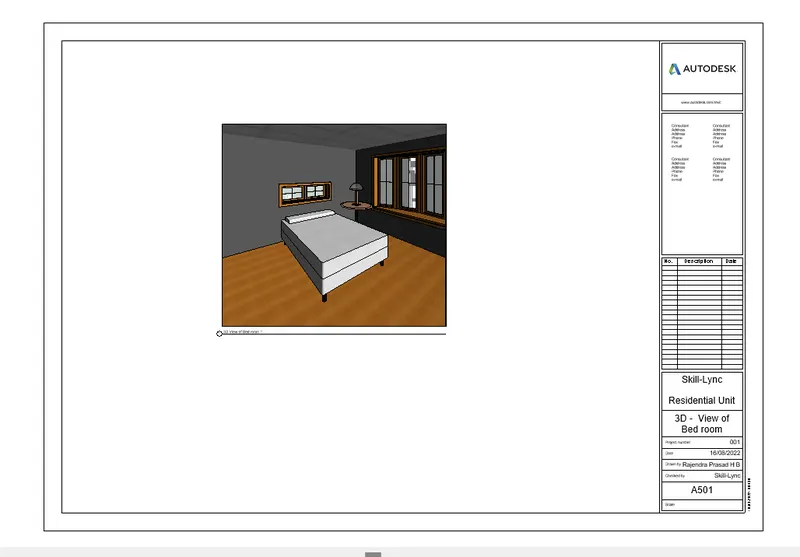
- Insert a camera into the bedroom 1 in the floor paln
- Then adjust the region by draging the bubble
- Click on the realistic in the visual style
- Then the 3D view looks like this
Step2:-
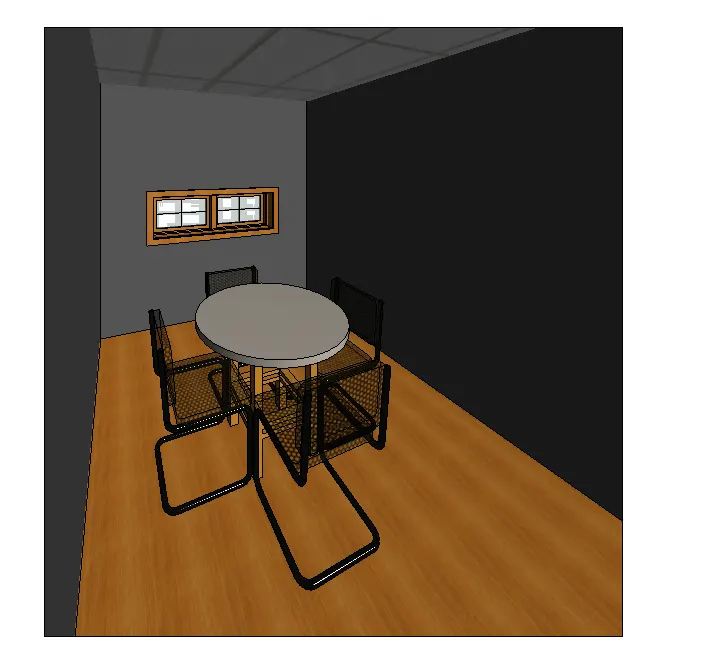
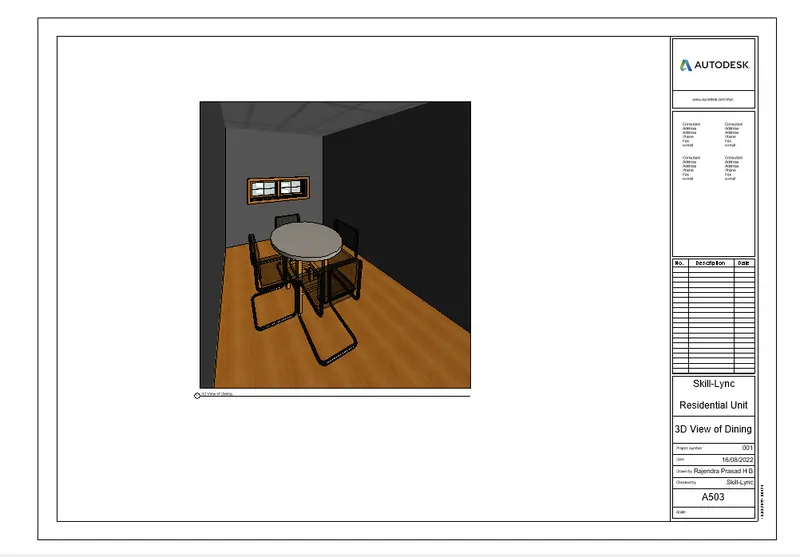
- Insert a camera into the dining in the floor paln
- Then adjust the region by draging the bubble
- Click on the realistic in the visual style
- Then the 3D view looks like this
Step3:-
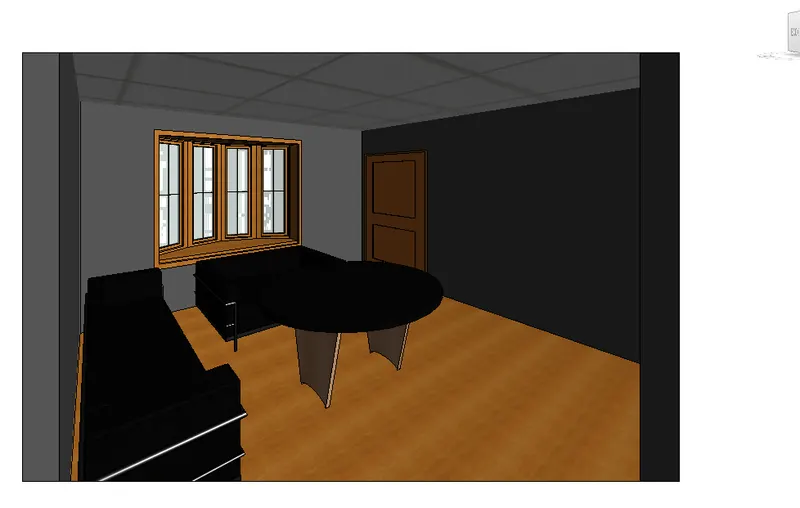
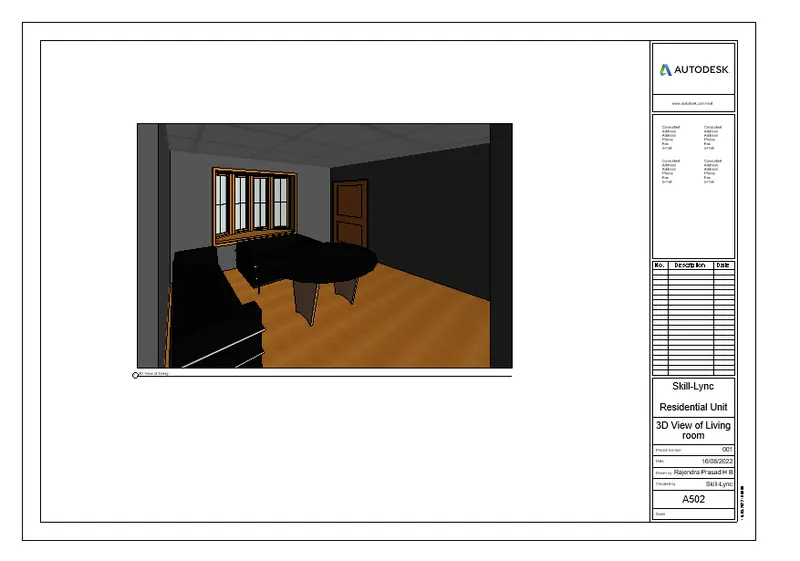
- Insert a camera into the living room in the floor paln
- Then adjust the region by draging the bubble
- Click on the realistic in the visual style
- Then the 3D view looks like this
Step4:-
- After opening the default sheet which is A1 metric
- Drag the Camera view of the bedroom in to the sheet
- Then change the information in the sheet
Step5:-
- After opening the default sheet which is A1 metric
- Drag the Camera view of the dining in to the sheet
- Then change the information in the sheet
Step6:-
- After opening the default sheet which is A1 metric
- Drag the Camera view of the living room in to the sheet
- Then change the information in the sheet
Result:-
Camera view of the Bed room
Camera view of the dining
Camera view of the living