Creating different types of Rest Units & Clamp Units for Spare Wheel Well using CATIA V5
REPORT ON CLAMP UNIT AND REST UNIT DESIGN CHALLENGE
Aim/Objective
Design 3 Different types of Power Clamp Unit with Different Riser, Blade and Clamp Arm for the given Car Panel.
Design 2 Different types of Rest Unit for the given Car Panel.
Write a Detailed Report describing the process and attach relevant images.
Introduction
Clamp and rest units are primarily used to support and secure vehicle components during the assembly process, guaranteeing accuracy and uniformity. Importance of them are to preserve dimensional accuracy, minimize rework, and boost productivity in BIW assembly, these units are essential.
A clamp is a tool that is used to hold the part in the assembly tightly but firmly. The clamp guarantees that the part operates properly without distortion and prevents any movement of the assembly within the fixture. It is necessary to position the clamp so that it does not interfere with the operation. The information that the customer supplies forms the clamp plan. The clamp plan details where pins, rest units, clamp units, dumps, etc. are located. It provides coordinates that describe the precise location of the clamping points in detail.
Clamp Unit: A clamp unit is a unit designed to clamp / hold the car panel with NC blocks / Mylar / Rest by using a pneumatic clamp cylinder. And below are the different parts of a clamp unit in general.
Rest Unit: A rest unit is a unit designed to rest / support the car panel using NC blocks / Mylar / Rest.
And below are the different parts of a rest unit in general.
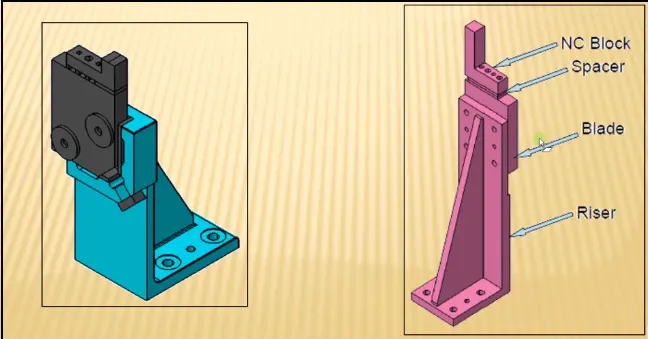
TYPES OF CLAMP UNITS:
- Power clamp unit.
- Swivel cylinder clamp unit.
I relied on a power clamp unit to design this project
3-2-1 Principle: The 3-2-1 principle of location, also known as the six-point positioning principle, is used to constrain the movement of a workpiece along the three axes XX, YY, and ZZ. This principle is achieved by providing six locating points, including three pins in the base plate, two pins in the vertical plane, and one pin in a plane perpendicular to the first two planes.1 The principle states that the workpiece has six degrees of freedom in space, and six locators are sufficient to restrict the required degree of freedom of any workpiece. A three-pin base can restrict five motions, while six pins restrict nine motions.
For a fixture designer, the major portion of design time is spent deciding how to locate the work piece in the fixture.
For any free body there are total of twelve degrees of freedom as below:
6 translational degrees of freedom: +X, -X, -Y, *Z, -Z
And 6 rotational degrees of freedom:
- Clockwise around X axis (CROT-X)
- Anticlockwise around X axis (ACROT-X)
- Clockwise around Y axis (CROT-Y)
- Anticlockwise around Y axis (ACROT-Y)
- Clockwise around Z axis (CROT-Z)
- Anticlockwise around Z axis (ACROT-Z)
You must fix all the 12 degrees of freedom in order to locate the work piece in the fixture. So, 12 degrees of freedom of the work piece need to be fixed & thus we can achieve zero degree of freedom for the work piece.
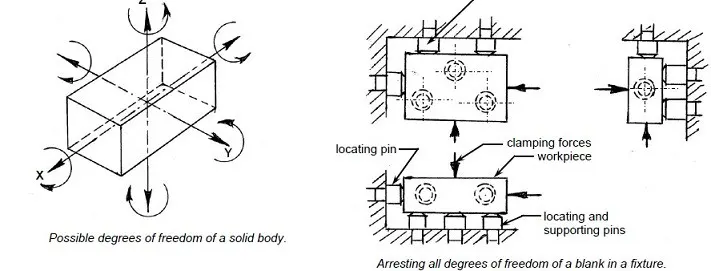
- The best and most cost effective method of part location is referred to as the 3-2-1 method.
- (3.) Minimum: three locator blocks to establish part plane. Three locators, or supports, are placed under the work piece. The three locators are usually positioned on the primary locating surface. This restricts one axial movement downward, and 4 radial movements. Together, the three locators restrict five degrees of freedom.
- (2.) Round locating pin in a round hole that defines location in four directions (4-way) perpendicular to the plane Previously established. This restricts four axial movement.
- (1 . ) Round locating pin in a slot that defines two of the directions of the other
pin (2-way).This restricts two axial movements
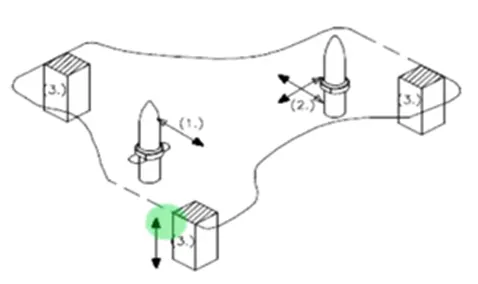
Arresting the component by using Different types of Units.
- The Pin Unit is employed to restrict five degrees of freedom (DOF) in components, ensuring that they are held firmly in place during assembly. The DOFs typically addressed include translation along three axes and rotation around two perpendicular axes.
- The Clamping Unit is used to address the remaining 1 DOF, typically involving rotation or tilting. This unit provides the necessary clamping force to prevent any rotational movement of the component.
- Rest Units are designed to distribute the weight of the component evenly across the fixture. They provide support to prevent deformation and ensure that the component remains stable during the assembly process.
Clamp Plan:
A clamp plan is primarily used in the design of BIW fixtures to guarantee that body panels or other components are kept precisely and firmly in place during welding or assembly processes. This aids in maintaining the body structure's dimensional precision and alignment, which are crucial for guaranteeing the quality and safety of the finished product.
A typical clamp plan includes information such as:
-
Clamp Locations: It indicates the precise locations on the body parts to which clamps or fittings will be fastened. In order to assure perfect alignment and dimensional accuracy, these spots were carefully selected.
-
Clamp Types: It details the types of fittings or clamps that should be utilized at each site. Depending on the needs of the assembly process, various clamp types, such as pneumatic clamps, hydraulic clamps, or manual clamps, may be employed.
-
Clamp Forces: The design may also specify the clamping pressures or forces to be used on each clamp. In order to hold the components firmly without producing deformation, the appropriate clamping force is crucial.
-
Sequence of Clamping: It explains the sequence in which clamps should be tightened or loosened during the welding or assembling process. To make sure that parts are correctly positioned and fastened in the right order, this arrangement is essential.
-
Safety Considerations: Safety comes first when designing fixtures. The clamp strategy could include operator safety precautions like making sure clamps are locked in place before welding starts.
-
Tolerance Requirements: It could include tolerance parameters for component alignment and placement. To achieve design requirements, certain tolerances must be maintained.
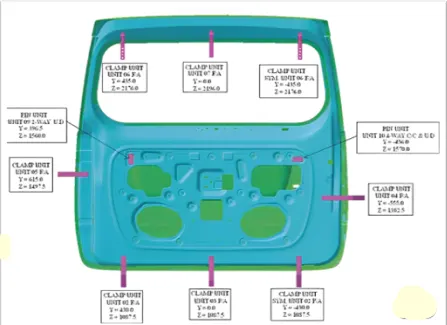
An image of Clamp Units holding a BIW of the car backdoor
In summary, a well-designed clamp plan is essential for the design of BIW fixtures since it aids in the quick and precise assembly of automobile body parts, which eventually produces finished vehicles of high quality. It assists in lowering manufacturing flaws, enhancing production effectiveness, and guaranteeing that the finished product complies with design and safety criteria.
Parts of the Clamp Unit and Rest Unit
Finger: A Finger is another name for an NC Mylar. It is attached to the Power Clamp's arm and works to push the automobile panels toward the rest of the Mylar, holding them there. Clamp Mylar is the name given to Mylar that has been clamped. Rest mylar is the mylar that is fastened to the blade or riser that is beneath the automobile component.
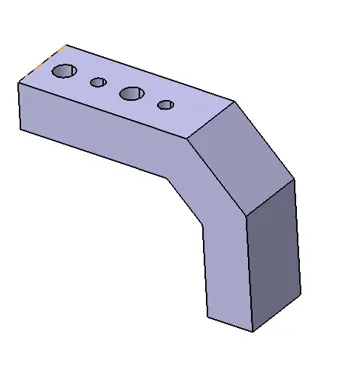
Image of Clamp Mylar
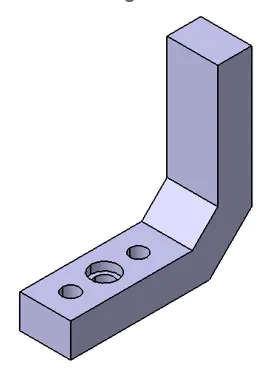
Image of Rest Mylar
Rest: A rest is a NC block. Which is fixed to the unit to support the car panel. Also it resists the the clamping force of the finger and thus clamp the car panel.
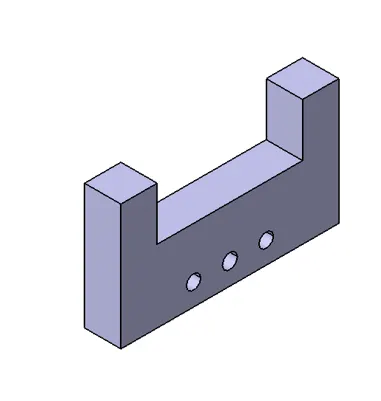
Image of Rest Mylar in Rest Unit
Clamp Arm: A clamp arm is a bought out part. to which all the movable parts are fixed. In general a clamp arm is apart of clamp cylinder.
- Clamp arms are different for different bore of the cylinder.
- Clamps arms are available in different hole pitch
- Clamp arms are available as :
- Middle Arm — A 10
- Right Arm — A 11
- Left Arm — A 12
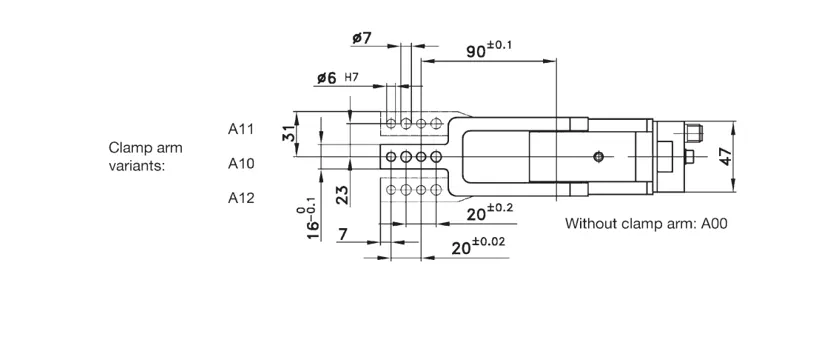
Image of different variations of clamp arms
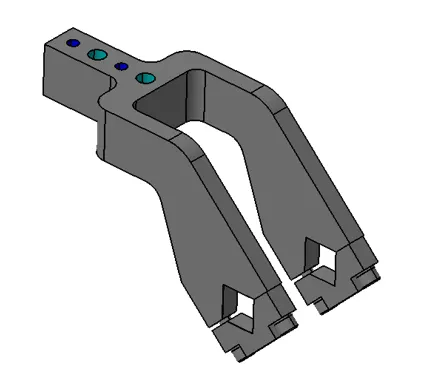
Image of A10 Clamp arm image
Clamp Cylinder: A clamp cylinder is a pneumatic device works with pressurised air. The clamp cylinder is used to open and close the parts fixed to the clamp arm fixed to the clamp body.
- Clamp cylinders are Bought out parts, Some of the manufacturers are: Tunkers and Destaco.
- Clamp cylinders are in general 40,50,63 and 80 bore capacity.
- Opens up to 135° for horizontal clamp mounting.
- Opens up to 105° for vertical clamp mounting.
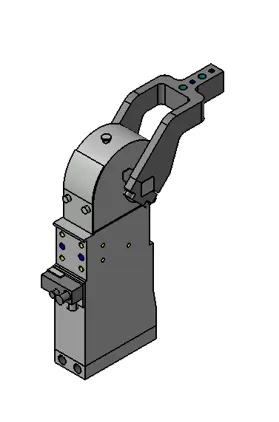
Image of power clamp
Shims or Spacers: Shims and spacers are some standard parts in general, which are used for adjustments of locators (NC Blocks and Pin retainers)for obtaining the desired values for the precise working of a unit with respect to car part. In general to adjust the Design to manufacturing deviation.
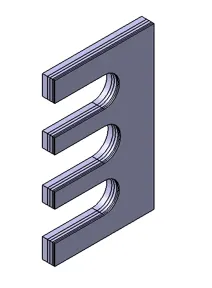
Image of Shims
Block or L Block: These parts are mainly used to ammmodate the shimming directions as per fundamental in general. Also in some cases used for other design feasibility.
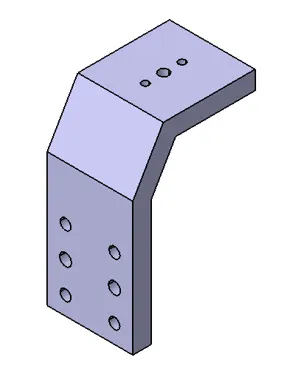
Image of Block
Blade: Blade is part like a plate. which connects the parts of a unit to a riser In general the blade can be either a make part or a standard part.
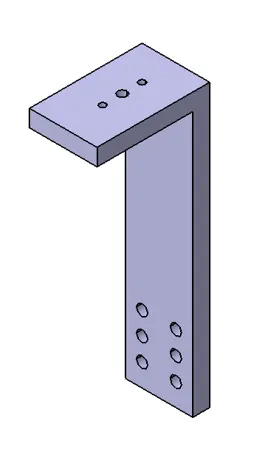
Image of Blade
Riser: Riser is a part on which all the parts of a unit are mounted, and is mounted on the base plate of a tool. In general the riser can either be make part or a standard part.
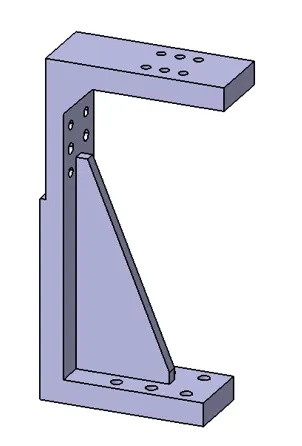
Image of Riser
Design methodologies for Clamping the BiW Panel:
- Place the work piece there, provide air to the side of the clamp without adding a clamping block, and then move the clamp arm all the way to the end.
- Adjust the shim under the aforementioned circumstances such that there is approximately 0.5 mm between the work piece and the clamping block. Theoretically, under these circumstances, there is no clamping force needed to hold a work piece.
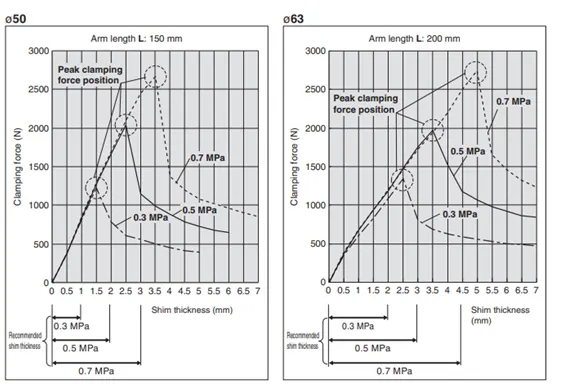
- Insert more shim to provide clamping force from the state stated in step B. Please use the graph on front matter 3 as a guide since the shim thickness varies with arm length and pressure. Due to the clamp cylinder body's different tolerance, there could be a 10% inaccuracy.
Clamping Force: Clamping Force is the force required to hold a part against the locators. During the machining process, clamping keeps the component from moving or being dragged off of the jig or fixture. The forces acting on the component and the way the part is positioned within the tool usually dictate the kind and quantity of holding force required to hold the part. There are situations when the procedure being done matters. Securing Generally speaking, pressure should just be sufficient to hold the part against the locators. Most of the thrust should be resisted by the locators. In case a high level of pressure is required to clamp a part, the tool design should be adjusted to direct the tool thrust towards the locators and the tool body. It is never appropriate to expect clamps to support the entire tool thrust.
The relationship between clamping force and shim thickness:
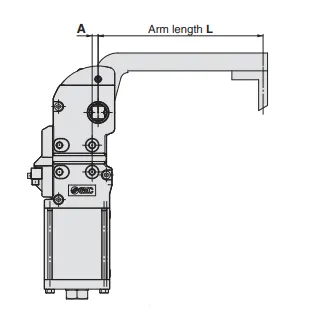
The self-locking system fails when a shim is applied that is larger than the clamping force peak seen on the graph. Put in a shim that is the right thickness. The distance between the clamp arm shaft and the clamping position is indicated by the arm length "L".
For the "A" distance between the clamp arm shaft and the knock location pinhole.

Due to the relation M = Fs x I
Fs = the clamping force which actually acts in the clamping point decreases depending on the length of the clamping arm.
General procedure for selecting the clamp
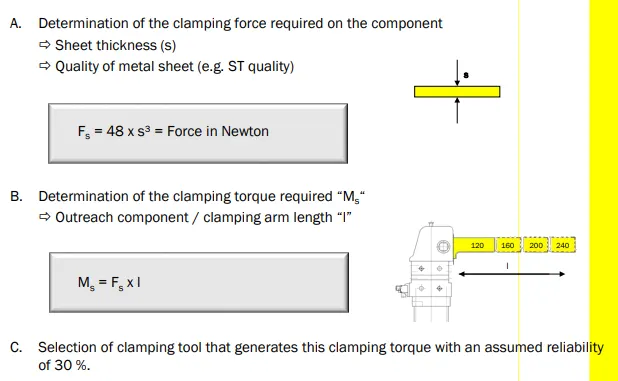
Relation Between Clamp arm length and maximum clamping force:
Study of process planning document:
In order to create a clamp unit, the following information needs to be included in the process document.
- Number of sheet metal panels that require welding.
- entire lack of spots.
- Examine the welding gun in detail, paying particular attention to its type and design if the process engineer has already approved it.
- Examine the data from the adjacent spots as well as the PLP (Principle Location Points) data.
Location of PLP and Clamp Plan: PLP stands for Principle Locating Points. The points that are utilized to precisely locate the panel sub-assemblies in order to preserve the assembly's geometry are known as principle locating points. The panel has numerous holes that are inaccurate because of stamping processes. Consequently, the drawings define the PLP. PLP holes need to be really exact.
Clamp Plan: This plan shows where pins, rest units, clamp units, dumps, and other components are located. It is a crucial piece of client feedback. Customers should always be informed before making changes to the clamp plan or position, which provides the precise location of the clamping units by providing a coordinate in that location.
Power clamp Cylinders: Energy In a pneumatic control system, the cylinder's purpose is to function as an actuator, positioning the final control elements in response to the controller signal. Similar to hydraulic cylinders, pneumatic cylinders are mechanical devices that generate force in a reciprocating linear motion by harnessing the power of compressed gas.
Images of the Rest and Clamp Units desgined
Design of Rest Unit 1
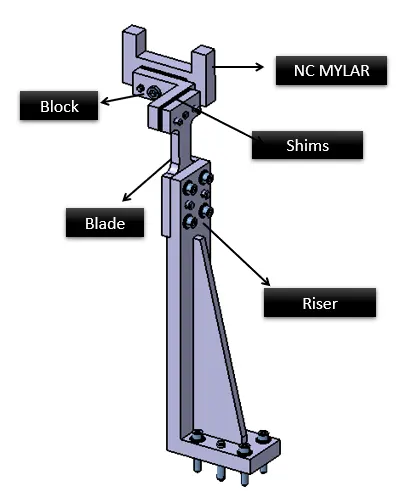
Design of Rest Unit 2
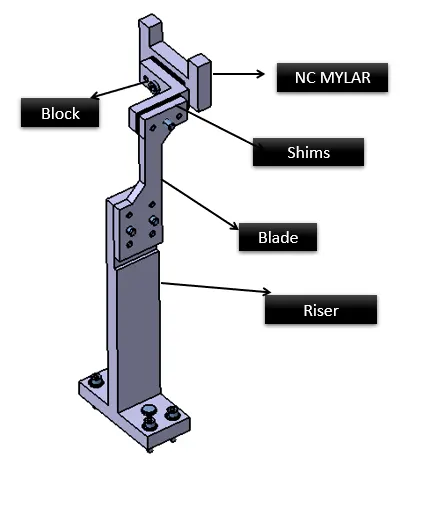
Design of Clamp Unit 1
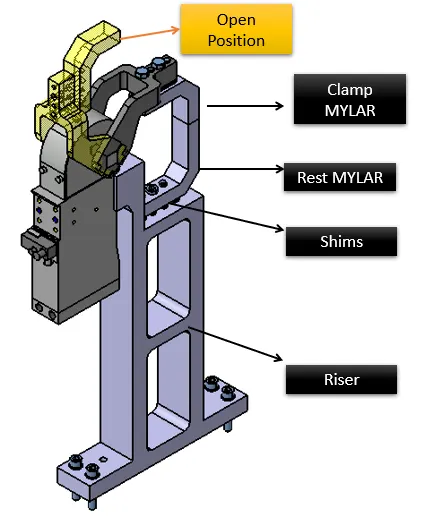
Design of Clamp Unit 2
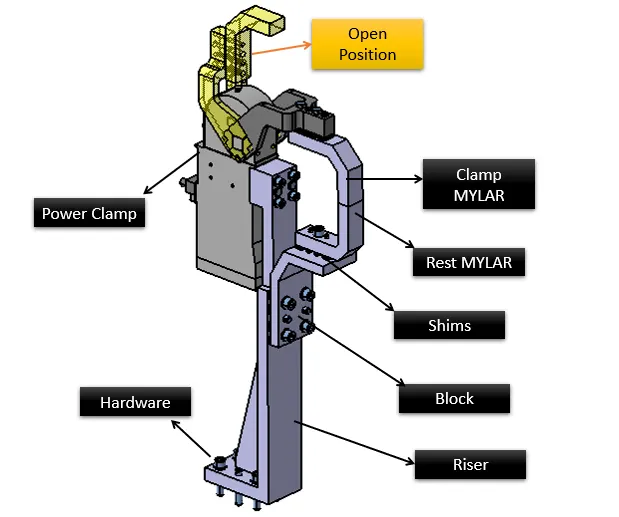
Design of Clamp Unit 3
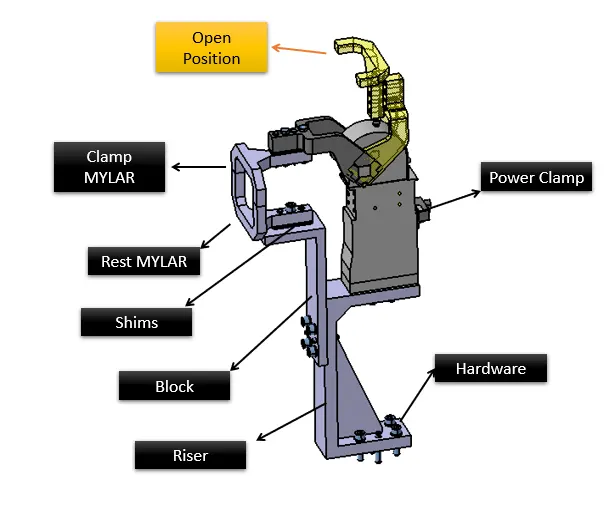
Image of Rest units and Clamp Units Holding a BiW Component
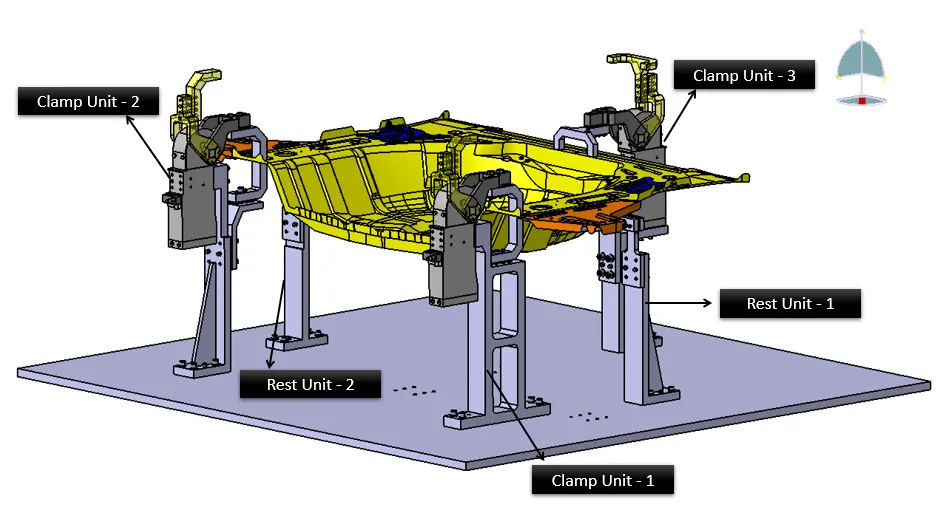
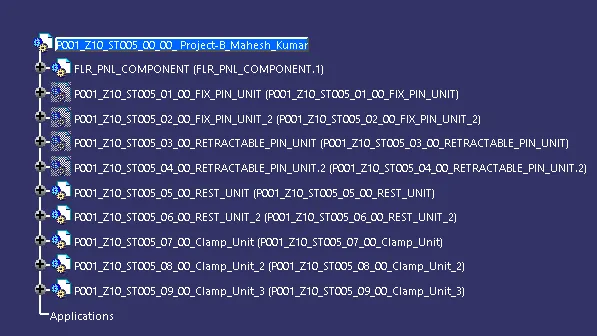
Image of Feature tree showing Rest units and Clamp Units in active
......................................................................................................
NOTE: All the files have been uploaded as a Single ZIP file and attached.