


Courses by Software
Courses by Semester
Courses by Domain
Tool-focused Courses
Machine learning
POPULAR COURSES
Success Stories

Week 9 - Attachment Feature Creation - Challenge 1
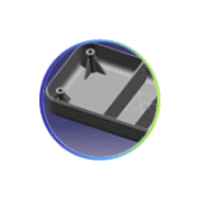
AIM:- RIB DESIGN INPUT- COIN HOLDER MODEL Introduction: Rib: Ribs are thin, wall-like features typically designed into the geometry of a part to add internal support to walls or other features like bosses. In a similar fashion, gussets are support features that reinforce areas such as walls or bosses to the floor. Ribs…
Nikhil KUMAR
updated on 16 Apr 2022


AIM:- RIB DESIGN
INPUT- COIN HOLDER MODEL

Introduction:
Rib: Ribs are thin, wall-like features typically designed into the geometry of a part to add internal support to walls or other features like bosses. In a similar fashion, gussets are support features that reinforce areas such as walls or bosses to the floor.
Ribs provide a means to economical stiffness and strength in molded parts without increasing overall wall thickness.
They also facilitate:
1) Locating & arresting components of an assembly.
2) Providing alignment in mating parts.
3) Acting as stops or guides for mechanisms.
A well-designed rib will overcome the following disadvantages:
1) Increase part weight and cost proportional to the increase in thickness.
2) Increase the molding cycle time required to cool the larger mass of material.
3) Increase the probability of sink marks.
Typical uses of Ribs:
1) Covers, cabinets, and body components with long, wide surfaces that must have a good appearance with low weight.
2) Rollers and guides for paper handling, where the surface must be cylindrical.
3) Gear bodies, where the design calls for wide bearing surfaces on the center shaft and on the gear teeth.
4) Frames and supports.
Ribs design involves 5 main issues:
1) Thickness.
2) Height.
3) Location.
4) Quantity.
5) Manufacturability.
PROCEDURE:-
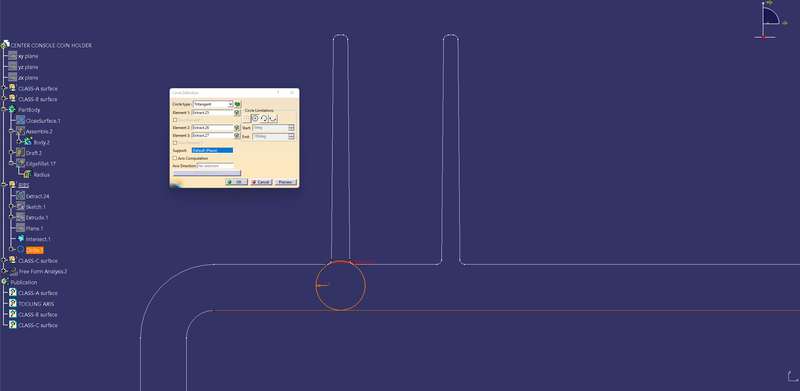
Extract a flat surface. and sketch on that. in this case bottom.

Extrude these lines in surface. and thicken them 1mm.


0.5Deg. draft for better mould ejection.

Fillet or round the edges.

Intersect the ribs via sketch to check the distance between ribs and the main body.
RIB GEOMETRY


1. Rib Thickness
Ribs should be designed to be 50-60 percent of the nominal wall thickness. Thinner does not provide much structure and may be hard to fill. Thicker ribs are tempting, but they can begin to introduce sinks on the cosmetic surface. Bottom Rib Thickness:(0.3 to 0.6) * Wall Thickness.
In this case, Thickness will be (t)- 1mm
Note: Top Rib Thickness should be a minimum of 0.75mm.
2. Rib height
For maximum effectiveness, rib height should be no more than three times the nominal wall thickness. Since the rib will be thinner than the walls, it may be hard to fill it if it is taller. In this case, Height will be (h)- 12.5mm
Rib Height= (3 to 5) * Wall Thickness.
3. Rib spacing
Increase the number of ribs rather than their height in order to increase stiffness. Ribs should be spaced a minimum of two times the nominal wall thickness apart from one another. In this case, Spacing will be - 5mm
Rib Height/Rib width ratio = 3:1 -steel.
Rib Height/Rib width ratio = 2:1-preferred
4. Rib draft
A minimum 0.5-degree draft will ensure that they release from the tool during molding. In this case, Draft will be - 0.5 deg.
Rib draft = (0.5 to 1) degree.
5. Rib fillet:
Fillet at feature intersections to increase rib strength. In this case, Fillet will be - 0.25mm
Rib fillet = 0.125 * Wall Thickness.
6. Rib Root Thickness
It is the thickness at the intersection of the Rib and Wall of the plastic component.
Rib Root Thickness = (0.3 to 0.5) * Wall Thickness
DRAFT ANALYSIS

Ribs are shown in pink because of the 0.5 deg angle.
Tree Structure

Leave a comment
Thanks for choosing to leave a comment. Please keep in mind that all the comments are moderated as per our comment policy, and your email will not be published for privacy reasons. Please leave a personal & meaningful conversation.
Other comments...
Be the first to add a comment
Read more Projects by Nikhil KUMAR (19)
Week 9 - Attachment Feature Creation - Challenge 1
AIM:- RIB DESIGN INPUT- COIN HOLDER MODEL Introduction: Rib: Ribs are thin, wall-like features typically designed into the geometry of a part to add internal support to walls or other features like bosses. In a similar fashion, gussets are support features that reinforce areas such as walls or bosses to the floor. Ribs…

16 Apr 2022 04:22 PM IST
Week 8 - Challenge 5 - Core & Cavity Design
CORE & CAVITY DESIGN OF SWITCH BEZEL AIM1. To create the switch bezel plastic component through the given class-A-surface and at theperforming the draft analysis on the model.2. Creat the core and cavity design of the switch bezel component OBJECTIVE• To ensure proper tree structure is followed.• …
14 Nov 2021 01:22 PM IST
Door Arm Rest Week 8 Challenge
AIM: To make a model from the provided class-A surface. INTRODUCTION: CLASS-A SURFACE: A surface made by the designer which is given as an input to the plastic modeller to work on. It is an aesthetic surface and the outermost surface. CLASS-B SURFACE: A surface after a certain thickness from the class-A surface…
13 Jun 2021 12:24 PM IST
Week 8 - Challenge 4 - Coin Holder Design
AIM: To make a model from the provided class-A surface. INTRODUCTION: CLASS-A SURFACE: A surface made by the designer which is given as an input to the plastic modeller to work on. It is an aesthetic surface and the outermost surface. CLASS-B SURFACE: A surface after a certain thickness from the class-A surface…
25 May 2021 03:14 PM IST
Related Courses

Skill-Lync offers industry relevant advanced engineering courses for engineering students by partnering with industry experts.


Our Company

4th Floor, BLOCK-B, Velachery - Tambaram Main Rd, Ram Nagar South, Madipakkam, Chennai, Tamil Nadu 600042.

Top Individual Courses
Top PG Programs
Skill-Lync Plus
Trending Blogs
© 2025 Skill-Lync Inc. All Rights Reserved.