Modified on
DFMA for Snap Fits In Plastics

Skill-Lync
Snap joints are a really simple, economical and rapid way of joining two different components. every kind of snap joint have in common the principle that a protruding part of one component, e.g., a hook, stud or bead is deflected briefly during the joining operation and catches during a depression (undercut) within the mating component. After the joining operation, the snap-fit features should return to a stress-free condition. The joint could also be separable or inseparable counting on the form of the undercut; the force required to separate the components varies greatly in line with the planning. it's particularly important to contact the subsequent factors in mind when designing snap joints:
- Mechanical load during the assembly operation.
- Force required for assembly
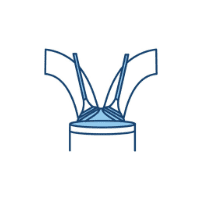
_1662469345.png)
A Snap-Fit type with a cantilever form and most generally used.
Designing your Snap Fit
Essentially, a Cantilever Snap-Fit is intended to be fastened with another component at the tip of the protrusion which extends from the bottom of a component and is processed to make a hook or a bead.
Snap-fits shouldn't be considered in components intended to be disassembled regularly. (Cantilever Snap-fits exhibit easy assembly, so disassembly is feasible but rather difficult. additionally, as a snap-fit is meant on the premise of the deformation caused by the assembly, plastic deformation or plastic failure may result from the disassembly causing relatively larger deformation.)
Generally, the strain of parts fabricated from unfilled materials is allowed up to five which of reinforced materials is allowed up to 1~2 %. (This strain is slightly more than the widely recommended strain. However, strain only partially occurs at the surface and adding a supporting wall isn't completely fixed, unlike the belief of mechanics theory, and has some flexibility. Therefore the above-mentioned strain is offered since the important value is often decreased more effectively than the theoretical value.)
_1662469509.png)
∴ Strain by deformation of Straight Beams (A) and Slope/Tapered Beams (B)
Strain beam:
`epsilon = (3hY)/(2L^2)`L2
Slope beam:
`epsi= (3hY)/(2L^2K)`
Where as,
K = Geometrical Factor `= (h_L) /(h_O)`
Deformation in Permanent Assembly
As for permanent assembly, there's only one deformation, therefore the strain cannot exceed the above-mentioned strain.
In the case of employing a sloped beam, stress is reduced because it is cosmopolitan throughout the cantilever. Therefore, stress concentration and fastening force is comparatively reduced. (An added note: the ratio of hO and hL is suggested to be 2:1.)
In order to cut back the strain concentration, add a round form (R) to the sting of the underside of a beam.
_1662469589.png)
Fig 3 graphically represents the effect the basis radius has on stress concentration. initially glance, it seems that an optimum reduction in stress concentration is obtained using the ratio R/h as 0.6 since only a marginal reduction occurs after now. However, using R/h of 0.6 would end in a thick area at the intersection of the snap-fit arm and its base. Thick sections will usually end in sinks and/or voids which are signs of high residual stress. For this reason, the designer should reach a compromise between an oversized radius to cut back stress concentration and atiny low radius to cut back the potential for residual stresses thanks to the creation of a thick sec-tion adjacent to a skinny section. Internal testing shows that the radius shouldn't be but 0.015 in. in any instance.
The location of assembly should be considered with the flexibility of the wall of the merchandise. This helps to cut back external stress. To avoid shrinkage marks, it should be but 60% of the thickness of the essential wall
Significance of the Thickness of the Cantilever
Good results are obtained by reducing the thickness (h) of the cantilever linearly in order that its value at the tip of the hook is adequate to one-half the worth at the root; alternatively, the finger width is also reduced to one-quarter of the bottom value.
For more interesting observations have a glance at the below image with comparative charts.
_1662469677.png)
Whereas,
y = (permissible) deflection (=undercut)
E = (permissible) strain in the outer fiber at the root; in formulae: E as absolute value = percentage/100
1 = length of arm
h = thickness at root
b = width at root
c = distance between outer fiber and neutral fiber (center of gravity)
Z = section modulus = Z = I c,
I = axial moment of inertia
Es = secant modulus
P = (permissible) deflection force
K = geometric factor
Nowadays because of the event of technology one needn't try and do these calculations by hand. There are much software available within the market where you only have to enter the desired conditional inputs and they will calculate the full stress concentration and deflections and you'll be able to see the results and make a choice stating good to proceed or not with the specified value. Technology is saving lots of time, must say, isn't it?
One of the widely used software for these calculations is Ksoft, which could be Korean Software.
Take a glance at the window attached below from the software, how easy it is!
_1662469769.png)
Author

Navin Baskar
Author
Skill-Lync
Subscribe to Our Free Newsletter

Continue Reading
Related Blogs
Learn how to render a shock-tube-simulation and how to work on similar projects after enrolling into anyone of Skill-Lync's CAE courses.
09 May 2020
In this blog, read how to design the frontal BIW enclosure of a car (Bonnet) and learn how Skill-Lync Master's Program in Automotive Design using CATIA V5 will help you get employed as a design engineer.
09 May 2020
Tetrahedral is a four- nodded solid element that can be generated through the tria element by creating a volume and also through the existing volume of the geometry. These elements are used where the geometry has high thickness and complexity. The image attached below is a representation of a Tetra element. The Tetra element will have 4 triangular faces with four nodes joining them together
01 Aug 2022
A connector is a mechanism that specifies how an object (vertex, edge, or face) is connected to another object or the ground. By often simulating the desired behaviour without having to build the precise shape or specify contact circumstances, connectors make modeling simpler.
02 Aug 2022
One of the most crucial processes in carrying out an accurate simulation using FEA is meshing. A mesh is composed of elements that have nodes—coordinate positions in space that might change depending on the element type—that symbolise the geometry's shape.
03 Aug 2022
Author
Skill-Lync
Subscribe to Our Free Newsletter
Continue Reading
Related Blogs
Learn how to render a shock-tube-simulation and how to work on similar projects after enrolling into anyone of Skill-Lync's CAE courses.
09 May 2020
In this blog, read how to design the frontal BIW enclosure of a car (Bonnet) and learn how Skill-Lync Master's Program in Automotive Design using CATIA V5 will help you get employed as a design engineer.
09 May 2020
Tetrahedral is a four- nodded solid element that can be generated through the tria element by creating a volume and also through the existing volume of the geometry. These elements are used where the geometry has high thickness and complexity. The image attached below is a representation of a Tetra element. The Tetra element will have 4 triangular faces with four nodes joining them together
01 Aug 2022
A connector is a mechanism that specifies how an object (vertex, edge, or face) is connected to another object or the ground. By often simulating the desired behaviour without having to build the precise shape or specify contact circumstances, connectors make modeling simpler.
02 Aug 2022
One of the most crucial processes in carrying out an accurate simulation using FEA is meshing. A mesh is composed of elements that have nodes—coordinate positions in space that might change depending on the element type—that symbolise the geometry's shape.
03 Aug 2022
Related Courses