Modified on
The Major Injection Molding Defects

Skill-Lync
Making injection molded prototypes requires high levels of technical expertise and attention to detail. This is to prevent small mistakes from costing companies big money when it comes to mass-production of parts that are being manufactured.
In order to prevent such circumstances, we need to be equipped with a highly intelligent design. This article discusses some of the molding defects that can occur in parts during injection molding, and ways to fix and avoid them.
Flow Lines in Injection Molding
Flow lines can be defined as linear grooving, or circular ripples, on the surface of molded parts that indicate the direction of material flow within the mould cavity. Injection molded plastic begins its journey through the part tooling via an entry section called a “gate.” It then flows through the tool cavity and eventually hardens into a solid.
_1659623323.png)
Causes of Injection Molding Defects
- Flow line defects are caused by the varying speed at which the molten plastic flows as it changes direction through the contours and bends inside the mold tool. They also occur when the plastic flows through sections with varying wall thickness or when the injection speed is too low, causing the plastic to solidify at different speeds.
Remedies of Injection Molding Defects
- Increase injection speeds and pressure to the optimal level, ensuring the cavities are filled properly (while not allowing the molten plastic time to start cooling in the wrong spot). The temperature of the molten plastic or the mould itself can also be elevated to ensure the plastic does not cool down sufficiently to cause the defect.
- Examine the gates and runners to determine if any burrs or other obstructions exist. If possible, perform a computer analysis to determine the proper sizing and location of gates and runners. Ask the material supplier for gate and runner dimensioning data for a specific material and flow rate.
Injection Molding Defects in Detail
Below are the common injection molding defects:
Sink Marks
Sink marks are unwanted shallow depressions on the molded plastic surface caused by localized shrinkage during the hardening process of injection molding. Sink marks on the exterior impair the aesthetic quality of the hardening process. In the plastic part design practice, engineers often check the thickness distribution to predict potential sink marks. This difference in the shrinkage amount is the main cause of the sink mark.
_1659623476.png)
Causes:
Sink marks are often caused when the cooling time or the cooling mechanism is insufficient for the plastic to fully cool and cure while in the mold. They can also be caused by inadequate pressure in the cavity or by an excessive temperature at the gate. Thick sections of the injection molded part take longer to cool than thin ones and so are more likely to be where sink marks are located.
Remedies:
- Mold temperatures should be lowered, holding pressure increased, and holding time prolonged to allow for more adequate cooling and curing.
- Reducing the thickness of the thickest wall sections will also ensure faster cooling and help reduce the likelihood of sink marks.
Surface Delamination
Delamination, sometimes referred to as lamination or layering, is a defect in which the surface of a molded part can be peeled off layer by layer.
_1659623592.png)
Causes
- This is caused due to high shear stress; incompatible materials blended together to the part.
- Over-dependence on mold release agents can also cause delamination. Excessive moisture heats up and forms steam, which results in delamination on the surface.
Remedies
- Eliminate excessive Shear Stress
- Remove excessive moisture
- Material suppliers can provide optimum drying conditions for the specific materials.
- Reduce and regrind material
- Avoid excessive use of mold release agent
- Focus more on the ejection mechanism in the mold design to reduce or eliminate the dependence on mold release agents
- Avoid material contamination
Warpage
Warpage is an excessive shape change of the part after it has been ejected from the injection mould. Also known as deformation, a warped part will twist or bend due to internal stresses in the part caused by uneven shrinkage rates or by some mechanically applied forces such as during the ejection phase. Eliminating part warp can have huge cost savings and should be part of a lean manufacturing program.
_1659623695.png)
Causes:
Warping is usually caused by non-uniform cooling of the mold material. Different cooling rates in different parts of the mold cause the plastic to cool differently and thus create internal stresses. These stresses, when released, lead to warping.
Remedies:
- Ensure that the cooling time is sufficiently long and that it is slow enough to avoid the development of residual stresses being locked into the part.
- Design the mold with uniform wall thickness so the plastic flows in a single direction.
- Select plastic materials that are less likely to shrink and deform. Semi-crystalline materials are generally more prone to warping.
Note: Semi-crystalline materials have a highly ordered molecular structure with sharp melt points. They do not gradually soften with a temperature increase, instead, semi-crystalline materials remain solid until a given quantity of heat is absorbed and then rapidly change into a low viscosity liquid.
Burn Marks
Burn marks are small, dark or black spots that appear near the end of the flow path of a molded part or in the blind area where the air trap forms.
_1659623825.png)
Causes:
Burn marks are caused either by the degradation of the plastic material due to excessive heating or by injection speeds that are too fast. Burn marks can also be caused by the overheating of trapped air, which etches the surface of the molded part.
Remedies:
- Reduce injection speeds.
- Optimize gas venting and degassing.
- Reduce mold and melt temperatures.
Jetting
Usually, the molten resin flows in the form of a jet stream. However, when flowing from a narrow area to a wide space, if too fast, it sometimes flies out in strips, and flows without contacting the mold. This is referred to as jetting. Depending on the appearance of the jetting on the surface of a finished product, some are banded and some are misty, but the reasons are the same.
_1659623915.png)
Causes
1) The gate is small
- The most significant reason for jetting is the gate size. Imagine how a water gun works, and then it becomes easy to understand the phenomenon. The smaller the hole (gate), the higher the power that pushes it out, making it worse. The reason is that, when the hole is small, it means that the pressure in the location is higher with an increased speed.
2) Injection speed is fast
- With the same gate diameter, the faster the injection speed, the worse the jetting.
3) High viscosity / low fluidity
- With the same gate diameter and injection speed, the higher the viscosity of the resin (the lower the fluidity), the worse the jetting.
The conditions causing the increase in viscosity are as follows:
- Low resin temperature
- Low mold temperature
- Material viscosity
- Low holding pressure
To a certain extent, the holding pressure makes jetting less apparent. On the contrary, if the applied holding pressure is not high enough, jetting becomes more obvious.
Remedies
- Increase mold and melt temperatures.
- Increase the size of the gate so that the injection speed becomes slower.
- Optimize gate design to ensure adequate contact between the molten plastic and the mold.
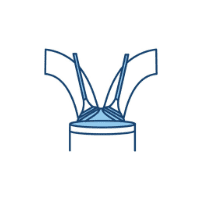
Weld Lines
Weld lines occur in plastic injection molded parts in the area or plane where two or more streams of material fuse together as the mold cavity fills with material. It is common knowledge that weld lines create weak areas in molded parts. Weld lines are not caused by any deficiencies in material, machine, mold or process and are difficult to eliminate. Weld lines are inherent in the design of the component itself although they can be mitigated with proper part design, material selections and processing considerations.
_1659624076.png)
Causes
Weld lines are caused by the inadequate bonding of two or more flow fronts when there is partial solidification of the molten plastic.
Remedies:
Weld lines are inherent in the design of the component itself although they can be mitigated with the following factors:
- Proper part design, material selections and processing considerations.
- Raise the temperature of the mold or molten plastic.
- Increase the injection speed.
- Adjust the design for the flow pattern to be a single source flow.
- Switch to a less viscous plastic or one with a lower melting temperature
Flash
Flash is a defect where excessive material is found at locations where the mold separates, notably the parting surface, movable core, vents, or venting ejector pins.
_1659624189.png)
Causes:
Low clamp force -
- If the clamp force of the injection machine is too weak to hold the mold plates together during the molding process, flash will occur.
Gap within the mold -
- Flash will occur if the parting surface does not contact completely, due to a deformed mold structure, parting surface defect, improper machine and mold set up, or flash or foreign material stuck on the parting surface.
Molding conditions -
- Improper molding conditions, such as a high melt temperature (which makes a thinner melt) or high injection pressure, will cause flash.
Improper venting -
- An improperly designed venting system, a very poor venting system, or a venting system that is too deep, will cause flash.
Remedies:
- Increase the clamp pressure to ensure that the mold parts remain shut during shots.
- Ensure that the mold is properly maintained and cleaned (or replaced when it has reached the end of its useful lifespan).
- Adopt optimal molding conditions like injection speed, injection pressure, mold temperature, and proper gas venting.
Short shot
A short shot is a molded part that is incomplete because insufficient material was injected into the mold. In some cases, short shots are intentionally produced to determine or visualize the filling pattern. But problematic short shots occur when the polymer melt cannot fill the entire cavity (or cavities)-most commonly at thin sections or extremities.
_1659624340.png)
Causes
Any factors that increase the resistance of polymer melt to flow or prohibit delivery of sufficient material into the cavity can cause a short shot. These factors include:
- Insufficiently-sized restrictive-flow areas, such as gates, runners, and thin walls.
- Low melt and/or mold-wall temperatures.
- A lack of vents to bleed the air trapped inside the cavity.
- Insufficient machine injection pressure (resulting from high melt resistance and a restricted flow path), volume, and/or ram speed.
- Machine defects such as an empty hopper, blocked feed throat, or a worn non-return (check) valve that causes loss of injection pressure or leakage of injection volume.
- Premature solidification of the polymer melt due to Hesitation, poor filling pattern, or prolonged injection time.
Remedies
- Select a less viscous plastic with higher flowability. This plastic will fill the hardest-to-reach cavities.
- Increase mold or melt temperature so as to increase flowability.
- Account for gas generation by designing the mold so that gas is not trapped within the mold and is properly vented.
- Increase the material feed in the molding machine or switch to a machine that has a higher material feed in the event that the maximum material feed has been reached.
Vacuum Voids and Sinks
When molten plastic is injected into a mold, its performance is affected by four major forces: the pressure pushing it, the temperature it’s at, how well it flows at that temperature, and how quickly it will change temperature (i.e. cooling rate). When these conditions are not optimal, it can cause voids and sinks.
_1659624479.png)
Causes
- Vacuum voids and sinks are usually caused when there’s not enough plastic in the mold, and as the plastic cools, it leaves empty spaces as the plastic shrinks. Where the plastic touches the mold, it cools first, meaning the bubble will not be as visible: this is a void. When this shrinking occurs on the surface, it’s a sink defect instead.
Remedies
- Higher Pressure and Times: Getting in more plastic through higher injection pressure and second stage (pack and hold) time can get the needed plastic into the mold.
- Runner and Gates: Increasing the runner size and altering the mold gates can bring more plastic into the mold.
- Slower Cooling Rates: Working with the temperature of the plastic or mold can also help. This could be switching to plastics with lower melting points, heated molds, or hot runners.
- Tool Redesign: Sometime, the issues could be with the mold. If parts are too thick, they may be needing a redesign to avoid molds forming when so much plastic shrinks.
While the root cause is related to the injection mold defect of short shots, in that defect the issue is focused on flow and mechanisms of the mold that interferes with that.
Author

Navin Baskar
Author
Skill-Lync
Subscribe to Our Free Newsletter

Continue Reading
Related Blogs
Learn how to render a shock-tube-simulation and how to work on similar projects after enrolling into anyone of Skill-Lync's CAE courses.
09 May 2020
In this blog, read how to design the frontal BIW enclosure of a car (Bonnet) and learn how Skill-Lync Master's Program in Automotive Design using CATIA V5 will help you get employed as a design engineer.
09 May 2020
Tetrahedral is a four- nodded solid element that can be generated through the tria element by creating a volume and also through the existing volume of the geometry. These elements are used where the geometry has high thickness and complexity. The image attached below is a representation of a Tetra element. The Tetra element will have 4 triangular faces with four nodes joining them together
01 Aug 2022
A connector is a mechanism that specifies how an object (vertex, edge, or face) is connected to another object or the ground. By often simulating the desired behaviour without having to build the precise shape or specify contact circumstances, connectors make modeling simpler.
02 Aug 2022
One of the most crucial processes in carrying out an accurate simulation using FEA is meshing. A mesh is composed of elements that have nodes—coordinate positions in space that might change depending on the element type—that symbolise the geometry's shape.
03 Aug 2022
Author
Skill-Lync
Subscribe to Our Free Newsletter
Continue Reading
Related Blogs
Learn how to render a shock-tube-simulation and how to work on similar projects after enrolling into anyone of Skill-Lync's CAE courses.
09 May 2020
In this blog, read how to design the frontal BIW enclosure of a car (Bonnet) and learn how Skill-Lync Master's Program in Automotive Design using CATIA V5 will help you get employed as a design engineer.
09 May 2020
Tetrahedral is a four- nodded solid element that can be generated through the tria element by creating a volume and also through the existing volume of the geometry. These elements are used where the geometry has high thickness and complexity. The image attached below is a representation of a Tetra element. The Tetra element will have 4 triangular faces with four nodes joining them together
01 Aug 2022
A connector is a mechanism that specifies how an object (vertex, edge, or face) is connected to another object or the ground. By often simulating the desired behaviour without having to build the precise shape or specify contact circumstances, connectors make modeling simpler.
02 Aug 2022
One of the most crucial processes in carrying out an accurate simulation using FEA is meshing. A mesh is composed of elements that have nodes—coordinate positions in space that might change depending on the element type—that symbolise the geometry's shape.
03 Aug 2022
Related Courses