Modified on
The Basics of Mold Design 3 (Part 2): A Further Look at the DFM Checklist

Skill-Lync
We introduced DFM and covered part details in the last part of the basics of mold design. In this article, we move further down the DFM checklist and touch upon the following points.
- Parting surface
- Gate point
- Wall thickness
- Cores
- Tolerance
- Venting
- Ejector pads
Therefore, let us jump straight into parting surfaces and cover up to ejector pads.
Parting Surface
The parting surface is a surface that splits the core and the cavity. In most of the products manufactured by injection molding, you can see a prominently visible mark along the parting surface, such as in the image below.

The customers are informed that there will be a mark at a particular region to decide whether or not some changes should be made to the parting surface.
On the diagram to the left in the picture above, you can clearly see the parting surface on the product.
Even when using sliders, there is a visible mark along the parting line of the product. Hence, there are certain cases where just the core and the cavity are not enough for creating a proper mold, and that sliders are added along with the core and cavity to make an appropriate mold.
The sliders will also leave a mark similar to the parting line, as you can see in the diagram to the right.
Gate Point
For injection molded parts, there is a visible gate mark present. Most of the time, the location of the gate is placed where it will not be visible from the outside. But in the case it is visible from the outside, the customers are already informed about it.
You can find gate marks on the bottom of buckets, pens, bottles, and many other household injection molded products.
Wall Thickness
For the plastic components manufactured, you should try to keep the overall thickness relatively constant. Variation in the thickness of the component will lead to non-uniform shrinkage of the material because thick sections shrink more compared to thinner sections.
This non-uniform shrinkage causes the manufactured component to warp. In the image shown below, you can see that more warpage was observed when there was a bigger change in the thickness of sections. However, when you core out the thicker section (make it hollow), the warpage can be avoided.

Coring out can also make the parts weaker. So, ribs are sometimes added in the cored-out sections to improve the part's strength.
Usually, the thickness values used for plastic components vary from 0.6 mm to 5 mm. If the parts are less than 0.6 mm thick, there will not be a proper filling of material in the mold. The material itself will solidify before reaching the ends. Such a defect is called a short shot.
For thickness values greater than 5 mm, gas-assisted injection molding is used.
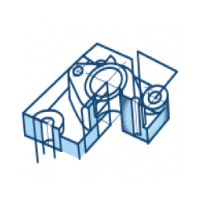
Cores
If there are deep holes in the part, then you have to make use of longer core pins to make the deep hole. But, using longer pins from the core side results in heat dissipation problems.
If heat dissipation does not take place properly, it will lead to burn marks in the hole region, which is also a type of defect.
As a rule of thumb, if the length of the hole is greater than seven times its diameter, then it would be considered too deep. To counteract, we split the hole into two parts. So, some part of the hole is made using the cavity side; the rest is captured from the core side.
In the first diagram of the image below, you can see the hole. The second diagram shows the core pin for making the hole. In the third diagram, you can see that instead of making the hole using a single core pin, some part of it was capture from the cavity side and the rest from the core side.

Another point to note is that in general, you should try to avoid features in the cavity side because creating the pins to make the holes in the cavity side creates more surface in the cavity side where the material could stick. Sticking of the material on the core side is not as big of an issue as the sticking of material in the cavity side because on the core side, we have the ejector pins to eject the part.
Tolerance
When we have the same upper and lower limits for tolerance, it would be a case of symmetric tolerance. But if the upper and lower limits vary, then it is a case of unsymmetric tolerance.
For example;
10 +- 1; Symmetric tolerance
10 (+1 / -0.5); Unsymmetric tolerance
The mold is typically designed in the dimensions that are the average of the upper and lower limits to ensure that the final product dimensions stay within the tolerance levels.
Venting
When you close the mold, some air is trapped between the surface. Due to this trapped air, the molten material will not be able to fill the entire mold region, and some defects will be found in the finished product. For this, some channels are provided in the mold to allow the air to escape. These channels are known as vents, and this process is called venting.
Ejector Pads
In the image shown below, you can see that the thickness of the section highlighted is around 1.4 mm. However, the ejector pins come in standard sizes of 3 mm or 6 mm. So, if we try to eject the component from the left side, it will not be possible because the ejector pins of higher thickness cannot move through the core. To deal with such situations, one can use ejector pads.

Undercuts
Undercuts are those features of the part due to which it cannot be directly ejected from the mold.
Undercuts are of two types:
- Internal undercut
- External undercut
Conclusion
We have discussed seven pointers from the DFM checklist in this part. In the next part, you will read about inserts, guide pillars, and more.
Meanwhile, take time to check out more courses like this one from Skill-Lync's catalog of job-leading online engineering courses. Click here.
Author

Navin Baskar
Author
Skill-Lync
Subscribe to Our Free Newsletter

Continue Reading
Related Blogs
Explore the fundamentals of vehicle dynamics and ultimate trends in the field from design and modeling to control with Skill Lync's exclusive course on the subject. Read about how Skill-Lync's CAE courses can help you get employed.
28 Jul 2020
In this article, we will briefly discuss the working, applications, and features of the one-dimensional systematic simulation tool, GT-Power, in Emission Control Strategy, engine calibration, hybrid vehicle modeling. Read about how Skill-Lync's CAE courses can help you get employed.
28 Jul 2020
This article offers a brief introduction to the globally accepted standard of Geometric Dimensioning and Tolerancing, and its importance for the entire manufacturing process. Read about how Skill-Lync's CAE courses can help you get employed.
28 Jul 2020
In this blog we will read about Going a step into Biomechanics and how Skill-Lync's CAE course will help you get employed.
09 May 2020
The powertrain is the most prominent source of vibrations that affects the driving experience for the people on board. This blog from Skill-Lync examines these vibrations to help enhance that experience.
21 Aug 2020
Author
Skill-Lync
Subscribe to Our Free Newsletter
Continue Reading
Related Blogs
Explore the fundamentals of vehicle dynamics and ultimate trends in the field from design and modeling to control with Skill Lync's exclusive course on the subject. Read about how Skill-Lync's CAE courses can help you get employed.
28 Jul 2020
In this article, we will briefly discuss the working, applications, and features of the one-dimensional systematic simulation tool, GT-Power, in Emission Control Strategy, engine calibration, hybrid vehicle modeling. Read about how Skill-Lync's CAE courses can help you get employed.
28 Jul 2020
This article offers a brief introduction to the globally accepted standard of Geometric Dimensioning and Tolerancing, and its importance for the entire manufacturing process. Read about how Skill-Lync's CAE courses can help you get employed.
28 Jul 2020
In this blog we will read about Going a step into Biomechanics and how Skill-Lync's CAE course will help you get employed.
09 May 2020
The powertrain is the most prominent source of vibrations that affects the driving experience for the people on board. This blog from Skill-Lync examines these vibrations to help enhance that experience.
21 Aug 2020
Related Courses