Modeling the End Cap and Gudgeon Pin in SolidWorks
Learn how to model the end cap and gudgeon pin in SolidWorks with this step-by-step guide. This tutorial is perfect for mastering multibody dynamics using SolidWorks in mechanical assemblies.
Welcome back to the Multibody Dynamics using SolidWorks blog series! In this part of our Multibody Dynamics using SolidWorks series, we focus on modeling the end cap and the gudgeon pin. These components are essential in many mechanical assemblies, particularly in connecting rod assemblies for engines. Below is a detailed guide on how to create these geometries.
Step 1: Creating the End Cap
Start by creating a new part. Go to File > New > Part, ensuring that you are using the millimeter-based unit system. Select the front plane to begin sketching. First, we’ll draw two concentric circles with the origin as the center.
- Inner circle diameter: 43.75 mm
- Offset distance: 20 mm for the outer circle
After drawing the circles, create a midpoint line by selecting the center of the circle, dragging out, and using the trim entities tool. Trim the unnecessary sections, leaving only the right side. Exit the sketch and proceed to extrude the geometry. Use the mid-plane option, setting the extrusion value to 30 mm, ensuring the extrusion is symmetric on both sides.
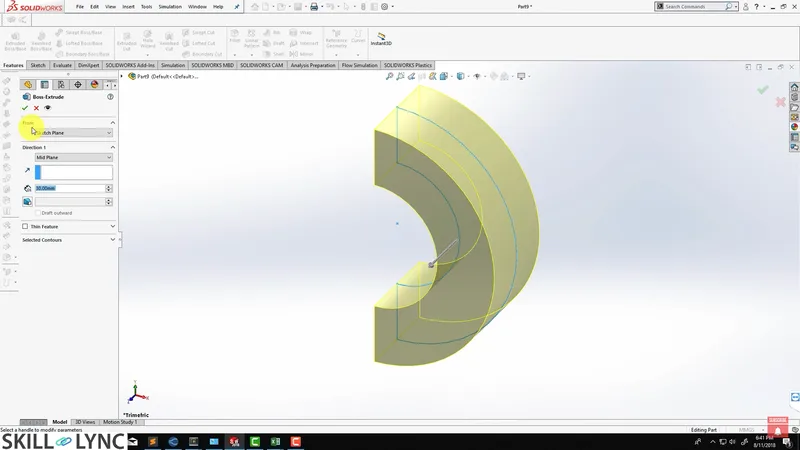
Step 2: Adding Sketches on the End Cap
Next, select one of the faces of the extruded shape and create a new sketch using Control + 8 to view the sketch normally. Use the circle tool to draw a new circle on the center point of the previously drawn circle. Set the circle diameter to 20.5 mm and ensure it is fully defined by applying the vertical constraint.
Now, mirror the circle about the top plane by selecting mirror entities. Exit the sketch, and apply an extruded boss of 30 mm, reversing the direction so that it extrudes properly.
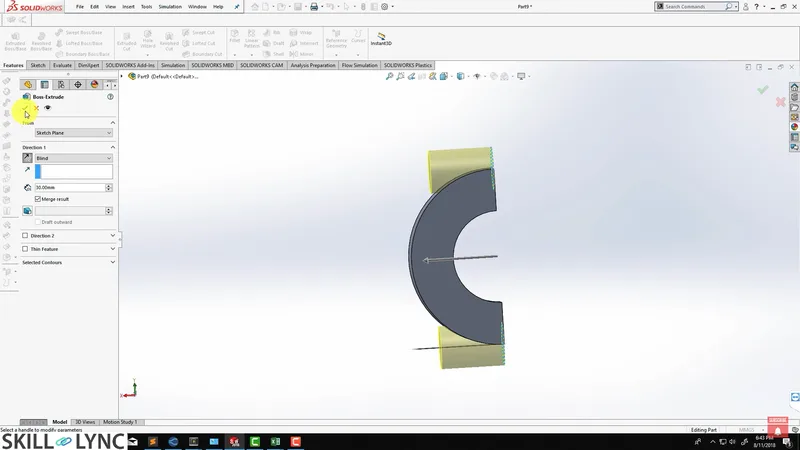
Step 3: Creating Bolt Holes
For the bolt holes, select the sketch of the end cap, even if it’s not immediately visible. Add a new circle centered around the previously created circle. Set the diameter of this circle to 11.25 mm. Mirror the circle using the top plane. Apply the extruded cut with a depth of 30 mm, or use the through all option to cut through the geometry.
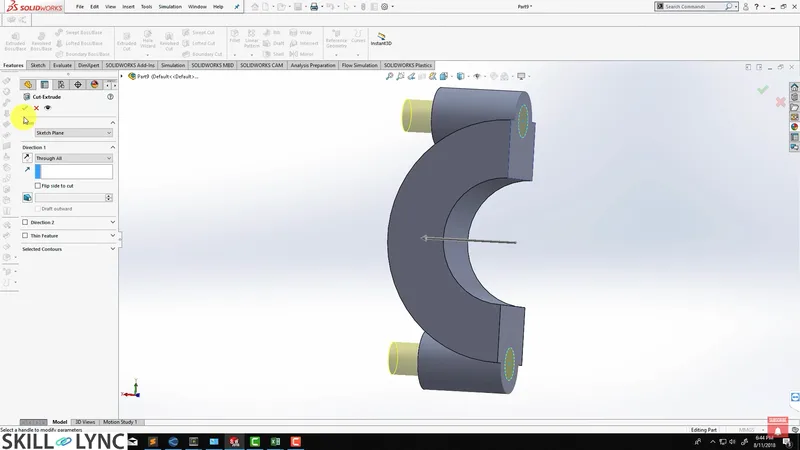
Step 4: Adding Fillets
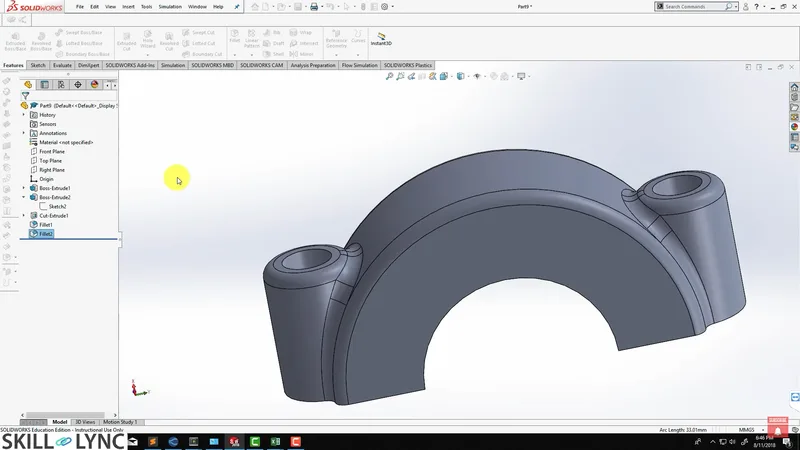
Once the basic geometry is completed, apply fillets to the edges of the end cap to smoothen out sharp corners. Use the fillet tool and set the fillet radius to 2.7 mm for a clean, rounded finish. Apply the fillet to all necessary edges.
Step 5: Creating the Gudgeon Pin
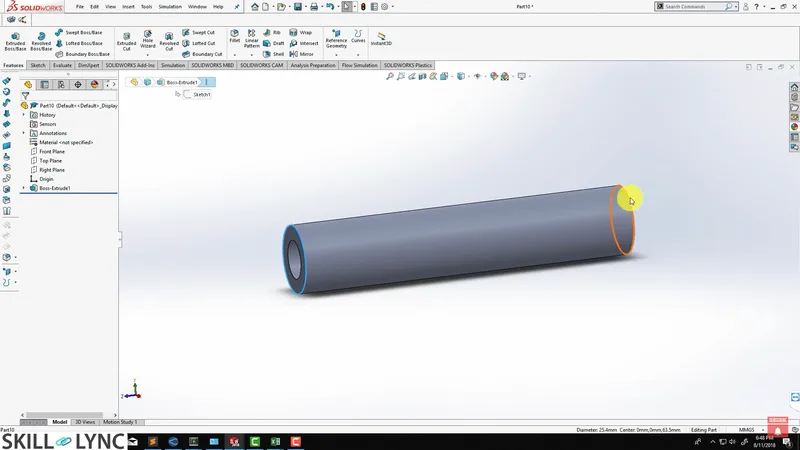
Now, we’ll proceed with the gudgeon pin. Create a new part, and once again ensure your unit system is set to millimeters. Start with a simple circle sketch on the front plane. Set the outer diameter of the circle to 25.4 mm (1 inch).
Rather than providing a radius for the inner circle, use an offset distance of 5.5 mm. Once the sketch is complete, apply an extrusion with a length of 127 mm using the mid-plane option for symmetry.
Step 6: Adding Chamfers
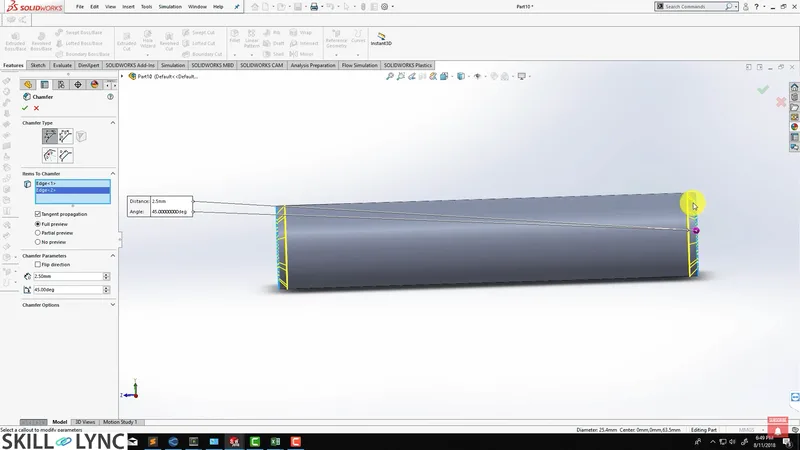
To finish the gudgeon pin, apply chamfers to both ends of the extruded cylinder. Use the chamfer tool from the dropdown next to the fillet tool and set the chamfer distance to 2.5 mm. Apply this chamfer to both edges of the cylinder.
Conclusion
In this blog, we’ve covered how to model both the end cap and the gudgeon pin in SolidWorks. These components are critical in multibody dynamics assembly, and learning to model them effectively is an essential part of mastering SolidWorks for mechanical engineering. Whether you're working through a multibody dynamics course or using these parts in a SolidWorks tutorial, these steps will provide a clear foundation for creating accurate components.
In the next part of the series, we will dive into the creation of the crank. Stay tuned for more insights into SolidWorks design projects and tutorials!
This blog is part of our ongoing series on Multibody Dynamics.
If you missed the previous posts, check them out here.
Would you like to have a more interactive experience going through the SolidWorks user interface?
Skill-Lync has released a FREE comprehensive course covering Multibody Dynamics in detail! Check it out here.
If you’re looking to go deeper into SolidWorks training and multibody dynamics skills, check out Skill-Lync’s SolidWorks certification course.
Check out our hands-on course today and add Multibody Dynamics and SolidWorks to your list of skills!
Let’s get #IndustryReady together, one skill at a time!


