Modeling the Crank in SolidWorks: A Step-by-Step Guide
Learn to model the crank in SolidWorks with this step-by-step guide. Master key dimensions and techniques, essential for multibody dynamics using SolidWorks in mechanical systems.
Welcome back to the Multibody Dynamics using SolidWorks blog series! In this part of the blog series, we will model the crank, a crucial component in many mechanical systems. This step-by-step guide will cover the essential dimensions and modeling techniques required to complete the crank geometry using SolidWorks.
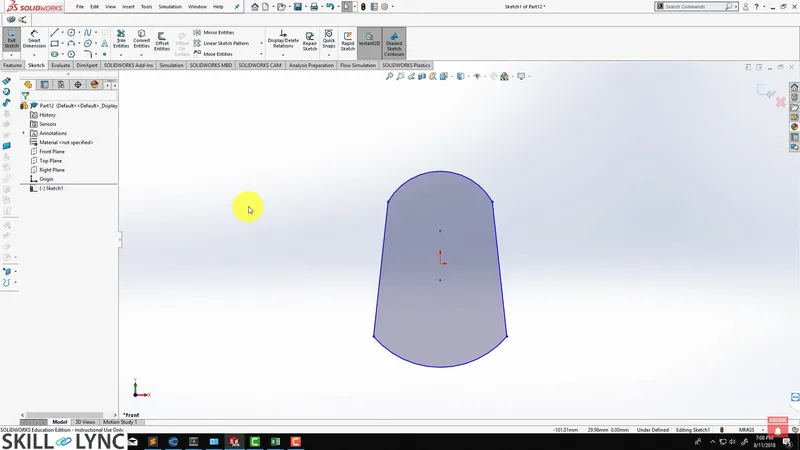
Step 1: Creating the Initial Sketch
Begin by creating a new part in SolidWorks, ensuring your unit system is set to MMGS. On the front plane, use the three-point arc tool to draw two arcs, one above and one below the origin. These arcs will form the primary shape of the crank.
Now, draw two lines connecting the arcs on each side. Select the lower arc's center and the origin and apply the make vertical constraint. Repeat this for the upper arc. Similarly, constrain the points on each side horizontally.
Step 2: Defining Dimensions
Once your basic sketch is ready, it’s time to apply the necessary dimensions:
- Center of the first arc: 45 mm from the center
- Horizontal distance: 80 mm
- Line length: 12 mm
- Distance between points: 60 mm
- Upper arc radius: 50 mm
- Lower arc radius: 65 mm
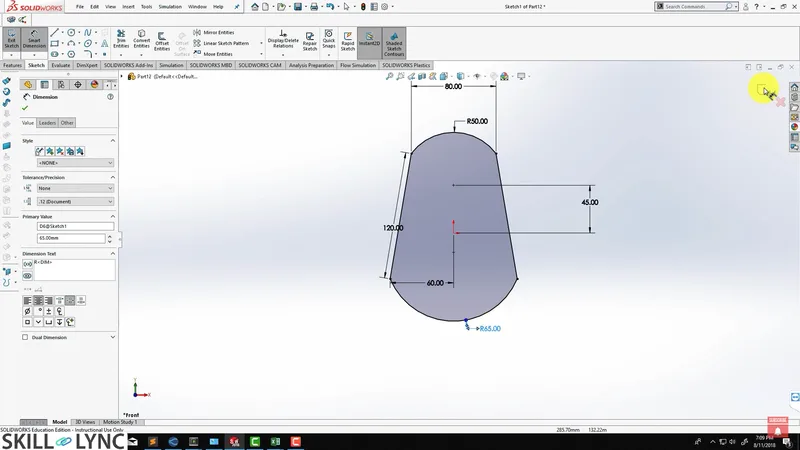
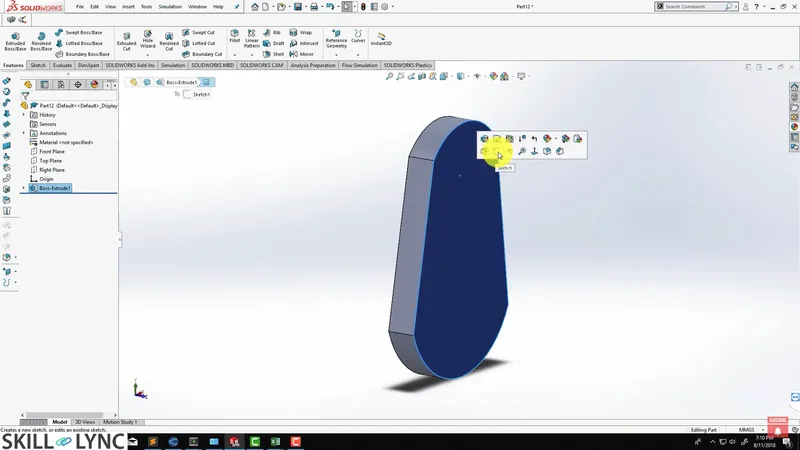
This fully defines the sketch. Now, proceed to extrude the sketch by 20 mm.
Step 3: Adding the Connecting Rod Mount
Next, select the top face of the extruded part and create a new sketch for the connecting rod mount. Use the circle tool to draw a circle at the mount’s center and assign a diameter of 43.75 mm. Position this circle 50 mm away from the crank’s center using the vertical constraint.
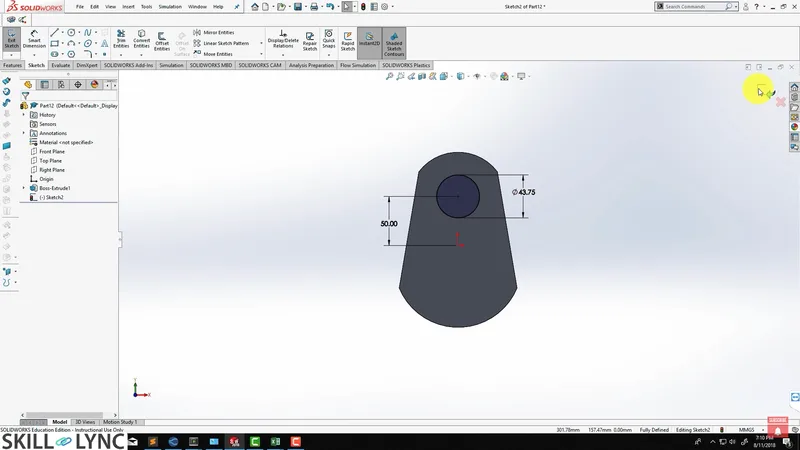
Extrude this circle by 16 mm.
Step 4: Adding the Backside Geometry
Now, flip to the back side of the crank, where we’ll add another circular feature. Create a circle with a diameter of 35 mm and extrude it by 20 mm.
Step 5: Applying Fillets
To smooth the edges, use the fillet tool on the four corners of the crank. Set the fillet radius to 25 mm and apply it to all four corners.
Step 6: Cutting the Crank with Three-Point Arcs
To cut the crank for final shaping, select the right plane and sketch two three-point arcs—one at the top and one at the bottom of the crank. Assign the following dimensions:
- Top arc dimensions: 4.87 mm vertical distance, 35 mm, and 50 mm radius
- Bottom arc dimensions: 5.12 mm vertical distance, 50 mm radius, and 120 mm arc
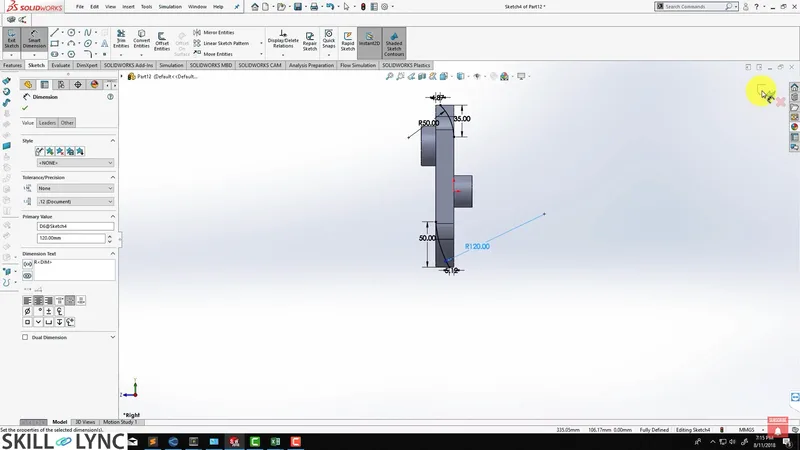
Once sketched, use the extruded cut option, selecting through all both to complete the cuts. If any issues arise with overlapping contours, use the thin feature option to adjust the cuts as necessary.
Step 7: Mirroring the Crank
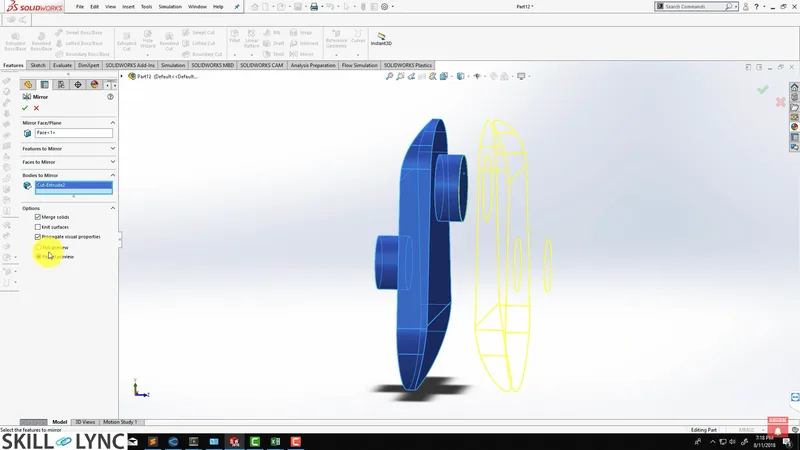
To complete the crank, use the mirror tool to mirror the geometry across the circular face. This creates a symmetrical crank, ready for further assembly.
Conclusion
This blog covered the detailed steps for creating a crank in SolidWorks as part of the multibody dynamics simulation process. Whether you're working through a SolidWorks course or tackling a multibody dynamics assembly, mastering the modeling techniques for components like the crank is essential for success in mechanical engineering.
In the next post, we’ll cover the assembly process of all parts created so far. Stay tuned for more on SolidWorks training and dynamic simulations!
This blog is part of our ongoing series on Multibody Dynamics.
If you missed the previous posts, check them out here.
Would you like to have a more interactive experience going through the SolidWorks user interface?
Skill-Lync has released a FREE comprehensive course covering Multibody Dynamics in detail! Check it out here.
If you’re looking to go deeper into SolidWorks training and multibody dynamics skills, check out Skill-Lync’s SolidWorks certification course.
Check out our hands-on course today and add Multibody Dynamics and SolidWorks to your list of skills!
Let’s get #IndustryReady together, one skill at a time!
Start Course Now


