Exploring the AutoCAD Interface: A Detailed Guide for Mechanical Engineers
Explore the AutoCAD interface with this detailed guide for mechanical engineers. Learn to navigate AutoCAD 2D and 3D workspaces, master essential tools, and enhance your CAD skills with parametric drawing and macros.

Welcome to this blog series on AutoCAD Essentials for Mechanical Engineers, the globally renowned tool for 2D drafting and design. Understanding the AutoCAD interface is essential for anyone aiming to excel in mechanical engineering or any field that involves CAD software. Whether you're just starting out with AutoCAD 2D or transitioning into AutoCAD 3D, this guide will help you navigate through the workspace and master the essential tools. Let's walk through the interface step by step, making sure we cover everything you need to get started.
Getting Started with AutoCAD
When you first open AutoCAD, you'll notice a powerful array of toolsets featured in the software. Let’s begin by creating a new drawing to explore the different toolbars and ribbons. After double-clicking the AutoCAD icon on your desktop, you’ll be greeted with the workspace. Click on "Start Drawing" to open a blank canvas where we can experiment with the AutoCAD tools.
The AutoCAD Workspace
The workspace in AutoCAD is designed to adapt to the type of work you're doing. In AutoCAD for engineers, there are three predominant workspace settings that you'll likely use:
- Drafting and Annotation: This workspace is tailored for 2D drafting, where you will find all the 2D drawing tools you need.
- 3D Basic Modeling: If you're working on AutoCAD 3D, switching to this workspace will update your toolsets for 3D modeling.
- 3D Modeling: This advanced workspace gives you more complex 3D modeling tools, making it ideal for high-level projects.
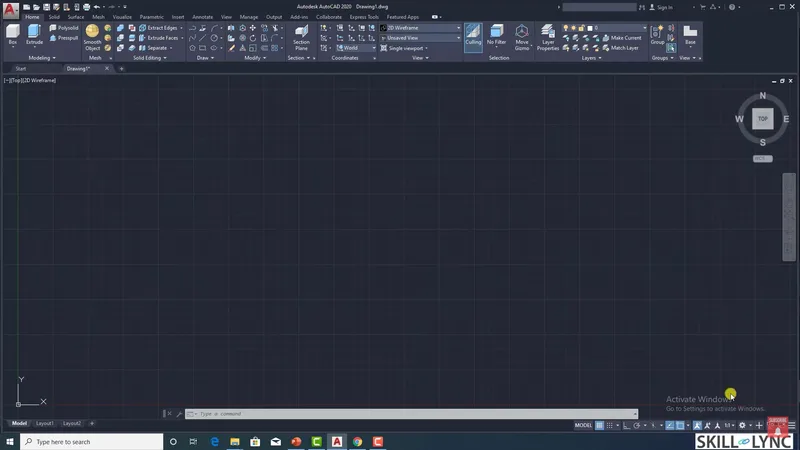
If you prefer to customize your workspace, you can adjust which tools and panels are visible to match your specific needs. This flexibility is one of the reasons AutoCAD is considered a top choice among mechanical engineers and professionals in other engineering fields.
Key Areas of the AutoCAD Interface
The Application Menu (Big “A”)
In the top left corner, you'll see the large “A” icon, which stands for AutoCAD. This is your application menu. Here, you can access file-related commands, such as:
- New: Create a new file.
- Open: Open an existing file.
- Save: Save your work.
- Import/Export: Bring in or export designs from other sources.
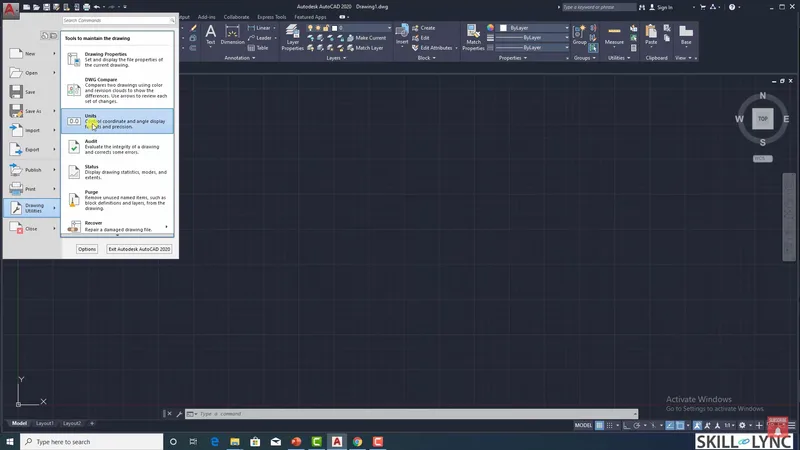
The application menu also includes drawing utilities that allow you to set file properties, units, and preferences, ensuring your designs are precise and ready for use in any mechanical autocad project.
The Ribbon
The ribbon is the larger toolbar located just below the application menu. It organizes AutoCAD commands into tabs based on function. For instance:
- Home Tab: Contains basic drawing tools like lines, arcs, circles, and polygons. You will also find modify commands, annotation tools, layers, and properties management here.
- Insert Tab: Allows you to insert blocks, manage references, and link external data to your drawing, a useful feature in mechanical engineering design.
- Annotate Tab: For detailed drawings, especially in AutoCAD mechanical engineering, this tab helps you add centerlines, leaders, tables, and dimensions to clarify the functionality of the design.
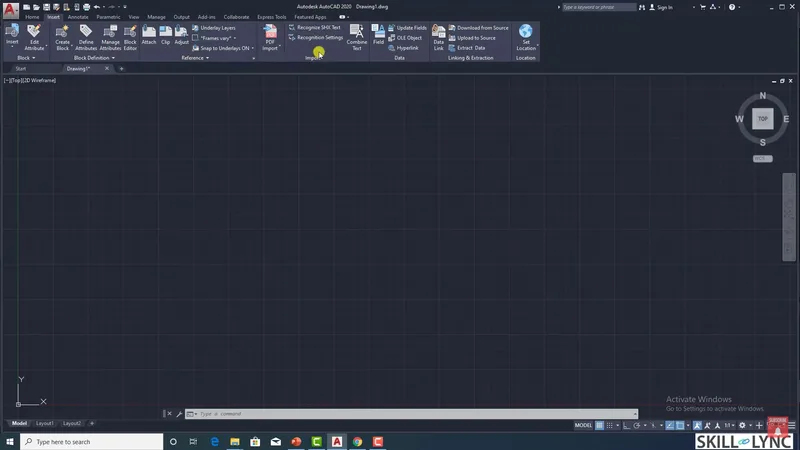
The ribbon also features tooltips and extended information on each command. Hover over a tool to learn what it does, and press F1 for even more details on how to use it.
The Quick Access Toolbar
Located at the top of the screen, the quick access toolbar contains frequently used commands like New, Open, Save, Undo, and Redo. You can customize this toolbar by adding commands you use regularly, saving you time and making your workflow smoother.
The Command Line
One of the most powerful aspects of AutoCAD is the command line. This is where you can directly input commands, speeding up the design process. For example, typing "C" into the command line immediately opens the circle tool without needing to navigate the ribbon. This feature is invaluable for experienced users who want to increase efficiency and reduce modeling time.
Try this: To draw a circle using the command line, simply type "C" and follow the prompts to input the center point and radius.
Navigating the Drawing Space
In AutoCAD, the drawing space is where your designs come to life. This area changes based on your current workspace (2D or 3D), and here you’ll execute all of your mechanical AutoCAD drawings.
- View Cube: The View Cube helps you switch between different viewpoints. By clicking on the cube, you can rotate between top, front, and side views. This is particularly useful when working in AutoCAD 3D, allowing you to visualize your model from multiple angles.
- UCS Icon: Located in the bottom left corner, the User Coordinate System (UCS) icon indicates the orientation of your drawing in terms of the X, Y, and Z axes.
- Navigation Bar: Use tools like the pan, zoom, and orbit commands to adjust your view and get a closer look at specific parts of your drawing. The ShowMotion tool even allows you to record sequences for presentations, which is helpful when showcasing your CAD design to clients or teammates.
- Advanced Tools: Parametric Drawing and Macros
Parametric Drawing
In AutoCAD mechanical engineering, the parametric toolset allows you to add constraints and relationships between different elements of your drawing. For instance, you could define that Line A is always three times the length of Line B. Anytime you update Line A, Line B will automatically adjust to maintain this relationship. This tool is particularly useful when working on designs that need to be scalable or follow specific dimensional rules.
Macros and Action Recorder
Macros are another powerful feature of AutoCAD. They automate repetitive tasks, like measuring the boundaries of objects or calculating the total area. Using the Action Recorder, you can record a series of steps, then replay them whenever needed, saving you time and effort on repetitive tasks. This is similar to macros in programs like Excel and can be incredibly useful when dealing with large mechanical AutoCAD drawings.
Managing and Comparing Drawings
AutoCAD also has excellent capabilities for managing and comparing drawings:
- File Tabs: Easily switch between different projects with the file tabs at the top of the screen.
- Drawing Compare: This feature lets you compare two drawings side by side to see any revisions or differences. It’s an essential tool for mechanical engineers who frequently deal with multiple iterations of a design.
- Conclusion: Mastering AutoCAD for Mechanical Engineers
Mastering AutoCAD opens up a world of possibilities for mechanical engineers. From basic 2D drafting to advanced 3D modeling, this toolset gives you the flexibility and power to bring your designs to life. With features like the command line, macros, and parametric drawing, you can streamline your workflow and produce professional-quality designs efficiently.
By familiarizing yourself with the AutoCAD interface and using its robust set of tools, you’ll be well on your way to becoming proficient in AutoCAD for mechanical engineers. Whether you're taking an AutoCAD free certification course, enrolling in an AutoCAD crash course, or self-learning through tutorials, the key is practice. Dive in, explore the toolsets, and start creating!
This blog is part of our ongoing AutoCAD Design Series. If you missed the previous posts, check them out here.
Would you like to have a more interactive experience going through the AutoCAD essentials?
Skill-Lync has released a FREE comprehensive course covering AutoCAD Essentials for Mechanical Engineers in detail! Check it out here.
If you’re looking to go deeper into AutoCAD Essentials check out Skill-Lync’s AutoCAD certification course.
Check out our hands-on course today and add AutoCAD to your list of skills!
Let’s get #IndustryReady together, one skill at a time!


