To calculate dead and live load for industrial steel structures and to apply them using TSD
1)
Aim :
1. Create beam properties for First floor and model the beams
2. Create rafter beam on second floor as roof and moment frame action in one direction and add bracings at locations as per the design intent
Procedure :
Details of the structure:
- Support: Fixed-Pinned(Top and Bottom)
- Concrete Pedestal Size PD1= 600x600mm
- Steel Column C1= MB 300
Steel Beams:
B1= ISMB 300 applied for primary beams at ground floor including staircase landing beam.
B2= ISMB 250 applied for primary beams at first floor including staircase landing beam.
B3= ISMB 225 applied for secondary beams at first floor
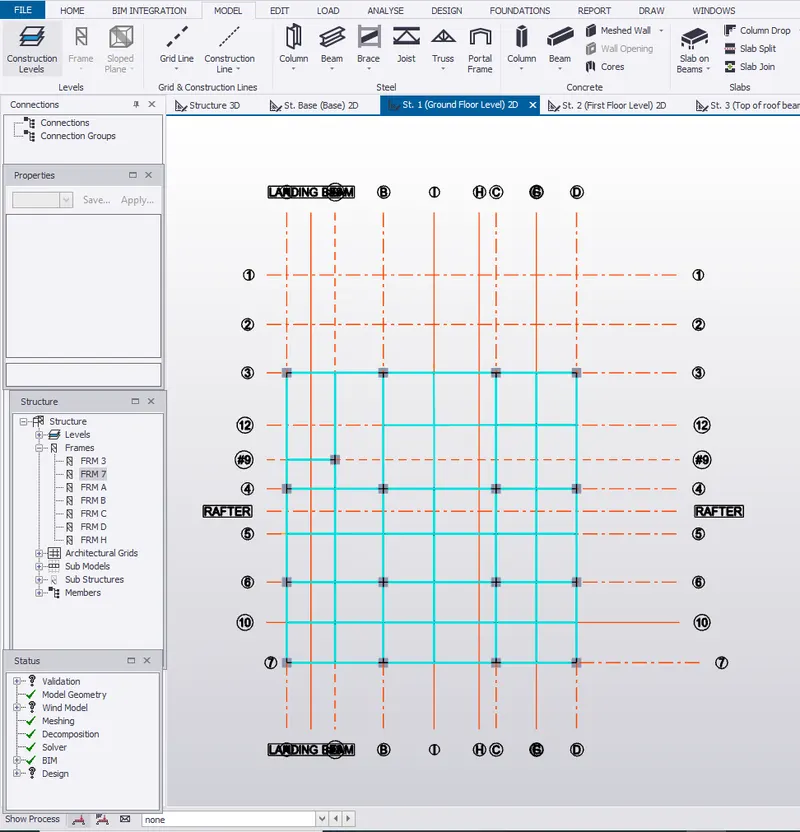
- First floor plan view.
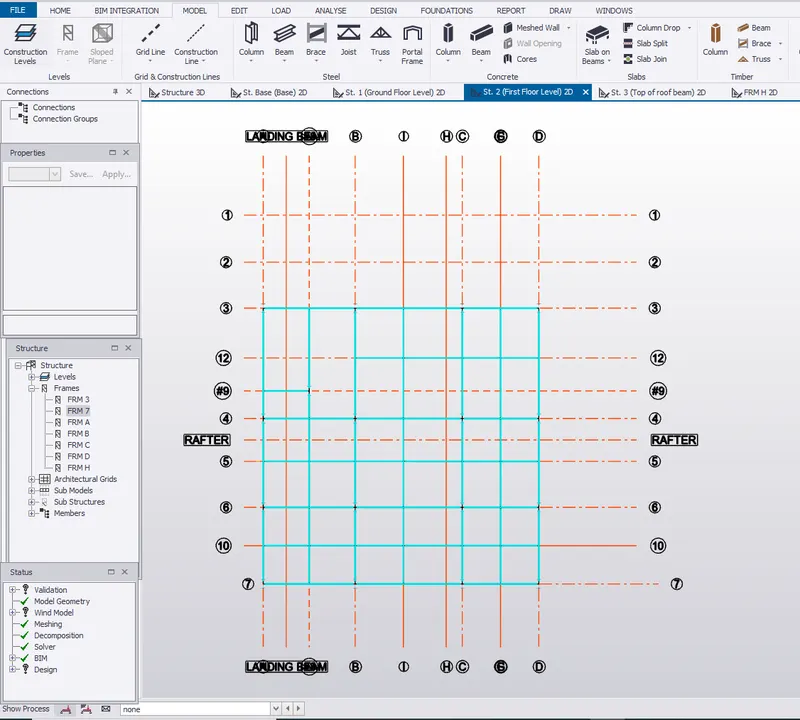
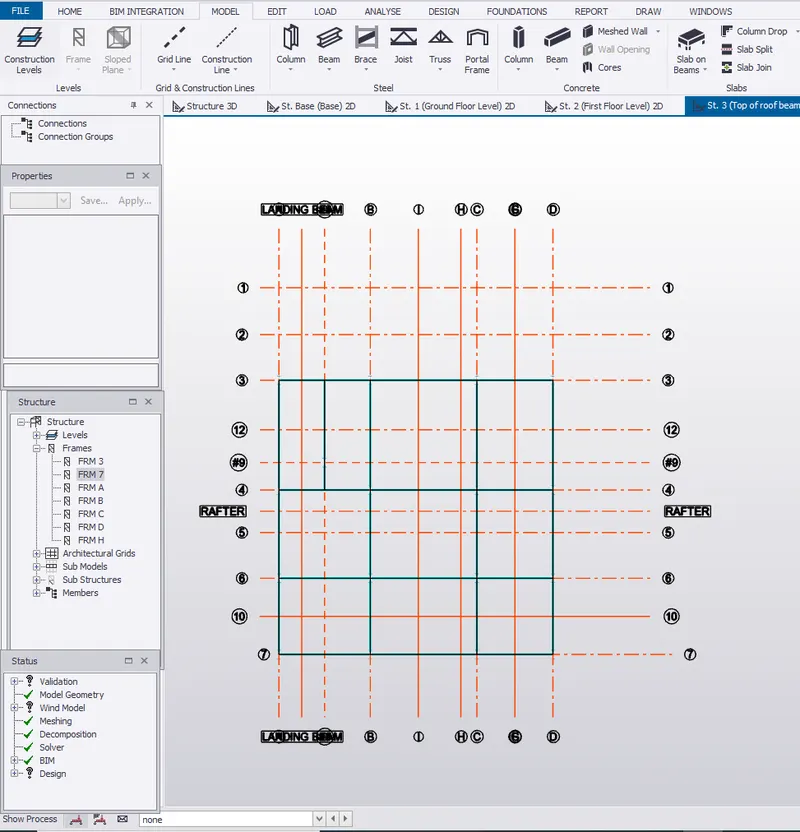
- Second floor plan view= Top of roof beam view
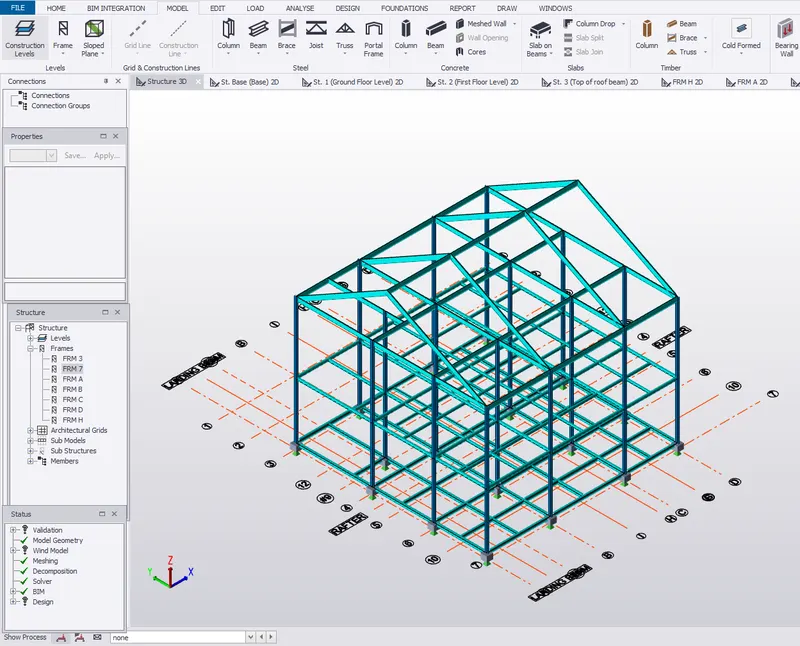
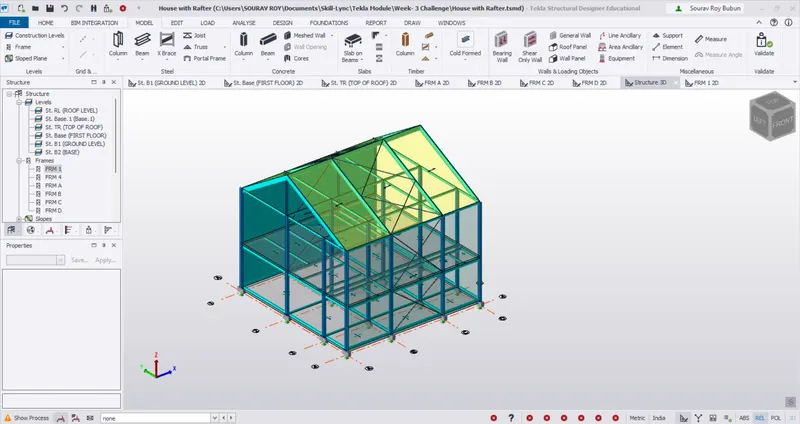
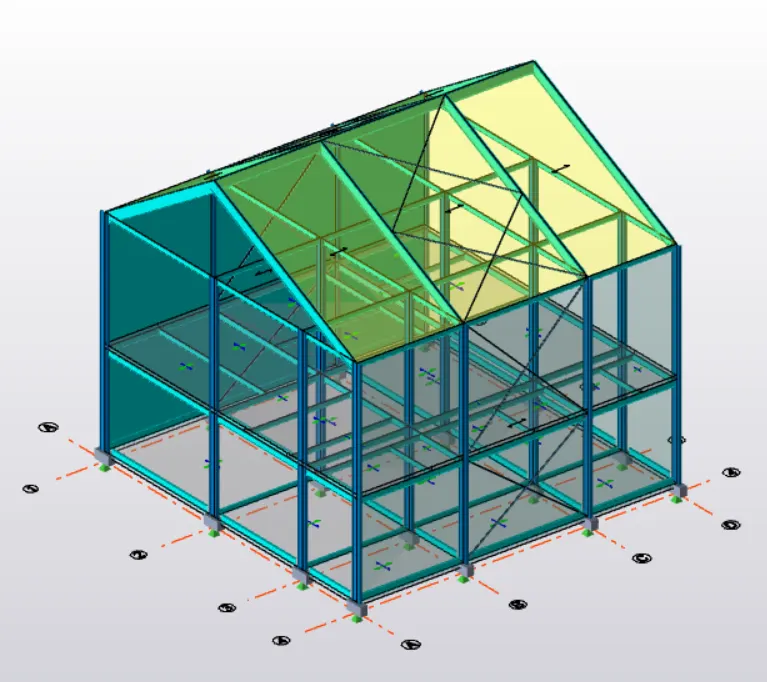
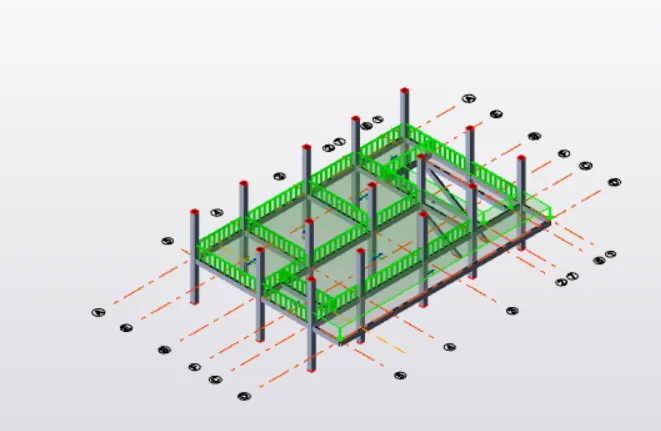
- Structure in 3D view
open old file with colums
•
• Go to home
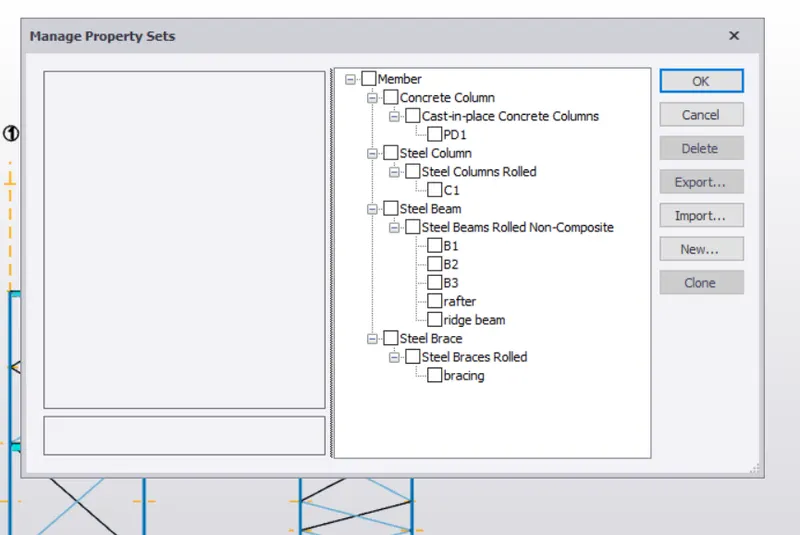
• Here select manage property sets
• Click new members
• Add the required members as show below
•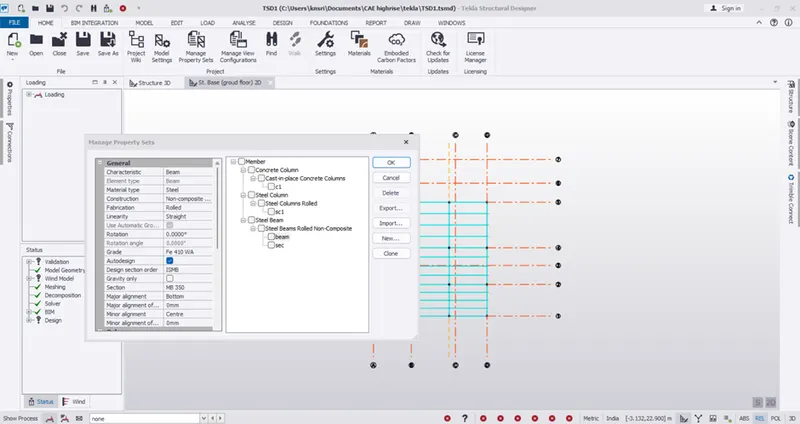
• Here edit the required properties
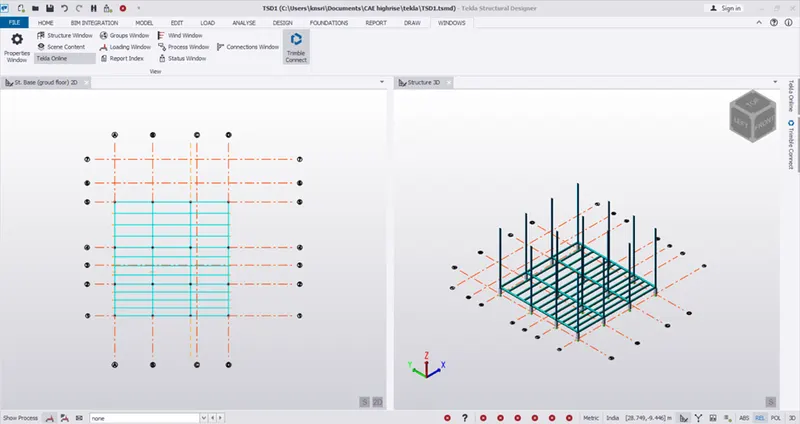
• Go to model
• Select beam
• Select desired beam I properties
• Click I the respective grid points as required
• Copy the beams to required positions
• Similarly carry the same procedure for the secondary ones
•
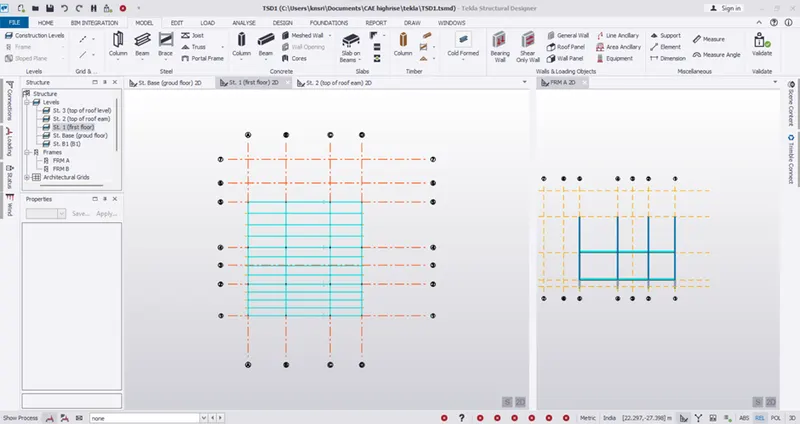
• For the first floor
• Go to first floor
• Here replicate the same framing plan as the ground level
•
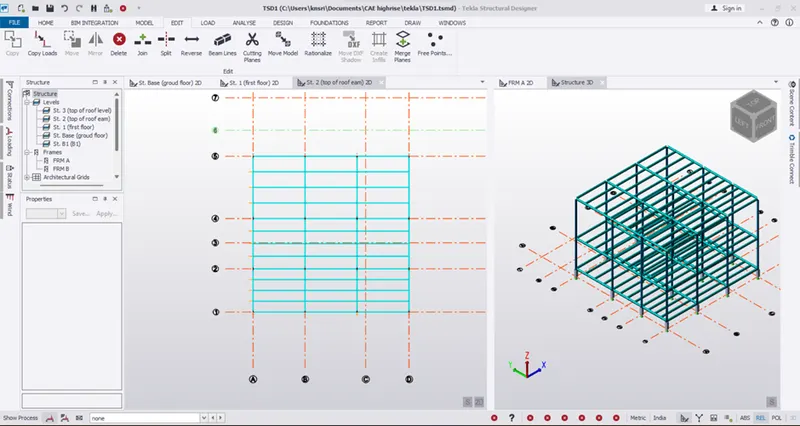
• Same for the roof level
•
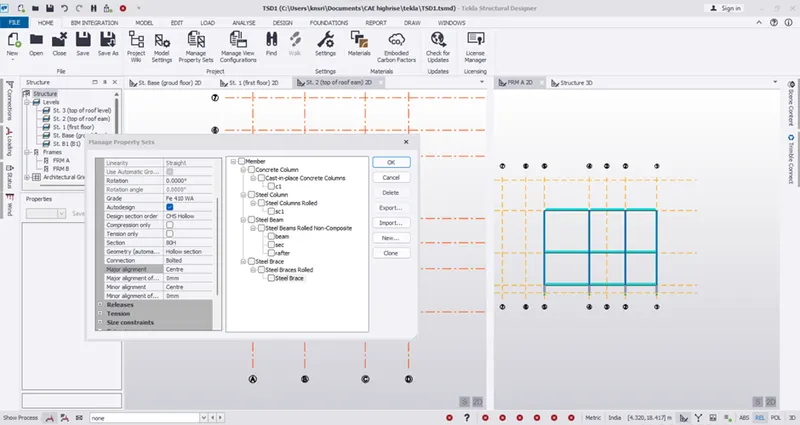
• For manage property sets add the bracings ad rafter beam properties
•
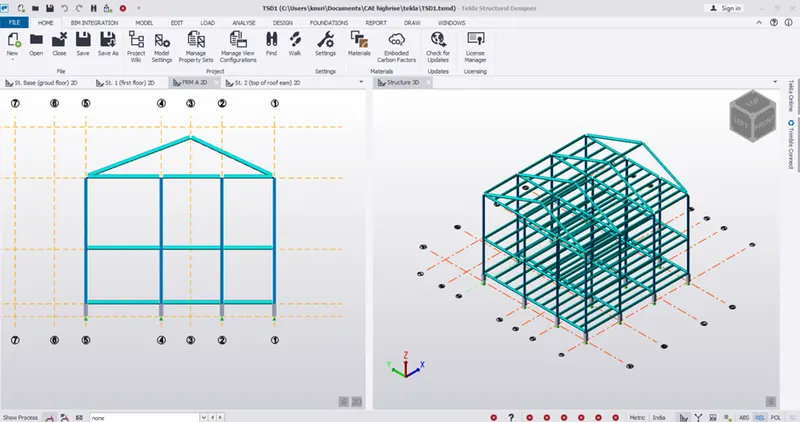
• Place the frames for different views
• Go to frame A
• Here draw the rafter with 18 degree
• Go to 3d structure ad cory the rafter for the required position
•
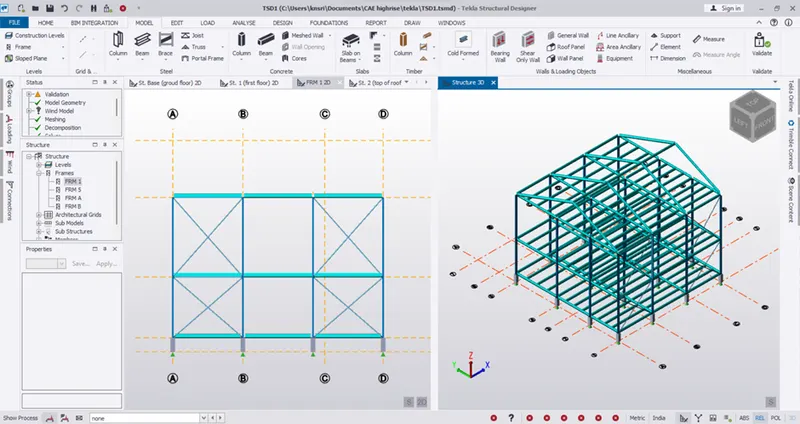
• Go to model
• Select x brace
• Go to desired frames
• Here pick 4 poits to draw
•
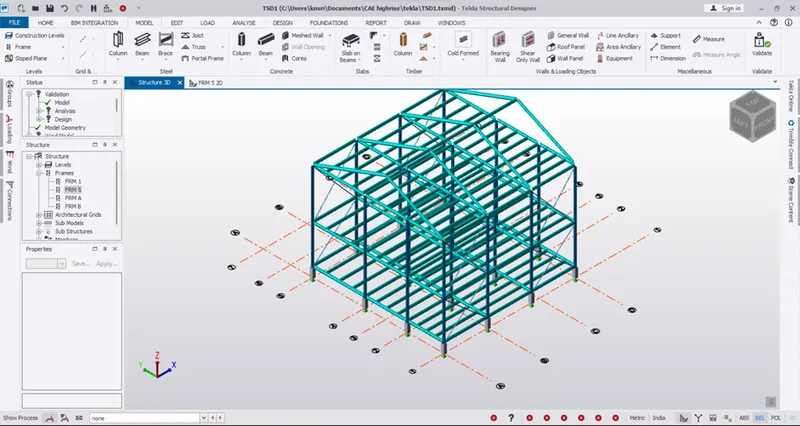
Result:
•
Create beam properties for First floor and model the beams.
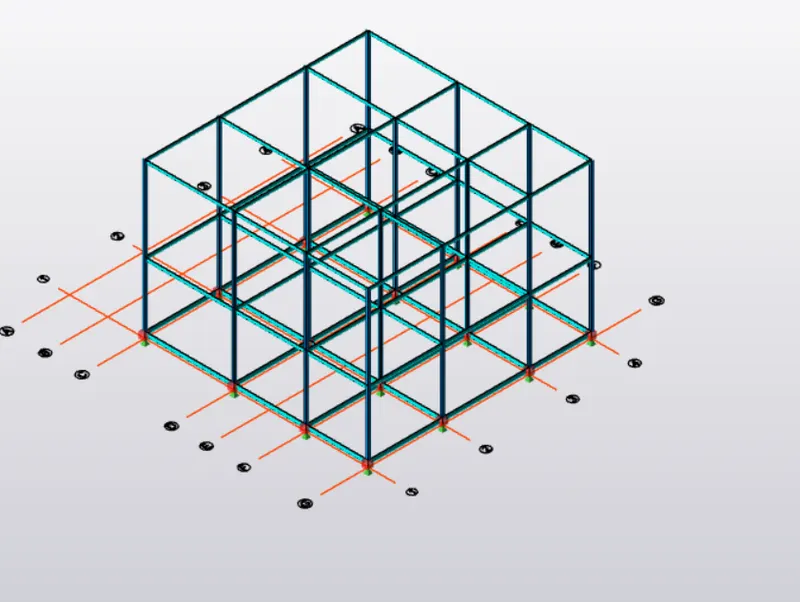
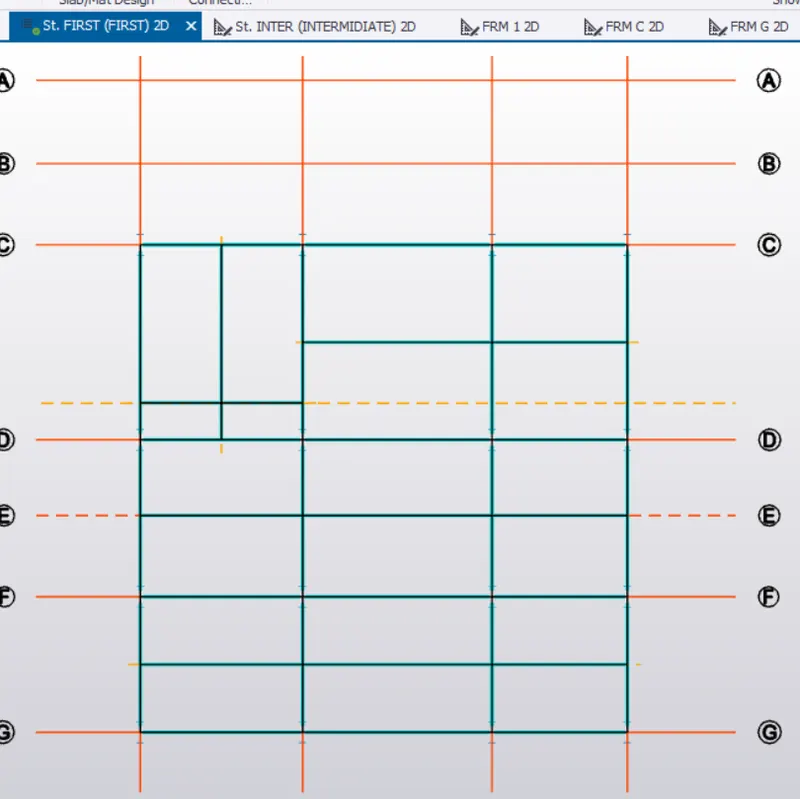
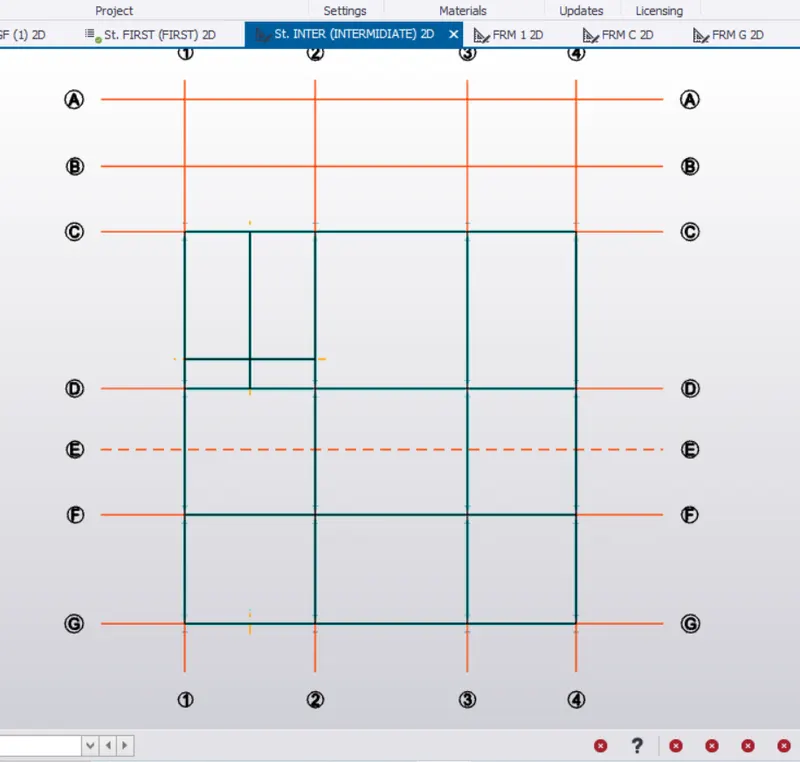
Create rafter beam on second floor as roof and moment frame action in one direction and add bracings at locations as per the design intent
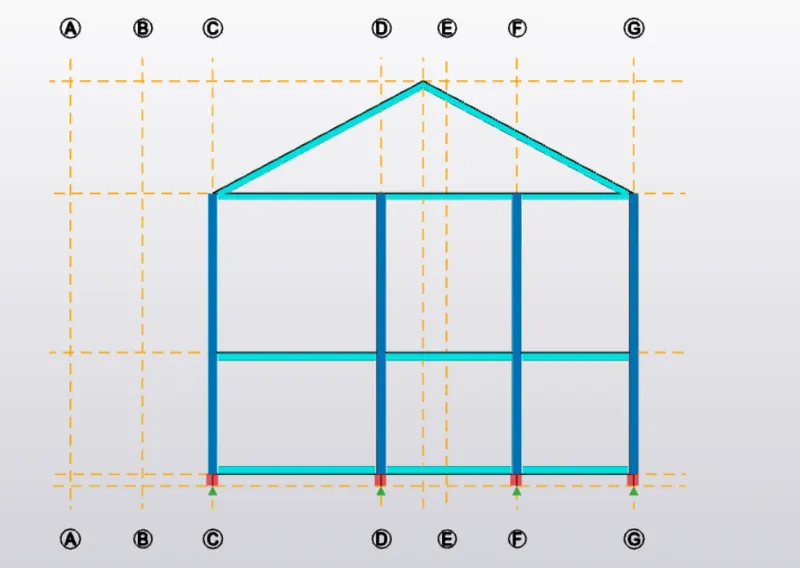
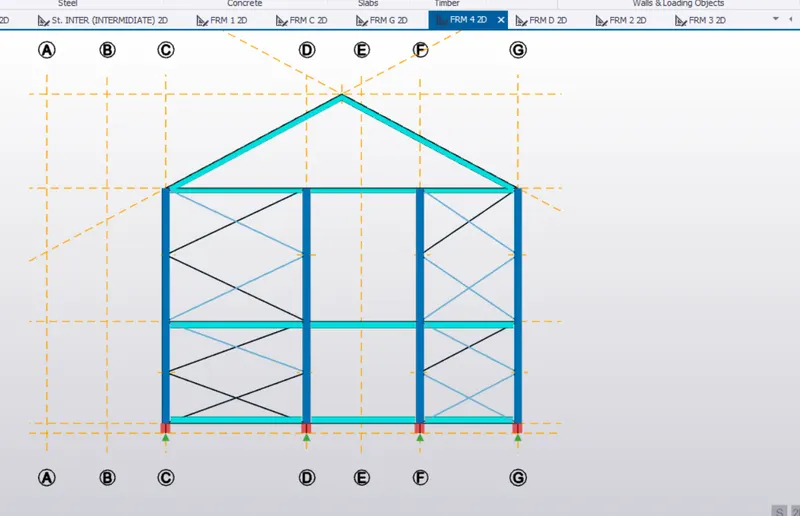
RAFTER BEAM
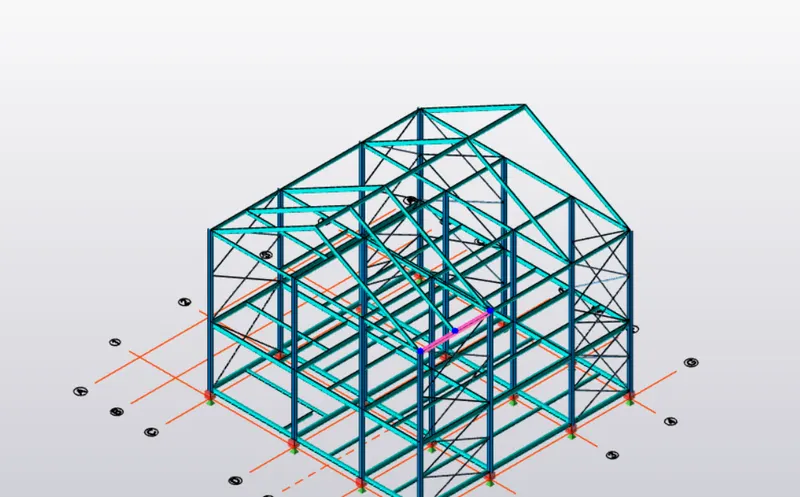
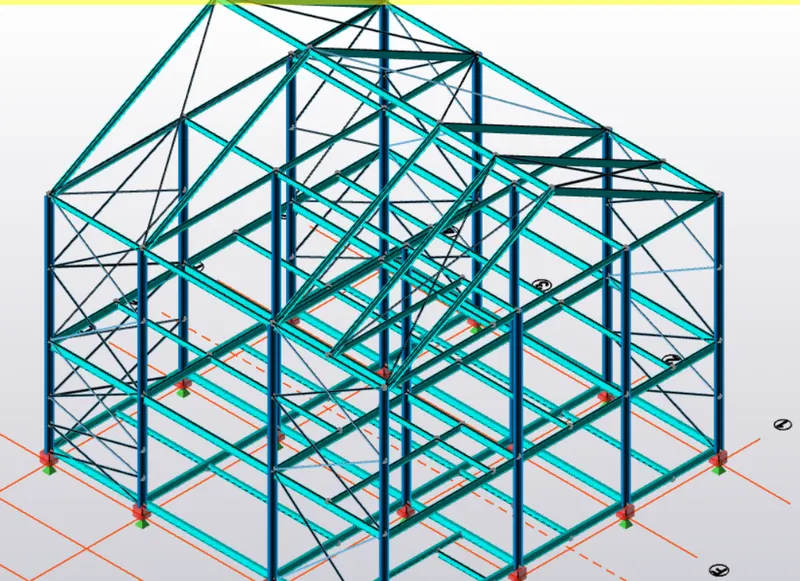
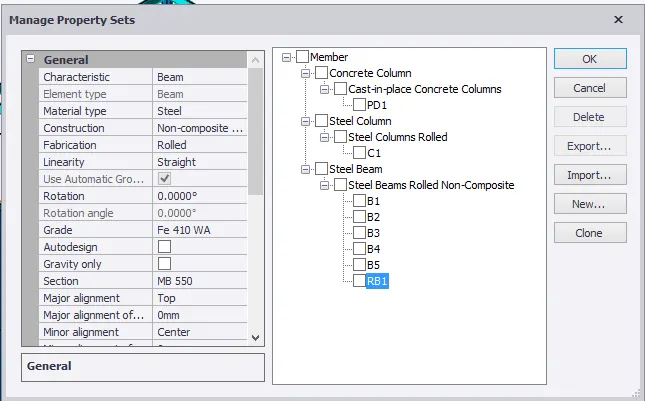
For Rafter first we have to create the Rafter properties
Home - Manage property set - Member - Steel beam
Rename it as - RB1
Select section as - ISMB 550
Step-2
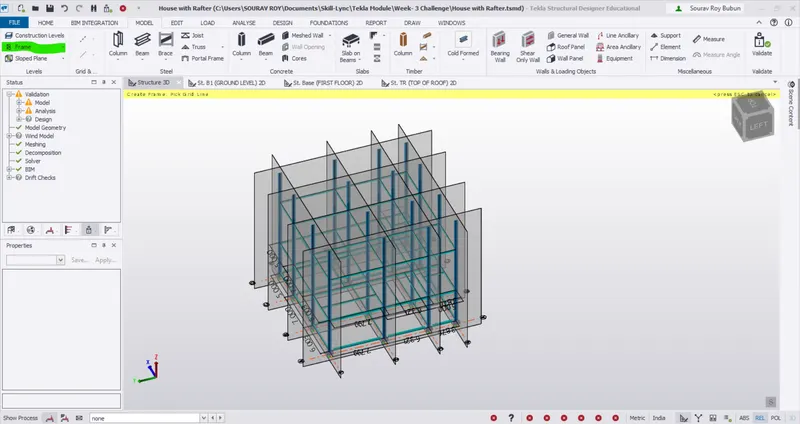
Create a Frame so that it will be easier to see the cross sections
Go to Model - Frame
Create a frames on grid lines as shown below
Step-3
Click on Frame A to draw the rafter
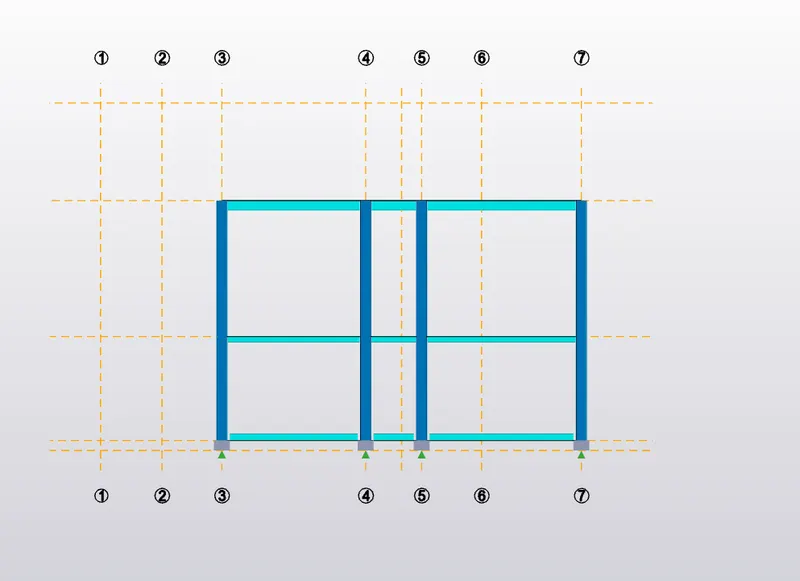
Draw the Rafter by picking up the points
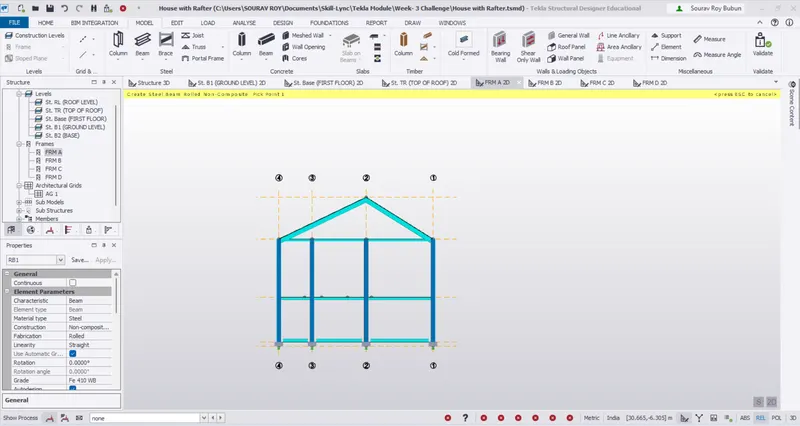
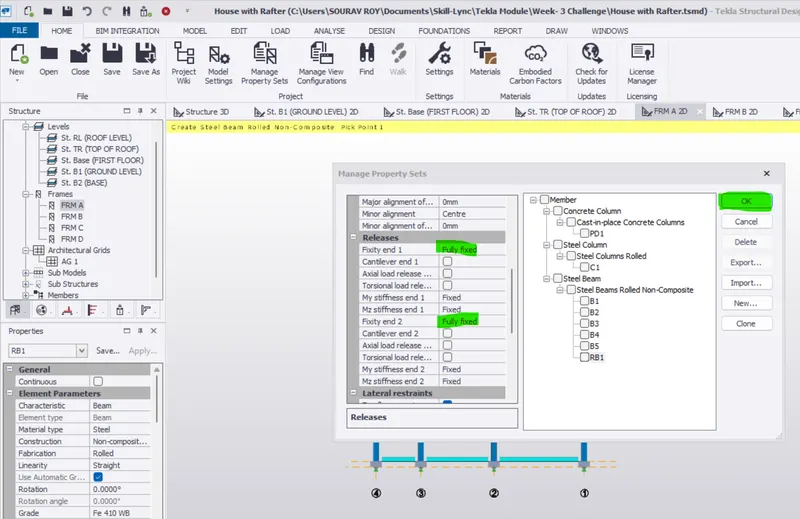
Change the property of Rafter from pin to Full Fixed
Step-4
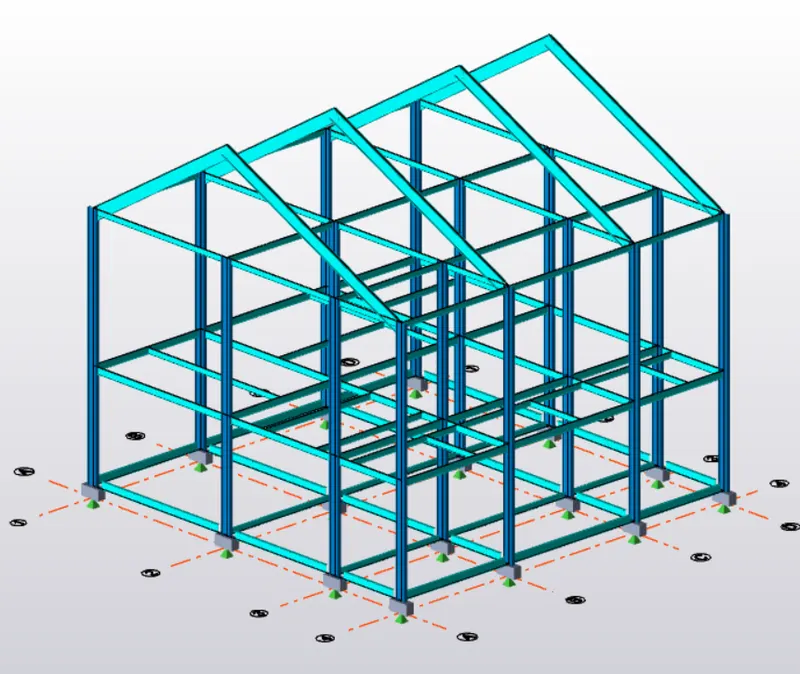
Do the same for B,C,D frames
Step-5
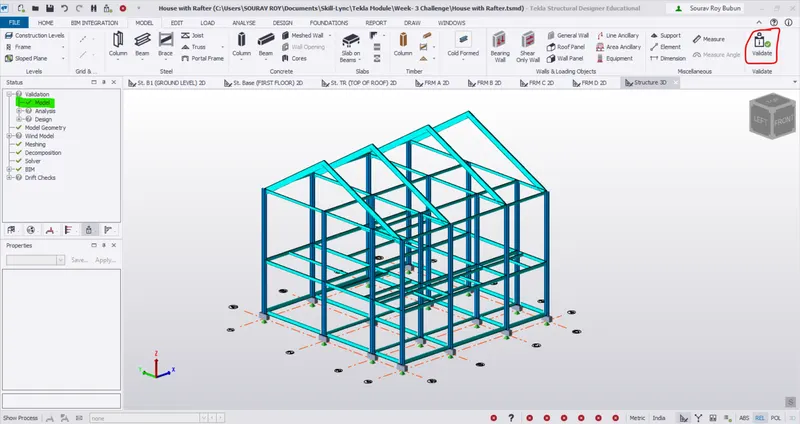
Validate the model to check the error
Step-6
Bracing
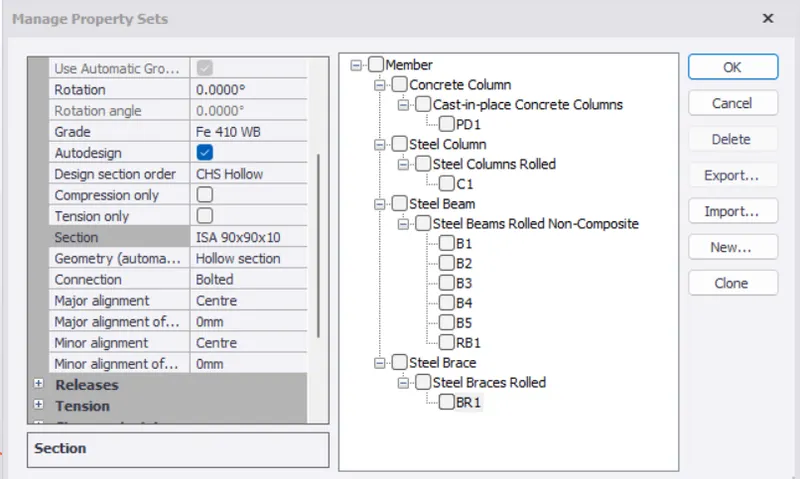
Follow the same procdure to create bracing properties
Home - Manage property set - Member - Steel brace
Rename it as - BR1
Select section as - ISA 90 x 90 x 10
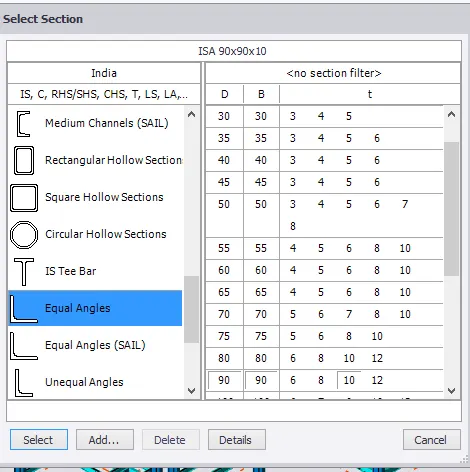
Now go to Model - Steel Brace - select X bracing and apply
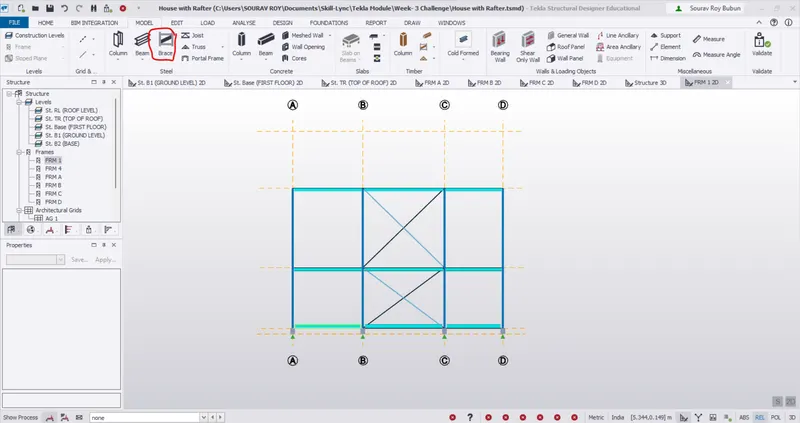
Step-7
Similalry we have to apply bracings on Roof also
Select the X bracing and draw the bracings on Roof also.
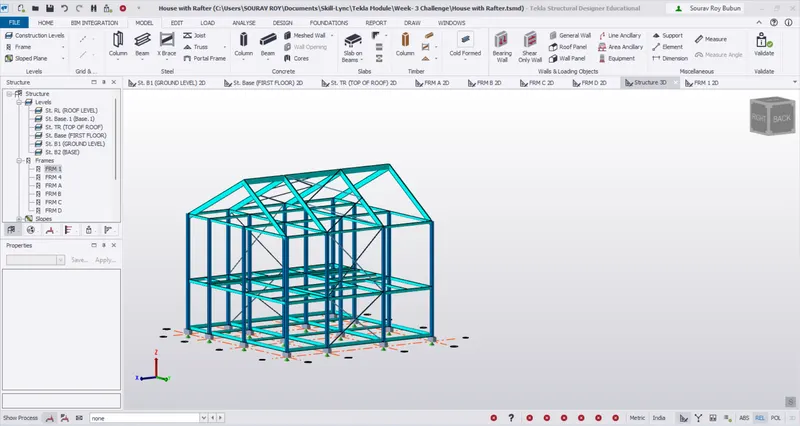
Step-8
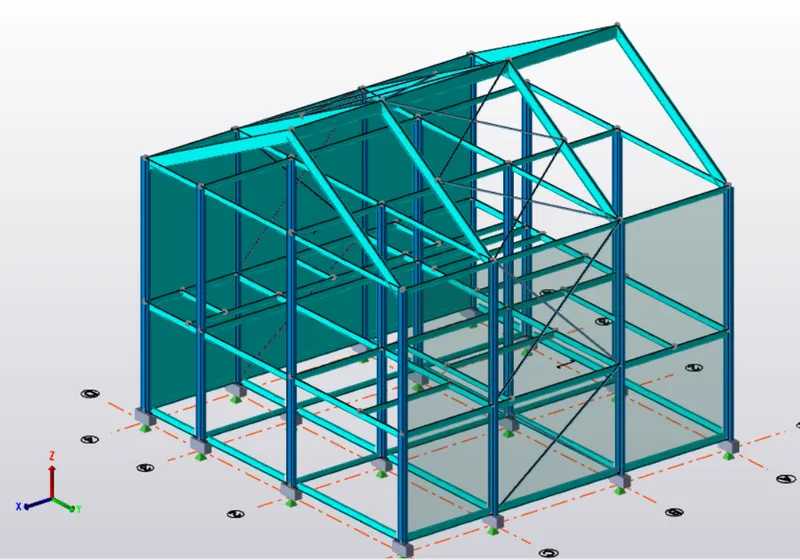
Creation of wall Panel and Roof panel
Wall panels are created to distribute the lateral load uniformly
Go to Model - Wall panel
Select the Frame 3 anf Frame 7 and draw the wall panel
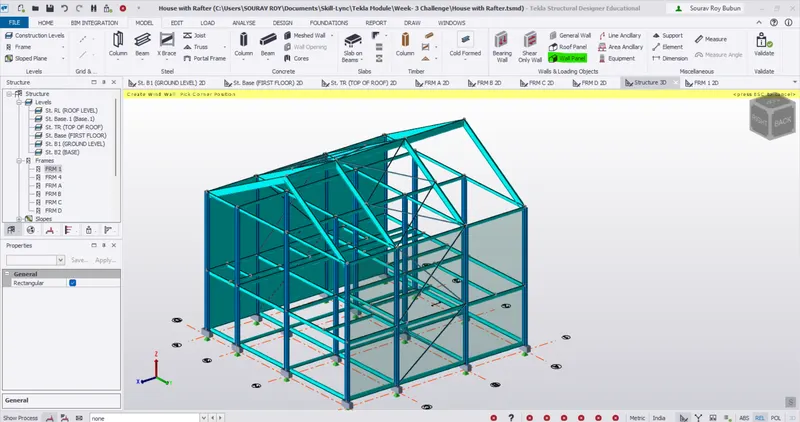
Step-9
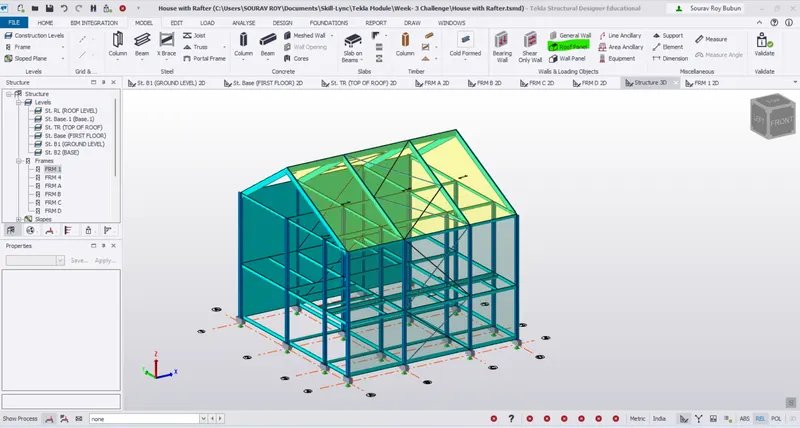
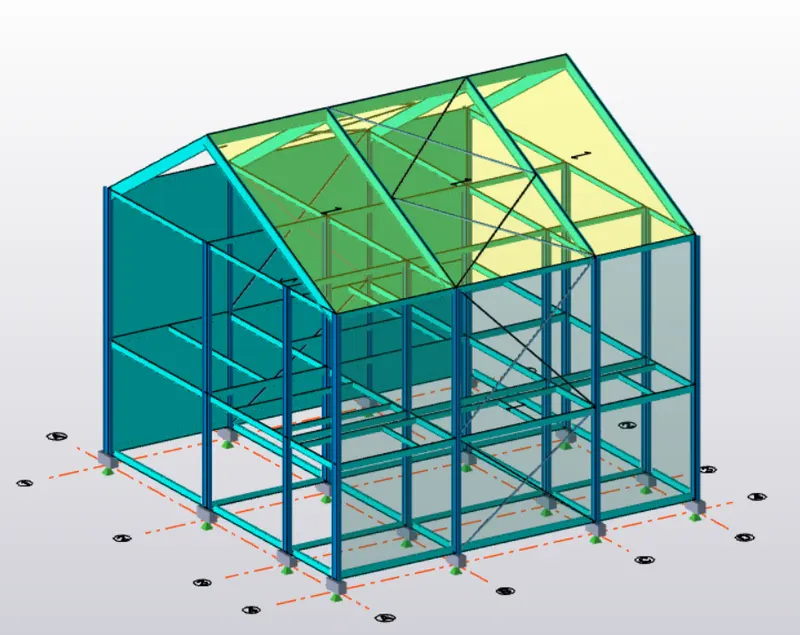
Similarly draw the roof panel also.
Pick up the reference point and draw rooof panel also.
Step-9
Slab Properties -
Slab properties is next to designed
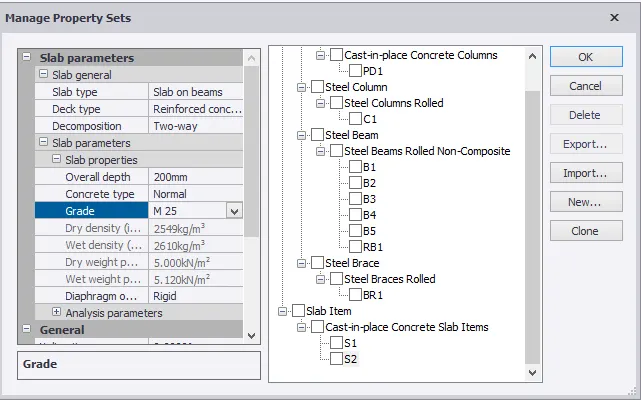
For that click on Manage property sets options and the manage property sets dialogue box appears.
Click on New followed by members and select Slabs followed by general slab item.
Rename it as S1 and S2
S1 = One way slab
S2 = Two way slab
Slab properties:
i) Grade M25
ii) Overall Depth 200mm
iii) Rotation 90 degree
iv) One way and Two-way slab were modelled with the same properties.
And can be distinguished by taking the Lx/Ly ratios
v) Slab property has been assigned to each level .
Result:-
All the qusestions from 1 and 2 are answered with detailed elaboration.
2)
Aim :-
Live load in design report based on IS code and apply live load on the model
Intraduction :-
Loads cases and load combinations are generated, assigned for the structure using tekla and validation of those loads is an important part of Tekla Structural Designer as it ensures a valid model for the analysis and design routines. Imposed Loads are assigned according to IS 875 Part 2
Dead Load calculation
Slab load : model slab in software
Finishes : 50mm x 24 KN/m^3 = 0.05 x 24 = 1.2 KN/m2
Brick wall width = 155mm
Unit weight = 20 KN/m^3
Floor height (Ground floor to First floor) = 5.2m
Brick wall loading for ground floor = 20 x (150/1000) x 5.2 = 15.6KN/m
Floor height (First floor to roof ) = 6.8 m
Brick wall loading for first floor = 20 x (150/1000) x 6.8 = 20.4KN/m
Roofing load based on purlin size :1.5KN/m^2
Ceiling loading 0f 0.3KN per sq m
PROCEDURE :
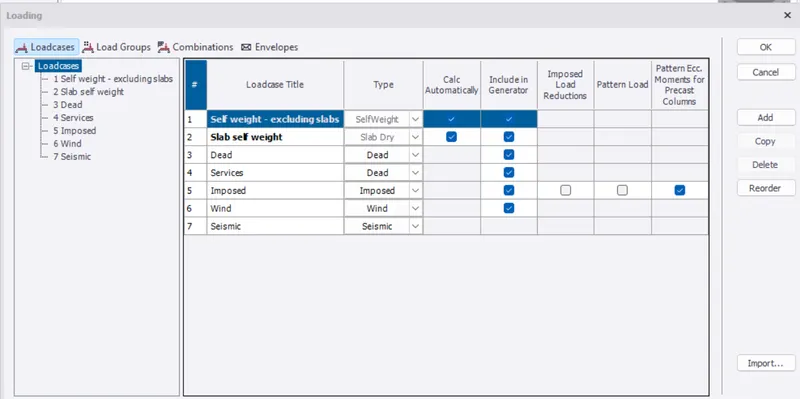
- Generate load cases
- Generate load combinations
- Now click on Load combinations in load tab
- Click on generate, we get initial paramters. Check and click on next
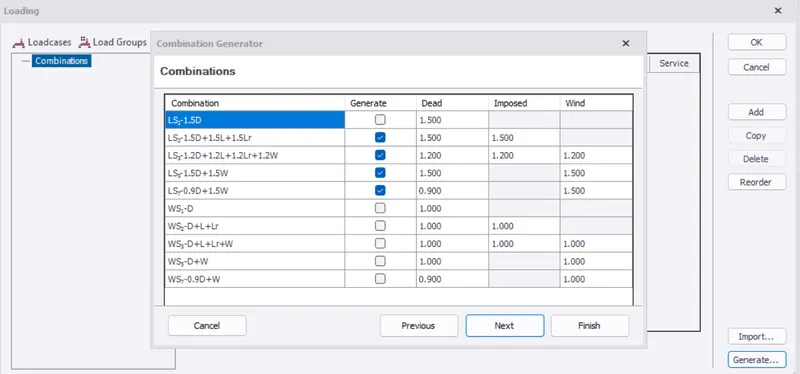
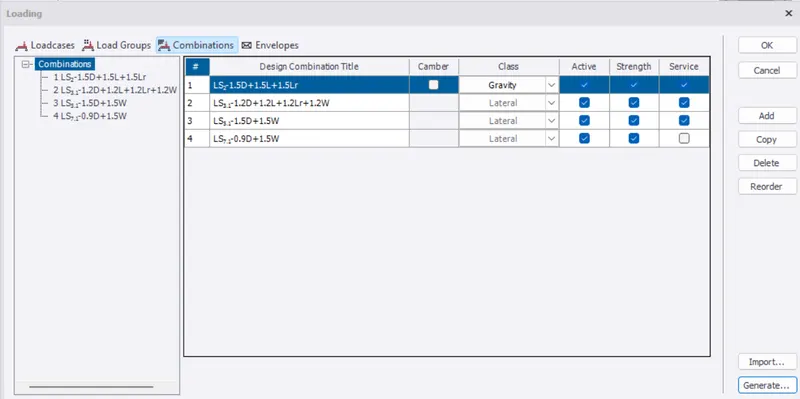
- Select dead load at the bottom
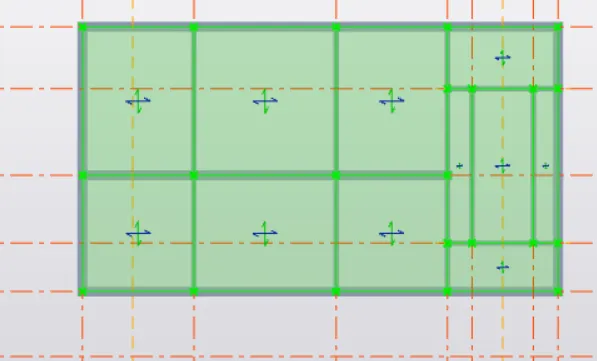
- Now select area load from panel load (Load tab)
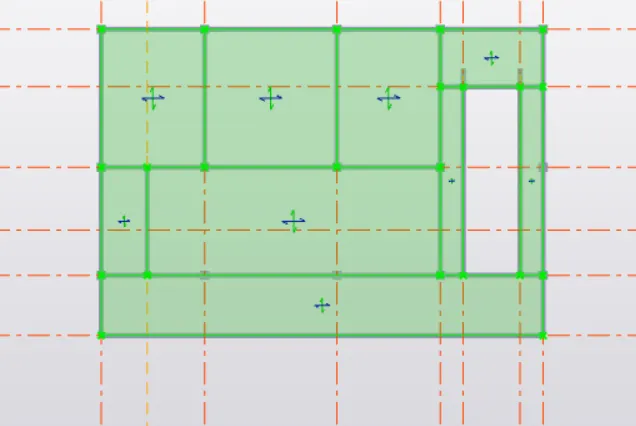
- Select area load = 1.2KN/m2 in ground floor and first floor and apply it
- Ground floor :
- First floor
- Now to apply brick load to Groundfloor, Firstfloor
- Select "Full udl" in load tab and apply brick load = 15.6 for groundfloor and First floor = 20.4KN/m
- Groundfloor
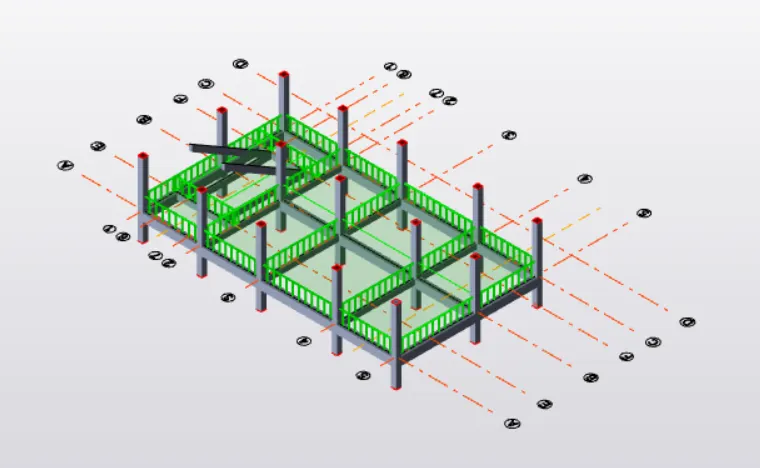
- First floor
Perhaps the first thing for the Structural Engineers to be aware of in their structural design is the assumptions and consideration of the design loads. As Structural Engineers, we should be very careful assigning these loads to the structure we are designing for. Because these loads will dictate how heavy our structure is and the reinforcement and the size or dimension of each of the structural members will vary according to our load assumptions.
In this article, we will tackle how to calculate structural design loads on our structures and what considerations we need to do in order to achieve an economical design. At the end of this article, you will learn at least the basics of load and its load path, what are the considerations in assigning loads in a structure, and the load calculation procedure necessary at the start of Structural Design.
We all know that a given structure carries gravity and resists horizontal or lateral loads. In this article, we will focus on the gravity loads that a structure is carrying. Loads in structures/buildings are composed of the self-weight of the structures or the DEAD LOAD, the Super Imposed Dead Load or SDL, and the LIVE LOADS or movable loads. These loads are the basic loads of a certain structure/building.
These basic loads are carried by the slab which will be distributed in beams and transferred to the columns to be resisted by the footing which is rested on the underlying soil.
Dead Load (DL).
Dead Load is the self-weight of the structure. To calculate dead load, the density or unit weight of the structure should be multiplied by the thickness, which will give us the weight of the structure per given area.
uperimposed Dead Load (SDL).
Superimposed Dead loads include the partition or interior walls, floor screeding, floor finish, ceiling loads, and MEP pipes and fixtures. To calculate, let us assume that a slab is carrying a total of 6 kN/m2.
*Note that the same principle as calculating dead loads can also be adopted in determining the weight of the Superimposed Dead Load making up the construction, with the given density or unit weight of the material. These densities or unit weight of materials can be sourced from the relevant codes and standards, material data sheets, or obtained via laboratory testing.
Live Load (LL).
Live Loads are the movable or moving loads that the structure can carry. It can include the movable equipment, movable partitions, furniture, and the people occupying the Structure. Live load assumptions depend on the usage of the building or the type of occupancy. It has obviously bigger live loads in assembly or gym areas compared to the residential areas.
The Dead Load, Superimposed Dead Load and Live Load that we consider will be carried by the slab. It will then be distributed to the perimeter beam supporting it. To distribute it on the perimeter beams, let’s take a look at this figure.
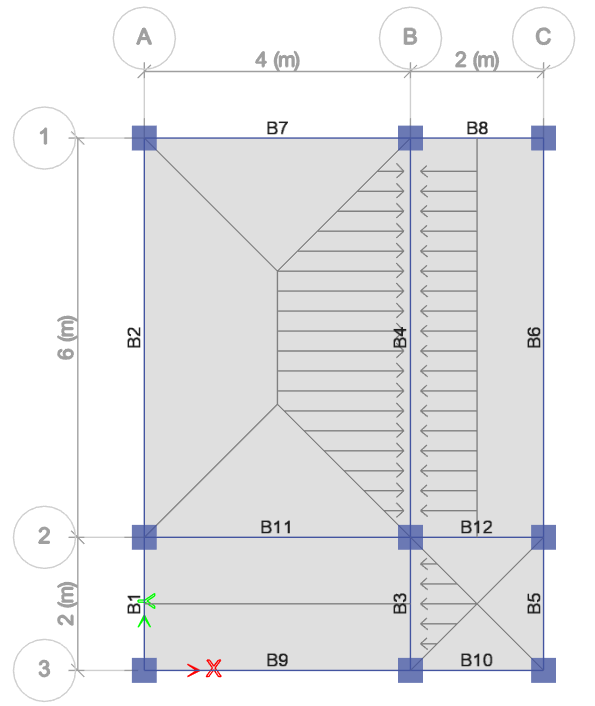
To distribute the load on a two-way slab, simply draw an isosceles triangle in its short direction and a trapezoid in its long direction as shown. A one-way slab simply cuts the slab into two along its length. For the beam to carry the slab
Result :-
Live load in design report based on IS code and apply live load on the model
3)
Aim :-
To a calculation for 5T crane loading based on following inputs
Procedure :-
Calculation of wheel pressure load under super static structure
The four-point supporting structure of the overhead crane is super static, the distribution of the supporting reaction force is not only related to the load, but also related to the structural rigidity of the frame, the foundation rigidity, the manufacturing and installation accuracy of the frame structure, and the elasticity and flatness of the track, etc. However, to calculate the impact of these factors on the supporting reaction force is quite time-consuming, and it is difficult to estimate the unevenness of the track. Therefore, the calculation of wheel pressure load under super-stationary structure generally adopts the approximate solution method, and the error difference between the approximate solution method and the exact solution method has not been studied yet.
Example analysis:
First,known: lifting capacity: Q = 20 tons, span: L = 22.5 m, the number of wheels: 4, the total weight of the crane (including the trolley) total = 32.5 tons.
Trolley weight: G = 7.5 tons, spreader weight: 0.5 tons, the minimum distance from the hook centerline to the end beam centerline L1 = 1.5 meters (large hook limit position)
Second, the calculation process
- Maximum wheel pressure load (full load) Pmax=(32500-7500)/4+(20000+500+7500)*(22.5-1.5)/2*22.5=19317kg
- The minimum wheel pressure load (full load) Pmin=(32500-7500)/4+(20000+500+7500)*1.5/2*22.5?=7183kg
- The maximum wheel pressure load (no load) Pmax=(32500-7500)/4+(500+7500)*(22.5-1.5)/2*22.5?=9983kg
- The minimum wheel pressure load (no load) Pmin=(32500-7500)/4+(500+7500)*1.5/2*22.5?=6517kg
Cranes are the most essential machines you will ever find these days. Cranes help people to ease out their work in industries and mechanical plants where there is a requirement of lifting heavy weight which is otherwise impossible with humans. You can contact any they will make sure to fulfill your requirements based on your needs. There are many technicalities when it comes to EOT cranes and we will be discussing some of them in the article.
The care wheel load that is also referred to as the maximum wheel load is the total load that a single crane wheel can take. The load here is in pounds. Maximum wheel load or MWL is determined by the below formula
Bridge weight / 2 + {Live load (crane capacity + hoist weight) x 15%impact*)/ Number of wheels on a single end truck.
For a 5 ton capacity crane that is top running which has a bridge that weighs 8000 lbs and a hoist that weighs 900 lbs with four wheels total is
8000/2 + (10000+9000 x 1.15)/2=12925 *15% impact for hoist speeds under 30 fpm in CMAA Class C Service
Measurement of crane deflection
Displacement of any member of the crane or its part is considered to be the deflection in case of EOT cranes. Deflection is also the measurement of the displaced structural element under load. The design of the crane and the working of the device is impacted considerably due to the vertical and horizontal displacement.
There are different ways to calculate the vertical and horizontal deflections which changes with organizational specifications and types of cranes available. These are discussed below.
- Vertical deflection criteria
All the parts that stand vertically like mast, columns wall etc are impacted by the vertical deflection. The highest deflection ratio for the lifting device is defined in the Vertical deflection criteria
- Horizontal deflection criteria
Just opposite to vertical deflection criteria, the horizontal deflection impacts all the parts that are placed horizontally.
Wheel Load
As the name suggests, the amount of load carried by the single wheel of the vehicle is called wheel load. When the crane is used to lift and move the weight, each wheel of the crane has to bear some ration of the total weight. Each wheel transmits its part to the load although all the four wheels work together in lifting and moving loads.
In comparison to the single wheel, dual wheel or tandem assembly is designed to carry more amount of load while in single wheels, each wheel can carry only a specific amount of load. The same amount of deflection, maximum stress, contact pressure etc on road or on a track can be generated with the equivalent single wheel of the dual wheel or tandem assembly. In order to find the equal stress of the single wheel load, Boyd and Foster method which is also known as semi-rational method is used.
Design wheel load
Design wheel load is directly responsible for the pavements and their failure. While wheel load is an important factor to determine the depth of road or the track, factors like the amount of traffic, loading, characterization of material, environment structural models etc are few reasons why pavements fan fail. Design load is something that the system cannot take or the desired result cannot be produced by the system during that situation. The reason for such situations is the failure of the engineers to design a system that can handle unexpected loads at times.
Standard Axle Load
Wheel load which is also called axle load is comparatively easier to determine for a single vehicle than the types of wheel loads. The pavement design life is directly related to the wheel load determination. In order to understand the damage done to pavement, it is very important to determine the types of wheel load.
There are various magnitudes like standard and equivalent loads which helps in converting the pavement damage from single or dual wheels load into a single load which is also the most commonly used approach in this case. Only one word related to all the factors related to traffic called equivalent axle single load is used at that time.
Point Load of a crane
Point loads happen when generally high loads are focused on a little bearing zone. So, point load on a crane with Hooks is a load that isn’t focused. In the event that you attempt to get something with the finish of the crane hook, the load isn’t focused and would be “point loaded”. This sort of burden will pressure the crane links. At the point when the load tumbles free point, the crane links respond – and can break strands of the link.
The crane link comprises an internal link and external links – so as a load is put on the link, it extends. In the event that this load unexpectedly moves or falls, the links withdraw rapidly and can break. This is hazardous; as you may not see the inward link has broken (could be a little lump in the link). Utilizing the crane with a wrecked link can make it fall flat and drop the load.
A steady burden is one in which the focal point of gravity of the load is straightforwardly beneath the fundamental hook and underneath the absolute bottom of connection of the slings. The focal point of gravity of an item is where the article will adjust. The whole weight might be considered as gathered now. A suspended article will consistently move so the focal point of gravity is underneath the purpose of help. To make a level or stable lift, the crane or hook block must be legitimately over this point. Consequently a load which is thrown above and through the focal point of gravity will be steady and won’t in general bring down or slide out of the slings.
Result :-
To calculation for 5T crane loading based on following inputs of the center to center wheel and the wheight of crab