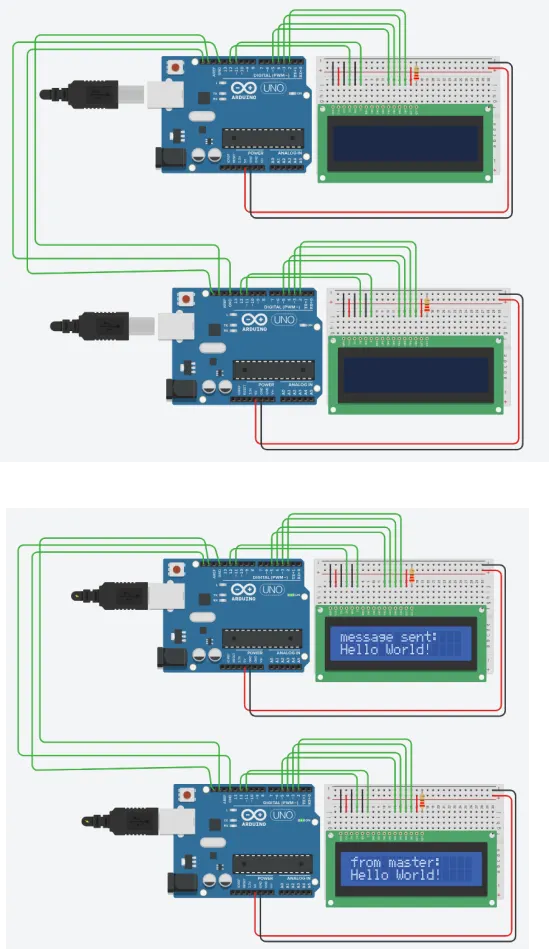
Project 1 - Interfacing a 16*2 LCD with Arduino using I2C protocol
NOTE: PLEASE REFER TO THE BELOW ATTACHED PDF FOR A BETTER READABILITY
AIM:
To implementing the Code for “Interfacing a 16*2 LCD with two Arduino’s (one for Master and one for Slave) using Inter-Integrated Circuit (I2C) communication protocol” by sending the message to LCD using I2C communication protocol and display the message on LCD screen.
Components Required:
- Arduino Uno - 2
- 16*2 LCD display - 2
- wires
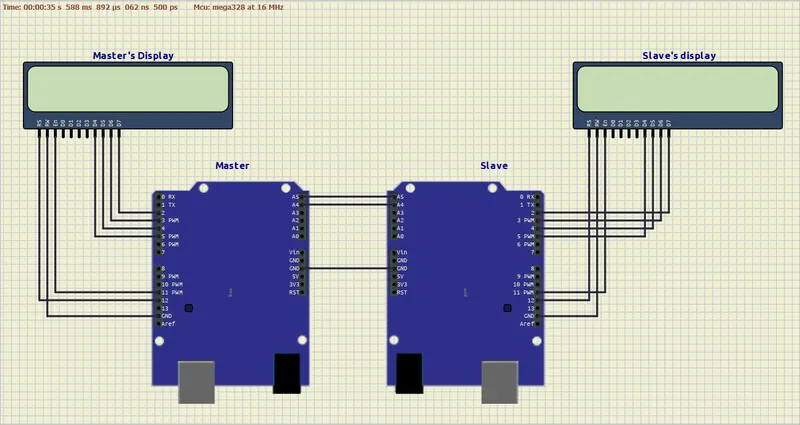
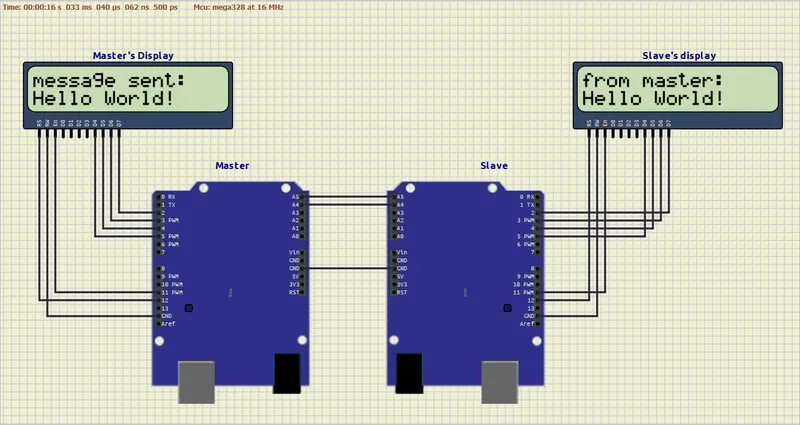
CIRCUIT DIAGRAM:
Using the simulIDE and Arduino IDE and Arduino UNO to Interfacing two arduino uno using I2c protocol with Lcd display
CODE:
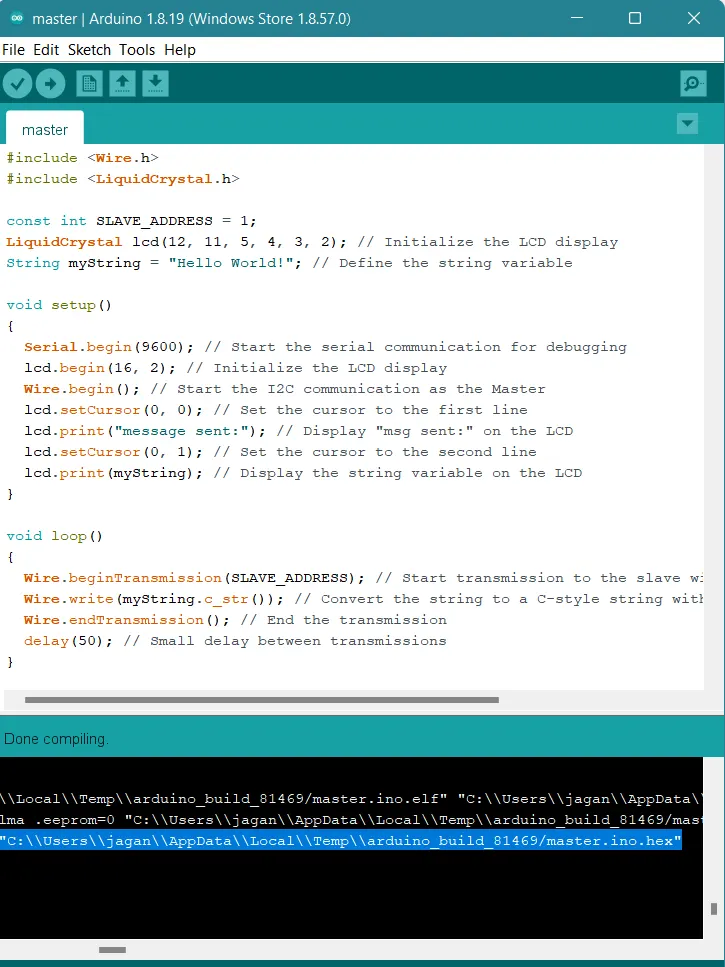
Master Arduino (Sender):
#include
#include
const int SLAVE_ADDRESS = 1;
// Initialize the LCD display
LiquidCrystal lcd(12, 11, 5, 4, 3, 2);
// Define the string variable
String myString = "Hello World!";
void setup()
{
Serial.begin(9600); // Start the serial communication for debugging
lcd.begin(16, 2); // Initialize the LCD display
Wire.begin(); // Start the I2C communication as the Master
lcd.setCursor(0, 0); // Set the cursor to the first line
lcd.print("message sent:"); // Display "msg sent:" on the LCD
lcd.setCursor(0, 1); // Set the cursor to the second line
lcd.print(myString); // Display the string variable on the LCD
}
void loop()
{
Wire.beginTransmission(SLAVE_ADDRESS); // Start transmission to the slave with the specified address
Wire.write(myString.c_str()); // Convert the string to a C-style string with c_str() and send it over I2C
Wire.endTransmission(); // End the transmission
delay(50); // Small delay between transmissions
}
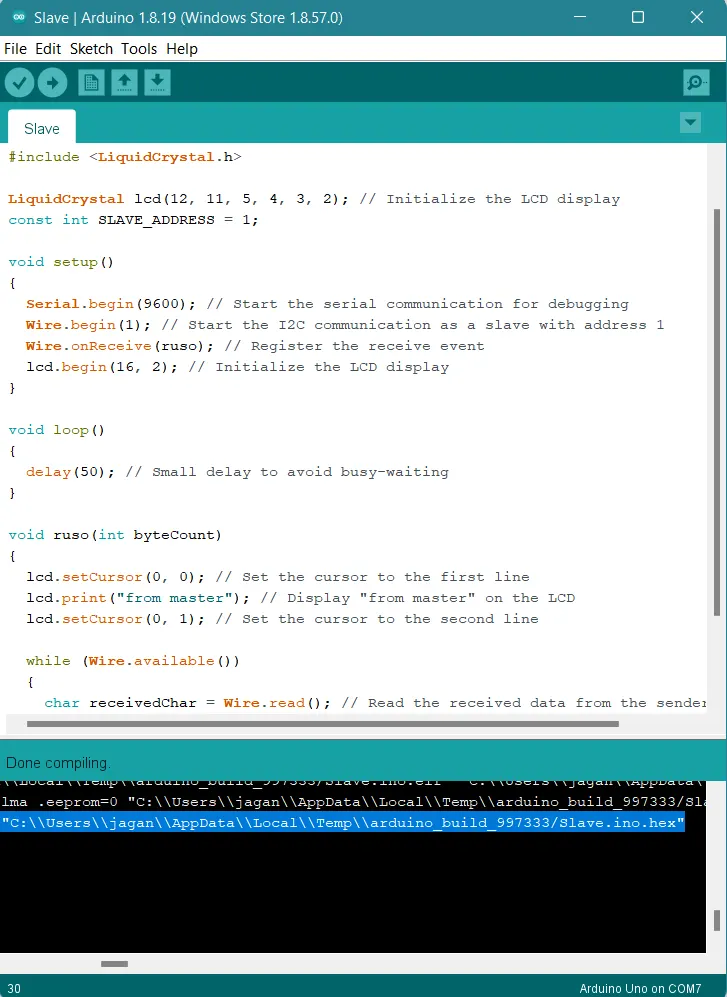
Slave Arduino (Receiver):
#include
#include
LiquidCrystal lcd(12, 11, 5, 4, 3, 2); // Initialize the LCD display
const int SLAVE_ADDRESS = 1;
void setup()
{
Serial.begin(9600); // Start the serial communication for debugging
Wire.begin(1); // Start the I2C communication as a slave with address 1
Wire.onReceive(ruso); // Register the receive event
lcd.begin(16, 2); // Initialize the LCD display
}
void loop()
{
delay(50); // Small delay to avoid busy-waiting
}
void ruso(int byteCount)
{
lcd.setCursor(0, 0); // Set the cursor to the first line
lcd.print("from master"); // Display "from master" on the LCD
lcd.setCursor(0, 1); // Set the cursor to the second line
while (Wire.available())
{
char receivedChar = Wire.read(); // Read the received data from the sender Arduino
lcd.print(receivedChar); // Display the received data on the LCD display
Serial.print(receivedChar); // Print the received data to serial for debugging
}
}
NOTE: First the code is written in the arduino IDE and the hex. file is loaded into the Simul IDE after the compilation of the code in the arduino IDE
EXECUTION:
The communication between two Arduino boards using the I2C protocol and displays a message sent by the master Arduino on an LCD connected to the slave Arduino.
Master Arduino:
- The master Arduino initializes the LCD display using the LiquidCrystal library and defines a string variable myString with the value "Hello World!".
- In the setup() function, it starts the serial communication for debugging, initializes the LCD display, and begins the I2C communication as the master.
- The LCD display is used to show the message "message sent:" on the first line and the value of myString on the second line.
- In the loop() function, the master Arduino starts a transmission to the slave Arduino with the specified address (SLAVE_ADDRESS).
- It writes the content of myString to the I2C bus after converting it to a C-style string using the c_str() function.
- The transmission is ended, and a small delay is added between transmissions.
Slave Arduino:
- The slave Arduino initializes the LCD display using the LiquidCrystal library.
- In the setup() function, it starts the serial communication for debugging, initializes the LCD display, begins the I2C communication as a slave with address 1, and registers the ruso function to handle the receive event.
- In the loop() function, a small delay is added to avoid busy-waiting.
- The ruso function is called when the slave Arduino receives data from the master Arduino.
- Inside the ruso function, the LCD display is updated to show "from master" on the first line.
- The received data is read from the I2C bus using the Wire.read() function and displayed on the LCD display.
- The received data is also printed to the serial monitor for debugging purposes.
Overall, the master Arduino sends the string variable myString to the slave Arduino using I2C communication. The slave Arduino receives the string and displays it on the LCD display, along with the message "from master".
OUTPUT CONSOLE:
Master Arduino Output: The master Arduino will send the string variable myString to the slave Arduino repeatedly in an infinite loop. The LCD display connected to the master Arduino will show the following:
First line: "message sent:" (indicating that a message is being sent)
Second line: The value of the string variable myString ("Hello World!").
Slave Arduino Output: The slave Arduino will continuously listen for data sent by the master Arduino. When data is received, it will display the following on the connected LCD display:
First line: "from master" (indicating that the message is from the master Arduino)
Second line: The received character(s) from the master Arduino (the string variable myString characters sent one by one).
For example, if the master Arduino is successfully sending the string "Hello World!" to the slave Arduino, the slave Arduino's LCD display will show:
First line: "from master"
Second line: "Hello World!" (the received characters from the master Arduino).
Additionally, the received characters will be printed to the serial monitor for debugging purposes on both the master and slave Arduino, assuming it is connected and initialized correctly.
I2C protocol:
The I2C (Inter-Integrated Circuit) protocol is a communication protocol that enables multiple devices to communicate with each other using a two-wire interface. It uses a master-slave architecture, where a master device initiates and controls the communication, and one or more slave devices respond to the master's requests. Communication occurs over two lines: SDA (Serial Data Line) for data transfer and SCL (Serial Clock Line) for synchronization.
Each slave device has a unique address, allowing the master to communicate with specific devices. Data is transferred in packets of 8 bits, and clock synchronization ensures reliable transmission. The protocol supports multi-master communication, enabling multiple master devices to share the same bus. Overall, the I2C protocol provides a simple and efficient means of interconnecting devices in embedded systems.
Key features of the I2C protocol include:
- Master-Slave Architecture: The communication in I2C is based on a master-slave relationship. The master device initiates and controls the communication, while one or more slave devices respond to the master's requests.
- Two-Wire Interface: I2C uses two lines for communication: SDA (Serial Data Line) and SCL (Serial Clock Line). SDA is bidirectional and carries data, while SCL is used to synchronize the data transfer.
- Addressing: Each slave device on the I2C bus has a unique address, allowing the master to communicate with specific slave devices. This enables the connection of multiple devices to the same bus.
- Data Transfer: Data is transferred in packets of 8 bits (bytes) between the master and the slave devices. Each byte is acknowledged by the receiver, ensuring reliable data transmission.
- Start and Stop Conditions: Communication in I2C starts with a start condition (SDA transitioning from high to low while SCL is high) and ends with a stop condition (SDA transitioning from low to high while SCL is high).
And also I have implemented same in ‘tinkercad’ you can access the below link for reference
Link to access the project: https://www.tinkercad.com/things/jrxbkNE2VZz