Project 2 - Measuring the distance of an object using ultrasonic sensor and also smoothen the sensor data using moving average filter
Project 2 - Measuring the distance of an object using ultrasonic sensor and also smoothen the sensor data using moving average filter
Overview of the Project:
In this project the implementation of code for “Measuring distance of an object using ultrasonic distance sensor (28015 Ping) and also smoothen the sensor data using moving average filter”.
Goals:
Measuring the distance in terms of inches of an object using Ultrasonic Distance Sensor (28015 Ping).
The sensor data is smoothened by using Moving average filter technique to eliminate the high frequency variations from the sensor data.
Key Highlights of the Project:
Measuring the distance travelled by the wave to the object and gets bounced back from the object to sensor.
Smoothening the sensor data by moving average filter technique, the filter has a window of certain size. That window determines that how many data the filter can take.
Deliverables of this project:
The distance travelled by a wave to the object for which we want to measure the distance using Ultrasonic Distance Sensor (28015 Ping).
Eliminate the high frequency jitters from the sensor data by Moving Average filter to smoothen the sensor data.
Expected Outcomes:
The students will get the Knowledge on Ultrasonic sensor (28015 Ping) to measure the distance travelled by wave to the object, the hardware connection of 2 Arduino’s connected to the sensor and smoothening the sensor data by removing high frequency variations using Moving Average Filter Technique.
Title:Measuring Distance of an Object using Ultrasonic Distance Sensor with Moving Average Filter
Aim:
The aim of this project is to measure the distance of an object using an ultrasonic distance sensor (28015 Ping) and apply a moving average filter to smoothen the sensor data. The project utilizes an Arduino board to process the sensor readings and display the distance on an LCD screen.
Components Used:
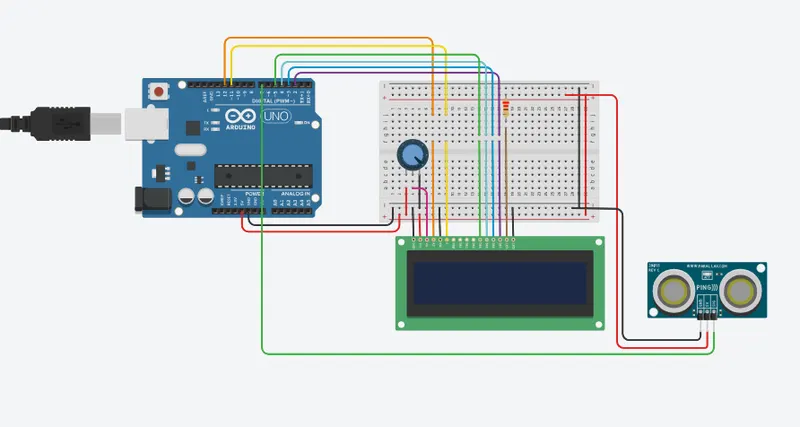
- Arduino board- 1
- Ultrasonic distance sensor (28015 Ping)- 1
- LCD display- 1
- wires
- Breadboard- 1
Circuit Diagram:
Code:
#include
const int numReadings = 10; // Number of readings to average
int readings[numReadings]; // Array to store sensor readings
int index = 0; // Index for the current reading
int total = 0; // Total sum of readings
int inches = 0; // Distance in inches
int cm = 0; // Distance in centimeters
LiquidCrystal lcd(12, 11, 5, 4, 3, 2); // LCD display object
void setup()
{
lcd.begin(16, 2); // Initialize LCD display with 16 columns and 2 rows
lcd.print("New String !!!"); // Display a string on the LCD
Serial.begin(9600); // Initialize serial communication at 9600 baud rate
pinMode(7, INPUT); // Set pin 7 as input
}
void loop()
{
lcd.clear(); // Clear the LCD display
cm = 0.01723 * readUltrasonicDistance(7); // Read distance from the ultrasonic sensor in CM
// Update the array with the latest reading
total = total - readings[index]; // Subtract the oldest reading from the total sum
readings[index] = cm; // Store the new reading in the array
total = total + readings[index]; // Add the new reading to the total sum
index = (index + 1) % numReadings; // Move to the next index
// Calculate the average distance
cm = total / numReadings; // Calculate the average in centimeters
inches = cm / 2.54; // Convert centimeters to inches
Serial.print("cm: "); // Print label to the serial monitor
Serial.print(cm); // Print the distance in centimeters
lcd.setCursor(0, 0); // Set the LCD cursor to the first column of the first row
lcd.print("cm: "); // Display label on the LCD
lcd.setCursor(4, 0); // Set the LCD cursor to the fifth column of the first row
lcd.print(cm); // Display the distance in centimeters on the LCD
Serial.print("inch: "); // Print label to the serial monitor
Serial.println(inches); // Print the distance in inches
lcd.setCursor(0, 1); // Set the LCD cursor to the first column of the second row
lcd.print("inch: "); // Display label on the LCD
lcd.setCursor(6, 1); // Set the LCD cursor to the seventh column of the second row
lcd.print(inches); // Display the distance in inches on the LCD
delay(250); // Delay
}
long readUltrasonicDistance(int pin)
{
pinMode(pin, OUTPUT); // Set the pin as output
digitalWrite(pin, LOW); // Set the pin to low
delayMicroseconds(2); // Delay for 2 microseconds
digitalWrite(pin, HIGH); // Set the pin to high
delayMicroseconds(10); // Delay for 10 microseconds
digitalWrite(pin, LOW); // Set the pin to low
pinMode(pin, INPUT); // Set the pin as input
return pulseIn(pin, HIGH); // Measure the pulse duration and return the result
}
Code Explanation:
- The code begins by including the `LiquidCrystal` library, which allows communication with the LCD display.
- Constants and variables are declared:
- `numReadings` is the number of readings to average.
- `readings` is an array used to store the sensor readings.
- `index` keeps track of the current reading in the `readings` array.
- `total` stores the sum of all readings.
- `inches` and `cm` store the distance in inches and centimeters, respectively.
- An instance of the `LiquidCrystal` class is created, defining the pins used to connect the LCD display.
- In the `setup()` function:
- The LCD display is initialized with the specified number of columns and rows.
- "New String !!!" is printed on the LCD display.
- Serial communication is initialized at a baud rate of 9600.
- Pin 7 is set as an input pin.
- The `loop()` function is where the main code execution takes place in an infinite loop.
- The LCD display is cleared at the beginning of each iteration.
- The `cm` variable is assigned the distance measured by the ultrasonic sensor, which is obtained from the `readUltrasonicDistance()` function. The distance is calculated in centimeters.
- The array `readings` is updated with the latest reading:
- The oldest reading is subtracted from the `total` sum.
- The new reading is stored in the `readings` array.
- The new reading is added to the `total` sum.
- The `index` is updated to move to the next reading in the array, or wrap around to 0 if the end is reached.
- The average distance is calculated:
- The `total` sum is divided by the `numReadings`.
- The distance in centimeters is printed to the serial monitor.
- The distance in centimeters is displayed on the LCD screen:
- The LCD cursor is positioned at the first column of the first row.
- "cm: " is displayed.
- The LCD cursor is positioned at the fifth column of the first row.
- The distance in centimeters is displayed.
- The distance in inches is printed to the serial monitor.
- The distance in inches is displayed on the LCD screen:
- The LCD cursor is positioned at the first column of the second row.
- "inch: " is displayed.
- The LCD cursor is positioned at the seventh column of the second row.
- The distance in inches is displayed.
- The program delays for 1 second before the next iteration of the loop.
- The `readUltrasonicDistance()` function is defined:
- The `pinMode()` function sets the specified pin as an output.
- The pin is set to low to ensure a clean pulse.
- A 2-microsecond delay is added.
- The pin is set to high to trigger the ultrasonic sensor.
- A 10-microsecond delay is added.
- The pin is set to low again.
- The pin mode is changed to input to receive the echo signal.
- The `pulseIn()` function measures the pulse duration and returns the result.
Result:
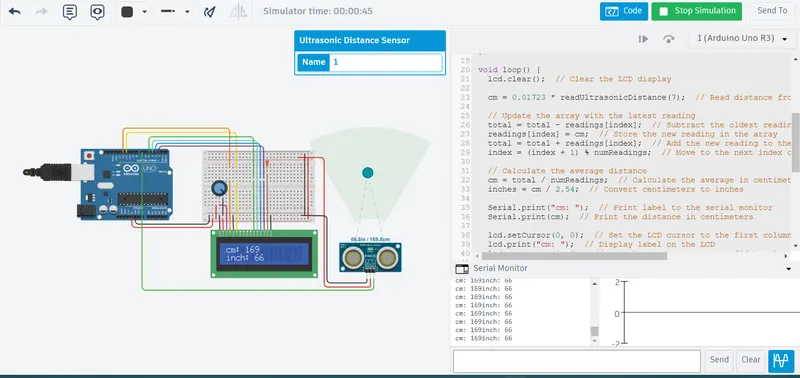
The project successfully measures the distance of an object using the ultrasonic distance sensor. The moving average filter is applied to smoothen the sensor data, resulting in more stable distance readings. The distances in centimeters and inches are displayed on the LCD screen and printed to the serial monitor.
Conclusion:
In conclusion, the project demonstrates the implementation of an ultrasonic distance sensor with a moving average filter to accurately measure the distance of an object. The moving average filter helps to minimize sensor noise and provides more reliable distance readings. The use of an Arduino board and LCD display enhances the user interface and allows for convenient distance monitoring. The project can be further expanded and improved for various applications such as robotics, home automation, and security systems.
I have attached the same Tinkercad link you can access the below link for easy simulation and verification
Link to access the project:https://www.tinkercad.com/things/gFBDIiVEPHN