Hood design-Week 2
HOOD DESIGN
Hood – Hood is the hinged cover that rests over the engine of a vehicle. (Or we can say it is the cover of the engine compartment)
PURPOSE – It’s purpose to provide access to the engine for repair and maintenance.
Material Used for Hood- Steel, Aluminum, Carbon Fiber, Fiber Glass, and Dry Carbon
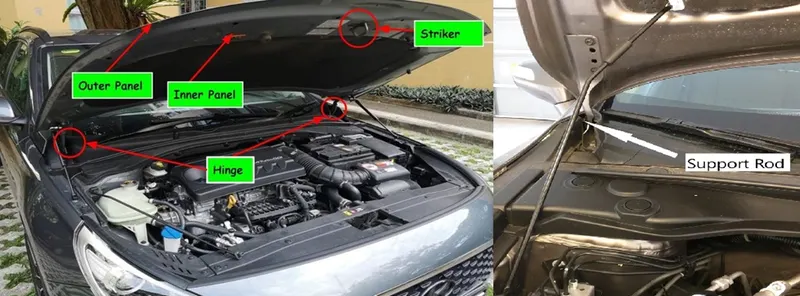
Components of Hood
1 – Hood Outer Panel 2 – Hood Inner Panel
3 – Hinges 4 – Latch Striker
5 - Gas Stay / Support Rod
Hood Outer Panel – Outer panel is the outside cover of the hood; it is use for making the car looks good.
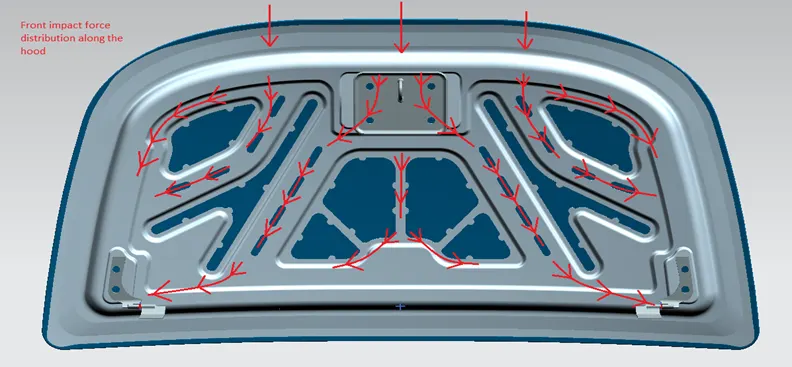
Hood Inner Panel – Inner Panel supports the outer panel it increases the strength of the hood; and also dissipate the energy towards the reinforcement (Towards the Hinges).
Hinges – Hinges are the connecting part which is use to connect the hood to the body of the automobile. It enables the opening and closing operation of hood, and it is Strong enough to handle the weight and force acting during collision.
Latch Striker – It is basically use for manual or automatic locking the hood with car body (engine compartment).
Gas Stay – Gas struts is also referred to as a gas spring that operates due to the exerted by the compressed gas stored inside the cylinder. Gas struts are used to lift the hood easily, and hold it in place.
Support Rod – Support rod is basically long cylindrical rod. It safely keeps an engine hood in an open state even if external forces are abruptly generated due to vibration & wind.
Manufacturing Process Used for Hood Design –
1 – Blanking and Punching 2 – deep Drawing
3 – Hemming 4 – Gluing (Mastic and Hemming Glue)
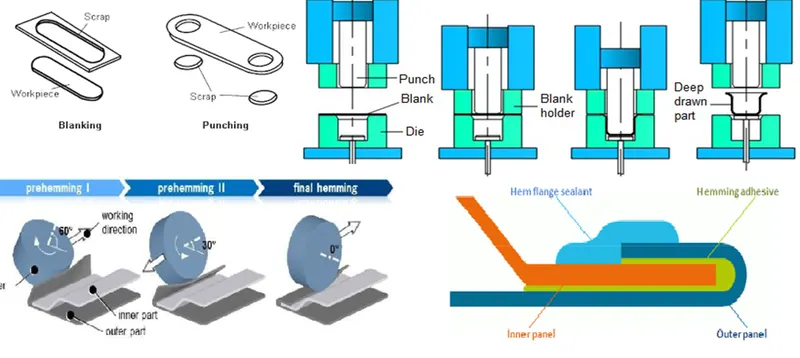
Blanking – Cutting of the Sheet metal along a closed Outline in a single step to separate the piece from the surrounding stock.
Deep Drawing – It is the sheet metal forming process in which a sheet metal blank is radially drawn into a forming die by the mechanical action of a punch. The process is considered deep drawing when exceeds its diameter.
Advantage –
- Manufacture the products more quickly and higher quality.
- More effective and efficient.
Hemming – Hemming is a sheet metal forming process in which sheets are joined by bending over another part in order to achieve a tight fit.
- Connects two sheet metal part together.
- Improve the appearance of a part and reinforce part edges.
Gluing – todays we use gluing for sheet metal joining. Best example hoods inner panel and outer panel joining by Hemming glue, in hemming we use hemming glue for stability and for strong bonding between inner panel and outer panel. hemming glue also provide a sealant between outer and inner panel.
Mastic – It is also use between inner panel and outer panel, it provides strength to the hood, one mastic cover 80mm area so we arrange the mastic in order to cover most of the area, where strength is necessity, it also prevents from noise and vibration between the inner and outer panel.
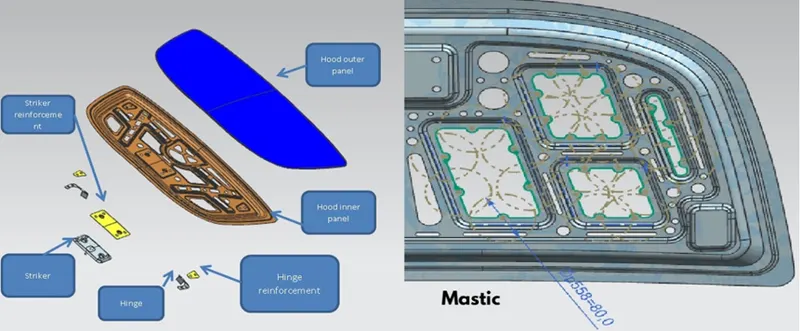
Reinforcement -
Reinforcements are used to provide more strength to the assembly.
- Latch & striker
- Hinge
Design Of Hood By NX-CAD
Design Hood Outer Panel, Inner Panel and the necessary reinforcements by following the Master Section mentioned with the Design parameters.
Data to be used-
Hood Skin Data-
Hood Thickness Information
- Outer Panel Thickness = 0.75mm
- Inner Panel Thickness = 0.75mm
- Reinforcement Thickness = 1.5mm
Master section – it is pre-defined shape or sketch which will be adoptable for different situation.
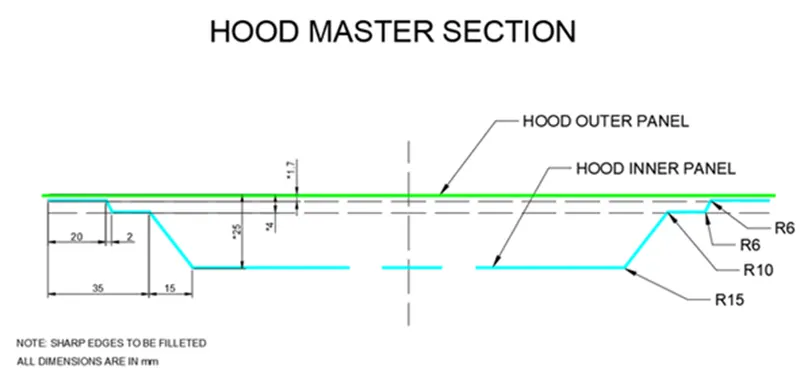
Hemming Data
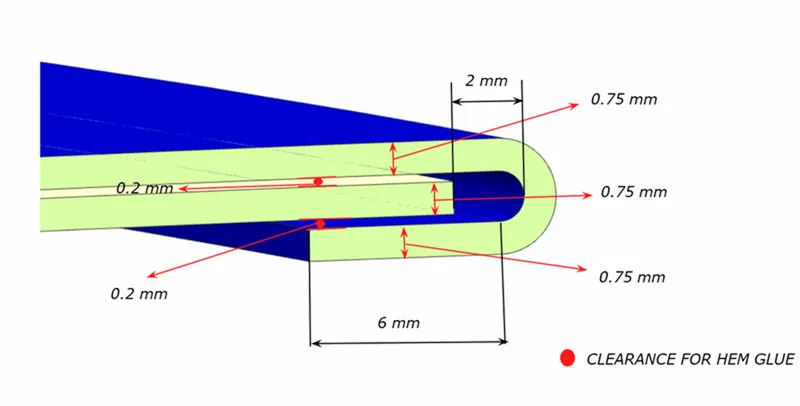
Relief rear section Front relief
 Design
Inner Panel -
The inner panel supports the outer panel. it consists of embosses & holes. Embosses provide stiffness as well as it dissipates energy towards reinforcement.
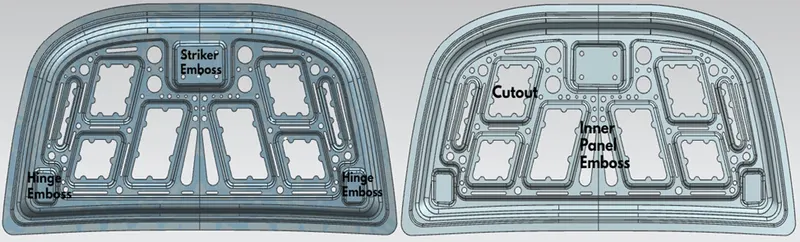
Emboss -
Embosses are the projections made on sheet metal using deep drawing techniques. the operation is carried out the mostly for the purpose of stiffening flat surface and design in the inner panel. the major function of embossing is to dissipate the force acting on the hood during the collision of the car toward the hinges as early as possible. this helps to reduce the impact of the force on the passenger sitting inside.
Force Distribution in Hood –
Outer Panel –
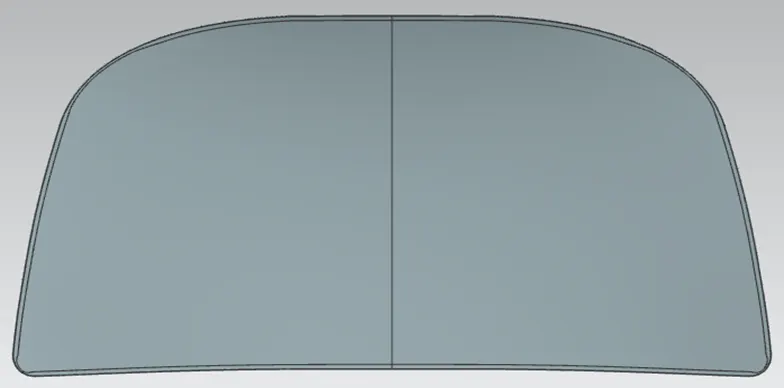
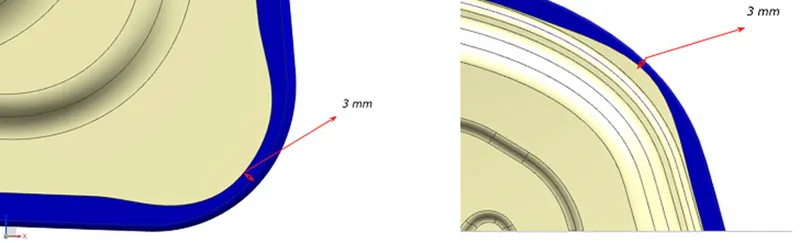
Corner Relief -
There are many types of Hemming process but in Hoods Roller hemming is used. In this process the roller will be rolling over the edges of the Outer panel to close it with the inner panel. These rollers will be rolling over 2-3 time for perfect closing. so, the certain force is being used by rollers to all the corners but there are some areas where the roller cannot tighten the part properly so that’s why we give some relief to the corners.
Relief rear section Front relief
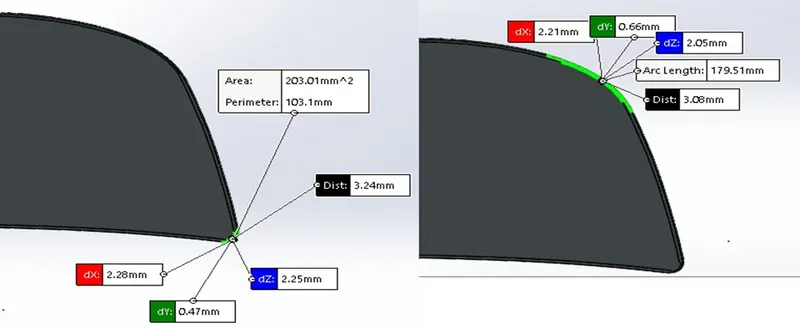 Hemming
- The outer panel & Inner panel join by Hemming process.
- It is the process of bending/folding the flange of the outer panel over the inner one.
- The flange of the outer panel is bent over the inner panel in progressive steps by means of the roller hemming head.
HOOD DESIGN REQUIREMENTS
- Functional requirement
- Important Regulation
Hood dissipates the energy outside the car body rather than inside the car body.
REASON BEHIND THE DEVELOPMENT THE HOOD
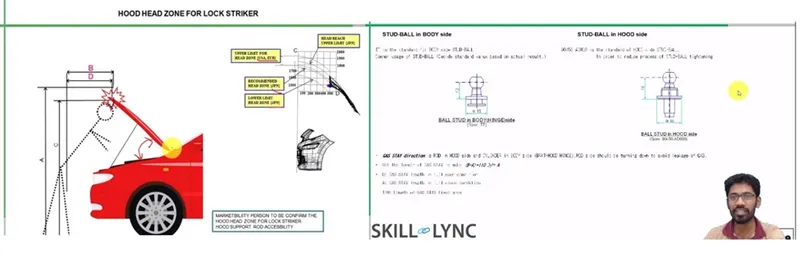
- First criteria for hood design are operating angle. Its very reason to reason according to the average height of the human at that reason.
- Hood operating angle control by gas stay and support rod.
- 2nd criteria for hood design are How I am going to keep the hood at open condition.
- by support rad B- Gas stay
- How I am going to position it (gas stay, support rod), Having it mounted over the hood or mounted over the engine compartment.
Basic consideration for gas stays and support rod
- where my opening angle and closing angle
- where I going to mount and dismount (support rod)
- What is the feasible length of support rod and gas stay
- Having small bend, the support rod for increase strength and rigidity of the rod. (Maximum curvature not more than 35mm more than 35 mm more chance to bend the rod.)
- Support rod is basically mounted opposite to the battery mounting.
- gromet are used for support rod to the rest condition it is rubber or plastic component.
Design requirement for gas stay
We Use Ball Stud For gas stay at both the corner at Hood and engine compartment. And we use additional bracket or reinforcement for gas stay use for strengthen the area locally, because gas stay weight is higher around 500gm to 800gm. When hood is Havier then we use gas stay for easy opening the hood, basically use in high performance vehicle.
What is reinforcement?
Whenever we add weight to the material we lose strength locally, so we can add additional material that area which is name it reinforcement. Like (Hing reinforcement, latch striker reinforcement at inner panel)
Stiffener pad - it is kind of sponge which does not have pre-defined shape, it is use between inner panel and outer panel, it is use for increase the strength locally, and at the motion of vehicle also avoids the noise and vibration it is good for vehicle NVH (NOISE VIBRATION AND HARDNESS).
Mastic – also use for NVH and reinforcement, it is a plastic/rubber part between inner panel and outer panel, and it is also joined outer and inner panel. It is placed in such a manner by which most of the hood reason cover.
Hamming reason – we done hamming 25 mm offset because pedestrian safety, we use hamming at 45* because when we prepare the inner panel, we basically use Deep Drawing operation we stamp the part so we use 45* and open the part a lot .so tool come out easily.
Emboss are doing for strengthen the part more, we create the emboss in such a way that the forces direction changes and goes towards the hinges.
No specific criteria for emboss only logic is the create the emboss along the “Y” and “V” direction, so that the forces dissipate equally.
Latch and striker mechanism –
Latch Trajectory –
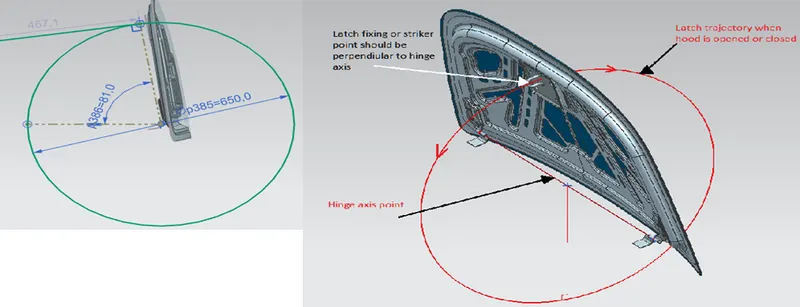
How will understand the latch striker position is right or wrong?
- Hood assembly is going to be a same axis.
- At the hinge axis we get center hinge axis point.
- At the midpoint of the striker to the center hinge axis is radios for the trajectory and draw a circle.
- The circle is the trajectory of the Hood opening and closing.
- And the striker is exactly perpendicular to the Circle (trajectory).
Why the striker is perpendicular to the trajectory?
Because at the engine compartment latch is mounted with respect to trajectory, if it is not perpendicular then not proper closing and opening.
At the time of Hemming at the corner we allow to give a relief due to –
- The force using for hemming operation is really sufficient to doing hemming operation.
- If the part brings back to its original condition, then the applied force is right.
- At the corner we get red zone we provide relief there, so we avoid that situation, and we don’t complete rolling there.
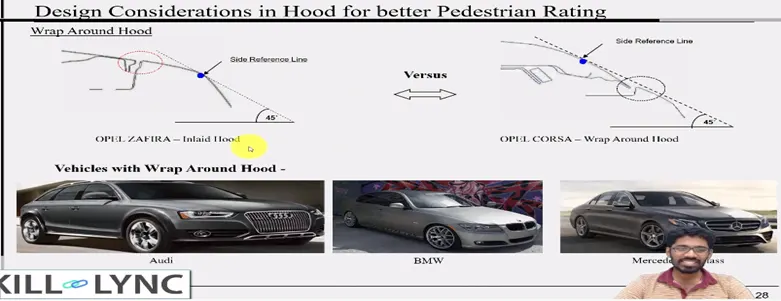
Type of Hood –
- inlaid hood – the end point of the car is laying on the fender.
- Wrap around hood – if the end point of the car use on the hood
Design Consideration –
- NVH (Noise, Vibration, Hardness)
- Gas stay mounting
- Latch striker Mounting
- Hing Mounting
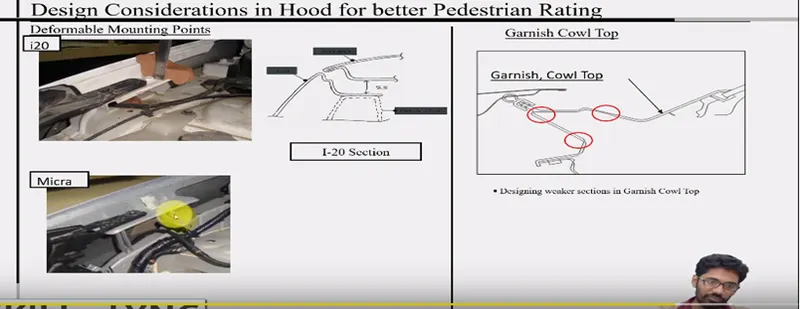
- Deformable brackets
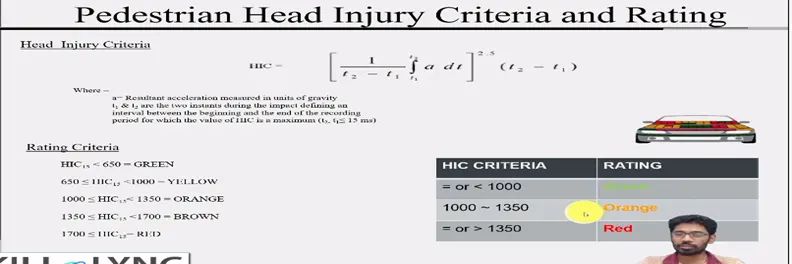
- Pedestrian safety consideration
- EURO N cap rating
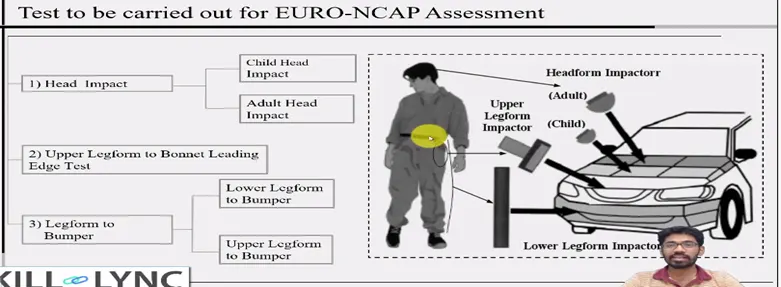
Head impact criteria –
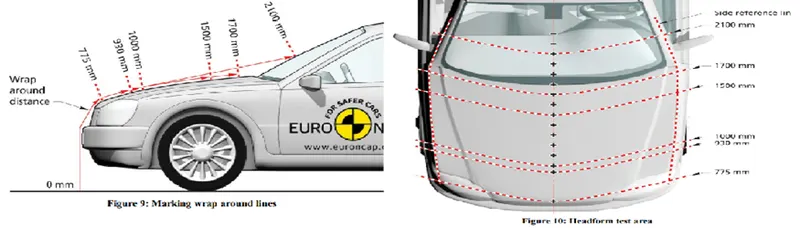 In the below images we can see the wrap-around distance for adults and children.
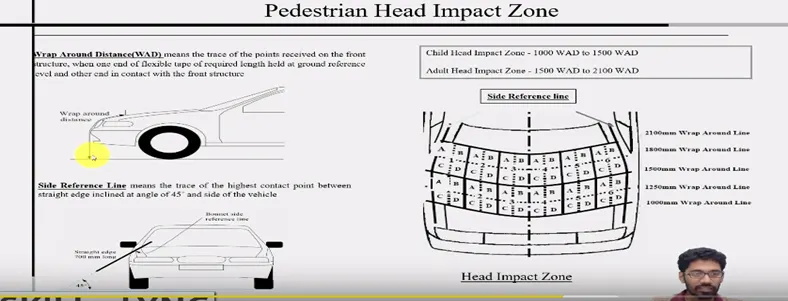
Wrap around distance: It is the distance from the road to the point where the head of the pedestrian collides with the hood.
Draft analysis
Draft analysis is done to see the manufacturability of a part, here draft analysis has been done on inner panel, green color indicates that all parts are clearing when core is removed from cavity.
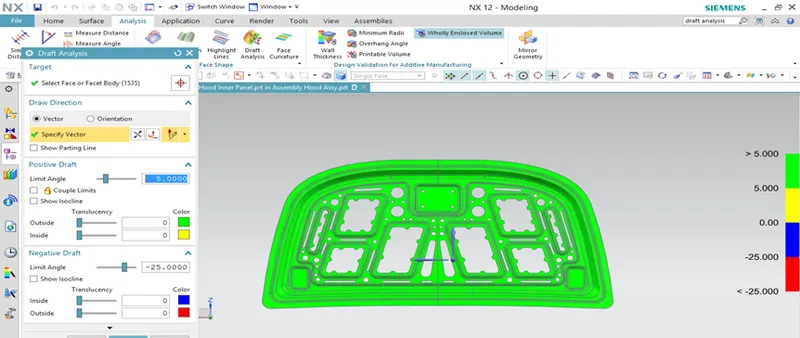
The part has fully constrained like.
- It does not have any negative draft.
- How does the part behave.
- What is going to the constrain whether it is maintain the same radios.
- You don’t have any undercut in part, you have maintained 3 plus thickness radius.
- you have minimum hold requirement Gap.
Command Use in NX CAD For Hood Design
- Offset surface- The offset surface gadget copies the picked surface at a provided distance and guidance.
- Emboss-The embossing contraption makes a punched surface of the picked shut contour. The punch is produced using a chosen surface containing the contour surface. Sketch. a draft can be obliged the punch from either the end cap or the base surface.
- Trim sheet-The trim sheet gadget parts the target surface along the intersection curve of the target surface and the gadget surface. The piece of the cover on either side of the intersection can be either discarded or retained according to need.
- Through curves-This contraption creates a surface between two various surface sections where the shape can change in section.
- Law Extensions-Creates an extended surface subject to an open-chain contour or a shut contour on the picked target surface. A draft can be obliged by the extension.
- Face blend-Creates a curved blend or fillet along two picked surfaces in gave direction vector. The blend curve can be changed regarding reach, width, and continuity.
- Edge bland-Creates a curved blend or fillet along the edge in gave direction vector. The blend curve can be changed regarding reach, width, and continuity.
- Extend sheet-Creates an extension of the picked sheet up to a given distance.
- Offset in the face- Creates an offset in the front or edge on the target face up to a provided distance.
- Bridge curve-Create a roundabout portion between two intersecting and non-intersecting curves. The beginning and endpoint of the roundabout changed by providing distance.
- Projected curve-Creates a projection of a curved profile onto a goal surface. The surface can be linear and curved. The direction can be changed by a reasonable vector.
- Sew-combines sheet bodies by sewing common edges together or combines solid bodies using sewing faces. Any opening between the surfaces can be closed.
- Mirror Geometry- Mirror a geometry along a face.
- The curve on the surface- Creates a surface spline feature directly on the face.
- Thicken-creates a strong body using thicken.
- Extracted body- Creates a body of picked geometry that can be changed by editing the parent feature and rebuilding the extracted feature.
- Pratik ShindeHi Neeraj, Can i get your number? actually need your help to complete this challange.