Modified on
The Basics of Mold Design 4 (Part 1): A Look at Parting Surface and Its Types

Skill-Lync
To be able to remove a part out of its mold safely and without damage, you need a parting surface. In this session of the basics of mold design using SolidWorks, you will learn what the parting surface is and what are its types.
Parting Line and Parting Surface
You have already read about parting lines in the second week of this course. It is a line that splits the mold into two parts – the core and the cavity. The concept of a parting surface is similar.
A parting surface is a surface that separates the mold block into two parts – the core and the cavity.

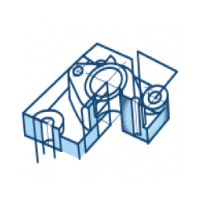
Consider a model, as shown in the image above. As you can see, the model is a hollow plastic component. To make a mold for this part, you should first select a parting line for the mold. As per the parting line’s location, a parting surface will be formed.

The portion of the mold block above the light blue surface will form the cavity, and the part below it will create the core.
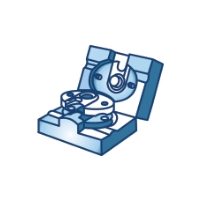
Below is the image that shows the core and the cavity for the same part.

During the injection molding process, the two surfaces come in contact with each other. The surface that is in contact with both the blocks is known as the parting surface of the mold.
The above was an example of a flat parting surface. There are more types of parting surfaces, which you will read below.
Types of Parting Surface
The shape of the parting surface changes depending on the profiles or contours of the paths. They can be split into four different types:
- Flat or straight parting surface
- Stepped parting surface
- Angled parting surface
- Complex or profiled parting surface
Flat or Straight Parting Surface
Below is the image of a part that will have a flat parting surface.

On the right, you can see the core and the cavity for the part. The green line represents the parting surface when the core and the cavity blocks meet. Such a parting surface is known as a flat or a straight parting surface.
Machining of a flat parting surface is the easiest, which is why they are preferred over other types of parting surfaces. However, a flat parting surface is not always feasible.
Stepped Parting Surface

Here, the model is similar to that of the previous one. But in this case, the base of the model is not in a single plane. Hence, having a flat parting surface is not possible in such a scenario.
On the right-hand side, you can see how the core and the cavity will look like for this model. The green line indicates the parting surface for the model. You will notice that although the parting surface is flat, it is located in two different planes, resulting in a stepped parting surface.
Angled Parting Surface

Here is another similar component. In this scenario, the base of the part is at an angle. It is not possible to have a horizontal parting surface for this part, and the core-cavity mold blocks will be at some angle to each other.
The thing to know here is that, even if you have an angle parting surface, the entire mold block will not be created, as shown in the image above. Instead, the inclined profile of the component will be followed up to a certain distance (usually around 20 to 30 mm). Then, the blocks are made flat again, as shown in the image below.

This is done because machining is easier in the case of flat, horizontal surfaces. Hence, once the profile of the component is captured in the mold block, there will be no necessity to continue the angled surface.
Even if you have the complete mold block at an angle, or an angle close to the component and then a flat profile, the result will remain the same. This addition of flat surface instead of an angled surface is done only to allow easier manufacturing.
Furthermore, some relief is also provided in the regions where the angle transitions into a flat surface (see below). This mechanism eliminates any chances of the cavity blocks rubbing. In the rest of the parting surface, the core and the cavity blocks do come into contact, but there will not be any rubbing of the clocks as they are separated instantly.

In the highlighted region, the surface is perpendicular (at a 90-degree angle). So, as the core block moves away from the cavity, it will rub the cavity block and will damage the mold block as time passes. Generally, you should try to avoid steel to steel rubbing in mold blocks. Hence, a relief component is provided to prevent such damages.
Complex or Profiled Parting Surface

Here is a part that would require a profiled parting surface. You can see in the image above that the base has a curvature. If you want the molded component to have a curved base, then you would have to create a curved mold block for that.
Hence, whenever you have a curved profile like in this case, you will necessarily have to create a curved or a profiled parting surface.
However, as mentioned previously, the entire mold block does not have to be curved. The curved profile will extend only a little past the component, after which it transforms into a straight line or a straight parting surface for easier machining.
Conclusion
The parting surface and its types are essential for superior part quality. In the next session on the basics of mold design using SolidWorks, you will be looking at various example cases to understand how parting surfaces are selected for multiple parts.
The industry experts at Skill-Lync teach and cover interesting topics in the engineering domain, including this one. If you want to learn more about our online courses, click here.
Check out List of Job opportunities for your Engineering Domain
Author

Navin Baskar
Author
Skill-Lync
Subscribe to Our Free Newsletter

Continue Reading
Related Blogs
Explore the fundamentals of vehicle dynamics and ultimate trends in the field from design and modeling to control with Skill Lync's exclusive course on the subject. Read about how Skill-Lync's CAE courses can help you get employed.
28 Jul 2020
In this article, we will briefly discuss the working, applications, and features of the one-dimensional systematic simulation tool, GT-Power, in Emission Control Strategy, engine calibration, hybrid vehicle modeling. Read about how Skill-Lync's CAE courses can help you get employed.
28 Jul 2020
This article offers a brief introduction to the globally accepted standard of Geometric Dimensioning and Tolerancing, and its importance for the entire manufacturing process. Read about how Skill-Lync's CAE courses can help you get employed.
28 Jul 2020
In this blog we will read about Going a step into Biomechanics and how Skill-Lync's CAE course will help you get employed.
09 May 2020
The powertrain is the most prominent source of vibrations that affects the driving experience for the people on board. This blog from Skill-Lync examines these vibrations to help enhance that experience.
21 Aug 2020
Author
Skill-Lync
Subscribe to Our Free Newsletter
Continue Reading
Related Blogs
Explore the fundamentals of vehicle dynamics and ultimate trends in the field from design and modeling to control with Skill Lync's exclusive course on the subject. Read about how Skill-Lync's CAE courses can help you get employed.
28 Jul 2020
In this article, we will briefly discuss the working, applications, and features of the one-dimensional systematic simulation tool, GT-Power, in Emission Control Strategy, engine calibration, hybrid vehicle modeling. Read about how Skill-Lync's CAE courses can help you get employed.
28 Jul 2020
This article offers a brief introduction to the globally accepted standard of Geometric Dimensioning and Tolerancing, and its importance for the entire manufacturing process. Read about how Skill-Lync's CAE courses can help you get employed.
28 Jul 2020
In this blog we will read about Going a step into Biomechanics and how Skill-Lync's CAE course will help you get employed.
09 May 2020
The powertrain is the most prominent source of vibrations that affects the driving experience for the people on board. This blog from Skill-Lync examines these vibrations to help enhance that experience.
21 Aug 2020
Related Courses