Exploring Surface Design in CATIA V5: A Comprehensive Guide
Master surface design in CATIA V5 with this comprehensive guide. Learn to create complex surfaces using tools like Extrude, Sweep, and Pattern. Enhance your skills with the Skill-Lync CATIA tutorial for mechanical engineers and explore our full CATIA V5 course.

Welcome back to the CATIA V5 Design Series! In this session, we are diving into a crucial aspect of 3D design: Surface Design. This method is particularly useful for creating complex, intricate shapes—think of components like a car bumper or the instrument panel near the steering wheel. Surface design is widely used in industries that rely on plastic molding, allowing for the creation of detailed and precise surfaces that can be transformed into solid objects later.
In this blog, we will walk through the Wireframe and Surface Design Workbench in CATIA V5, learning the most used commands, and then demonstrate how surface design is applied through practical exercises. We’ll also touch on how to generate technical drawings from your designs.
Introduction to surface design in CATIA V5
The Wireframe and Surface Design Workbench enables designers to create complex 3D shapes by constructing surfaces using curves, lines, and points. Unlike the Sketcher Workbench, where design is primarily constraint-based, surface design allows for more freedom, making it ideal for creating organic, freeform profiles.
CATIA V5 also offers the Generative Shape Design Workbench, which integrates these surface features with solid modeling tools to create hybrid designs. This combination is particularly useful when you need to move between surface modeling and part design.
Common commands in the wireframe and surface toolbars
Let’s start by looking at some frequently used tools in the Wireframe and Surface Toolbars:
- Points Repetition: This command allows you to create multiple points along a curve. You can also create planes at these points to develop more intricate designs.
- Extremum: This tool generates points, lines, or edges at maximum or minimum distances along a specified direction. It’s great for creating reference geometry at extreme ends of a surface or curve.
- Extrude: The Extrude Command lets you extend a surface along a specific direction, like how you might use the Pad Command in part design. However, the profile must be perpendicular to the direction of extrusion.
- Revolve: This tool creates a surface by rotating a profile around an axis. It’s especially useful for cylindrical or rounded surfaces.
Now that we’re familiar with the basic tools, let’s dive into a practical exercise to see how these commands work in action.
Practical Exercise: Using surface design for a circular boss
In this exercise, we will model a circular boss using commands from the Generative Shape Design Workbench. This part will consist of intersecting surfaces and demonstrate how to use key surface tools like Extrude, Split, and Join.
Step 1: Setting up the model
Start by creating a new part in CATIA V5 and name it Exercise One. Next, create a Geometrical Set and call it Circular Boss.
- Create a Sketch on the YZ Plane. Draw three circles with diameters of 36 mm, 84 mm, and 114 mm. This fully defined sketch will serve as the base for our surface design.
- Exit the Sketcher and switch to the Generative Shape Design Workbench.
- Select the Extrude Command from the surfaces toolbar and choose the 84 mm circle for extrusion. If the sketch contains multiple elements, you can right-click and use the Extract Option to isolate specific elements for extrusion.
- Set the extrusion height to 48 mm and ensure that the direction is along the YZ Plane.
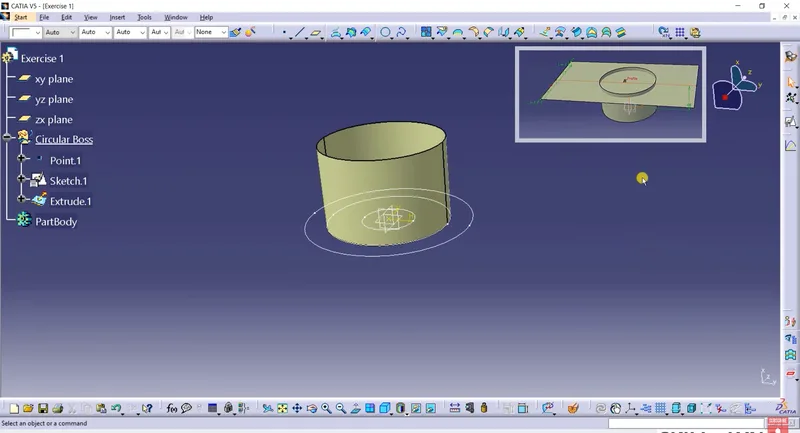
Step 2: Creating and splitting surfaces
- Now, create a horizontal Line in a new sketch, positioned 48 mm above the circular boss.
- Extrude this line symmetrically along both sides to form a flat surface that intersects with the boss.
- Use the Split Command to cut the circular surface where it intersects with the flat surface. This will leave only the desired section of the boss.
- Apply the Split Command again to trim the flat surface where it meets the circular profile.
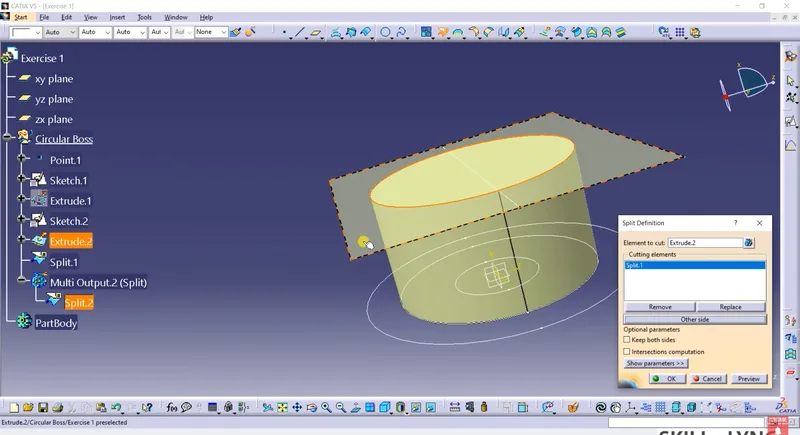
Step 3: Joining and filleting surfaces
- To apply an edge fillet to the intersection, first use the Join Command to combine the circular surface and flat surface into a single element.
- Now, use the Edge Fillet Command to apply a 9 mm radius fillet to the joined surfaces.
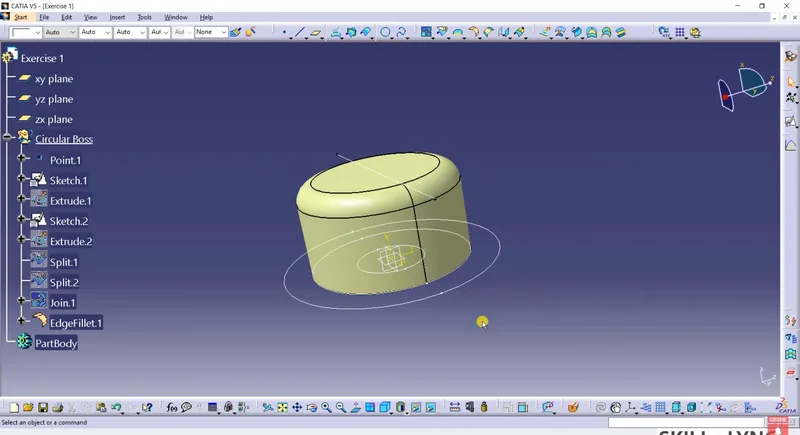
Finally, apply color to the circular boss using the Graphics Properties Toolbar to give it a distinctive appearance.
Advanced Features: Sweep and Pattern commands
Let’s explore some advanced surface design tools, including the Sweep and Circular Pattern commands.
- Sweep Command: This tool extends an object along a defined path. For example, you can select a horizontal line as the profile and a vertical line as the guide curve to sweep a surface. Various profiles, such as circles or lines, can be selected depending on the shape you want to create.
- Intersection Command: This tool creates a line at the intersection of two surfaces. You can then use this intersection as the path for another Sweep Command, which we’ll use to create a complex spiral surface.
- Circular Pattern: Once you have your spiral surface, apply the Circular Pattern Command to replicate the surface around a central axis. Set the parameters to Complete Crown and create multiple instances along a 360-degree rotation.
Conclusion
In this session, we’ve covered the essentials of surface design in CATIA V5. You’ve learned how to use the wireframe and surface toolbars to create complex surfaces and apply advanced tools like Sweep and Pattern Commands.
Surface design in CATIA is a powerful method for creating intricate shapes and forms, especially for components used in industries like automotive, aerospace, and manufacturing. The ability to integrate surface design with solid modeling gives designers the flexibility to create detailed, manufacturable parts.
Stay tuned for our next session, where we’ll continue exploring advanced surface design techniques and learn how to turn surface models into solid bodies ready for production.
This blog is part of our ongoing CATIA Design Series. If you missed the previous posts, check them out here
Would you like to have a more interactive experience going through the CATIA user interface?
Skill-Lync has released a FREE comprehensive course covering CATIA in detail! Check it out here.
Right from the user interface's fundamentals, menus and options, this course covers most aspects of the tool from a practical perspective. It even includes a certificate to add to your resume after completion!
Check out our hands-on course today and add CATIA to your list of skills!
Let’s get #IndustryReady together, one skill at a time!


