Week 1- Mixing Tee
AIM - Simulation of turbulent and thermal flow through a Mixing Tee with various length.
OBJECTIVE -
- To compare the effectiveness of the k-epsilon and k-omega SST model.
- To compare the effectiveness with changing the length of the Mixing Tee.
- To compare the effectiveness depending on the momentum ratio for inlet flows.
Now we will be starting with our first simulation where we will be using the shorter Mixing Tee model and we will be doing the grid independence test, and try to find out which of the simulation model either k-epsilon or k-omega SST works better and suitable for our case.
CASE 1(A) : SHORT MIXING-TEE with Momentum Ratio = 2
K-epsilon model:
First we open a new workbench porject and add a fluid flow system(fluent) from the system given in the toolbox on the left side. to add this system we drag and drop it in the project schematic window. Then we can see it various steps we start with the geometry.
Now when we double click the geometry Spaceclaim opens up. We open the geometry that we have for the Mixing Tee- short. we can see it in the GUI as shown below
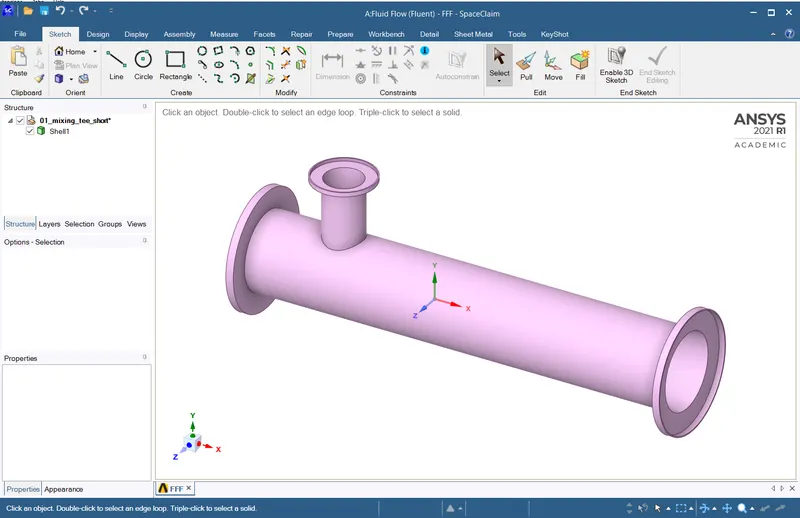
Now we will extract the flow volume where the fluid flow occurs for this we will go to the prepare tab and select volume extract button.
 now to extract the fluid we will cap the three opening in the shell using the edge selection tool and then click on the three edgees as shown in the following figure and ater that click on the right tick mark to extract the volume.
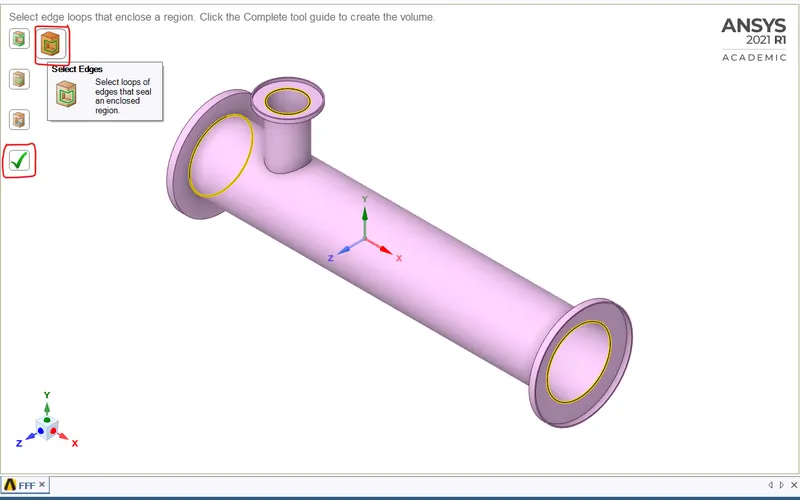
Now we can see that the fluid volume has been extracted and is visible in the tree on the left side . also we will be unchecking the box for the Shell1 and suppres it for physics by right clinkin gon it and selecting the supress for physics option. Then we get our desired volume.
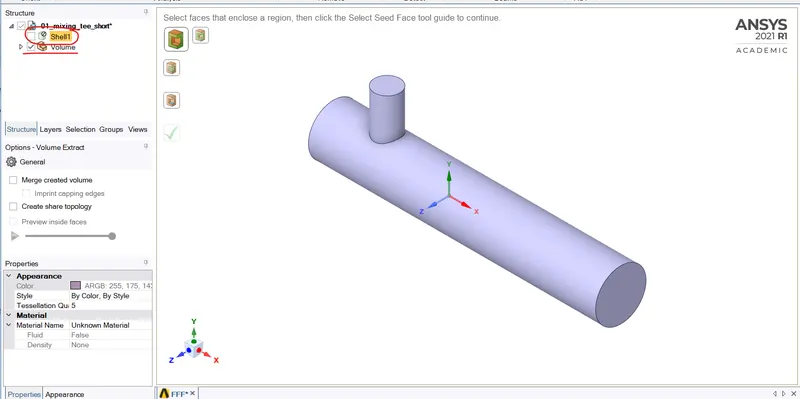
Now we will be closing the spaceclaim and it willbe updated in the workbench. we move on to the next step that is meshing by double clicking on the Mesh.
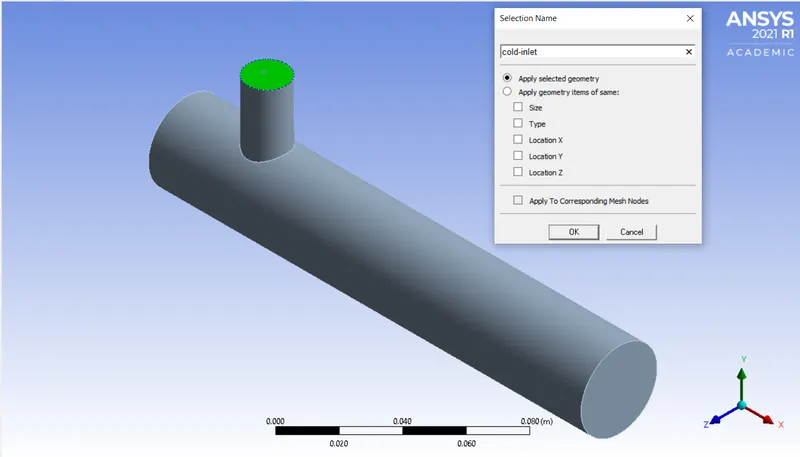
First we will be naming the parts of the model by using named selection that can be done by selecting teh part to be named and then right click on the part and selecting the named selection option or using N as the shortcut. The named selction are shown in the following images
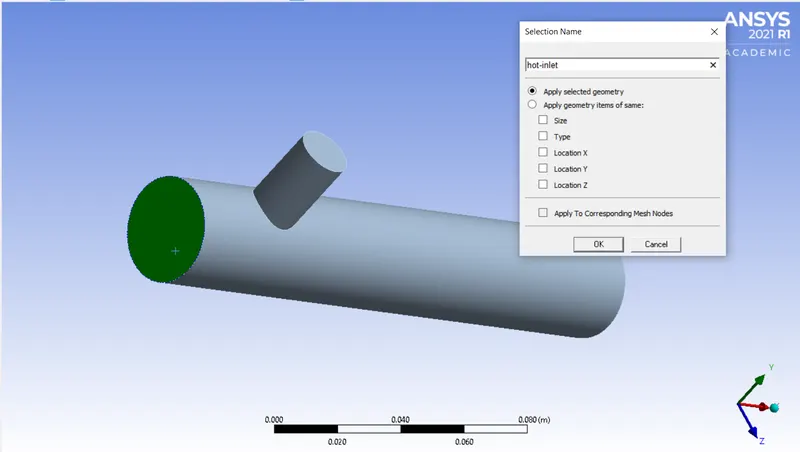
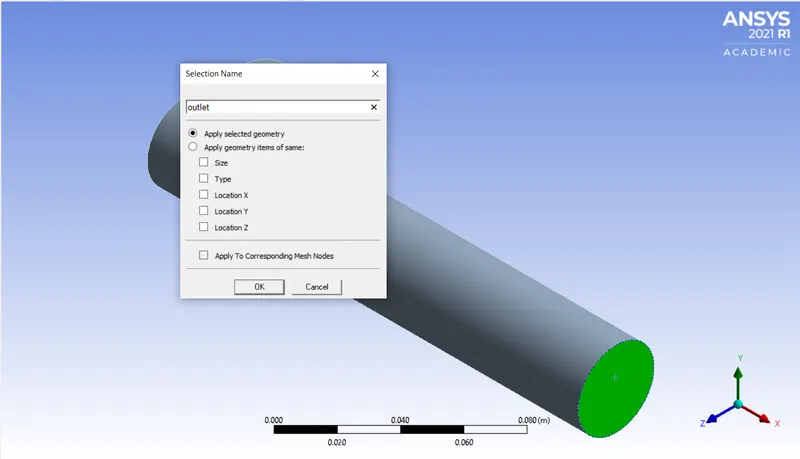
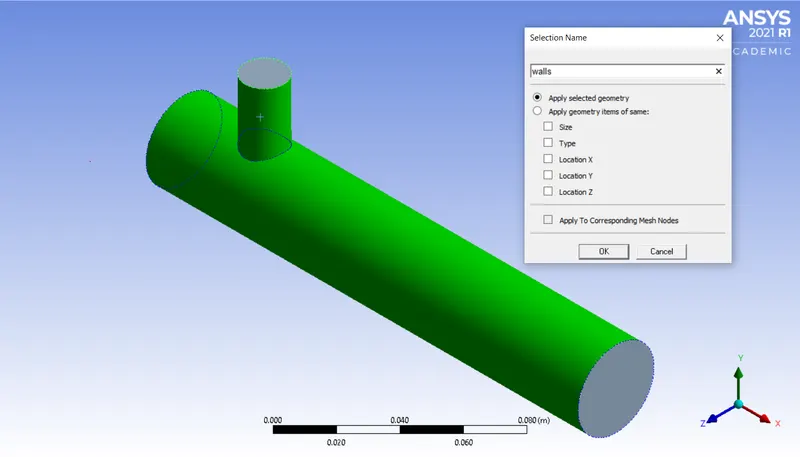
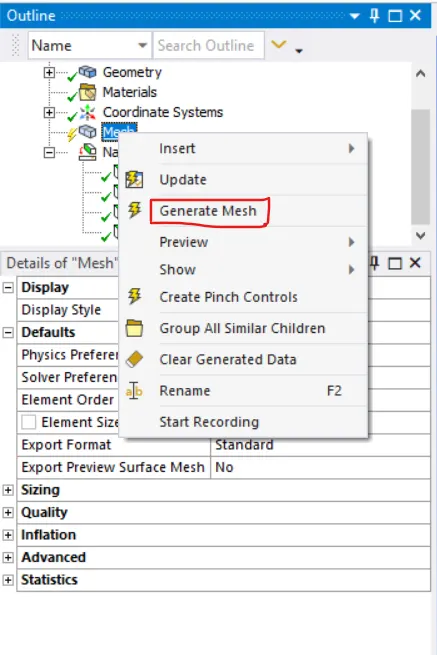
Now moving to the meshing part we will be first meshing our model by keeping the default values for all the parameters in ansys meshing. So here we select Mesh from tree using the right mouse button and select the generate mesh option and it will be generating the mesh.
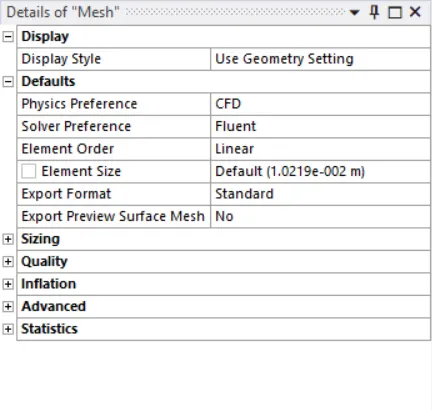
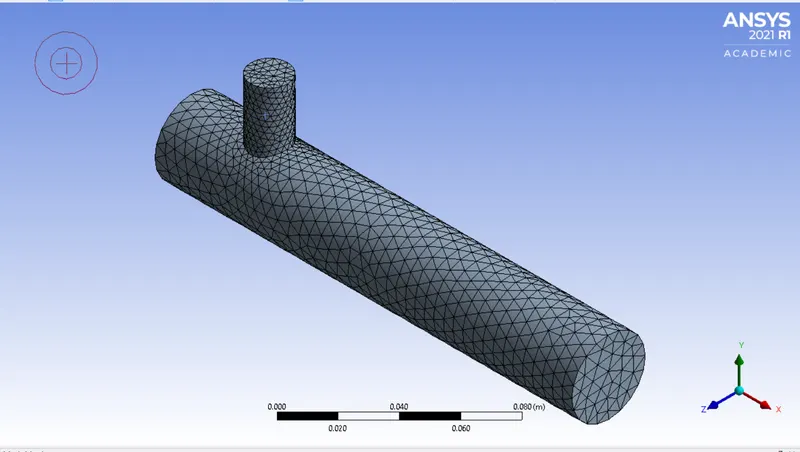
Now the mesh is geneated and we can see the mesh
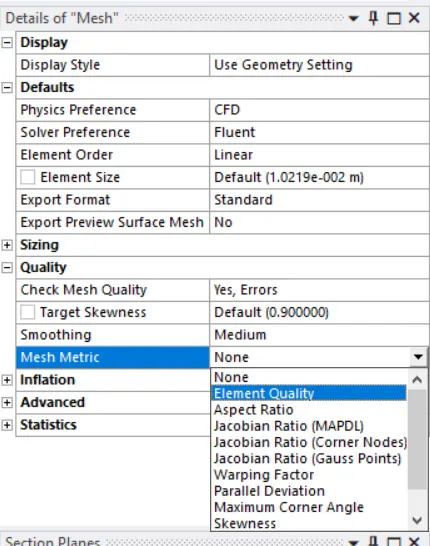
Also we will be checking the element quatliy from the mesh matrix under the Quality part as shown below
the mesh matrix can be seen in the mesh matrix window
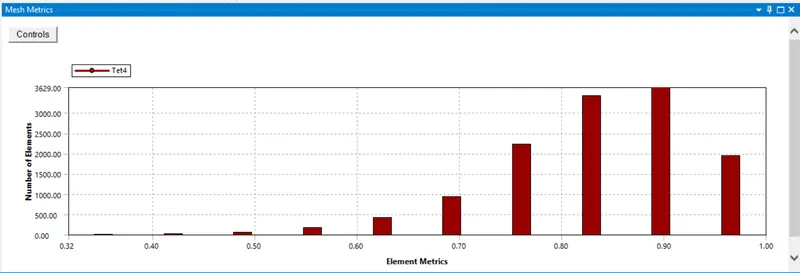
here it is seen that the minimum mesh quality is 0.32 that is more than the value 0.05 so our mesh is pretty good and we can use this mesh for our simulation process.
Now moving to the next step from the workbench that is the setup that we be in the fluent, so double clicking setup will open a fluent launcher, there we first check the double precision box and give 4 processors for parallel solvers processes.
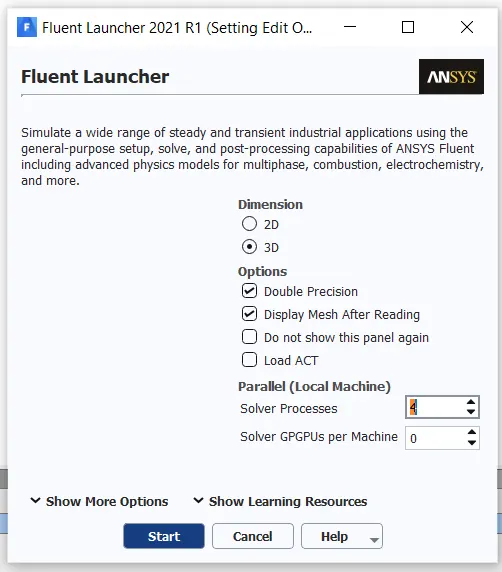
after starting the fluent our mesh model will load up inside the fluent GUI
first we will be perfoming the mesh check from the domain tab in the ribbon, it will give the output in the console as shown
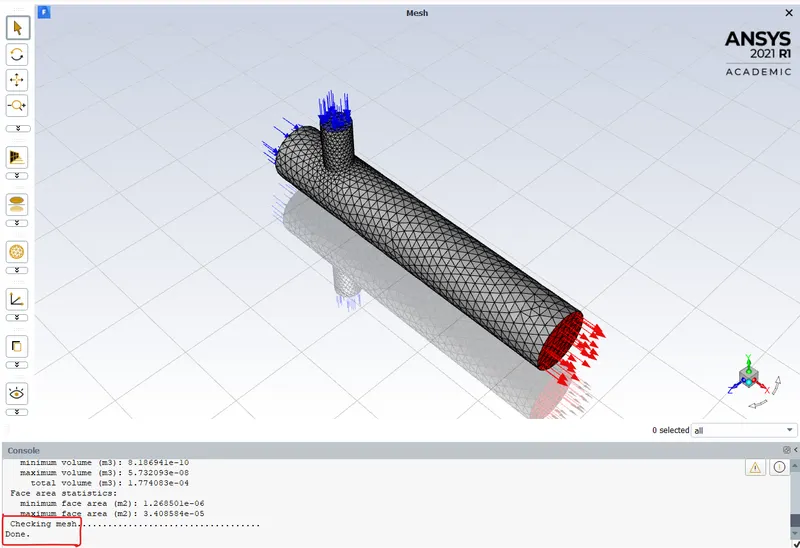
this means our mesh is good.
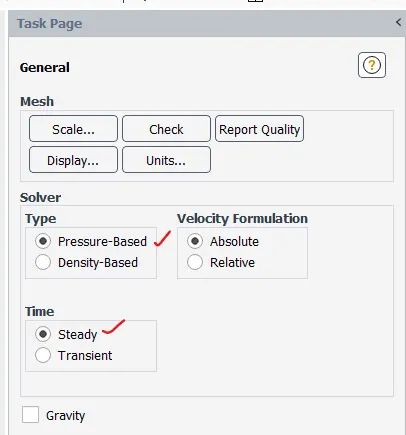
we will be using pressure based steady solver
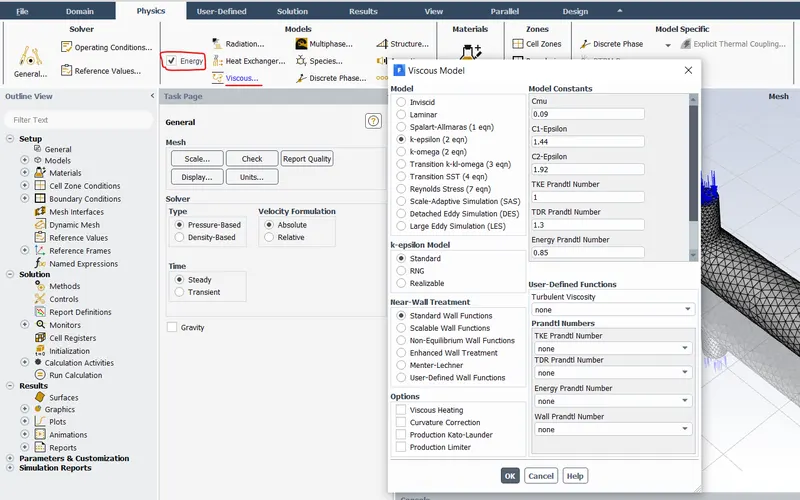
Moving to the physics tab to setup the physics of the simulation. we will check the energy box under the models menu. and then change the vicsous model to the standard k-epsilon model with standard wall conditions.
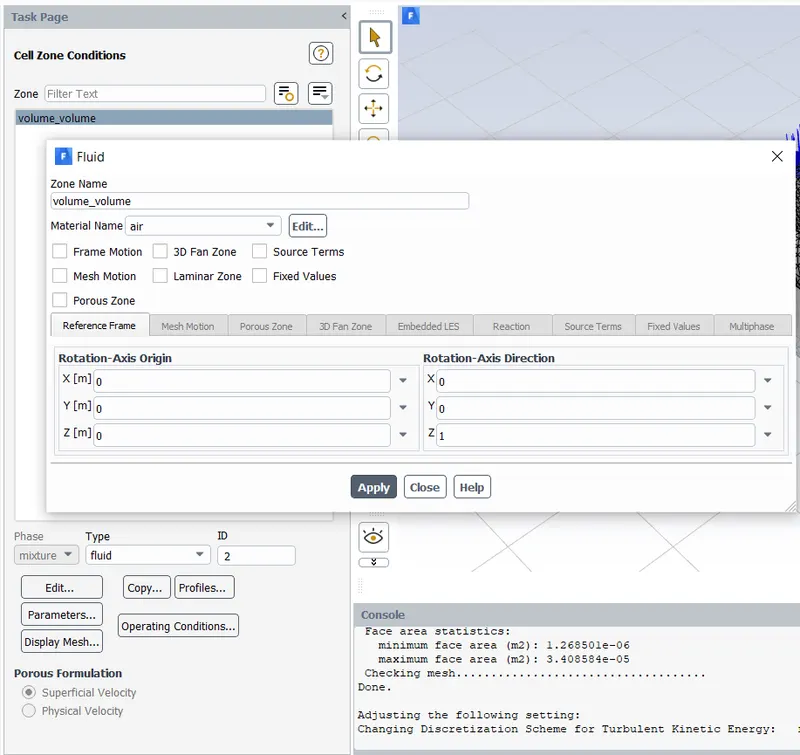
we set the material as air 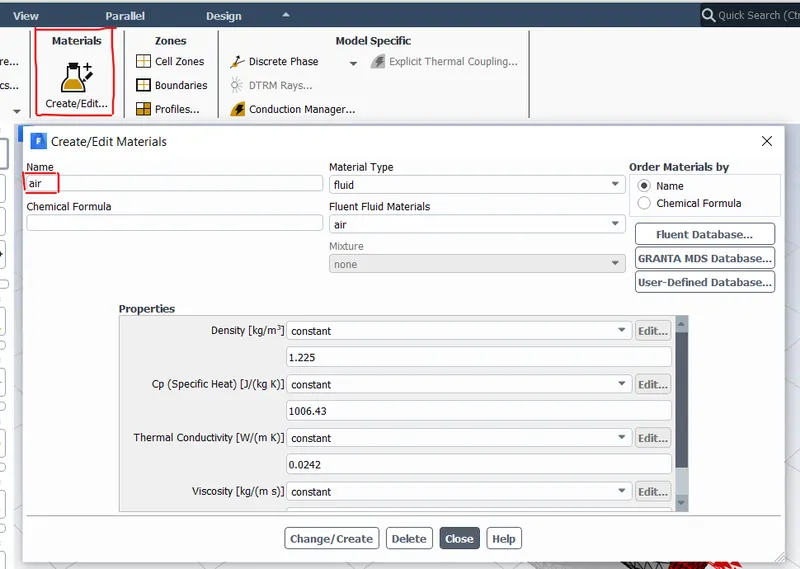
we set the boundaries from the boundaries option under the zones menu .
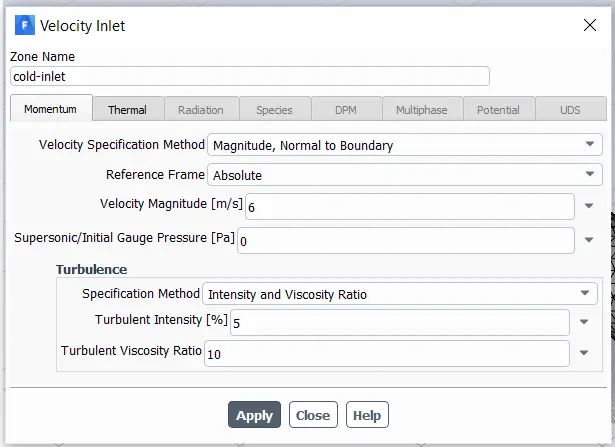
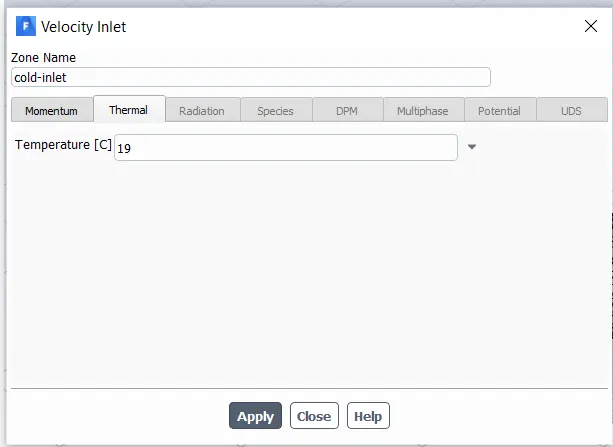
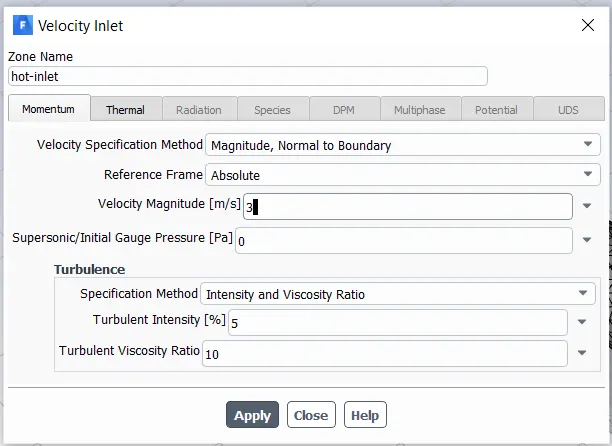
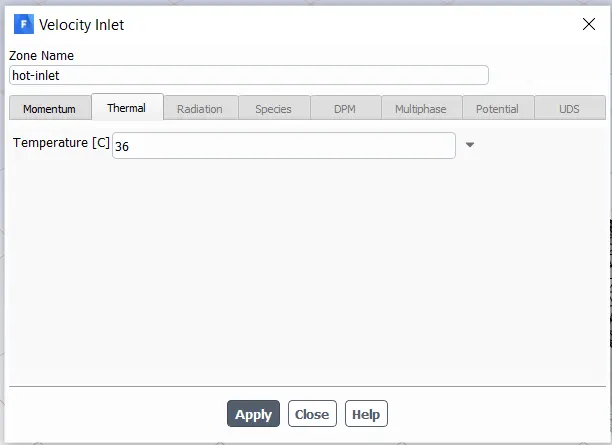
we will be using the monentum ratio as 2 and as out hot inlet velocity is 3 m/s our could inlet velocity will become 6 m/s , also the temperature of cold inlet will be 19 degrees Celcius and for the hot inlet the temperature will be 36 degree Celcius as given in teh problem defination. so accourdingly we will be setting the boundaries for both the inlets
for cold inlet velocity
for cold inlet temperature
for hot inlet velocity
for hot inlet temperature
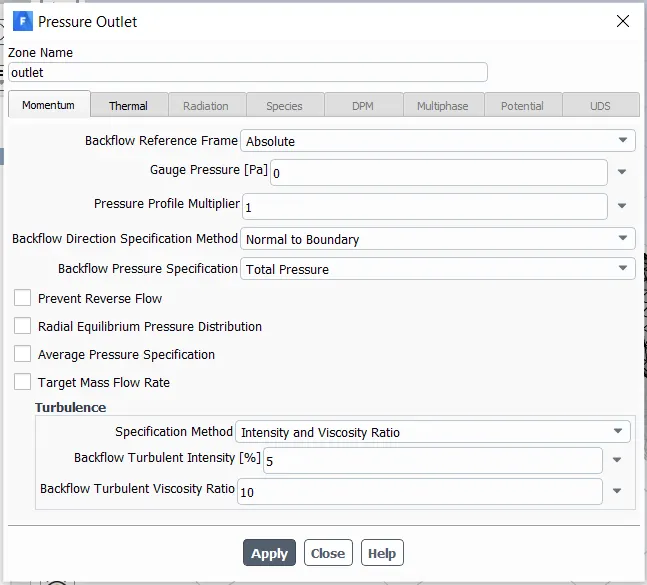
for the pressure outlet the gauge pressure is 0 as shown below that is the outlet is open to atmosphere.
Also we will make sure that our cell zone conditions are set to air as the material
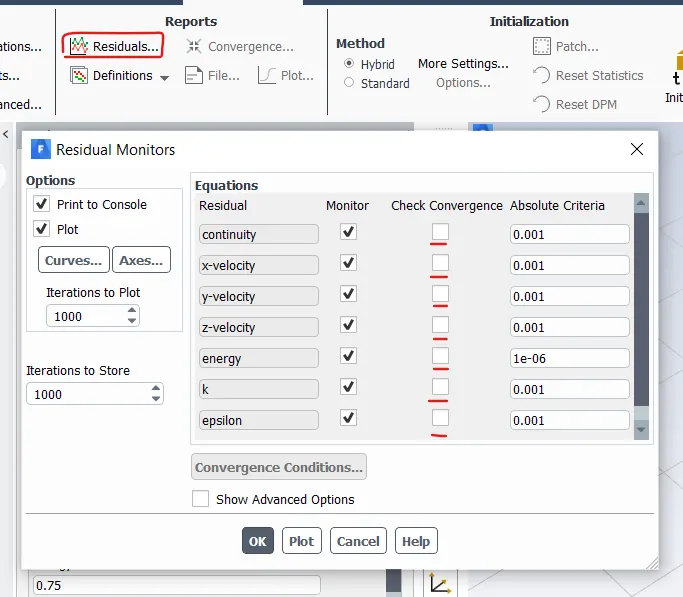
Now moving to the solution tab to set up the solver , we will first uncheck for convergence for all the residual parameters by going to the residual moniters under the reports menu
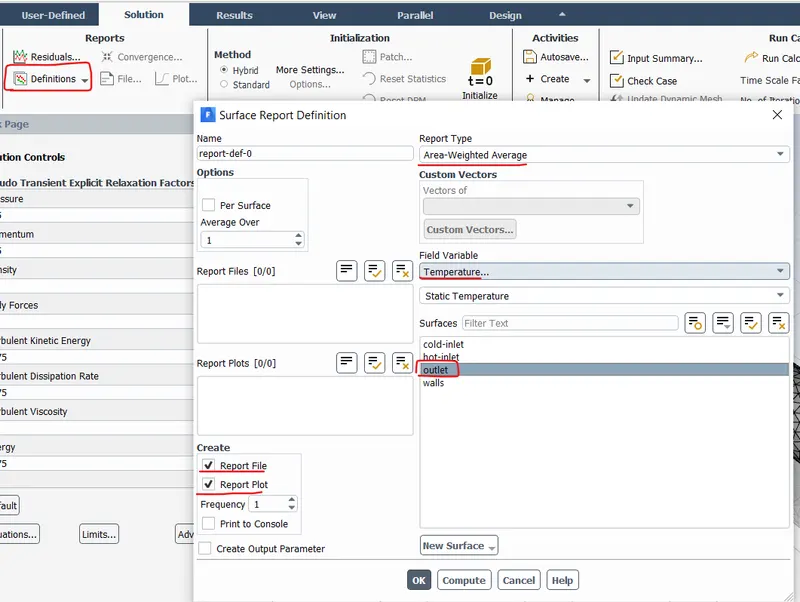
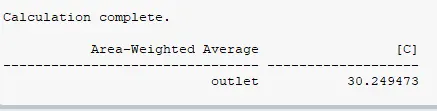
After this we setup a new report definition to measure the surface report of area weighted average of the temperature at the outlet
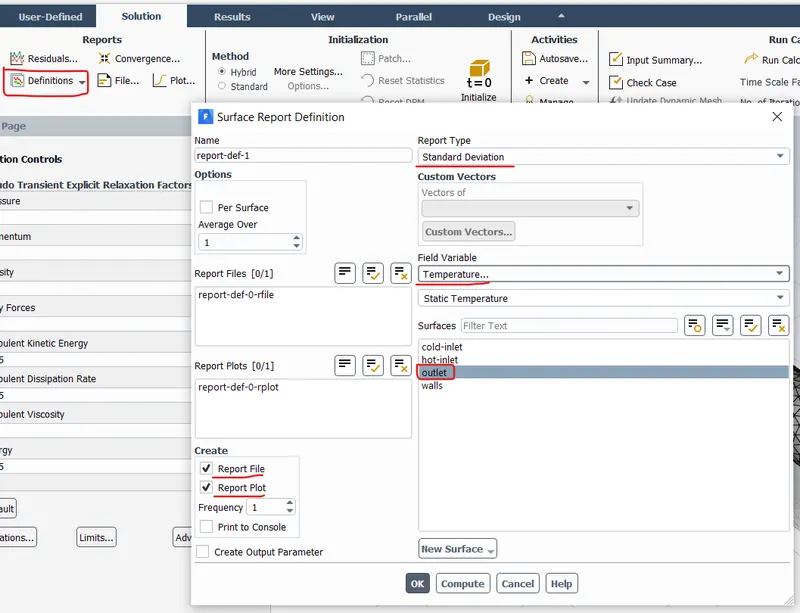
now we will set up one more report definition for the surface report of standard deviation of the tempreature at the outlet
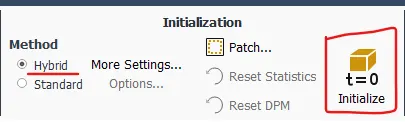
Now we will be initialising our simulation by slecting the initilize button from the initialization menu and we have set the method as hybrid that was the default method.
after the initialization we were getting a warning in the console
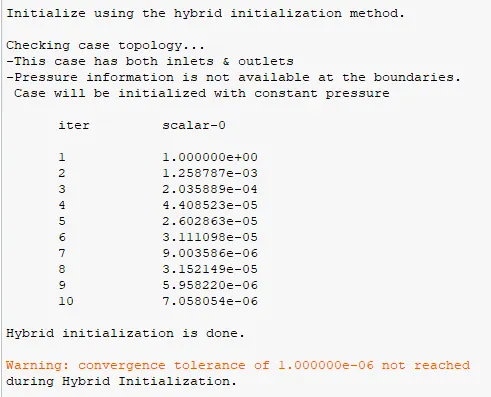
so we go to the more settings in the initilizations menu and change the number of iterations to 15 from the default value of 10.
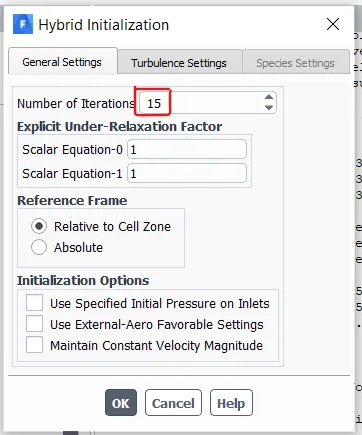
and reinitialie but clicking on the initialize button and now we do not get any warnings as earlier.
Now we will set the number of iteration to 300 and hit calculate under the run calculation menu to simulate our solution

After 300 iterations our calculation is completed
we can see that the residuals are following a simmilar pattern after about 200 iterations
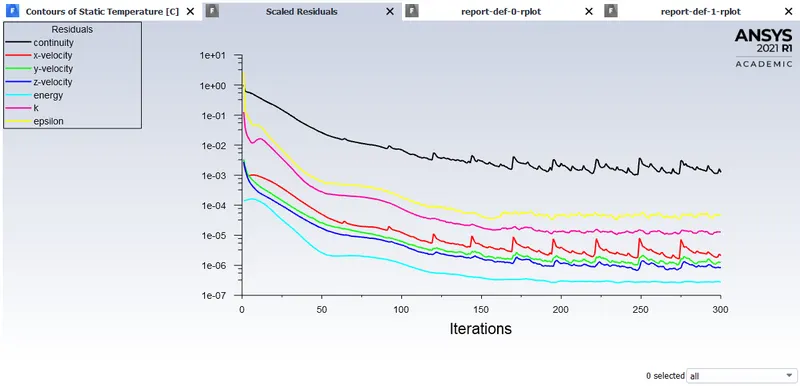
also here we can see that the enregy residuals are almost straight line after 200 iteration so we can say that our solutions has converged at about 200 iterations.
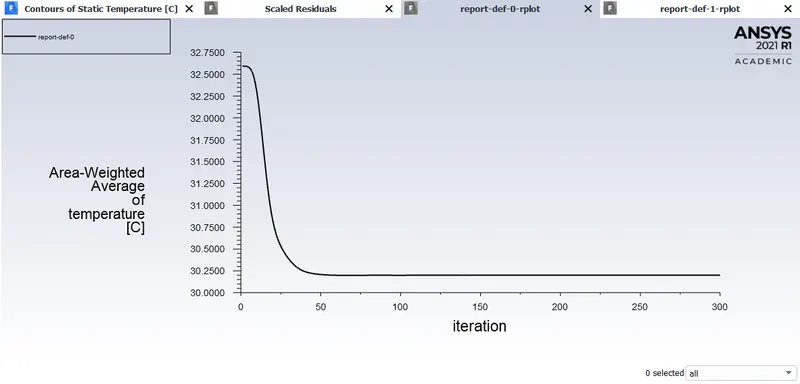
form the area weight average temp plot at the outlet we can see that we get a converged value at 80 iteration
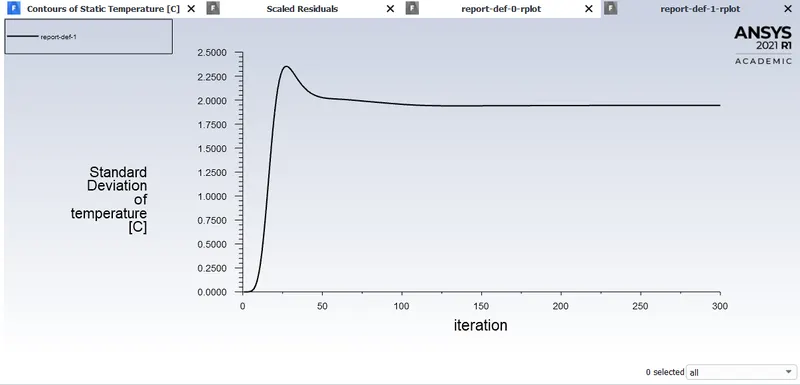
form the standard deviation of temperature at the outlet we can say that the values of standard deviation have converged at about 200 iteration.
The area weighted average temperature at the outlet is `30.1998 ^o C`

So now we will be post processing our solution in CFD post
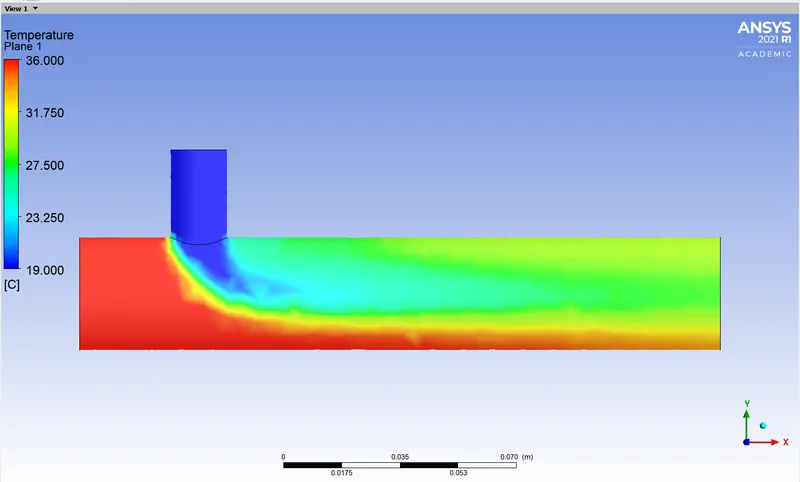
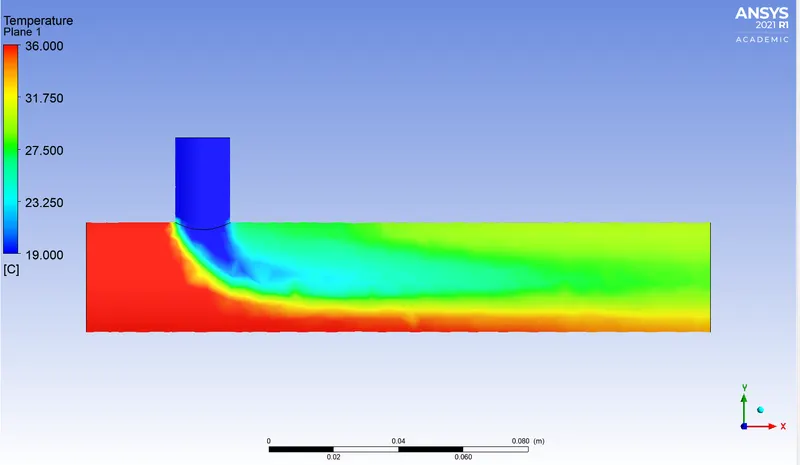
In the CFD post we will be creating a temperature contour at the midplane of the mixing Tee so we can see the temperature along and across the pipe.
K-omega SST model:
Now we will be doing the same simulation with k-omega SST model and keeping all the other parameters the same
so now we will be going to the setup part in the workbench where it will open fluent and then after prforming the mesh check we move to the Physics tab and under the models menu we check fo teh energy equation and change the model to k-omega SST
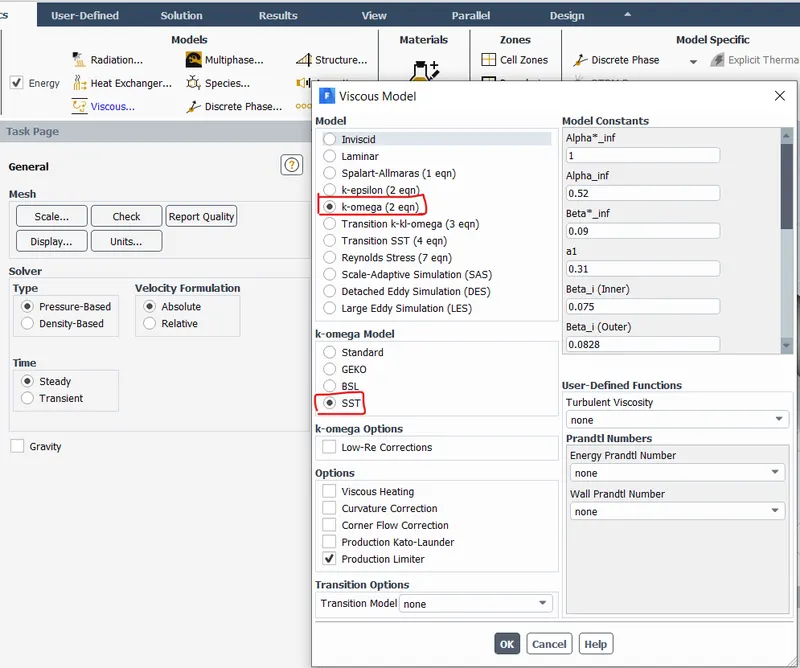
after that setting the boundary condition as earlier and creating the report definitioins of area weighted avrage and standard deviation of temperature at the outlet we noe initalize the solution using hybrid initialization. and run the calculation for about 400 iterations
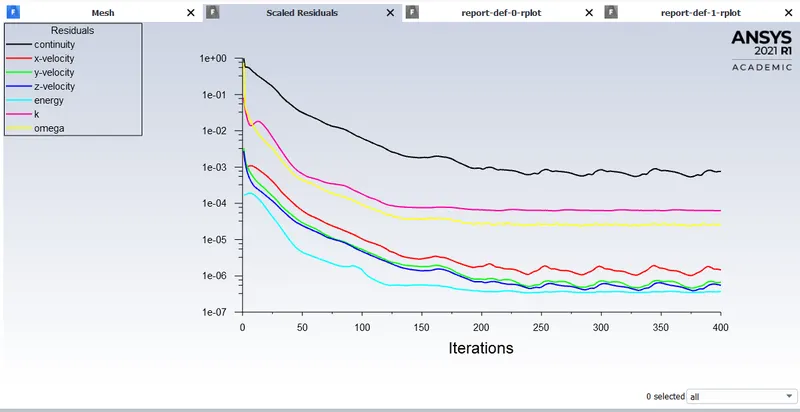
from the residuals plot we can see that the residuals stabilizes and we get almost straight line for the energy at about 300 iterations so we can say that our solution converges at about 300 iterations
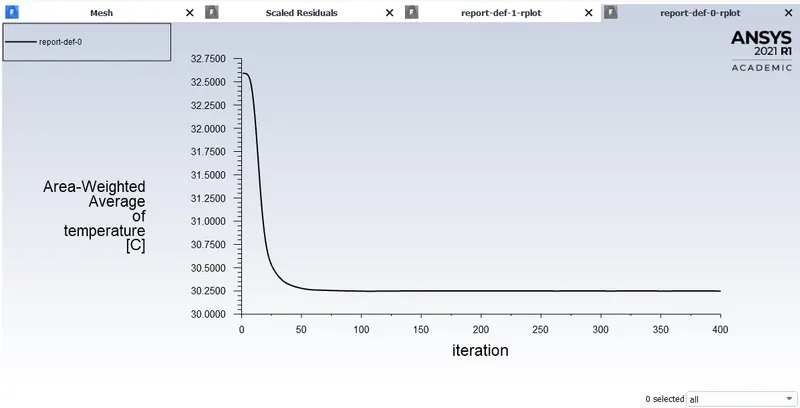
the area weghted average plot for temperature at the outlet is having a straight line after about 100 iterations
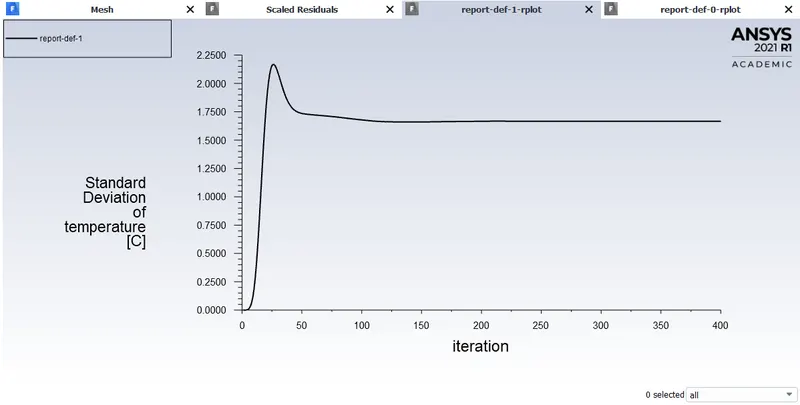
the standard deviation plot for the temperature at the outlet also has a straight line after about 150 iterations.
The area weighted temperature at the outlet is `30.2495 ^o C`
From the post processing results the pressure contour can be seen
Now comparing both the model k-epsilon and k-omega SST we see that it takes more number of iteration to reach the convergence for the k-omega SST model and thus it takes more time with more number of iterations.
Also the was a little difference between both the area wighted average values .
| Model | Number of iterations for convergence | Area weighted average temp at outlet |
| k-epsilon | 200 | 30.1998 |
| k-omega SST | 300 | 30.2495 |
So it is clear that k-epsilon model is more suitable for our case.
Grid Independence Test:
Now we will be doing grid independence test for our mesh using the k- epsilon model. Keeping all the other parameters same we will change the element size for our mesh and reduce it gradually.
1. Element Size = 0.005 m
In this case we will be using the elemnt size of 0.005 m for the mesh. it can be done by changing the element size in the mesh details box on the left side in the meshing window.
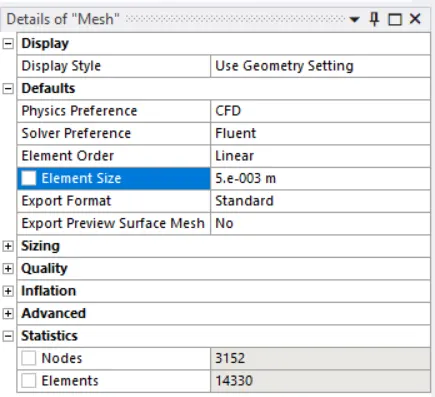
also we can see here in this image under the statics that we have 14330 elements. Now looking at the mesh metrices
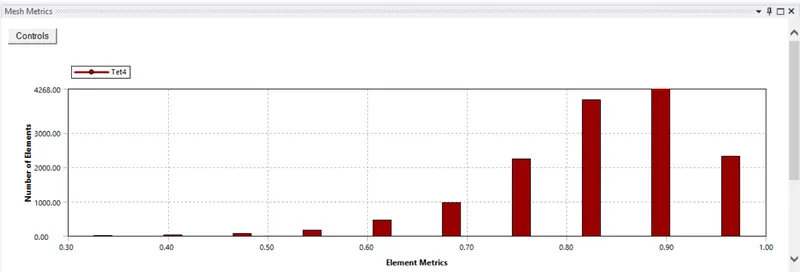
we can see that the quality of elements is above 5% so the mesh is good.
After this we will setup our fluent simulation as earlier with all the same parameters and see the results .
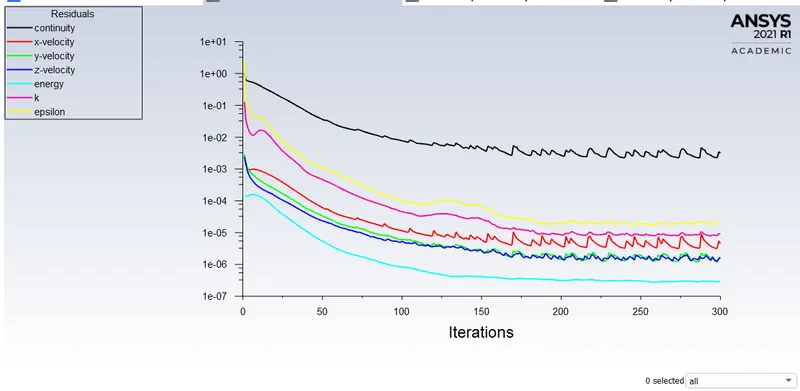
after 200 iteration the residuals have been fluctuating in the same range
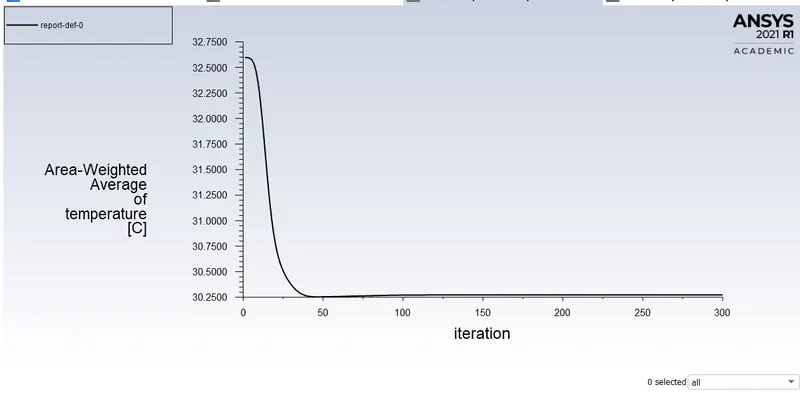
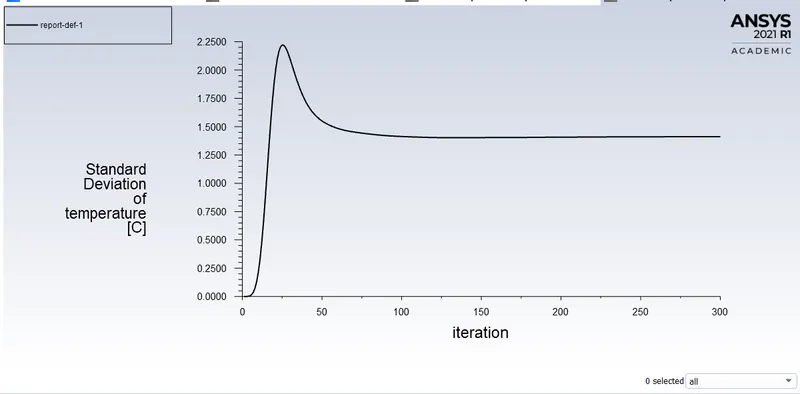
the area weighted temperature and the standard deviation of temperature at teh outlet has seem to stabilize so our simulation seems to converge at 200 iterations
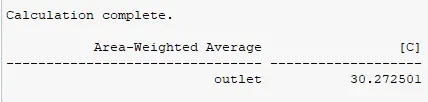
the area weighted average temperature at the outlet is `30.2725 ^o C`
then we see the temreature contour that is made using the CFD-post
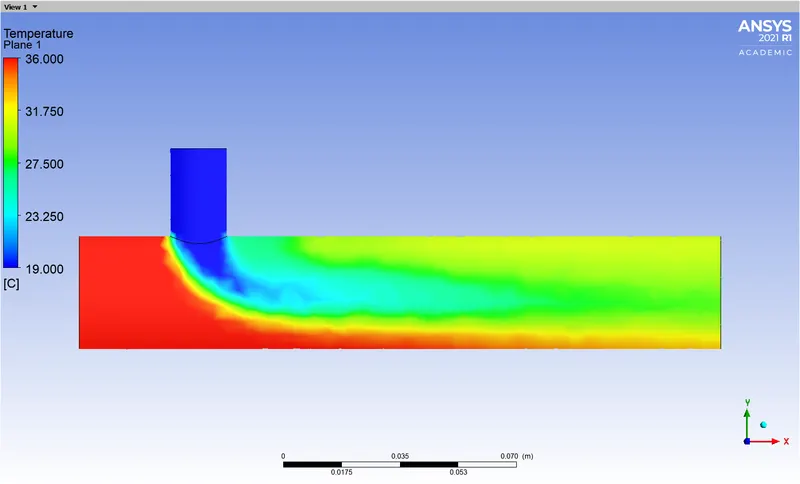
the flow is less diffused in the mixing region that compared to the earlier case where the mesh size was larger.
2. Element Size = 0.0025 m
Now again we will be reducing our element size to 0.0025 m and keep all other parameters for our simulation the same.
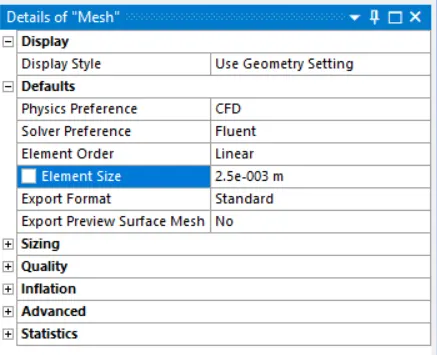
after this we can see the mesh statistics the we have 61276 elements in this case.

looking at the mesh metrices shown below we see that the element quality is above 5% so our mesh is good
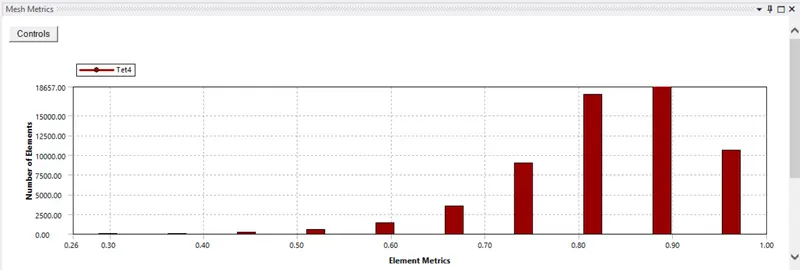
Now after this we setup our fluent simulation with the same step we used earlier and keeping all the parameters same we check our results .
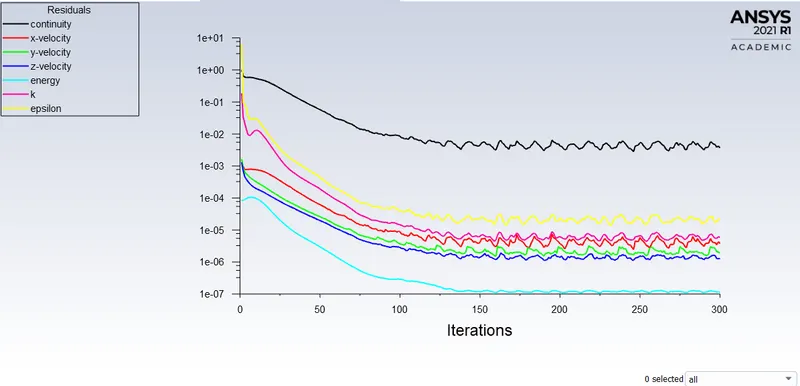
we get converge after about 200 iteration here as well
Looking the area weighted temperature at outlet and also the standard deviation of tempreature at outlet they seem to have been converged as well
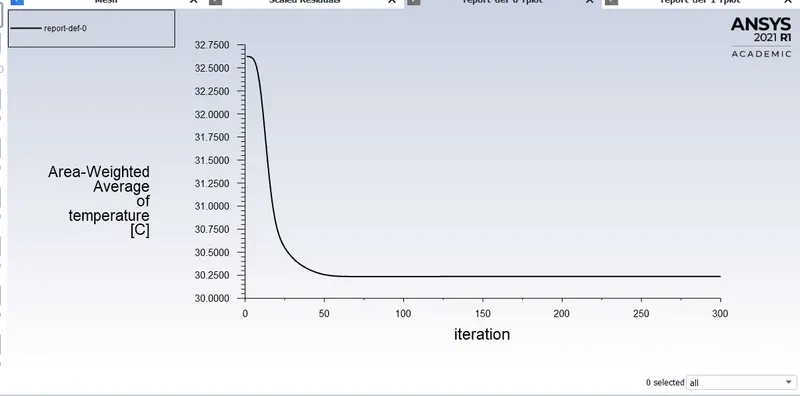
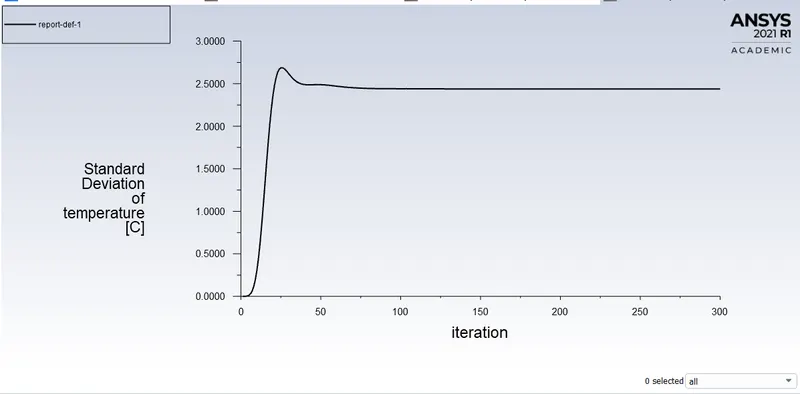
the area weighted tempreature at the outlet is `30.2377 ^o C`

Temperature contour of the simulation is shown below
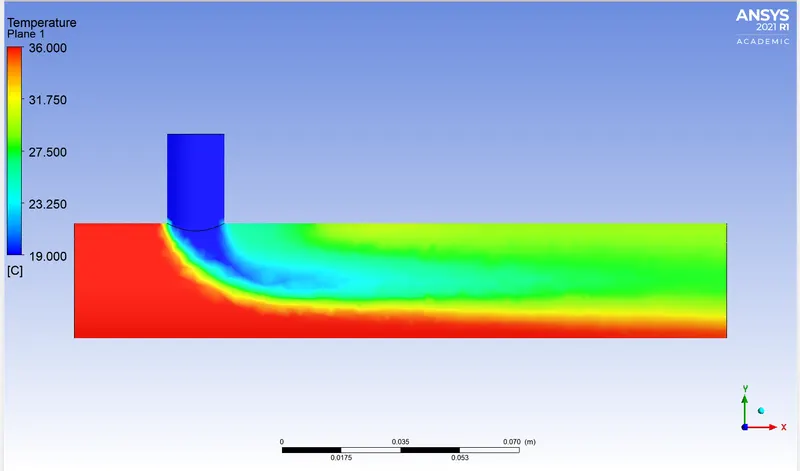
the diffusion reduces as the element size is more smaller
3. Element Size = 0.0015m
Now again we will be reducing our element size to 0.0025 m and keep all other parameters for our simulation the same.
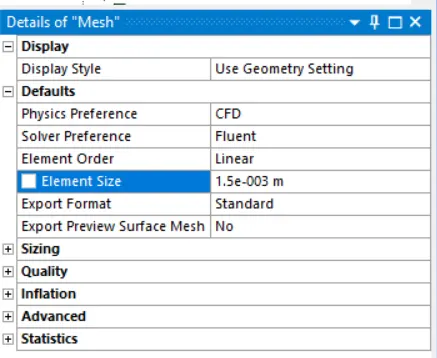
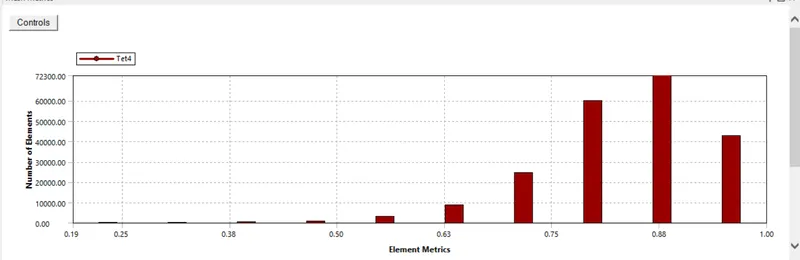
after this we can see the mesh statistics the we have 211671 elements in this case.

looking at the mesh metrices shown below we see that the element quality is above 5% so our mesh is good
Now after this we setup our fluent simulation with the same step we used earlier and keeping all the parameters same we check our results .
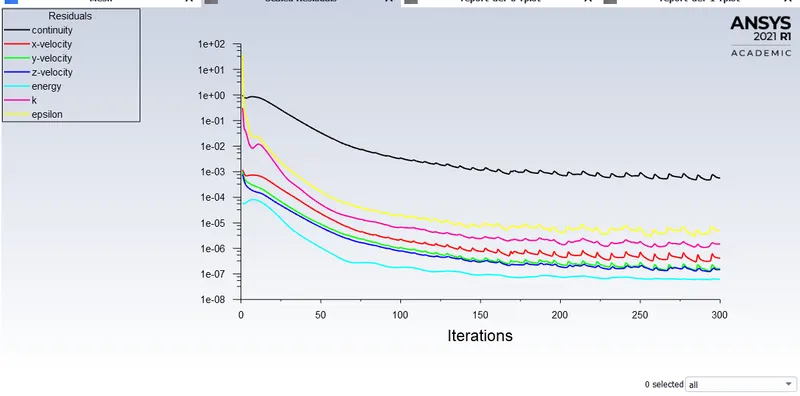
we get converge after about 200 iteration here as well
Looking the area weighted temperature at outlet and also the standard deviation of tempreature at outlet they seem to have been converged as well
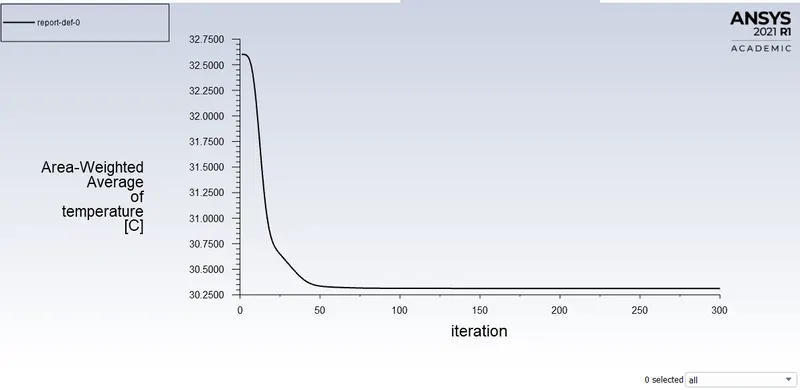
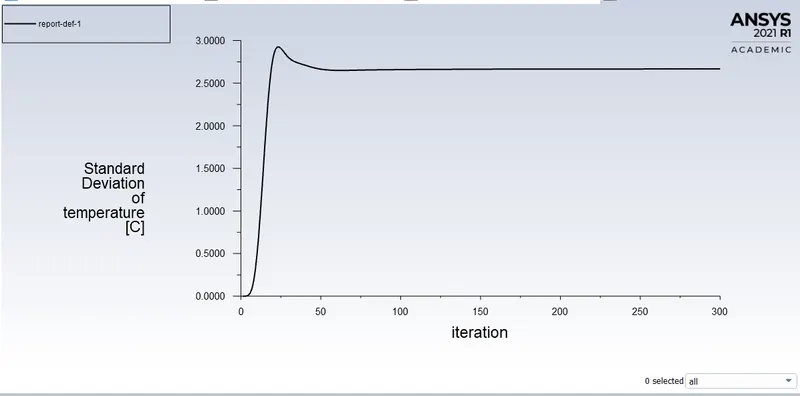
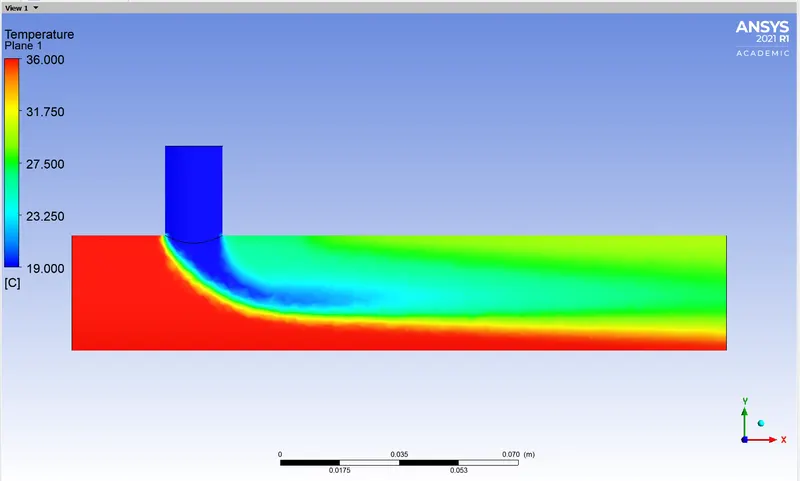
the area weighted tempreature at the outlet is `30.3118 ^o C`

Temperature contour of the simulation is shown below
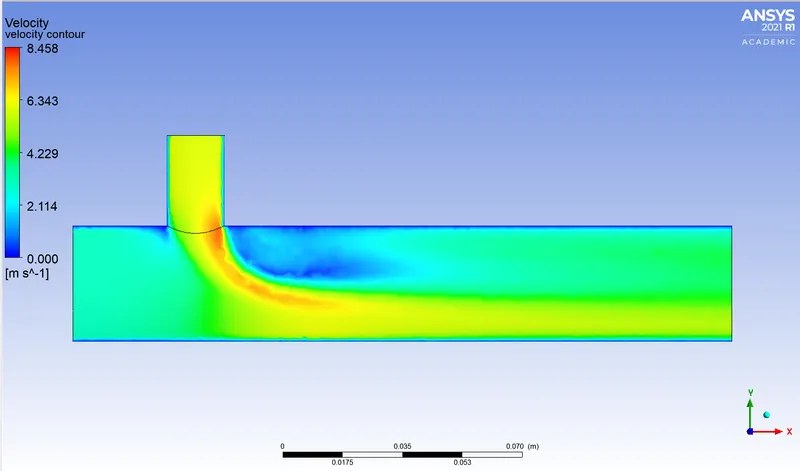
velocity contour along the pipe is shown below
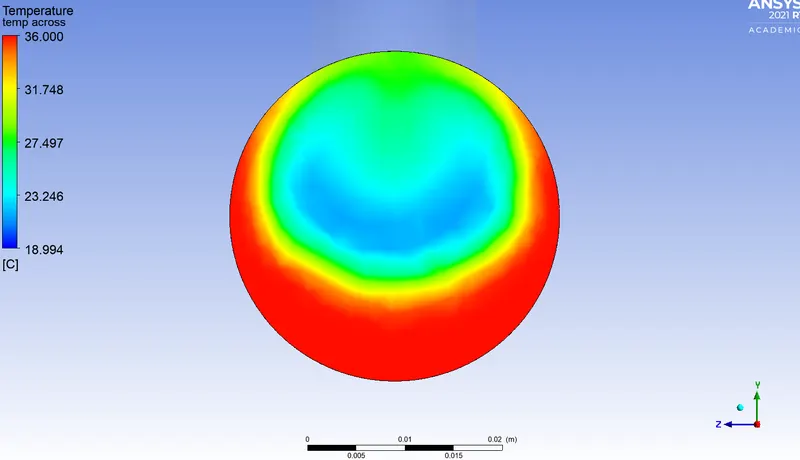
temperature contour across the pipe after mixing
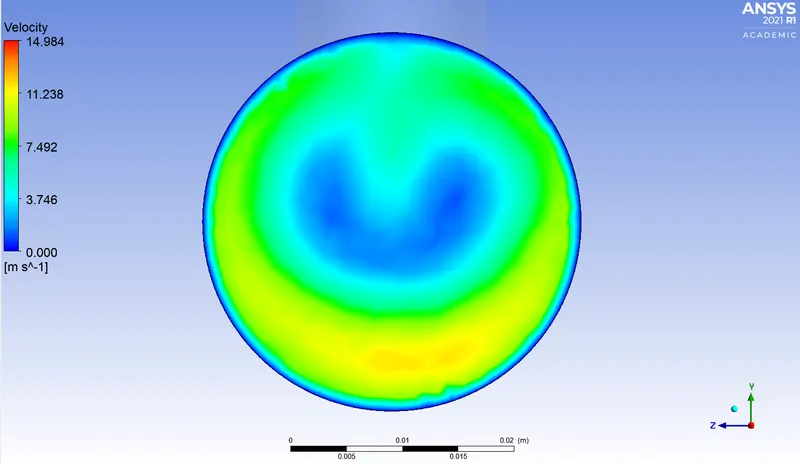
velocity contour across the pipe after mixing
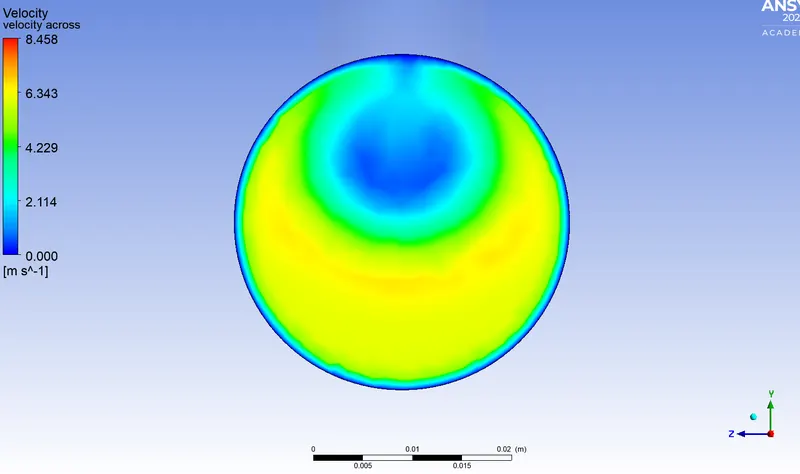
the diffusion reduces as the element size is more smaller
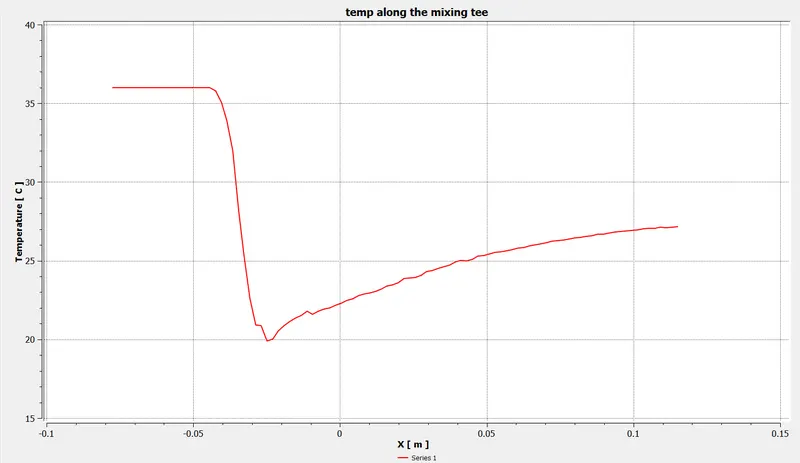
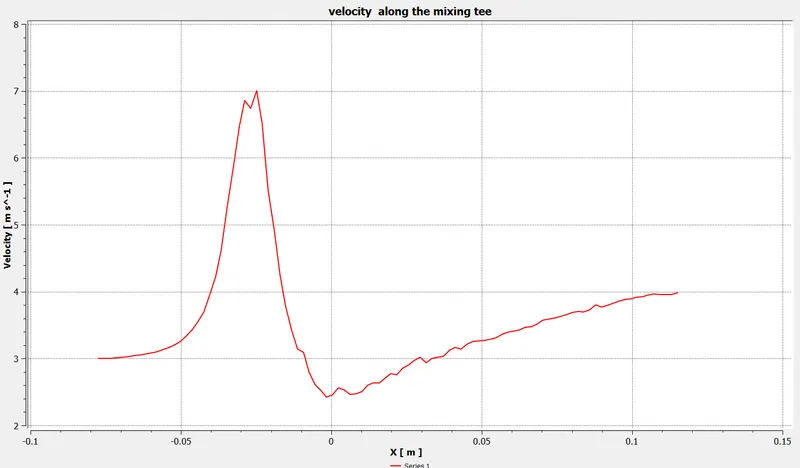
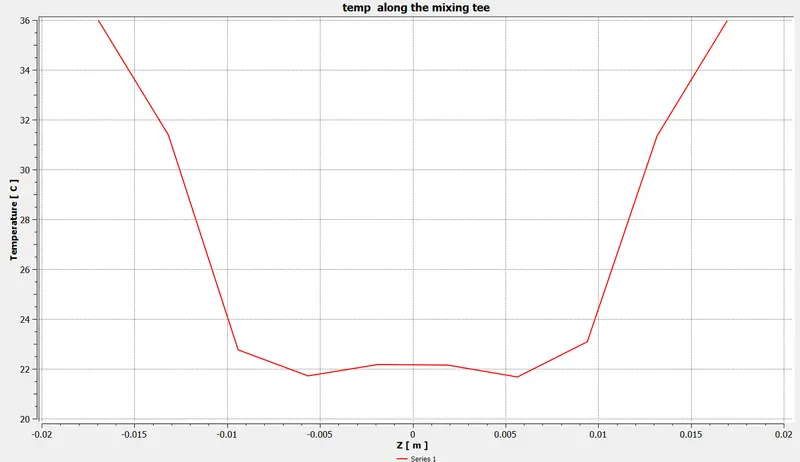
we weil observe various plots related to the simulation shown below
temperature plot along the pipe
velocity plot along the pipe
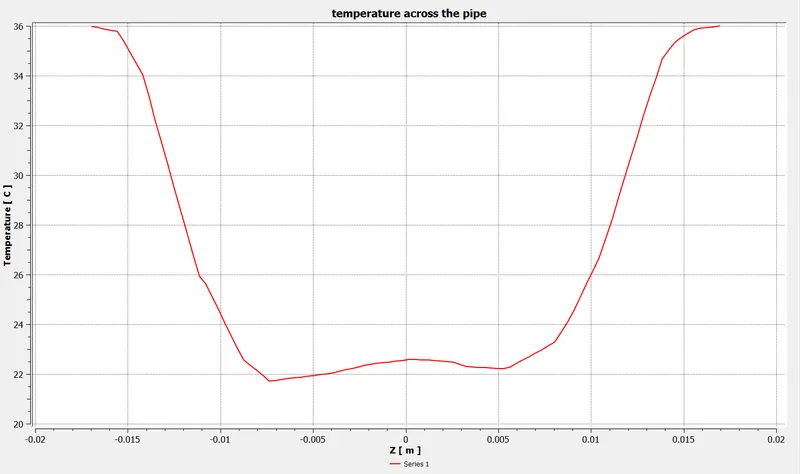
temperature plot across the pipe after mixng length
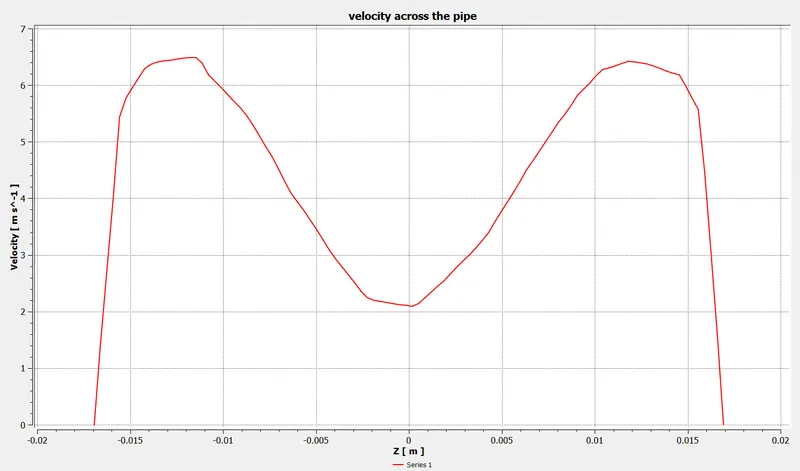
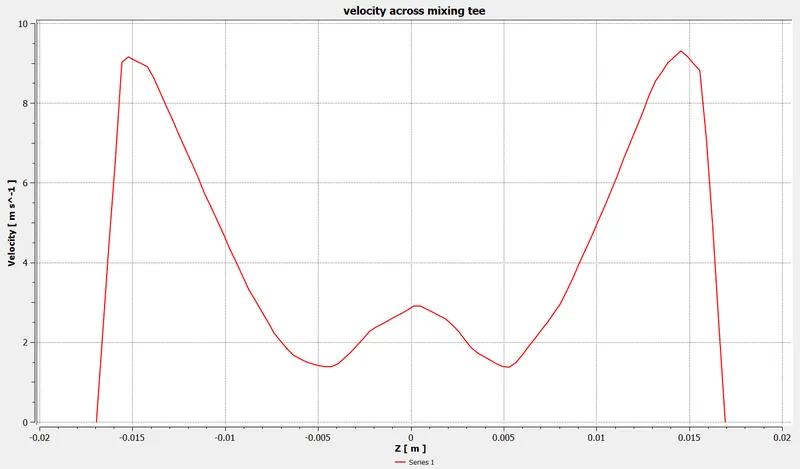
velocity plot across the pipe after mixing length
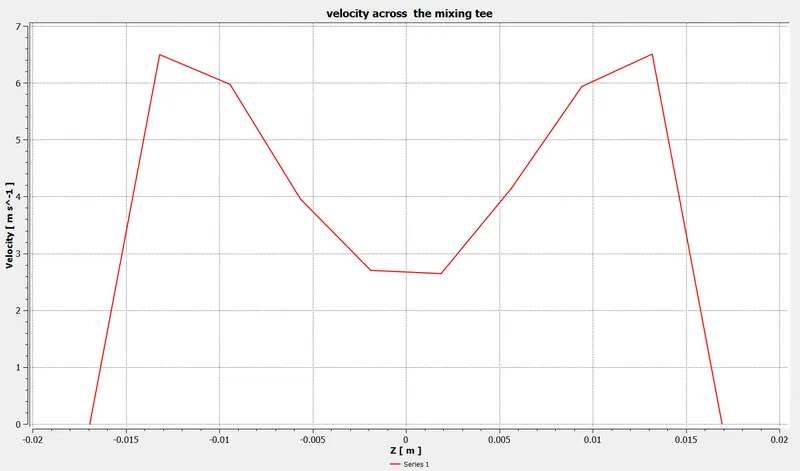
After comparing all the three element sizes it is found that as the element size is reduced the diffusion in the temperature coutour reduces and also there is a change in the values of the area weighted tempreature at the outlet. We get the best result with the smallest mesh size also we would have reduced the element size to 0.001 m but the ansys academic version do not support the number of elements generated by this size and exceed the limit. So we have to stop out grid test at 0.0015 m and we will be using the element size of 0.0015 m for our rest of the calculations for other cases wtih changing momentum ration and the length of the mixing Tee.
CASE 1(B) : SHORT MIXING-TEE with Momentum Ratio = 4
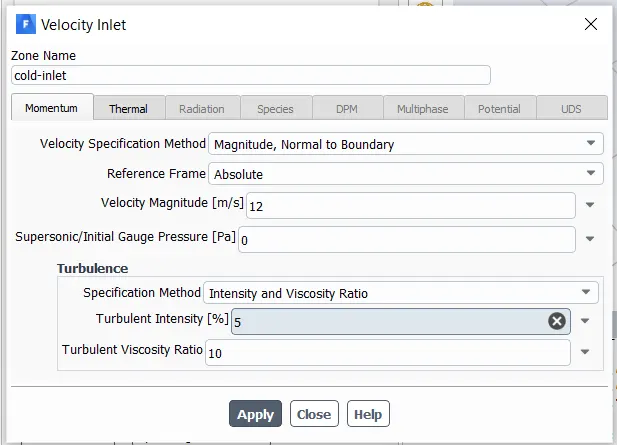
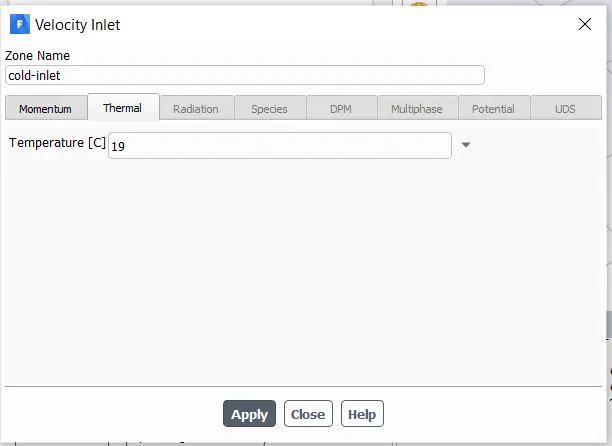
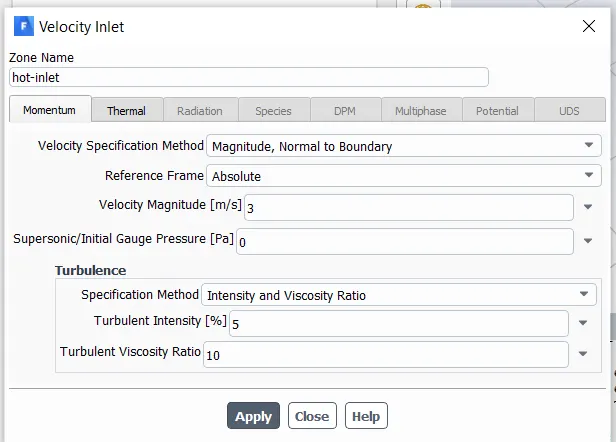
Now we will be simulation our case with the momentum ratio of 4 and so the new values of the cold and hot inlets will become 12 m/s and 3m/s respectively. We will be using the emelent size of 0.0015 m and k-epsilon model . The temperature of the inlets will be the same as earlier.
we will be generating the mesh with the element size of 0.0015 m and then load it to ansys fluent . While setting up the simulation the cold inlet velocity will be changed because the momentum ratio for this case is 4.
as the hot inlet velocity is fixed to 3 m/s then the cold inlet velocity will become 12 m/s. And the temperature at the cold inlet is ` 19^oC` and the temperature at the hot inlet is `36 ^oC`.
cold inlet setup
Hot inlet setup
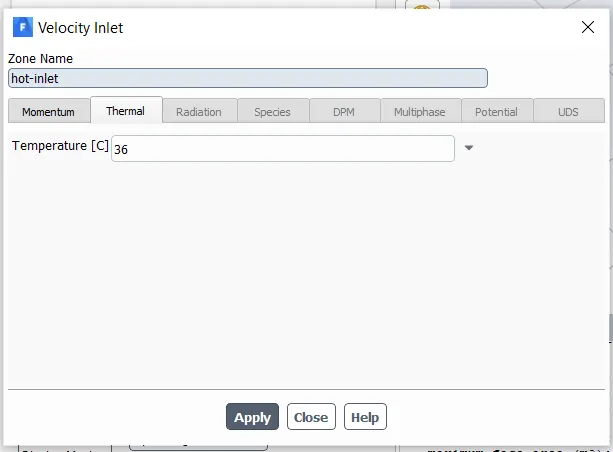
then after setting te residuals and the report definition we will initilize the simulation and run it for about 300 iterations
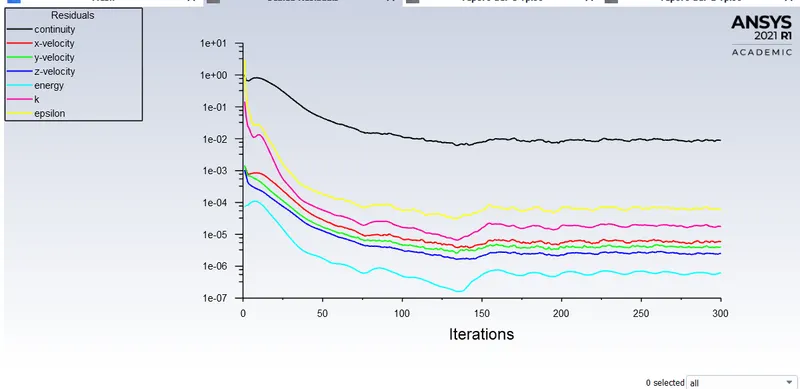
the residuals seem to have converged at about 200 iterations
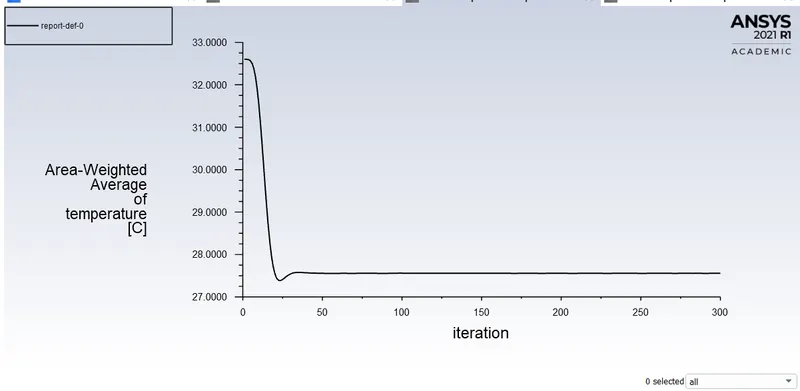
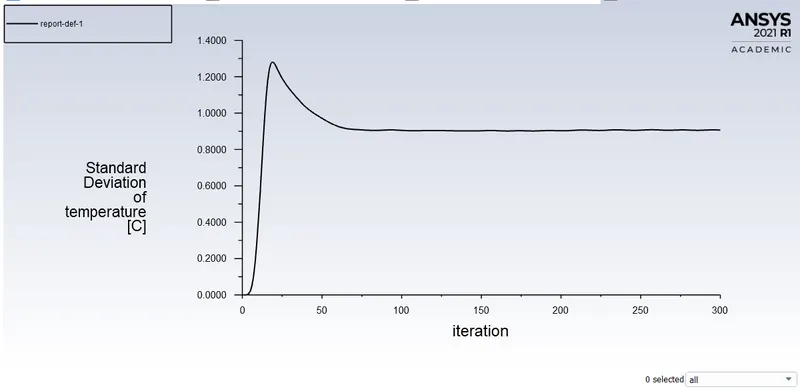
the area weighted average of temperature is converged at about 50 iterations and the standard deviation of temperature at the outlet is converged at about 100 iterations

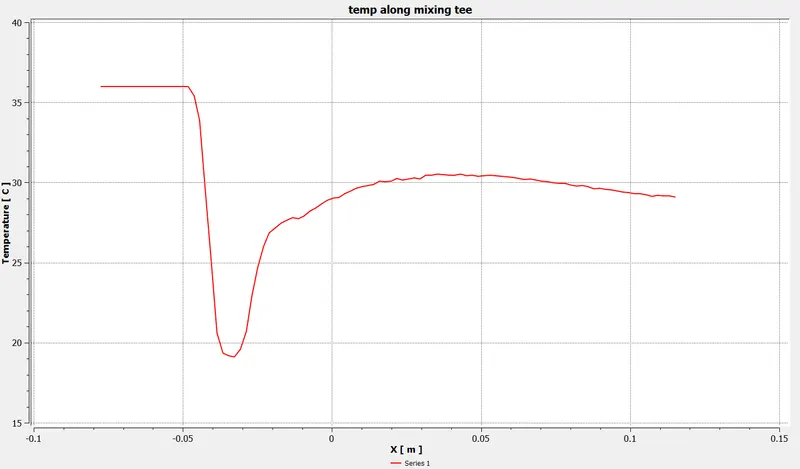
the area weighted average of temperature at outlet is `27.5594^oC`
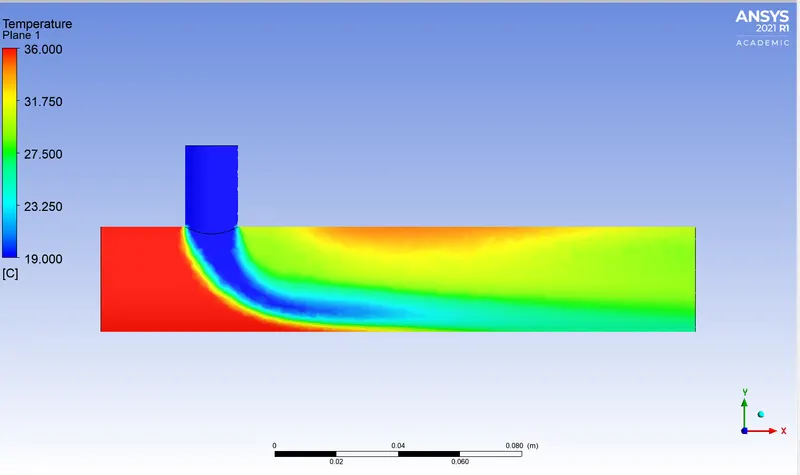
from the temperature contour along pipe we can see there is not muh deffusion and the flow seems good and the mixed well.
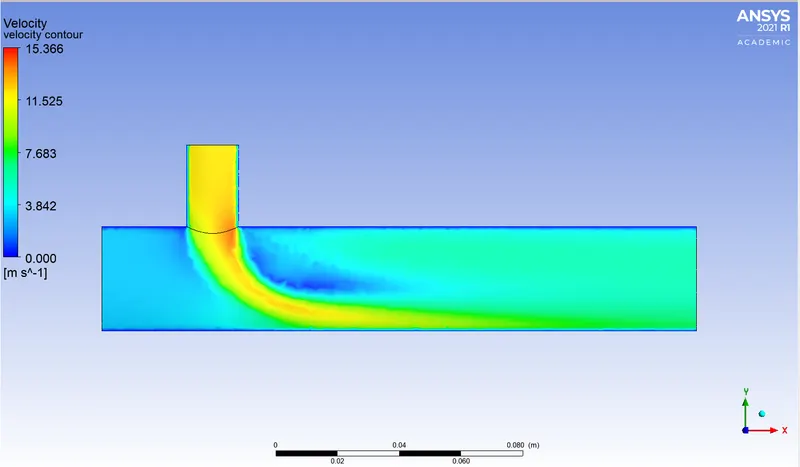
velocity contour along the pipe is shown below
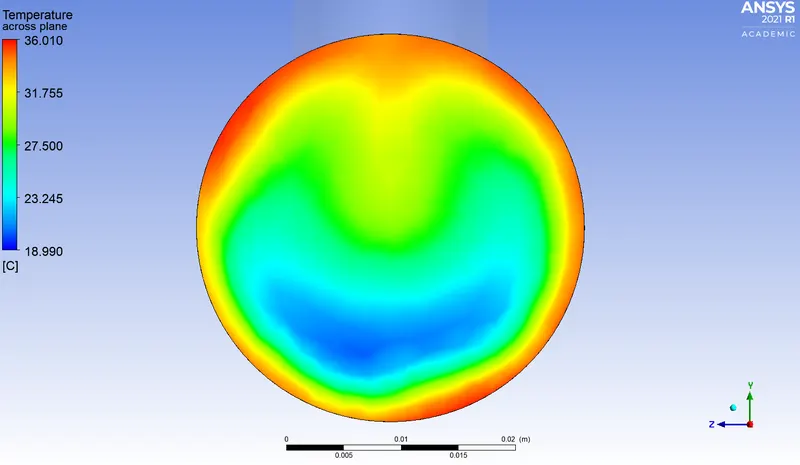
temperature contour across the pipe after mixing
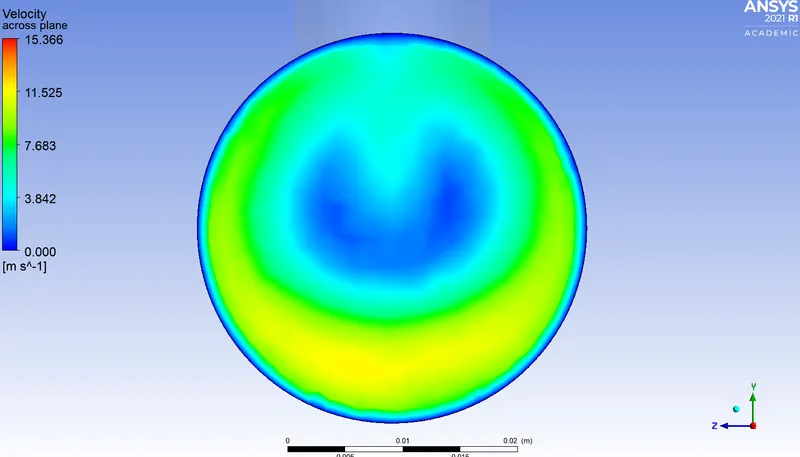
velocity contour across the pipe after mixing
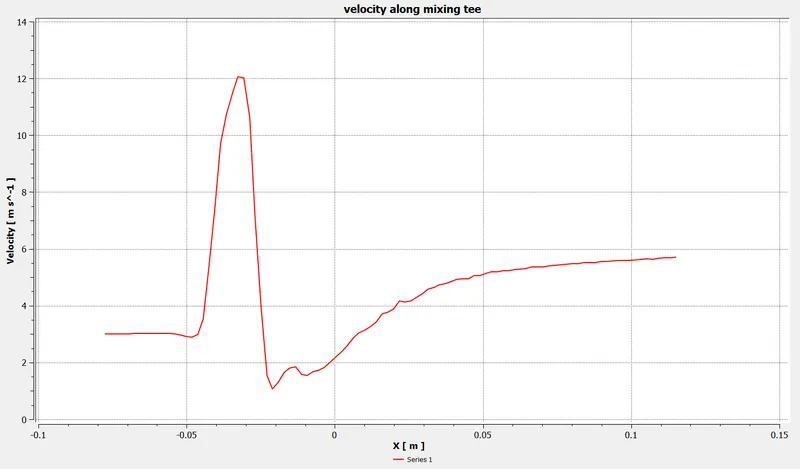
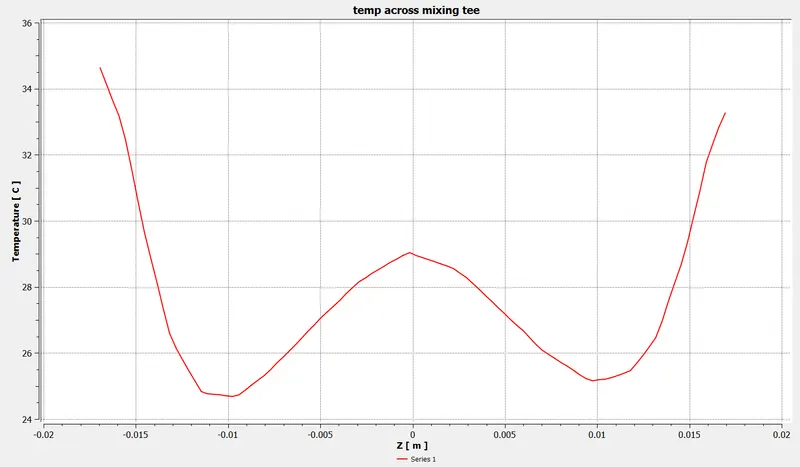
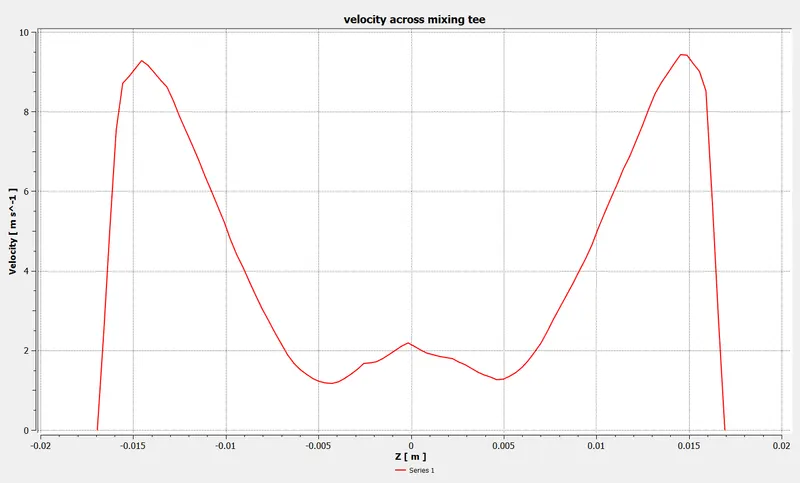
verious plot related to the solution are shown below
temperature plot along the pipe
velocity plot along the pipe
temperature plot across the pipe after mixing length
velocity plot across the pipe after mixing length
CASE 2 (A) : LONG MIXING-TEE with Momentum Ratio = 2
Now we will be changing the geometry of the mixing tee from short length of pipe to longer pipe.
the extracted volume is shown below
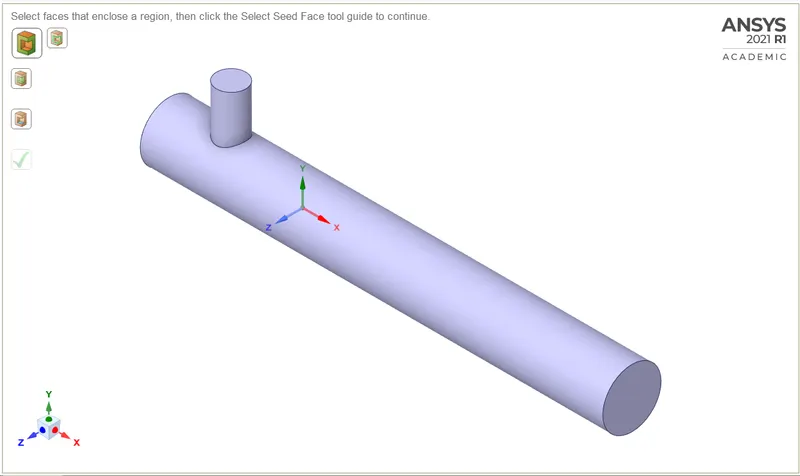
now we will be loading this geometry into the meshing to mesh and then we will mesh it with element size of 0.0015 m.
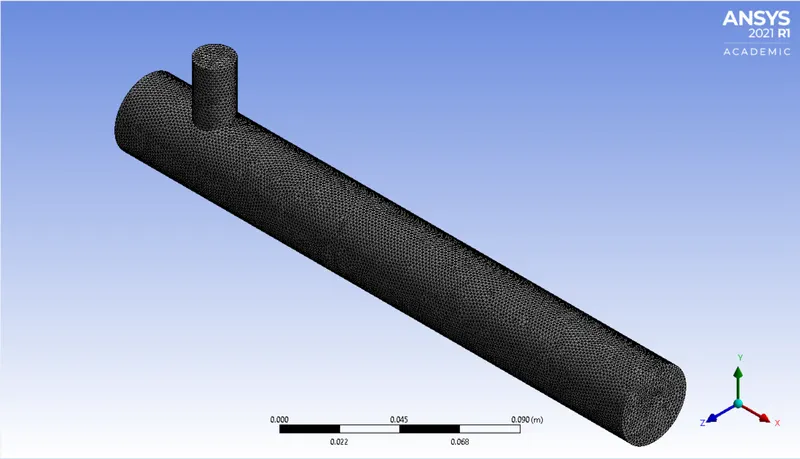
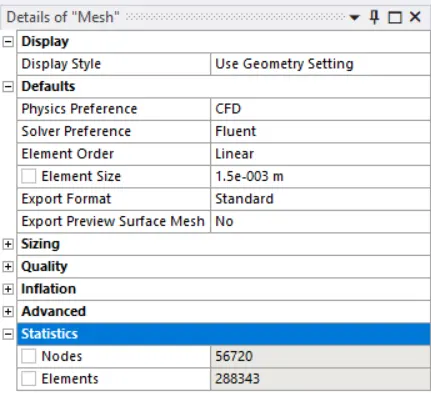
we get 288343 elements.
after this we will load this mesh into fluent setup and run the simulation for the inlet velocity for cold inlet as 6 m/s and for hot inlet 3m/s.
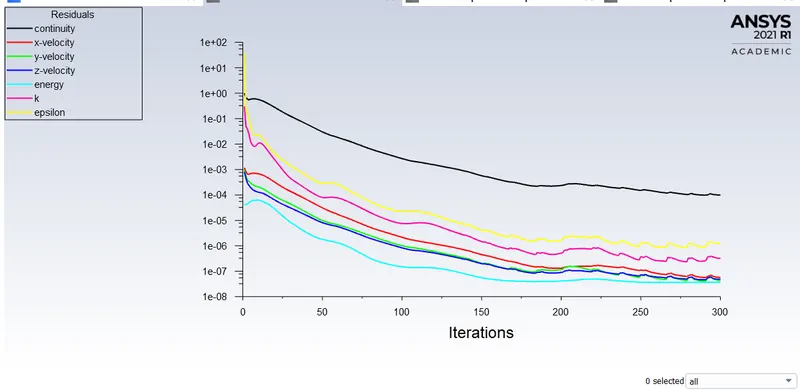
after 280 iterations the residuals have stabilized
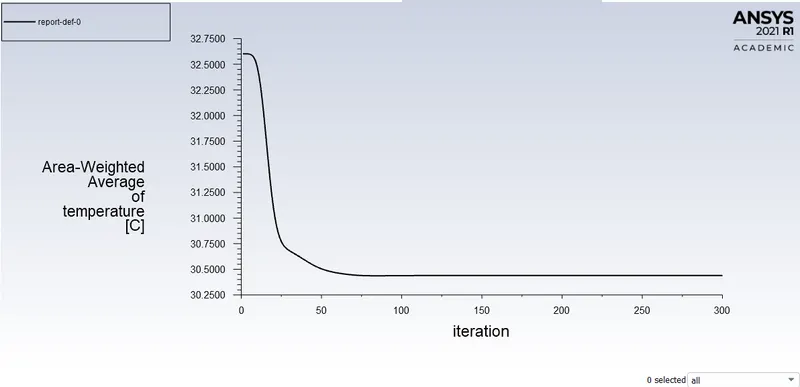
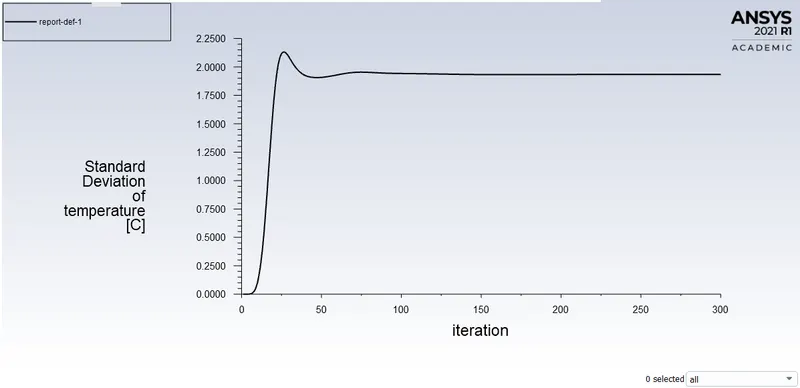
the values of area weighted average and standard deviation of temperature are stable so our solution is good.
we get the area weighted average of temperature at the outlet as `30.4398 ^o C`

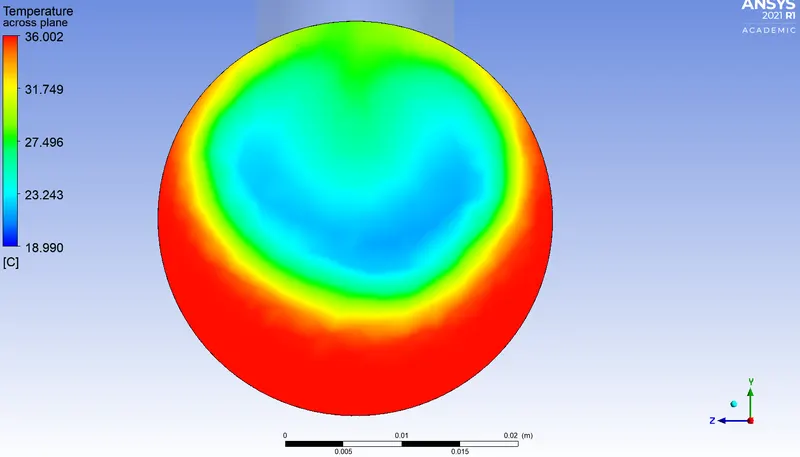
and the temperature contour looks like the mixed more properly than compared to the shorter pipe and also the standard deviation of temperature at outlet is less that the shorter pipe.
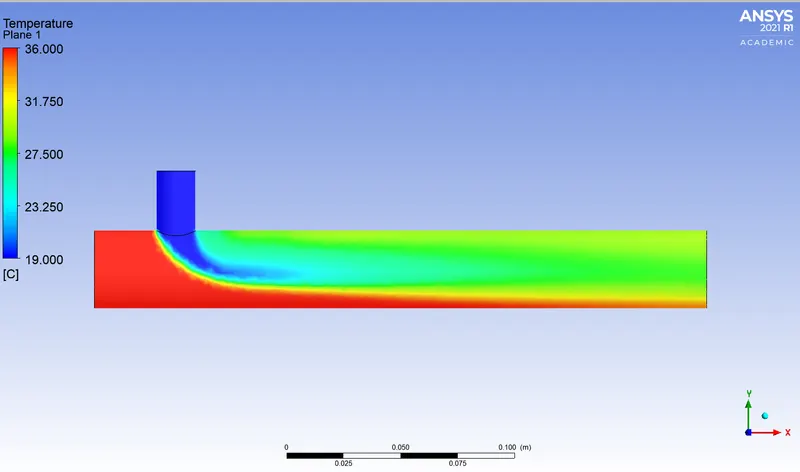
velocity contour along the pipe
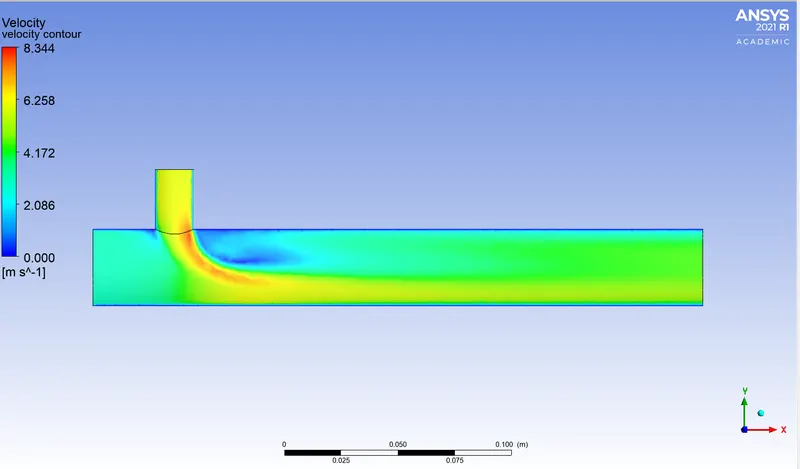
temp contour across the pipe after mixing length
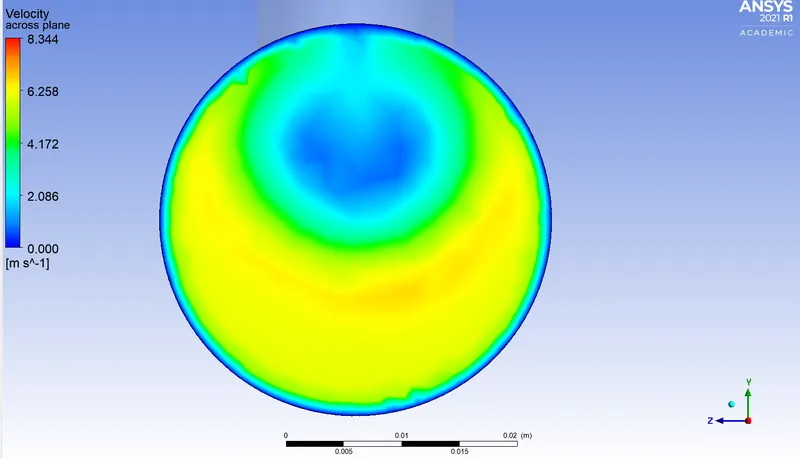
velocity contour arcoss the pipe after mixing length
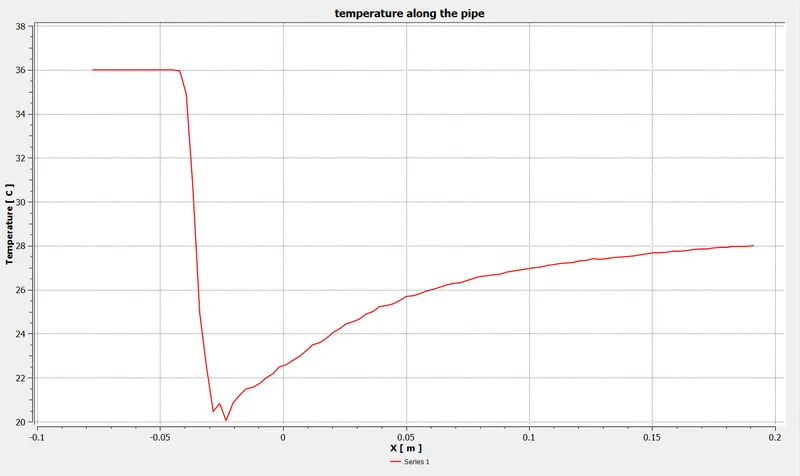
the plot related to this solution are given below
temperature plot along the pipe
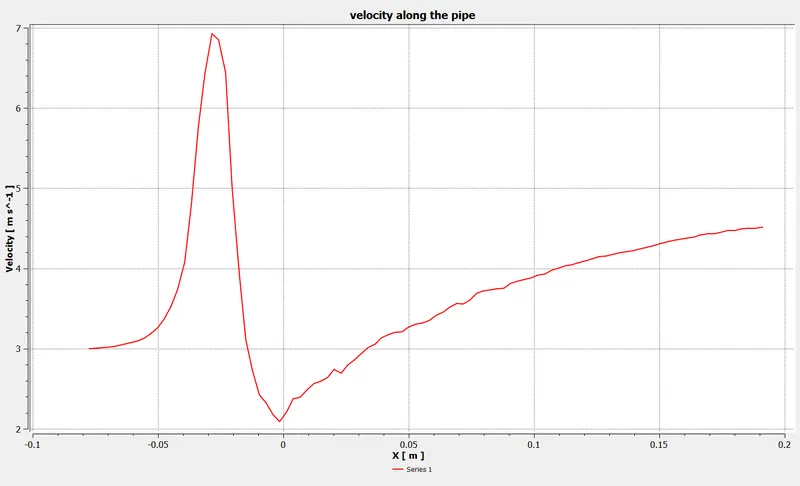
velocity plot along the pipe
tempreature plot across the pipe after mixing length
velocity plot across the pipe after mixing
CASE 2(B) : LONG MIXING-TEE with Momentum Ratio = 4
now for this case we will be using the same geometry and mesh of long mixing tee as in case 3 . the only difference is in the setup of the velocity of the cold inlet . here the cold inlet velocity will be 12m/s with temperature ` 19 ^o C` and the hot inlet velocity will remain the same as earlier that is 3m/s with temperature `36 ^o C`.
After the running the simulation lets see the results.
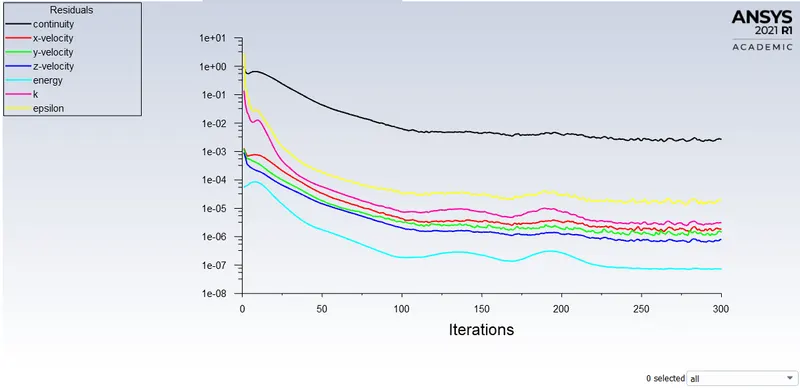
the residuals stabilizes after about 250 iterations.
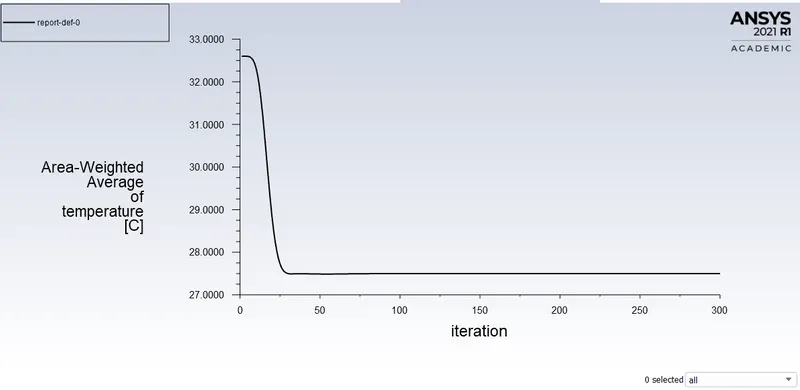
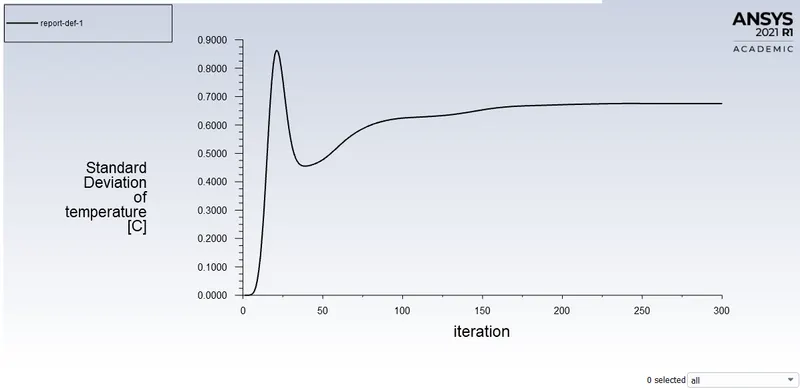
the area weighted average and the standard deviation of temperature are also stable so the solution is good.
we get the area weighted average of the temperature at the outlet as ` 27.5004 ^o C`

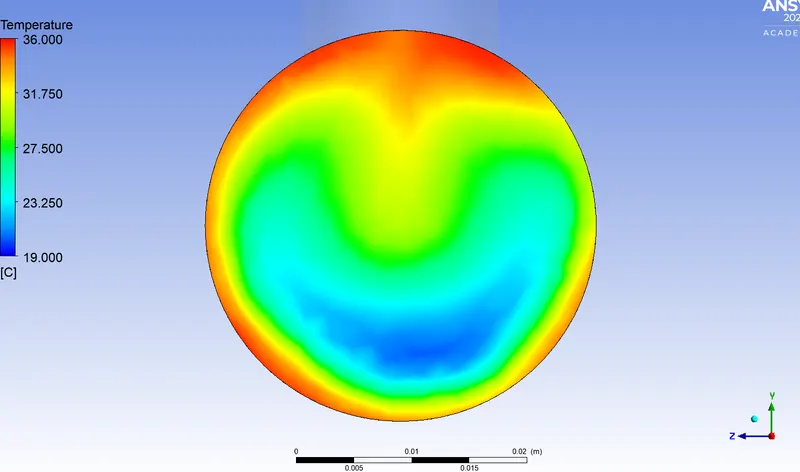
the temperature contour of is shows a well mixed profile at the outlet and also the standard deviation is lowest in this case.
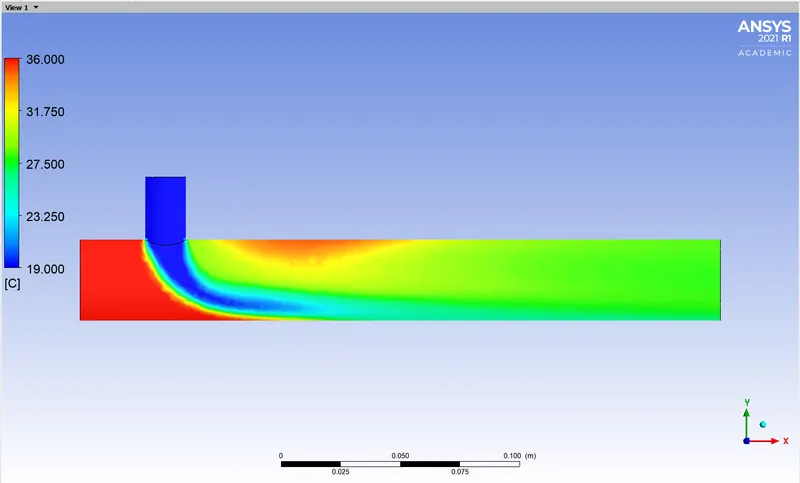
velocity contour along the pipe
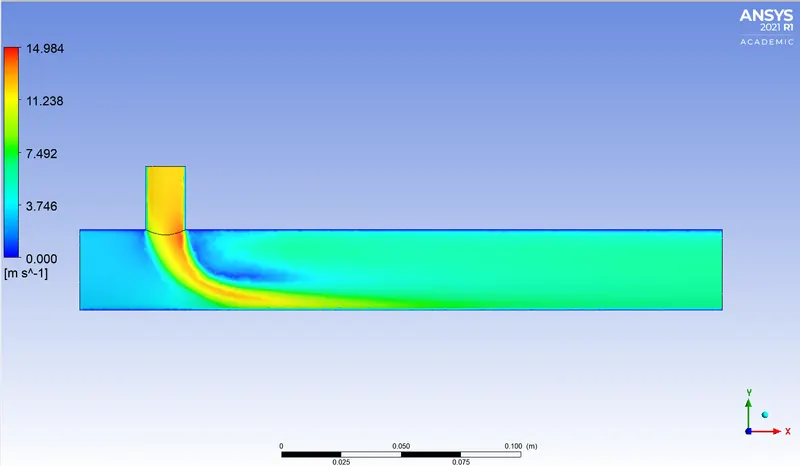
temp contour across the pipe after mixing
velocity contour across the pipe after mixing
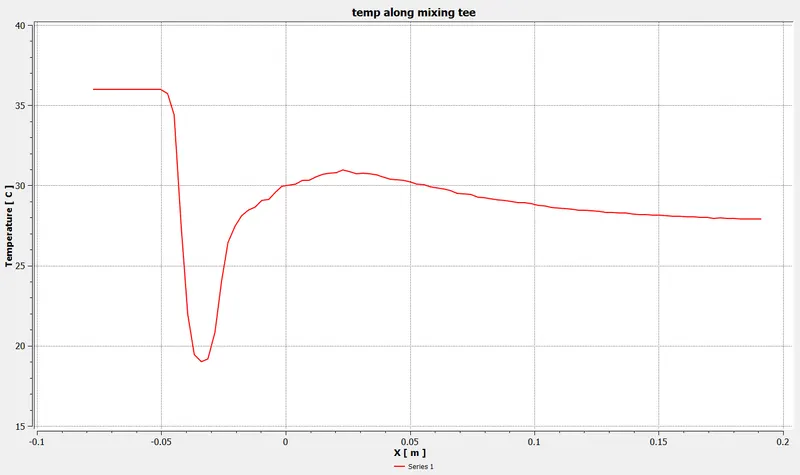
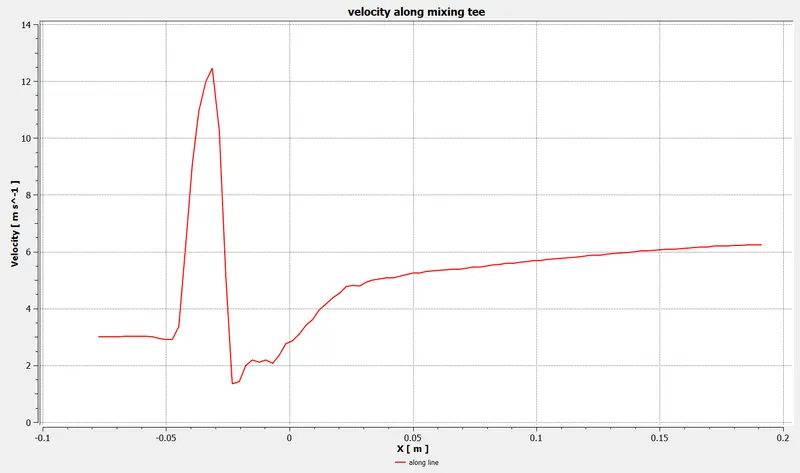
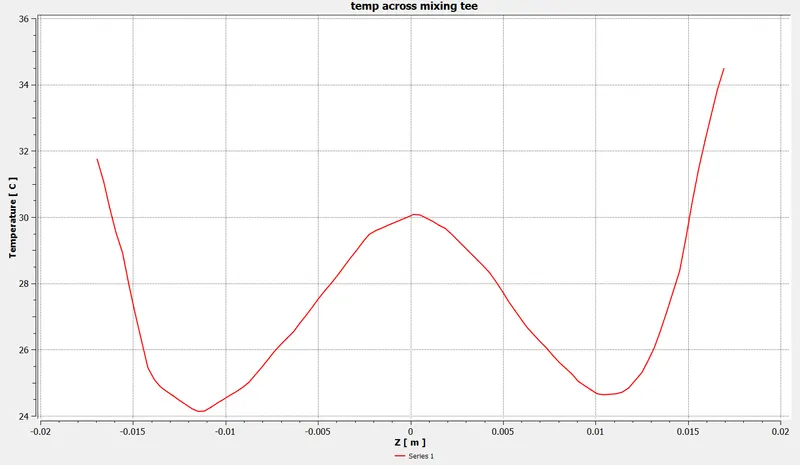
Now we wil be seeing various plots for this case
temperature plot along the pipe
velocity plot along the pipe
temperature lot across the pipe after mixing length
velocity plot across the pipe after mixing length
Comparing all the four cases having element size 0.0015 m
| Case number | Momentum ratio | Length of pipe of mixing Tee | area weighted average of temperature at outlet | standard deviation of temerature at outlet | mixing quality |
| Case 1 | 2 | Short | `30.3118^o C` | `2.7^o C` | poor |
| Case 2 | 4 | Short | `27.5594^o C` | `0.8^o C` | good |
| Case 3 | 2 | Long | `30.4398^o C` | `1.9^o C` | poor |
| Case 4 | 4 | Long | `27.5004^o C` | `0.65^o C` | best |
CONCLUSIONS:
- By doubling the velocity of the cold inlet the temperature of the outlet decreases.
- For the short pipe length the flow is not mixed porperly
- With increasing the length of the pipe the mixing of air increases and the standard deviaition of temperature at outlet is reduced
- With standard deviation of temperature at outlet also decreases when the cold inlet velocity is doubled.
- We can find the best mixing in the Case 2 (b) , where due to the long length of pipe and doubled cold inlet velocity the flow at outlet is mixed properly and have lower temperature.
- The plot of velocity and temperature along and across the pipe give us the idea of how the flow distribution occurs at various positions in the pipe.
- The velocity contours shown how the turbulent flow along the length of pipe and also we can see teh boundary layer near the walls.
- The temperature contours shows the mixing of hot and cold air flows.