Bird Strike - Project - 2
OBJECTIVES :
1. To simulate the bird Strike on the given aero engine model.
2. To carry out the simulation by including the different files of the part into a Single Main file by using the keyword* INCLUDE
3.To renumber the Nodes, Elements and the Parts before running the simulation in the ranges of 100000+, 500000+ and 1000+ respectively.
CASE SET UP :
1. Adding the Elastic Material for the Engine-Casing and the Bird in the Material keyword file
The Elastic material for the engine casing and the bird are added to the Material Keyword file which already contains the Material for the Blade and the hub. The keyword that is used for creating the Material cards for the engine casing and the bird is *MAT_001_ELASTIC. The Young's modulus for engine casing material and the bird material is taken as 200GPa and 2000MPa respectively.
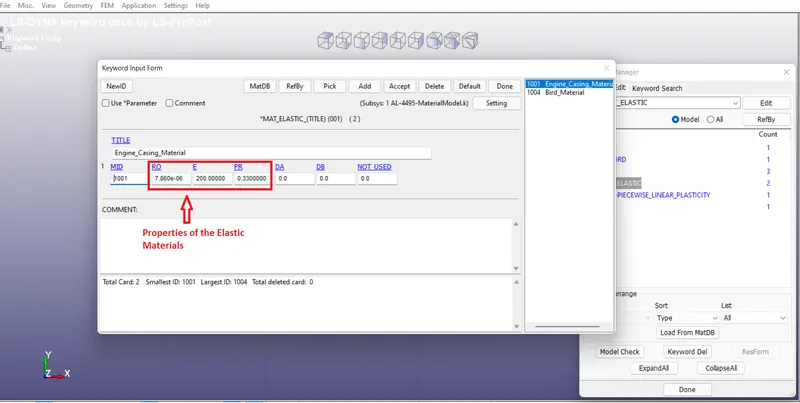
Fig 1 Creating the Elastic Material Card for the Engine Casing and the Bird
2.Splitting the given file into different Part keyword file.
All the files are splitting into different keyword files by deleting all the parts except the one for which the keyword file is to be created and the file is saved as a different keyword file under the name of that Part. Following are Part keyword files that were created :
- Engine_Casing.k
- Hub_Blade.k
- Bird.k
3. Renumbering the Elements, Nodes and the Parts according to the required range
In each of the individual part file, the Nodes, Elements and the Parts are Renumbered according to the required range of 100000+, 500000+ and 1000+ respectively by using the Renumber tool in the Model and Part toolbar. The Renumbering for the Nodes, Elements and the Parts in different Part keyword files were renumbered according to the following table :
| Sl No | Item | Numbering range | Part_Name | Start Id | EndID |
|
1
|
Nodes
|
100000
|
Engine_Casing | 100000 | 104096 |
| Blade_Hub | 104097 | 114010 | |||
| Bird | 114011 | 114428 | |||
|
2
|
Shell Elements
|
500000
|
Engine_Casing | 500000 | 503967 |
| Blade_Hub | 503968 | 509440 | |||
| Bird | 535758 | 536167 | |||
| 3 | Solid Elements | 500000 | hub | 514914 | 535757 |
|
4
|
Parts
|
1000
|
Engine_Casing | 1001 | 1001 |
| Blade_Hub | 1002 | 1003 | |||
| Bird | 1004 | 1004 |
4.Creating the sections for the Respective Parts
In each of the individual part keyword file, the Section cards for the respective elements are created in which the Elementform and the thickness to the elements are assigned.
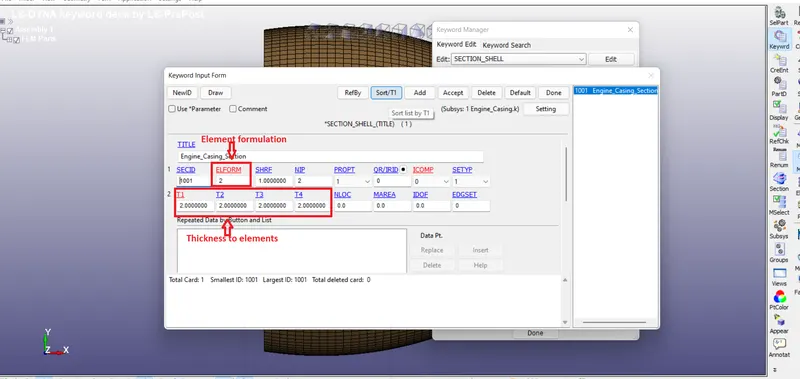
Fig 3 Creating sections for the respective Parts
These sections are assigned to the respective part IDs in the individual keyword files for the Parts.
5. Creating the Main file and Including all the Part and Material Keyword files
A new file is opened and it is saved as a main keyword file. All the keyword files for the Part and the Material are included in that file using the keyword * INCLUDE.
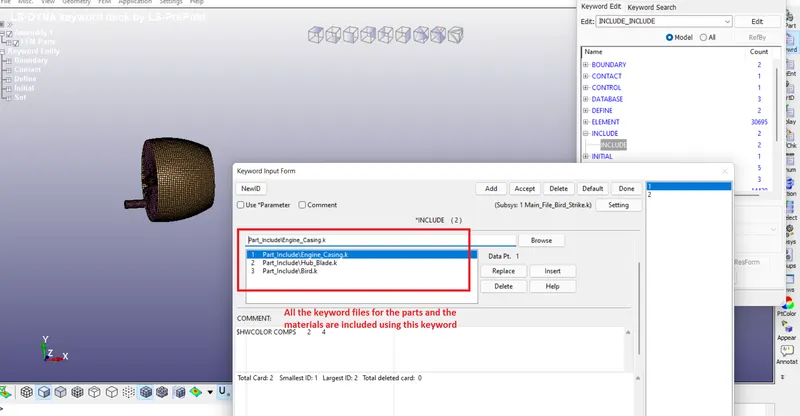
Fig 4 Including the Part and Material keyword files
6.Assigning the Materials to the Parts
The Material Ids are assigned to the parts in the keyword * Parts. All the materials that were created in the Material keyword file that was included are available to be assigned to the parts.
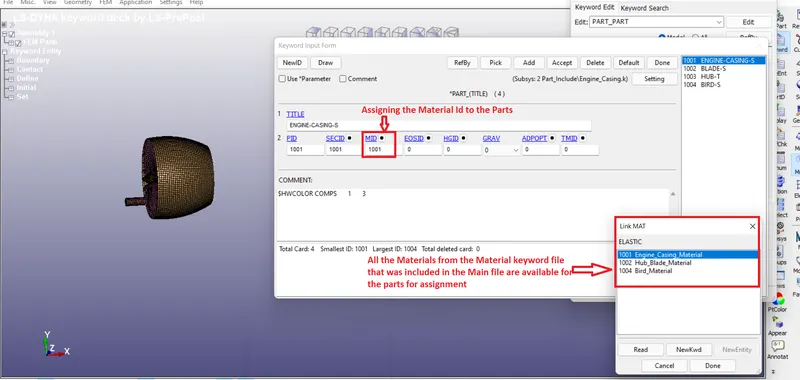
Fig 5 Assigning the Materials to the Parts
7.Applying the Boundary Conditions
i. Applying the SPC_set to the Engine Casing
The nodeset that belongs to the engine casing is constrained in all directions of freedom using the keyword *BOUNDARY_SPC_SET. 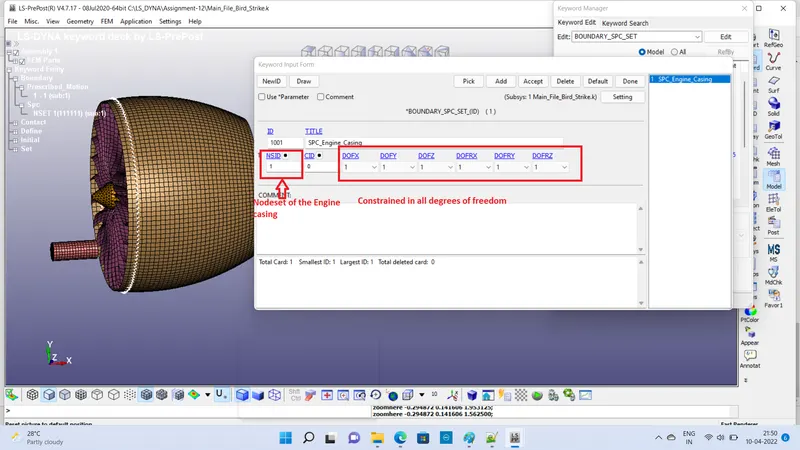
Fig 6 Applying the SPC to the Engine Casing
ii. Applying the Prescribed Motion to Hub and the Blade arrangement
The prescribed motion set keyword is used for applying the rotational displacement to the hub and blade about their axis. The axis of rotation for the hub and the blade is in the x-direction, hence the flag value for the rotational displacement about the x-axis is entered in the card. The flag value for the displacement motion is also entered. The curve describing the rotational displacement of the hub with respect to the time is defined and assigned in the card.
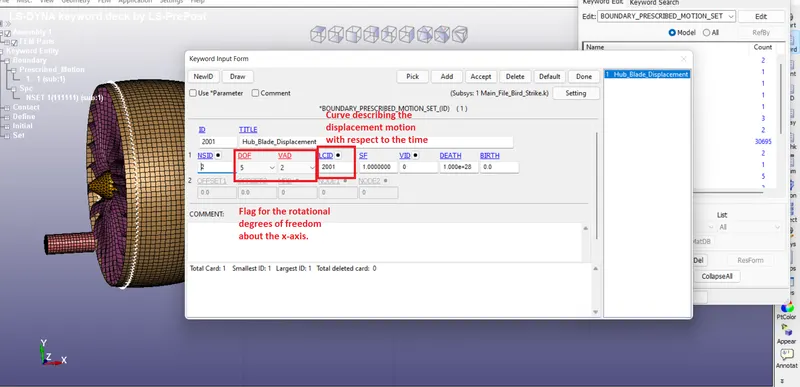
Fig 7 Applying the Prescribed motion to the Hub and the Blade
8. Applying the Intial Velocity to the Bird
The Intial velocity of 360 kmph is applied to the Bird part using the keyword *INTIAL. The value of the velocity is entered in the space provided for direction which in this case is x-direction.Hence, the value of velocity is entered for the Vx in the card.
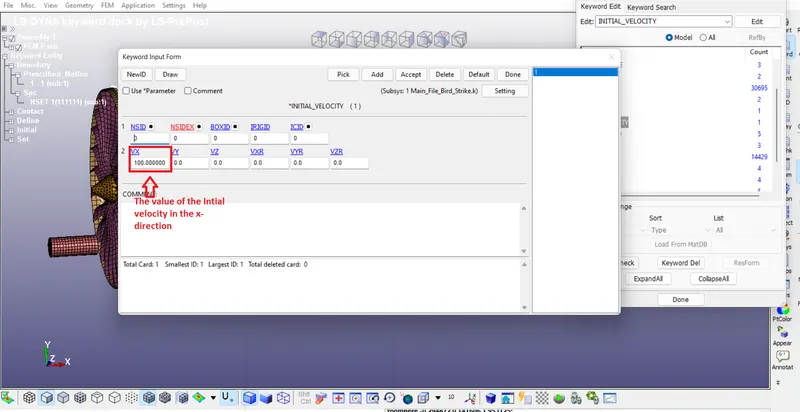
Fig 8 Applying the Intial Velocity in the X-direction for Bird
9.Creating the Surface to Surface Contact betweent the Blade and the Bird
The surface to surface contact betweent the Bird and the blade is created using the keyword *CONTACT_SURFACE _TO_SURFACE. The Element set for the Blade acts as the Slave whereas the Element_set for the bird acts as the Master.
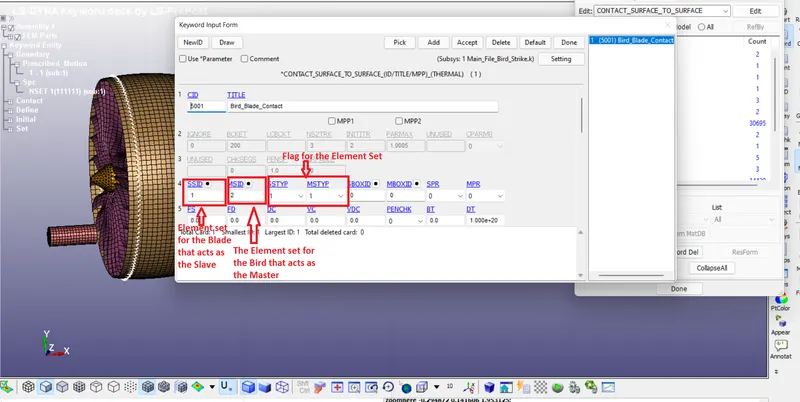
Fig 9 Creating Surface to Surface Contact betweent the Blade and the Bird
10. Creating the DATABASE for the Output
The DATABASE for the Output is created mainly using two keywords *DATABASE_ASCII and DATABASE_d3plot.
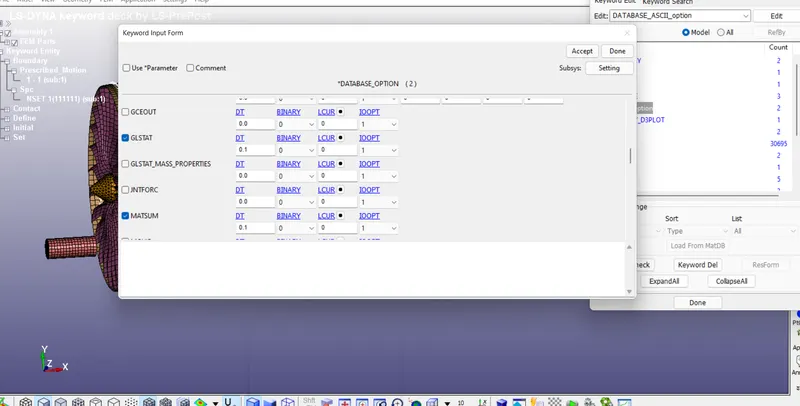
Fig 10 Creating the keyword database_ASCII for the ASCII output
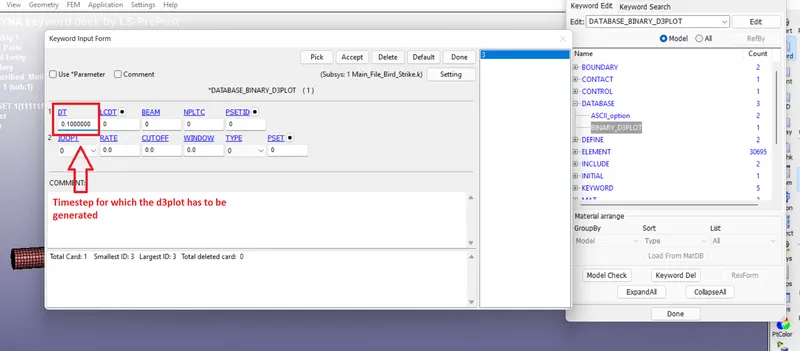
Fig 11 Creating the keyword database_d3plot
11.Creating the Control Termination card
The Control termination card is created in order to assign the simulation runtime.
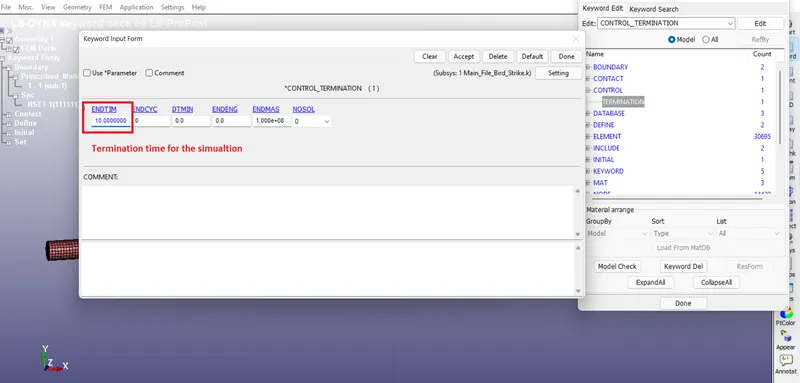
Fig 12 Creating the Control Termination card for assigning the termination time for the Simulation
EXECUTION :
The Main file is run for the simulation in the LS-run. The results of the simulation are generated in the same folder as that of the keyword file.
RESULTS :
Contour Plot depicting the blade failure
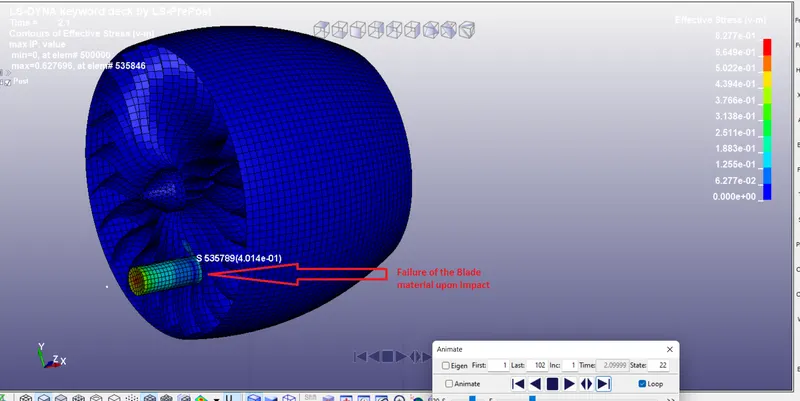
Fig 13 Contour Plot depicting the failure of the blades
INFERENCE : It can be seen that the failure of the blades happen when the bird strikes the engine blades at the velocity of 360kmph. This failure is due to the plastic nature of the material and the stress reaching the failure limit at the time of Impact due to the high kinetic energy of the Bird due to it's high velocity.
Note : *The Simulation file is in the form of the PPT file that is attached with this report.
CONCLUSION :
1.The simulation of the bird strike on the engine depicting the failure of the blades was carried out successfully.
2. The simulation was run using the Main file which included several files for the Parts and the material.
3. All the Nodes, elements and the Parts were renumbered in the required ranges of 100000+, 500000+ and 1000+ respectively before running the simulation.