2D meshing for Plastic components
AIM:
To extract the midsurface & mesh the component with given quality parameters & assign the thickness on a plastic bottle cap component.
DESCRIPTION:
|
S.No |
Quality Criteria |
Value |
|
1 |
Target/Average length |
1 |
|
2 |
Minimum Length |
0.5 |
|
3 |
Maximum Length |
3 |
|
4 |
Aspect |
3 |
|
5 |
Warpage |
15 |
|
6 |
Skewness |
45 |
|
7 |
Jacobian |
0.7 |
|
8 |
Minimum Quad Angle |
45 |
|
9 |
Maximum Quad Angle |
135 |
|
10 |
Minimum Tria Angle |
30 |
|
11 |
Maximum Tria Angle |
120 |
|
12 |
Tria Percentage |
15 |
PROCEDURE:
Tools which has been used to perform the steps are:
UNIVERSAL DELETE: Its the function of the geometry group can be used to delete the various ANSA entities(Curves, Faces, FE-Modelentities etc)
RELEASE: Release the topology of the selected cons.
FILL HOLE: Its a function which fills holes on the faces. The holes can be in any shape, we can select manually or automatically.
COMPRESS: Its used to comprerss an ANSA database. KIt maybe selectively either on geometric entities only (faces, curves 3-D points) on the entire database. In this opertaion all information concerning deleted entities is lost.
PASTE: Its used to paste nodes.
COONS: It defines a multi-patch surface using the coons interpolation principal. Its a easy way to define a new surface by its boundary curves. Quadrilateral & triangular surfaces are created.
MOVE SURFACE: it moves a selected mesh node on the Macro Area's surfacebor a perimeter node along the parameter segment on which it lies. It moves a node belonging to FE-model mesh on the surface which is defined by the adjacent shell elements.
SPLIT: It is used to splits quadrilateral & triangular sheel elememts into smaller ones.
RECONSTRUCT: It is a powerful tool for the creation of a high quality surface mesh.
PROJECT: It projects CONS or 3D curves, a number of selected 3D curves, CONS , elements, edges, line elements or Hexa box edges on a number of selected faces in a user controlled direction. The selection of the CONS or 3D curves can be assisted by the corner angle PID Neighbs for the line elements or paths.
SWAP: It rotates the sheel edge picked by the user, inside the two shells which have that edge as common.
CUT: It is used to cuts(splits) an existing face or joins if inverse operation is applied.
RM-DBL: It compares & remove the similar surfaces.
PROCEDURE:
IMPORT & CLEAN UP THE MODEL:
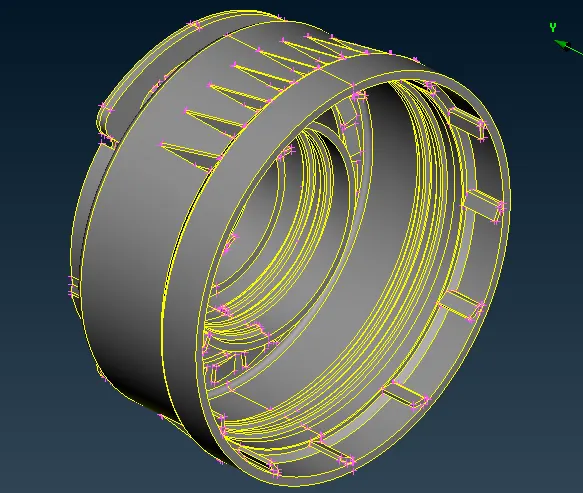
- We import the model into ANSA the file ttransfers from igs file & database file, then we switch to topo mode(open-bottle cap_updated.igs)
- Then we perform the geometry checks from checks manager we found the some cracks on the inner & outer ribs, we deal those cracks using coons & topo commands.
- After eliminating those cracks we goes to check manager & again perform geometry checks onorder to confirm the entire model is clean now, it shows some needle faces are generated we use auto fix command inorder to fix them. So now the model is free from topological errors.
EXTRACT THE MID-SURFACE:
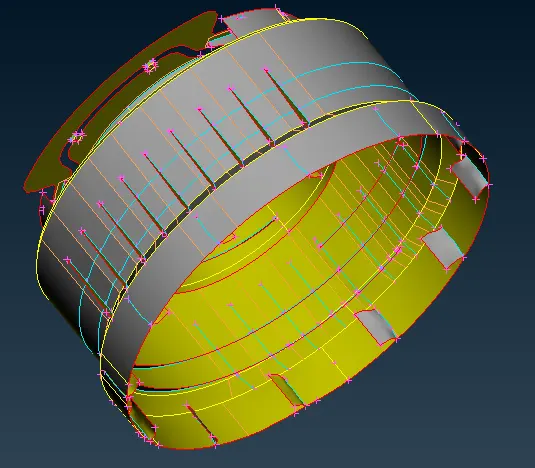
- In order to extract the mid-surface, we have two options one is manual & auto mid-surface extraction.
- In auto mid-surface extraction method we use command mid-surface from faces tab but here the geometry is in the complex form the mid-surface option cannot generate the proper results, so here we use manual mid-surface method.
- For outer shell portions w euse offset option from faces we offset the faces to half of it respective surface thickness. The surface thickness are measured using the measure option from utilities & these measurements are stored for further references.
- For the surfaces like ribs we use middle option from faces which creates a middle face between the two others.
- For extracting the mid-surface for the thread we generate the middle curve using middle option from the curves & we projecr the curve to opposite edge & we use coons option to generate the surface attaching the two curves.
- We need to project or extend or intersect some surfaces to other surfaces in order to have continous geometry as of the parent model.
- After extracting all the midsurface, all are free from geometry & topology errors by making performing geometry checks option. While cleaning the geometry is necessary we perform cleaning operations so we can delete the unnecessary hot points present.
ASSIGNING THE PROPERTY ID'S TO THE MODEL:
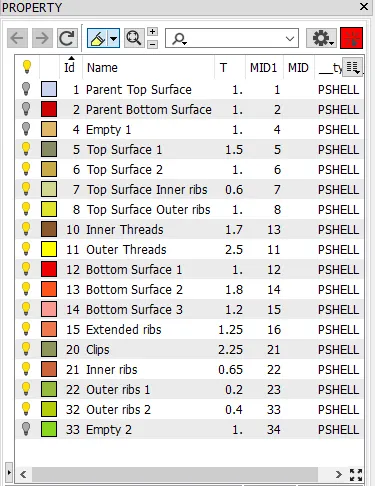
- We assign the property id's to the extracted mid surface parts by clicking the property id tab.
- Then we assign the thickness to extracted mid surface parts with respect to their parent parts.
MESHING THE COMPONENT:
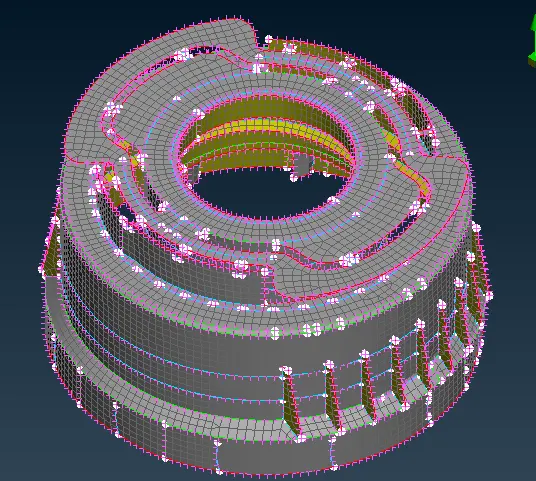
- In order to mesh the model we need to make sure that the model is error free.
- Now to perform meshing we switch from topo mode to mesh mode & assign thhe target length as 1 mm.
- We need to assign the quality parameters in the quality criteria as shown in the above tab. Before the mesh is generated, we need to check the perimeter length to 1
- The mesh is applied to the complex geometry & then the remaining parts. By selecting the mesh generation tool, select the element shape as mixed.
- After meshing the mid surface, we need to check the element quality, it should pass the quality criteria if some element fails, we can adjust or reconstruct the mesh. The main criteria while meshing is trias should be neglected in plain surfaces.
RESULTS:
- The mesh is obtained significantly by fixing them using several options in the mesh panel.
- The given component is extracted with mid-surface & thickness is assigned for the component & it's been meshed for the given quality patrameters & element size with the given value & fine mesh flow is achieved.