Static Structural Analysis on the Sheet Metal Bending Model
Static Structural Analysis on the Sheet Metal Bending :
Aim :
- To perform static structural analysis on the sheet metal bending model with different materials and with different frictional values to find out the Equivalent Von Misses Stress,Total Deformation and Equivalent Elastic Strain results and compare them.
Objective :
- To define appropriate material to the Sheet Metal Bending Model.
- To define connection between them.
- To perform mesh on the Sheet Metal Bending Model
- To define appropriate Boundary Conditions to the Sheet Metal Bending Model.
- To define Face Sizing and Body Sizing to the Sheet Metal Bending Model.
- To solve and compare the results of the three cases for Total Deformation, Von-Mises Stress and Equivalent Elastic Strain.
Theoretical Frame Work :
- Bending of sheet metal is a common and vital process in manufacturing industry. Sheet metal bending is the plastic deformation of the work over an axis, creating a change in the part's geometry. Similar to other metal forming processes, bending changes the shape of the work piece, while the volume of material will remain the same. In some cases bending may produce a small change in sheet thickness. For most operations, however, bending will produce essentially no change in the thickness of the sheet metal. In addition to creating a desired geometric form, bending is also used to impart strength and stiffness to sheet metal, to change a part's moment of inertia, for cosmetic appearance and to eliminate sharp edges.
- Metal bending enacts both tension and compression within the material. Mechanical principles of metals, particularly with regard to elastic and plastic deformation, are important to understanding sheet metal bending and are discussed in the fundamentals of metal forming section. The effect that material properties will have in response to the conditions of manufacture will be a factor in sheet metal process design. Usually sheet metal bending is performed cold but sometimes the work may be heated, to either warm or hot working temperature.
- Most sheet metal bending operations involve a punch die type setup, although not always. There are many different punch die geometries, setups and fixtures. Tooling can be specific to a bending process and a desired angle of bend. Bending die materials are typically gray iron, or carbon steel, but depending on the work piece, the range of punch-die materials varies from hardwood to carbides. Force for the punch and die action will usually be provided by a press. A work piece may undergo several metal bending processes. Sometimes it will take a series of different punch and die operations to create a single bend. Or many progressive bending operations to form a certain geometry.
- Sheet metal is referenced with regard to the work piece when bending processes are discussed in this section. However, many of the processes covered can also be applied to plate metal as well. References to sheet metal work pieces may often include plate. Some bending operations are specifically designed for the bending of differently shaped metal pieces, such as for cabinet handles. Tube and rod bending is also widely performed in modern manufacturing.
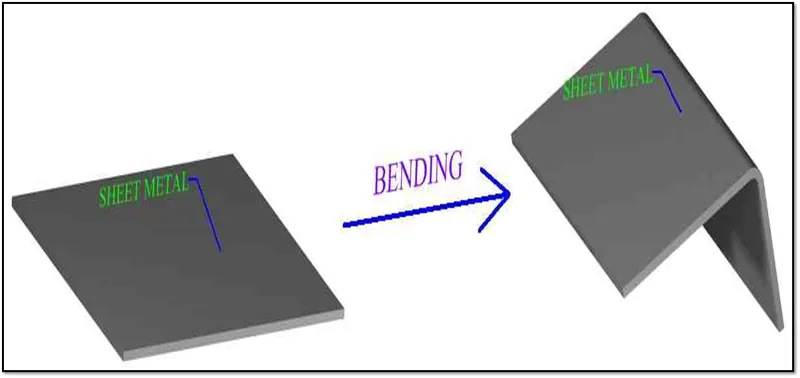
| Figure 1-Sheet Metal Bending. |
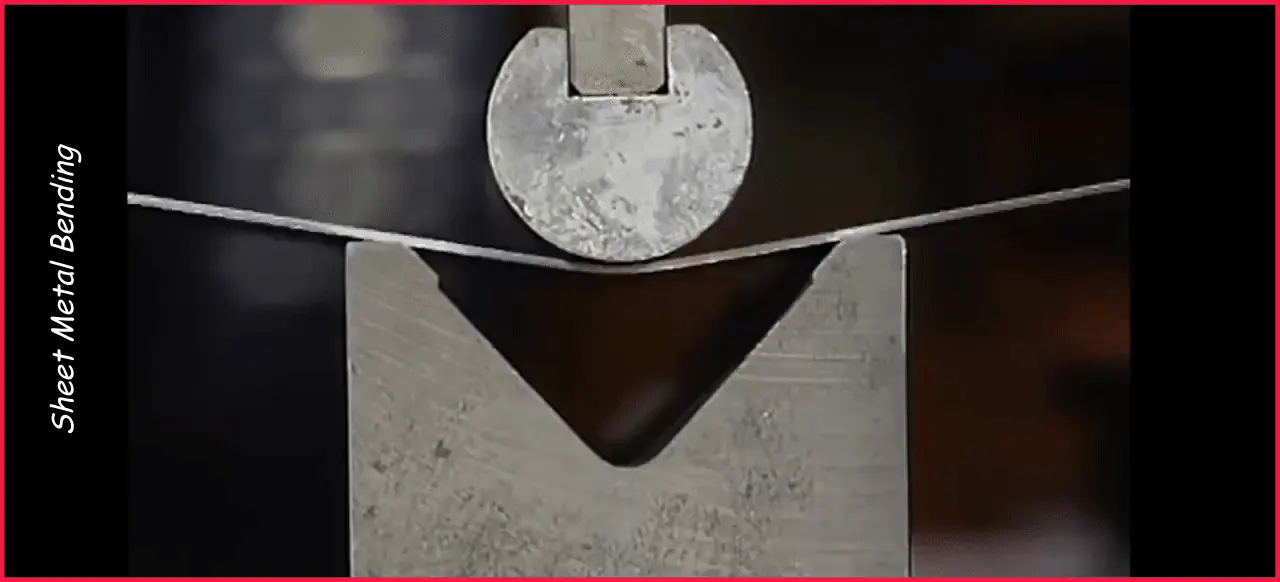
| Figure 2-Sheet Metal Bending Animation. |
Procedure :
Phase 1- Material Set Up :
- To set up the material for the SheetMetal Bending Model. First, drag and drop the static structural analysis workspace into the project schematic from the analysis system. This is shown in below Figure 3.
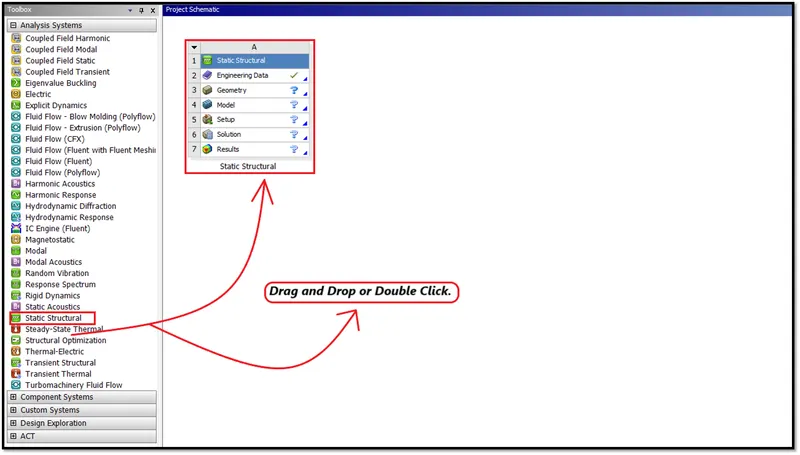
| Figure 3-Ansys Workbench Workspace. |
- After deploying the static structural analysis system in the project schematic workspace.
- Define the Engineering Data and geometry, To define the Geometry and Engineering Data, Right Click on the Engineering Data and click to edit, it will take to the Engineering Tab.
- There Right Click on the Material Tab, A window will Pop-Up stating Engineering data sources.
- Click on the Engineering Data Sources, There go and select the material to define the engineering data. This is shown in below Figures 4,5,6.
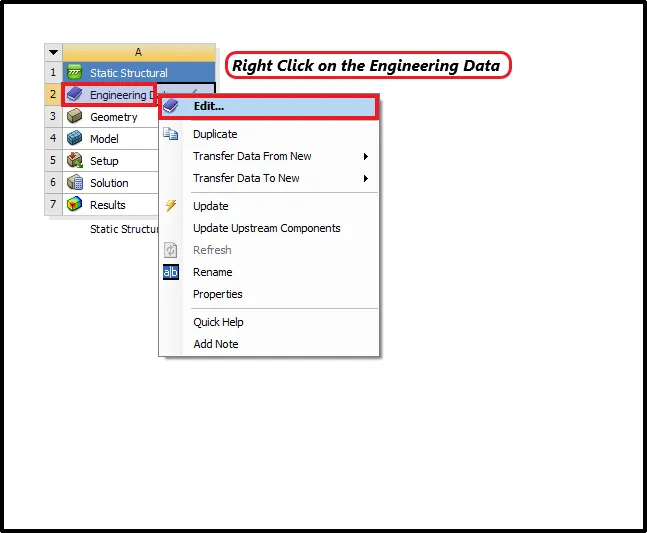
| Figure 4-Right Click on the Engineering Data. |
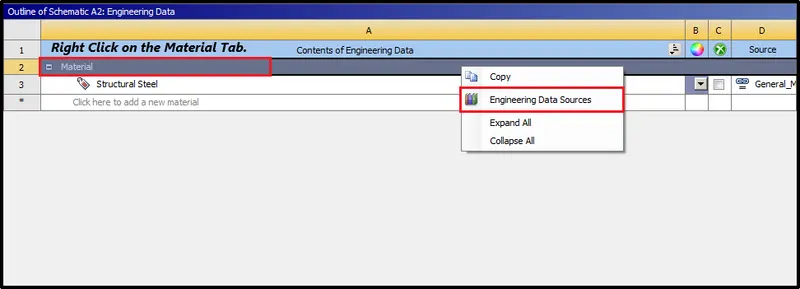
| Figure 5-Right Click on the Material Tab. |
- Here select all those 4 materilas to add in the engineering data,Which is shown in below Figure 6.
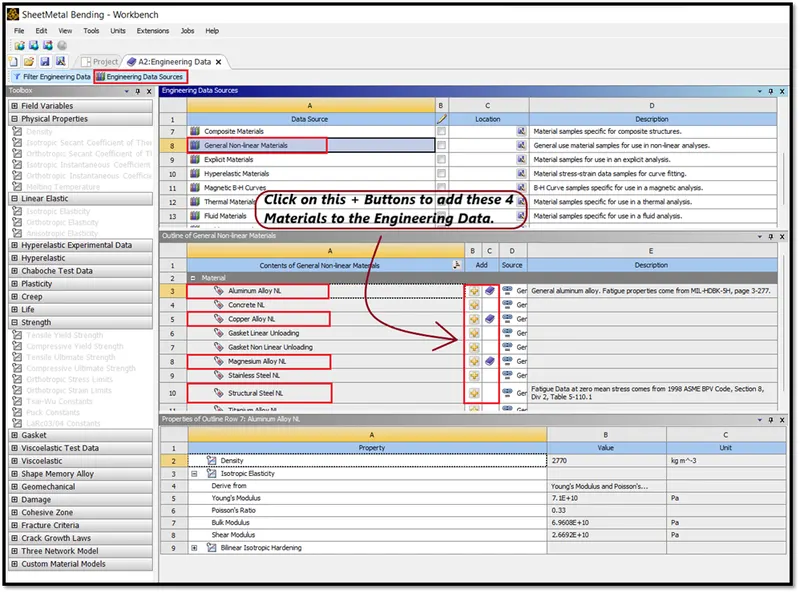
| Figure 6-Select all those Materials to define the Model. |
- We have to creat a another material card manually,Which is shown in below Figure 7.
- Add the properties to material created,To add the materials,Drag and drop the material proprties or double click on the properties to add them to the material.Which is shown in below Figure 7.
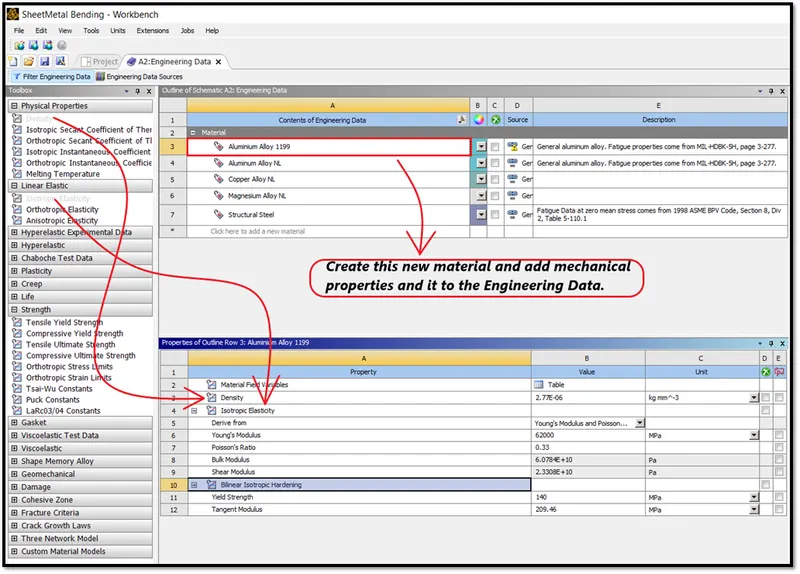
| Figure 7-Drag and Drop or Double Click on the Properties to Add. |
Phase 2-Geometry Set Up :
- Next set up the geometry. To set up the geometry, Right-Click on the Geometry option >> Import Geometry. This is shown in below Figure 8.
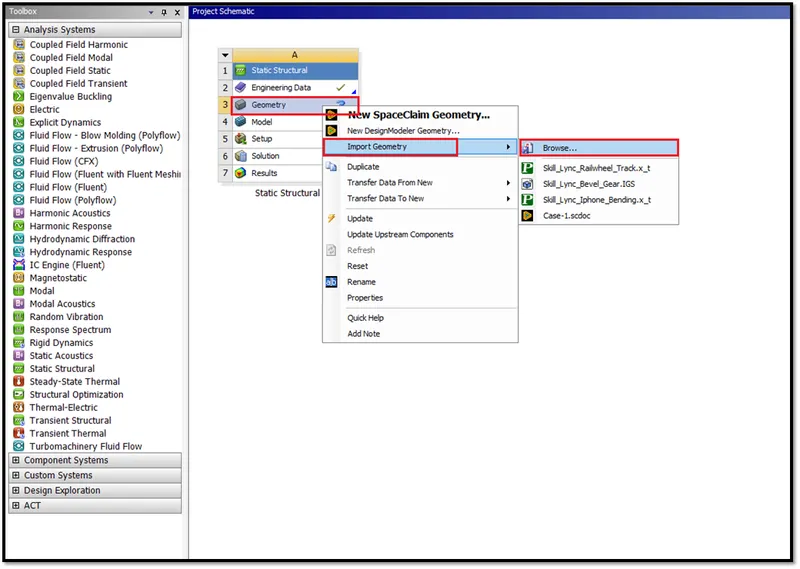
| Figure 8-Importing Geometry. |
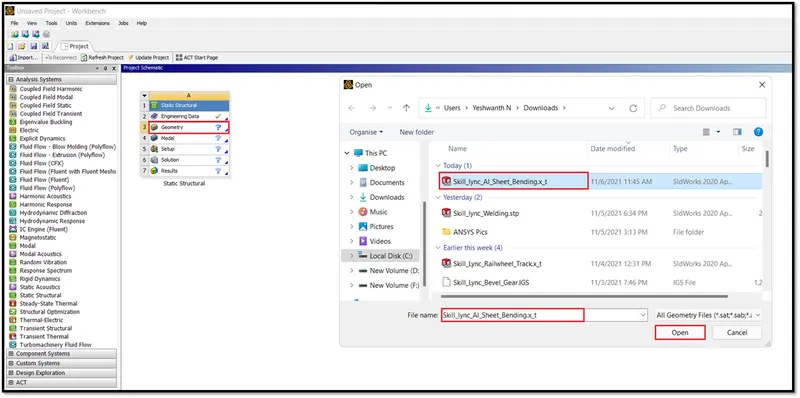
| Figure 9-Selecting the Geometry to Import. |
- Next double click on the geometry to check, Whether the model imported is Sheet Metal Bending Model or not. Space Claim Workspace will open.The model will be imported in the space claim,Which is shown in below Figure 10.
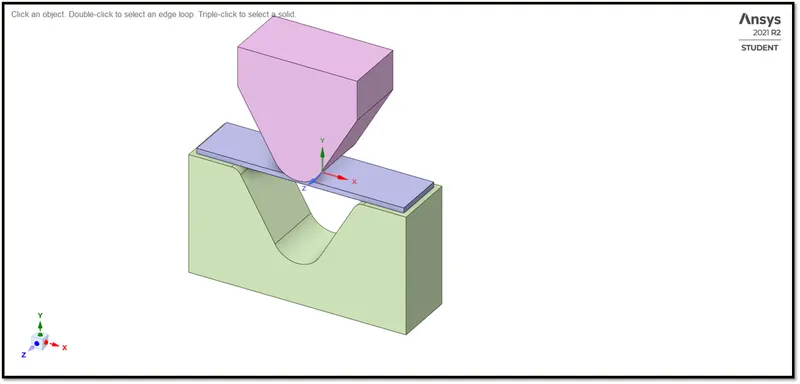
| Figure 10-Sheet Metal Bending Model in the Space Claim. |
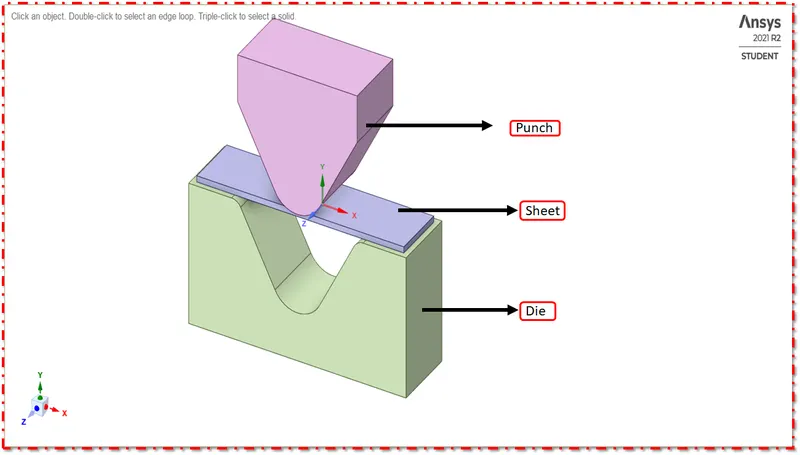
| Figure 11-Sheet Metal Bending Model. |
Phase 3-Model Set Up :
- Next, define the model, Double click on the model, The Mechanical Workspace will open, There go and define the material,set up the load case for all the three cases.
- The Model loaded in the mechanical workspace is shown in below Figure 12.
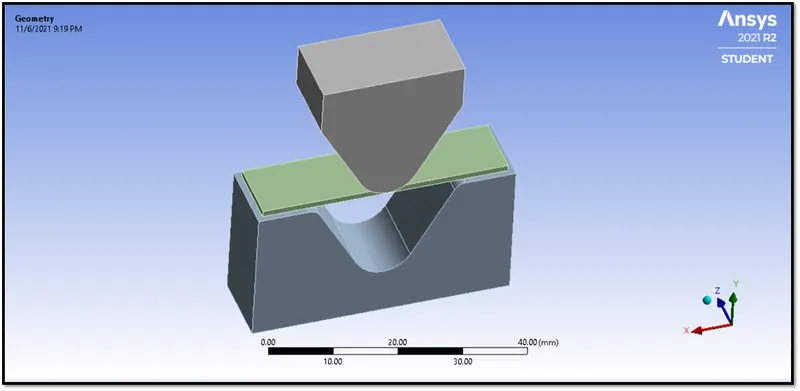
| Figure 12-Model Loaded in Mechanical Workspace. |
3:1 Assign Material :
- Next define the material as Aluminium Alloy 1199 for the Sheet which is shown in below Figure 13.
- Simillarly define the material for other two cases.The material properties is shown in below Figures 14,15,16,17 and 18.
- To assign a material,Click on the Geometry >>Select the Sheet Geometry >> Parameter Window >> Assignment >> Aluminium Alloy.
- Here in the first case it self,We have to define three materials for the sheet such as Aluminum Alloy 1199,Copper Alloy and Magnesium Alloy.
Case -1 :
i) Aluminium Alloy Material 1199 for the Sheet alone.
ii) Magnesium Alloy Material for the Sheet alone.
iii) Copper Alloy Material for the Sheet alone.
Case -2 :
- Aluminium Alloy Material for the Sheet alone.
- Coefficient of Friction-0.19.
Case-3 :
- Aluminium Alloy Material for the Sheet alone.
- Refine the Mesh for the Sheet.
- Element Size-0.5 mm.
[Note :While making changes to the cases,Right Click on the Static Structural Project >> Make it as Duplicate >> Open the Model >> Make Changes.Which is shown in below Figure-13].
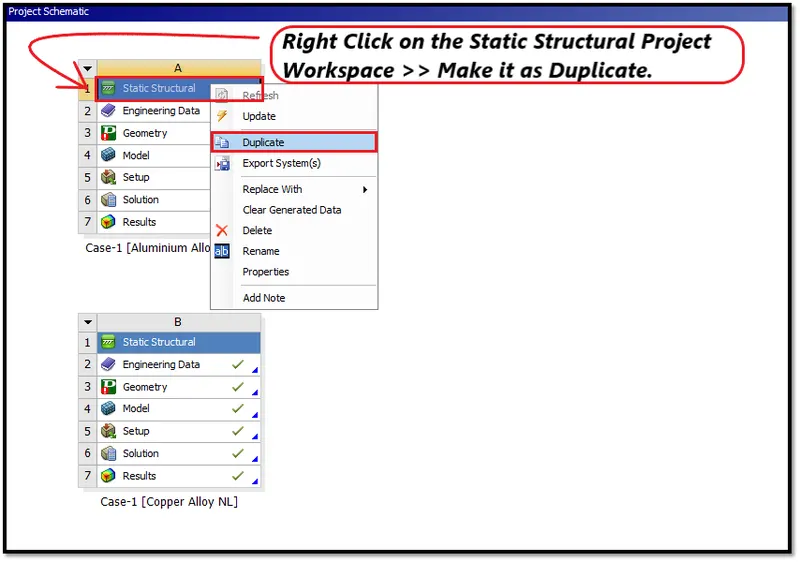
| Figure 13-Make it as Duplicate. |
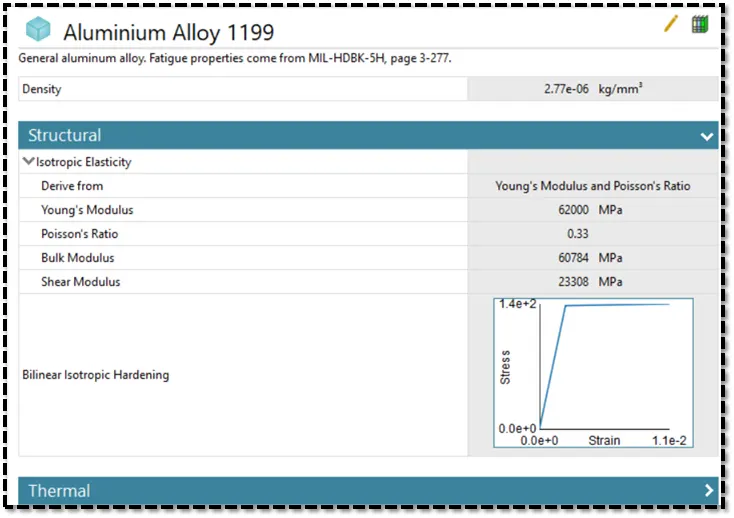
| Figure 14-Mechanical Properties of Aluminium Alloy 1199. |
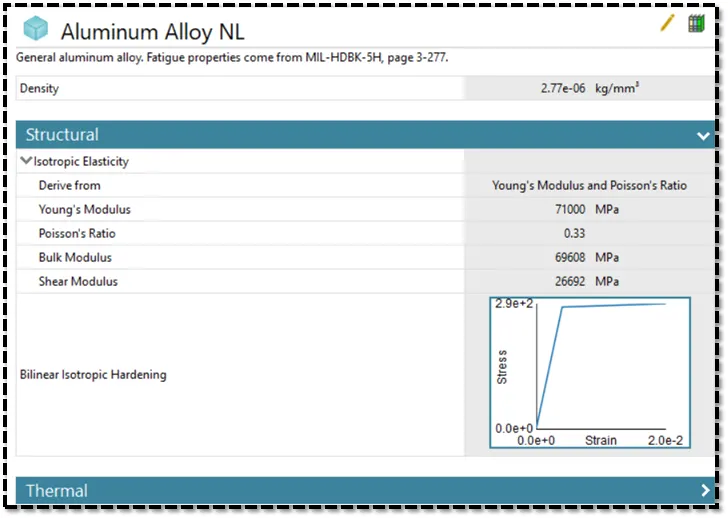
| Figure 15-Mechanical Properties of Aluminium Alloy. |
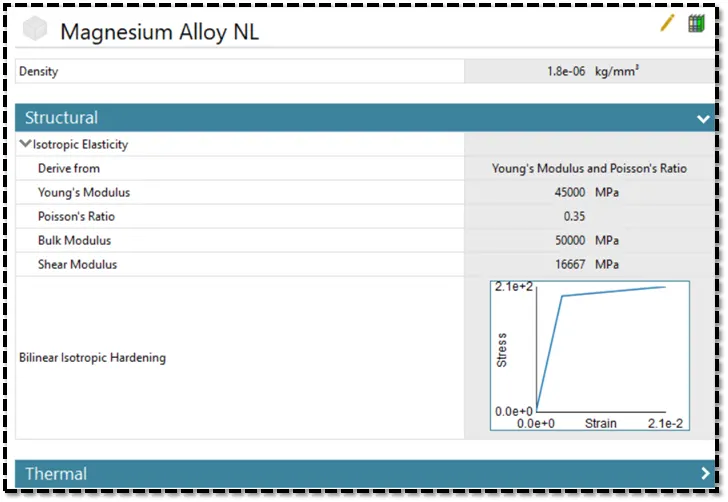
| Figure 16-Mechanical Properties of Magnesium Alloy. |
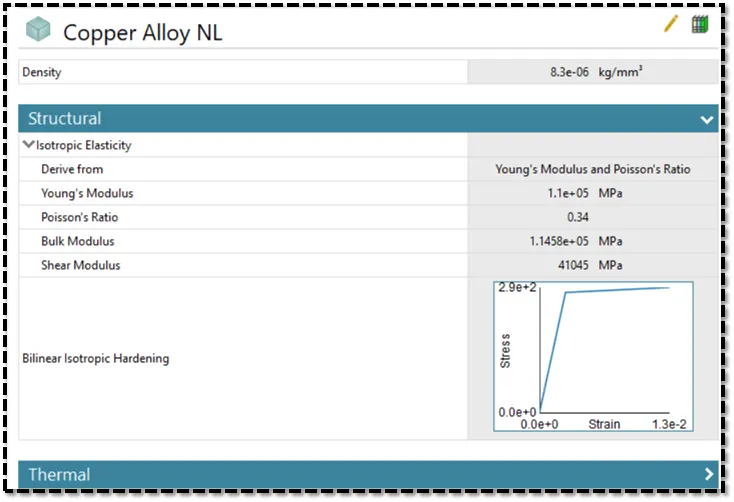
| Figure 17-Mechanical Properties of Copper Alloy. |
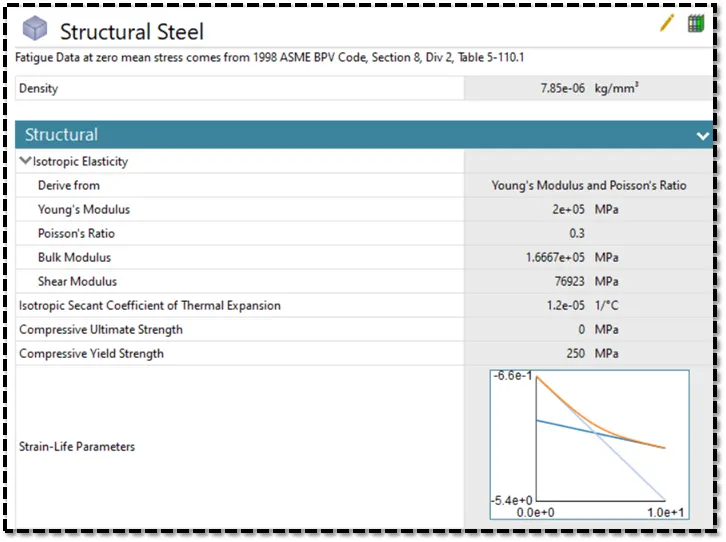
| Figure 18-Mechanical Properties of Structural Steel. |
3:2 Define Connections :
- For this Sheet Metal Bending Model,We have Create a two contacts, One is between Punch and Sheet and the other one is between Sheet and Die.
1) Contact between Punch and Sheet :
- Select the Punch Cone face as Contact Faces and Select the Work Piece (Sheet) Top Face as a Target Faces.
- Contact Type-Frictional with Coefficient of friction-0.1 between the contact faces.
- Behavior-Auto Asymmetric.
- Formulation-Augmented Lagrange.
- This Algorithm will helps to increase the stiffness of the contact and resist the penetration between them.
- Interface treatment-Add Offset,Ramped Effects .
- Keep other parameters as it is default.
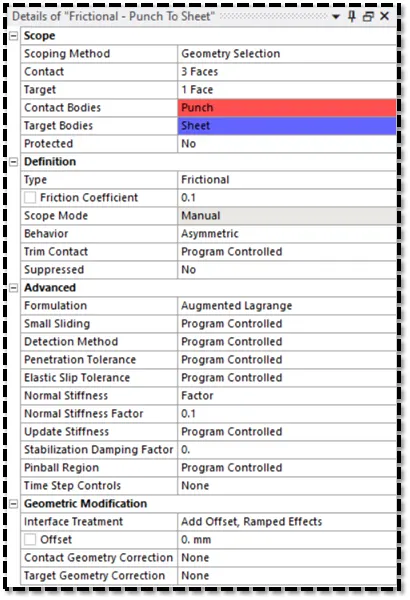
| Figure 19-Contact Between Punch and Sheet Parametrs. |
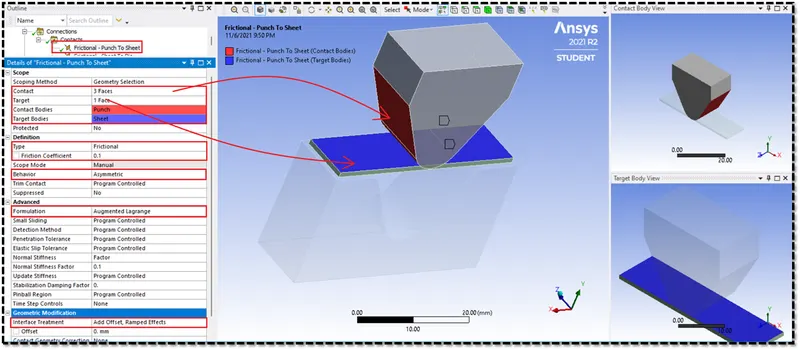
| Figure 20-Contact Between Punch and Sheet. |
2) Contact Between Sheet and Die :
- In this Contact,Select the bottom face of the work piece as Contact Face and Select the angular faces of the die as Target Faces,Which is shown in below Figure 22.
- Contact Type-Frictional with Coefficient of friction-0.1 between the contact faces.
- Behavior-Auto Asymmetric.
- Formulation-Augmented Lagrange.
- This Algorithm will helps to increase the stiffness of the contact and resist the penetration between them.
- Interface treatment-Add Offset,Ramped Effects .
- Keep other parameters as it is default.
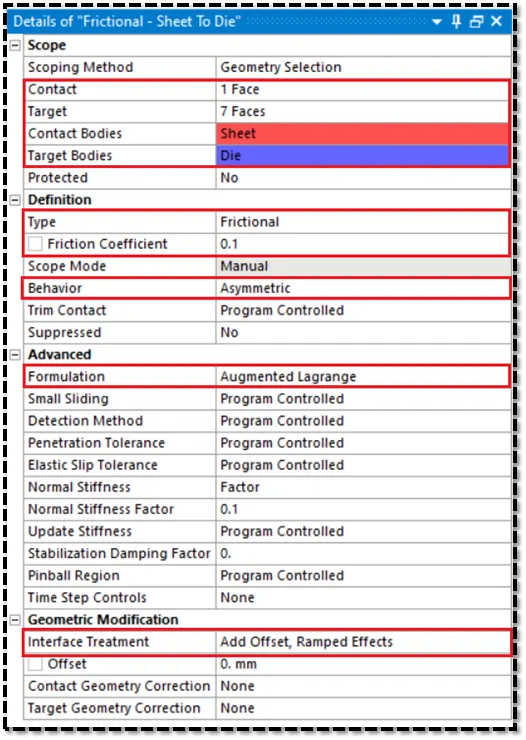
| Figure 21-Contact Between Sheet and Die Parametrs. |
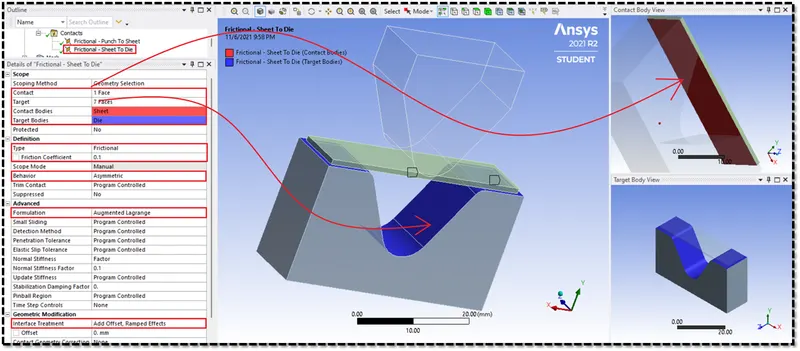
| Figure 22-Contact Between Sheet and Die. |
3:3 Meshing :
- After defining the connections ,We have to define mesh for the Sheet Metal Bending Model.
- There will be default mesh created for the sheet metal bending model.
- But we have to insert body sizing and face sizing to refine the mesh of sheet metal bending model.
1) Body Sizing on the Die :
- Select the die body and mesh the die with the mixed type of element with 4 mm element size,Which is shown in below Figure 23.
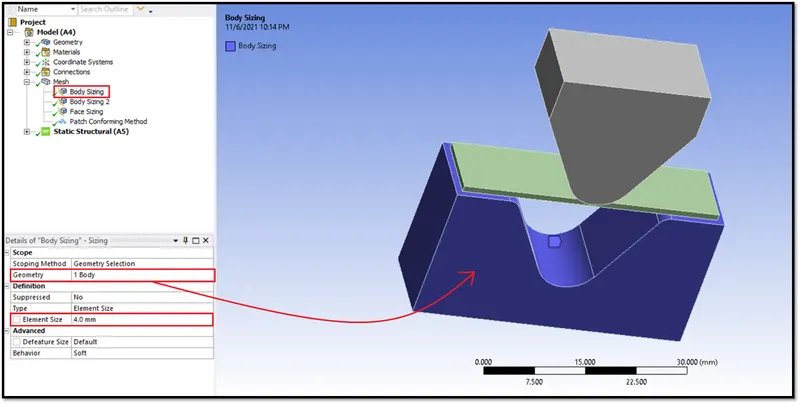
| Figure 23-Mesh Die by Inserting Body Sizing. |
2) Body Sizing on WorkPiece (Sheet) :
- Here mesh the sheet with tetrahedral elements and refine the mesh with 1 mm element size.
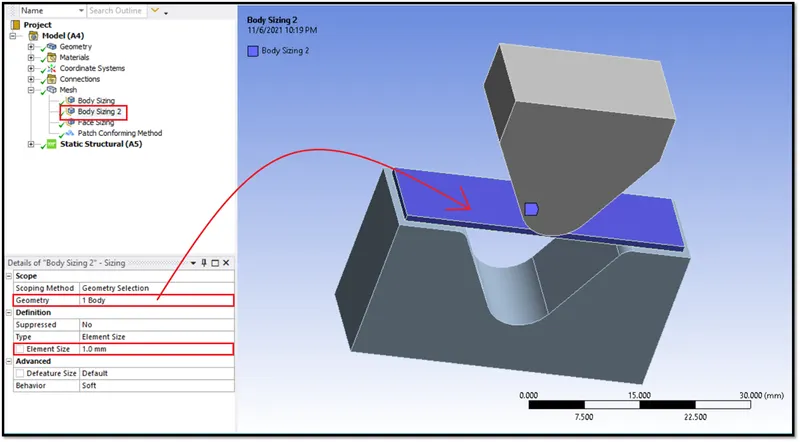
| Figure 24-Mesh WorkPiece (Sheet) by Inserting Body Sizing. |
3) Face Sizing on Angular Faces of Die :
- Here mesh the angular faces of die with hexahedral elements and refine the mesh with 1 mm element size.
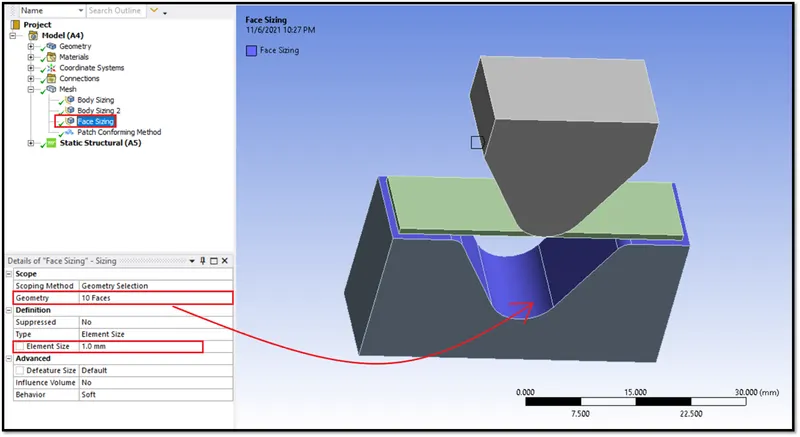
| Figure 25-Mesh Angular Faces of Die by Inserting Face Sizing. |
- The Whole Sheet Metal Bending Component is Meshed,Which is shown in below Figure 26.
- No of Nodes =21657
- No of Elements =7023
- Punch-Meshed with Mixed Type of Elements.
- Die-Meshed with Hexahedral Elements.
- Work Piece (Sheet)-Meshed with Tetrahedral Elements.
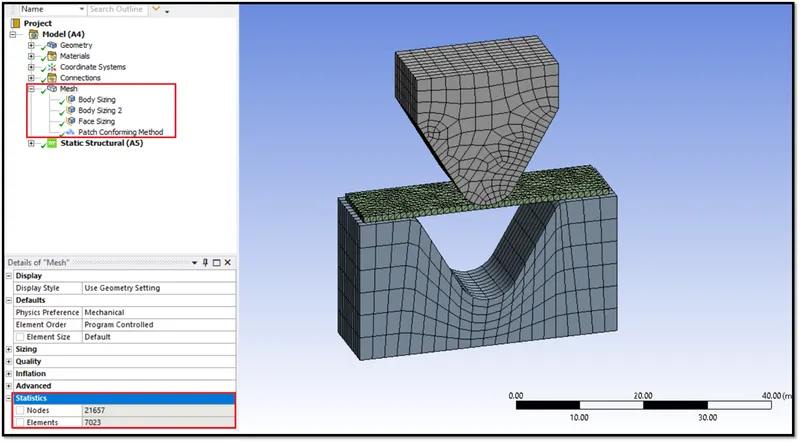
| Figure 26-Final Meshed Model. |
3:4 Analysis Settings :
- Here for this SheetMetal Bending Model,We are giving 10 number of steps to run simulation.
- Auto Time Stepping-Program Controlled.
- Large Deflection-ON.
- Solver Type-Direct.
- Stabilization -Constant.
- Method-Energy.
- Energy Dissipation Ratio-0.1
- For the other parameters,Keep as it is default.
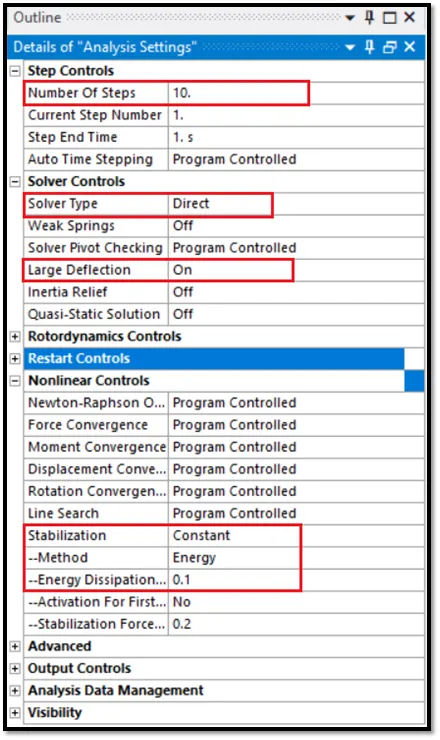
| Figure 27-Analaysis Settings. |
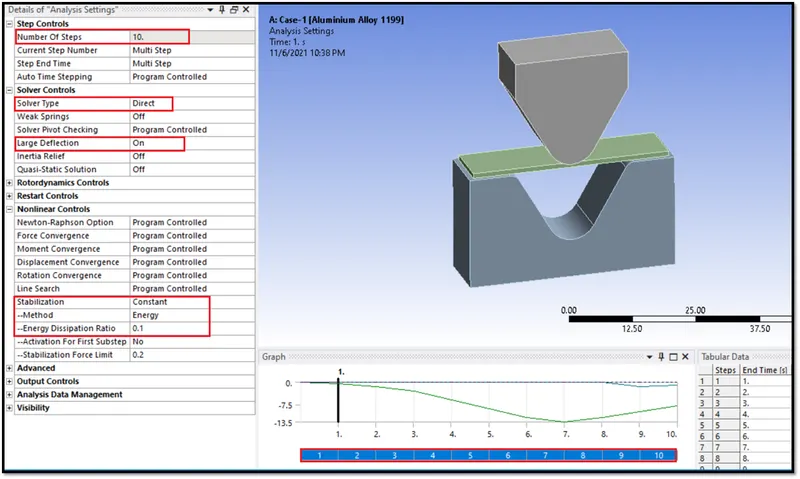
| Figure 28-10 Number of Steps. |
3:5 Boundary Conditions :
- After giving some parameters in the analysis settings,We have to give boundary conditions.
- Here we have to create a boundary conditions.
- We have to create three displacements.
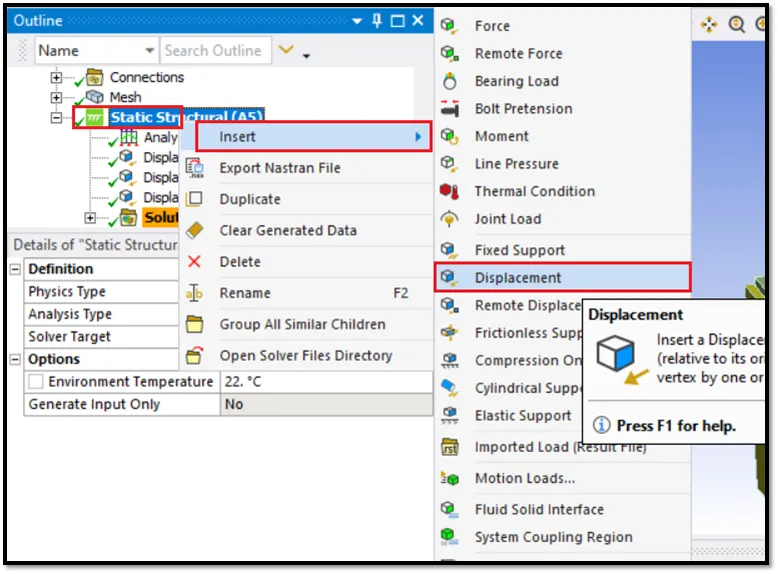
| Figure 29-Give Displacement to the Sheet Metal Bending Model. |
1) Displacement 1 :
- Here the punch will bend the sheetmetal,So a punch should be moving in Negative Y direction.
- So,Select the top face of the punch and give the displacement value ranges from 0 to -13.5 mm.
- Here the Punch will be moving in Negative Y directon to bend the sheetmetal,So keep free for X and Z axis.
- To create Displacement >> Right Click on Static Structural >> Insert >> Displacement.
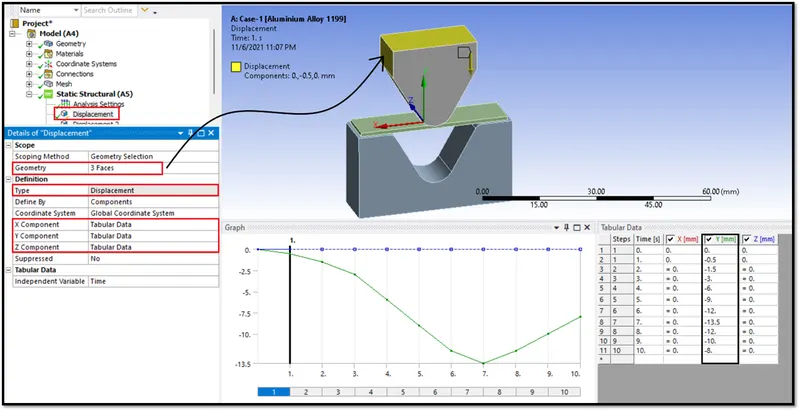
| Figure 30-Displacement 1. |
2) Displacement 2 :
- Select the side faces of the sheet to constrain in Z axis,Which is shown in below Figure 31.
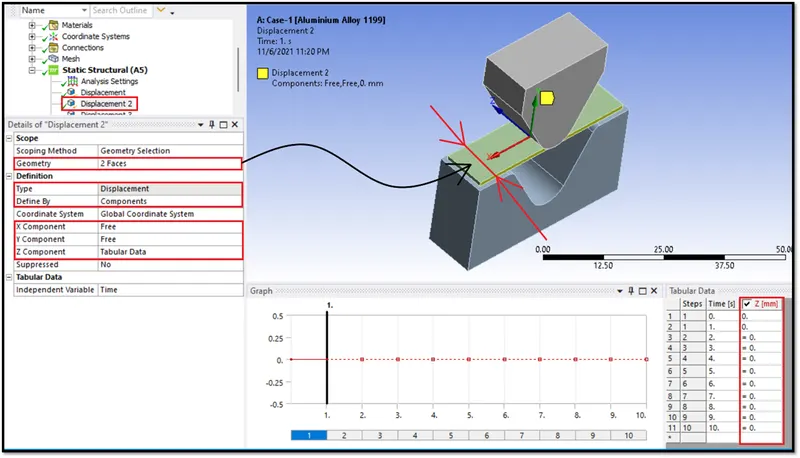
| Figure 31-Displacement 2. |
3) Displacement 3 :
- Here constrain all the faces of the die,Which is shown in below Figure 32.
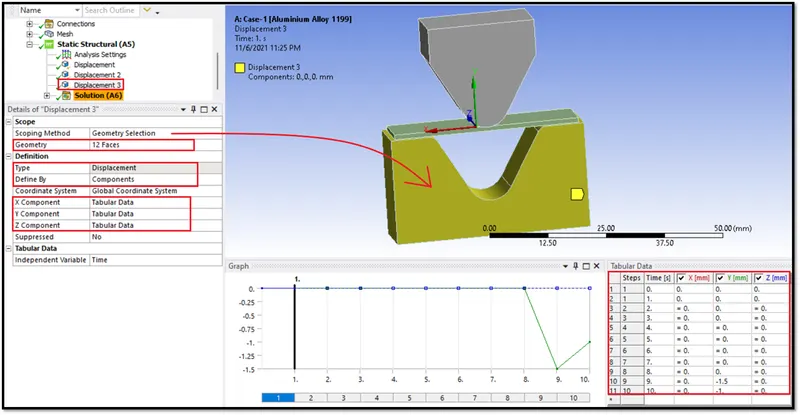
| Figure 32-Displacement 3. |
Phase 4-Request for the Outputs :
- Here we have to request outputs for the VonMisses Stress, Strain, and for Total Deformation.
- To request Output for Stress,Right Click on the Solution >> Insert >> Stress >> Equivalent Von Misses Stress.
- To request Output for Strain,Right Click on the Solution >> Insert >> Strain >> Equivalent Von Misses Strain.
- To request Output for Total Deformation,Right Click on the Solution >> Insert >> Deformation >> Total Deformation.
- This is shown in below Figure 33.
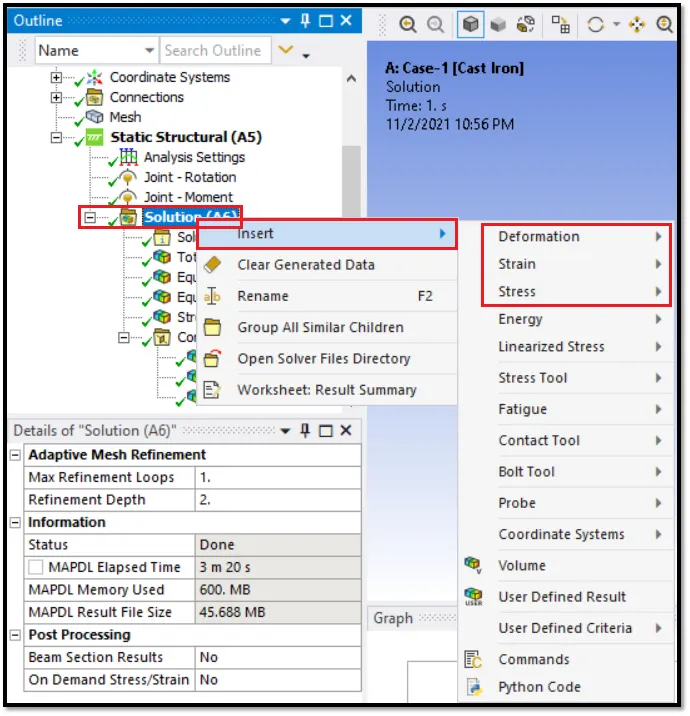
| Figure 33-Requesting Outputs for the Stress, Strain, and Deformation. |
- Next request output for the contact.
- To request Contact Tool >> Right Click on the Solution >> Insert >> Contact Tool >> Pressure >> Status,Which is shown in below Figures 34 and 35.
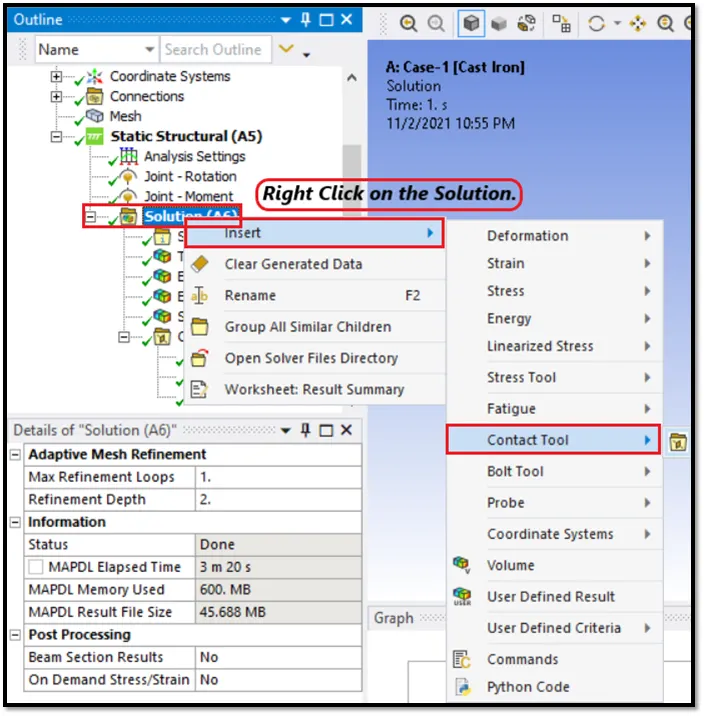
| Figure 34-Requesting Output for Contact. |
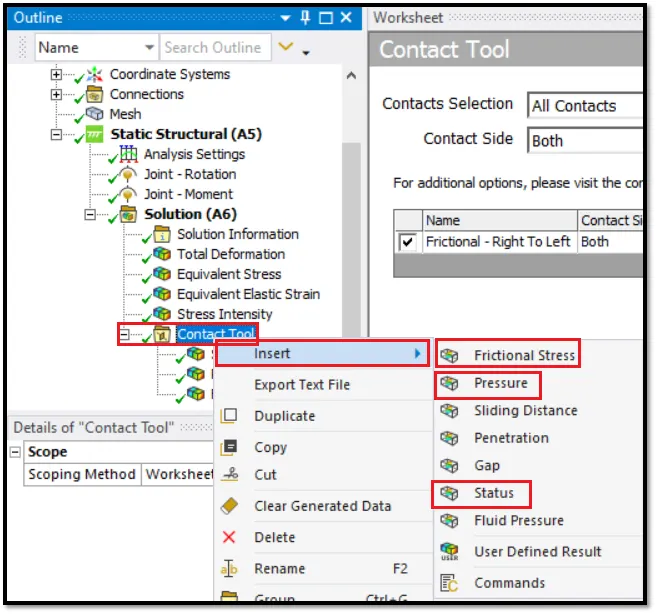
| Figure 35-Requesting Outputs for Contact Tool. |
- Simillarly request the output for the Force Reaction.
- The Output requested for the Sheet Metal bending Model is shown in below Figure 36.
- After requesting all the outputs which is shown in below Figure 36. Run the Simulation.
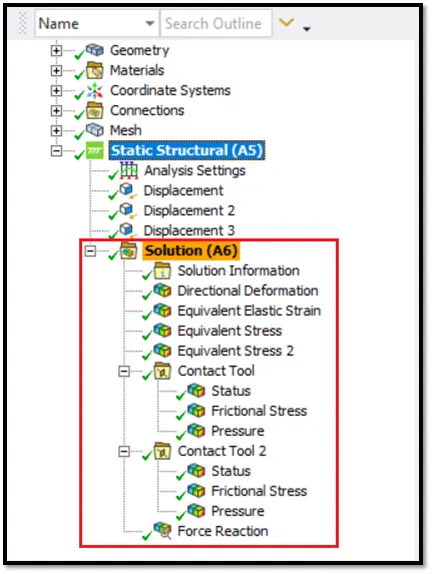
| Figure 36-Required Outputs Requested. |
Phase 5-Run the Simulation for all the three Cases :
- To run the simulation, Right Click on the Solution >> Solve. This is shown in below Figure 37.
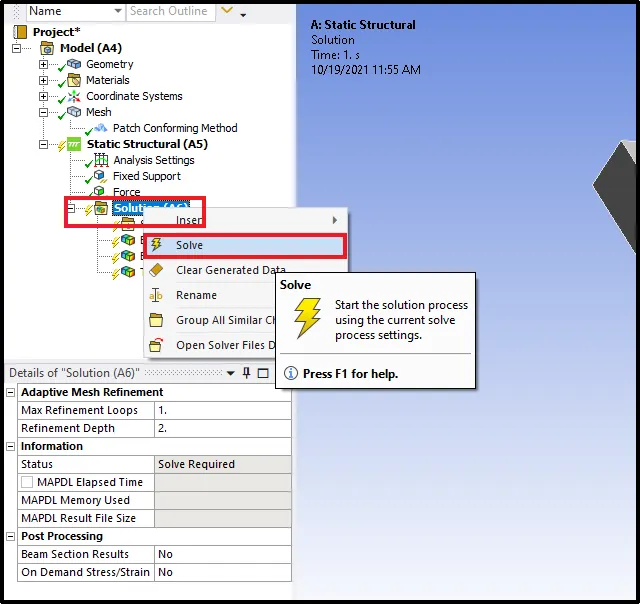
| Figure 37-Solve all the Outputs Requested. |
- After solving the outputs requested, the simulation results forthe two cases is shown in the below Figures.
Equivalent Von Misses Stress [Case 1-Aluminium Alloy 1199] :
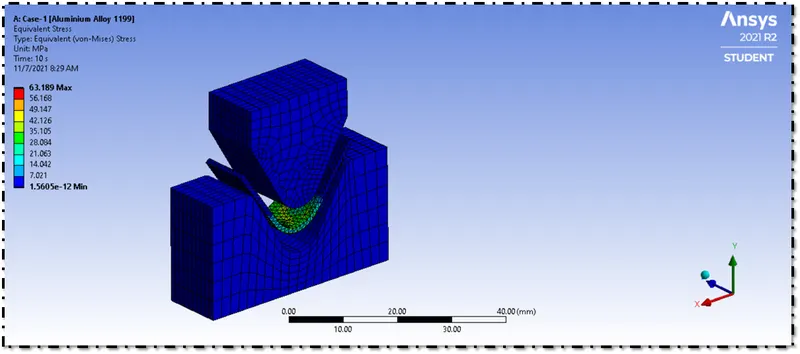
| Figure 38-Equivalent Stress [Case 1-Aluminium Alloy 1199]. |
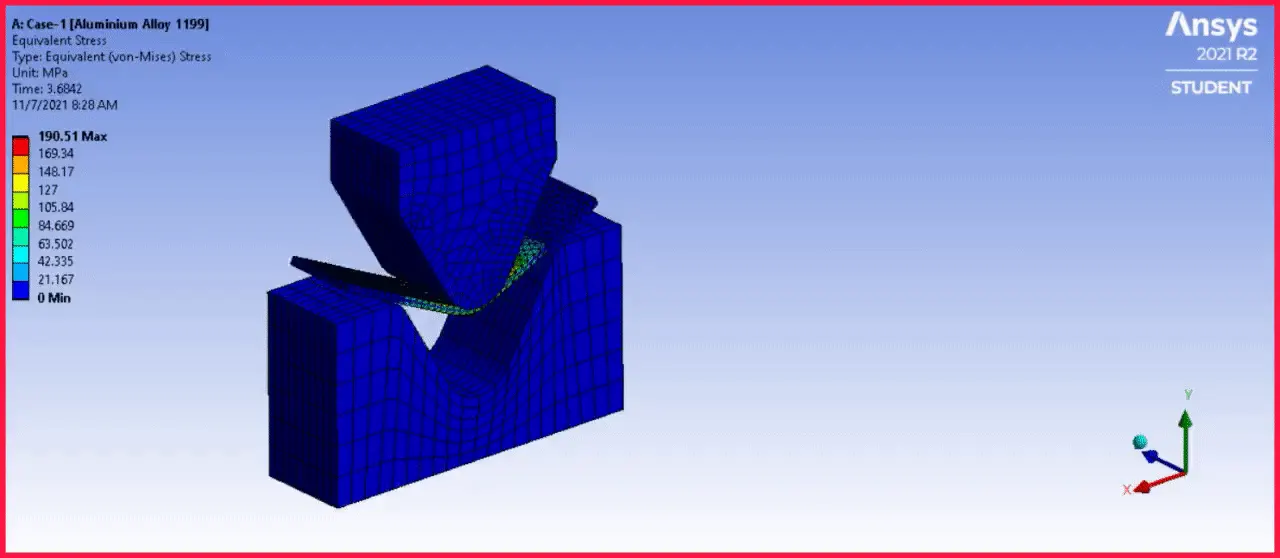
| Figure 39-Equivalent Stress Simulation Animation [Case 1-Aluminium Alloy 1199]. |
Equivalent Von Misses Stress [Case 1-Copper Alloy] :
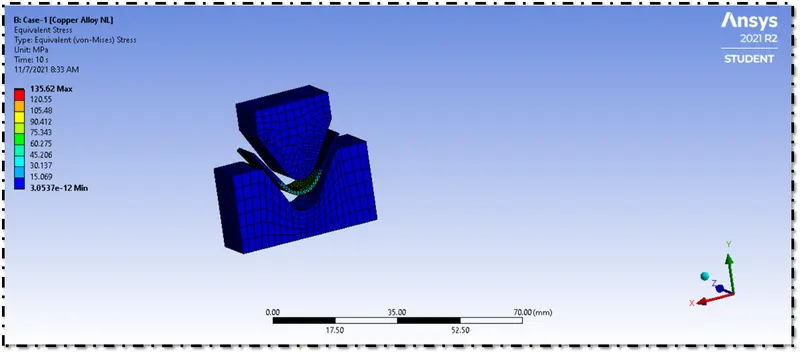
| Figure 40-Equivalent Stress [Case 1-Copper Alloy]. |
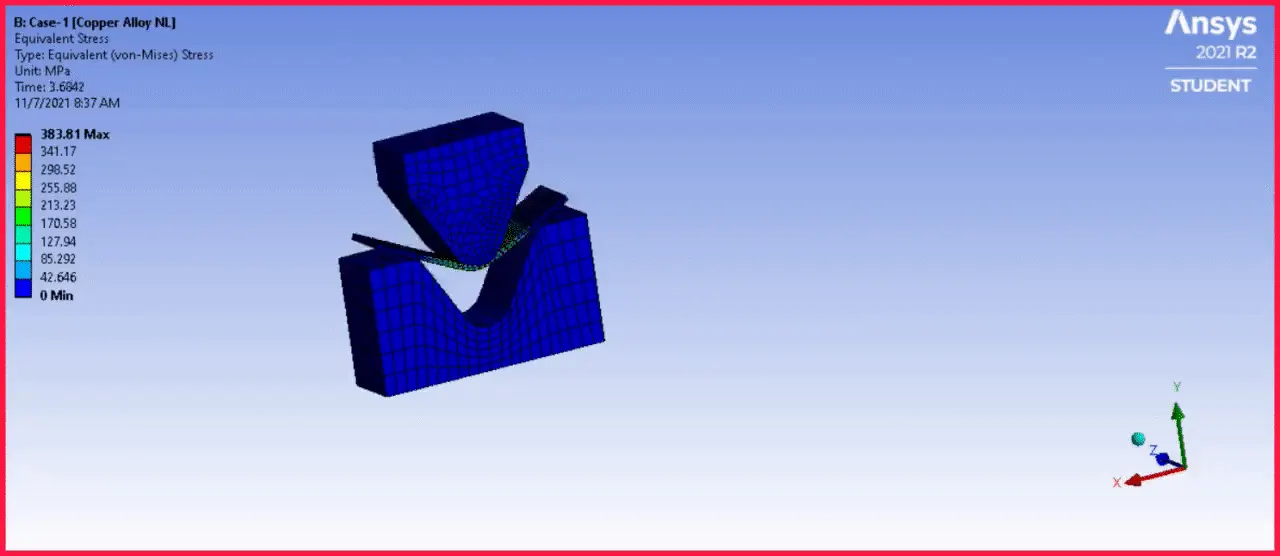
| Figure 41-Equivalent Stress Simulation Animation [Case 1-Copper Alloy]. |
Equivalent Von Misses Stress [Case 1-Magnesium Alloy] :
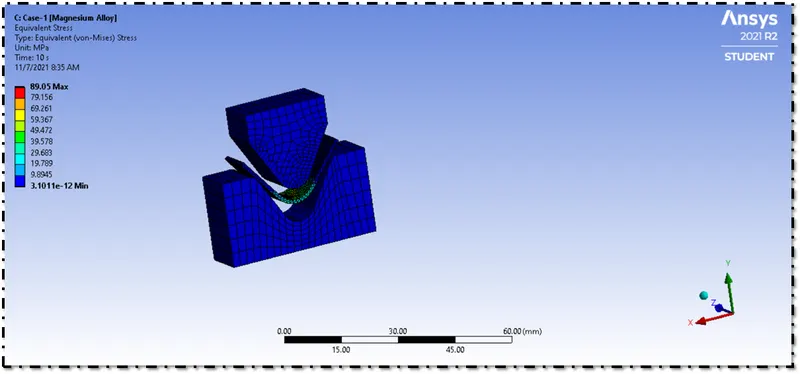
| Figure 42-Equivalent Stress [Case 1-Magnesium Alloy]. |
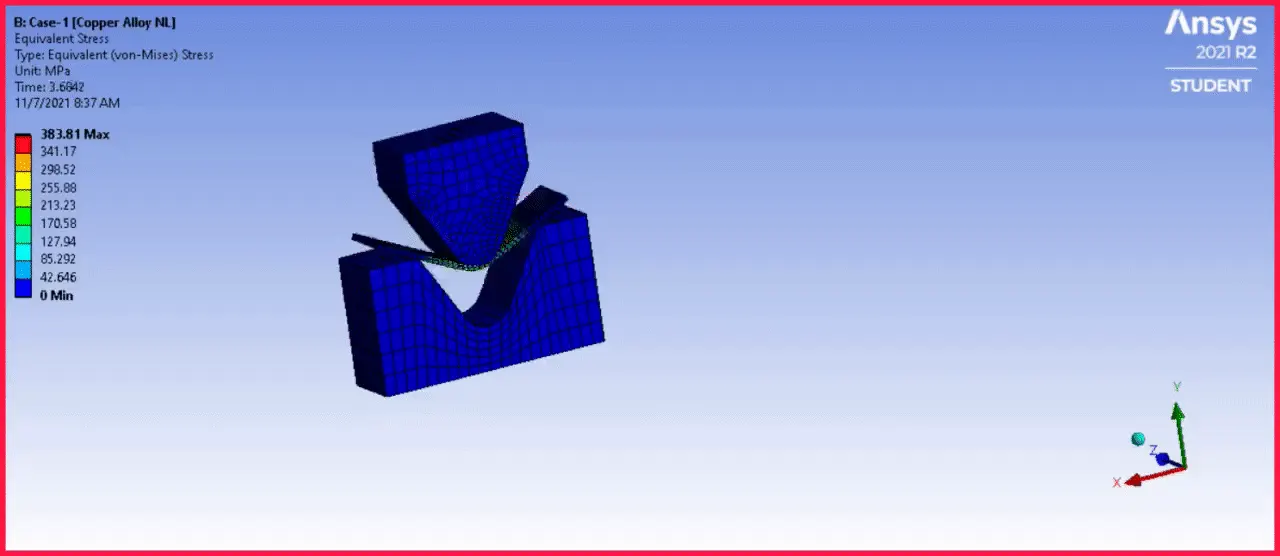
| Figure 43-Equivalent Stress Simulation Animation [Case 1-Magnesium Alloy]. |
Equivalent Elastic Strain [Case 1-Aluminium Alloy 1199] :
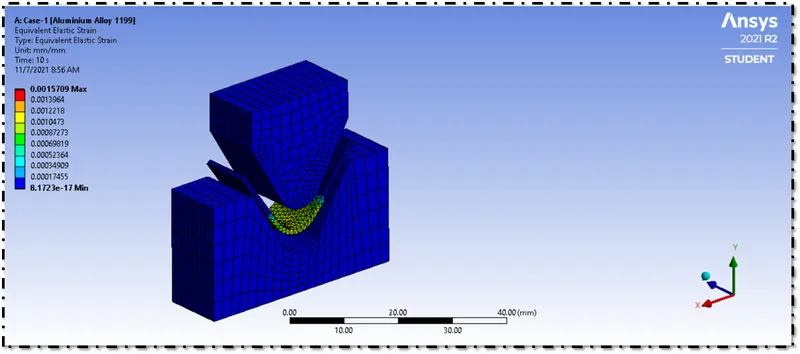
| Figure 44-Equivalent Elastic Strain [Case 1-Aluminium Alloy 1199]. |
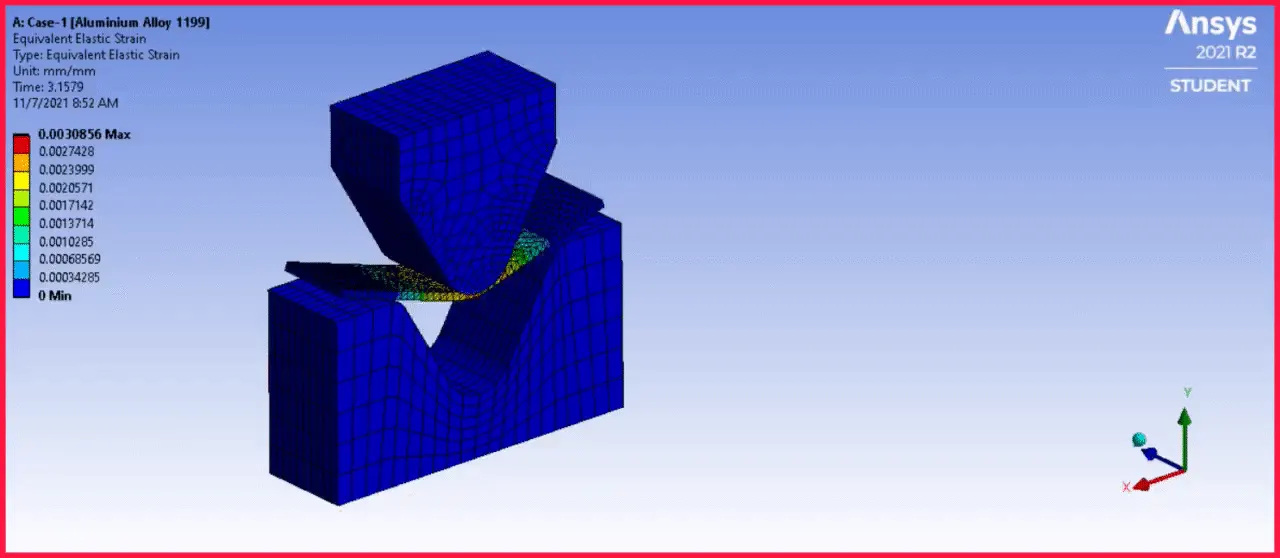
| Figure 45-Equivalent Elastic Strain Simulation Animation [Case 1-Aluminium Alloy 1199]. |
Equivalent Elastic Strain [Case 1-Copper Alloy] :
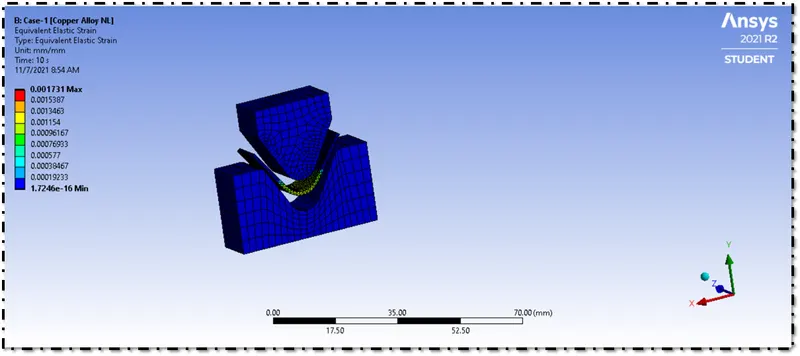
| Figure 46-Equivalent Elastic Strain [Case 1-Copper Alloy]. |
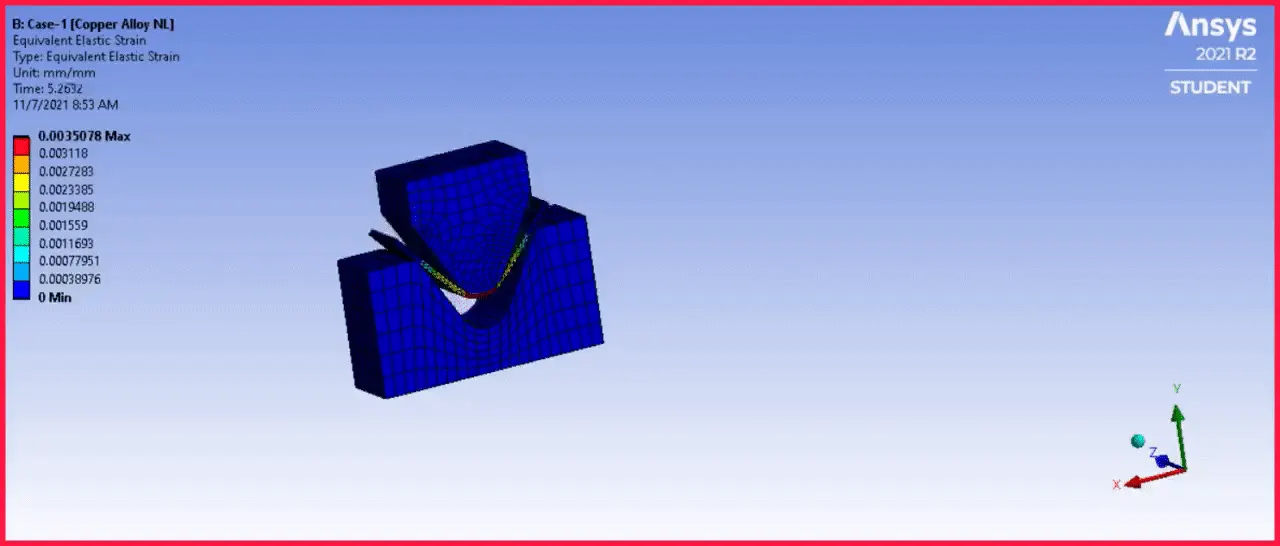
| Figure 47-Equivalent Elastic Strain Simulation Animation [Case 1-Copper Alloy]. |
Equivalent Elastic Strain [Case 1-Magnesium Alloy] :
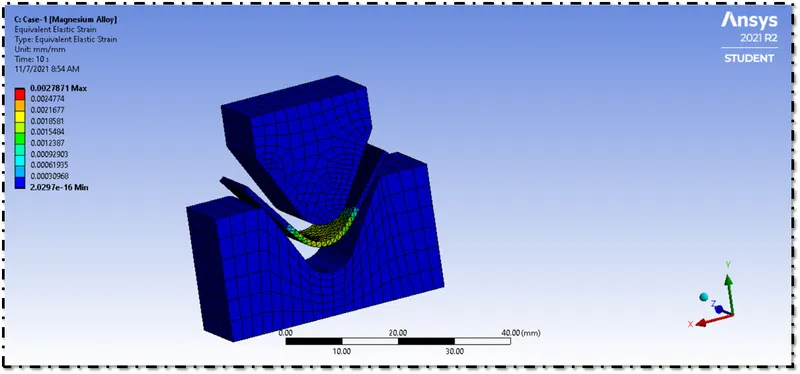
| Figure 48-Equivalent Elastic Strain [Case 1-Magnesium Alloy]. |
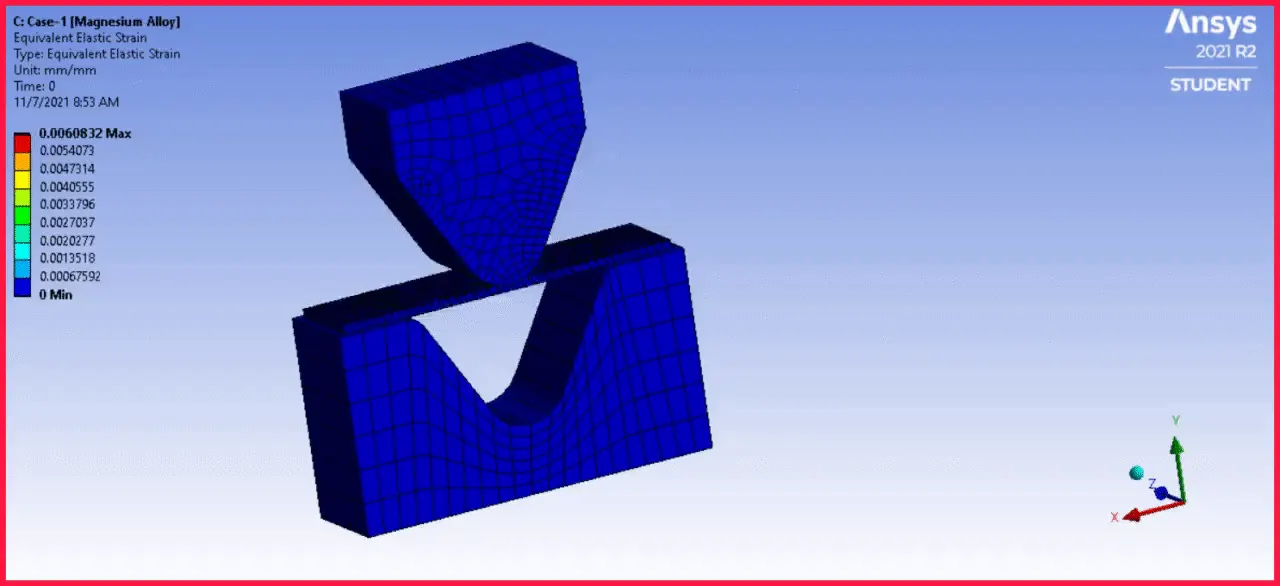
| Figure 49-Equivalent Elastic Strain Simulation Animation [Case 1-Magnesium Alloy]. |
Directional Deformation [Case 1-Aluminium Alloy 1199] :
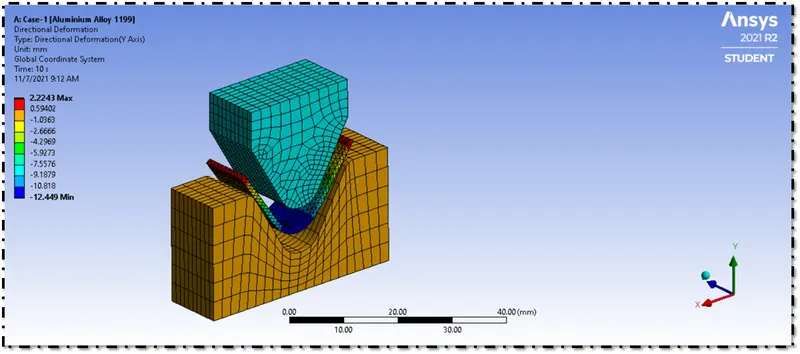
| Figure 50-Directional Deformation [Case 1-Aluminium Alloy 1199]. |
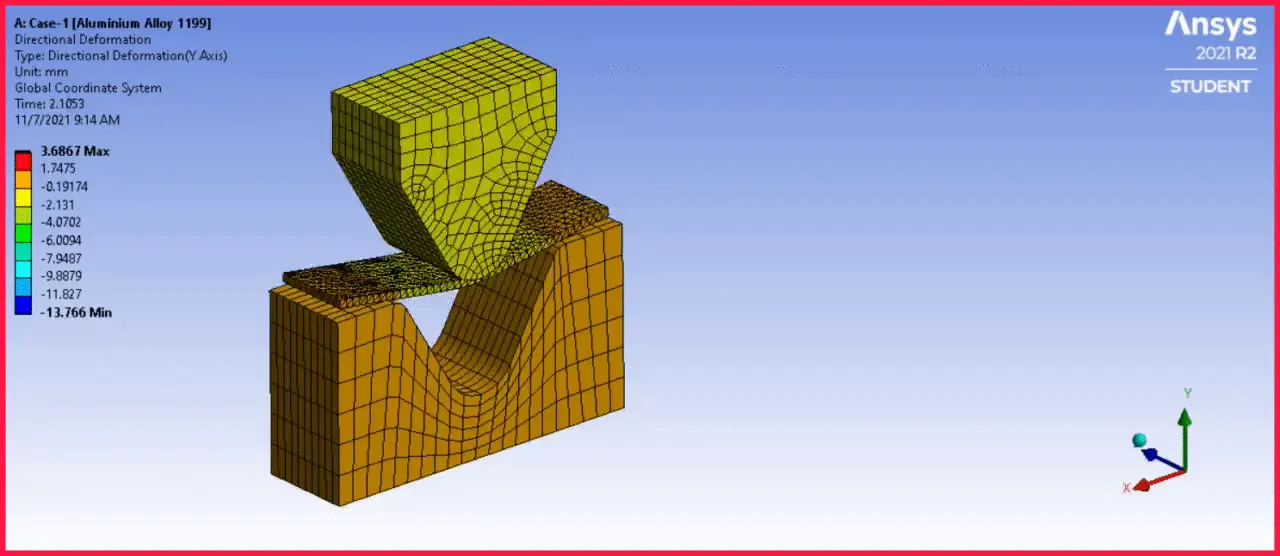
| Figure 51-Directional Deformation Simulation Animation [Case 1-Aluminium Alloy 1199]. |
Directional Deformation [Case 1-Copper Alloy] :
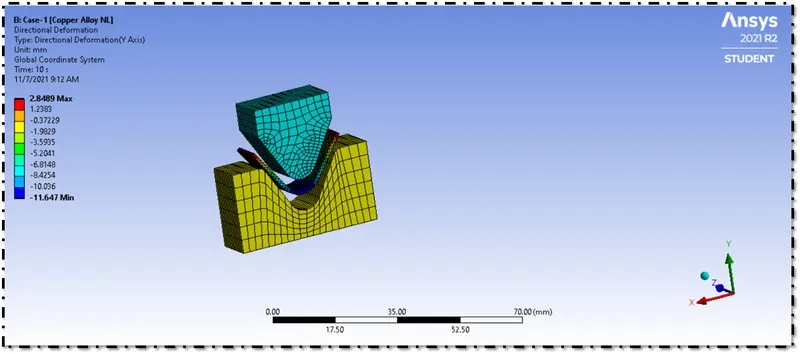
| Figure 52-Directional Deformation [Case 1-Copper Alloy]. |
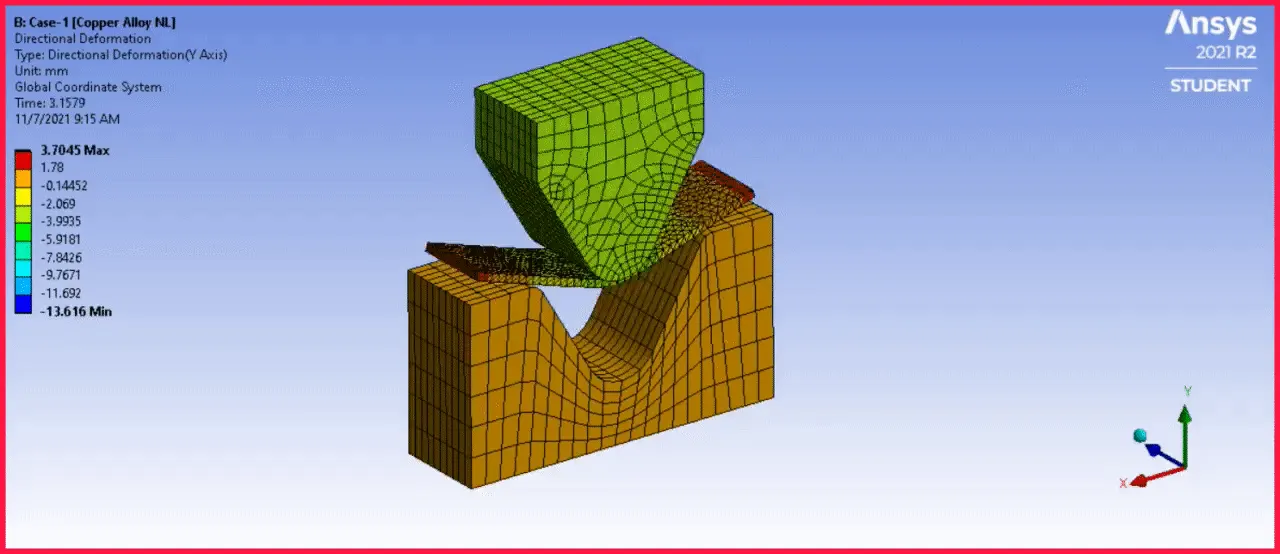
| Figure 53-Directional Deformation Simulation Animation [Case 1-Copper Alloy]. |
Directional Deformation [Case 1-Magnesium Alloy] :
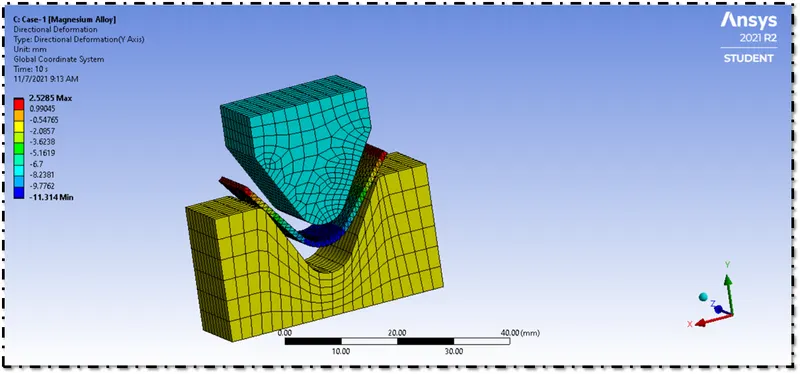
| Figure 54-Directional Deformation [Case 1-Magnesium Alloy]. |
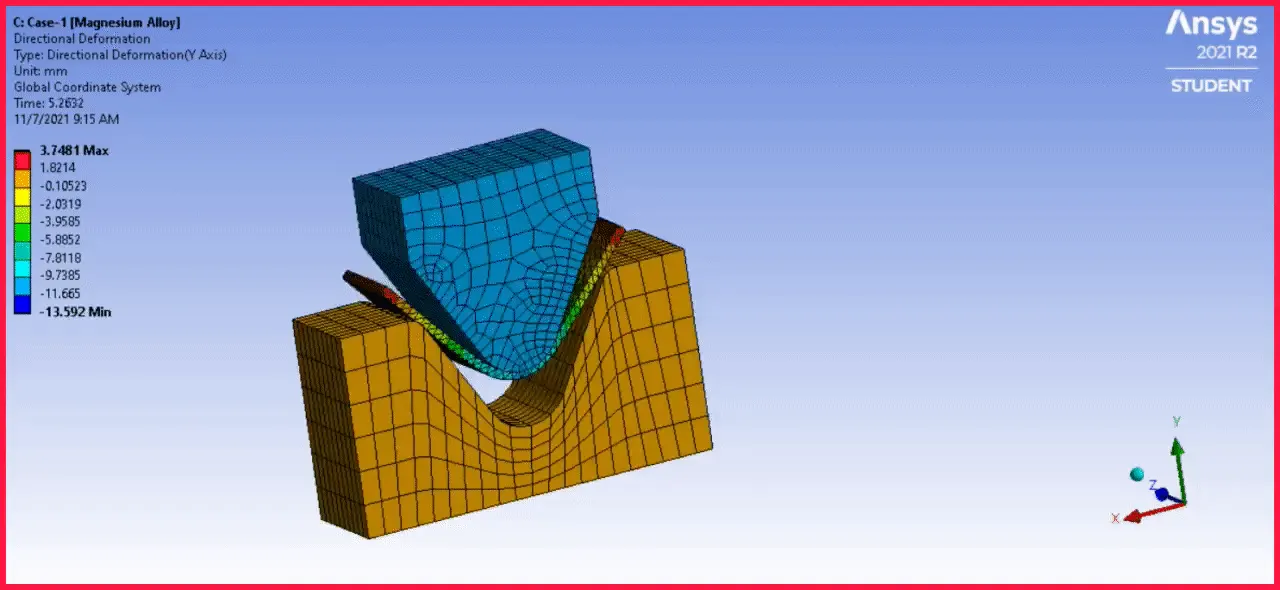
| Figure 55-Directional Deformation Simulation Animation [Case 1-Magnesium Alloy]. |
Equivalent Stress of Sheet [Case 1-Aluminium Alloy 1199] :
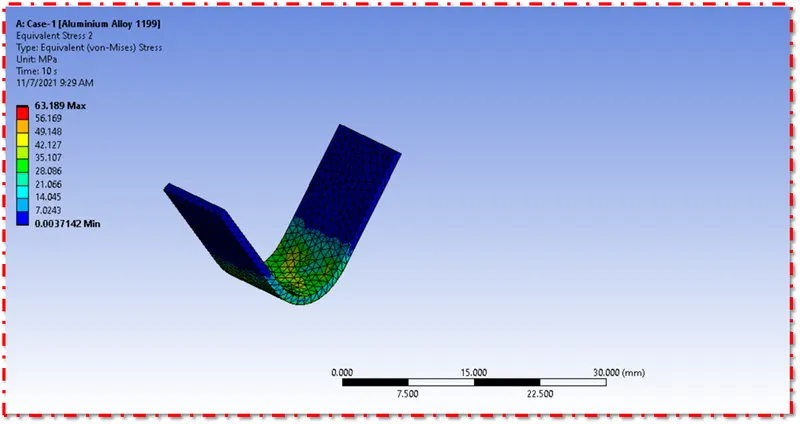
| Figure 56-Equivalent Stress of Sheet [Case 1-Aluminium Alloy 1199]. |
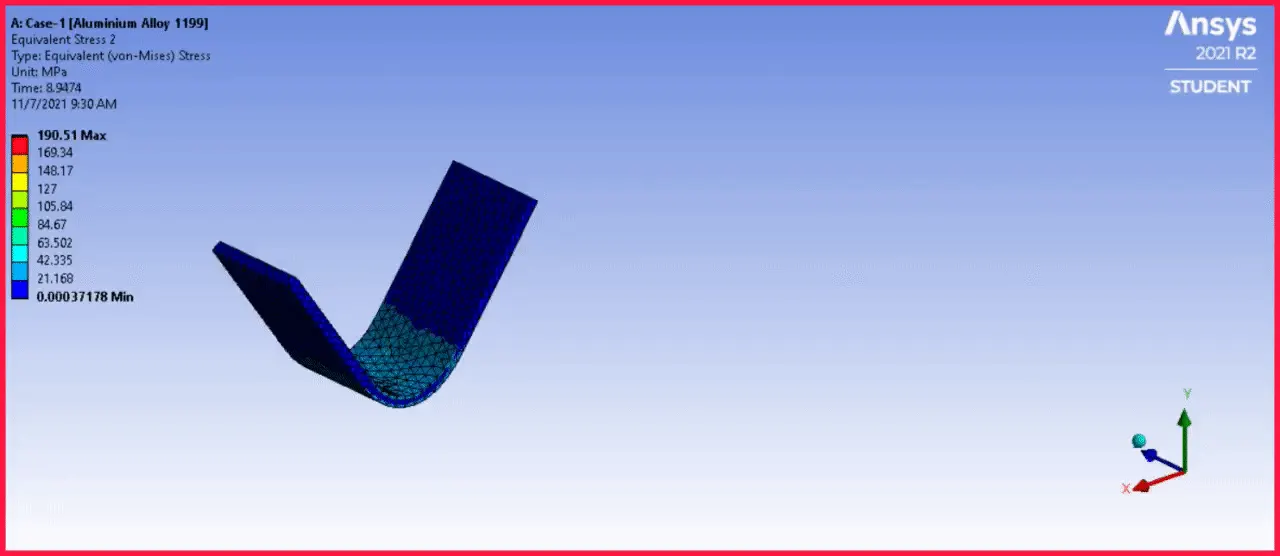
| Figure 57-Equivalent Stress Simulation Animation of Sheet [Case 1-Aluminium Alloy 1199]. |
Equivalent Stress of Sheet [Case 1-Copper Alloy] :
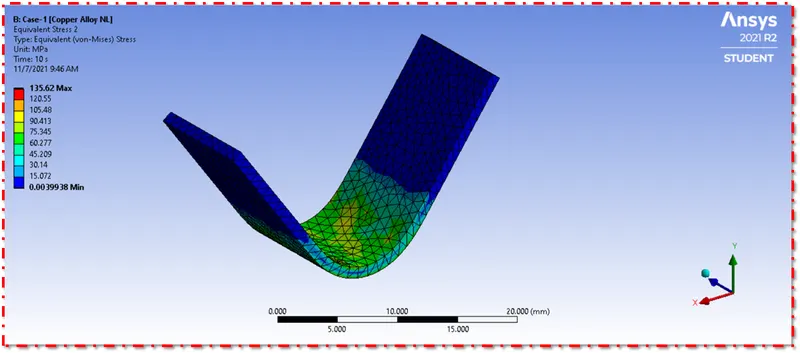
| Figure 58-Equivalent Stress of Sheet [Case 1-Copper Alloy]. |
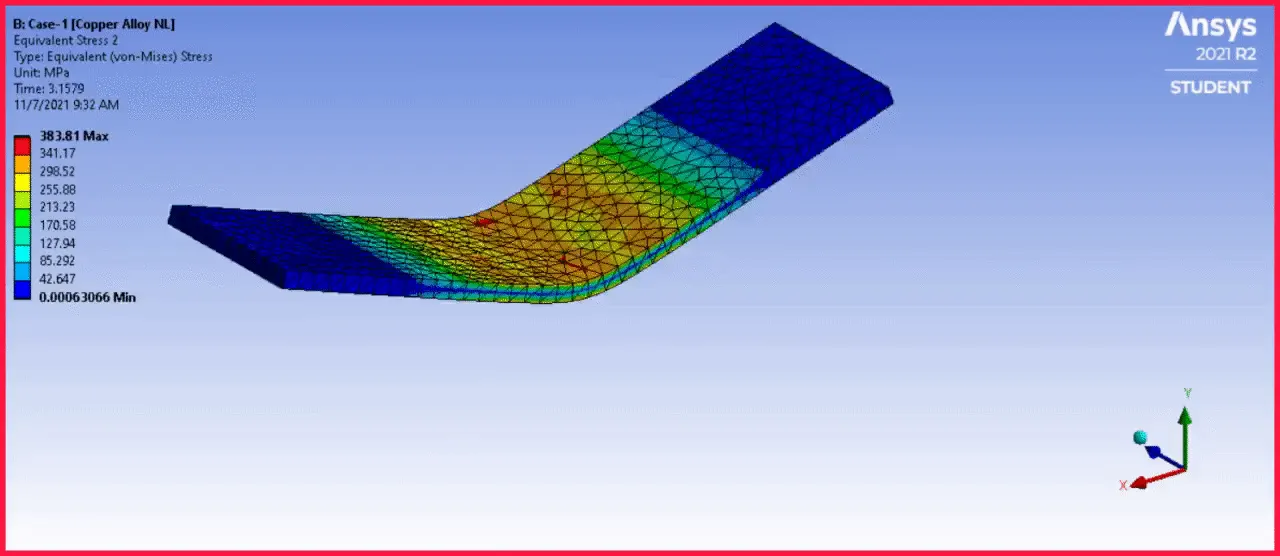
| Figure 59-Equivalent Stress Simulation Animation of Sheet [Case 1-Copper Alloy]. |
Equivalent Stress of Sheet [Case 1-Magnesium Alloy] :
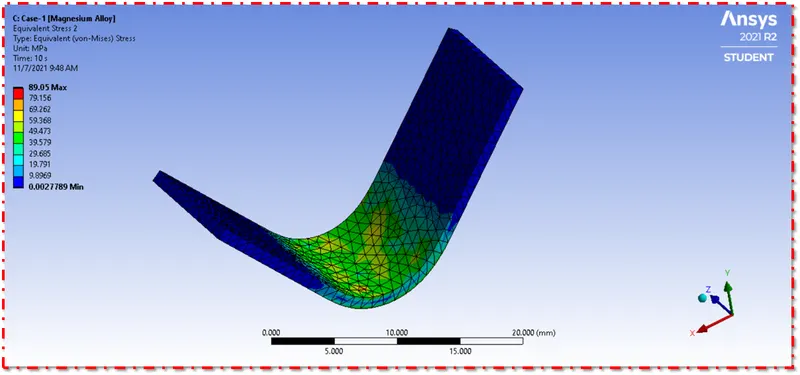
| Figure 60-Equivalent Stress of Sheet [Case 1-Magnesium Alloy. |
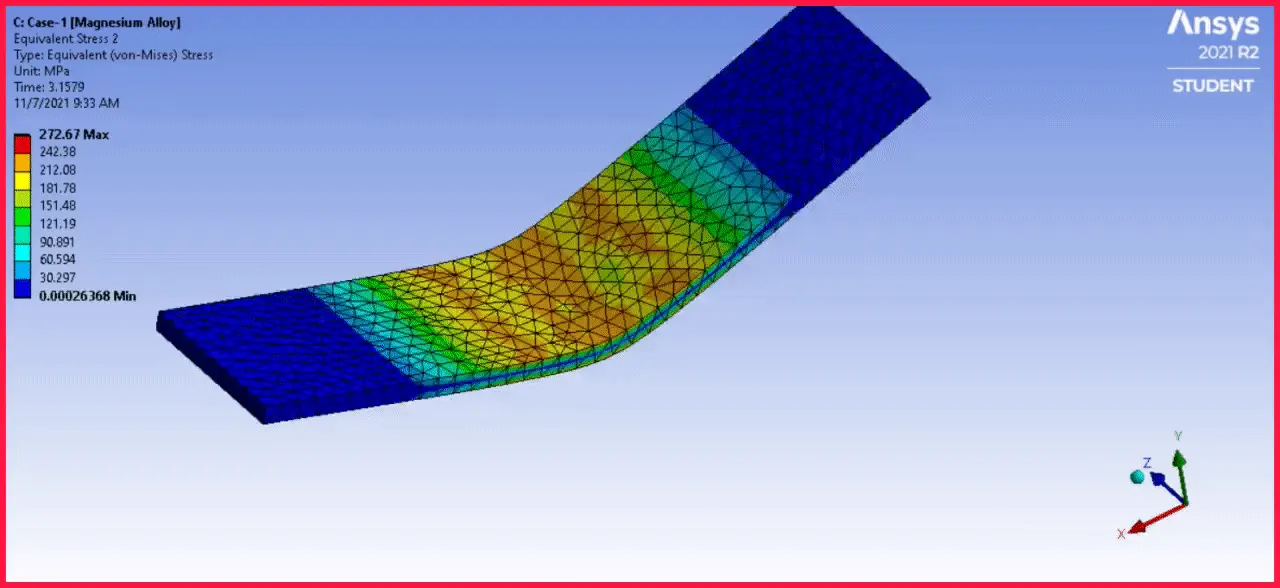
| Figure 61-Equivalent Stress Simulation Animation of Sheet [Case 1-Magnesium Alloy. |
[Case 2 Aluminium Alloy,Friction Coefficient-0.19] Equivalent Strees :
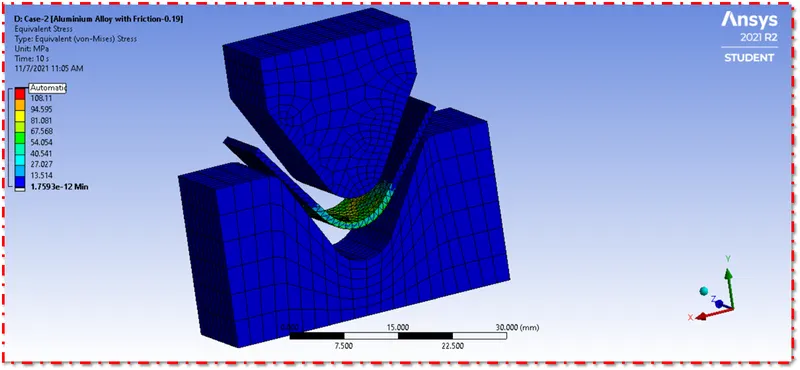
| Figure 62-Case 2-Aluminium Alloy,Friction Coefficient-0.19,Equivalent Stress. |
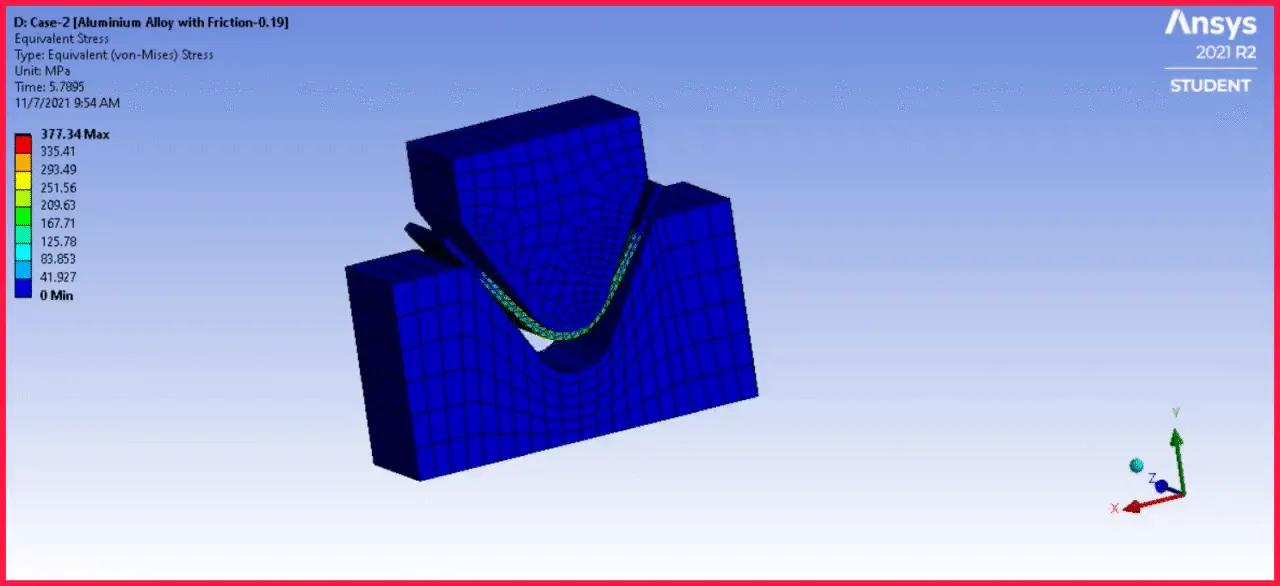
| Figure 63-Case 2-Aluminium Alloy,Friction Coefficient-0.19,Equivalent Stress Simulation Animation. |
[Case 2 Aluminium Alloy,Friction Coefficient-0.19] Equivalent Elastic Strain :
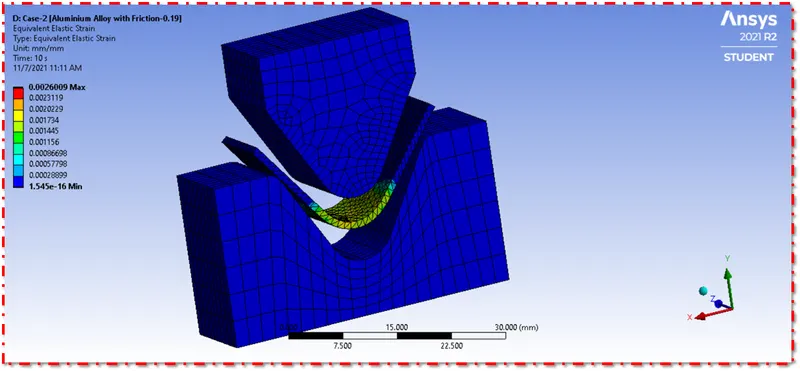
| Figure 64-Case 2-Aluminium Alloy,Friction Coefficient-0.19,Equivalent Elastic Strain. |
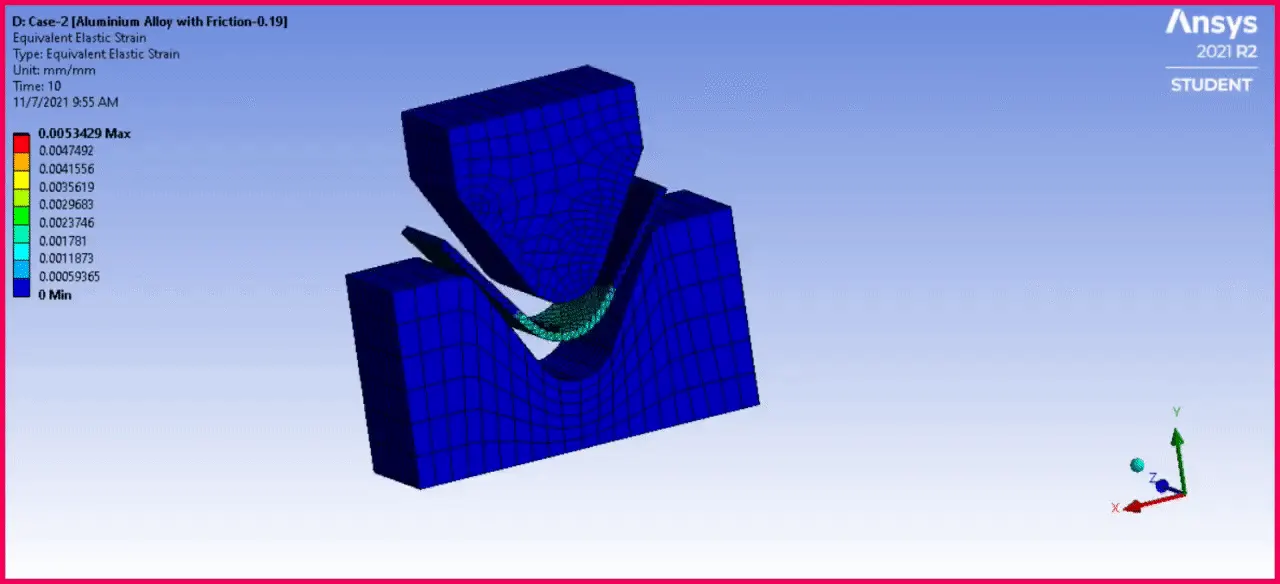
| Figure 65-Case 2-Aluminium Alloy,Friction Coefficient-0.19,Equivalent Elastic Strain Simulation Animation. |
[Case 2 Aluminium Alloy,Friction Coefficient-0.19] Directional Deformation :
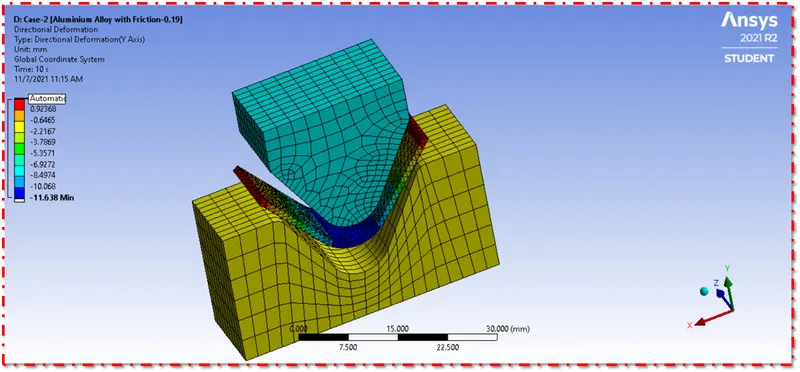
| Figure 66-Case 2-Aluminium Alloy,Friction Coefficient-0.19,Directional Deformation. |
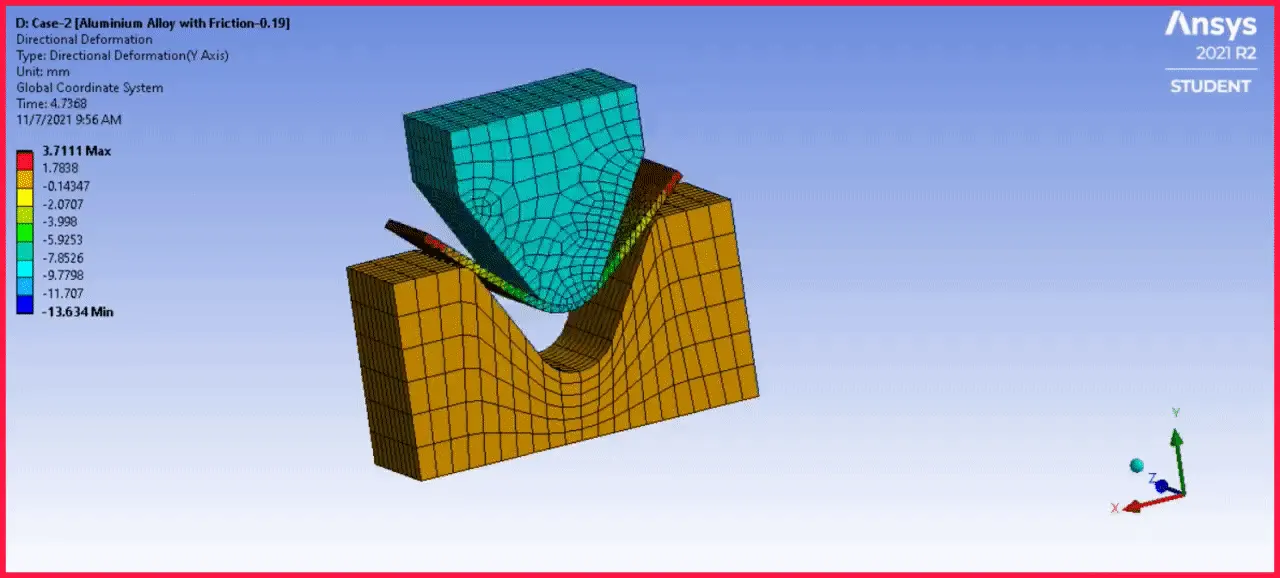
| Figure 67-Case 2-Aluminium Alloy,Friction Coefficient-0.19,Directional Deformation Simulation Animation. |
[Case 2 Aluminium Alloy,Friction Coefficient-0.19] Equivalent Stress of Sheet :
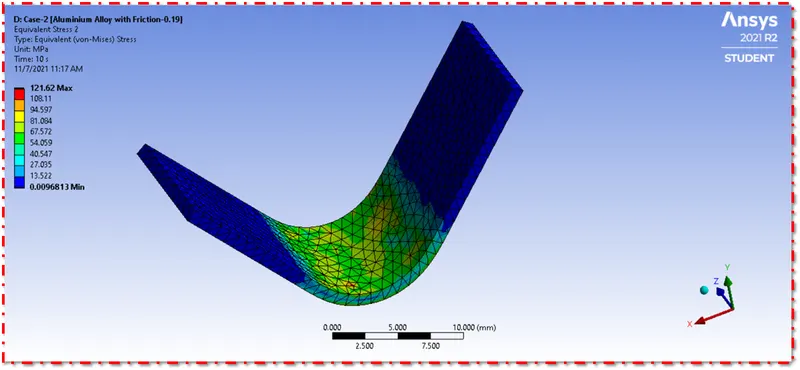
| Figure 68-Case 2-Aluminium Alloy,Friction Coefficient-0.19,Equivalent Stress of Sheet. |
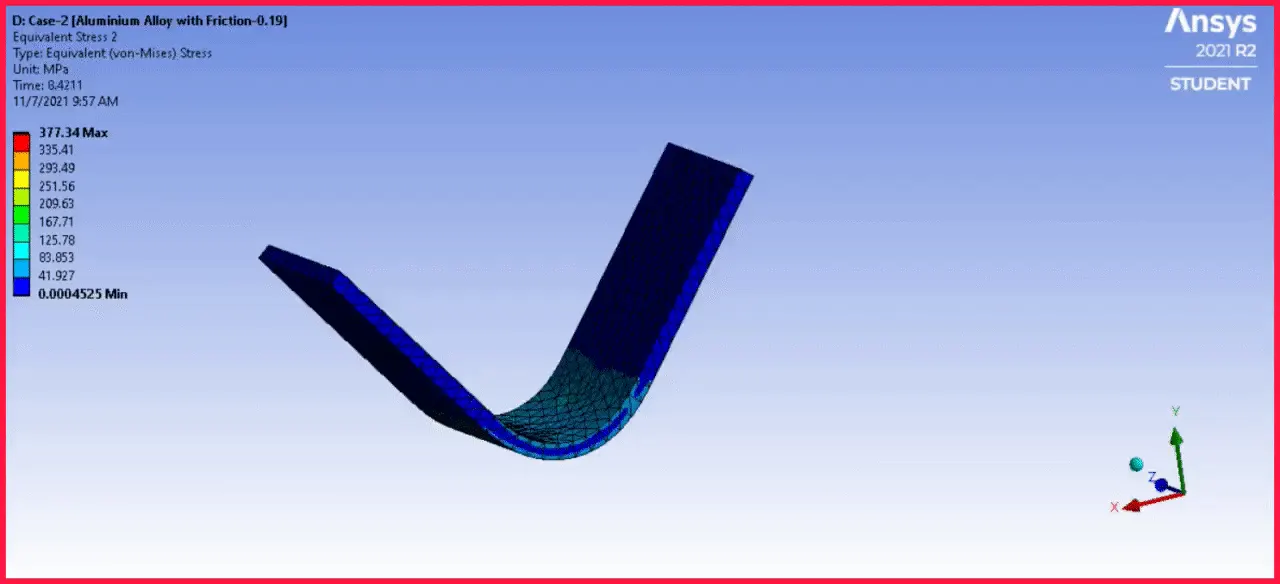
| Figure 69-Case 2-Aluminium Alloy,Friction Coefficient-0.19,Equivalent Stress of Sheet Simulation Animation. |
Case 3-Aluminium Alloy with Refined Mesh of 0.5 mm Element Size [Equivalent Stress] :
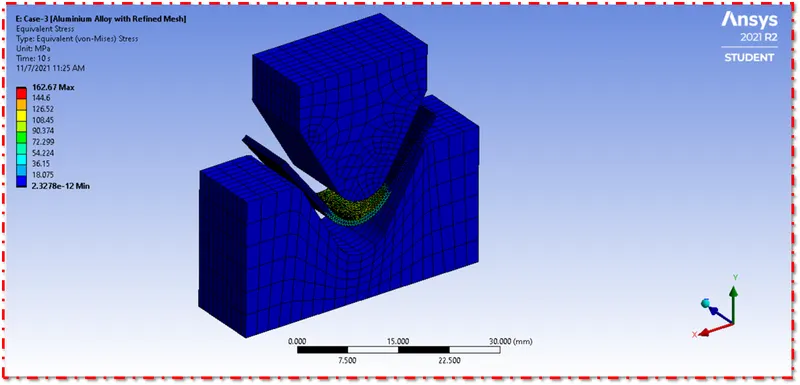
| Figure 70-Case 3-Aluminium Alloy with Refined Mesh of 0.5 mm [Equivalent Stress]. |
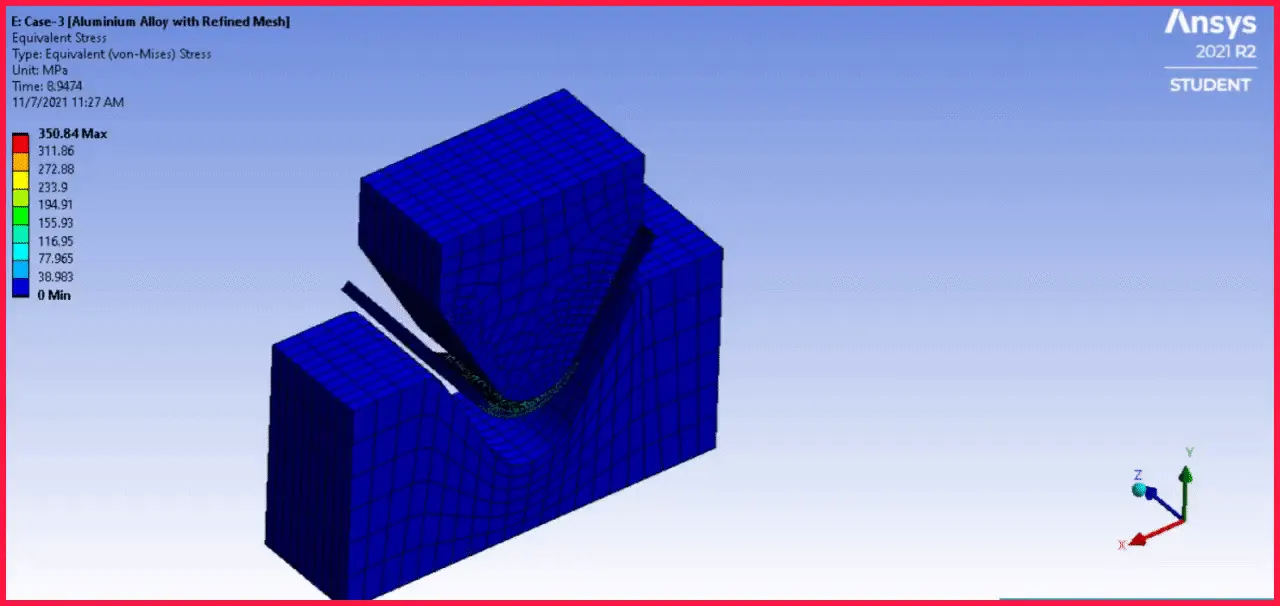
| Figure 71-Case 3-Aluminium Alloy with Refined Mesh of 0.5 mm [Equivalent Stress Simulation Animation]. |
Case 3-Aluminium Alloy with Refined Mesh of 0.5 mm Element Size [Equivalent Elastic Strain] :
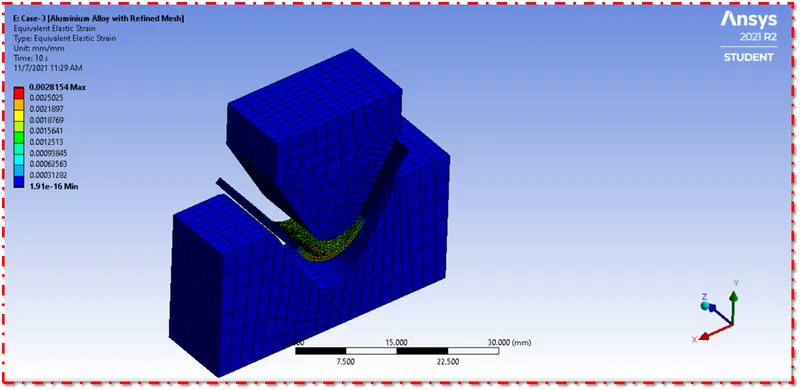
| Figure 72-Case 3-Aluminium Alloy with Refined Mesh of 0.5 mm [Equivalent Elastic Strain]. |
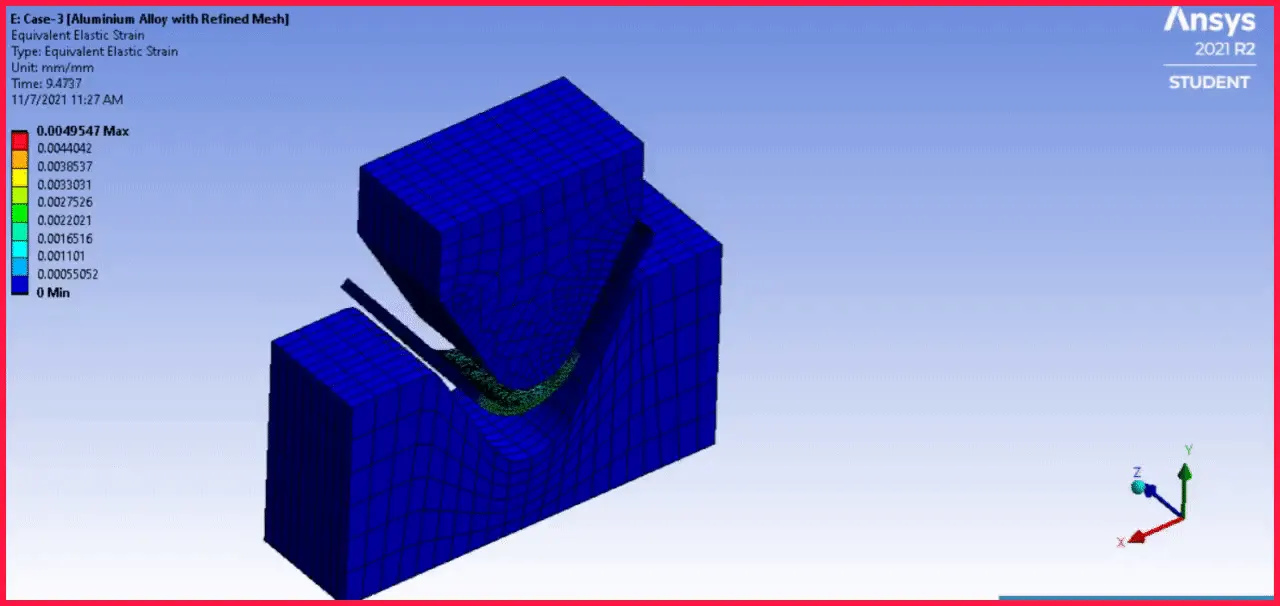
| Figure 73-Case 3-Aluminium Alloy with Refined Mesh of 0.5 mm [Equivalent Elastic Strain Simulation Animation]. |
Case 3-Aluminium Alloy with Refined Mesh of 0.5 mm Element Size [Directional Deformation] :
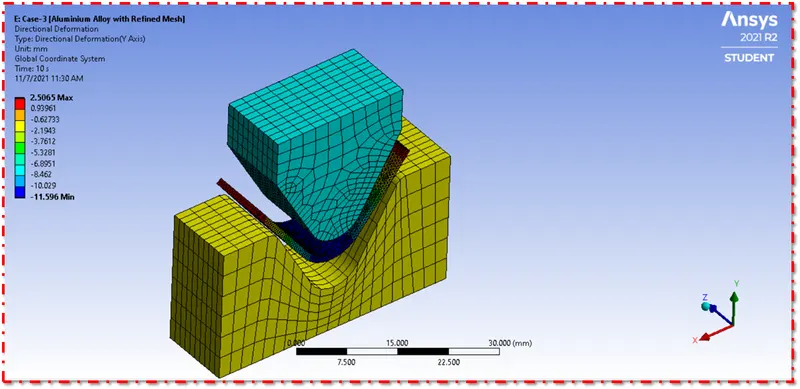
| Figure 74-Case 3-Aluminium Alloy with Refined Mesh of 0.5 mm [Directional Deformation]. |
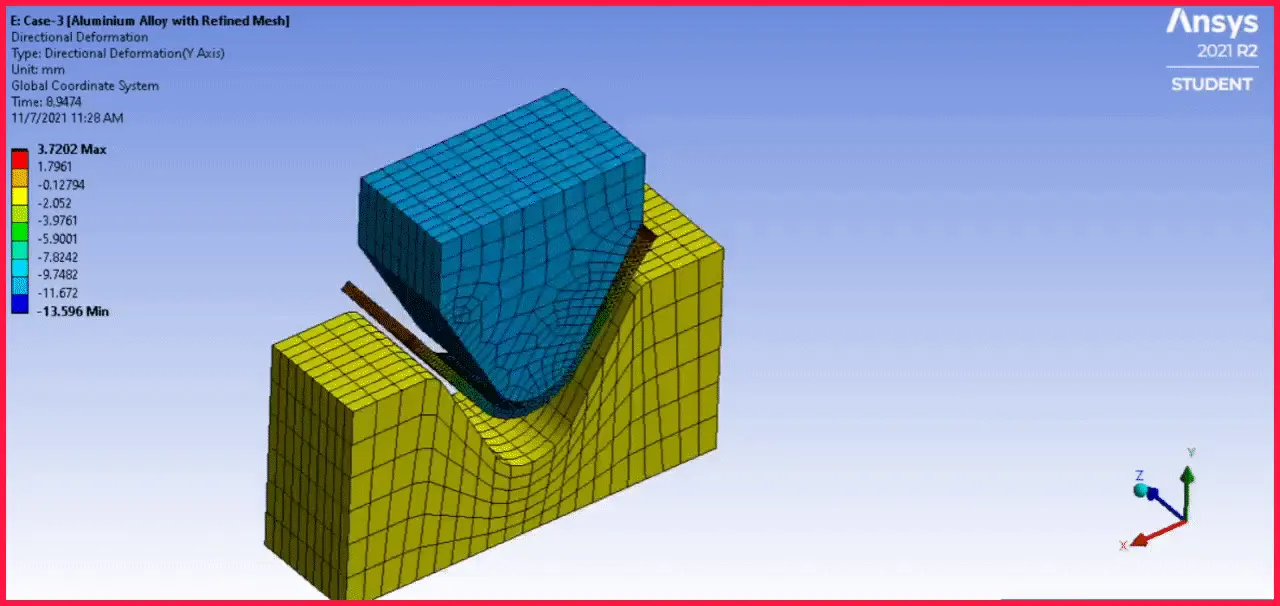
| Figure 75-Case 3-Aluminium Alloy with Refined Mesh of 0.5 mm [Directional Deformation Simulation Animation]. |
Case 3-Aluminium Alloy with Refined Mesh of 0.5 mm Element Size [Equivalent Stress of Sheet] :
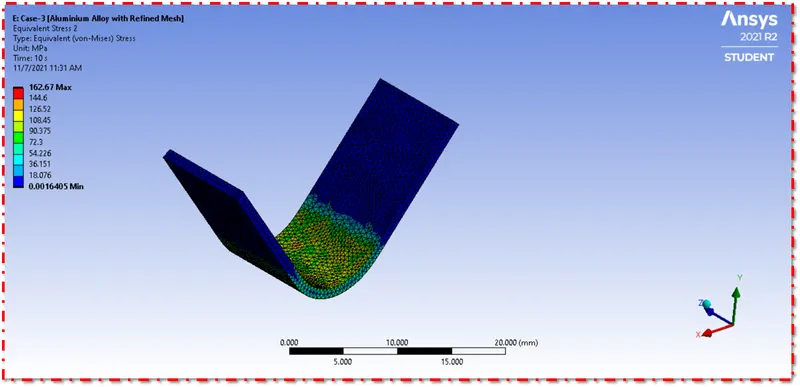
| Figure 76-Case 3-Aluminium Alloy with Refined Mesh of 0.5 mm [Equivalent Stress of Sheet]. |
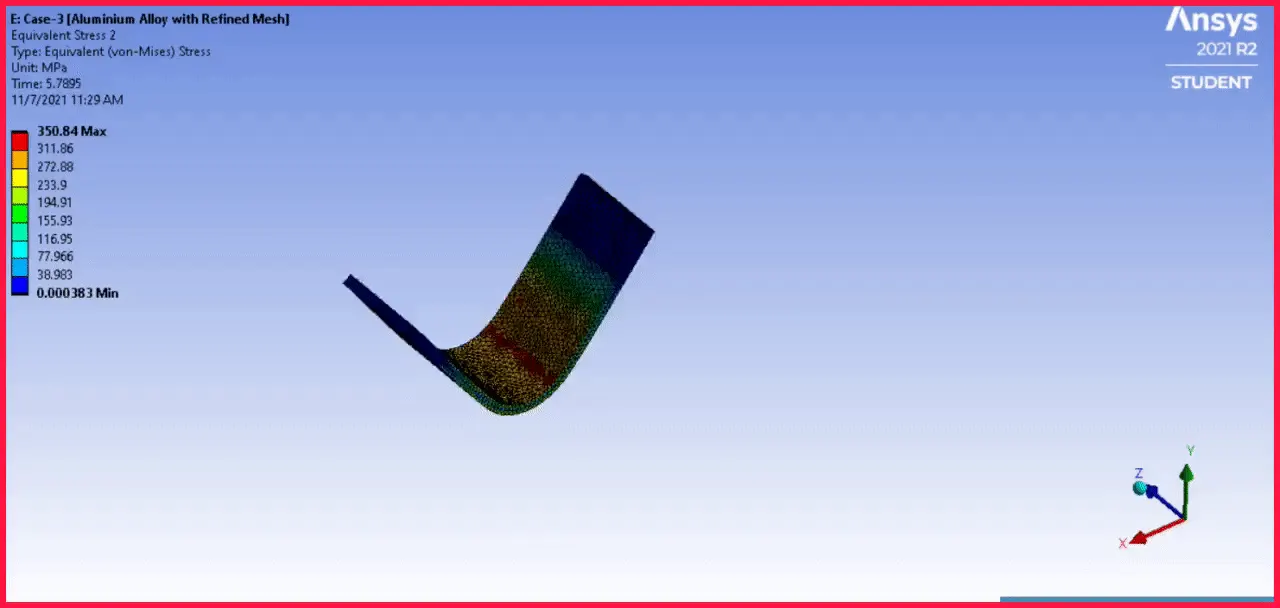
| Figure 77-Case 3-Aluminium Alloy with Refined Mesh of 0.5 mm [Equivalent Stress of Sheet Simulation Animation]. |
Comparison of Results :
|
Cases |
Equivalent Von Misses Stress Mpa |
Directional Deformation mm |
Equivalent Elastic Strain mm/mm |
Equivalent Von Misses Stress of Sheet Mpa |
|||||
|
Max. |
Min. |
Max. |
Min. |
Max. |
Min. |
Max. |
Min. |
||
|
Case-1 |
Aluminum Alloy 1199 |
63.189 MPa |
1.5605e-012 MPa |
2.2243 mm |
-12.449 mm |
0.0015709 mm/mm |
8.1723e-017 mm/mm |
63.189 MPa |
3.7142e-003 MPa |
|
Copper Alloy |
135.62 MPa |
3.0537e-012 MPa |
2.8489 mm |
-11.647 mm |
0.001731mm/mm |
1.7246e-016 mm/mm |
135.62 MPa |
3.9938e-003 MPa |
|
|
Magnesium Alloy |
89.05 MPa |
3.1011e-012 MPa |
2.5285 mm |
-11.314 mm |
0.0027871mm/mm |
2.0297e-016 mm/mm |
89.05 MPa |
2.7789e-003 MPa |
|
|
Case-2 |
121.62 MPa |
1.7593e-012 MPa |
2.4939 mm |
-11.638 mm |
0.0026009mm/mm |
1.545e-016 mm/mm |
121.62 MPa |
9.6813e-003 MPa |
|
|
Case-3 |
162.67 MPa |
2.3278e-012 MPa |
2.5065 mm |
-11.596 mm |
0.0028154mm/mm |
1.91e-016 mm/mm |
162.67 MPa |
1.6405e-003 MPa |
|
- Here in the Case-1 while comparing the three materials Aluminium Alloy 1199,Copper Alloy and Magnesium Alloy.
- The maximum Von Misses Stress is occured in the Copper Alloy,The Maximum Stress occured is 135.62 Mpa,It is high when compared to the other two materials.
- The maximum directional deformation is also occured in the Copper Alloy.The maximum directional deformation occured is 2.8489 mm,It is also highr when compared to the other two cases.
- The maximum von misses stress occured in the Aluminium Alloy 1199 is 63.189 Mpa,It i slow when compared to other two cases,The maximum directional deformation occured in the Aluminium Alloy 1199 is 2.2243 mm,It is low when compared to the other two cases.
- So the stress and deformation occured in Aluminium Alloy is low when compared to the other two materials,So the Aluminium Alloy is preferable material when compared to other two cases.
- In the Case-2,We are changing the material to Aluminium Alloy Non linear and changed the coefficeint of friction to 0.19,The results we got is some what similar to the Case-1 Copper Alloy,The values are slighlty decreased.
- The Maximum Von Misses Stress Occure is 121.62 Mpa and the Maximum Directional Deformation occured is 2.493 mm.It is also not preferrable when compared to the Case-1 with Aluminium Alloy 1199 Material.
- In the Case-3,We are using same Aluminium Alloy Non linear Material for the WorkPiece (Sheet) and refining the mesh with 0.5mm element size for the WorkPiece (Sheet).
- Here we will be getting accurate results,The Maximum Von Misses Stress occured in the Case-3 is 162.67 Mpa and the maximum Directional Deformation occured is 2.5065 mm.
- In the Case-3 we got a accurate results,But the computational time and Storage required to save the date is too high.
- I'm concluding that,the Aluminium Alloy 1199 is preferable when compared to other two cases,Cause the stress and the deformation occured is very less when compared to the other two cases.Any how it depend on applications.
Result :
- Hence the material has been defined for all the three cases.
- Hence the connections were defined to the Sheet Metal Bending Model.
- Hence the model has been solved for Von-Misses Stress, Equivalent Elastic Strain,Stress Intensity,Contact Tool and Directional Deformation by applying appropriate boundary conditions.
- Hence the displacement was given to the Sheet Metal Bending model.
- Hence the model was meshed with hexahedral and tetrahedral elements.
- Hence the Case-1 with Aluminium Alloy 1199 material is preferred,Cause the stress and the deformation occured is very less when compared to the other two cases.Any how it depend on applications.
Conclusion and Learning Outcome :
In this Week 3 Sheet Metal bending Challenge, I came to know about
- Learned how to give Displacement to the Sheet Metal Bending model.
- Learned the fine meshing of the sheet workpiece will provide more accurate results.
- Learned how to assign materials to the model.
- Learned how to apply boundary conditions to the model.
- Learned how to request outputs and solve them.
- Learned about the Force Convergence.