Hood design-Week 2
HOOD:
The Hood is the hinged cover over the engine of the vehicle. Hoods can open to allow access to the engine compartment, or trunk on rear-engine and some mid-engine vehicles for maintenance and repair also to cover the engine compartment and give an aesthetic look to the vehicle. A concealed latch is typically used to hold down the hood. On vehicles with an aftermarket hood and on race cars, hood pins may be used to hold down the car hood. Hoods sometimes also contain a hood scoop, wiper jets, power bulge, and/or hood ornament. Car hoods are typically constructed from steel and sometimes from aluminium. Aftermarket car hoods may be constructed from various other materials, including carbon fibre, fiberglass, or dry carbon. The hood design may vary from one make and model to another, including SUV, MUV, Sedan, Hatchback, or heavy vehicles.
The movement of the hood can be controlled by either one of them:
- Gas stay
- Support rod
Gas Stay
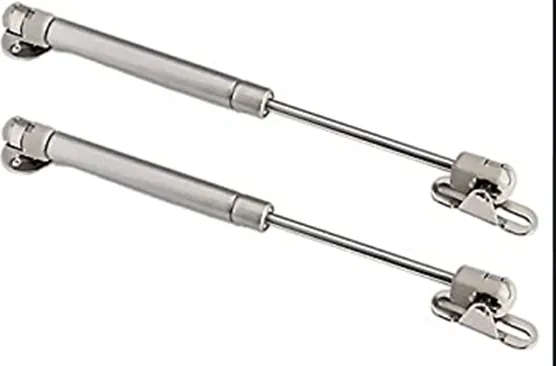
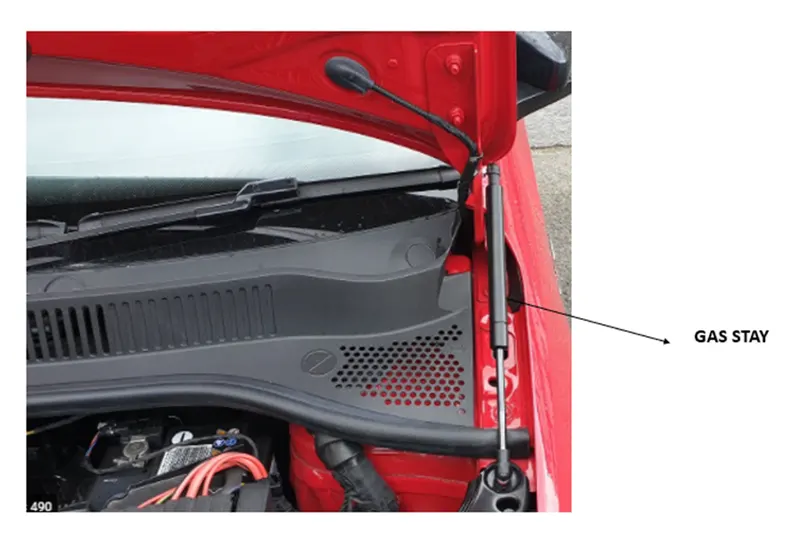
A gas stay is a type of spring that, unlike a typical mechanical spring that relies on elastic deformation, uses compressed gas contained within an enclosed cylinder sealed by a sliding piston to pneumatically store potential energy and withstand external force applied parallel to the direction of the piston shaft.
Support Rod
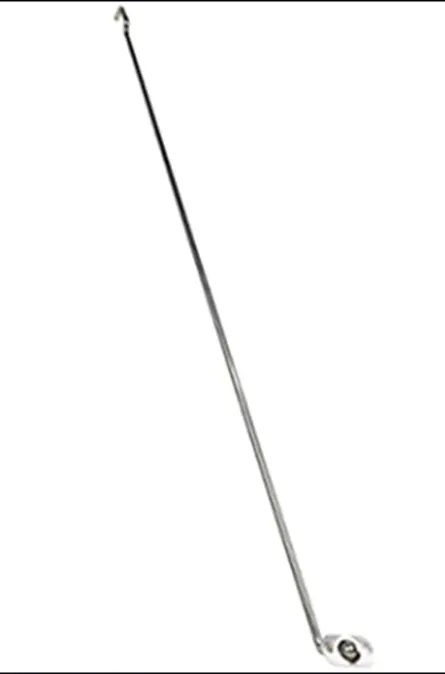
This is the most commonly used rod for opening and closing the hood at a certain angel. One end of the rod is hinged to the engine compartment and the other end is set free so that it can be locked to the hood inner panel when the hood is opened. This is usually used when the weight of the bonnet is small.
It is very important to consider that the support rod should not collide inside the engine compartment.
parameters followed in the designing a hood:
SAFETY REQUIREMENTS
Safety is the most important criteria in automobile designs which concentrates on both pedestrian and occupant safety. The pedestrians are the most vulnerable road users and are at high risk of traffic accidents. The major reason for the fatality of the pedestrian in traffic accident is due to the head injury resulting from the hard impact of the head against the stiffer hood or the ground. This leads to the necessity of new inner hood panel which is less stiffer and pedestrian friendly. The head impact analysis on the present hood of the car was done to study the response of the adult head form at two different locations. Structural and modal analysis for the same present hood assembly was done to observe the local and global stiffness. In order to reduce the head injury of the pedestrian the local stiffness over the area of head impact has to be reduced thus the new design of hood inner panel was focused on that and the structural and modal analysis was done for the new design. The design with lesser local stiffness and similar global stiffness compared to the existing hood was finalized. The head impact analysis for the new design of hood inner panel was performed. The HIC values of the adult head form for two different locations are found to be 706 and 948 which meets the safety limitations of the adult head acceleration during impact as proposed by EEVC WG17 and Euro NCAP regulations. Thus the new design of the hood is pedestrian friendly, considerably maintaining the overall global stiffness of the hood.
PEDESTRAIN SAFETY
crash mitigation tests that measure the potential for head and leg injuries resulting from pedestrian-motor vehicle crashes have been in place for many years in Europe and Japan. Euro NCAP began head and leg testing in 1997 and Japan began pedestrian head protection testing in 2003 and pedestrian leg protection testing in 2011. In general, these tests launch projectiles designed to simulate a person’s legs or head into various locations on a vehicle’s hood and bumper to assess the effectiveness in limiting pedestrian injury
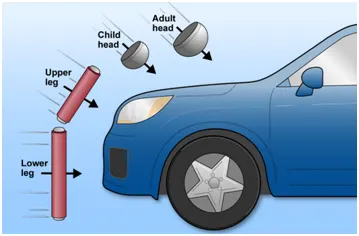
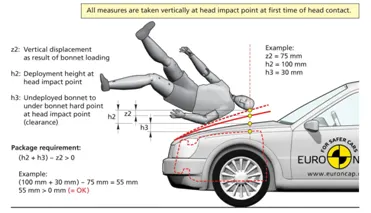
The inner panel is the component which make sure your hood assembly and your head imact pedestrian rates. So as a hood designer we have to take care of following design consideration while start to design the inner pannel,
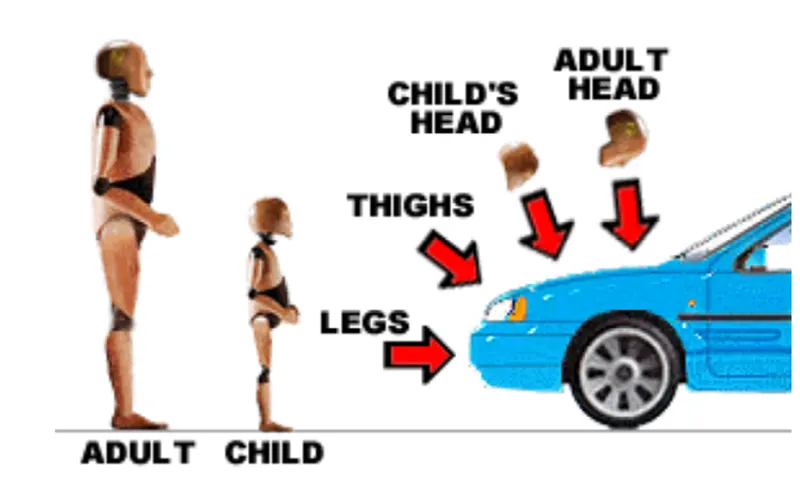
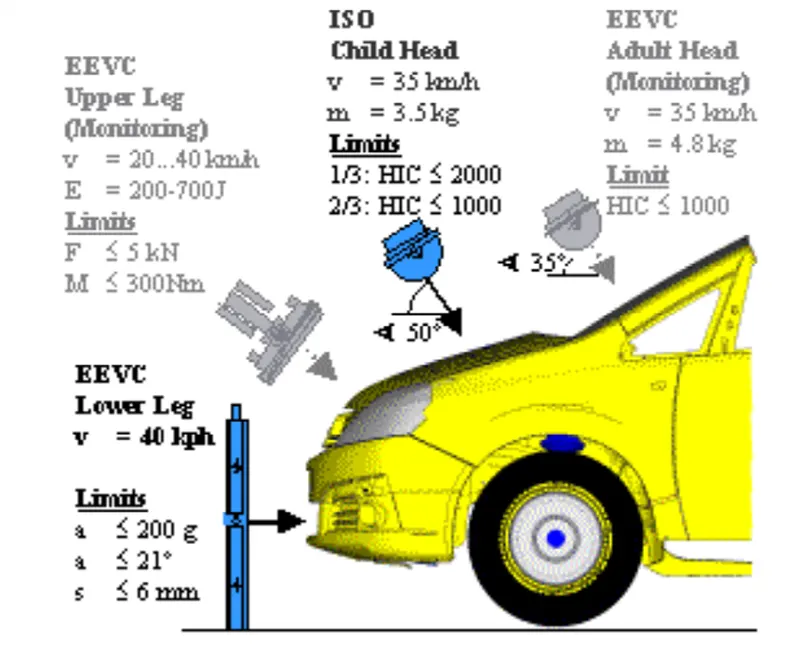
The above image is one of the NCAP standard which provides my car safety rate make best. Likewise if we fulfill it standards then obviously my car will be best safety rated one and also raise demands for my car in market under best safety one.
A pedestrian can be defined as a vulnerable road user that is at risk when it comes to roads. Thus the safety of such being is essential. The pedestrian safety and protection norms are aimed to do so. It will ensure that the new cars meet a minimum requirement of safety for the pedestrians. It’s one of the phases of Bharat New Safety Vehicle Assessment Program (BNVSAP).
India will also be getting its own safety test named BNVSAP. Soon, our country roads will get safer. But you cannot clap using a single hand. It is our duty also to check whether the cars we purchase have a good pedestrian score or not. Are the cars safe for anyone at risk, be it the occupants or the vulnerable road users? Tata Motors and Mahindra have worked significantly towards making their cars safer. Other manufacturers such as Maruti Suzuki direly need to ensure safer vehicles too.
The vehicles be tested for pedestrian safety so as a hood designer I should take care of them while designing the inner panel which will be most important thing to be consider in hood assembly.
I have mentioned here the pedestrian safety protection rating There is a maximum possible score awarded by Euro NCAP depending on the level of protection offered by a vehicle are:
- 12 points for child head impacts
- 12 points for adult head impacts
- 6 points for lower leg impacts
- 6 points for upper leg impacts.
Therefore, the maximum possible overall score is 36 points. The pedestrian protection rating is awarded as a percentage score. The sum of all the points from these tests determines the overall vehicle star rating. The overall vehicle star rating includes adult protection, child protection, pedestrian protection and safety assists.
In Hood assembly the following 3 safety points are considered most important while design the Hood, fender & front side bumper design, aslo the way of possibilities increase in best safety star rated.
1) Head Impact:
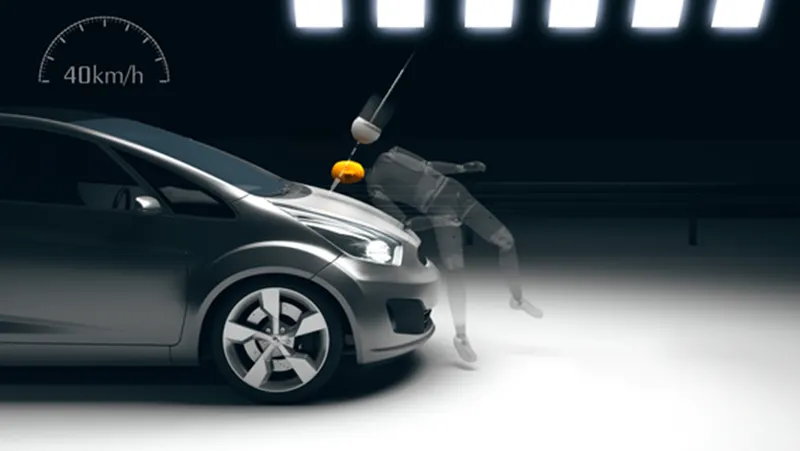
This test is carried out for a vehicle speed of 40 km/h. To have an estimate of the potential head injury in the fateful event of a vehicle striking an adult or a child, a head form impactor is used in a series of impact tests and the impact sites are then assessed for and rated accordingly.
This test will give essential information about the deformation clearance, energy-absorbing structures and deployable protection systems such as pop-up bonnets and external airbags in a new vehicle.
2) Upper Leg Impact:
This test is carried out for a vehicle speed of 40 km/h. To have an estimate of the potential head injury in the fateful event of a vehicle striking an adult or a child, a head form impactor is used in a series of impact tests and the impact sites are then assessed for and rated accordingly.
This test will give essential information about the deformation clearance, energy-absorbing structures and deployable protection systems such as pop-up bonnets and external airbags in a new vehicle.
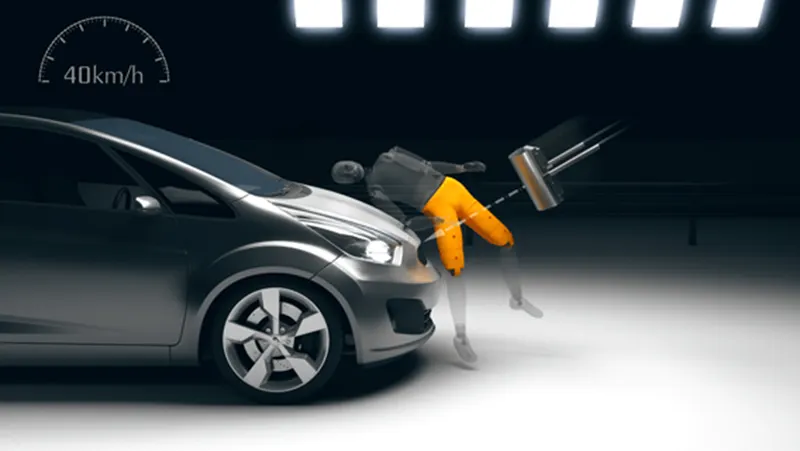
3) Lower Leg Impact
Euro NCAP carries the test at the same speed standard as the above ones. It uses an adult leg impactor and a series of tests are carried out. Impact sites are then assessed and the protection rating is offered.
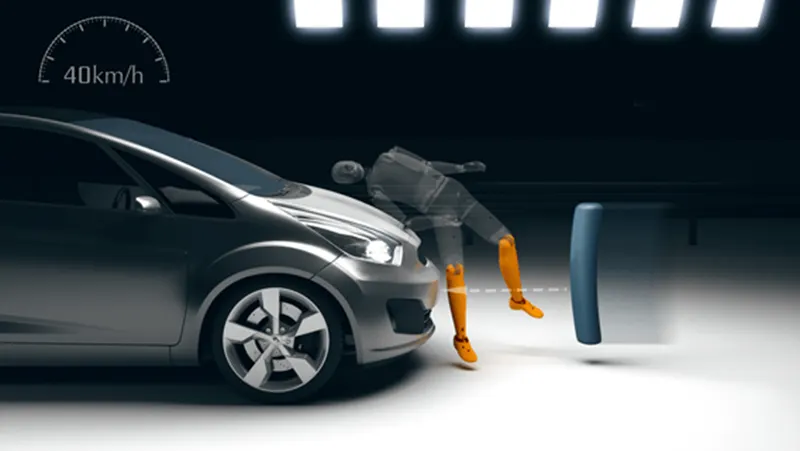
So as a hood designer, we should take care of pedestrian safety as first preparance also design consideration of EURO NCAP Standards.
It help us to make our car best safety rated one.
WRAP AROUND DISTANCE
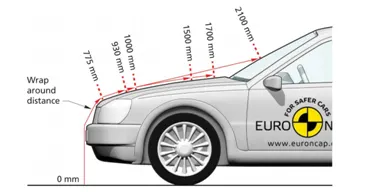
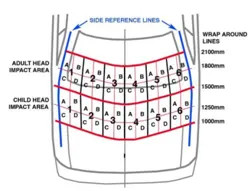
The headform test area is defined as the outer structure that includes the upper surface of all outer structures. It includes, but is not limited to, the bonnet, wings, windscreen scuttle, wiper arms/spindles, windscreen frame, A-pillars and roof. It is bounded by the geometric trace of the 1000mm wrap around line in the front, the Bonnet Side Reference Lines and the 2100mm wrap around distance (WAD)
Methodology:
- Creating Hood Inner Panel
- Creating Hood Outer Panel
- Creating Embossment for Hinge
- Creating Embossment for Latch
- Creating Reinforcements
- Assembling the components
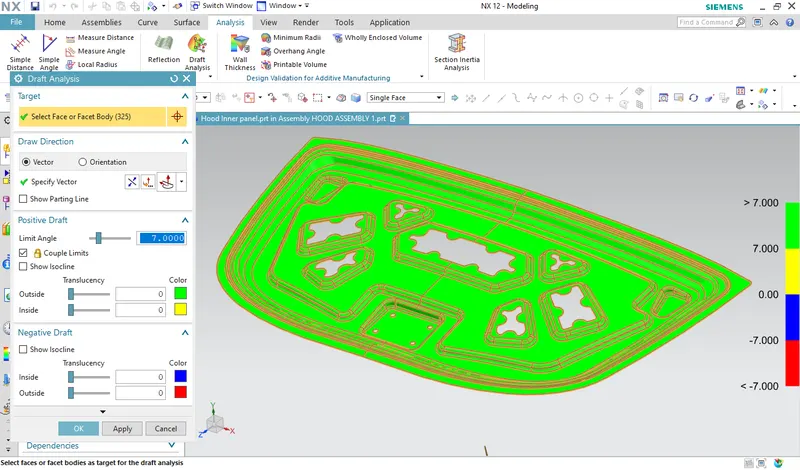
- Performing Draft Analysis on CAD Model
HOOD DESIGN USING NX-CAD:
AIM
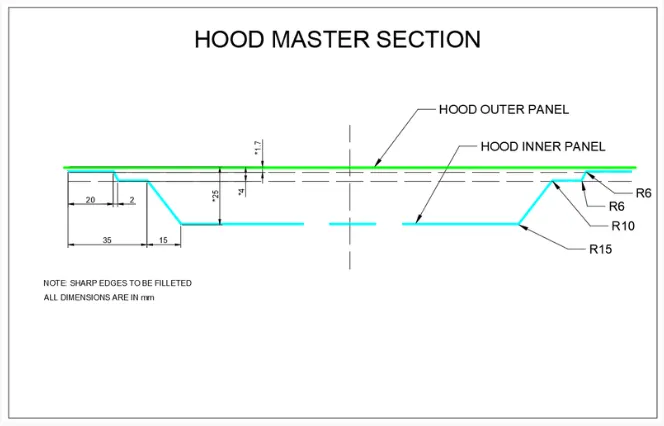
TO Design Hood Outer Panel, Inner Panel and the necessary reinforcements by following the Master Section and standard procedure which is used in the OEM Manufacturer's.
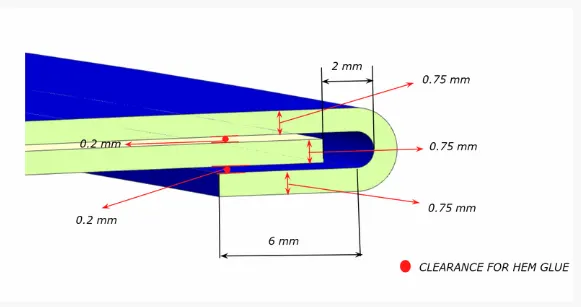
GIVEN MASTER SECTION
About Hood:
Hood is the most important component of engine room assembly and its being as a safety cover for engine compartment to protect the engine from dust, small small stones and other particles which can be possible to disturb their function or make any defects.
Also its consider as other door which can help to operate the engine compartment parts for usual repairs and maintenance.
In this hood assembly, hood outer panel is provides best look and make our car smart and atractive by the way to make this hood as best asthetic profile and designary product.
Hood stay is the part whcih can be helps to open and close the hood panel assembly.
Hood inner and outer panels are usually manufactured through metal stamping processes. Metal stamping is a manufacturing process used to convert flat metal sheets into specific shapes
About Hood Stay:
A device fpr supporting the engine hood of a motor vehicle in its open position.
there is 2 types usually runnig in the market.
- Support rod: Its a simple rod which is cost effective and simple design. But, its should be operate by manually.
- Gas stay: its operate by gas there is no manpower is required to operate just with help of simple lever near driver inside the car, we can open our hood cover. But is quite costly also its increase the weight with compart to support rod.
The following procedure, I did followed while designing the hood by NX CAD.
I create new assembly view in NX CAD, then insert what ever provided hood assembly sub system components,
Car Hood has the following components
- Outer Panel
- Inner Panel
- Hood locking system
- Reinforcement
- Hood Support
Outer Panel:
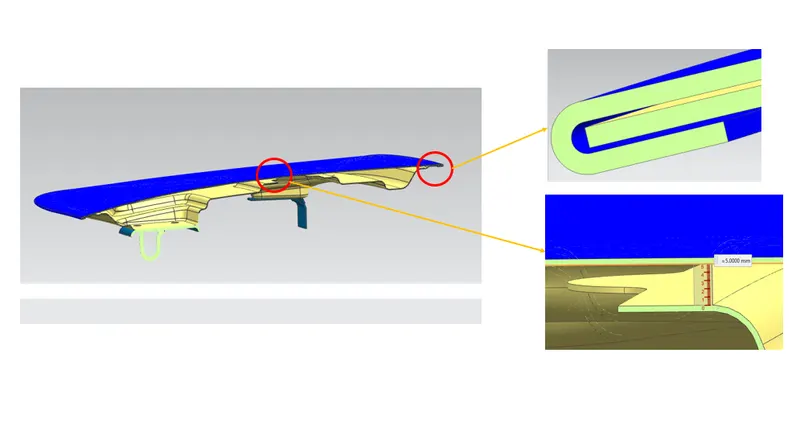
Outer Panel is the most important part of the hood to makes the car in a very good aesthetic proportion. So that the Outer panel is perfectly made insense to achieve the aesthatic requirement. So that, the sheet metal operation result which is visible on the outer panel or it reduces the aesthatic value means, those operations are strictly not to be followed to make the outer panel. That's why the hemming process is used to join the outer panel with the inner panel, instead of using welding methods.
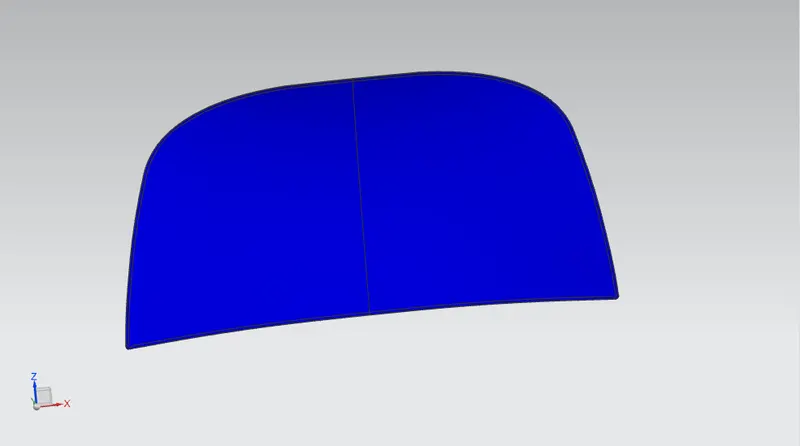
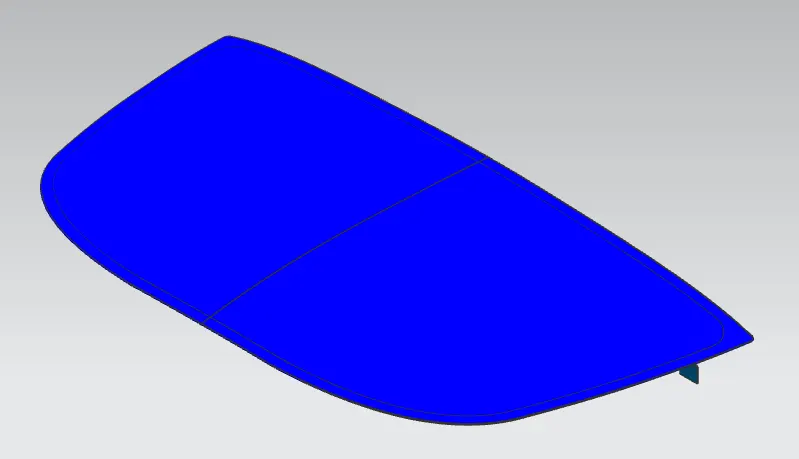
By considering the given Outer Panel thickness(0.75mm) and using the outer panel styling surface the outer panel has been made as below,
Inner Panel:
Inner Panel is the major part that ensures the rigidity of the hood and It is used to diverts the impact to outwards of the hood however possible when the collision occurs. It is can be achieved by the good inner panel design and the emboss direction in the inner panel.
Lot of design changes and researches are done and being carried out in the inner panel only to achieve the pedestrain safety and the passenger safety to make the standards.
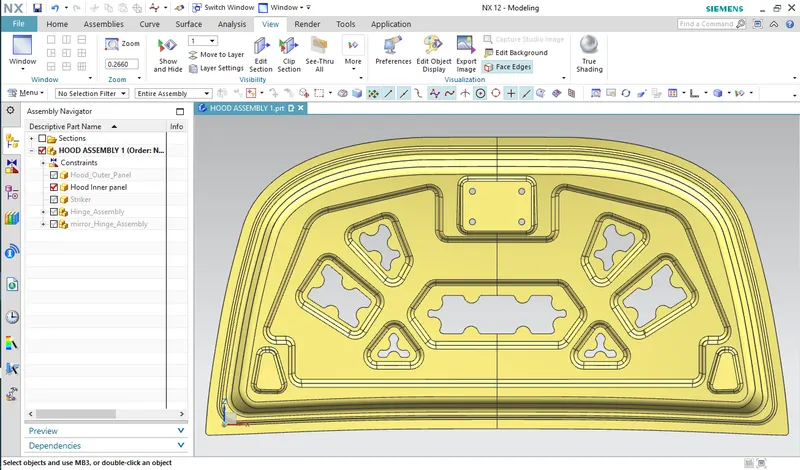
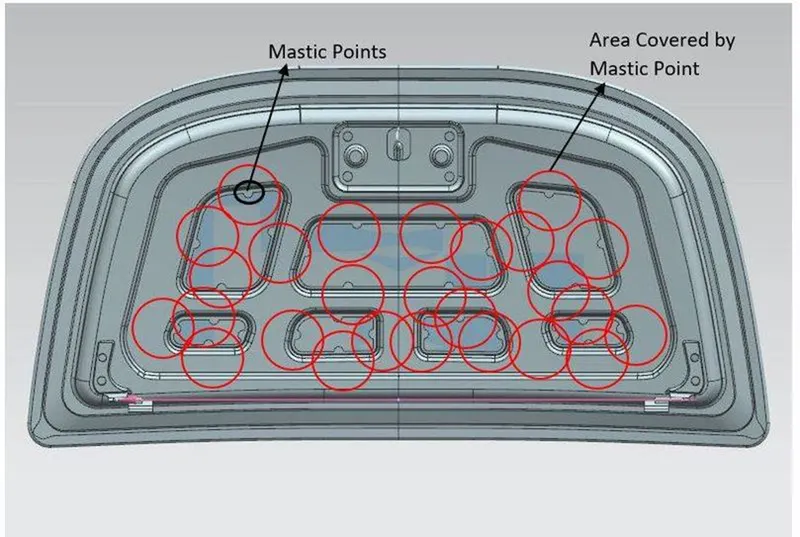
In this inner panel, the required holes are made to transport the hood from one station to other and fix the hood in fixture by using this hole as budding holes. Also the inner panel has the embosses and mastic points.
By considering the given Inner Panel thickness(0.75mm) and offseting the outer panel styling surface with the given offset data, the Inner Panel has been made with the embosses and mastic points as below,
Hood locking system
Striker-Latch
Striker-Latch
Striker is the part which is used to hold the hood with the engine compartment by using the latch which it is attached in the engine compartment, when the hood not require to open up. The striket is attached to the bottom of the inner panel and it hits the latch and locked with it, when the hood is dropped down.
There is lever which is provided inside the cabin to the driver to release the latch pressure. Once it can be done, the hood will opens up in a inch, then we can ableto open the hood more
Striker
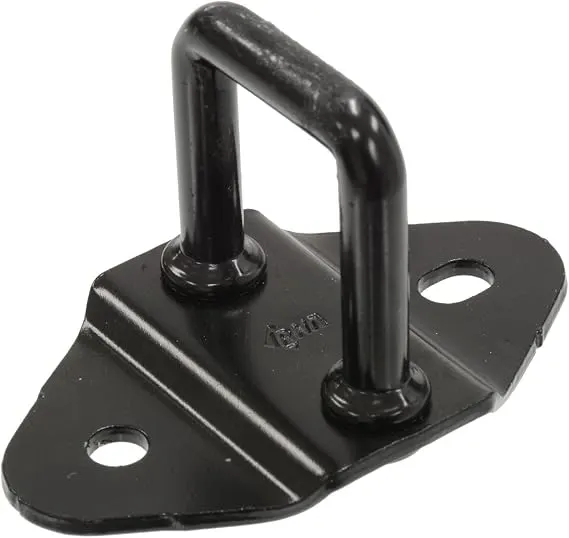
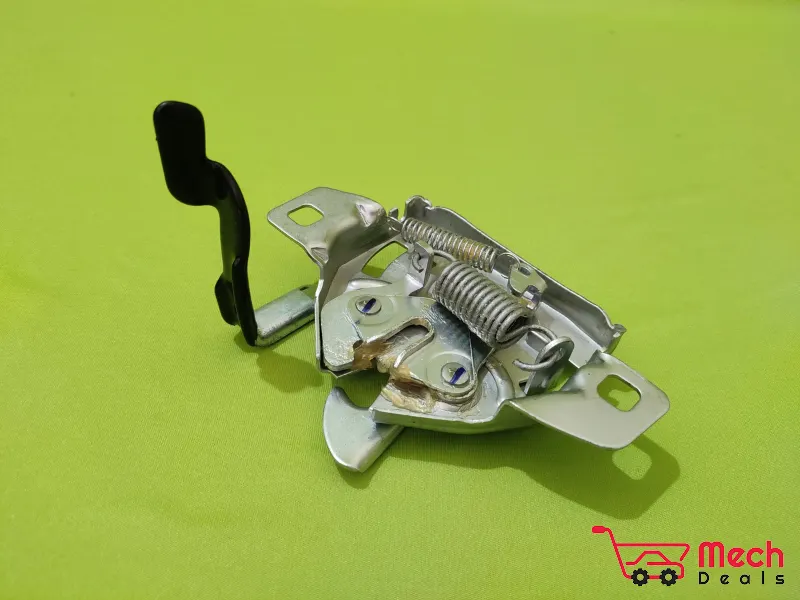
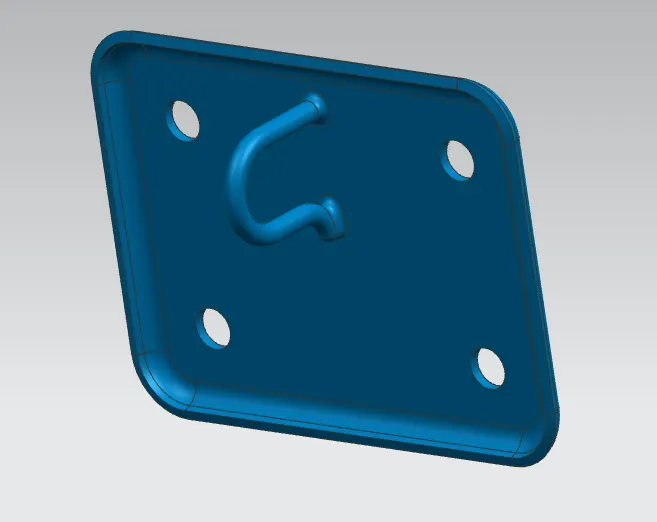 Latch: The hood latch helps to keep your hood closed. When the hood is closed, the latch slides over what is called a catch, and the spring covers the latch to keep it snug. When you pull the knob inside the car to open the hood, the hood latch cable opens the latch, allowing it to bypass the catch and open. There is, however, a second hood latch, to keep the hood from flying up if accidentally unlatched. That latch will need to be opened with your hand to get the hood fully open.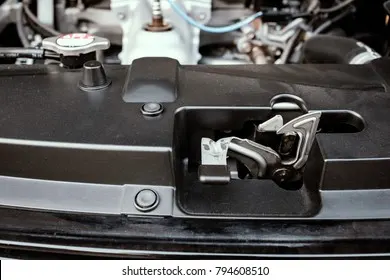
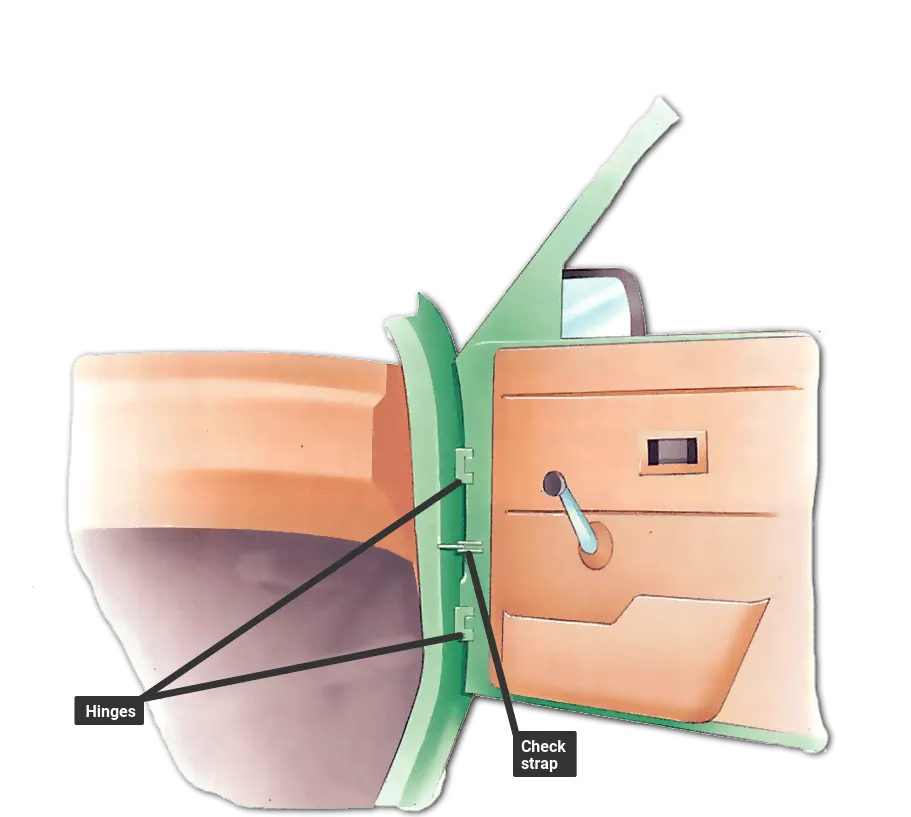
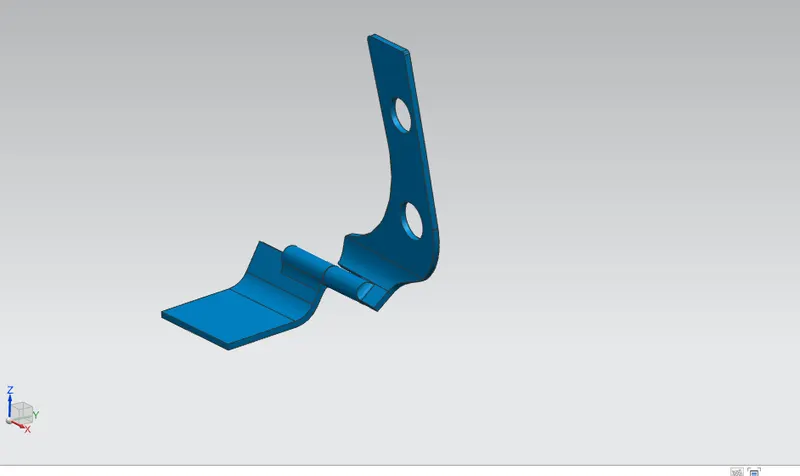
Hinge Assembly
It is used to fix the hood to the engine compartment.
For any component has to be open and close with an axis, then hinge plays a major role. It has two simple parts(one is hood side hinge, another one is engine compartment side hinge) and assembled with the single axis.
Hinge Assembly is attached at the each Outwards end of the hood and the engine compartment.
 Reinforcements: The purpose of reinforcement is to provide additional strength for the hood where it is needed. When the latch and striker attached to the panel, the strength will be reduced in that area. To improve the strength in that area the reinforcement is added.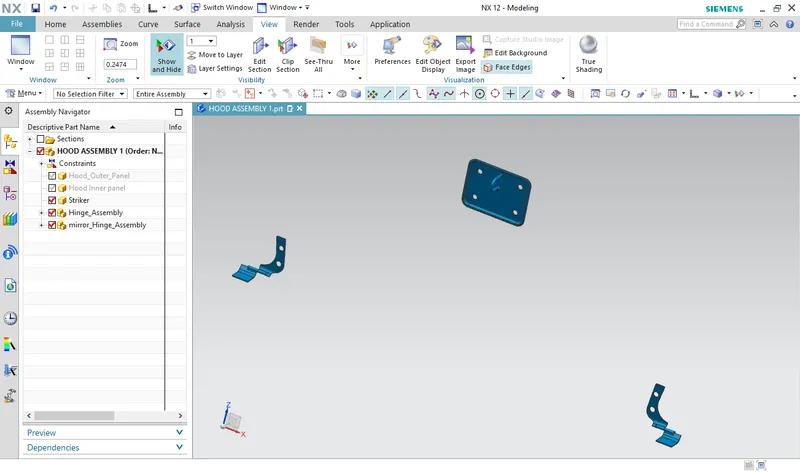
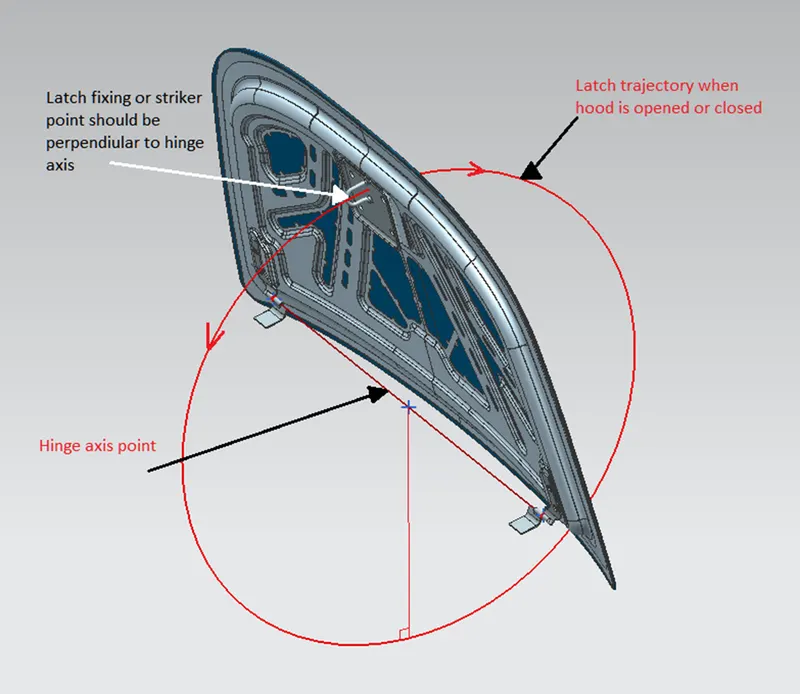
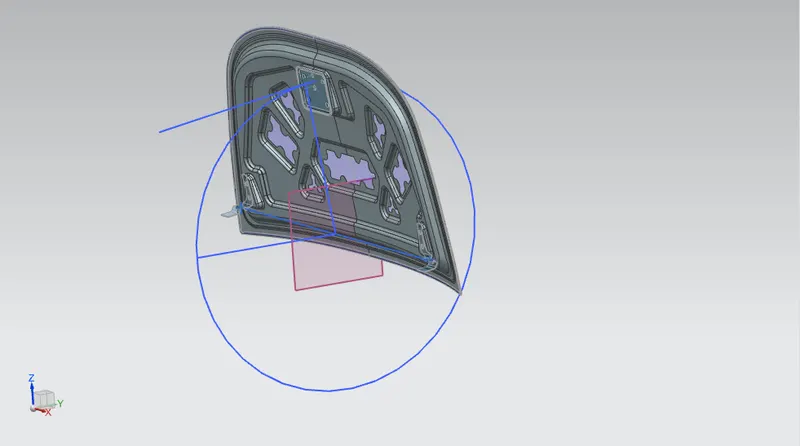
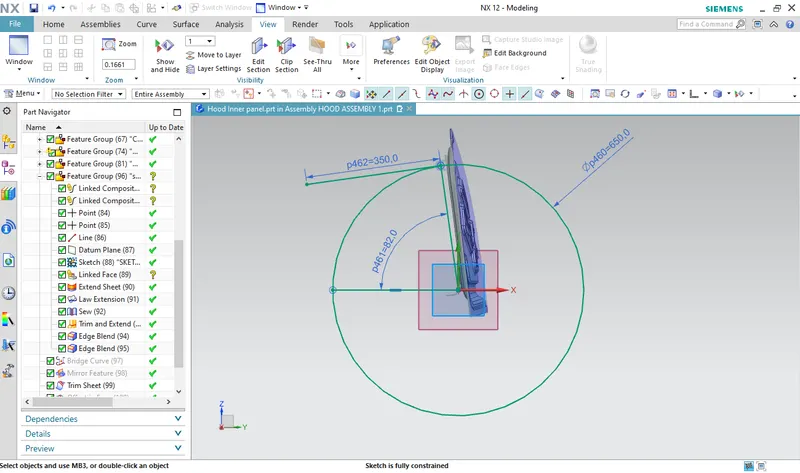
Latch Trajectory:
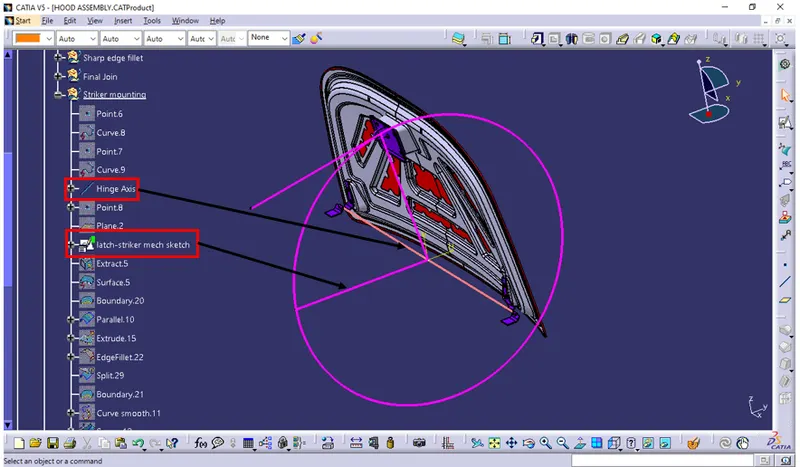
Latch Trajectory is the orbital path in which the latch should be positioned to the lock hole. The trajectory is drawn based on the reference of the Hinge joint central axis.
Mastic Data:
Mastic is common as an adhesive and sealant. A mastic sealant is a type of liquid sealant that cures in an elastic state, thus making it flexible while holding the bond of the surfaces that have attached. It adheres to just about any material making an all-purpose type of sealant. Wood, aluminium, glass, marble, and even duct board are all standard applications for mastic sealant.
EMBOSSING
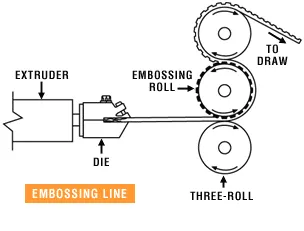
embossing is a metal forming process for producing raised or sunken designs or relief in sheet material by means of matched male and female roller dies, theoretically with no change in metal thickness, or by passing sheet or a strip of metal between rolls of the desired pattern.
Metal sheet is drawn through the male and female roller dies producing a pattern or design on the metal sheet. Depending on the roller dies used, different patterns can be produced on the metal sheet.
Characteristics of the metal embossing process include:
- Its ability to form ductile metals,
- Its use in medium to high production runs,
- The ability to maintain the same metal thickness before and after embossing,
- The ability to produce unlimited patterns, depending on the roll dies, and
- The ability to reproduce product with no variation.
Manufacturing Process:
The manufacturing process involves turning raw materials into finished products which are used for some purpose. The economics of the manufacturing operation is a very important consideration. To be viable in the modern environment, a product has to be competitively priced besides having functional and aesthetic appeal. There are different processes available for manufacture. These are classified as Casting Process, Forming Process, Fabrication Process, Material Removal Process.
Hood has designed by the process of using the following Sheet Metal Operations
- Hemming
- seam
- Embossing
- Deep Drawing
- Piercing
Hemming
Hemming in sheet metal operations refers to the bending of a sheet metal edge onto itself. It is very similar to edge stitching in clothes. Similar to how an edge stitch strengthens the edge and makes it more durable, a hem imparts strength to the metal edge and improves its appearance. The edge of one part may also be folded onto another part to create a joint.
Hemming is usually done in two stages. The first stage creates an acute bend using acute tooling (V die) followed by a flattening of the return flange using a flattening die.
A complete list of hemming benefits on a sheet metal product is as follows:
-
Hems strengthen the sheet metal edge
-
They improve the surface appearance and surface quality
-
They hide defects such as rough edges and burrs
-
They can connect parts
-
They make the edges safer to handle
Hemming types
The different sheet metal hems based on the hem shape are as follows:
-
Flat or closed hem
-
Open hem
-
Teardrop hem
-
Rope hem
-
Rolled hem
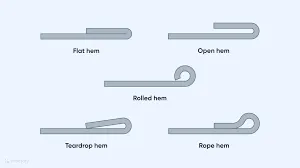
Hemming process
The hemming process can be carried out in one of the following two ways:
-
Die hemming process
-
Roller hemming process
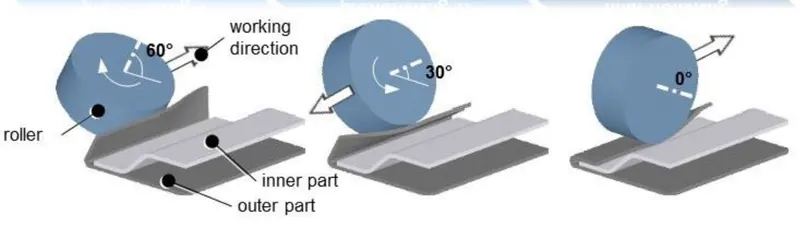
Seaming
A seam is used to connect two metal parts by interlocking the edges of the folded sheet metal parts. The resulting shape may even form a seal that isolates one side of the sheets from the other.. Seams are commonly used in the food industry on canned goods. Seams are also used to seam two roofing sheets together in the building industry.
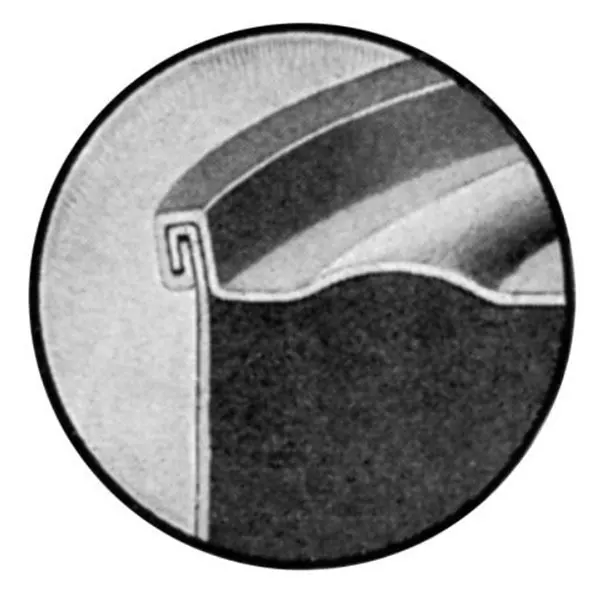
Deep Drawing:
Drawing is the process of making cu[s, shells, and similar articles from metal blanks. Drawing when cup height is more than half the diameter is termed deep drawing. Ductile materials are easier to be drawn into deeper cups. In deep drawing, because of the radial flow of material, the sidewalls increase in thickness as the height is increased. There would be a slight thinning of metal at the bottom corners.
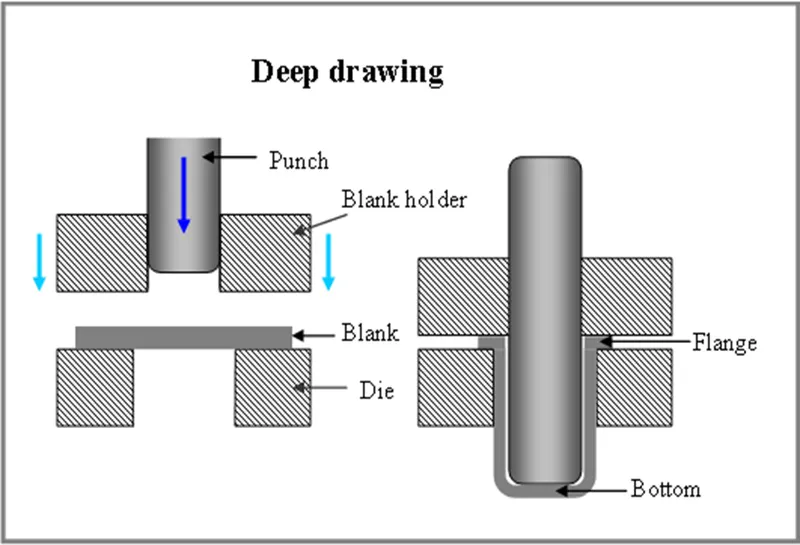
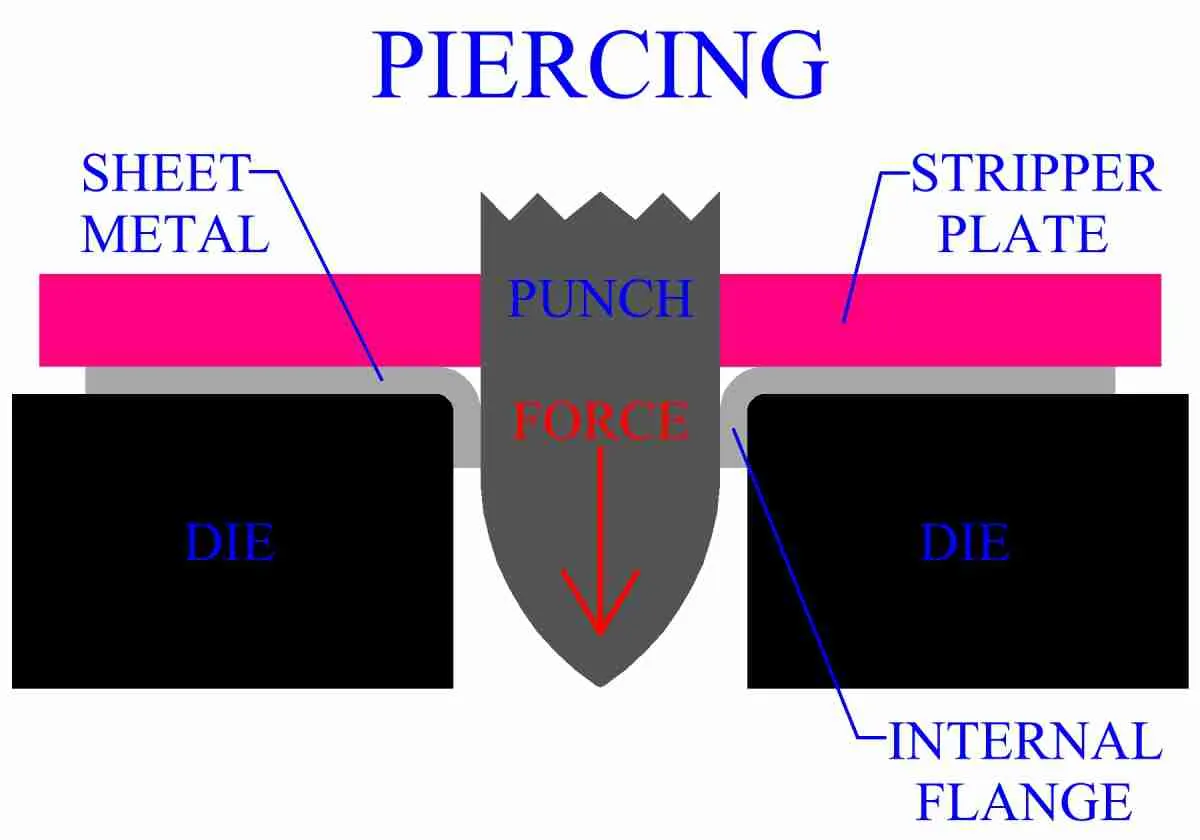
Piercing
Piercing is a shearing process in which raw metal is pierced with a machining tool, resulting in the creation of a circular or other shaped hole. As the raw metal is pierced, the metal from the newly created hole is considered scrap
Hood Inner panel:
I have design the inner hood with help of NX tools, Emboss surface, varies curve creation tools, Law extension, offset surface trim sheet & other surface tools.And the following process i have done with my hood inner panel,
Tooling axis creation:
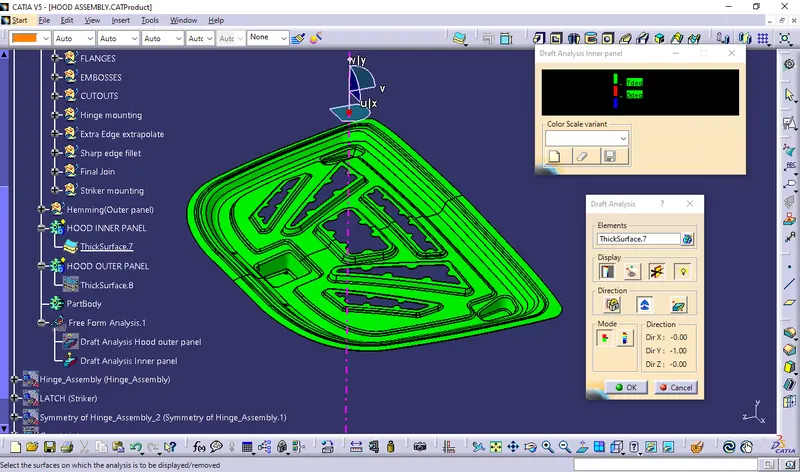
To create any sheet metal and plastic components, we have to create tooling axis which can help us to make our design for easy manufacturing also it can be a directional support to make our product can be minimum draft angle requirements of fullfilment.
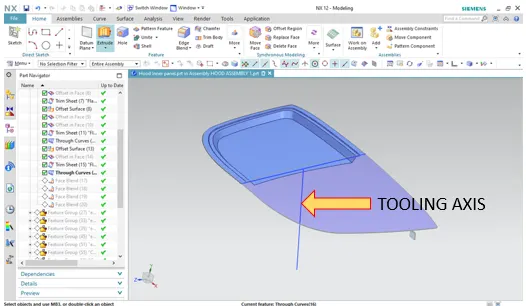 In sheet metal component minimum draft angle considered as 7 Degrees.
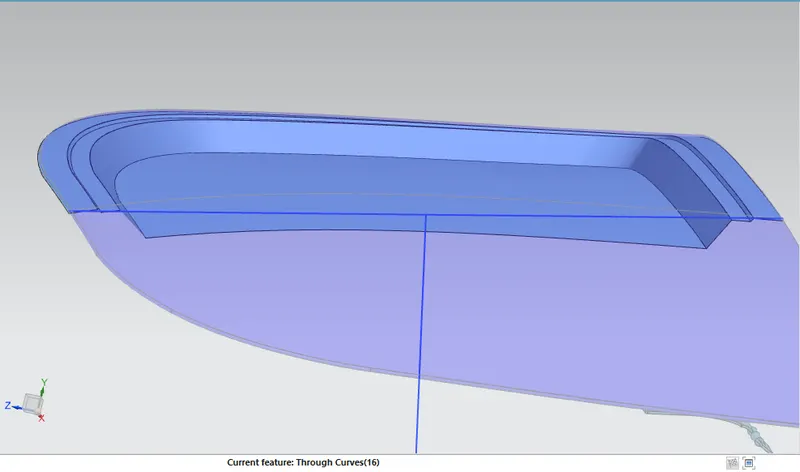
Flange creation:
The next step have followed that made flage with help of Asthetic outer panel surface and input dimensions from master section,
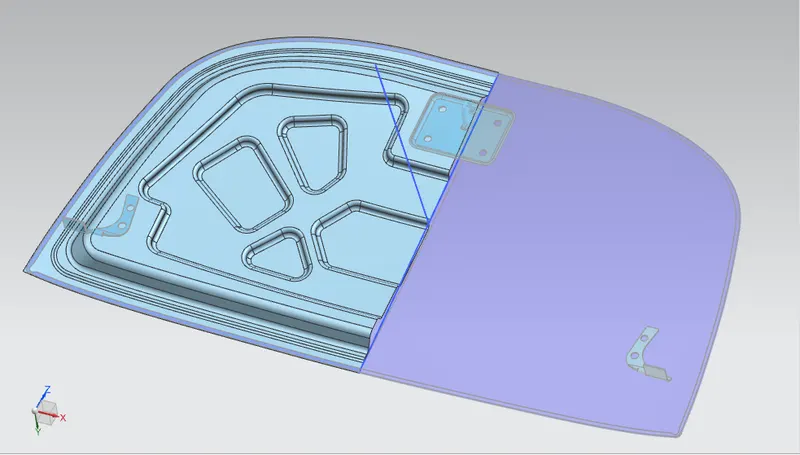
Embosses creation:
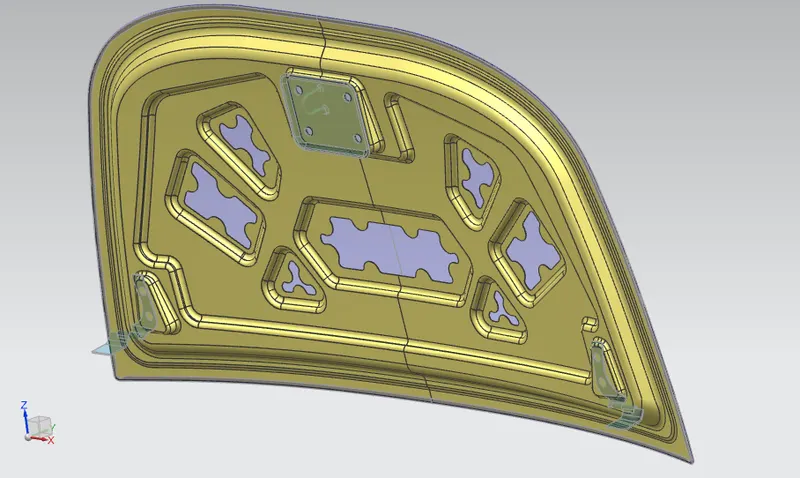
Here accourding to the reference of market lastest design of embosses I have made 5 emboss shape into my hood inner panel.
Holes creation at emboss portion:
I have provides holes, see it as stiffening I make the outer skin structurally rigid when the two parts are bonded, which is how the inner panel is designed and punched from sheet metal while mfg.
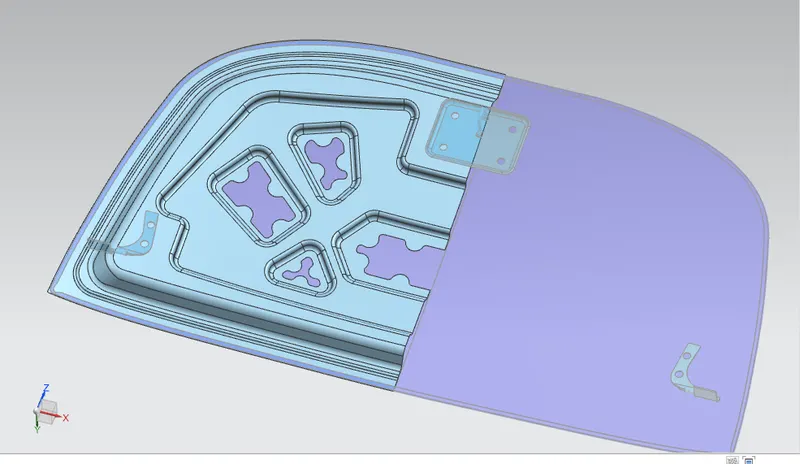
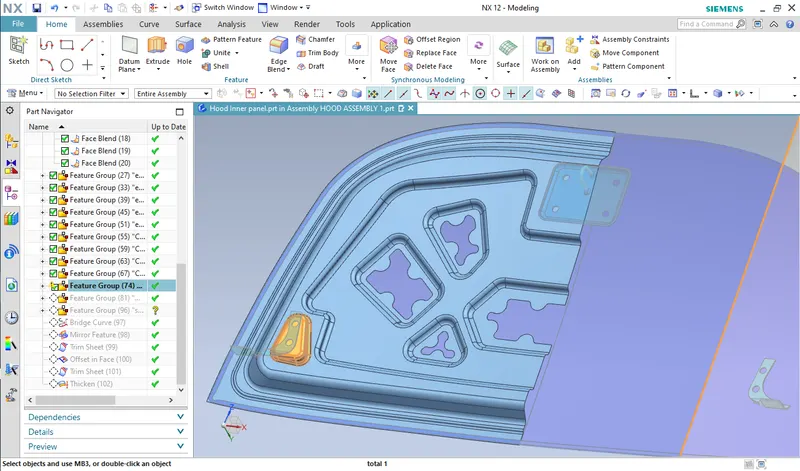
Defining Hinge base:
Hinge is the component which will be help to provides our Hood assembly for movement in rotary way. so it will be mount on the below highlighted portion accourding to my design view, as well as followed standards,
I have mirror the overall surface to make my inner panner as completed shape. 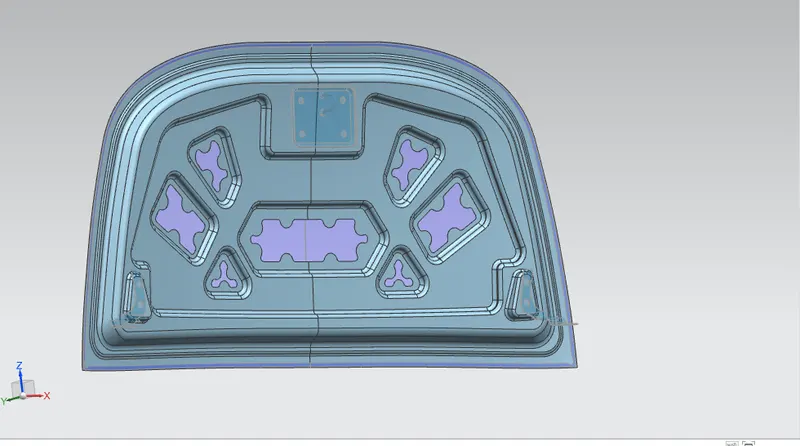 Hinge Axis creation with striker nose locking orinetaion decides:
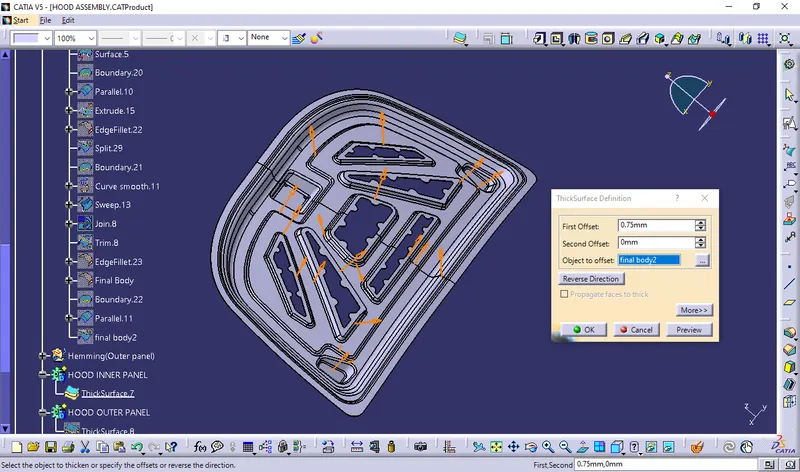
 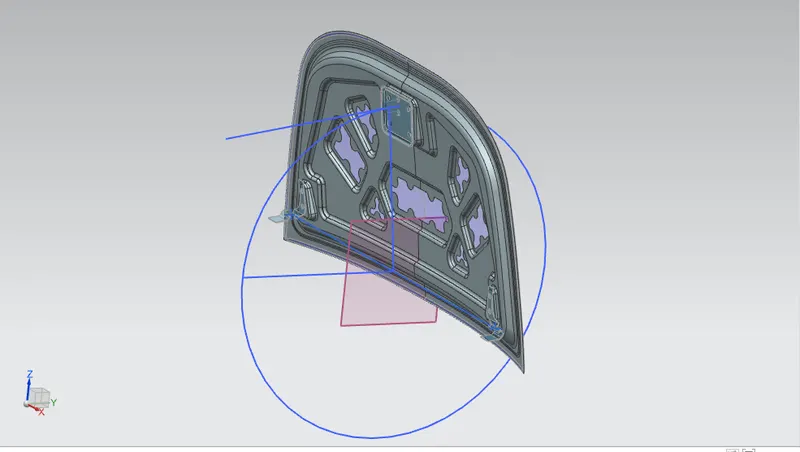 After thicken my final trim surface by 0.75mm of inner hood panel, I have made finsih the Hood inner panel component with considering the master section and other standard engineering design principles.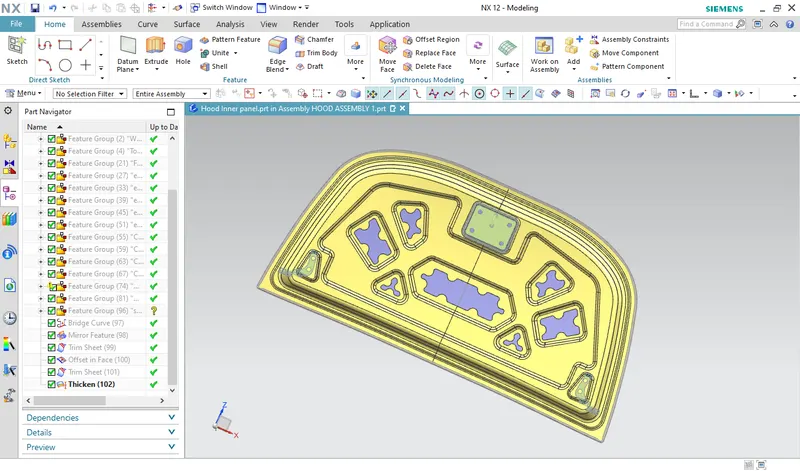
Hood Outer Panel:
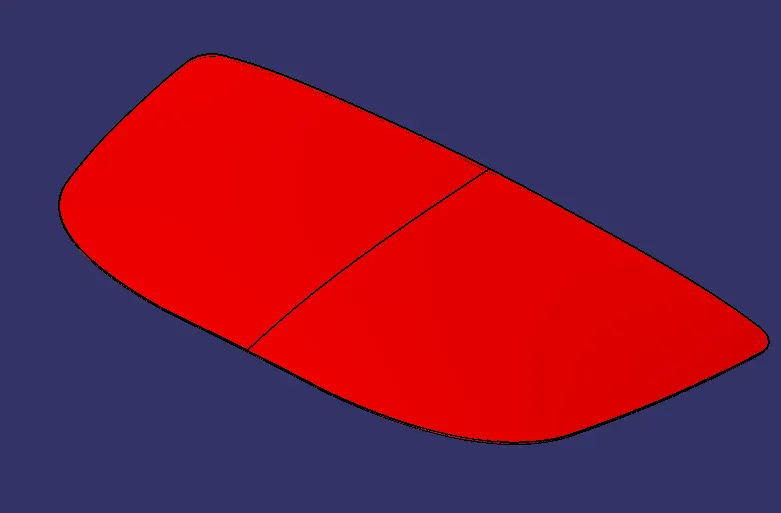
I have made finalize the hood outer panel surface by design tools, then thicken the outer panel by 0.75mm. The below image shows the thicken hood outer panel.
In the outer panel we have to consider the following process to reduce the NVH and perfect fittment each to other hood assembly components.
- Hemming
- Front relief
- rear section relief
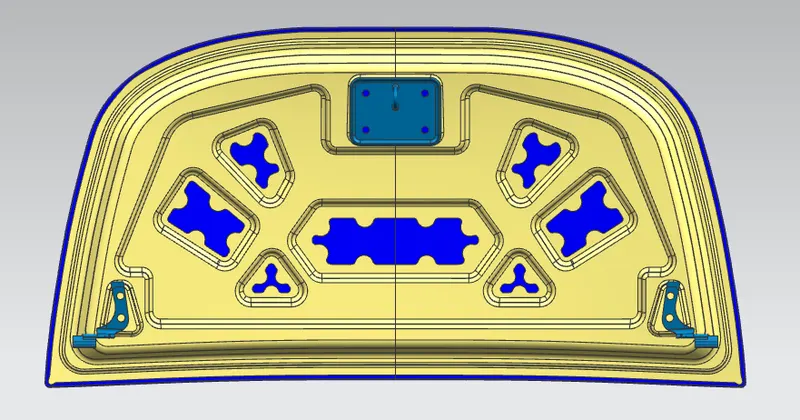
 I have assembled the Hood inner panel, outer panel, Striker & hinges by make constraining each to other. The below images shows assembly view of my hood Panel assembly,
  Hemming: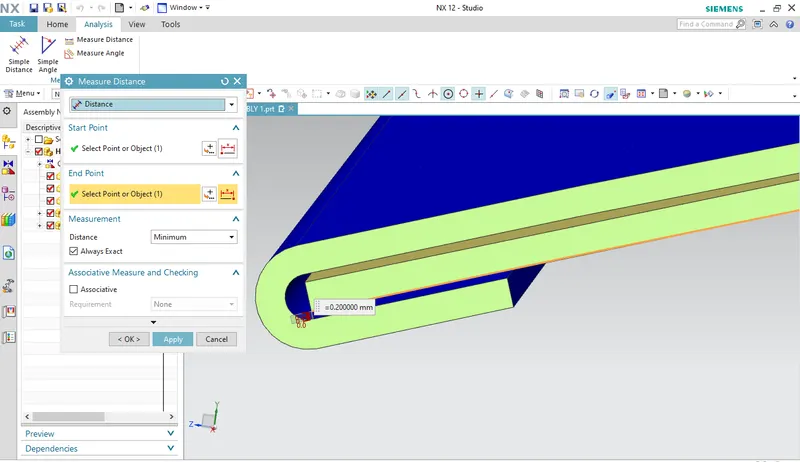
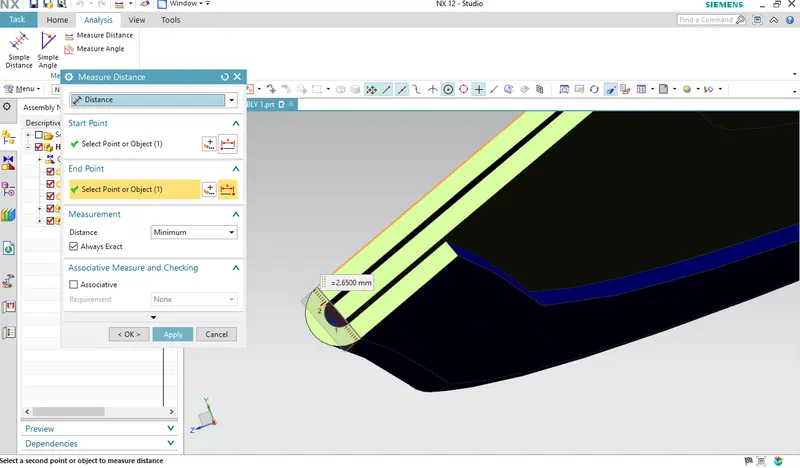
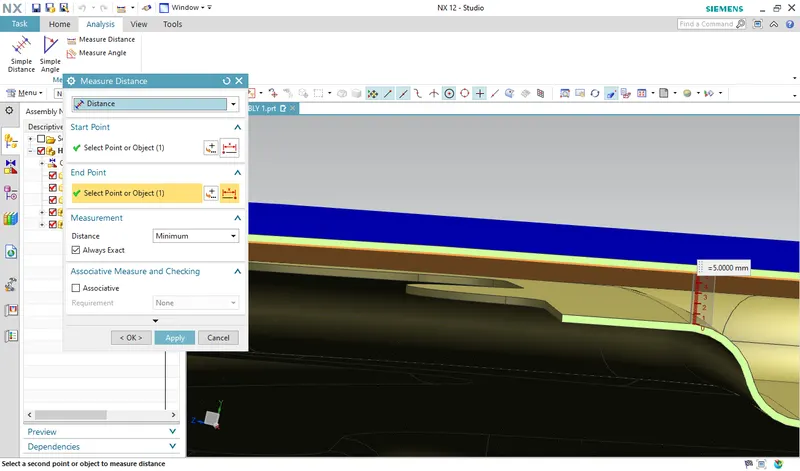 Rear section relief:
 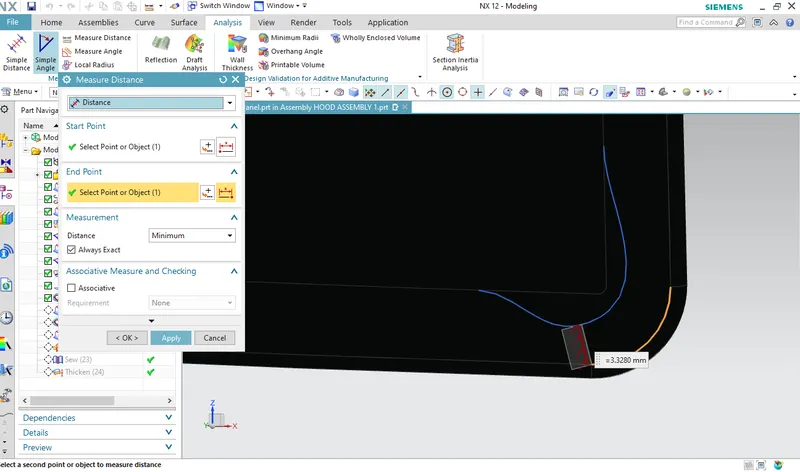 Front relief:
 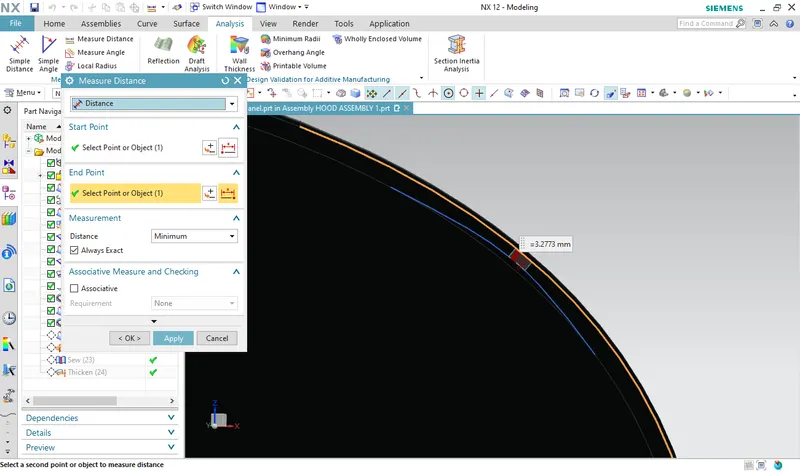 We have made perfect Hood assembly with includes all the design considerations with input of master section. 1. Front view
 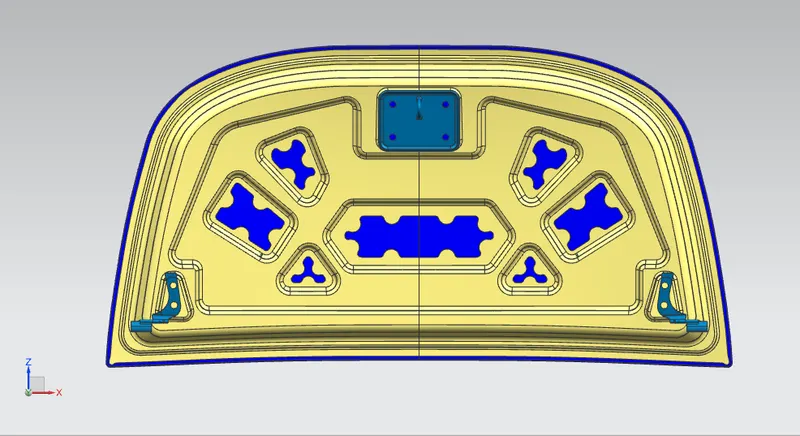 2. Top view
 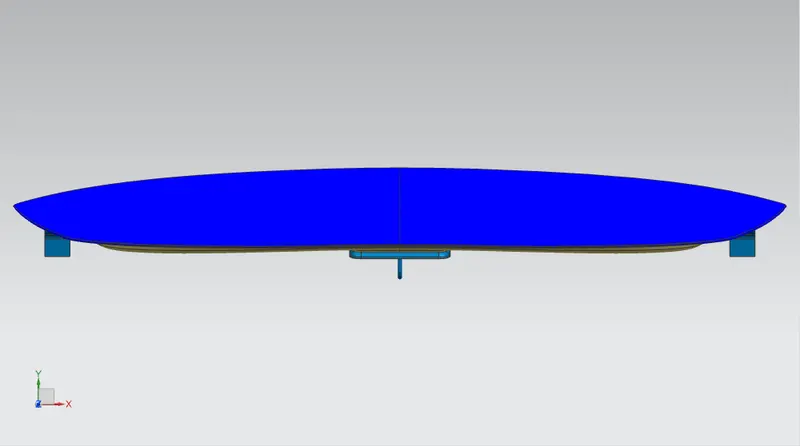 3.Isometric view
 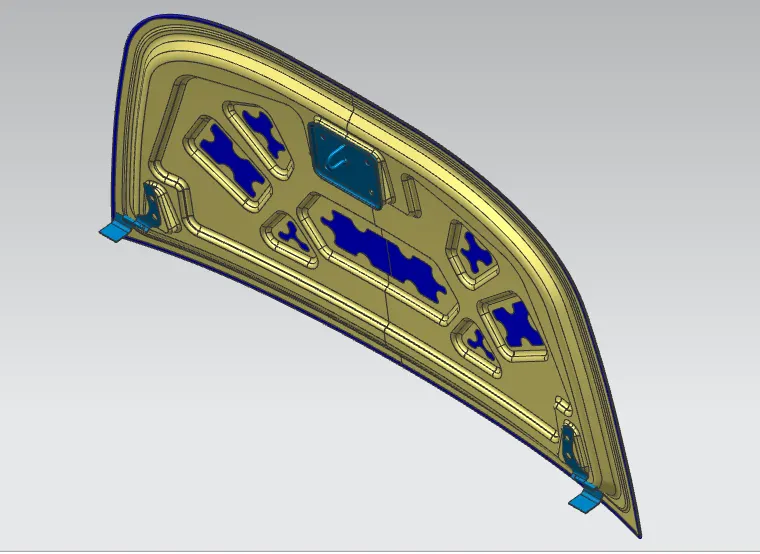 4.Clip Sectional view 4.Clip Sectional view
  4.DRAFT ANALYSIS OF HOOD INNER PANEL: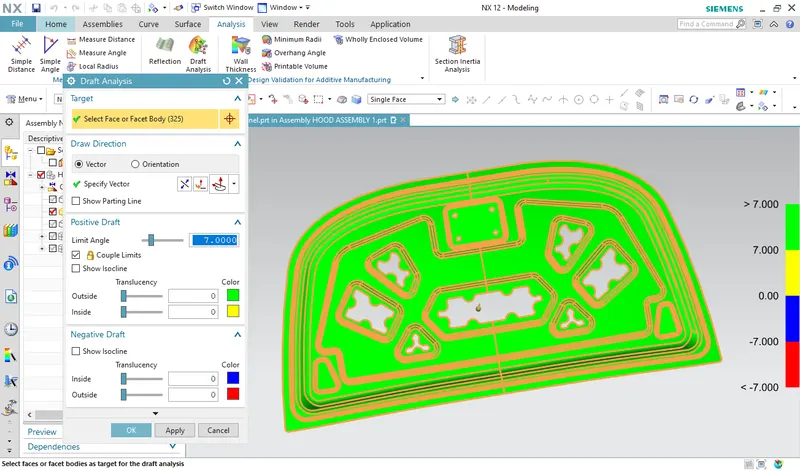
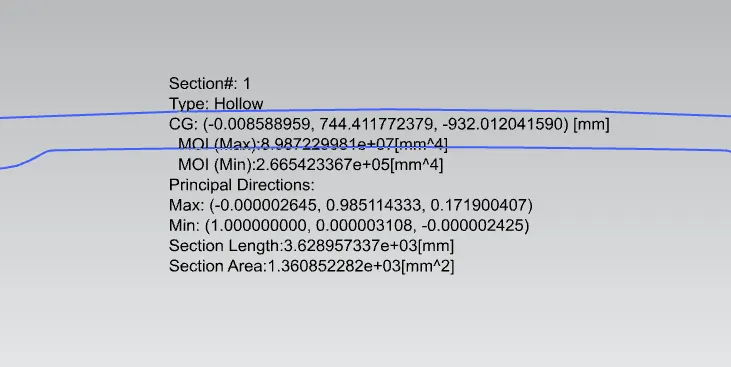
 4.SECTION MODULUS ANALYSIS:
  HOOD DESIGN USING CATIA: Reinforcements:
 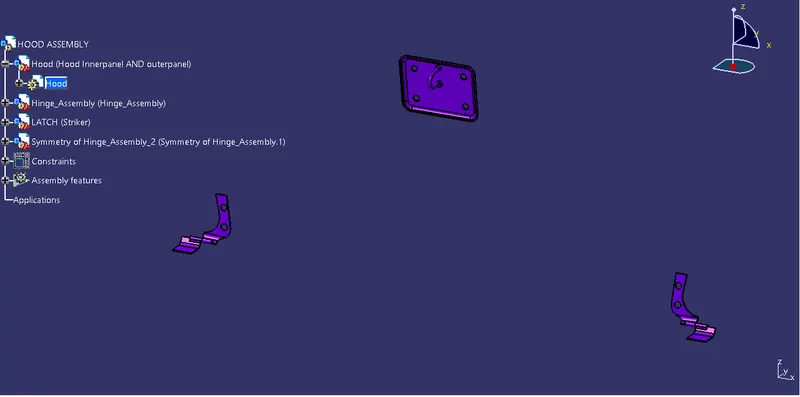 Inner Panel:
 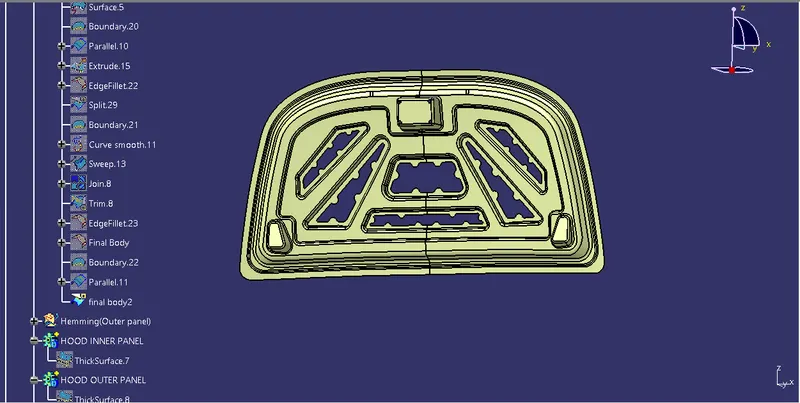 Inner Panel(After thicken): After thicken my final trim surface by 0.75mm of inner hood panel, I have made finsih the Hood inner panel component with considering the master section and other standard engineering design principles.
  Outer Panel(After thicken):
  Different views of final assembly: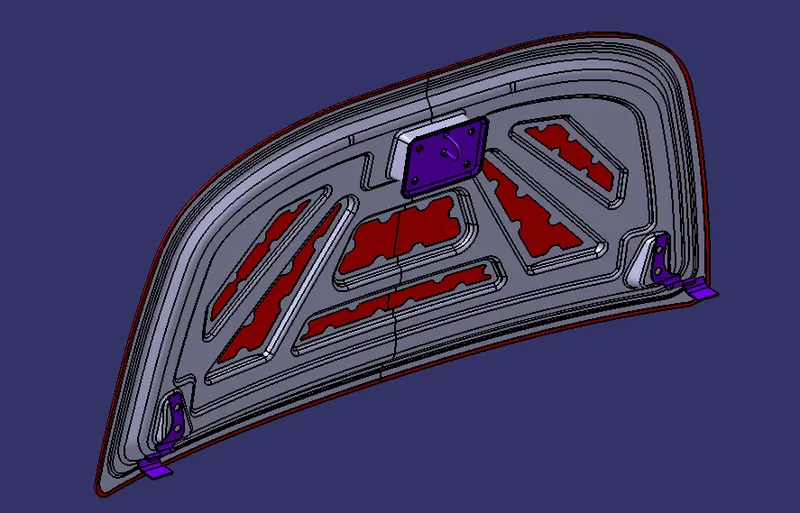
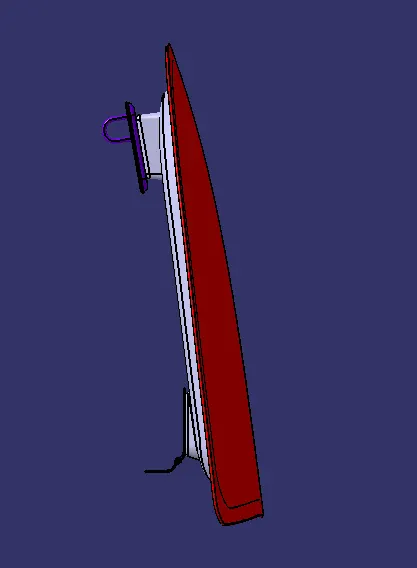
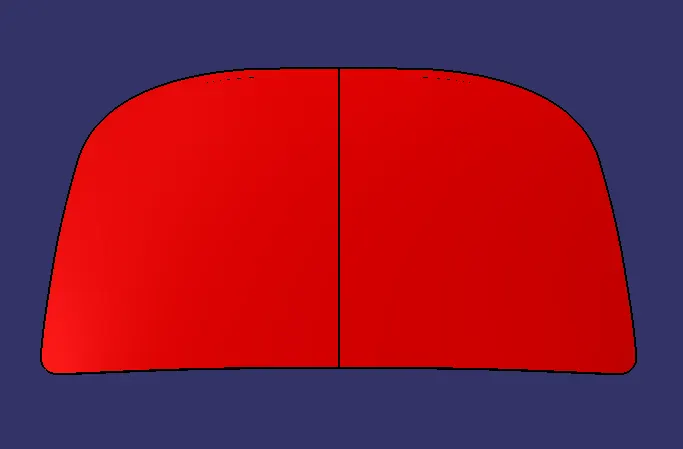
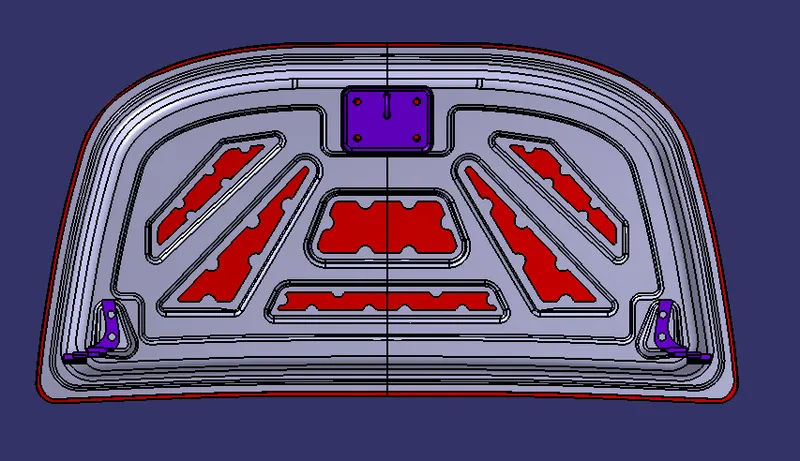
 Draft Analysis of Inner Panel:
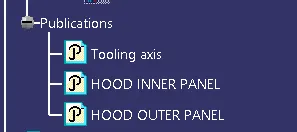
  I HAVE PUBLISHED PARTS FOR EASY ACCESS:
  Note: I herewith enclosed Assembly of Hood Design in NX CAD format and step format too. And also enclosed Assembly of Hood Design in CATIA in .CATPRODUCT file and .CATPART FILES attached.