Simulation of flow over a FSAE Car using Converge CFD
Aim:
To simulate the flow over the given geometry of the FSAE car, and find the aerodynamic properties (downforce and drag) at different car parts and compare the results obtained for different cases.
Problem statement:
To perform flow a simulation over the given geometry of the FSAE car for two cases given below and compare the aerodynamic properties (downforce and drag) produced by different car components (rear tail, rear tires, rear suspension, front left-wing, front right-wing, front suspension, front tires, car body, driver helmet, underbody)
Case1:
Racing track conditions - Straights
Average lap speed - 75kmph
Case2:
Racing track conditions - Lot of turns
Average lap speeds - 45kmph
70% turns at 45 degrees
20% turns at 80 degrees
10% turns at 20 degrees
Geometry:
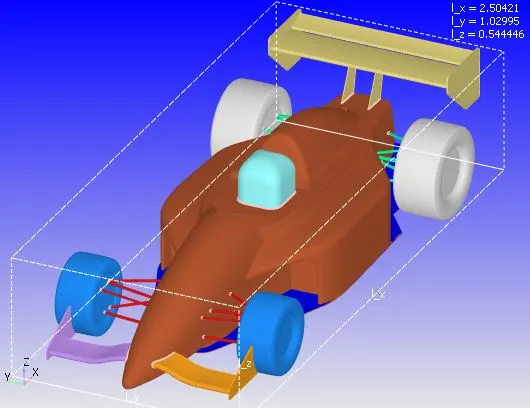
The given FSAE car dimensions in x, y, and z directions are approximately 2.5, 1.02, 0.54 meters respectively.
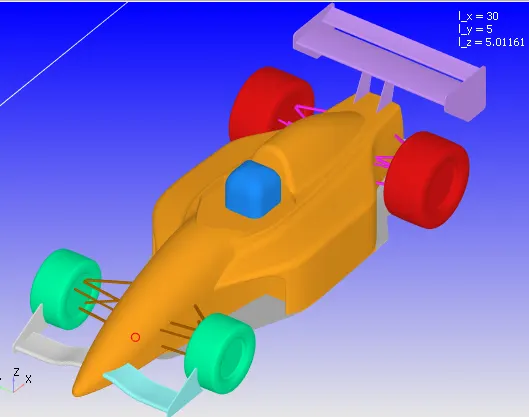
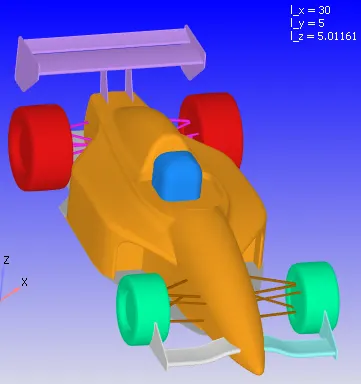
The given FSAE car geometry consists of the following parts where the aerodynamic properties are calculated separately:
1. Front right-wing
2. Front left-wing
3. Front suspension
4. Front tires
5. Rear tires
6. Rear suspension
7. Rear tail
8. Car body
9. Underbody
10. Driver helmet
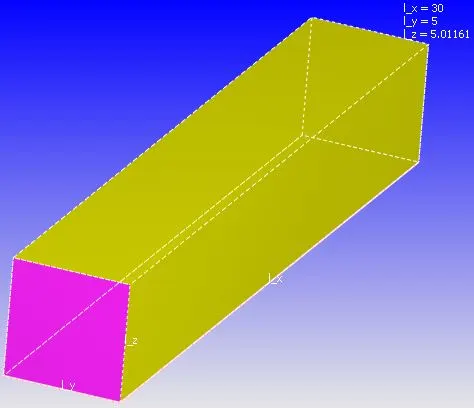
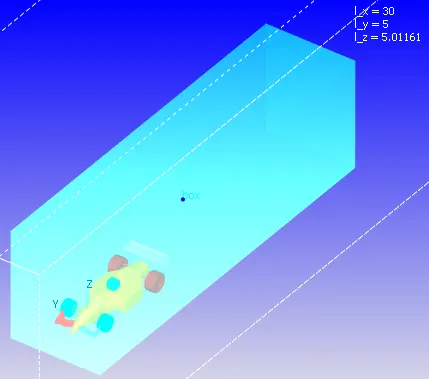
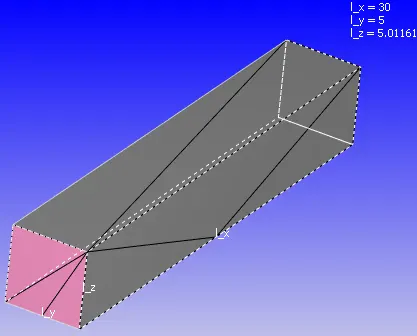
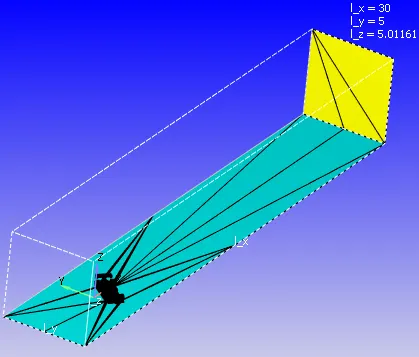
The virtual wind tunnel dimensions are calculated as follows:
Let the length of the given FSAE car be L
Then the length of the virtual wind tunnel aft the car (x-direction) is taken as 9L
The length of the virtual wind tunnel in front of the car (x-direction) is taken as 2L
The height of the virtual wind tunnel from the base of the tires (z-direction) is taken as 2L
The width of the virtual wind tunnel is taken as 1L in either direction (y-direction) from the car centerline
Case1:
Track type= stright
Average speed= 75Kmph= 20.833 m/s
Calculation of start time and end time for transient-state simulation
The inlet velocity= 20.833 m/s
The length of the virtual wind tunnel= 30m
The time taken by the air to move from inlet to outlet= 30/20.833= 1.44s
Suppose we want to simulate the flow for at least 2 times this value, then 1.44x2= 2.88s
Rounding off to the next digit= 3s
Hence the transient-state simulation must be run from 0 to 3s
Case setup:
1. Run parameters:
Solver= transient, time-based simulation
Simulation mode= full hydrodynamic
Gas flow solver= compressible
2. Simulation time parameters:
Start time= 0s
End time= 3s
Initial time-step= 1e-7s
Minimum time-step= 1e-7s
Maximum time-step= 1s
Maximum convection CFL limit= 1
3. Solver parameters:
Navier-Stokes solver scheme= PISO
Navier-Stokes solver type= Density-based
4. Regions and initialization:
Region0:
Velocity(x, y, z)= (20.833, 0, 0)m/s
Temperature= 300K
Pressure= 101325Pa
Species= air
5. Boundary:
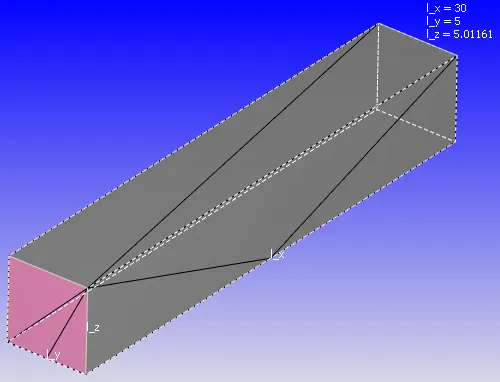
a. Inlet
Inflow boundary condition
Velocity(x, y, z)= (20.833, 0, 0)m/s
Pressure= Zero normal gradient(Neumann BC)
Temperature= 300K
Species= air
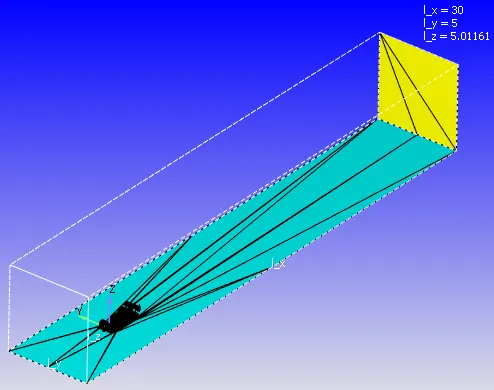
b. Outlet
Outflow boundary condition
Pressure= 101325Pa
Velocity= Zero normal gradient (Neumann BC)
Species backflow= air
Temperature backflow= 300K
c. Symmetry wall
Symmetry boundary condition
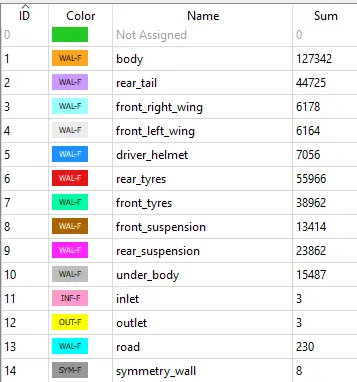
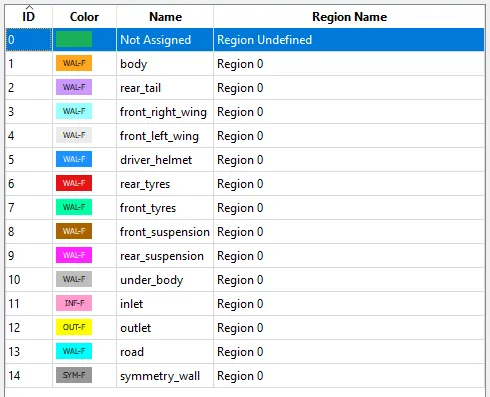
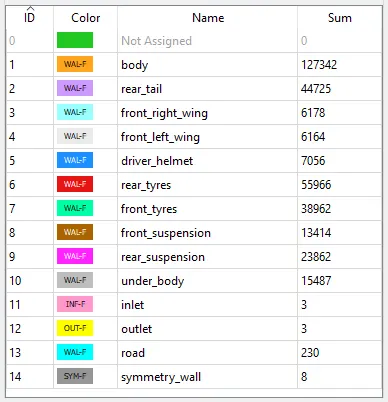
d. Body, rear tail, front right-wing, front left-wing, driver helmet, rear tires, front tires, front suspension, rear suspension, underbody, road
Stationary wall boundary condition (law of wall)
Law of wall boundary condition is used rather than no-slip boundary condition since the law of wall boundary condition gives more accurate results when a coarse mesh is used, whereas, the no-slip boundary condition gives more accurate results if a finer mesh is used. This is mainly because for the no-slip boundary condition, the solver considers the first cell adjacent to the wall as zero velocity magnitude. When the law of wall boundary condition is used, the solver uses the law of the wall assumption for velocity in the log-log layer tries to estimate the flow properties near the walls. Hence it gives less error when a coarse mesh is used.
6. Turbulence modeling
Standard K-omega 2006 turbulence model
Near wall treatment= automatic wall function
7. Grid control:
Base grid size(x, y, z)= (0.25, 0.2, 0.2)m
Fixed embedding:
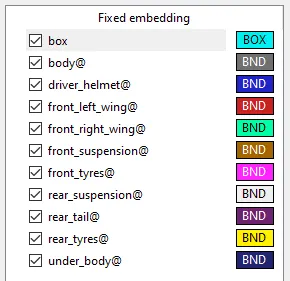
a. Box embedding
Entity type= box (enclosing the FSAE car)
Dimensions(x, y, z)= (8, 2, 2.4)m
Mode= permanent
Scale= 2
b. Boundary embedding
Entity type= boundary
Boundary ID= All boundaries included except inlet, outlet, road, symmetry wall
Mode= permanent
Scale= 3
Embed layers= 5
8. Output files:
Wall output= boundaries only
Time interval for writing 3D output data files= 0.03s
Time interval for writing text output= 1e-6s
Time interval for writing restarting output= 0.03s
Results:
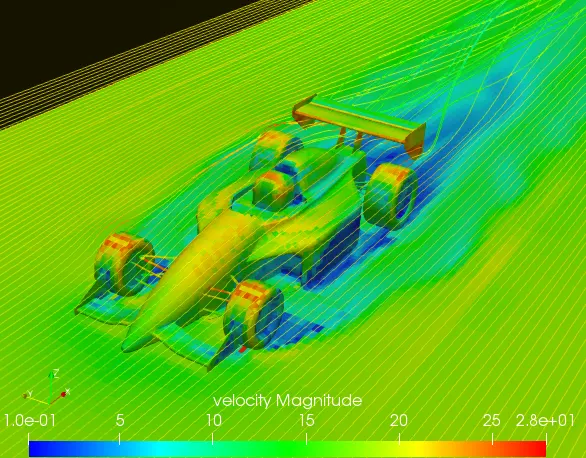
Velocity contours:
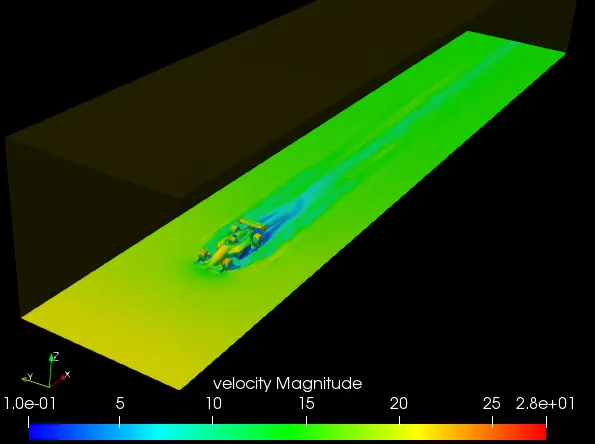
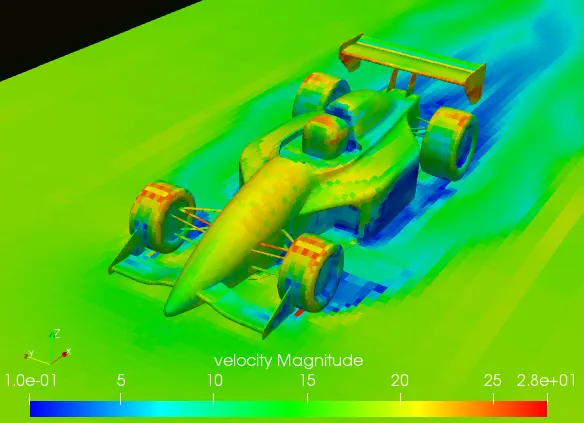
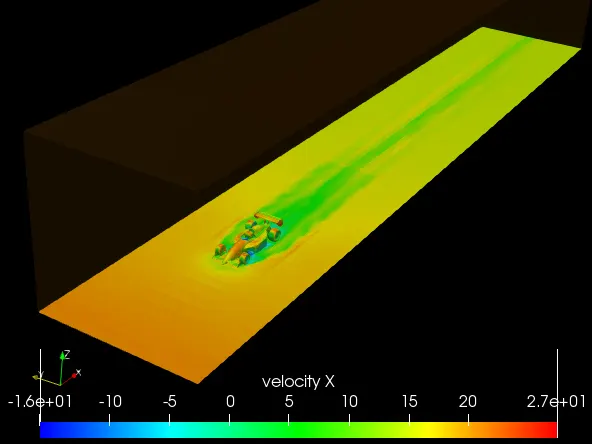
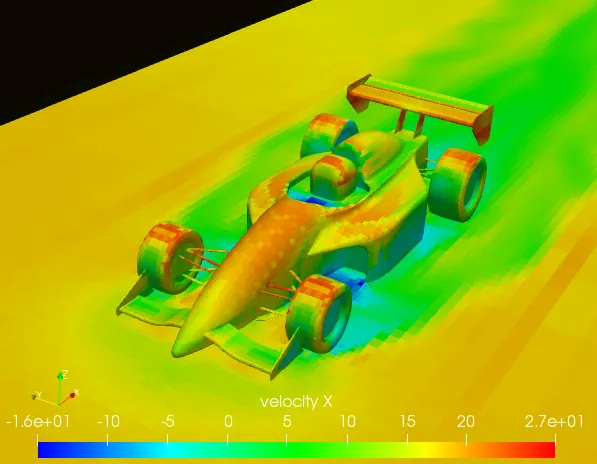
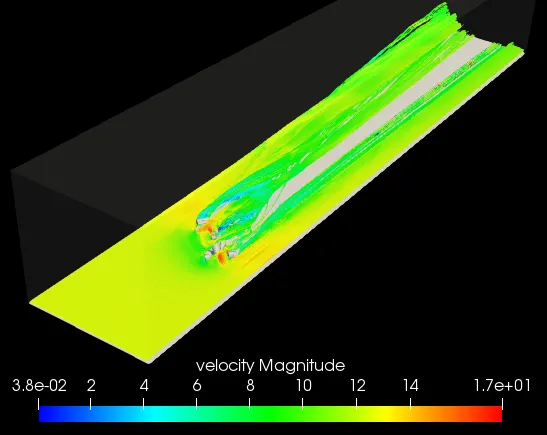
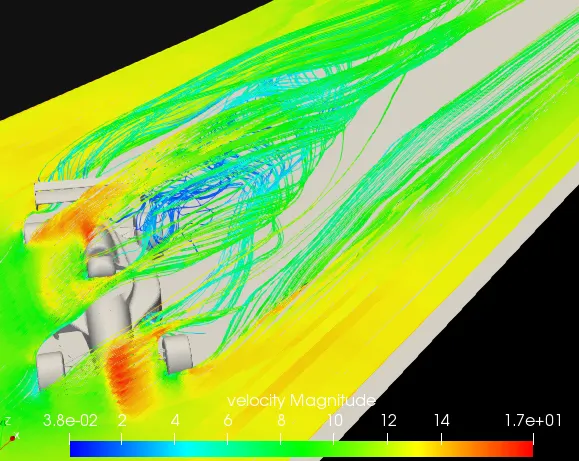
The negative magnitude of velocity indicated the reverse flow of air in certain regions.
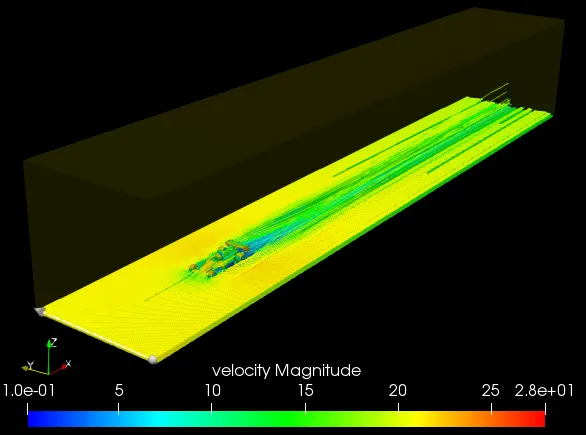
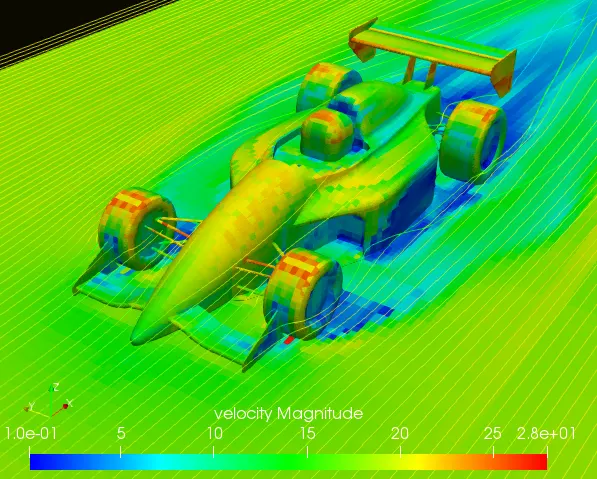
Stream tracker placed at a height of 0.1m above the tire base:
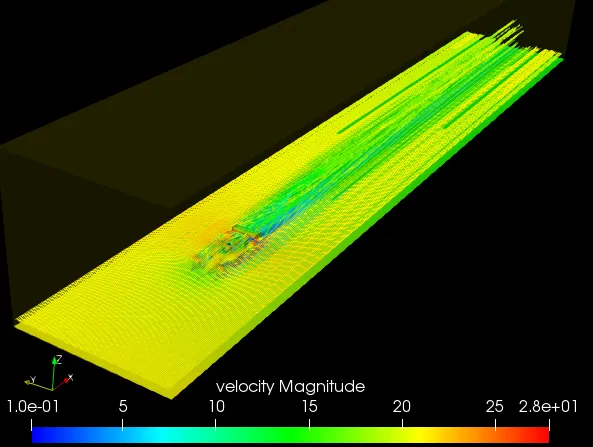
Stream tracker placed at a height of 0.25m above the tire base:
Vorticity contours:
vorticity is a pseudo-vector field that describes the local spinning motion of a continuum near some point, as would be seen by an observer located at that point and traveling along with the flow.
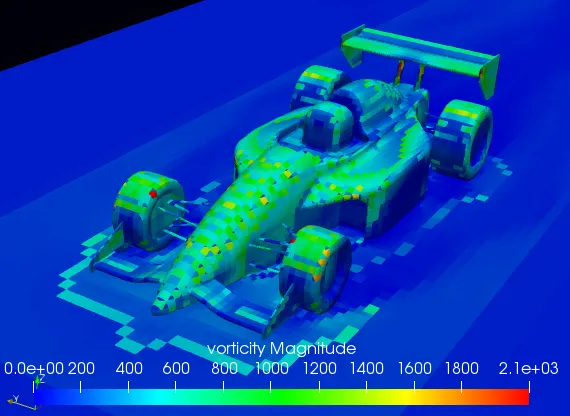
The vorticity magnitude is higher on certain locations of the car than at any other point of the wind tunnel. The vortices are generated as a result of flow interaction with the walls of the car.
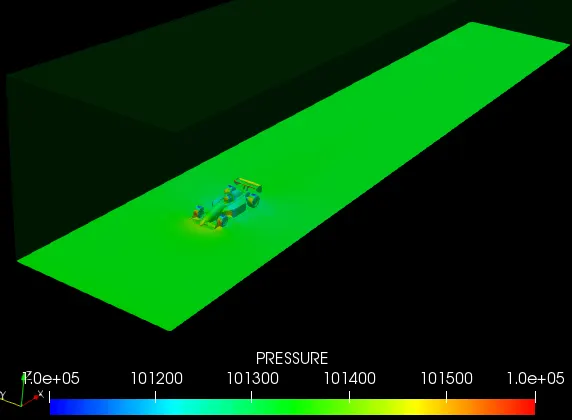
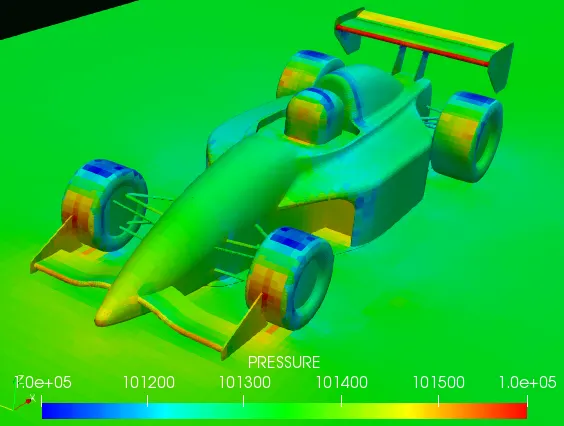
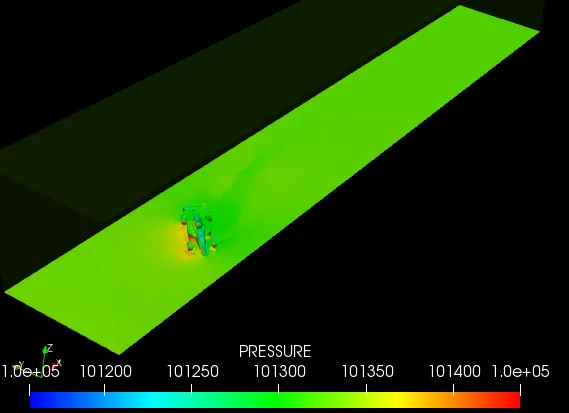
Pressure contours:
Downforce:
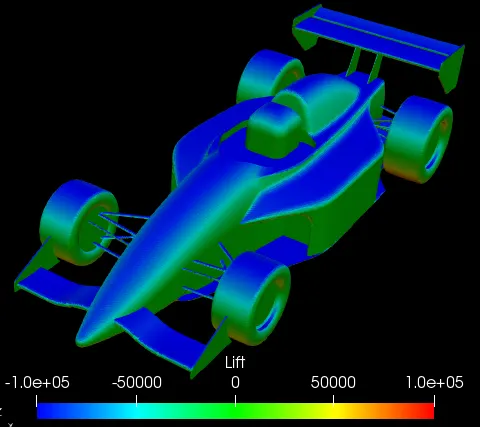
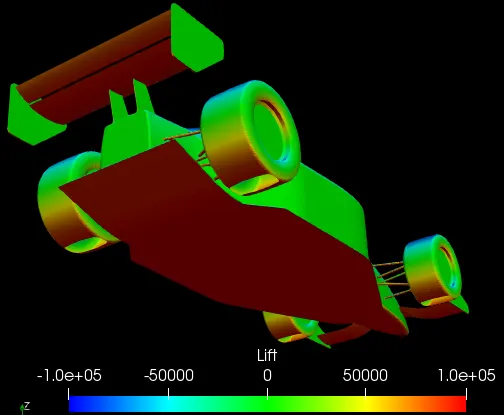
The total lift generated by the car at the given conditions is found to be -5418.0864N. Hence the downforce which acts in the direction opposite to that of lift is 5418.056N.
Similarly, the downforce generated by each component can be calculated by first calculating the lift force and then multiplying the result by -1. The downforce generated by each component is given below and is calculated by taking the time average of the results obtained once the solution is converged:
Body:
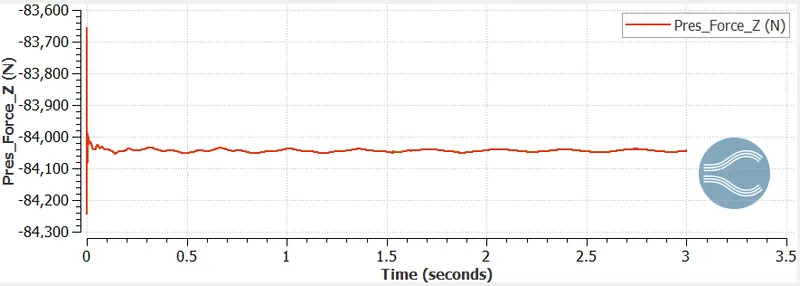
Downforce= 84044.233N
Rear tail:
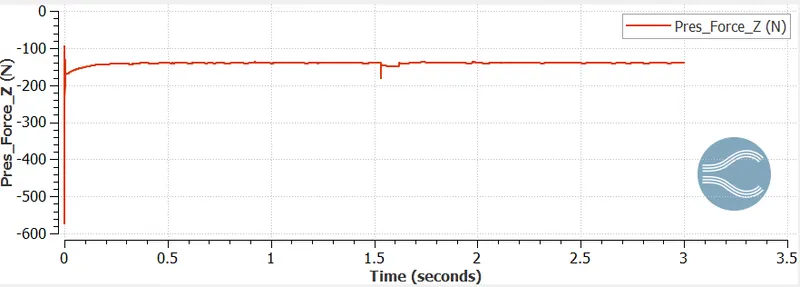
Downforce= 139.22126N
Front right-wing:
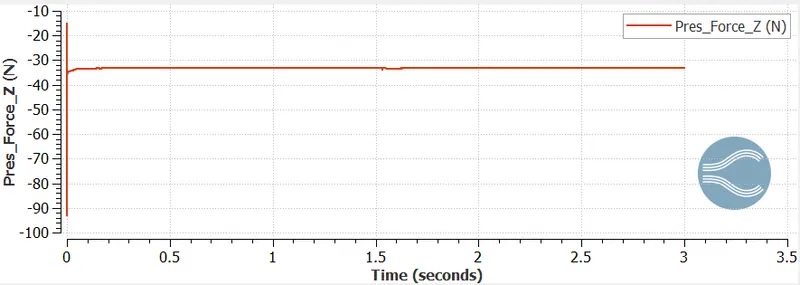
Downforce= 33.06109N
Front left-wing:
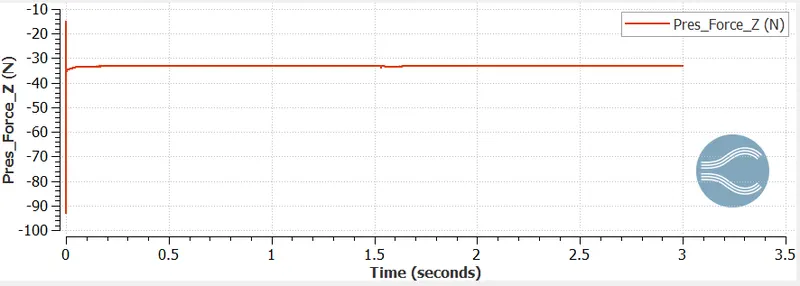
Downforce= 33.0524N
Driver helmet:
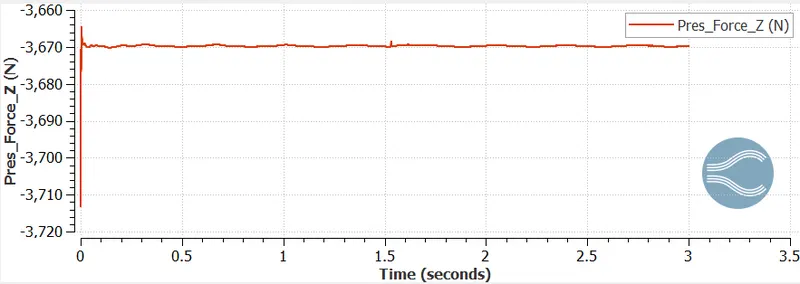
Downforce= 3669.7857N
Rear tires:
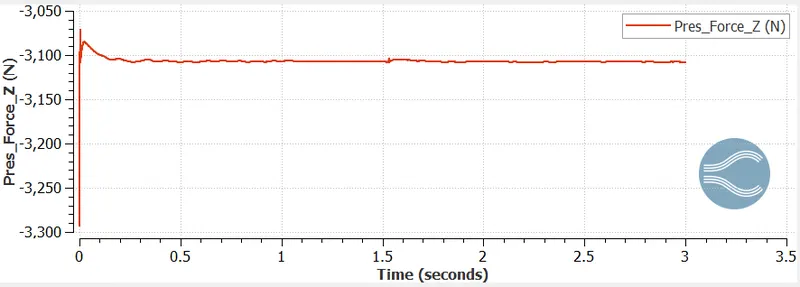
Downforce= 3108.07N
Front tires:
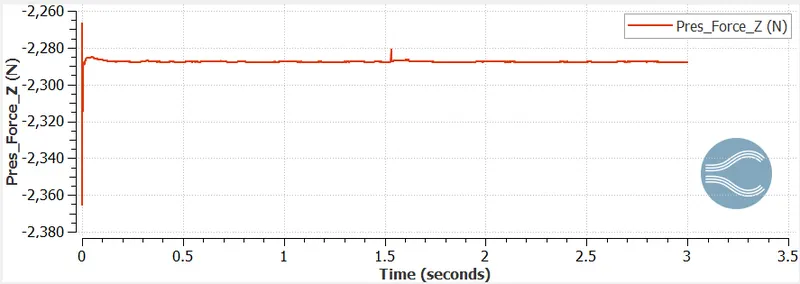
Downforce= 2287.7778N
Front suspension:
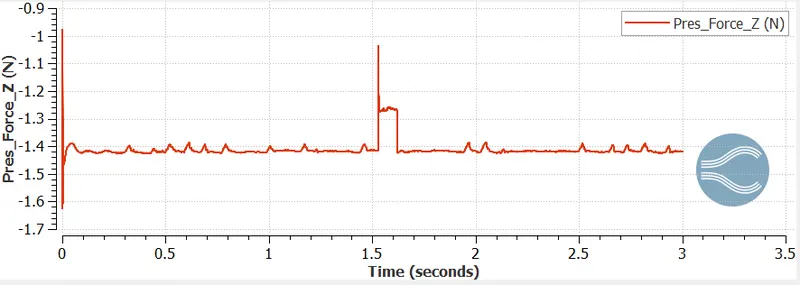
Downforce= 1.4189N
Rear suspension:
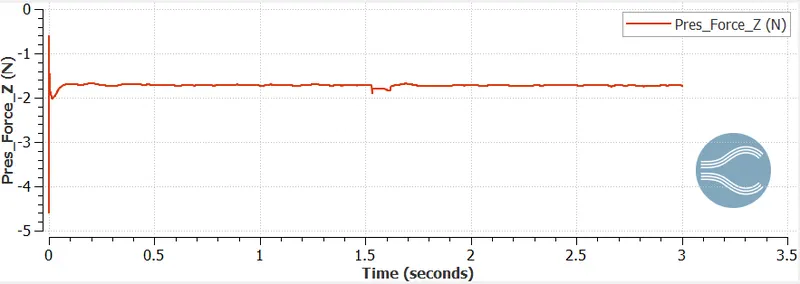
Downforce= 1.7257N
Underbody:
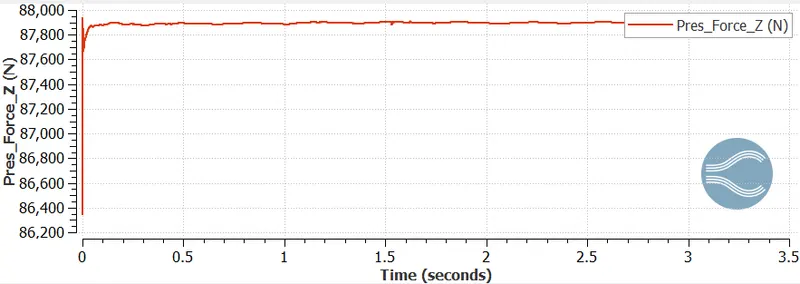
Downforce= -87899.548N
Drag:
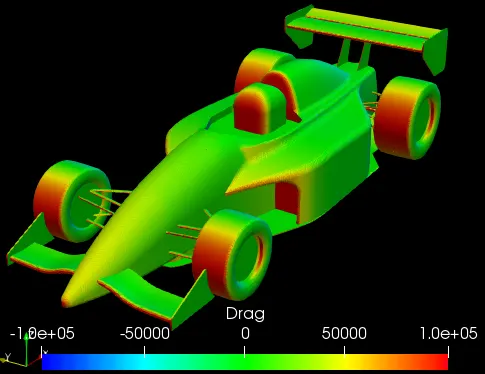
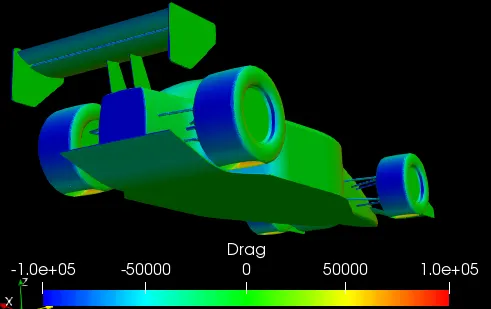
The total drag force generated by the car at the given conditions is found to be 69.5644N. The downforce generated by each component is given below and is calculated by taking the time average of the results obtained once the solution is converged:
Body:
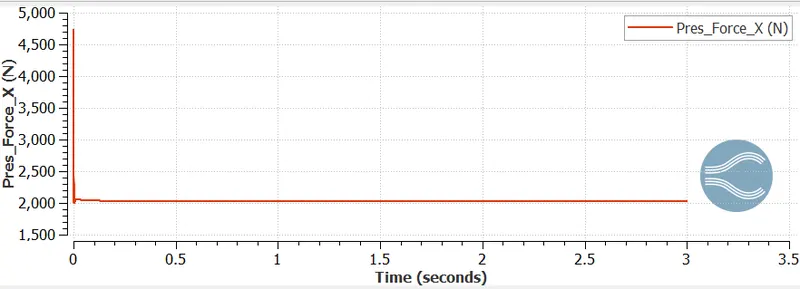
Drag force= 2032.86N
Rear tail:
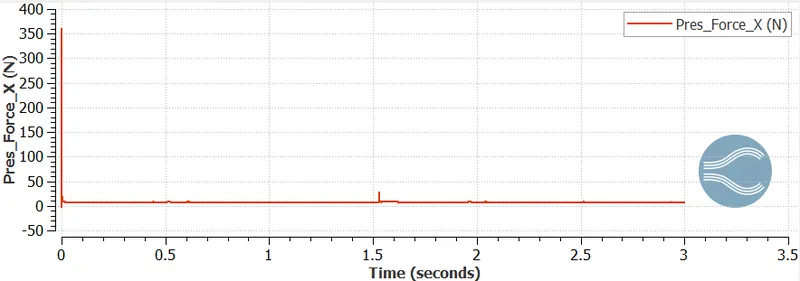
Drag force= 7.4892N
Front right-wing:
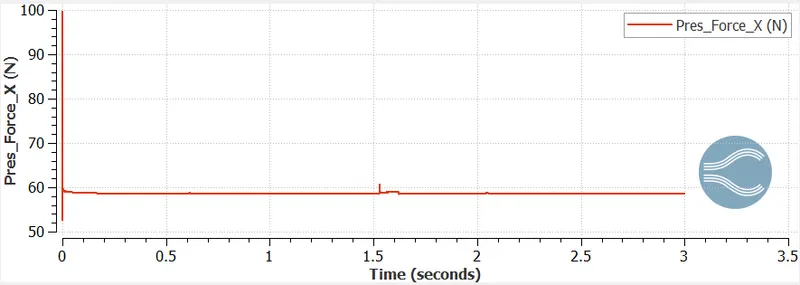
Drag force= 58.5584N
Front left-wing:
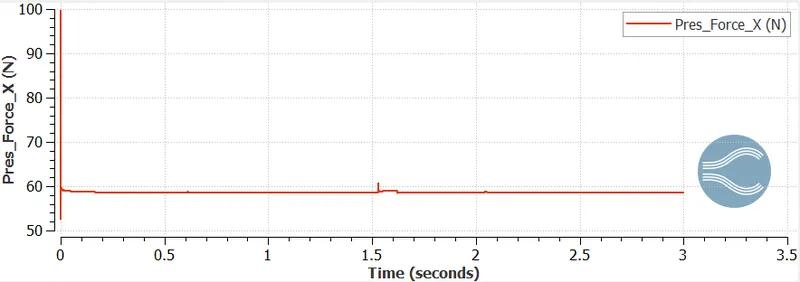
Drag force= 58.56
Driver helmet:
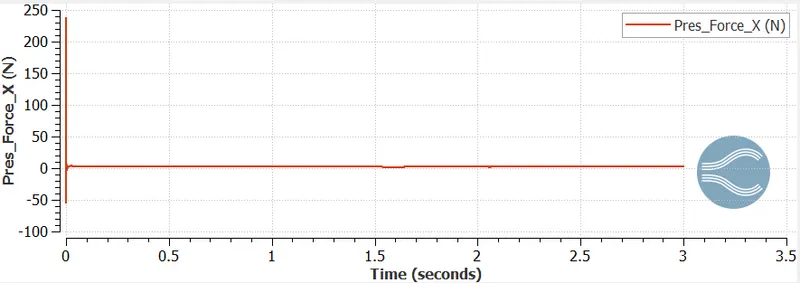
Drag force= 2.3117N
Rear tires:
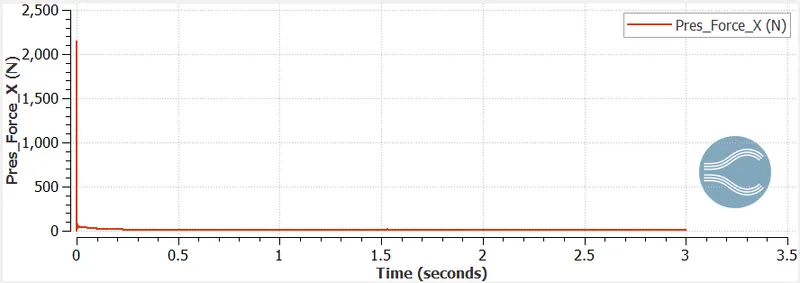
Drag force= 11.511N
Front tires:
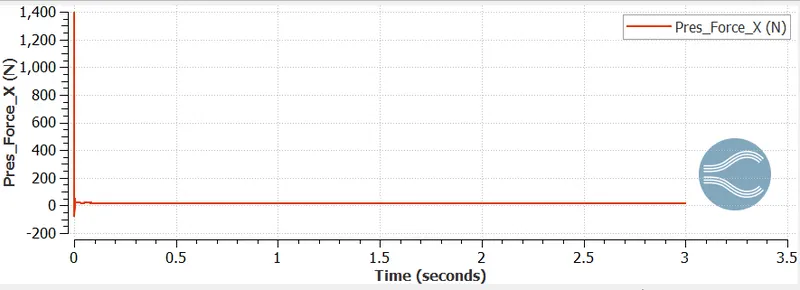
Drag force= 16.957N
Front suspension:
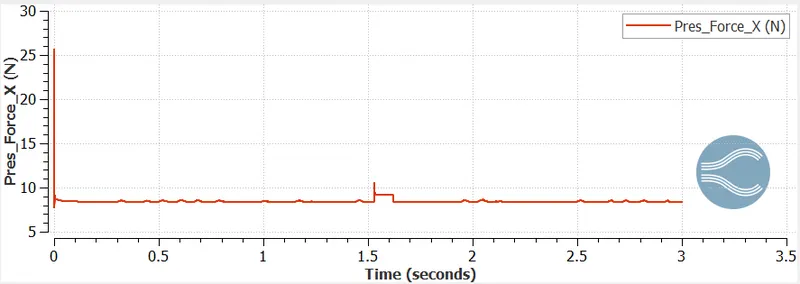
Drag force= 8.38N
Rear suspension:
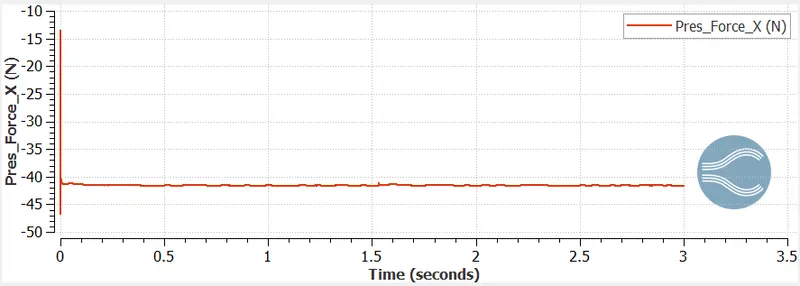
Drag force= -41.6N
Underbody:
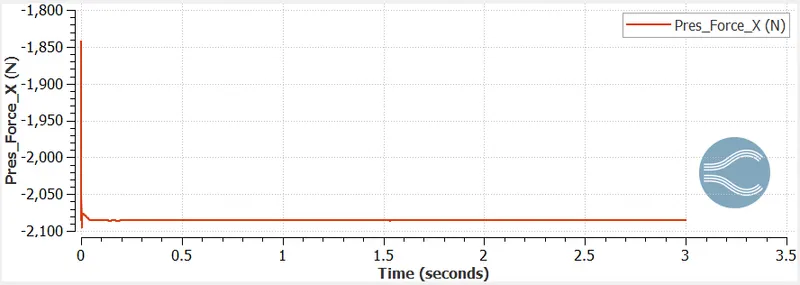
Drag force= -2085.47N
Yplus:
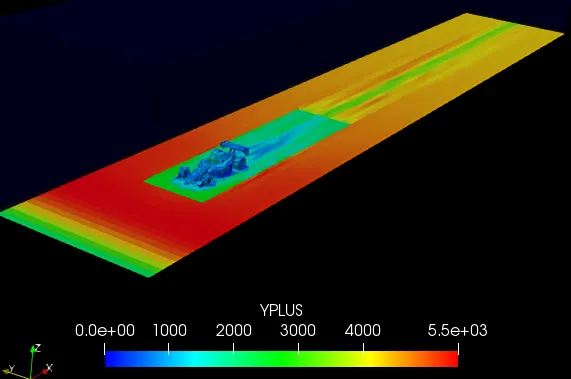
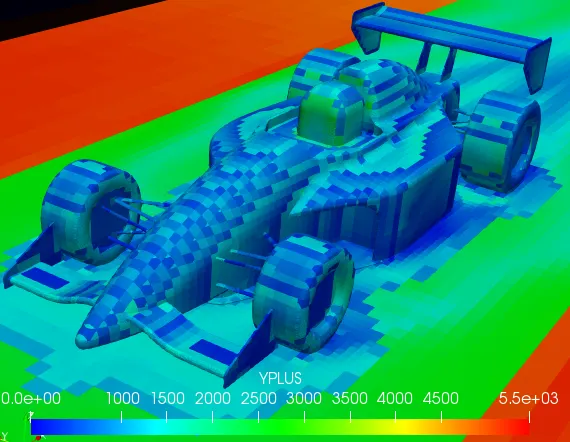
The value of the Yplus term ranges from 10 to 5500. This term is lesser near the body of the car since a finer mesh is used (fixed embedding), but it is still higher than the recommended range. If the yplus term is higher than the recommended range (30-100 for K-omega turbulence model), the accuracy of the solution decreases. But due to lack of computation power, the case is run for coarse mesh setup.
Cell count:
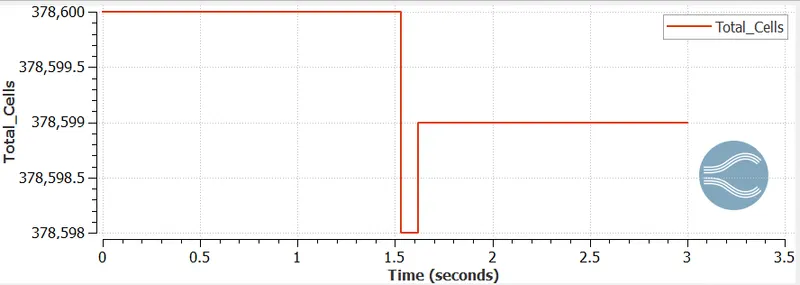
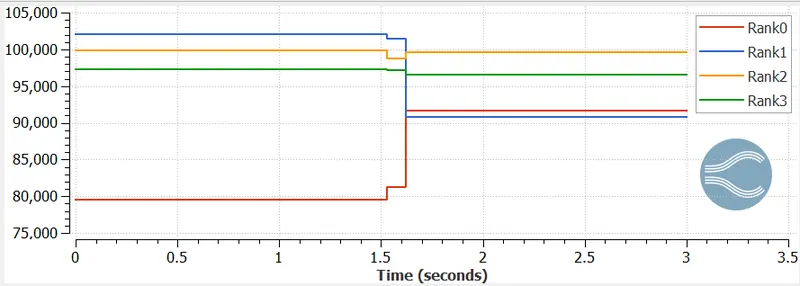
As the problem is solved, there is a change in the total number of cells generated in between the solution. This is because the simulation crashed twice while solving the problem due to memory exhaustion. This happened at around the time of 1.5-1.6s. To rectify this problem, some memory was cleared out and the simulation was re-run from the point it crashed using the restart files. Once the simulation is complete, the results were stitched in Converge.
The simulation was run for 3s and towards the end of the simulation, a total of 378599 cells were generated. The problem was solved using 4 processors, and the cells were distributed between them as follows:
Rank0= 91667
Rank1= 90735
Rank2= 99643
Rank3= 96554
Summary of case1:
Now the obtained values of down and drag force at different car components are summarised as follows:
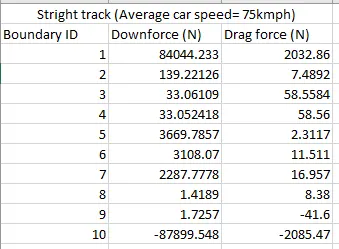
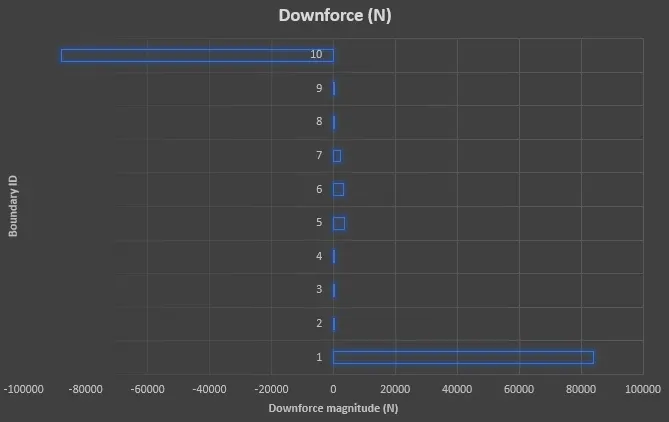
The body of the car is the most significant contributor to the downforce generated, whereas the underbody component generates a significant amount of lift. For a race car to be most efficient the downforce just be as high as possible and the lift must be as low as possible so that the traction between the road and tires is increased. Apart from the body and underbody, the contribution of the remaining components to the downforce is very less comparatively.
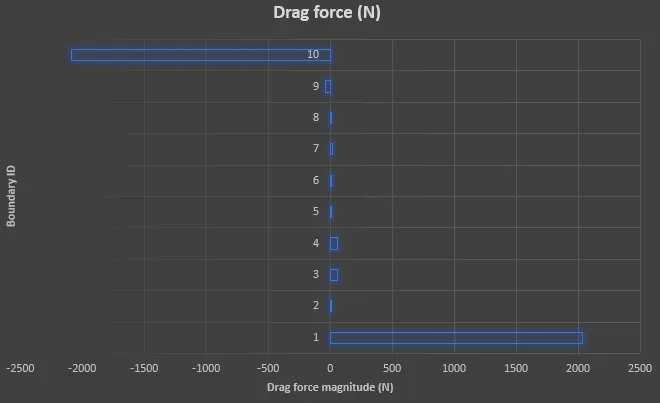
When it comes to the drag force, the underbody and the rear suspension are the only components that generate a negative drag force. The body is the main contributor to drag and the remaining components contribute significantly to the drag force generated. Even though the underbody contributes to the lift force, it contributes to the negative drag force thereby reducing the overall drag generated by the car.
Case2:
Track type= Lots of turns
Average speed= 45Kmph= 12.5 m/s
Calculation of start time and end time for transient-state simulation:
The inlet velocity= 12.5 m/s
The length of the virtual wind tunnel= 30m
The time taken by the fluid to move from inlet to outlet= 30/12.5= 2.4s
Suppose we want to simulate the flow for at least 2 times this value, then 2.4x2= 4.8s
Rounding off to the next digit= 5s
Hence the transient-state simulation must be run from 0 to 5s
It is known that the track consists of the following:
- 70% turns at 45 degrees
- 20% turns at 80 degrees
- 10% turns at 20 degrees
Therefore the average turn angle of the car for the duration of the race is calculated as follows:
Average turn angle= (0.7x45)+(0.2x80)+(0.1x20)= 49.5 degrees
Hence the FSAE car is experiencing an average turn of 49.5 degrees throughout the duration of the race with an average car speed of 45Kmph. Hence, to calculate the average aerodynamic forces acting on the FSAE car during the course of the race, the car geometry needs to be tilted by 49.5 degrees.
Case setup:
1. Run parameters:
Solver= transient, time-based simulation
Simulation mode= full hydrodynamic
Gas flow solver= compressible
2. Simulation time parameters:
Start time= 0s
End time= 5s
Initial time-step= 1e-7s
Minimum time-step= 1e-7s
Maximum time-step= 1s
Maximum convection CFL limit= 1
3. Solver parameters:
Navier-Stokes solver scheme= PISO
Navier-Stokes solver type= Density-based
4. Regions and initialization:
Region0:
Velocity(x, y, z)= (12.5, 0, 0)m/s
Temperature= 300K
Pressure= 101325Pa
Species= air
5. Boundary:
a. Inlet
Inflow boundary condition
Velocity(x, y, z)= (12.5, 0, 0)m/s
Pressure= Zero normal gradient(Neumann BC)
Temperature= 300K
Species= air
b. Outlet
Outflow boundary condition
Pressure= 101325Pa
Velocity= Zero normal gradient (Neumann BC)
Species backflow= air
Temperature backflow= 300K
c. Symmetry wall
Symmetry boundary condition
d. Body, rear tail, front right-wing, front left-wing, driver helmet, rear tires, front tires, front suspension, rear suspension, underbody, road
Stationary wall boundary condition (law of wall)
Law of wall boundary condition is used rather than no-slip boundary condition since the law of wall boundary condition gives more accurate results when a coarse mesh is used, whereas, the no-slip boundary condition gives more accurate results if a finer mesh is used. This is mainly because for the no-slip boundary condition, the solver considers the first cell adjacent to the wall as zero velocity magnitude. When the law of wall boundary condition is used, the solver uses the law of the wall assumption for velocity in the log-log layer tries to estimate the flow properties near the walls. Hence it gives less error when a coarse mesh is used.
6. Turbulence modeling
Standard K-omega 2006 turbulence model
Near wall treatment= automatic wall function
7. Grid control:
Base grid size(x, y, z)= (0.25, 0.2, 0.2)m
Fixed embedding:
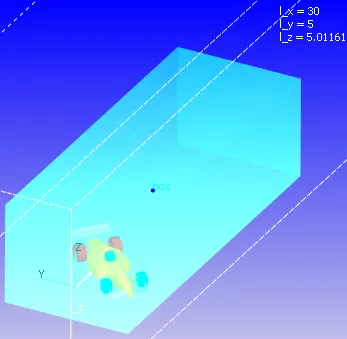
a. Box embedding
Entity type= box (enclosing the FSAE car)
Dimensions(x, y, z)= (8, 3, 2.4)m
Mode= permanent
Scale= 2
b. Boundary embedding
Entity type= boundary
Boundary ID= All boundaries included except inlet, outlet, road, symmetry wall
Mode= permanent
Scale= 3
Embed layers= 5
8. Output files:
Wall output= boundaries only
Time interval for writing 3D output data files= 0.05s
Time interval for writing text output= 1e-6s
Time interval for writing restarting output= 0.05s
Results:
Velocity contours:
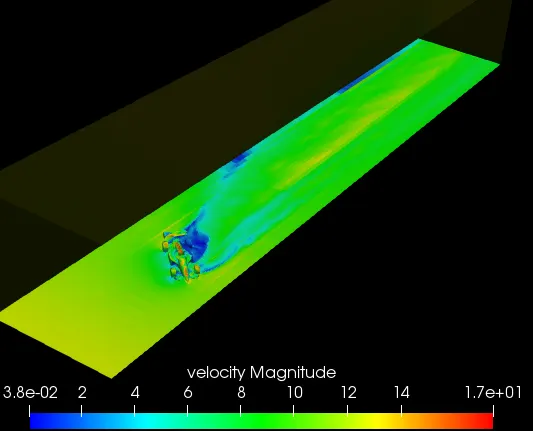
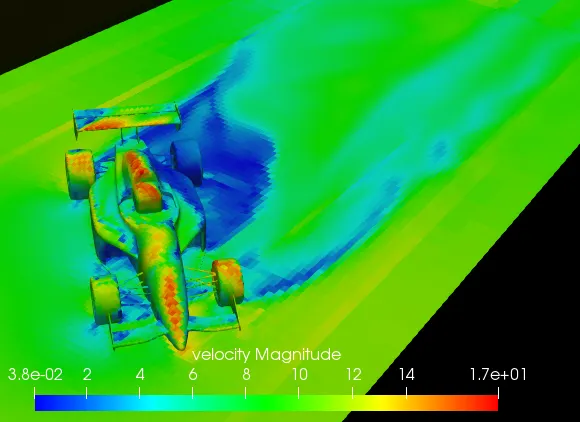
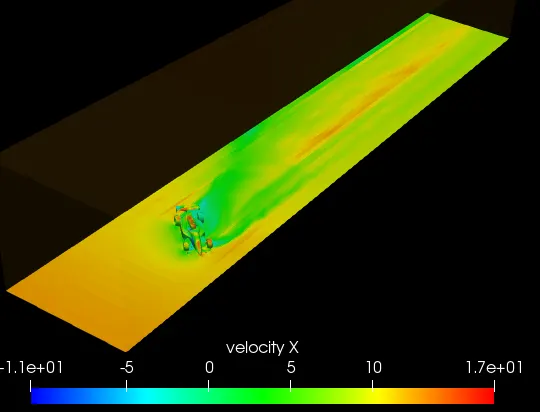
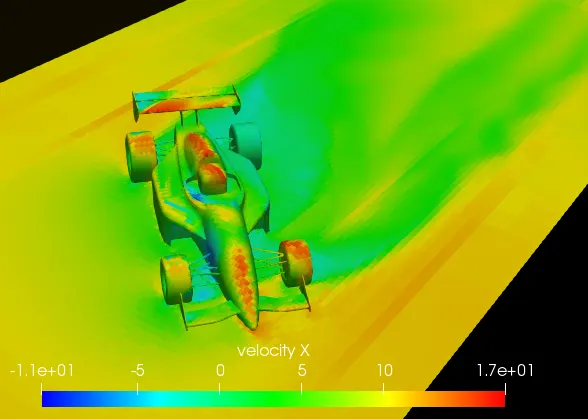
The negative magnitude of velocity indicated the reverse flow of air in certain regions.
Stream tracker placed at a height of 0.1m above the tire base:
Vorticity:
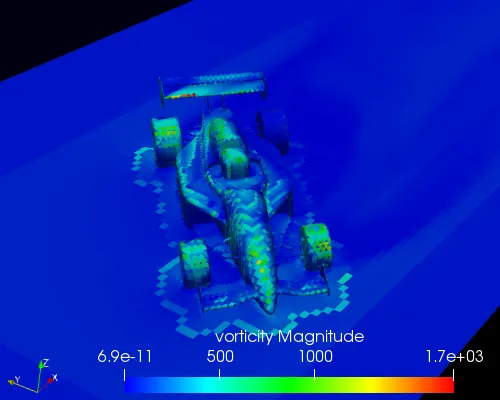
The vorticity magnitude is higher on certain locations of the car than at any other point of the wind tunnel. The vortices are generated as a result of flow interaction with the walls of the car.
Pressure:
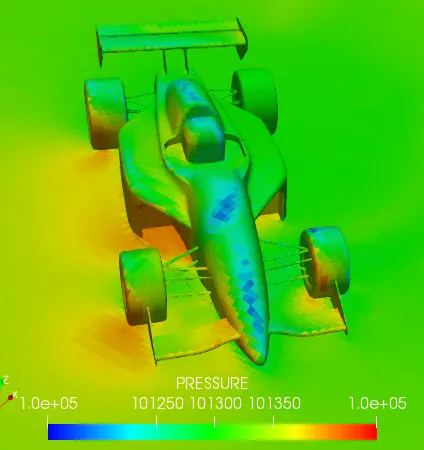
Downforce:
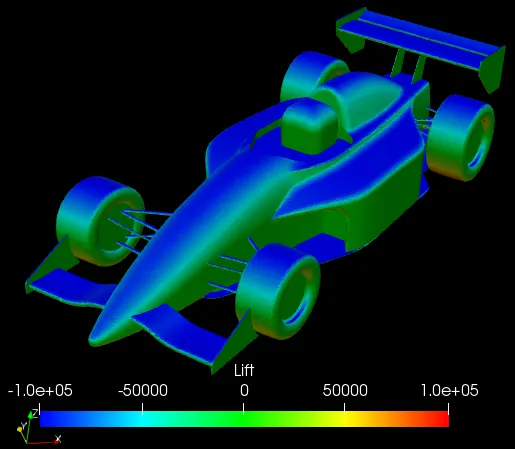
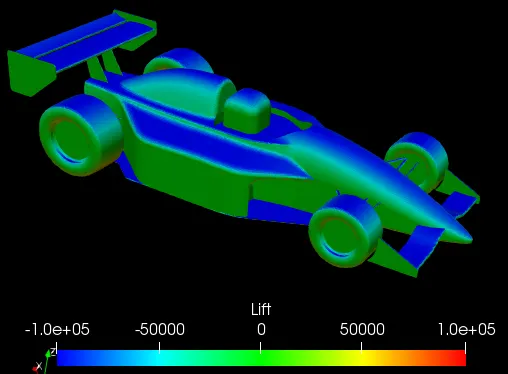
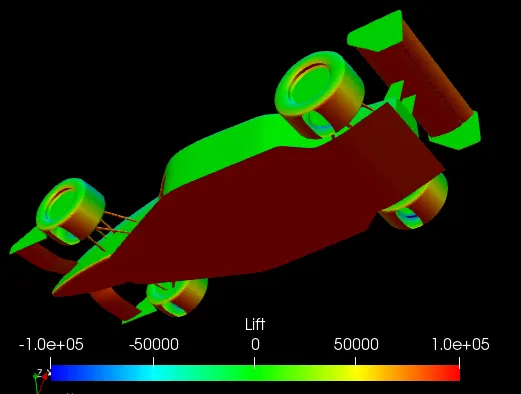
The total lift generated by the car at the given conditions is found to be -5397.97N. Hence the downforce which acts in the direction opposite to that of lift is 5397.97N.
Similarly, the downforce generated by each component can be calculated by first calculating the lift force and then multiplying the result by -1. The downforce generated by each component is given below and is calculated by taking the time average of the results obtained once the solution is converged:
Body:
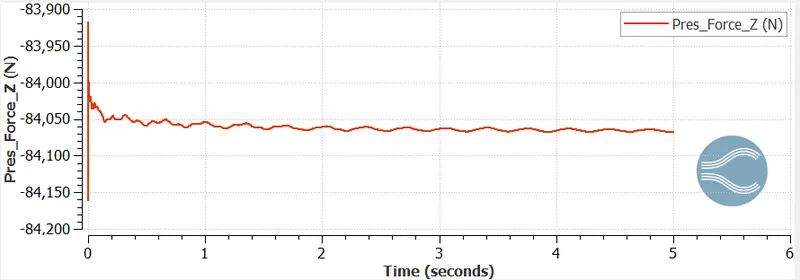
Downforce= 84067.294N
Rear tail:
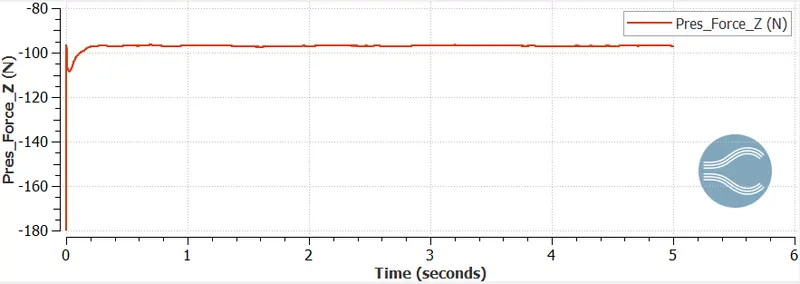
Downforce= 96.963N
Front right-wing:
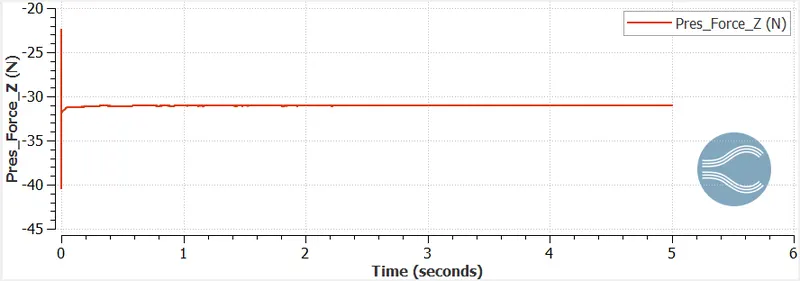
Downforce= 31.0565N
Front left-wing:
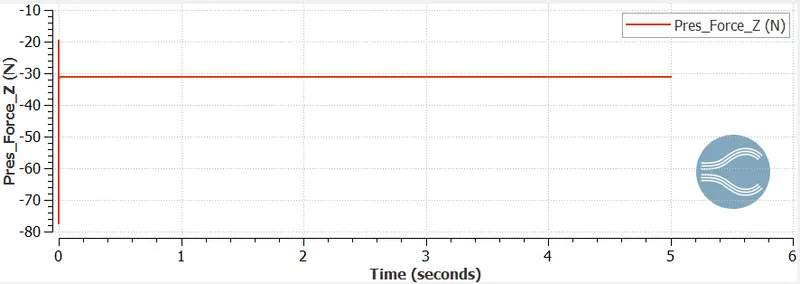
Downforce= 31.25N
Driver helmet:
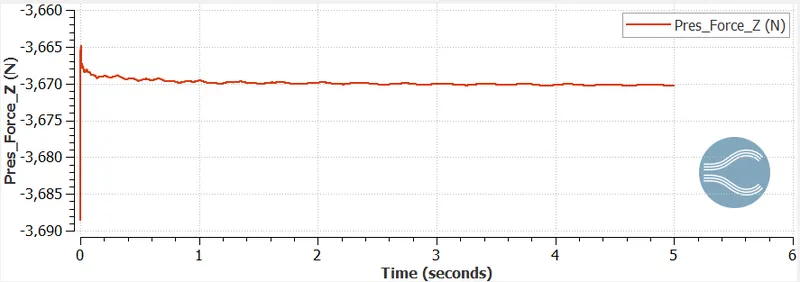
Downforce= 3670.26N
Rear tires:
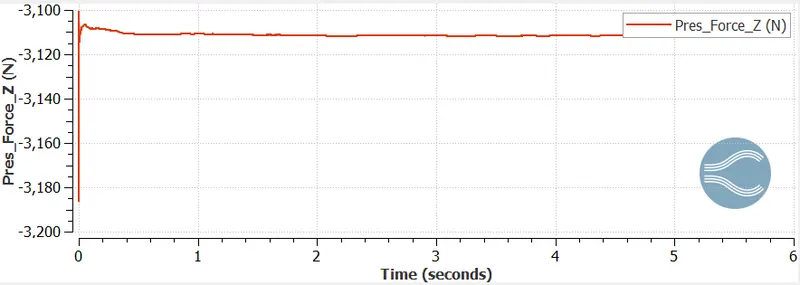
Downforce= 3111.6961N
Front tires:
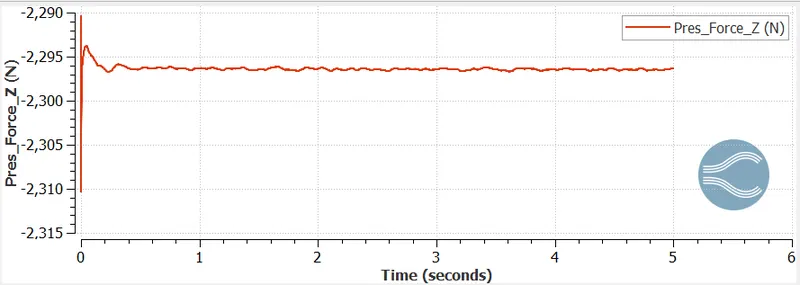
Downforce= 2296.3298N
Front suspension:
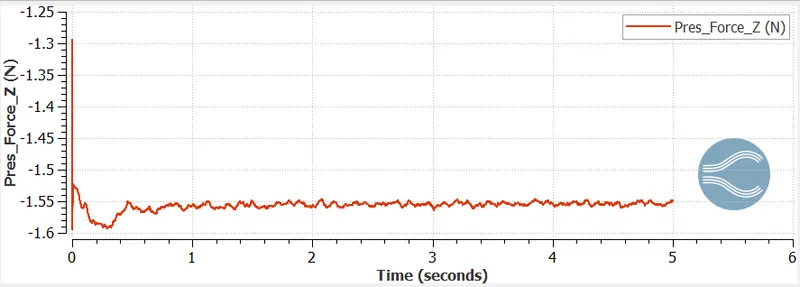
Downforce= 1.5491
Rear suspension:
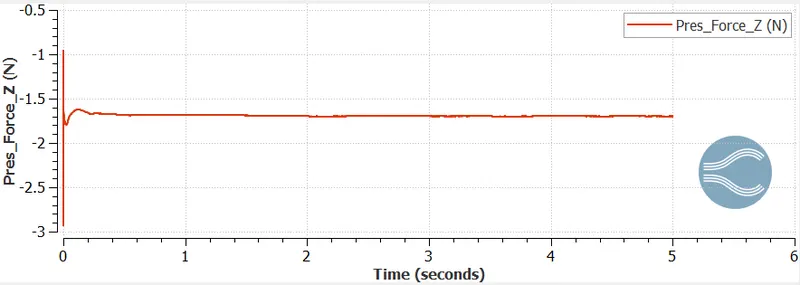
Downforce= 1.6984
Underbody:
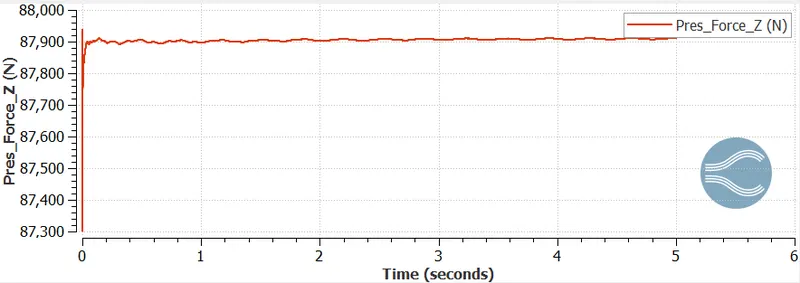
Downforce= -87910.131N
Drag:
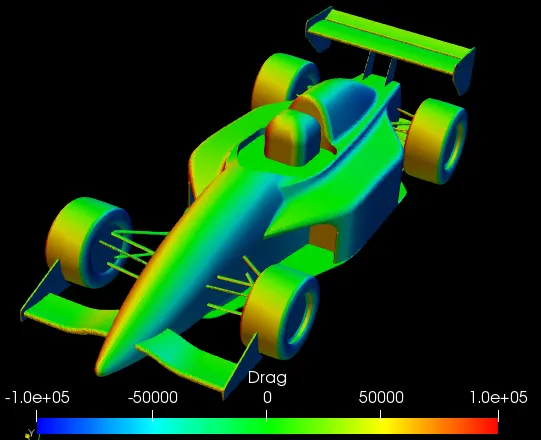
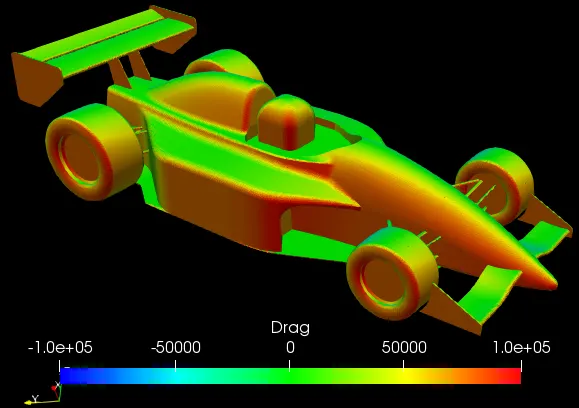
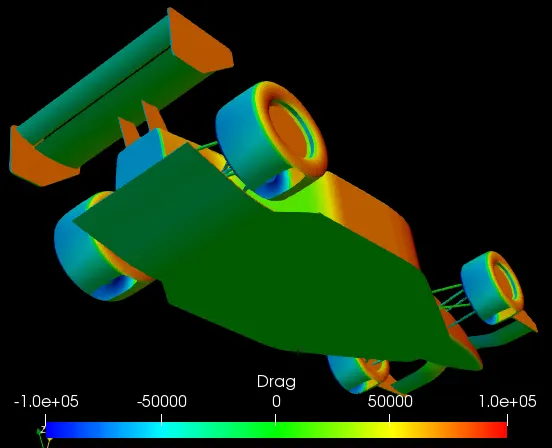
The total drag force generated by the car at the given conditions is found to be 54.0864N. The downforce generated by each component is given below and is calculated by taking the time average of the results obtained once the solution is converged:
Body:
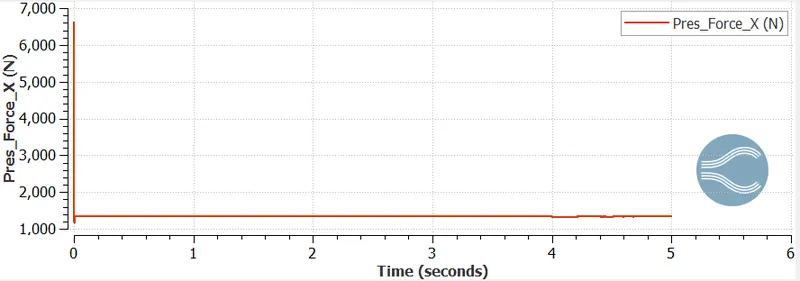
Drag force= 1330.68N
Rear tail:
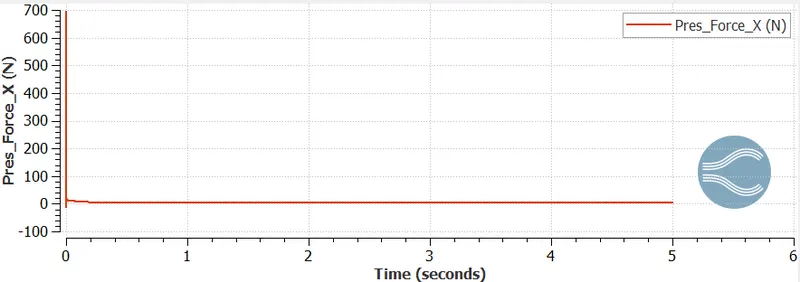
Drag force= 3.4618N
Front right-wing:
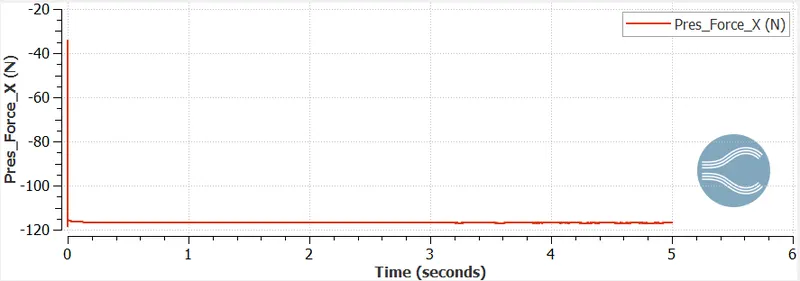
Drag force= -116.922N
Front left-wing:
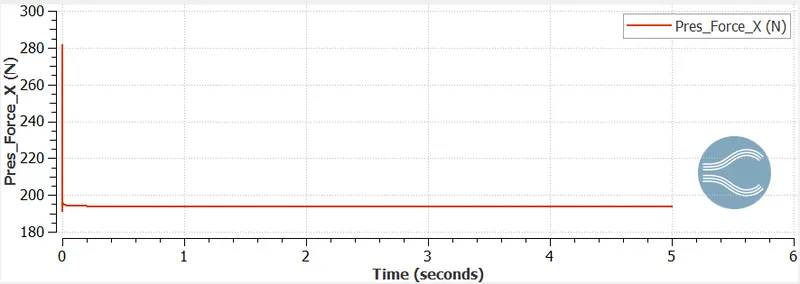
Drag force= 193.7263N
Driver helmet:
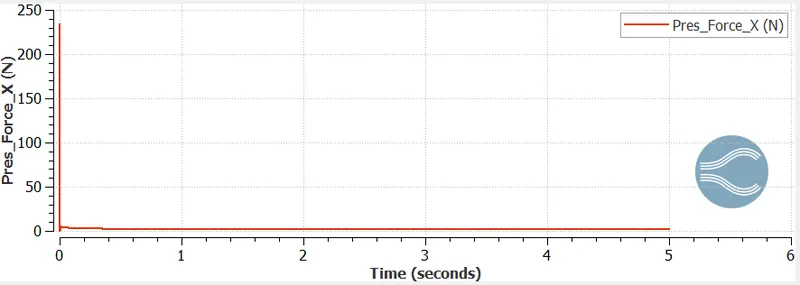
Drag force= 1.69N
Rear tires:
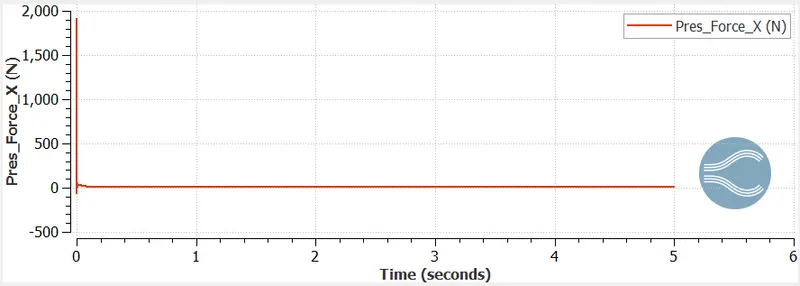
Drag force= 8.4422N
Front tires:
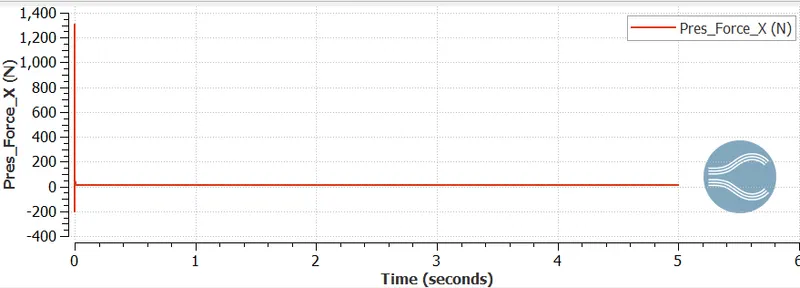
Drag force= 8.3174N
Front suspension:
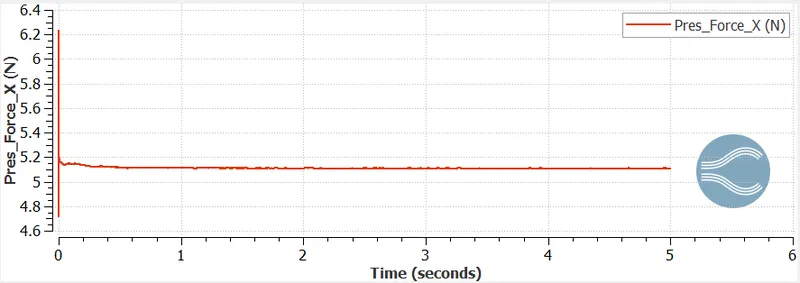
Drag force= 5.108N
Rear suspension:
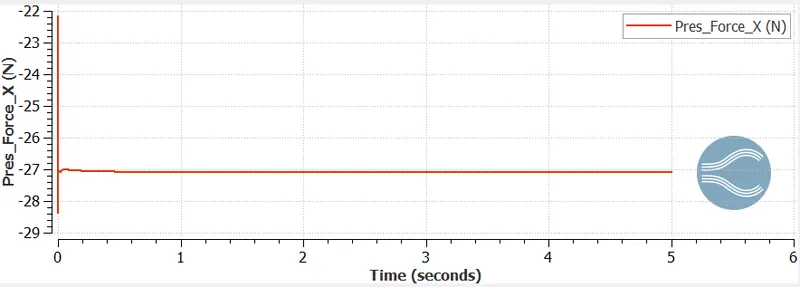
Drag force= -27.076N
Underbody:
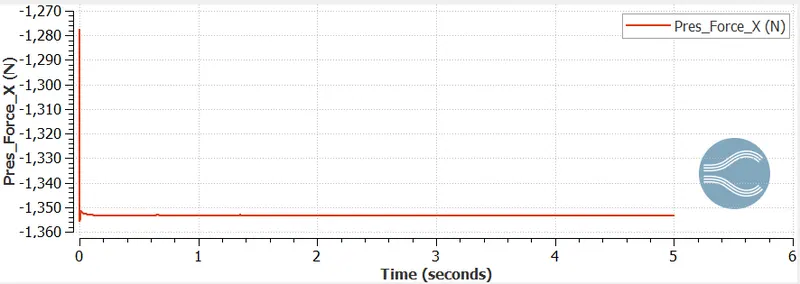
Drag force= -1353.3467N
Yplus:
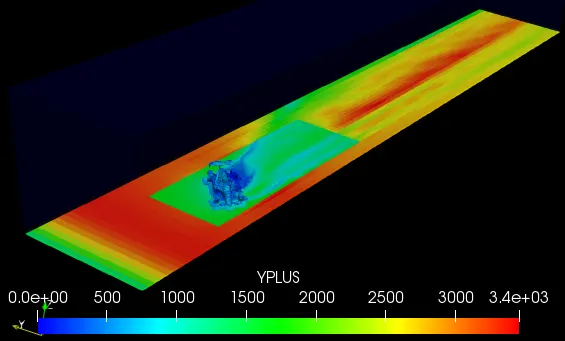
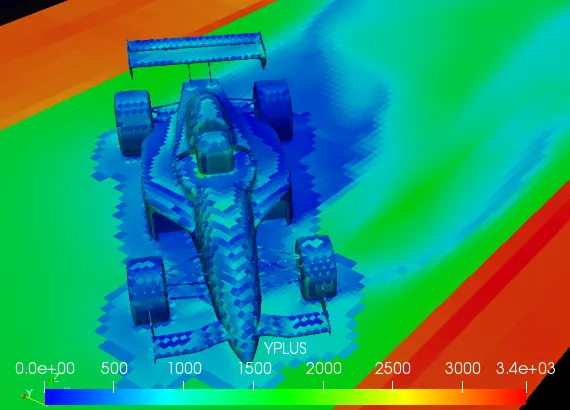
The value of the Yplus term ranges from 10 to 3400. This term is lower near the body of the car since a finer mesh is used (fixed embedding), but it is still higher than the recommended range. If the yplus term is higher than the recommended range (30-100 for K-omega turbulence model), the accuracy of the solution decreases. But due to lack of computation power, the case is run for coarse mesh setup.
Cell count:
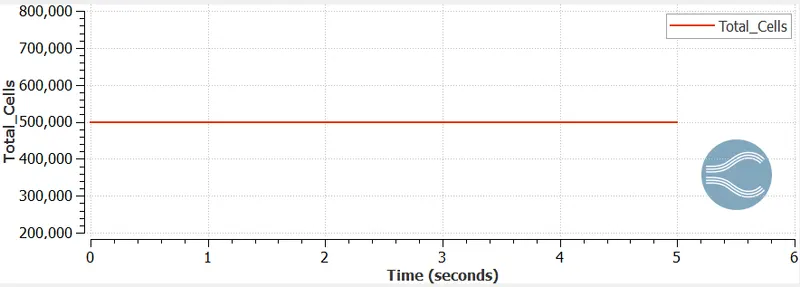
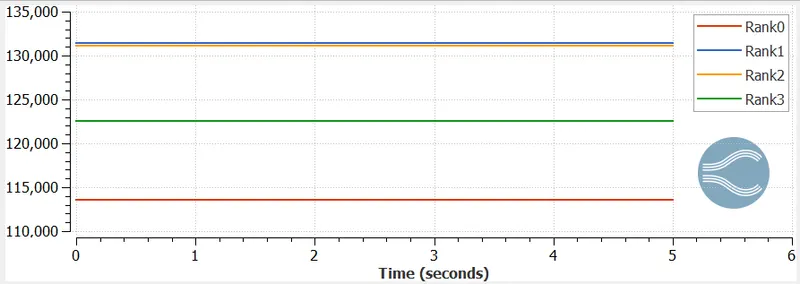
The simulation was run for 5s and a total of 498621 cells were generated. The problem was solved using 4 processors, and the cells were distributed between them as follows:
Rank0= 113596
Rank1= 131395
Rank2= 131126
Rank3= 122504
Summary of case2:
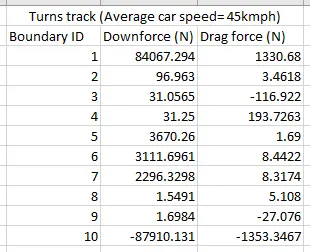
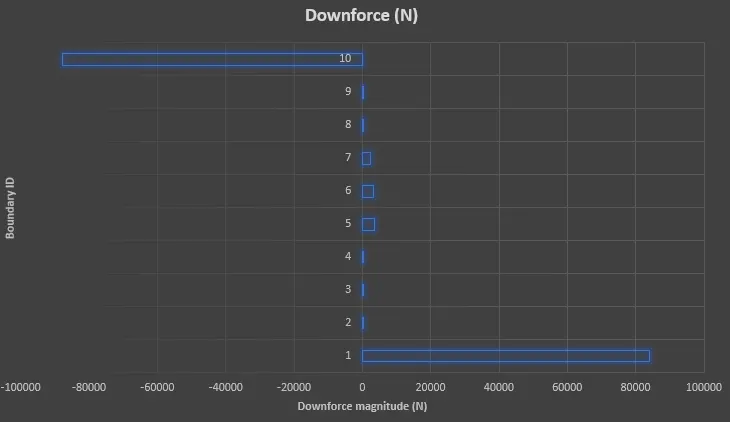
The body of the car is the most significant contributor to the downforce generated, whereas the underbody component generates a significant amount of lift. For a race car to be most efficient the downforce just be as high as possible and the lift must be as low as possible so that the traction between the road and tires is increased. Apart from the body and underbody, the contribution of the remaining components to the downforce is very less comparatively.
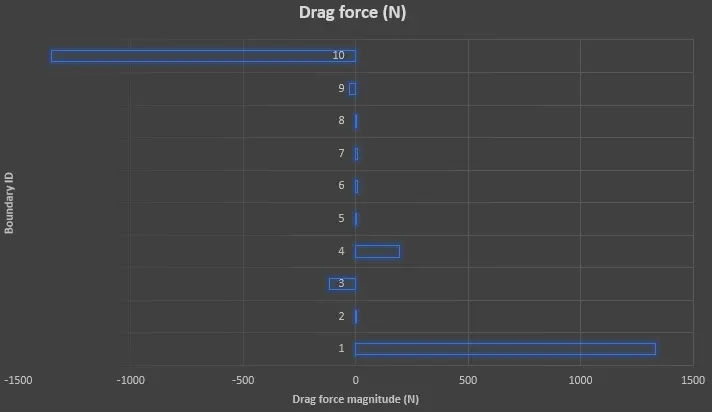
When it comes to the drag force, the underbody, rear suspension, and front right-wing are the only components that generate a negative drag force. The body is the main contributor to drag and the front left-wing significantly to the drag force generated. Even though the underbody contributes to the lift force, it contributes to the negative drag force thereby reducing the overall drag generated by the car.
Conclusions:
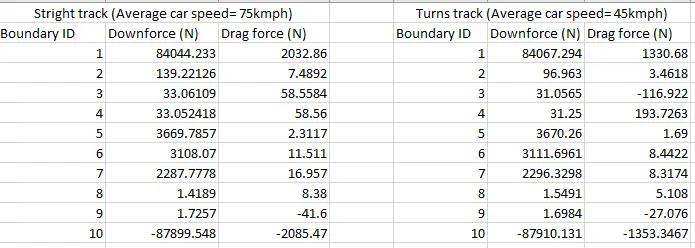
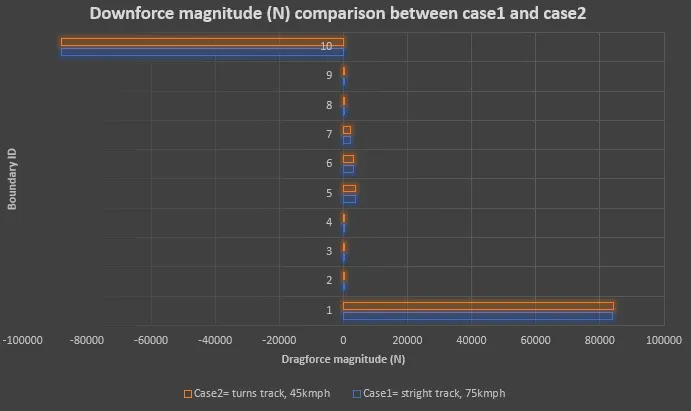
From the above comparison chart, we can say that the downforce is more or less the same for both the cases.
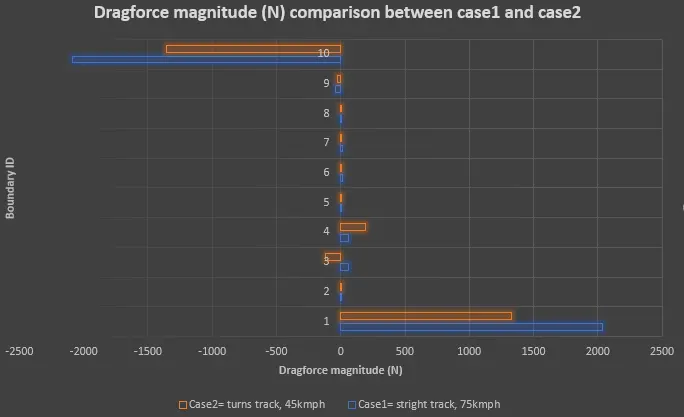
From the above comparison chart, we can say that there is a substantial difference in the drag force generated in the two cases at different car components. The aerodynamic forces acting on different car components depend on the race track conditions.