Forward Kinematics of 2R Robotic Arm
- Aim : Study of Kinematics of 2R Robotic Arm Using Matlab.
- Objective : Got to know algorithm for solving Basic kinematics using matlab.
- Description of Robotic Arm :
Robotic arm contains huge number of links , Joints etc.., They work without the help of a human , for that we need to program them using available
software For the robot to work good we should define co-ordinate positions for the required movement to do by the robot .we call it as a workspace.
Workspace : set of points that can be reached by its end-effector or in other words , it is the space in which the robot works and can be either a 3D space
or a 2D surface.
- Description of Robotic arm components for kinematics analysis :
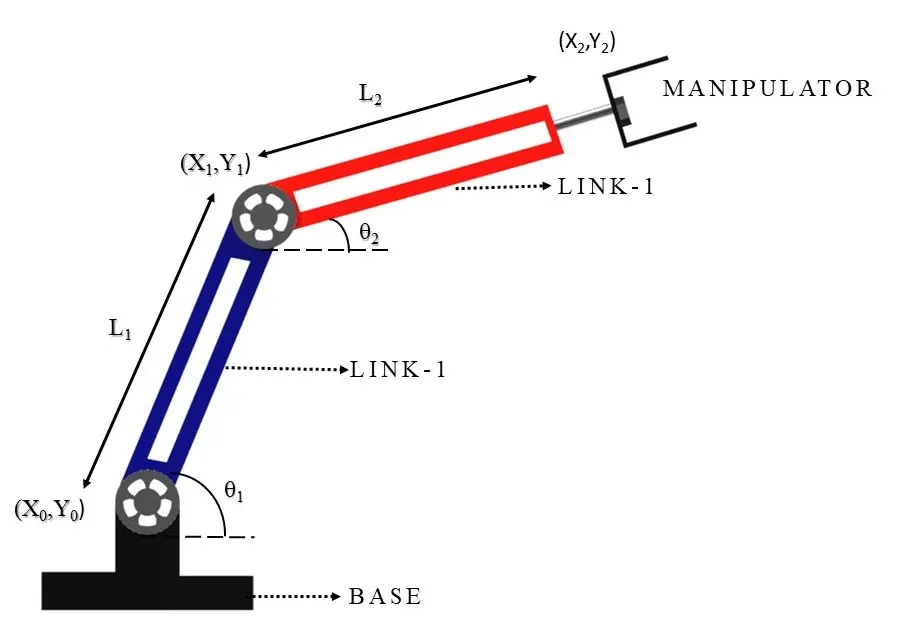
Defining the points and parameters between the links :
`(x_0,y_0)` this is joint between base (fixed link) link-1 (blue link) ,
`(x_1,y_1)` this is joint between the link-1 and link-2 (red link),
`(x_2,y_2)` this is the joint between the link-2 and manipulator.
`theta_1` angle between the link-1 and base.
`theta_2` angle between the link-1 and link-2.
`L_1`length of the link-1.
`L_2`length of the link-2.
Robotic arm contains two links link-1 and link-2 as shown in figure and contains joints ,
aligned with a certain angle with the horizontal axis. Parameters defined above.
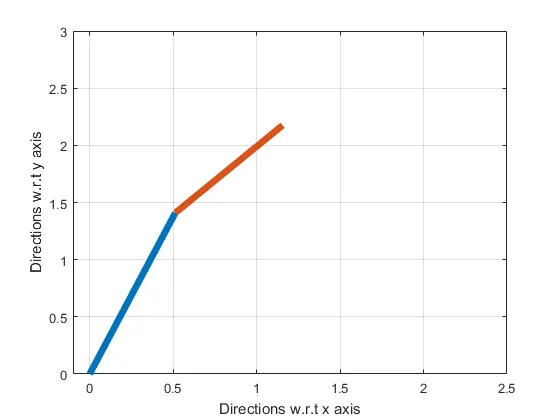
The above picture is our robotic arm but our motto is to analyse the motion of this
2R robotic arm , as robot is always moving to perform different tasks.
Code for analyse using matlab :
close all
clear  , clc
% Initialising the required inputs to the variables.
l1 = 1;
l2 = 0.5;
ct=1;

%linspace(x,y,z) - x - start , y - end , z - no.of division between start and end.

thetha1 = linspace(0,90,10);  % creating an array of containing 10 angles values.

thetha2 = linspace(0,90,10);  % creating an array of containing 10 angles values.

for i=1:length(thetha1)

    for j = 1:length(thetha2)
                x0 = 0;
        y0 = 0;

        x1 = l1*cosd(thetha1(i));
        y1 = l1*sind(thetha1(i));

        x2 = x1 + l2*cosd(thetha2(j));
        y2 = y1 + l2*sind(thetha2(j));


        plot([x0 x1],[y0 y1],[x1 x2],[y1 y2],'linewidth',3);
        axis([-0.1 1.5 0 1.5]);
        %pause(0.1)
        drawnow

 % getframe copying the all frames of animation in array 'M'.
        M(ct) = getframe(gcf);
        ct = ct+1;
    end
end

%VideoWriter - Creating a video file from an array
my_creator_animation = VideoWriter('M');


open(my_creator_animation)

%writeVideo - Writing the data stored in M into my_creator_animation video object.
 writeVideo(my_creator_animation,M)

close(my_creator_animation)
Explanation of code Step-wise :
At first using the common commands for better execution of code
close all - Clearing all existing plots and figures
clear - Clearing all data in the workspace.
clc - Clearing the command window.
1. Initialising the required inputs for calculations for kinematics analysis , length of two links
and the data of angles stored in arrays by using linspace from `0^0` to `90^0` with
constant increment of `10^0`.
2.ct is a variable intialised to 1 , its's values increases for every iteration in the for loop.
Workflow of for loop :
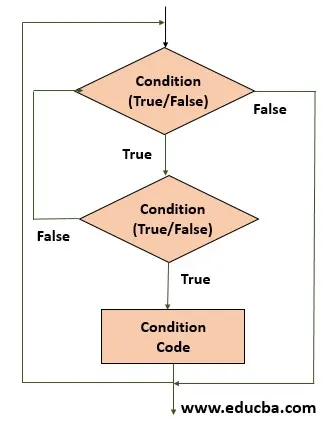
The above figure describes the workflow of the loops in matlab.
3.Conditions for loops taken so that loops can iterate for 10 times by using (1:length(x)).
4.length(x) - returns the largest dimention of the array x . It is inbuilt function.
5.In the nested for loop declared the co-ordinate of joints as shown in code.
6.cosd() , sind() used to analysis using in terms of degrees.
7.Used 'plot' command to plot the graph.
8.'linewidth' command define the thickness of the plots.
9.used 'axis' command to define the x-axis and y-axis limits. 'axis([x-min x-max y-min y-max]).'
10.'drawnow' - means stop the execution of code temporarily and plot the figure at current time , as matlab gives preference to the execution of code than plotting.
so, used drawnow for to show the animation of movement of robot arm.
11.'getframe' - getframe command stores the data of all frames , and the data stored in the variable M , used ct to change the value of index or location to store data.
12.The entire required data stored in variable 'M' after completion of all iterations of for loops.
13.'VideoCreator' - creates a video file but it won't write any thing . created a Video object 'my_creator_animation' by assigning to it and it does not contain any data.
14.'open' - command used for opening the video file.
15.'writeVideo' - write a video by using the data stored in array 'M'.
16.'close' - command used for closing the video file.
video file created only after the animation completed in the output . Can observe that in command history. By default matlab creates '.avi' files. we can convert that into '.mp4' file . use VideoWriter('name','MPEG-4');
Animation Video Of Robotic Arm: