Week 11 - Final project
AIM - To design a Door Panel of an Automotive using CATIA V5.
OBJECTIVES -
- To create an assembly and organize different surfaces of the given class A surface into different parts of the door trim panel.
- To create a tooling axis and perform a draft analysis on the class A surface of each part.
- To create class B, class C surface, and close surface for each part.
- To perform draft analysis on the close body of each part.
- To create engineering features (Heat stakes, Locators, Dog House) to join the parts of the door trim panel together.
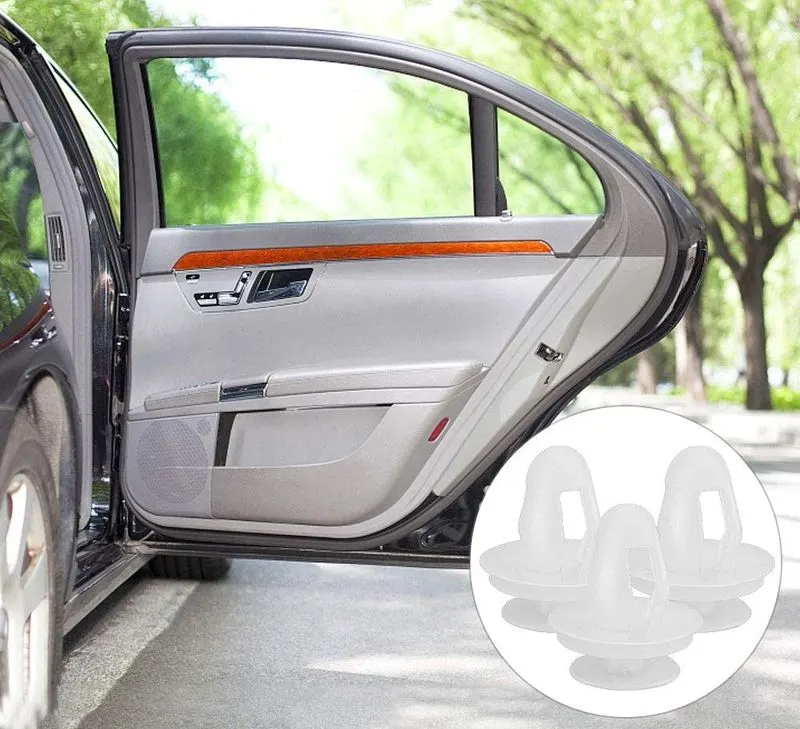
- To assemble push pins to the door panel.
THEORY -
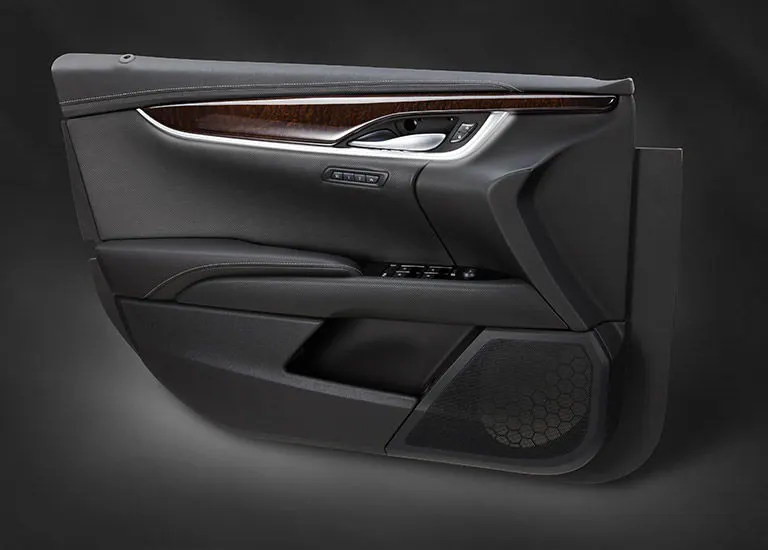
A door panel, also known as a door card, is an insert that covers the interior components of a vehicle's door. Modern cars often have door cards that are constructed of plastic and incorporate other decorative elements, with injection molding being the most common method. Other features that add to the vehicle's aesthetic, functionality, and ergonomics are usually included in the door panel. Armrests, switches, or other controls for the windows and locking mechanism, convenience lights, speakers, storage compartments, and other features are examples of this.
MAIN CONTENT -
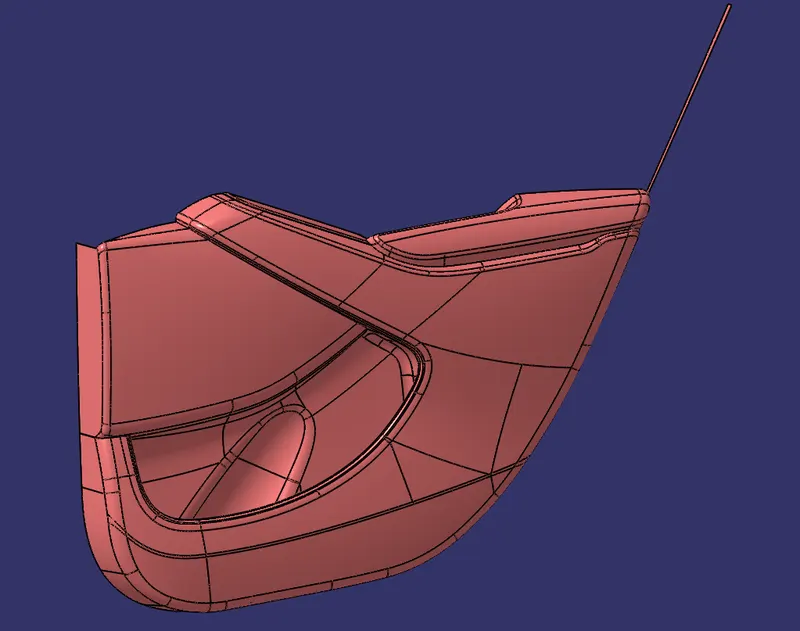
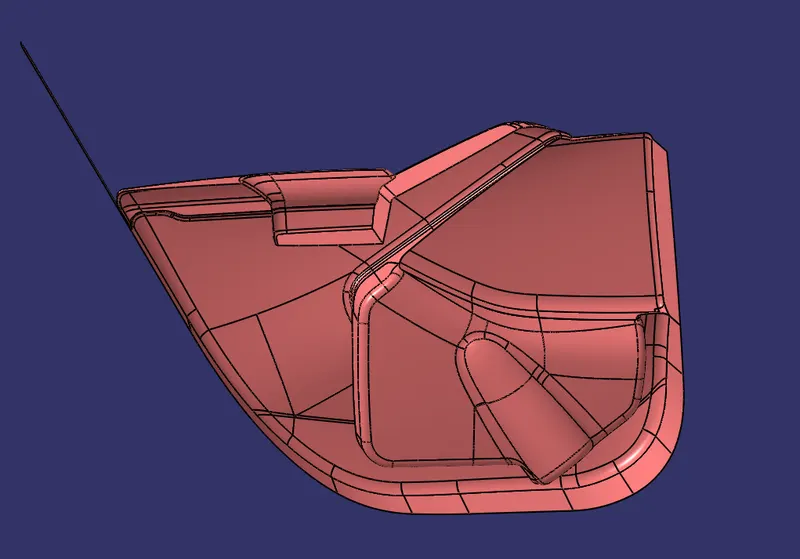
Class A surface of a door panel received from the styling team. In the automotive industry dedicated team is allocated to develop class A surface using sketches followed by ideation. Class A surface is the first input given to the plastic designer.
A) CLASS A SURFACE OF A DOOR PANEL
- Front Side
- Back Side
B) CREATION OF AN ASSEMBLY
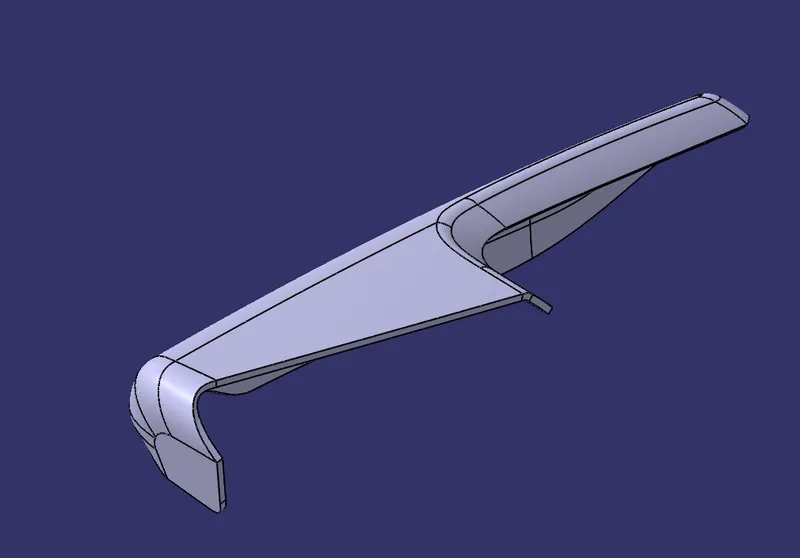
Door Panel class A surface has the following parts -
- Switch Bezel
- Door Arm Rest
- Lower Substrate
- Map Pocket
- Bottle Holder
1. SWITCH BEZEL
- Creation of tooling axis
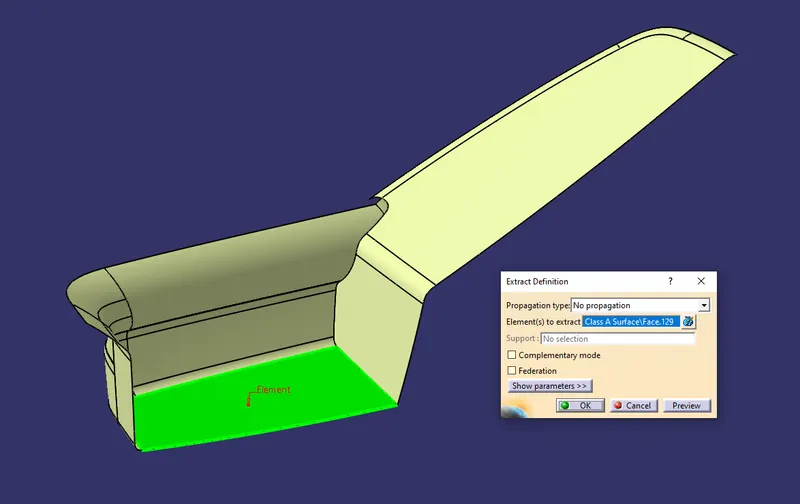
Extract of the bottom surface has been created using single extract command.
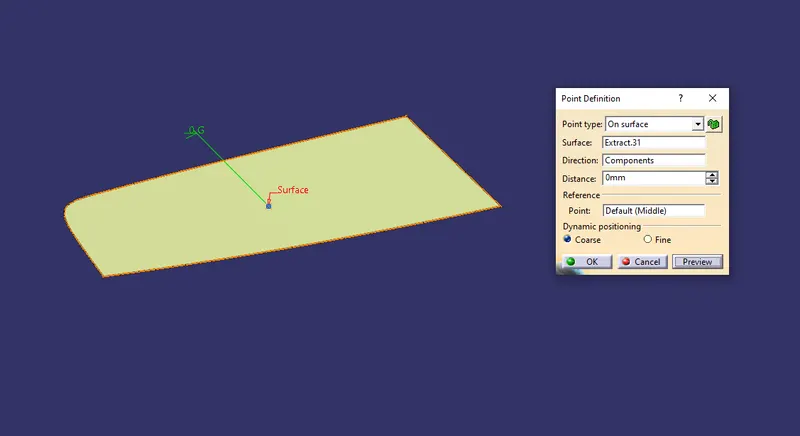
The point has been created onto the extracted surface using the point command.
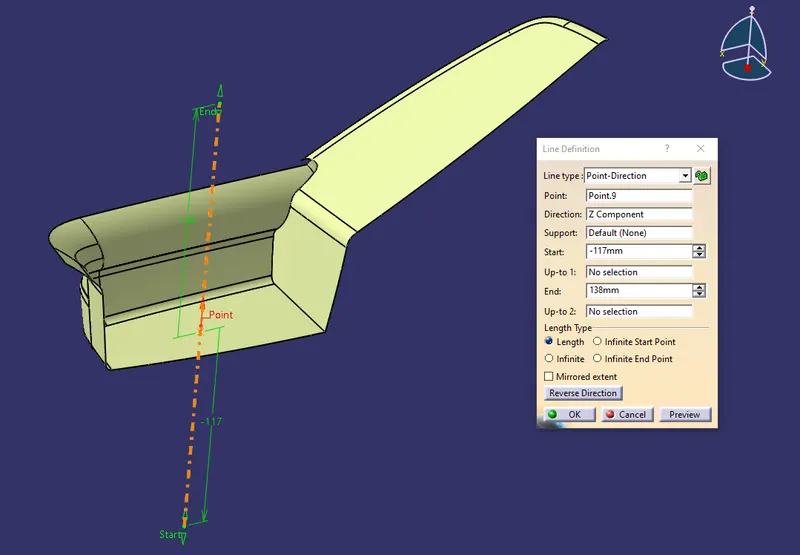
The line has been created using the line command. The point-direction option is used to create the main tooling axis in the z-direction.
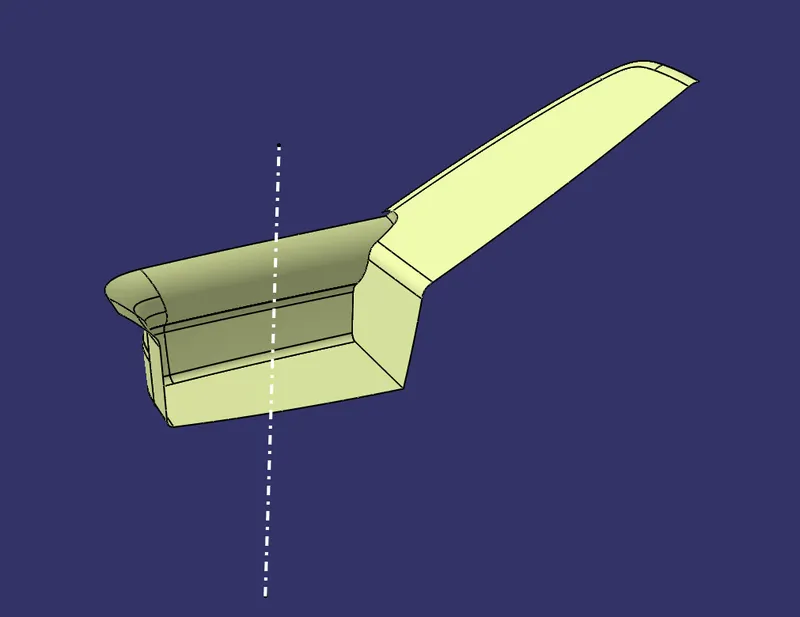
By the observation, it can be seen that an undercut is present in the depression area of a switch bezel. Undercuts are always cleared using the side core tooling axis. Hence, a side core tooling axis is needed for this part. It is created using line command with point and direction options. Point used to create the main tooling axis is used with Y-direction.
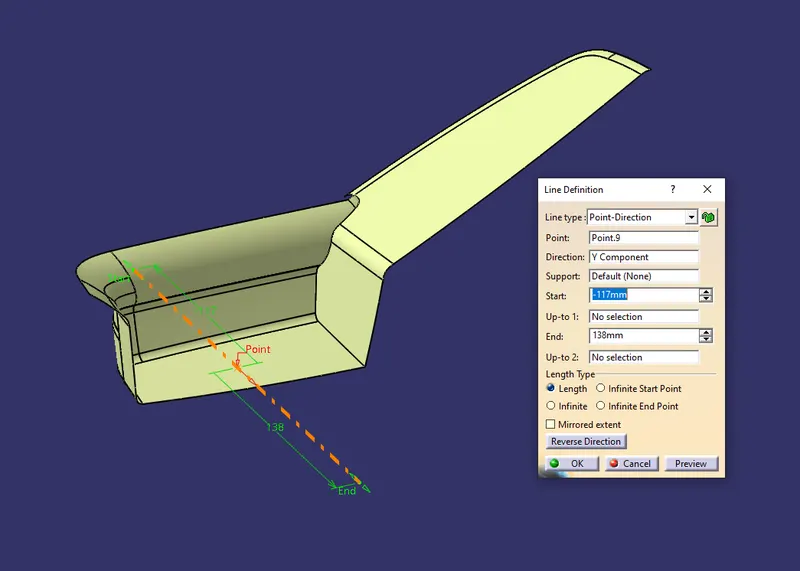
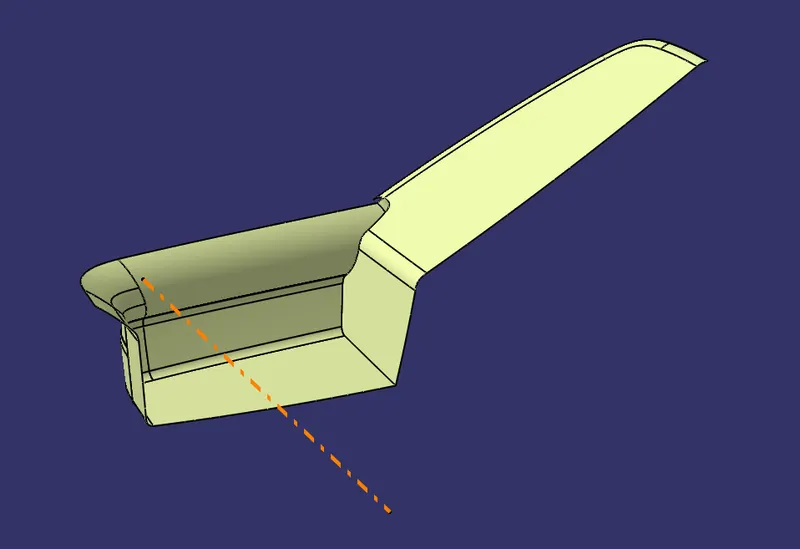
- Draft analysis on Class A Surface
Using insert command draft analysis tool has opened.
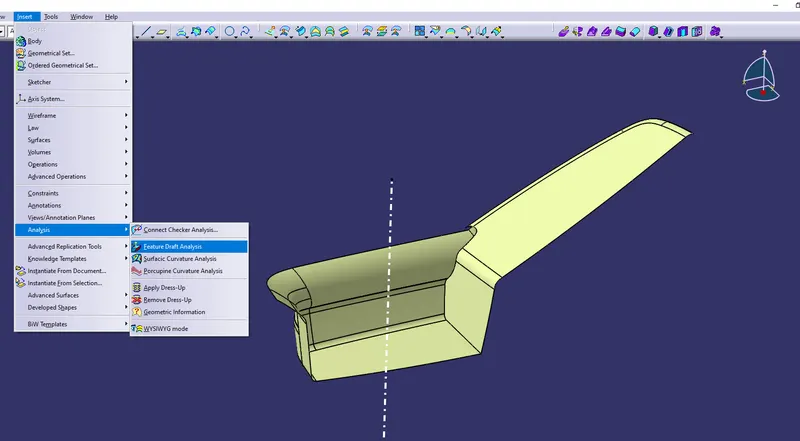
By clicking on feature draft analysis two pallets opened. One pallet has necessary draft analysis commands and other one is a color range which shows the draft values range in form of color.
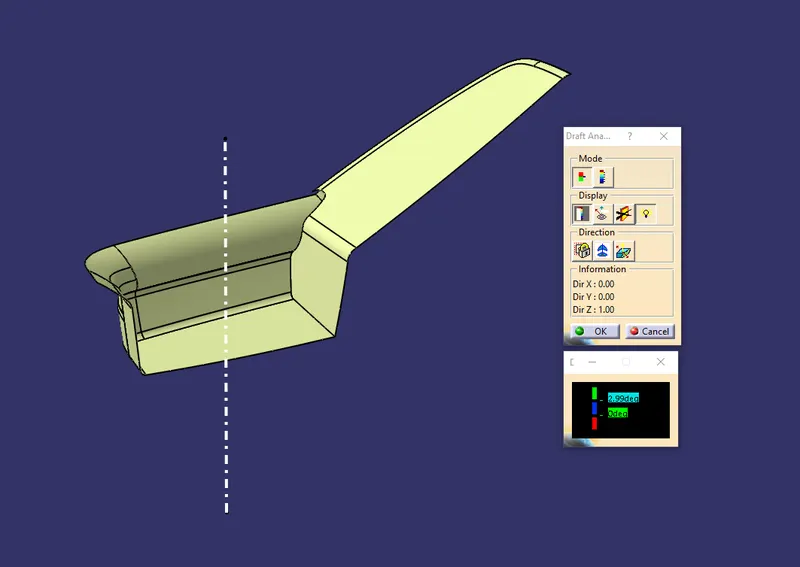
Inside the draft analysis command window, the compass option has been selected to create a compass.
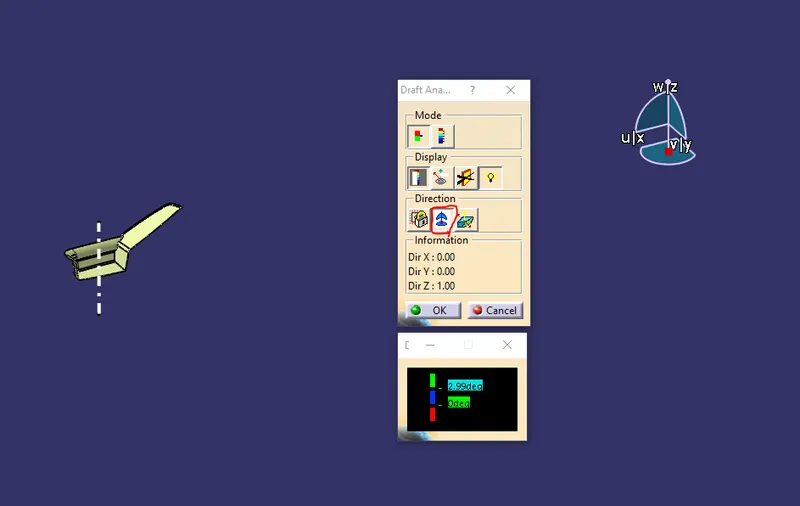
Compass has been dragged onto the component and aligned with the main tooling axis and locked using the lock command.
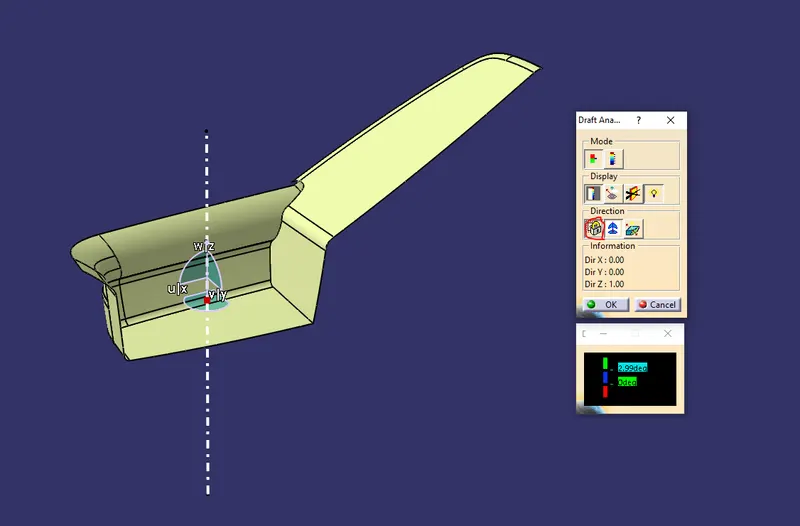
Now by dragging the mouse pointer anywhere on the component and clicking on it will show us the required draft analysis.
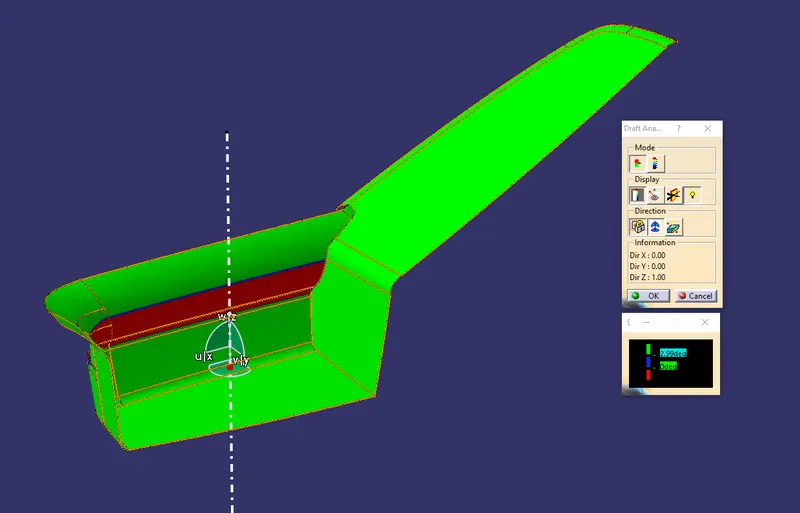
As per the color scale, the minimum draft angle for all faces should be 2.9 degrees or above that. Inside the color scale, green shows a draft angle of 2.9 or above 2.9 degrees. Blue shows between 0 and 2.9 degrees. And red shows a negative draft angle. As per the above figure, some faces are green, blue, and red as well. Hence our surface has not cleared the draft analysis at the red faces using the main tooling axis which is an undercut. Another draft analysis is performed using a side core tooling axis with the same steps.
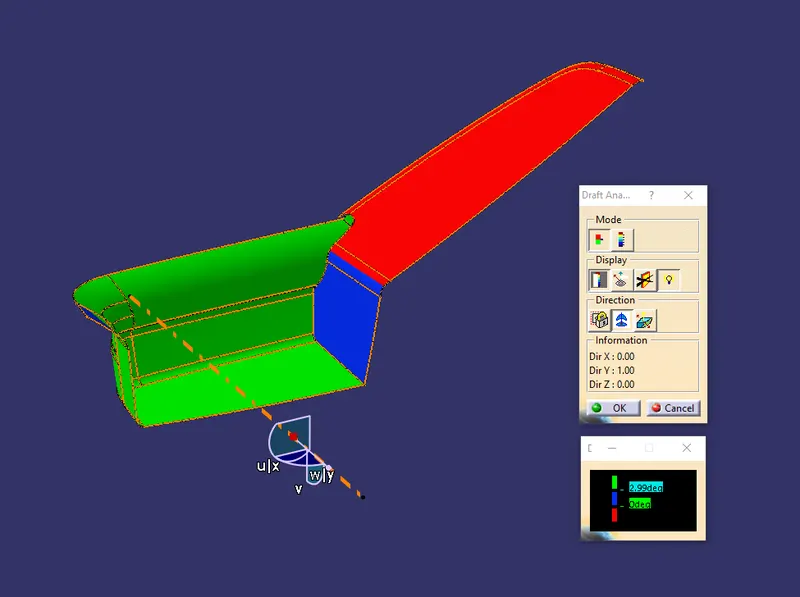
Using the side core tooling axis an undercut is easily clearing the draft analysis. Hence, entire class A surface can easily be cleared using the main tooling axis and side core tooling axis. Draft analysis on switch bezel class A surface has been successful.
- Creation of Class B surface
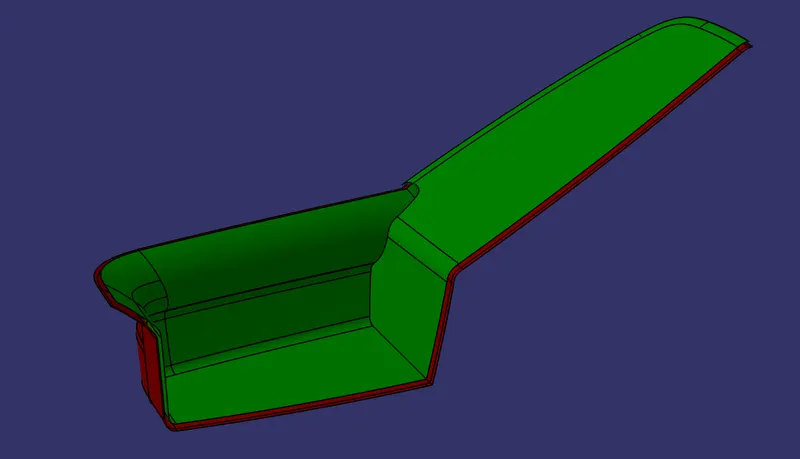
Class B surface has been created by offsetting of class A surface. Offsetting has been done using the offset command. Class A surface is offset with a 2.5 mm distance. Surfaces that were not offsetting were formed using the multisection command. Class A surface has green color whereas red shows class B surface.
- Creation of Class C surface
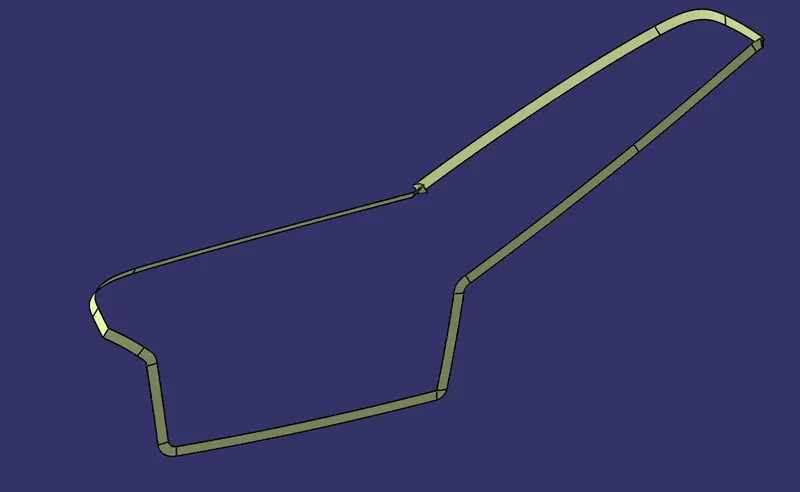
Using the Multiple extract commands, boundaries of class A surface were extracted. Class C surface joins class A and class B surfaces. It is created using the sweep command. Inputs for the sweep command were extracted boundary, class-A surface, angle value, and length of the sweep. Due to surface irregularities, it was not possible to create a single sweep. Hence, several sweeps and multisection were created, and finally, they joined together to create a class C surface.
- Creation of Close Surface
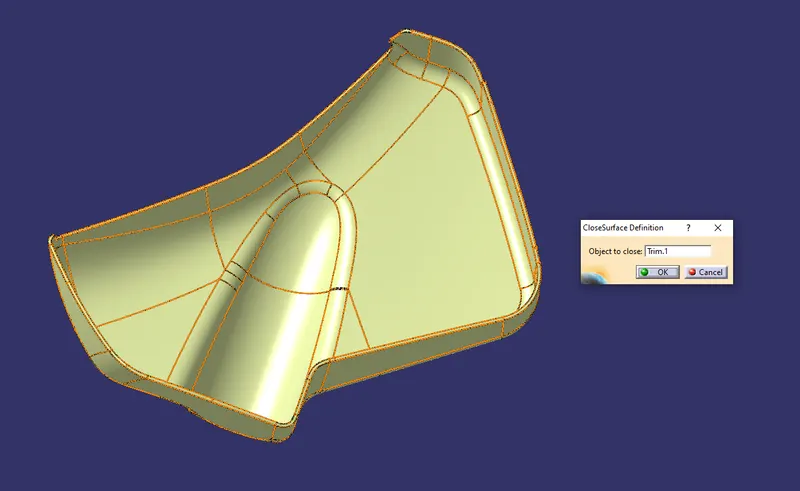
Class A and Class C surfaces were joined together.
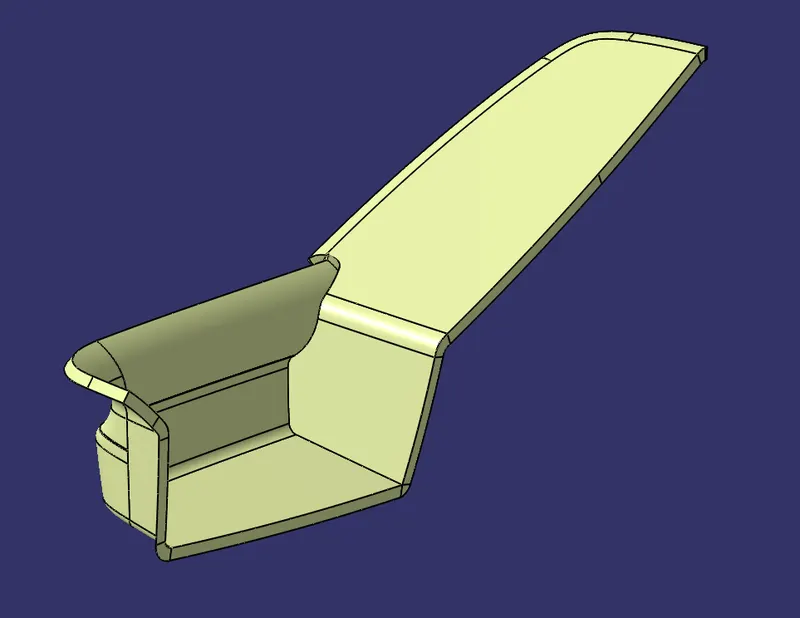
The join of Class A and Class C surface is trimmed with class B surface to create a closed surface. While performing trim operation errors were coming as a proper intersection was not happening. Hence with the help of extrapolating command class B surface was extrapolated and finally trimmed.
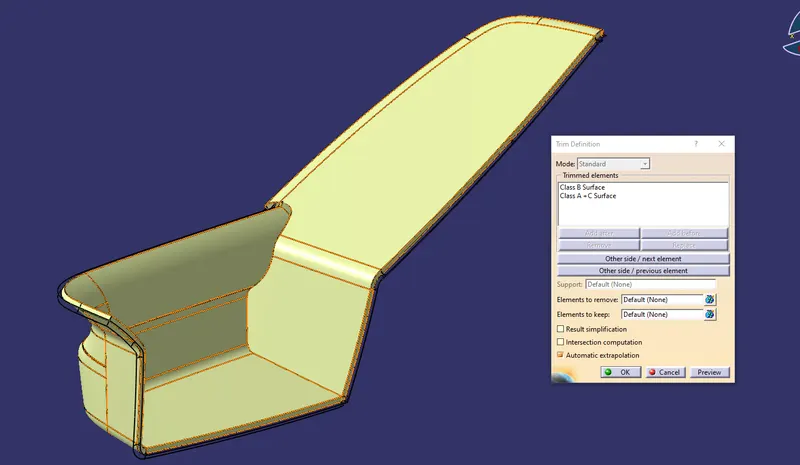
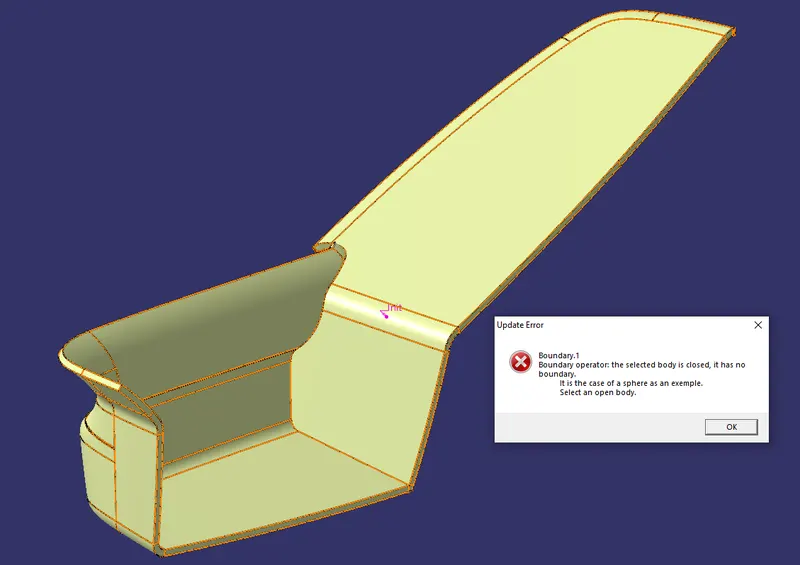
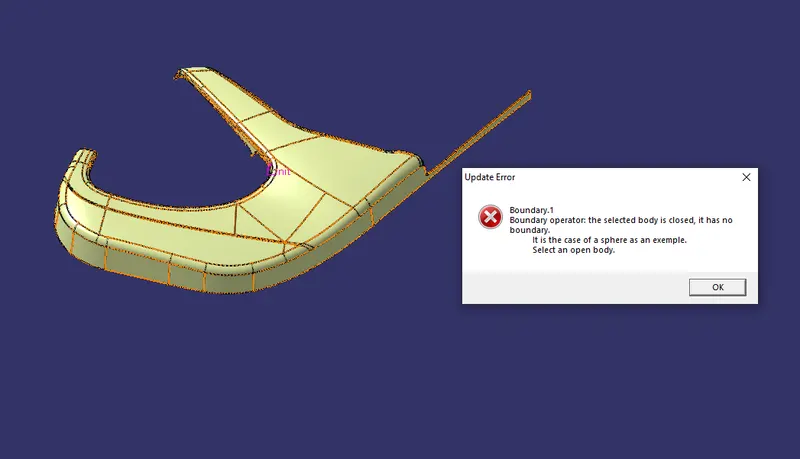
The close surface was confirmed using the boundary command. By clicking on surface warning popped up stating the surface is close and it has no boundaries. This is the trick often used to check whether the surface is close or not.
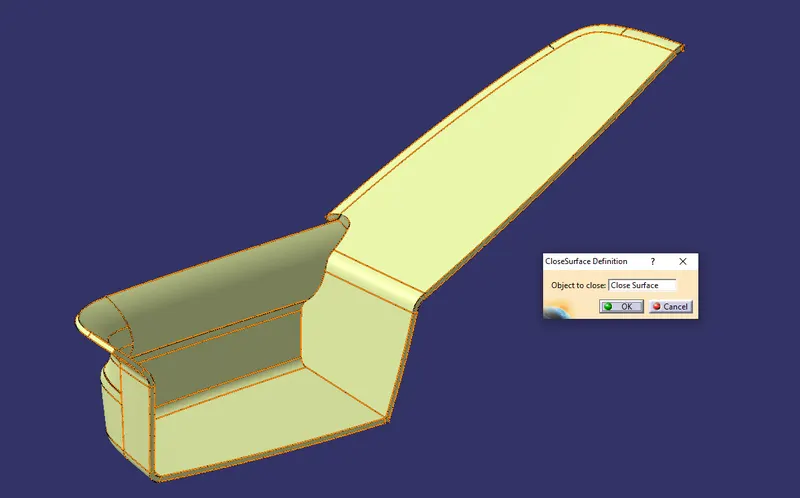
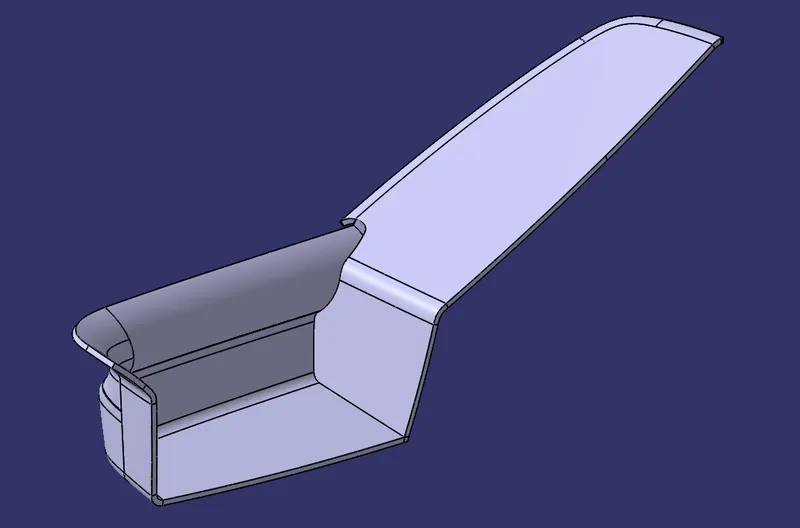
Above Close surface is converted into the close body using the close surface command from part design workbench.
2. DOOR ARM REST
- Creation of tooling axis
The point has been created onto the top surface using the point command.
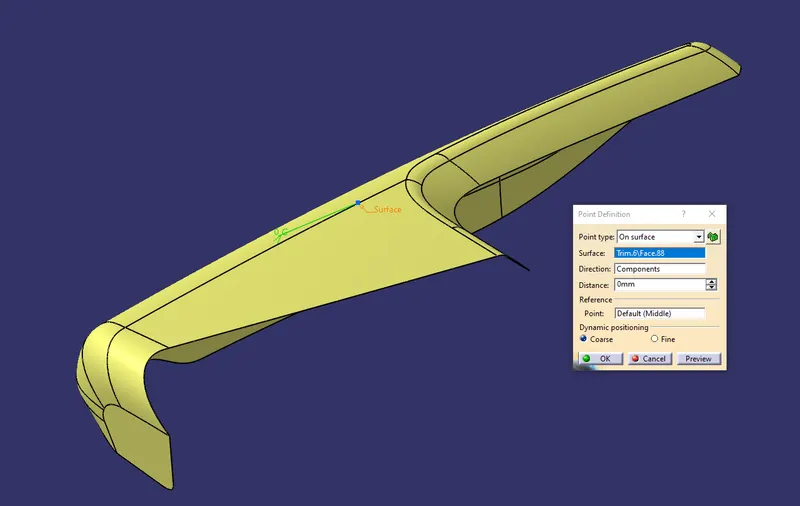
The line has been created using the line command. The point-direction option is used to create the main tooling axis in the z-direction.
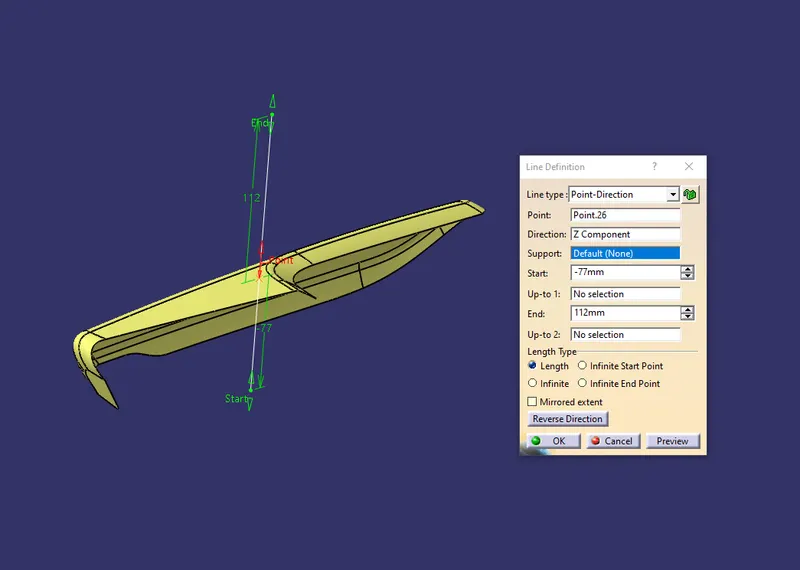
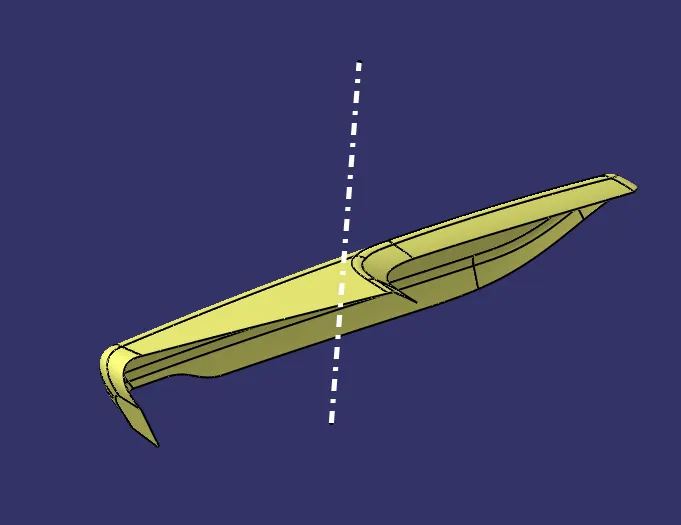
By the observation, it can be seen that undercut is present. Undercuts are always cleared using the side core tooling axis. Hence, a side core tooling axis is needed for this part. It is created using line command with point and direction options. Point used to create main tooling axis is used, with Y-direction.
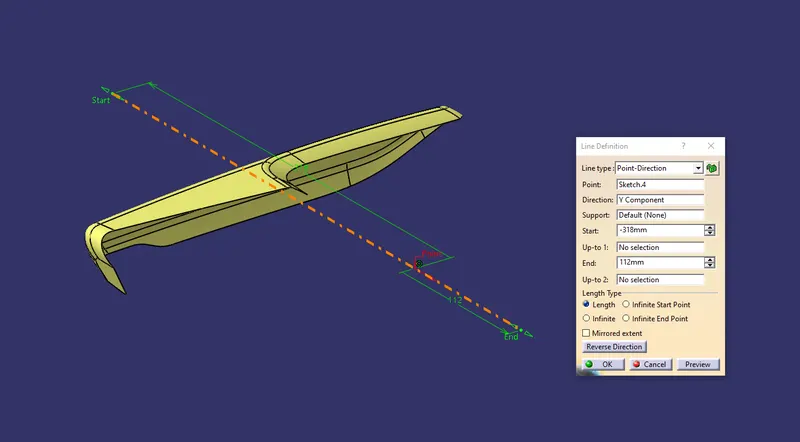
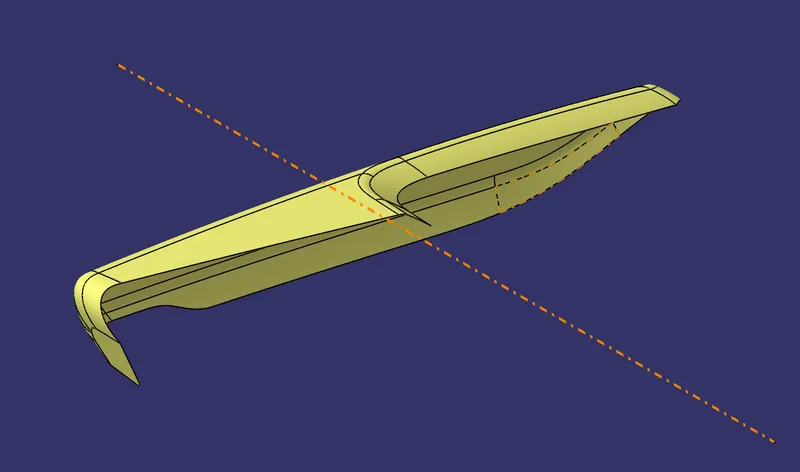
- Draft analysis on Class A Surface
Using insert command draft analysis tool has opened.
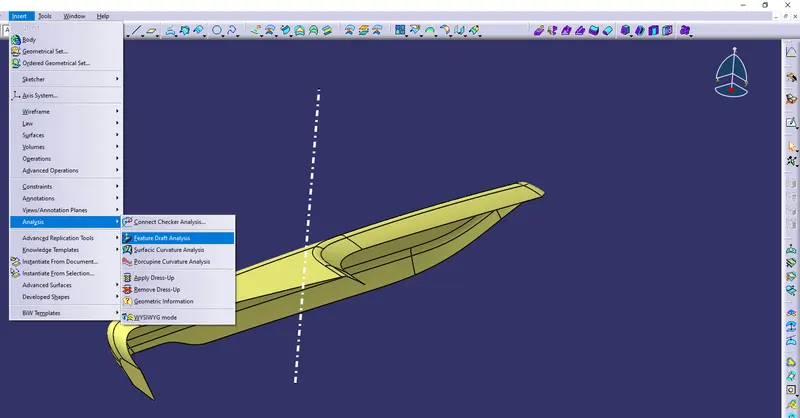
By clicking on feature draft analysis two pallets opened. One pallet has necessary draft analysis commands and other one is color range which shows the draft values range in form of color.
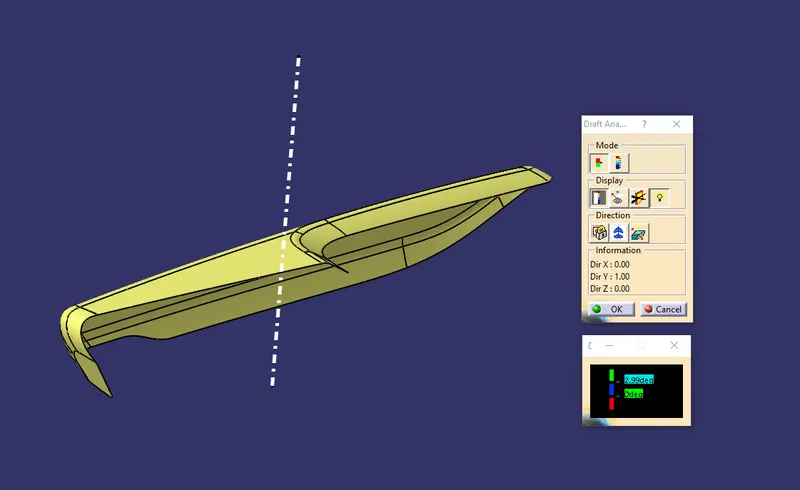
Inside the draft analysis command window, the compass option has been selected to create a compass.
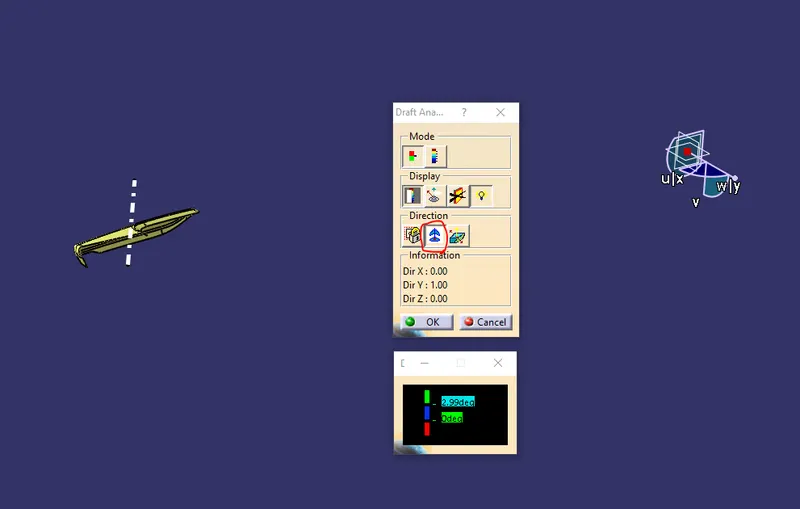
Compass has been dragged onto the component and aligned with the main tooling axis and locked using the lock command.
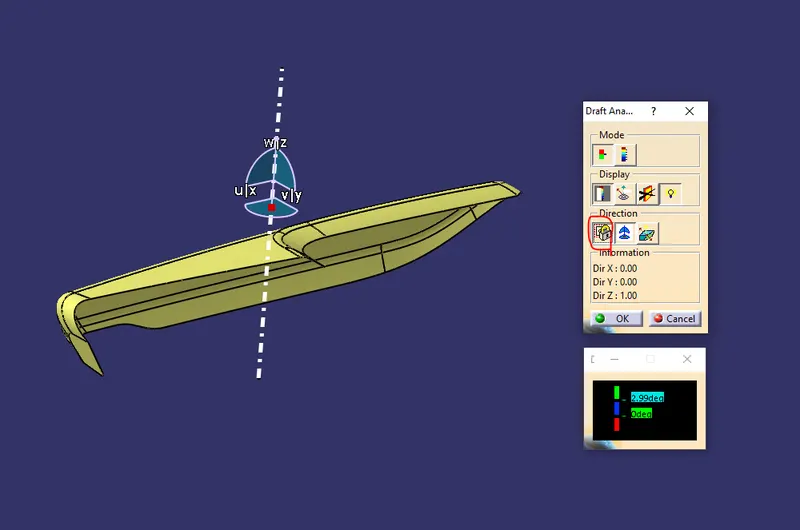
Now by dragging the mouse pointer anywhere on the component and clicking on it will show us the required draft analysis.
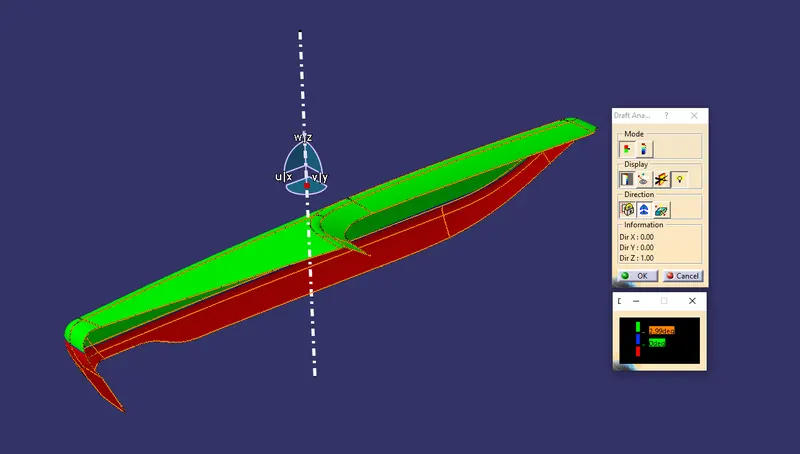
As per the color scale, the minimum draft angle for all faces should be 2.9 degrees or above that. Inside the color scale, green shows a draft angle of 2.9 or above 2.9 degrees. Blue shows between 0 and 2.9 degrees. And red shows a negative draft angle. As per the above figure, some faces are green, blue, and red as well. Hence our surface has not cleared the draft analysis at the red faces using the main tooling axis which is an undercut. Another draft analysis is performed using a side core tooling axis with the same steps.
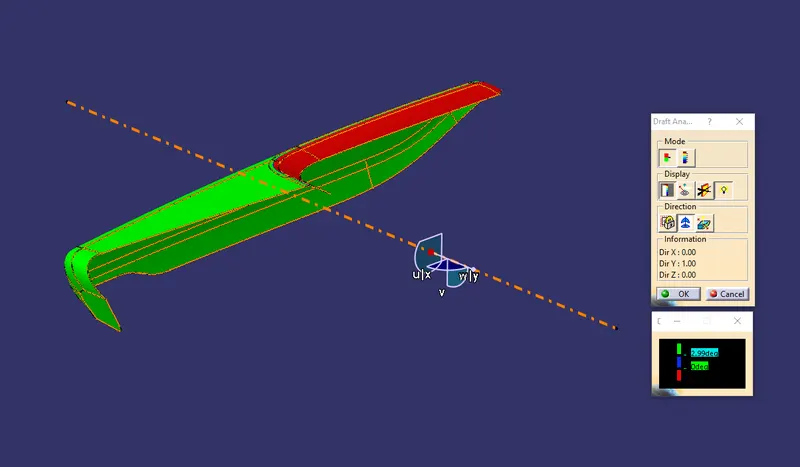
Using the side core tooling axis an undercut is easily clearing the draft analysis. Hence, entire class A surface can easily be cleared using the main tooling axis and side core tooling axis. Draft analysis on door arm rest class A surface has been successful.
- Creation of Class B surface
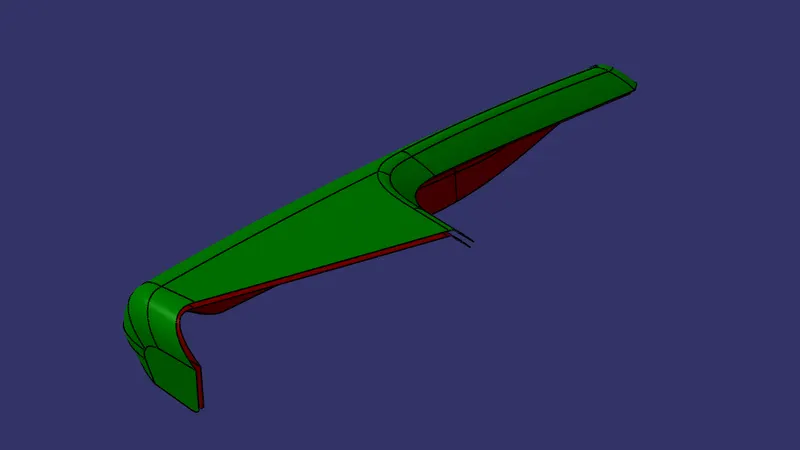
Class B surface has been created by offsetting of class A surface. Offsetting has been done using the offset command. Class A surface is offset with a 2.5 mm distance. Class A surface has green color whereas red shows class B surface.
- Creation of Class C surface
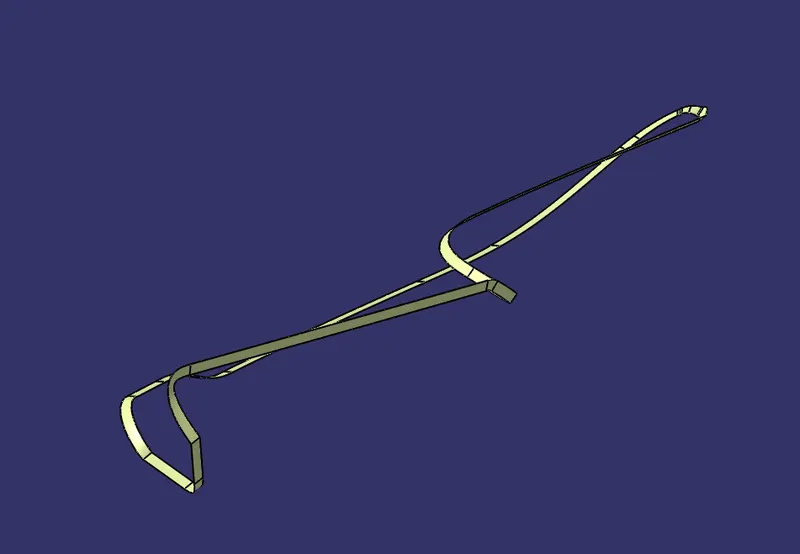
Using the Multiple extract commands, boundaries of class A surface were extracted. Class C surface joins class A and class B surfaces. It is created using the sweep command. Inputs for the sweep command were extracted boundary, class-A surface, angle value, and length of the sweep.
- Creation of Close Surface
Class A and Class C surfaces were joined together.
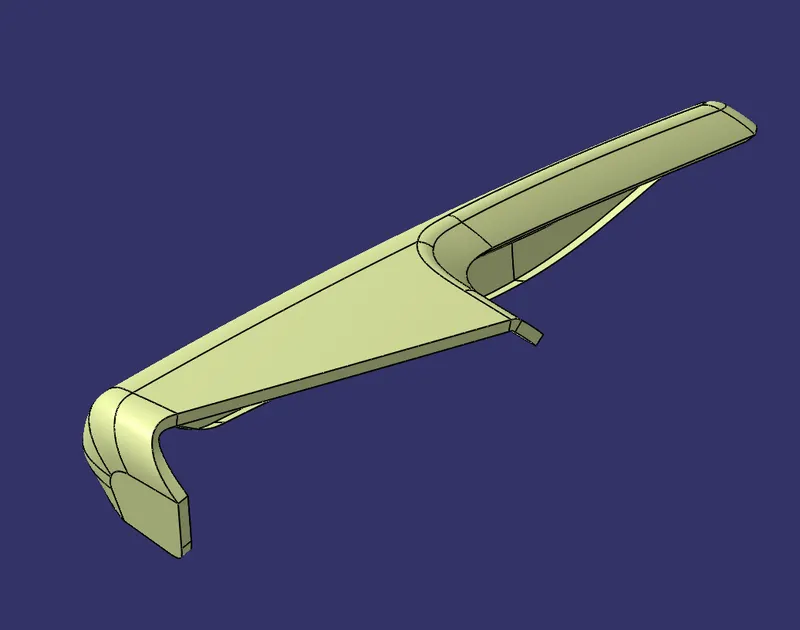
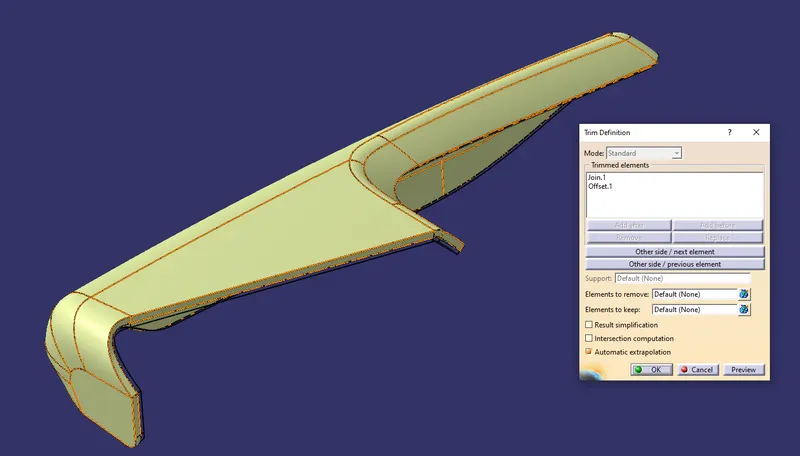
The join of Class A and Class C surface is trimmed with class B surface to create a closed surface.
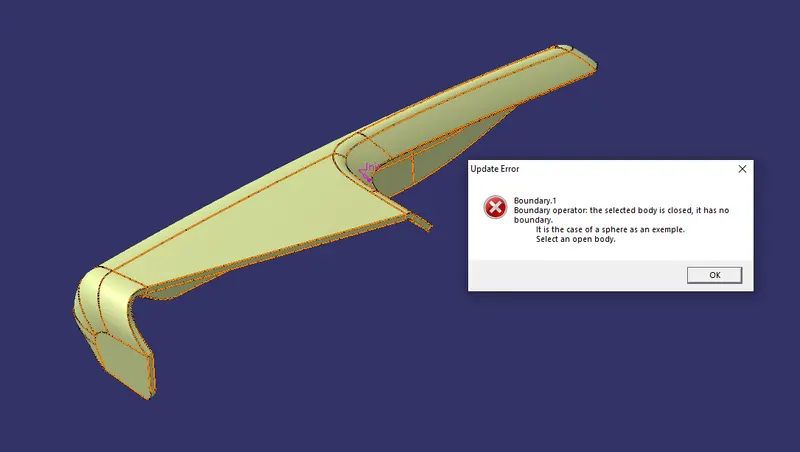
The close surface was confirmed using the boundary command. By clicking on surface warning popped up stating the surface is close and it has no boundaries. This is the trick often used to check whether the surface is close or not.
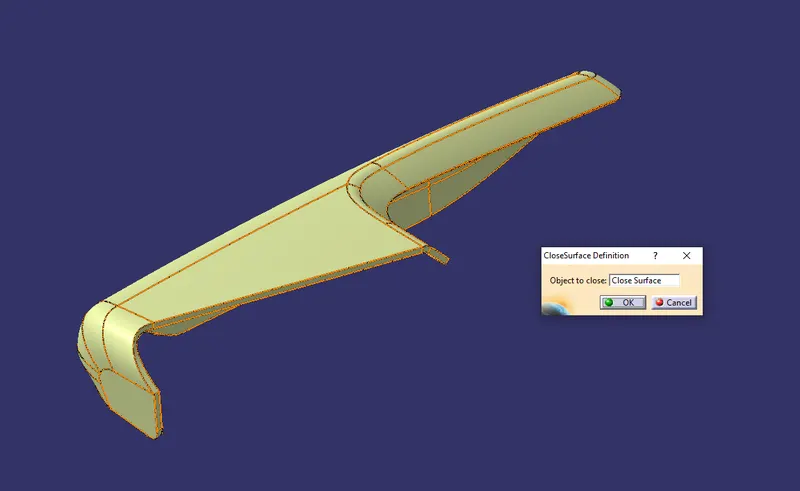
Above Close surface is converted into the close body using the close surface command from part design workbench.
3. LOWER SUBSTRATE
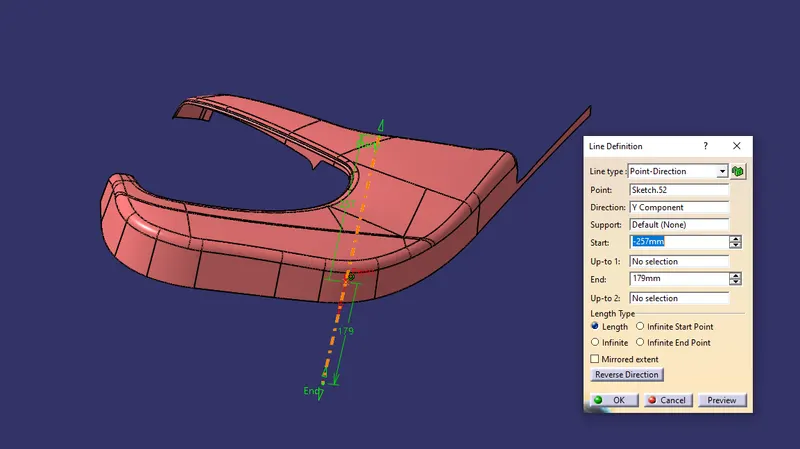
- Creation of tooling axis
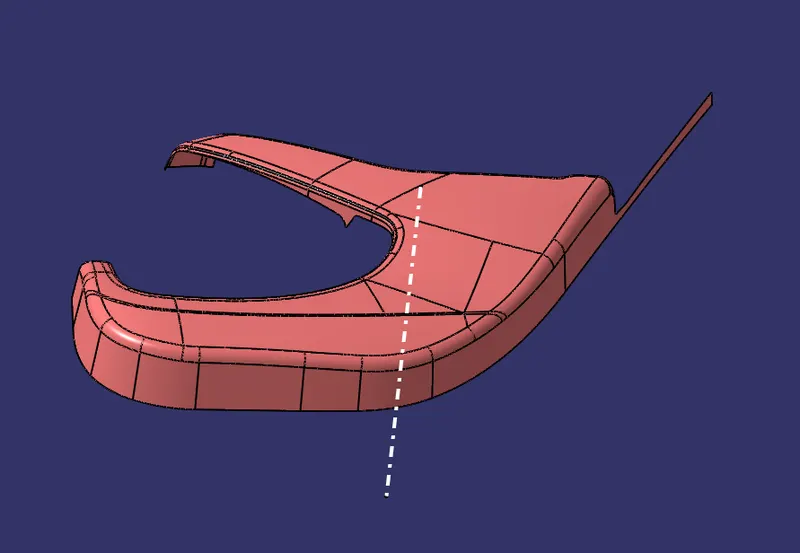
The line has been created using the line command. The point-direction option is used to create the main tooling axis in the z-direction.
- Draft analysis on Class A Surface
Using insert command draft analysis tool has opened.
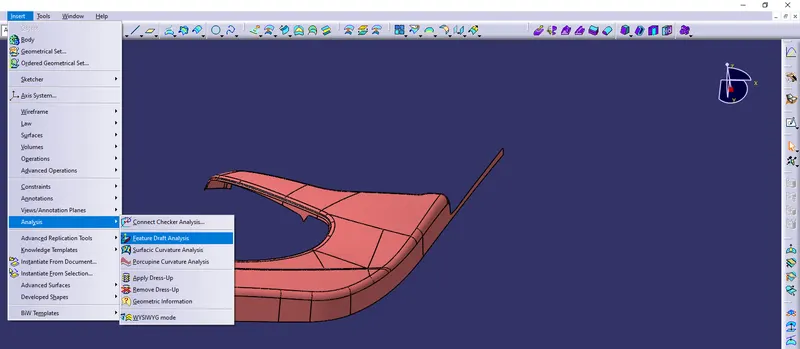
By clicking on feature draft analysis two pallets opened. One pallet has necessary draft analysis commands and other one is a color range which shows the draft values range in form of color.
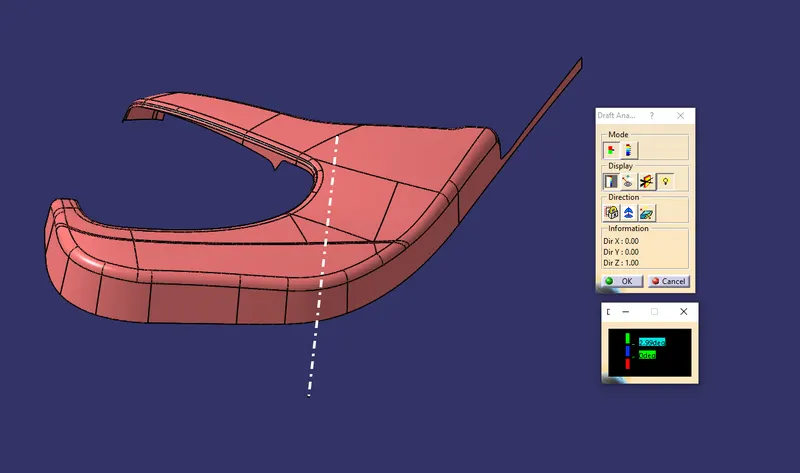
Inside the draft analysis command window, the compass option has been selected to create a compass.
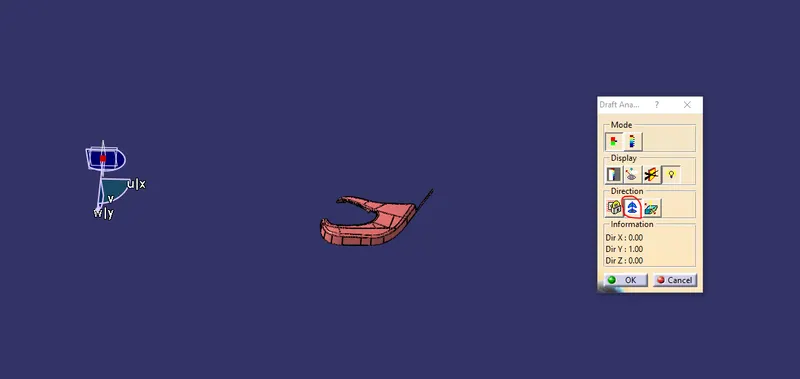
Compass has been dragged onto the component and aligned with the main tooling axis and locked using the lock command.
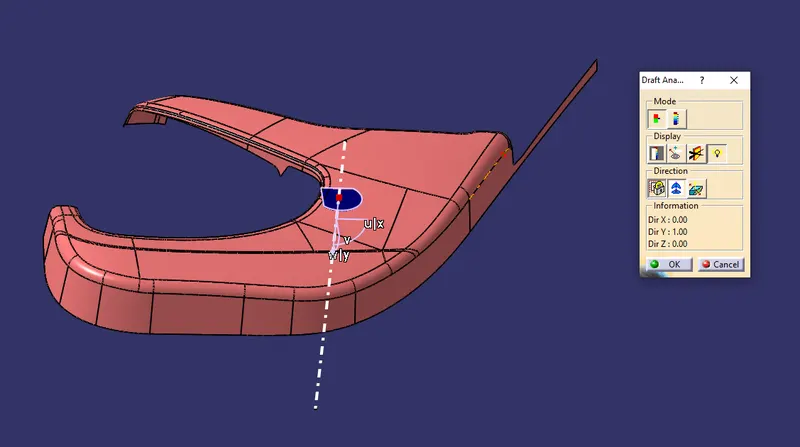
Now by dragging the mouse pointer anywhere on the component and clicking on it will show us the required draft analysis.
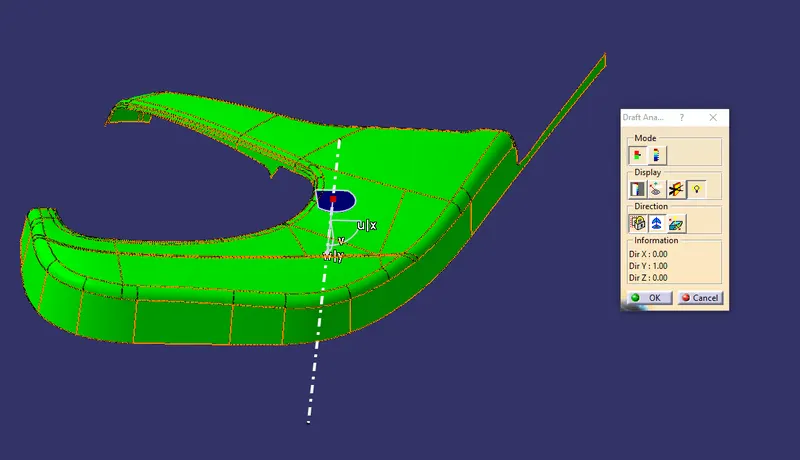
As per the color scale, the minimum draft angle for all faces should be 2.9 degrees or above that. Inside the color scale, green shows a draft angle of 2.9 or above 2.9 degrees. Blue shows between 0 and 2.9 degrees. And red shows a negative draft angle. As per the above figure, all faces are green. Hence our surface has cleared the draft analysis successfully.
- Creation of Class B surface
Class B surface has been created by offsetting of class A surface. Offsetting has been done using the offset command. Class A surface is offset with a 2.5 mm distance. Class A surface has green color whereas red shows class B surface.
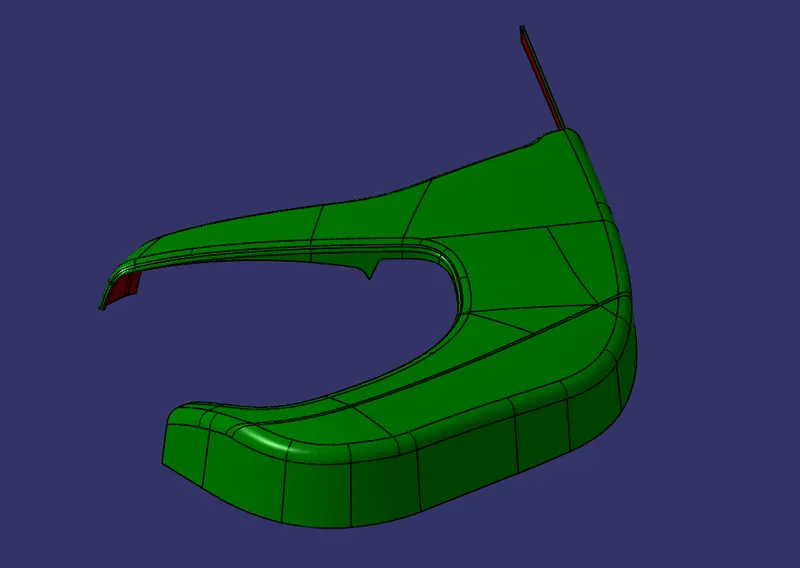
- Creation of Class C surface
Using the Multiple extract commands, boundaries of class A surface were extracted. Class C surface joins class A and class B surfaces. It is created using the sweep command. Inputs for the sweep command were extracted boundary, class-A surface, angle value, and length of the sweep.
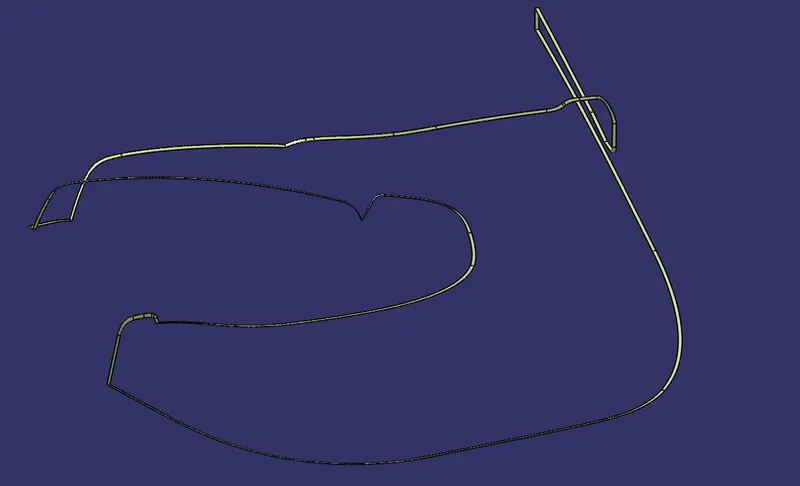
- Creation of Close Surface
Class A and Class C surfaces were joined together.
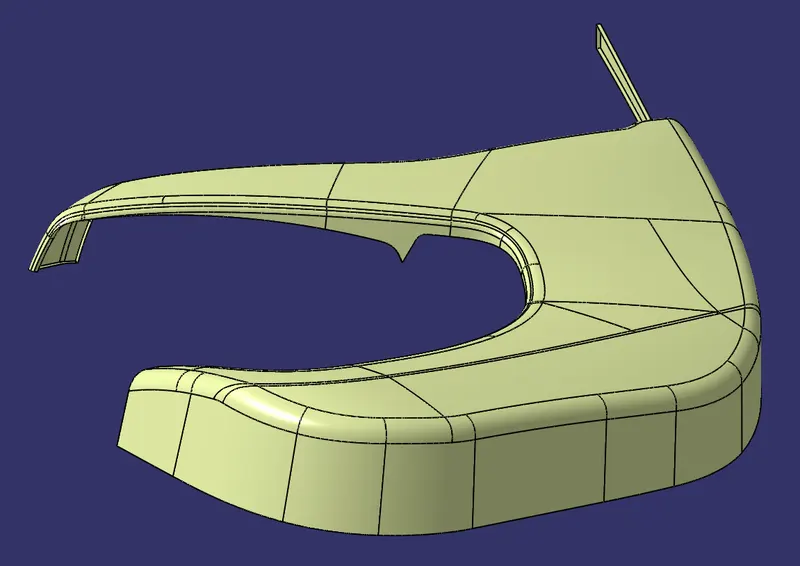
The join of Class A and Class C surface is trimmed with class B surface to create a closed surface.
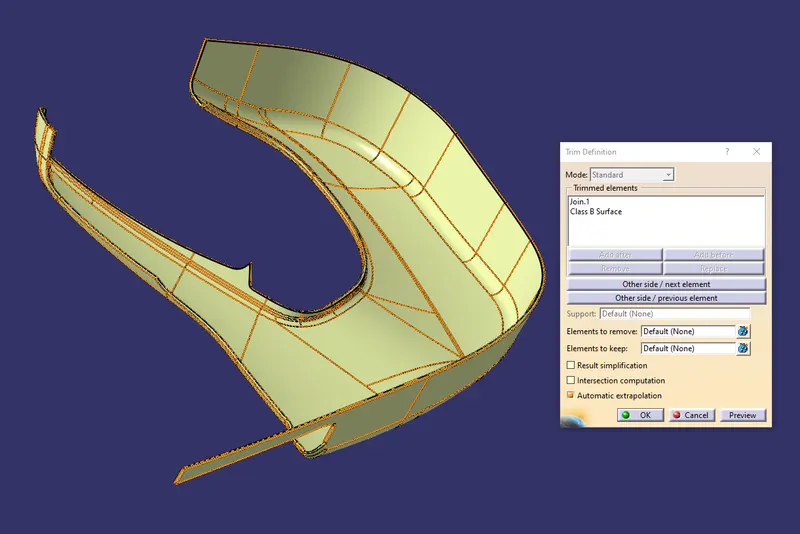
The close surface was confirmed using the boundary command. By clicking on surface warning popped up stating the surface is close and it has no boundaries. This is the trick often used to check whether the surface is close or not.
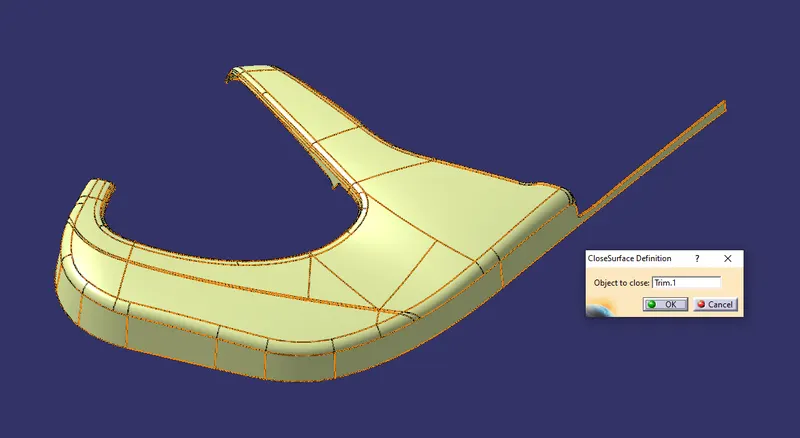
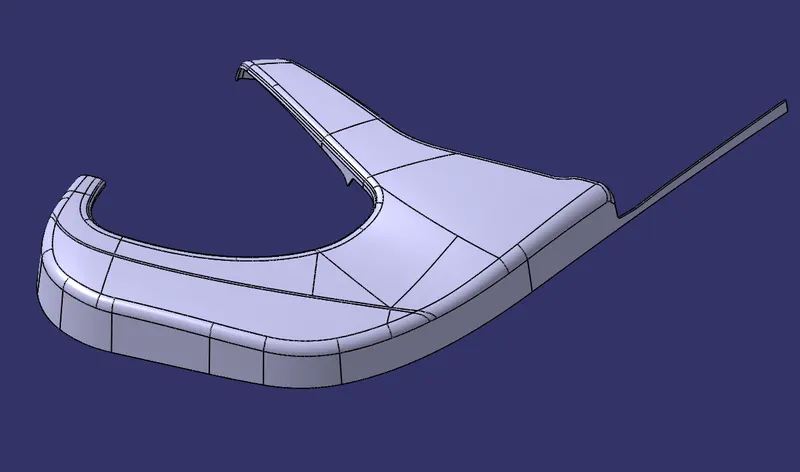
Above Close surface is converted into the close body using the close surface command from the part design workbench.
4. MAP POCKET
- Creation of tooling axis
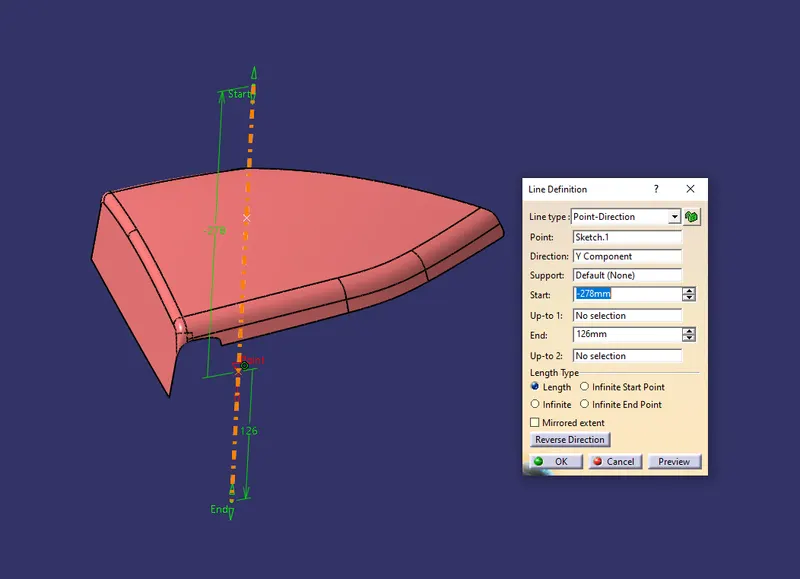
The line has been created using the line command. The point-direction option is used to create the main tooling axis in the z-direction.
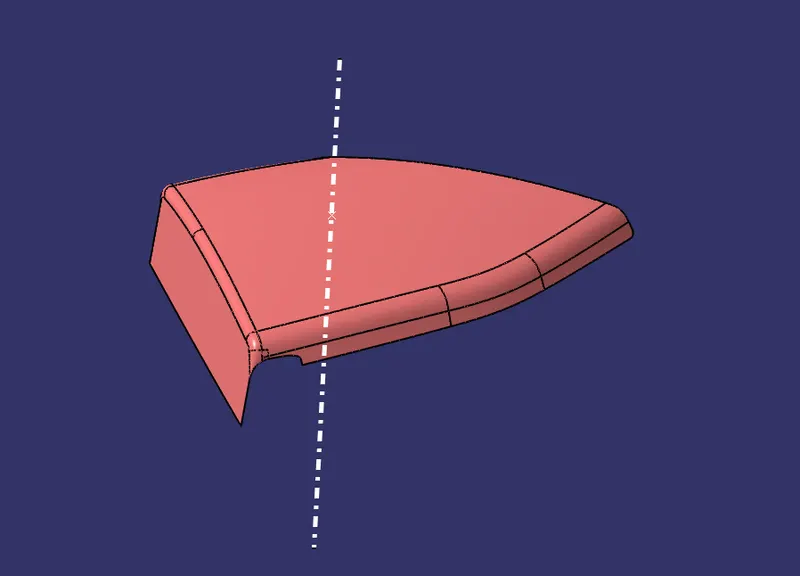
- Draft analysis on Class A Surface
Using insert command draft analysis tool has opened.
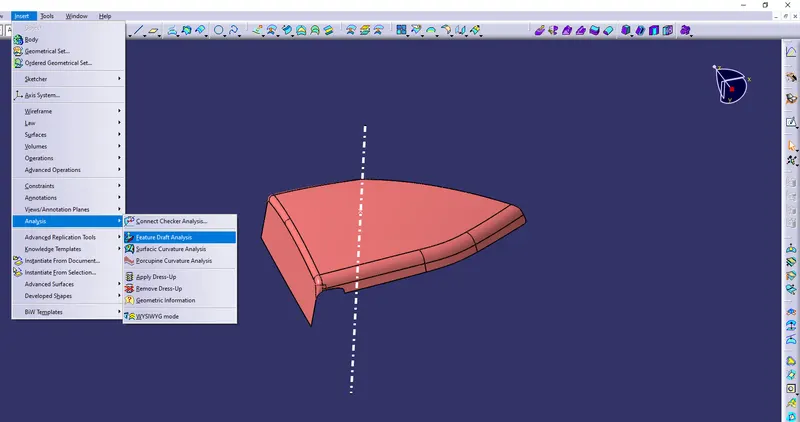
By clicking on feature draft analysis two pallets opened. One pallet has necessary draft analysis commands and other one is a color range which shows the draft values range in form of color.
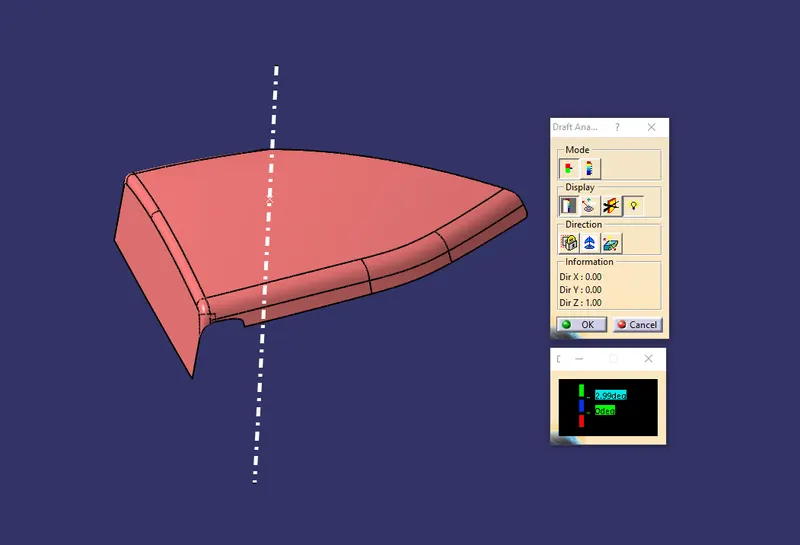
Inside the draft analysis command window, the compass option has been selected to create a compass.
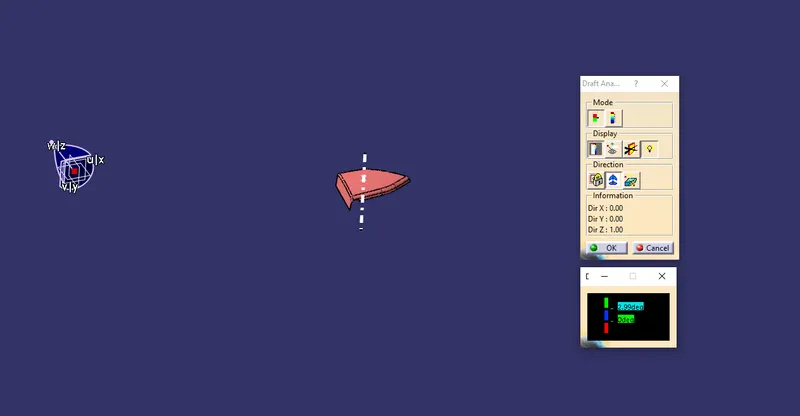
Compass has been dragged onto the component and aligned with the main tooling axis and locked using the lock command.
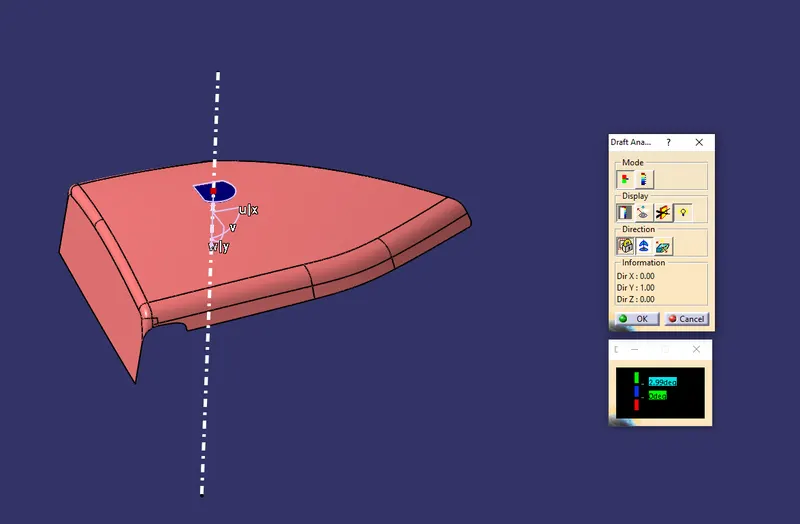
Now by dragging the mouse pointer anywhere on the component and clicking on it will show us the required draft analysis.
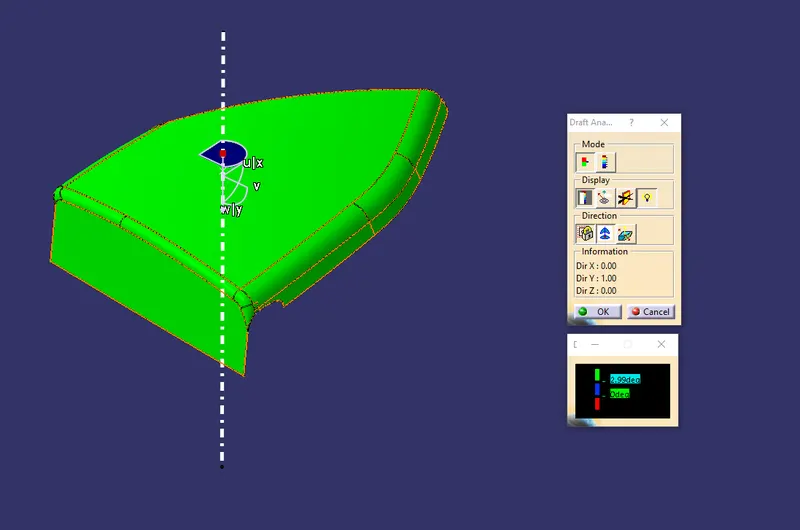
As per the color scale, the minimum draft angle for all faces should be 2.9 degrees or above that. Inside the color scale, green shows a draft angle of 2.9 or above 2.9 degrees. Blue shows between 0 and 2.9 degrees. And red shows a negative draft angle. As per the above figure, all faces are green. Hence our surface has cleared the draft analysis successfully.
- Creation of Class B surface
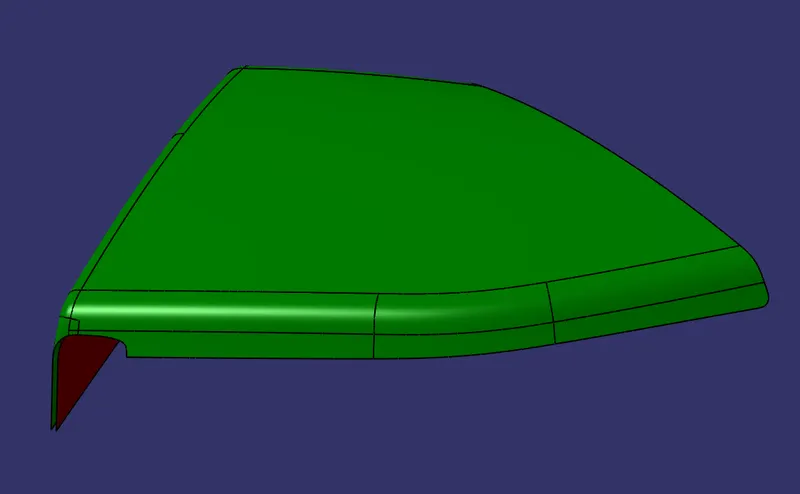
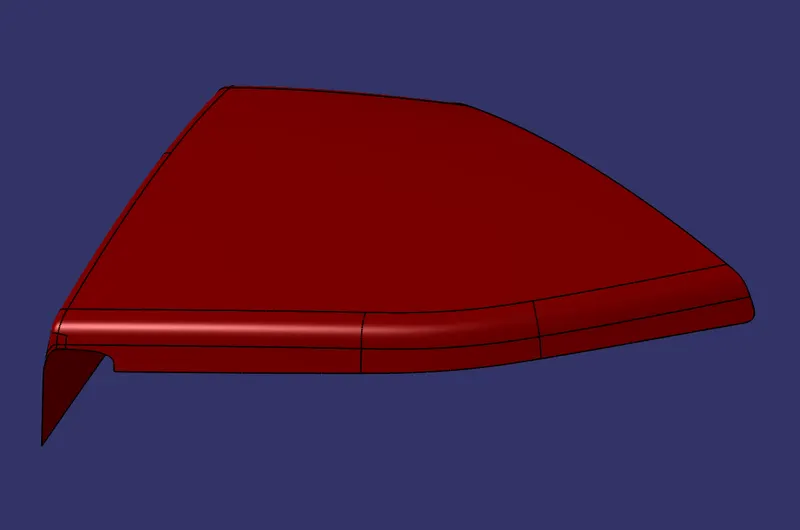
Class B surface has been created by offsetting of class A surface. Offsetting has been done using the offset command. Class A surface is offset with a 2.5 mm distance. Surfaces that were not offsetting were formed using the multisection command. Class A surface has green color whereas red shows class B surface.
- Creation of Class C surface
Using the Multiple extract commands, boundaries of class A surface were extracted. Class C surface joins class A and class B surfaces. It is created using the sweep command. Inputs for the sweep command were extracted boundary, class-A surface, angle value, and length of the sweep.
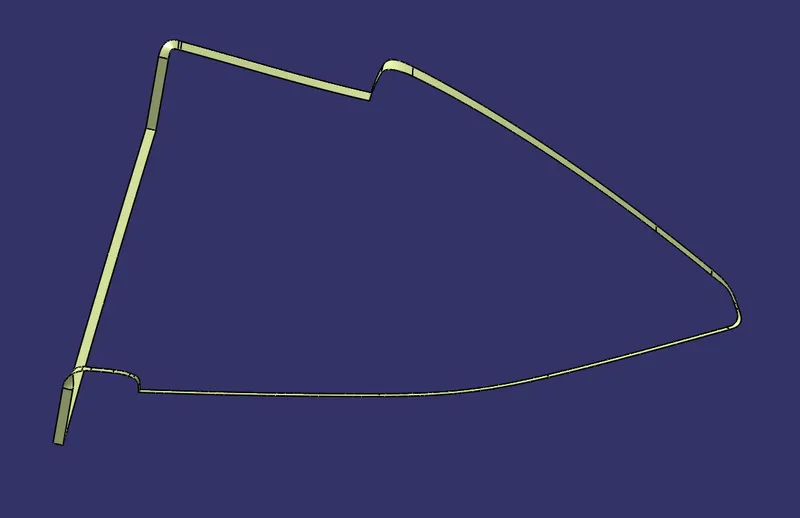
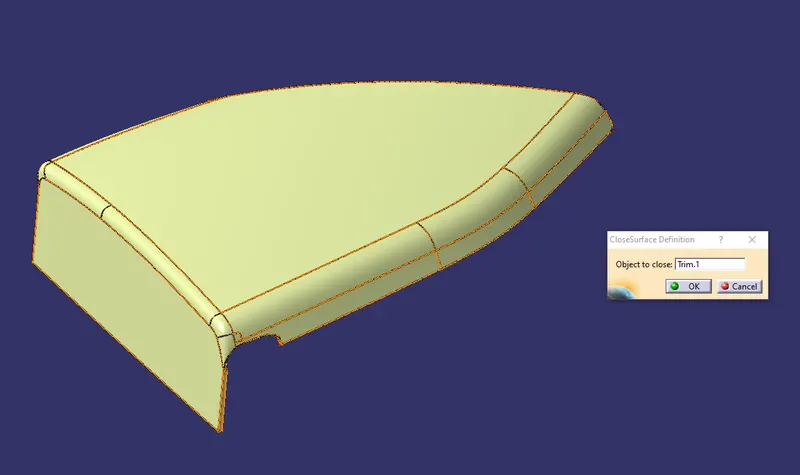
- Creation of Close Surface
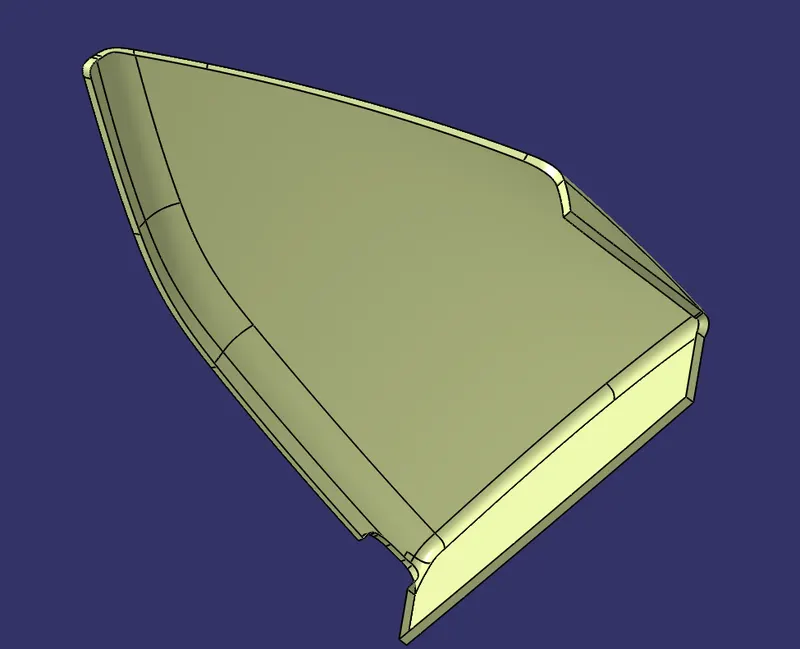
Class A and Class C surfaces were joined together.
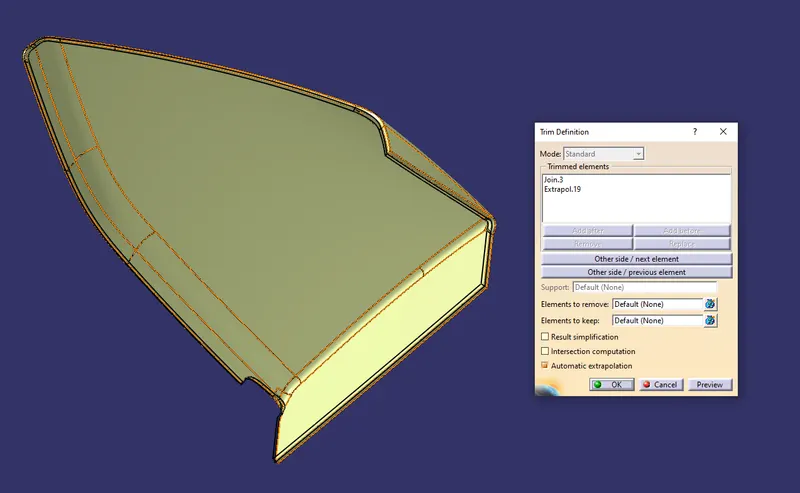
The join of Class A and Class C surface is trimmed with class B surface to create a closed surface. While performing trim operation errors were coming as a proper intersection was not happening. Hence with the help of extrapolating command class B surface was extrapolated and finally trimmed.
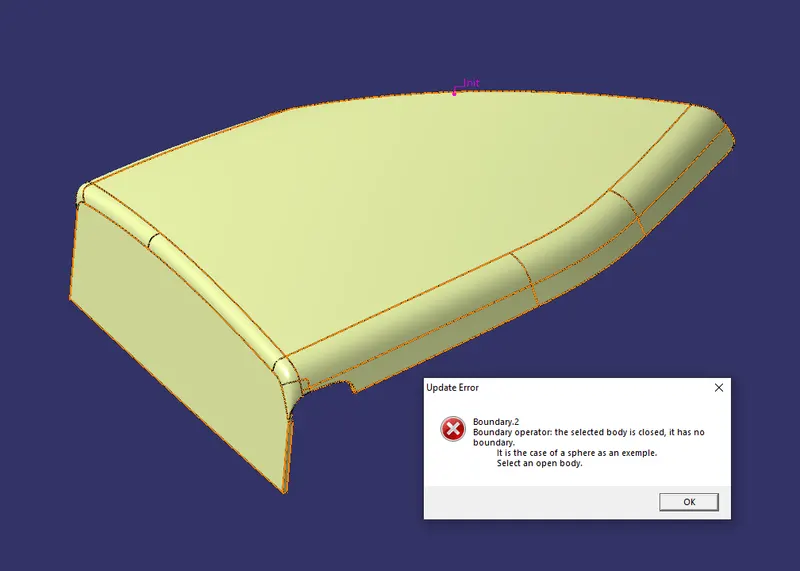
The close surface was confirmed using the boundary command. By clicking on surface warning popped up stating the surface is close and it has no boundaries. This is the trick often used to check whether the surface is close or not.
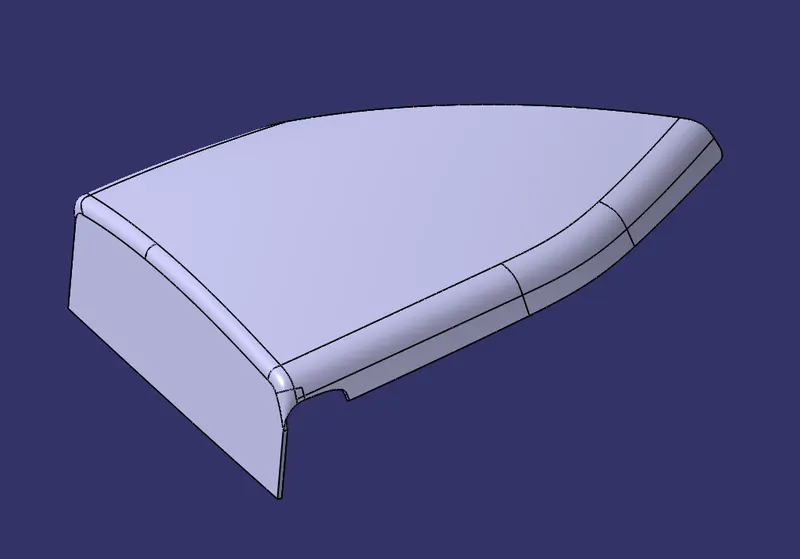
Above Close surface is converted into the close body using the close surface command from part design workbench.
5. BOTTLE HOLDER
- Creation of tooling axis
The line has been created using the line command. The point-direction option is used to create the main tooling axis in the z-direction.
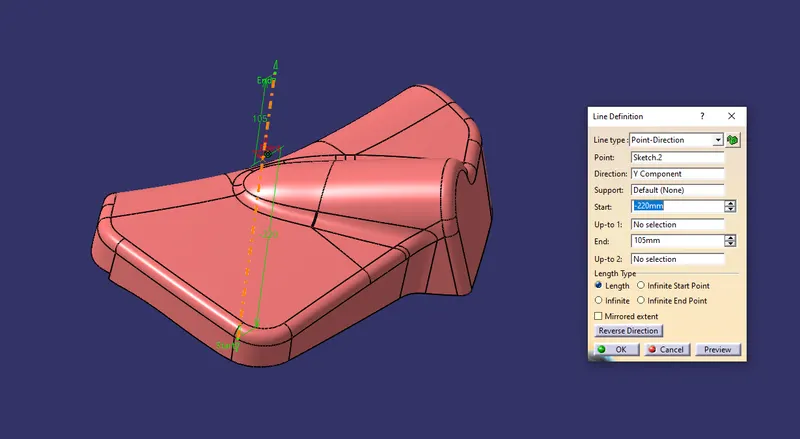
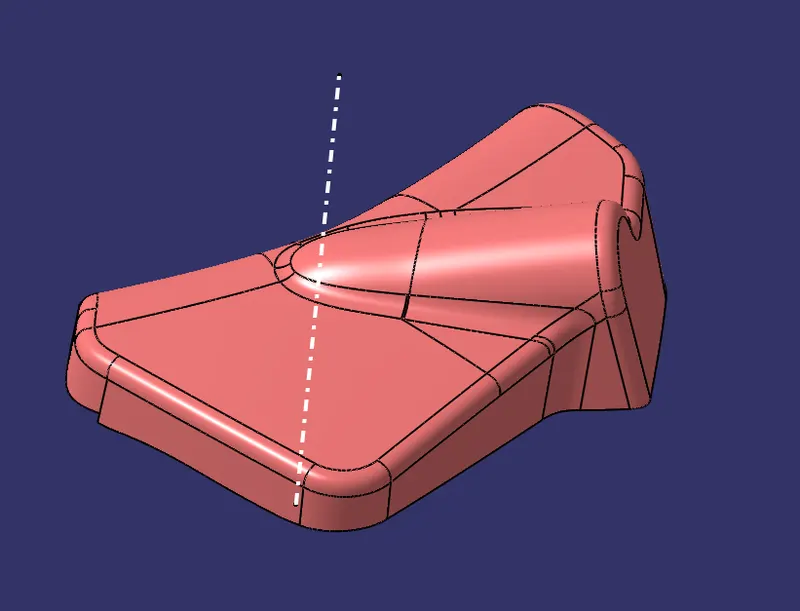
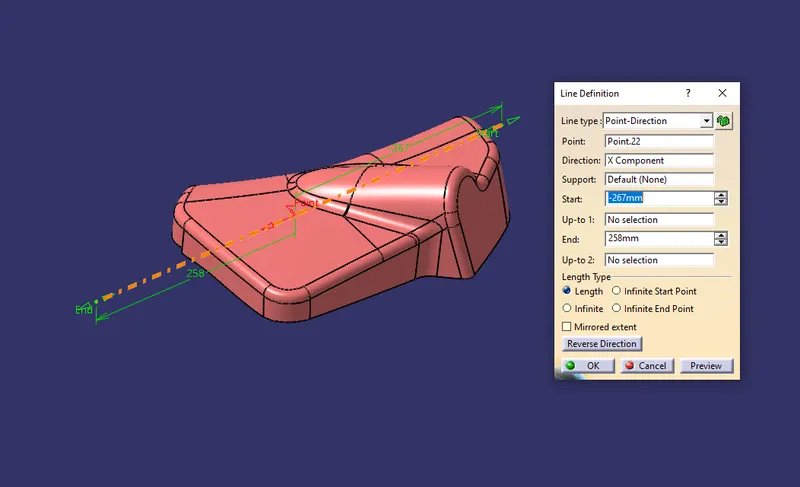
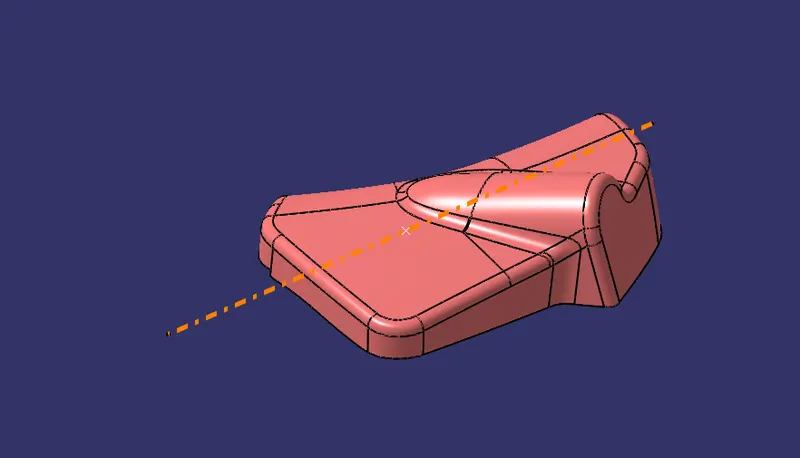
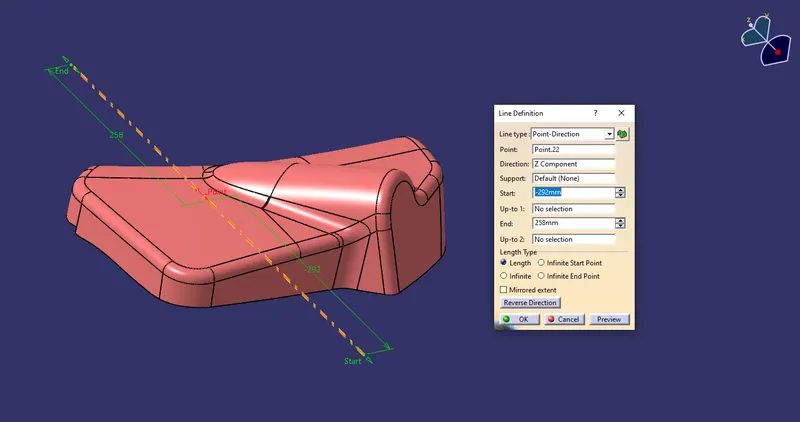
Two side core axis are created to clear the part. One side core axis is in the x-direction and the other one is in the y-direction with the same point which is used for creating the main tooling axis. The below image shows the side core tooling axis in the x-direction.
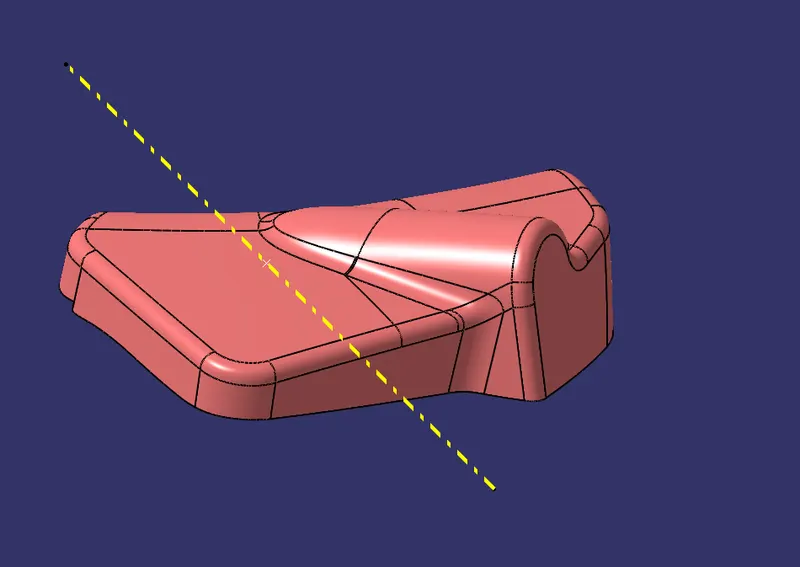
The below image shows the side core tooling axis in z-direction.
- Draft analysis on Class A Surface
Using insert command draft analysis tool has opened.
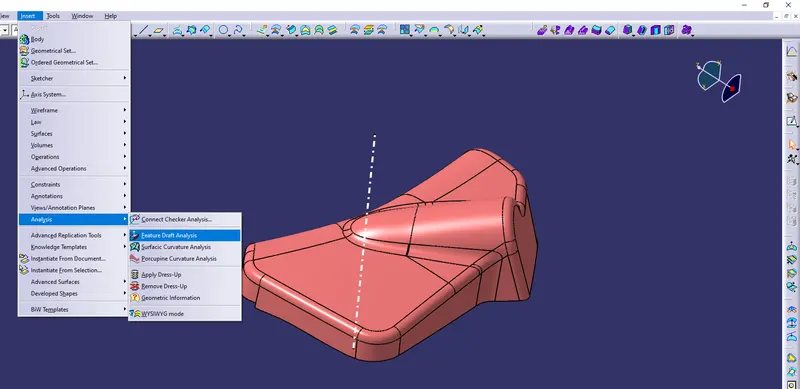
By clicking on feature draft analysis two pallets opened. One pallet has necessary draft analysis commands and other one is a color range which shows the draft values range in form of color.
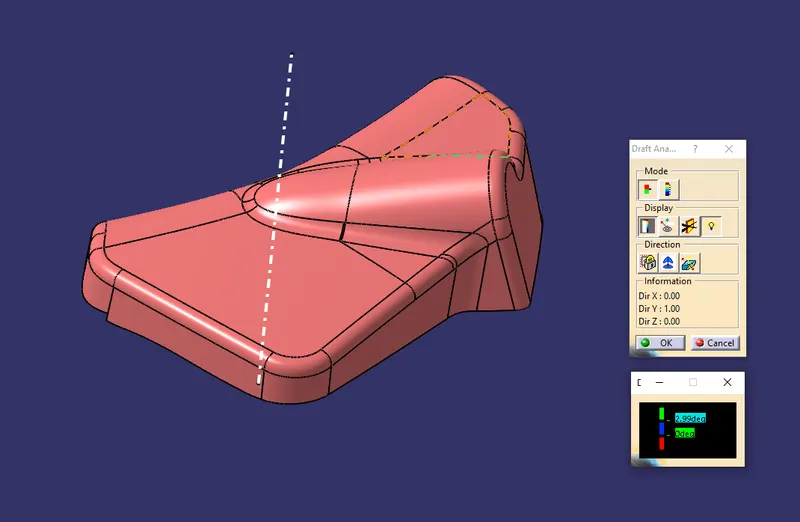
Inside the draft analysis command window, the compass option has been selected to create a compass.
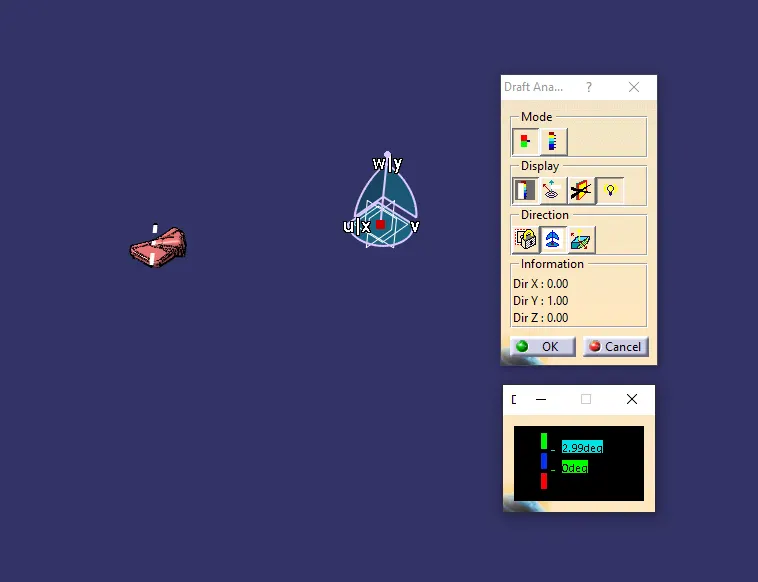
Compass has been dragged onto the component and aligned with the main tooling axis and locked using lock command.
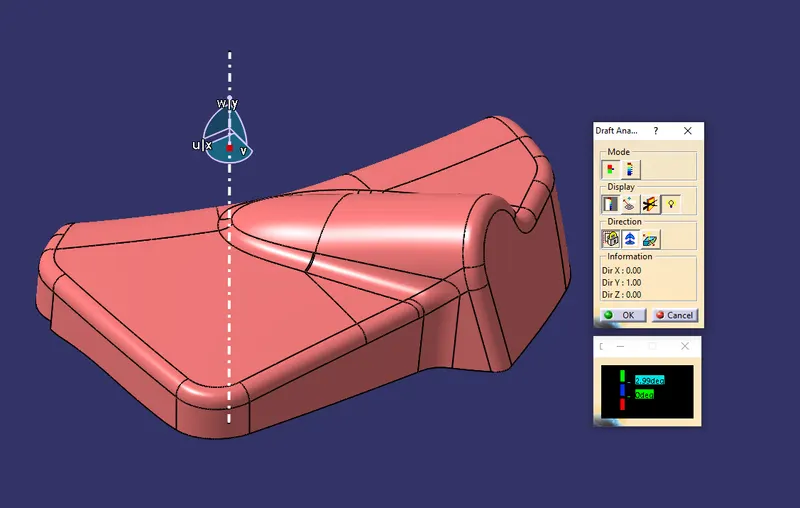
Now by dragging the mouse pointer anywhere on the component and clicking on it will show us the required draft analysis.
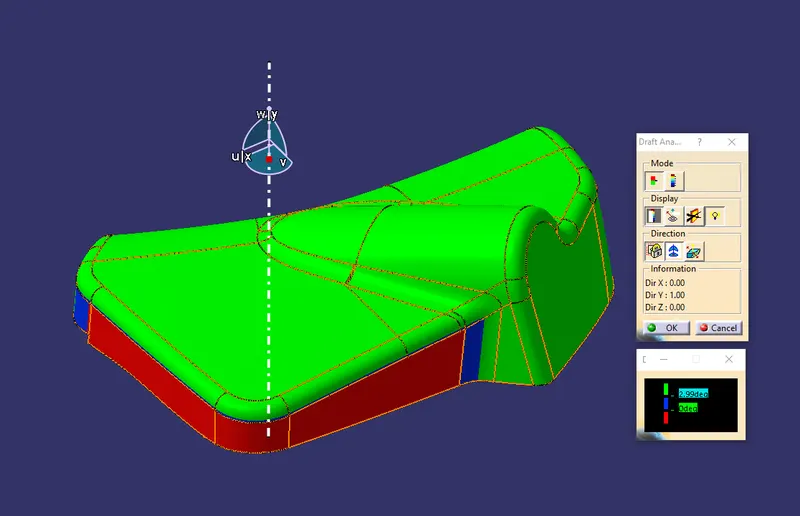
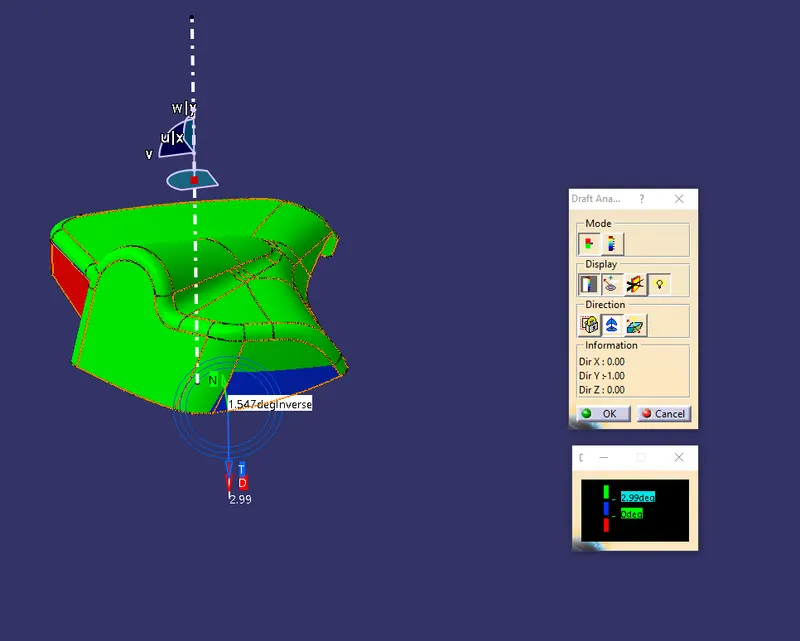
As per the color scale, the minimum draft angle for all faces should be 2.9 degrees or above that. Inside the color scale, green shows a draft angle of 2.9 or above 2.9 degrees. Blue shows between 0 and 2.9 degrees. And red shows a negative draft angle. As per the above figure, some faces are green, blue, and red as well. Hence our surface has not cleared the draft analysis at the red faces and blue faces using the main tooling axis. The minimum draft angle at the blue face is 1.547 degrees. Class A surface needs to be given a proper draft. Required changes are forwarded to the styling team for modification.
- Creation of Class B surface
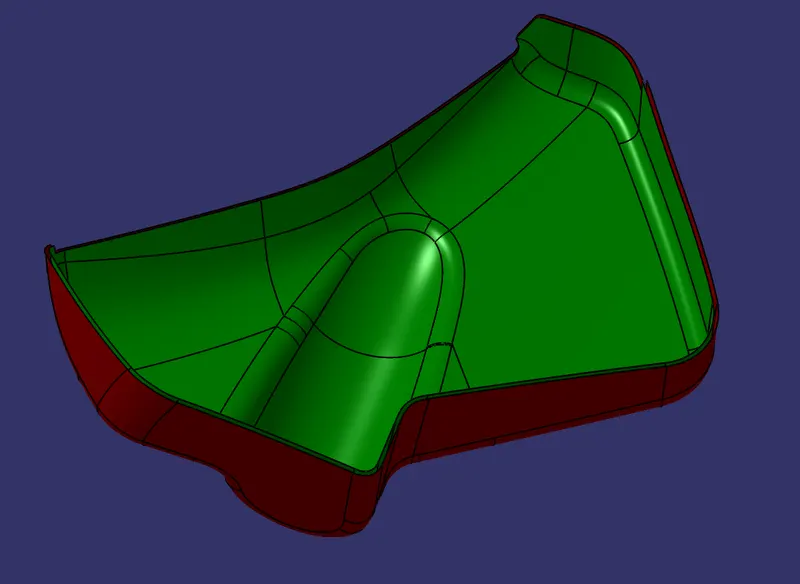
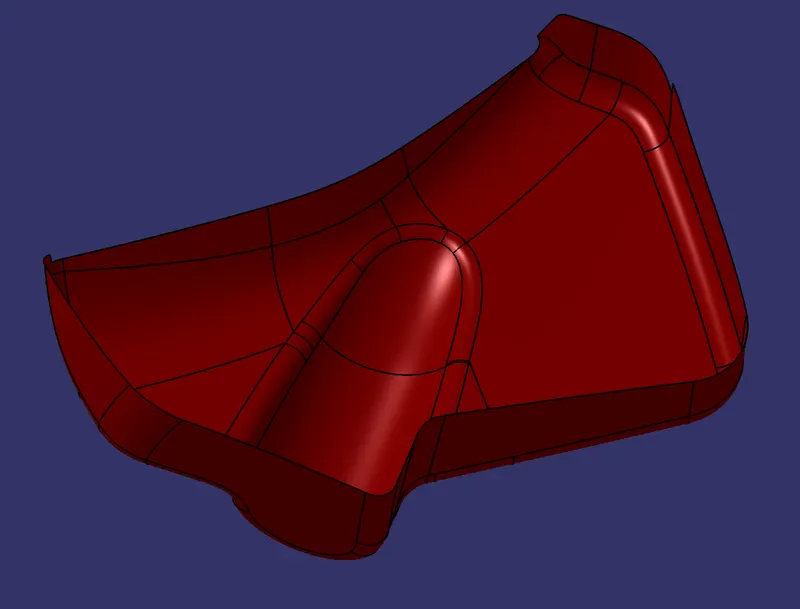
Class B surface has been created by offsetting of class A surface. Offsetting has been done using the offset command. Class A surface is offset with a 2.5 mm distance. Class A surface has green color whereas red shows class B surface.
- Creation of Class C surface
Using the Multiple extract commands, boundaries of class A surface were extracted. Class C surface joins class A and class B surfaces. It is created using the sweep command. Inputs for the sweep command were extracted boundary, class-A surface, angle value, and length of the sweep.
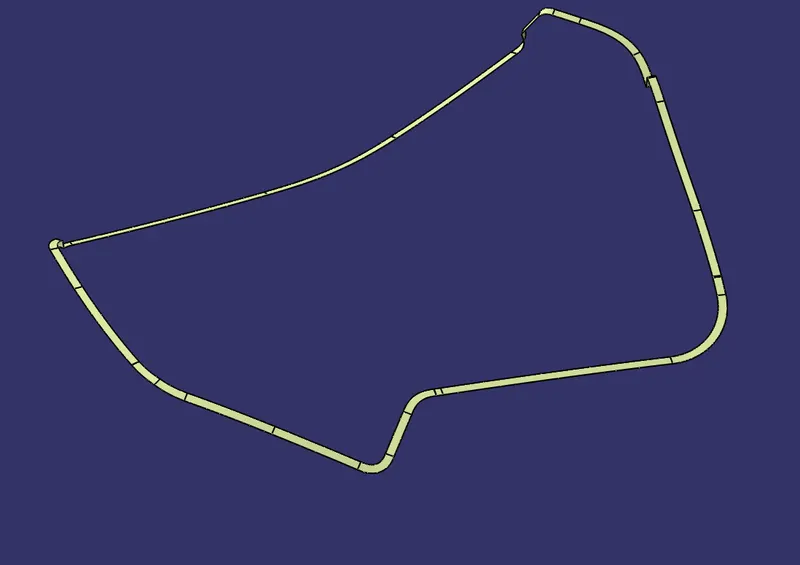
- Creation of Close Surface
Class A and Class C surfaces were joined together.
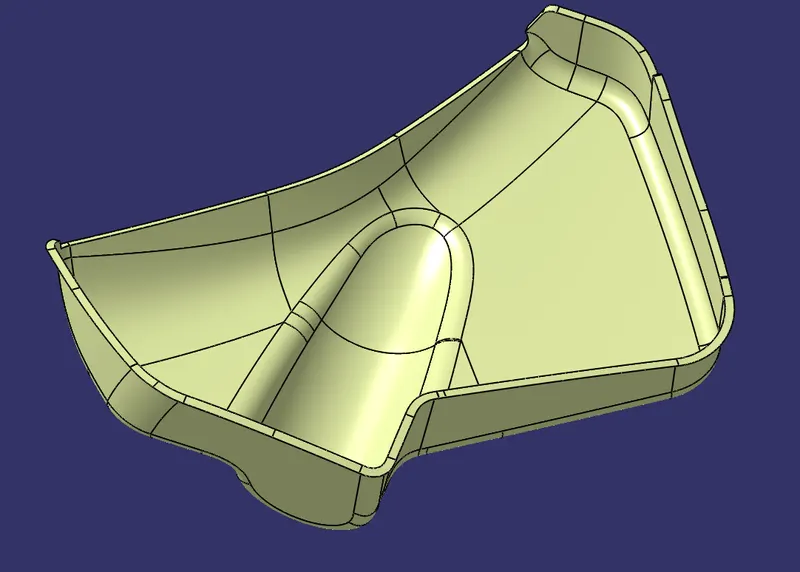
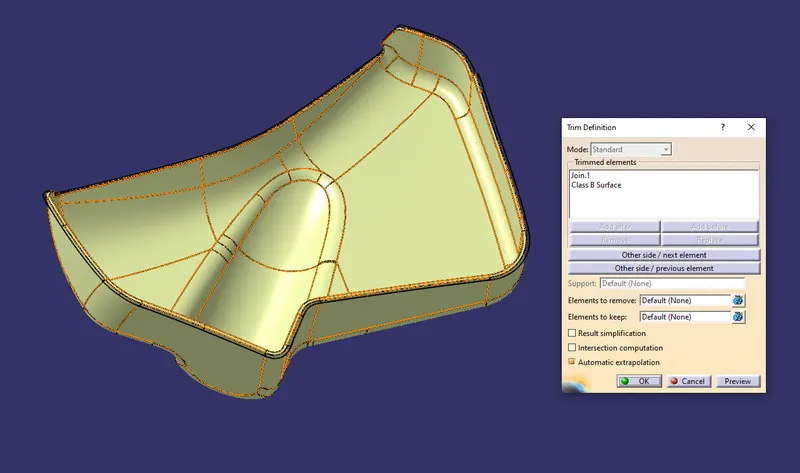
The join of Class A and Class C surface is trimmed with class B surface to create a closed surface.
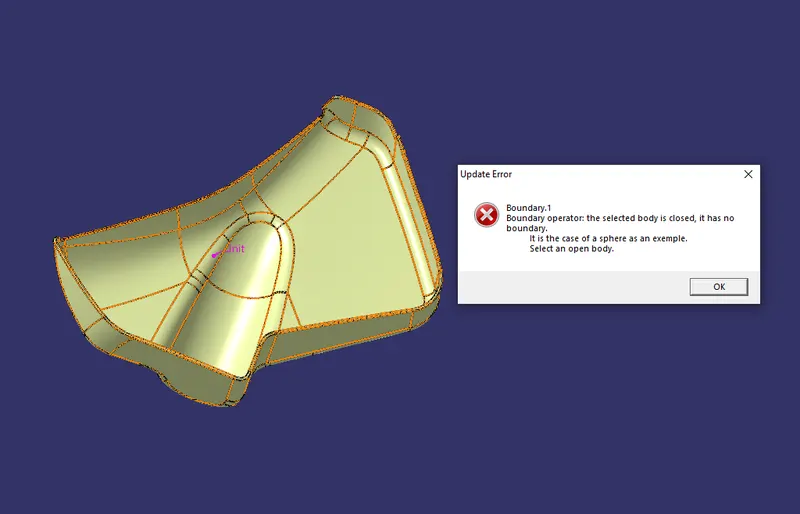
The close surface was confirmed using the boundary command. By clicking on surface warning popped up stating the surface is close and it has no boundries. This is the trick often used to check whether the surface is close or not.
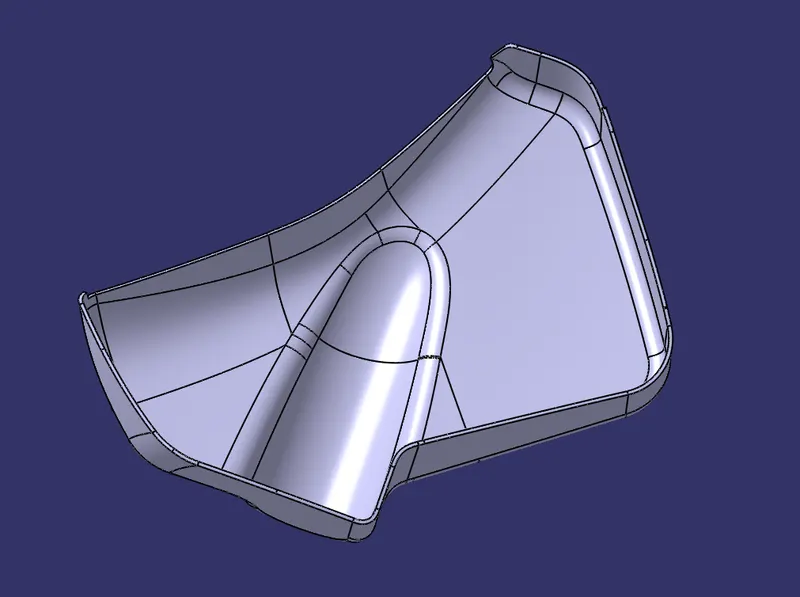
Above Close surface is converted into the close body using the close surface command from part design workbench.
C) CREATION OF ENGINEERING FEATURES
All the above parts have been attached together using engineering features such as locators, heat stakes, ribs. Flanges have been created into the Switch bezel, door armrest, map pocket, and bottle holder. All the required engineering features have been created onto a lower substrate which acts as a central part for joining all parts together.
- Locators
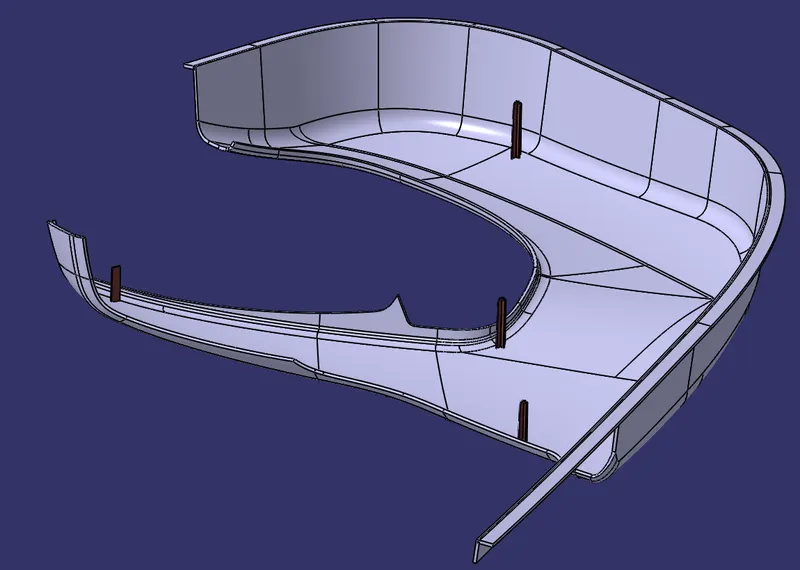
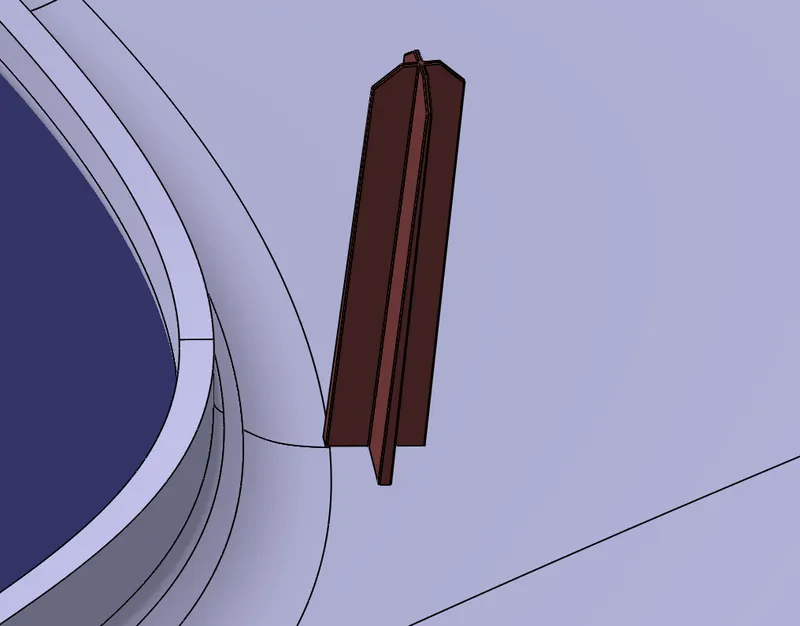
Locators act as guiders. All the locators have been presented onto the lower substrate. Necessary holes are made onto the remaining parts to allow locators to move inside the part. They are just used to align the parts together and act as temporary joints. Four-way and two-way locators have been created onto different locations on the lower substrates. All the locators have 1mm thickness and a draft of 0.5 degrees. The chamfer of 2 x 45 is used. There is one two-way locator and three four-way locators.
Draft Analysis of Locator
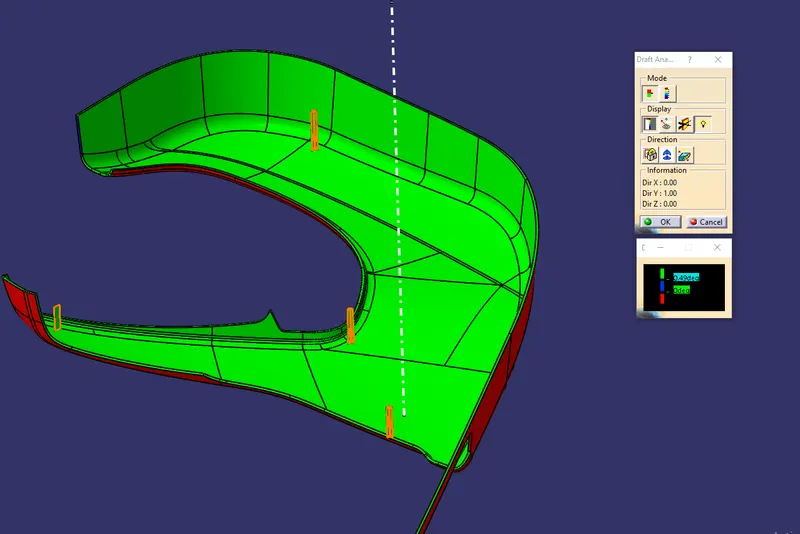
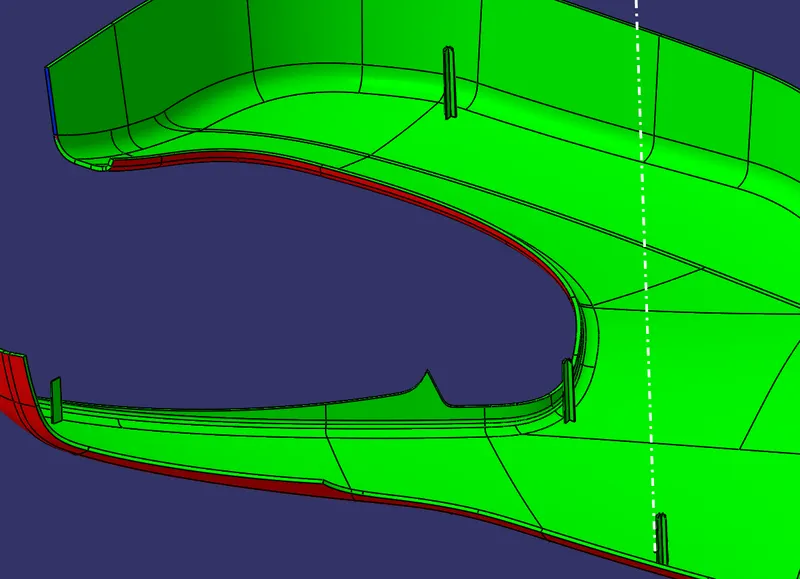
As per the color scale, the minimum draft angle for all faces should be 0.49 degrees or above that. Inside the color scale, green shows a draft angle of 0.49 or above 0.49 degrees. Blue shows between 0 and 0.49 degrees. And red shows a negative draft angle. As per the above figure, all faces of locators are green. Hence all locators have cleared the draft analysis successfully with respect to the main tooling axis.
- Heat Stakes and Ribs
The use of heat stakes is to attach two plastic components permanently. A total of 12 heat stakes were placed at different locations on the lower substrate. One heat has been created onto the door armrest part which will be attached to the upper substrate. Following the master section, the outer diameter of the heat stake is 7.5 mm and the inner diameter is 4.5 mm. Necessary slots are made onto other parts where heat stakes will attach together. Draft of 0.5 degrees has been given to all the heat stakes. All the heat stakes have ribs attached to them. All the ribs have 1mm thickness and 0.5 degrees of the draft. The length of the ribs is 14 x 14 mm.
Heat staking also known as thermoplastic staking is the process of joining two dissimilar materials together. In heat staking, we use local heating and cooling to raise the temperature of plastic components and allow plastic reforming to be carried out. This reforming can be used in a wide variety of applications.
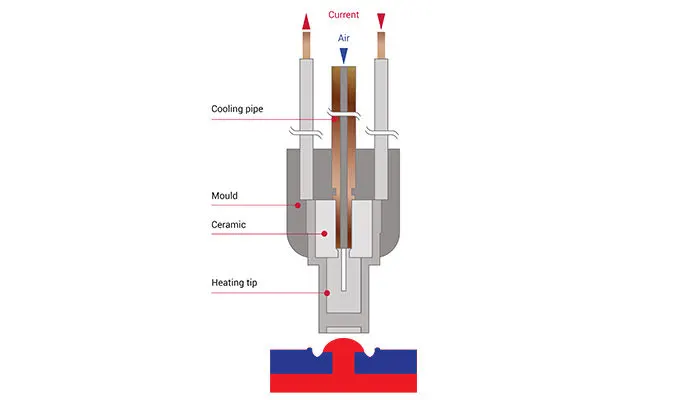
heat stakes on the lower substrate
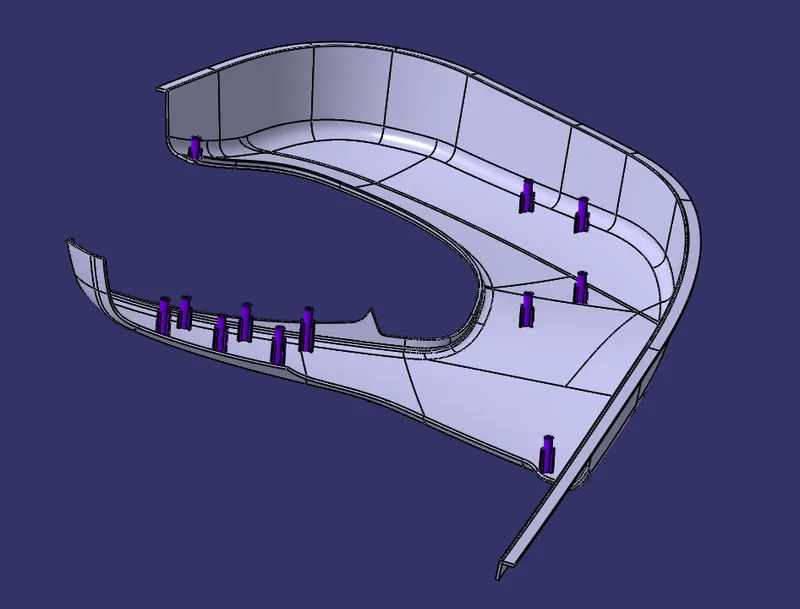
Draft Analysis of Heat Stakes
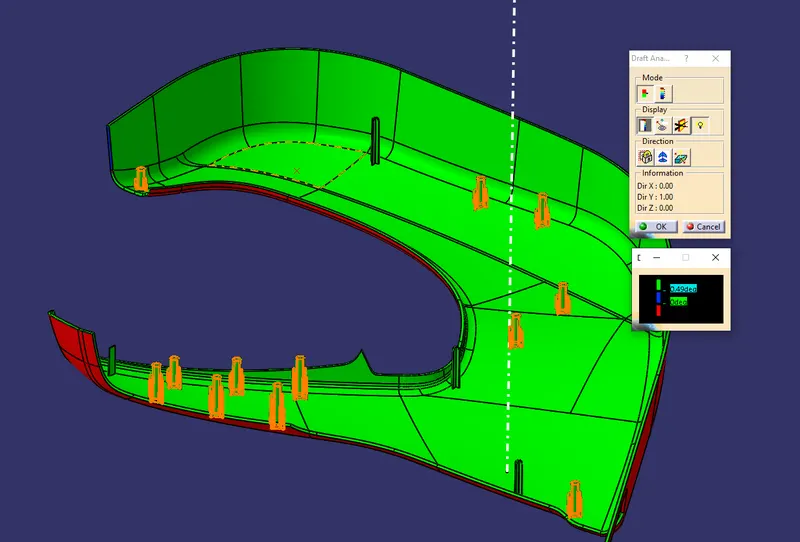
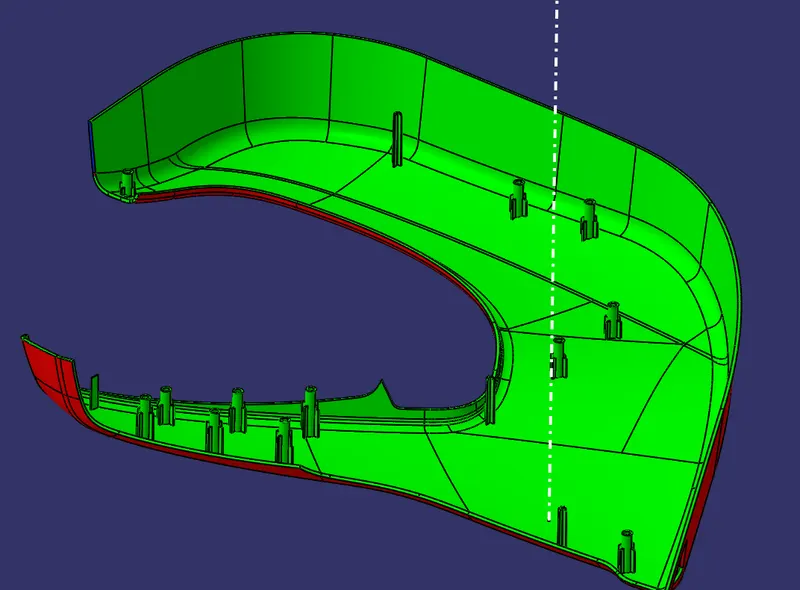
As per the color scale, the minimum draft angle for all faces should be 0.49 degrees or above that. Inside the color scale, green shows a draft angle of 0.49 or above 0.49 degrees. Blue shows between 0 and 0.49 degrees. And red shows a negative draft angle. As per the above figure, all faces of heat stakes are green. Hence all locators have cleared the draft analysis successfully with respect to the main tooling axis.
- Flanges
All the flanges have been created by following the given master section. The thickness of all the flanges is 2.5 mm. Draft of 0.5 degrees applied to all the flanges. Edge fillet of 3 mm applied to sharp corners. Slots for locators and heat stakes have been created onto all the flanges.
Flanges on switch bezel
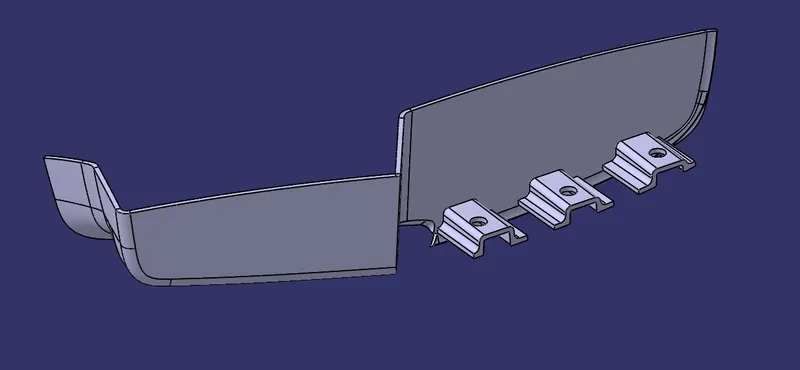
Draft Analysis on switch bezel Flanges
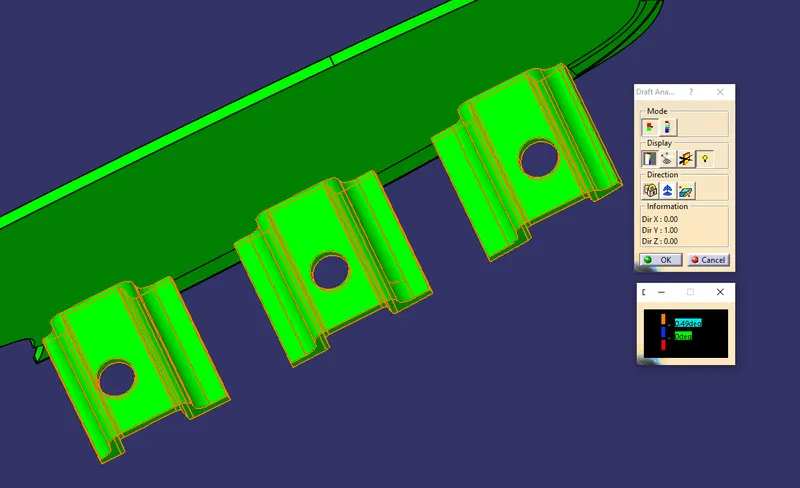
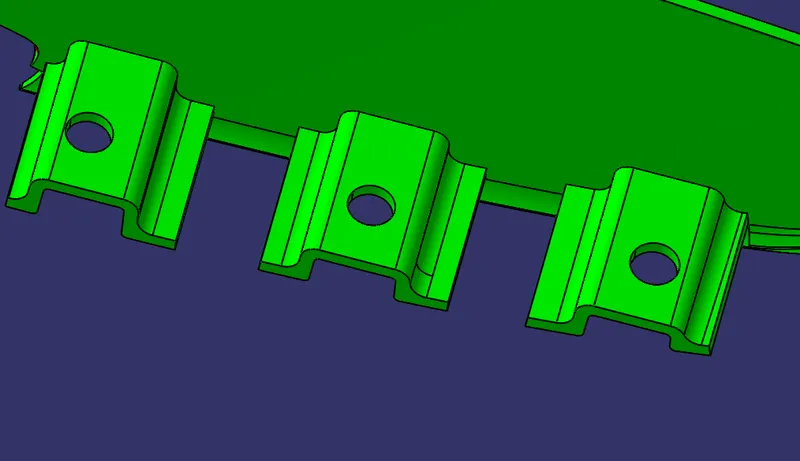
As per the color scale, the minimum draft angle for all faces should be 0.49 degrees or above that. Inside the color scale, green shows a draft angle of 0.49 or above 0.49 degrees. Blue shows between 0 and 0.49 degrees. And red shows a negative draft angle. As per the above figure, all faces of flanges are green. Hence all flanges have cleared the draft analysis successfully with respect to the Side core tooling axis.
Flanges on Bottle Holder
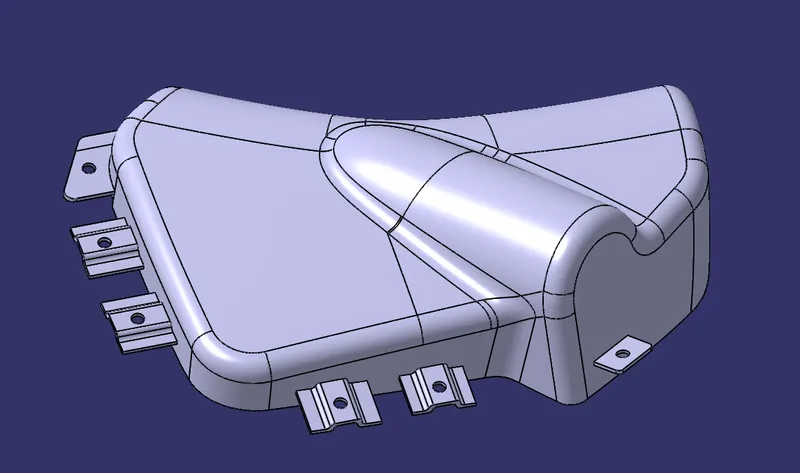
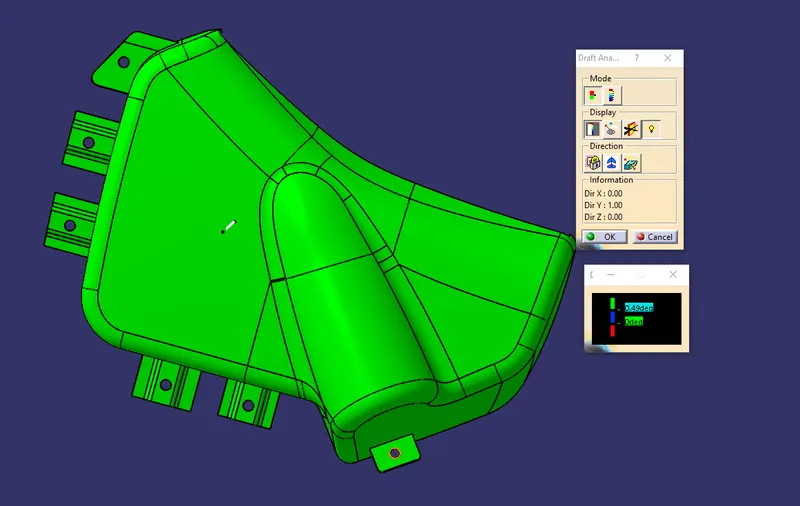
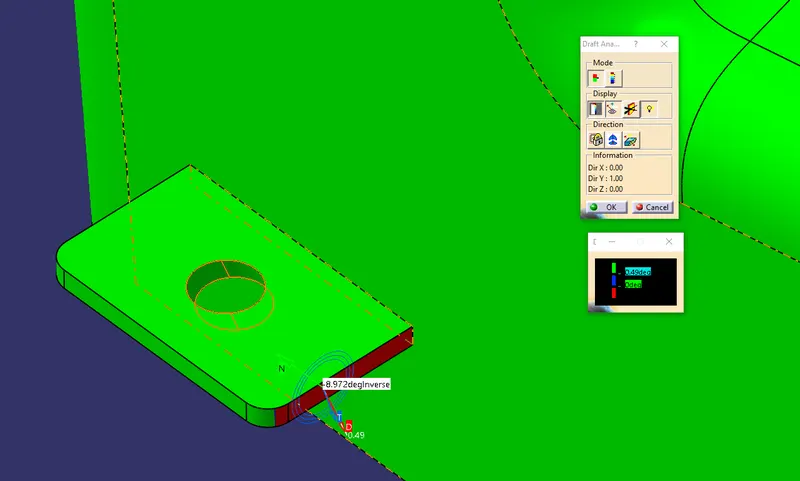
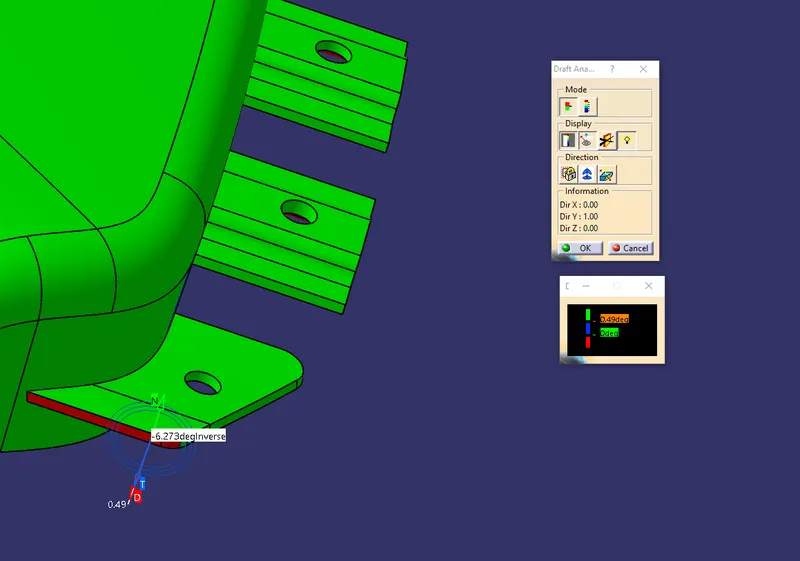
As per the color scale, the minimum draft angle for all faces should be 0.49 degrees or above that. Inside the color scale, green shows a draft angle of 0.49 or above 0.49 degrees. Blue shows between 0 and 0.49 degrees. And red shows a negative draft angle. As per the above figure, most of the faces of flanges are green but some are red. Flanges that are not clearing the draft analysis have a different orientations with respect to the main tooling axis. Hence flanges have not cleared the draft analysis successfully with respect to the main tooling axis.
Flanges on Map pocket
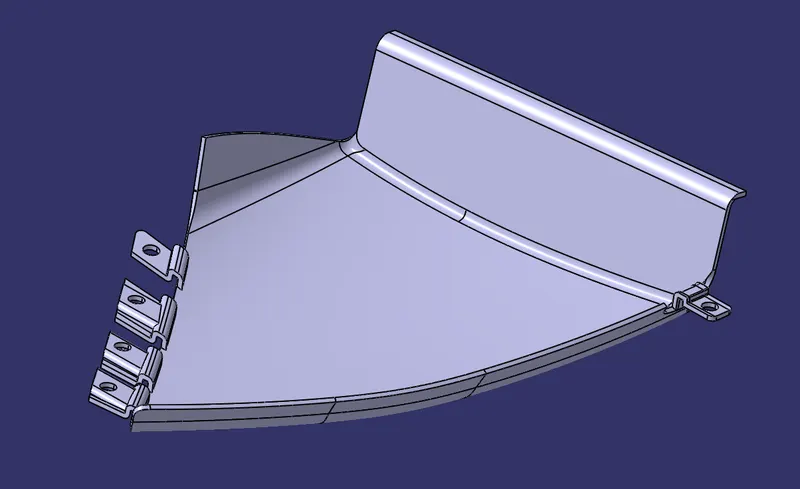
Draft Analysis on Map Pocket Flanges
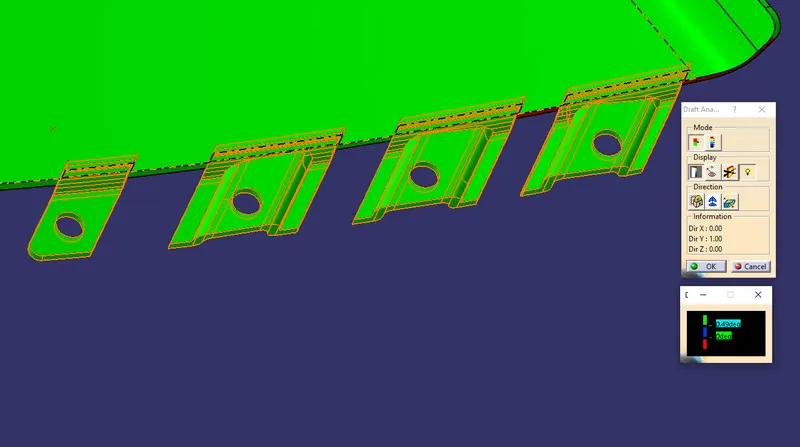
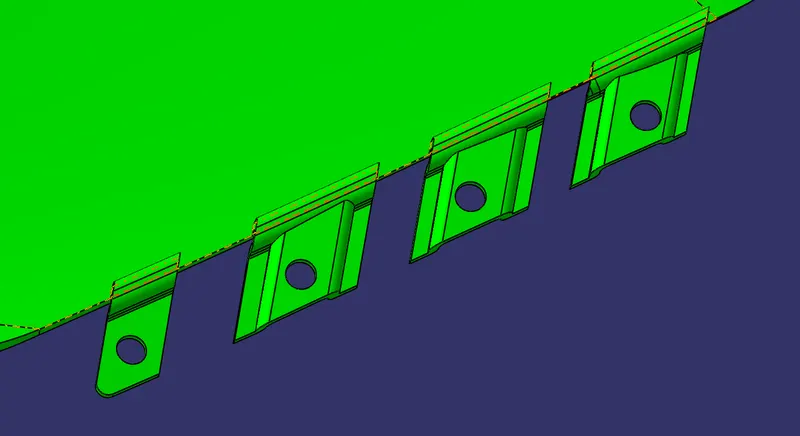
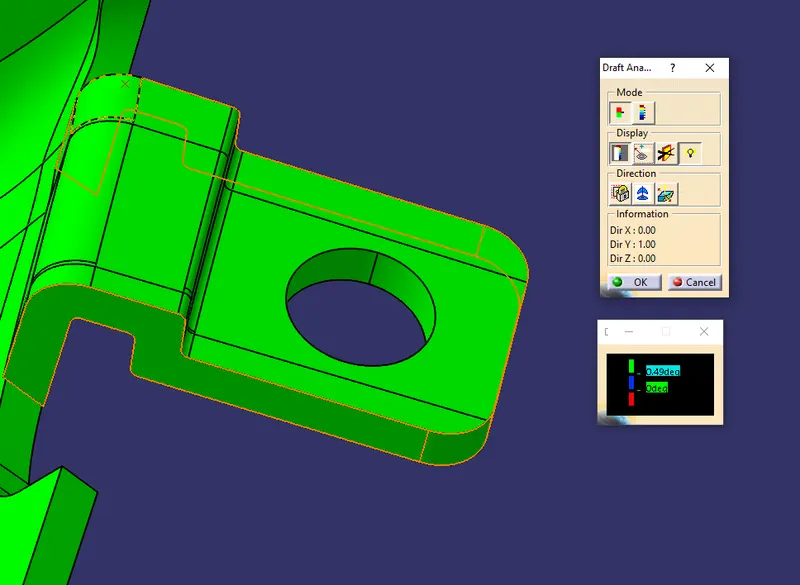
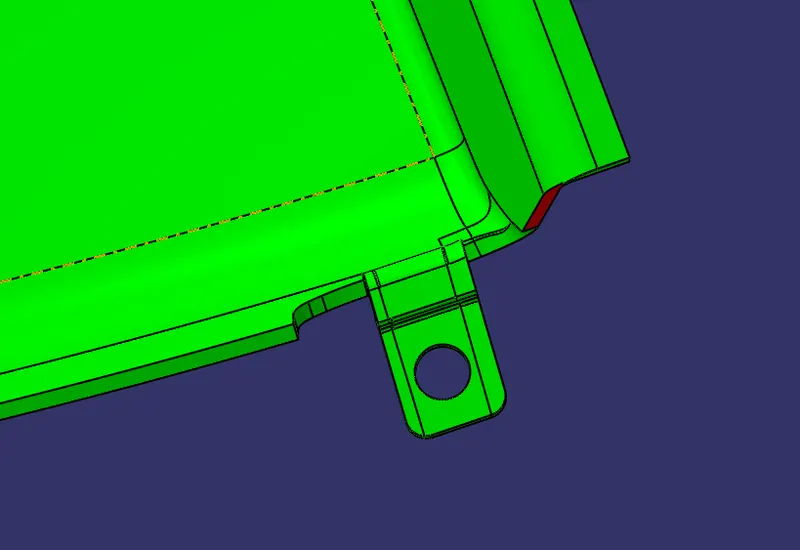
As per the color scale, the minimum draft angle for all faces should be 0.49 degrees or above that. Inside the color scale, green shows a draft angle of 0.49 or above 0.49 degrees. Blue shows between 0 and 0.49 degrees. And red shows a negative draft angle. As per the above figure, all faces of flanges are green. Hence all flanges have cleared the draft analysis successfully with respect to the main tooling axis.
Flanges on Door armrest
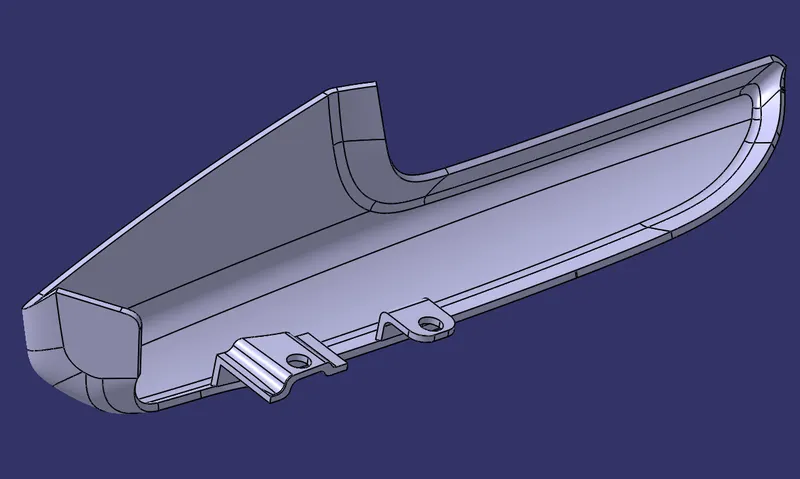
Draft Analysis on Door Arm Rest flanges
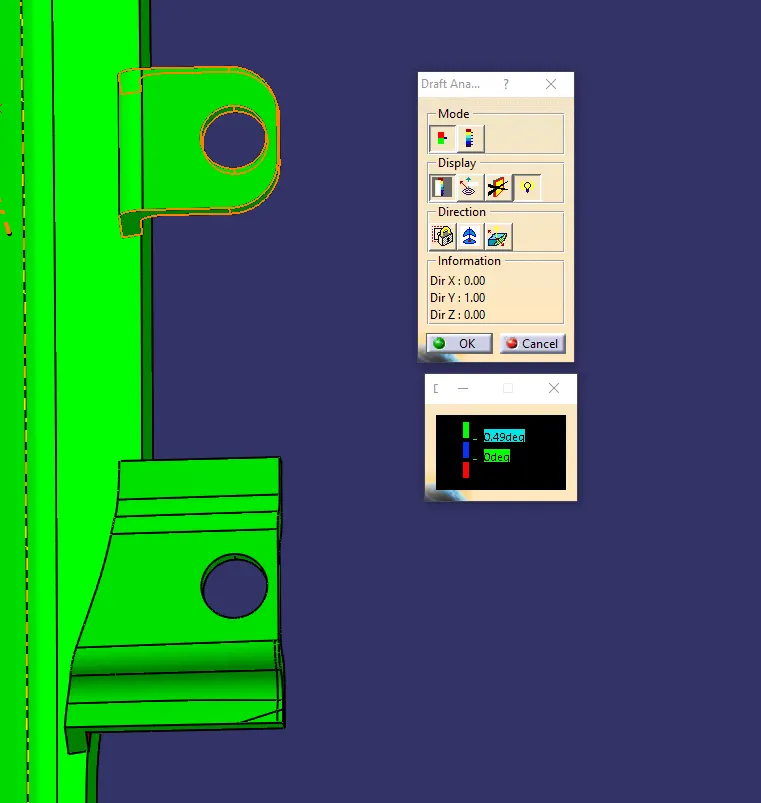
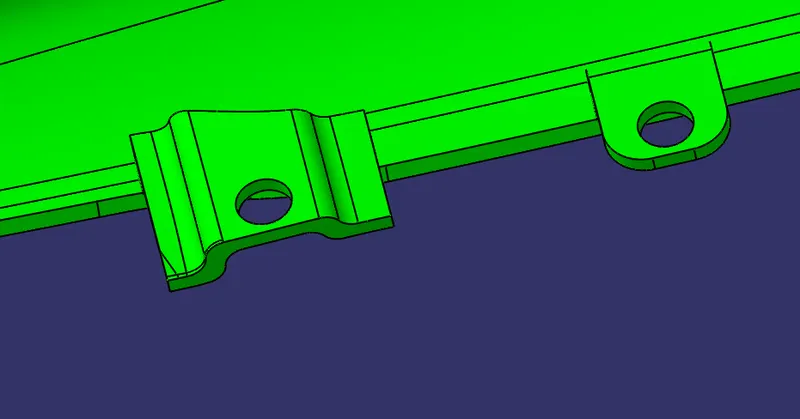
As per the color scale minimum draft angle for all faces should be 0.49 degrees or above that. Inside the color scale, green shows a draft angle of 0.49 or above 0.49 degrees. Blue shows between 0 and 0.49 degrees. And red shows a negative draft angle. As per the above figure, all faces of flanges are green. Hence all flanges have cleared the draft analysis successfully with respect to the Side core tooling axis.
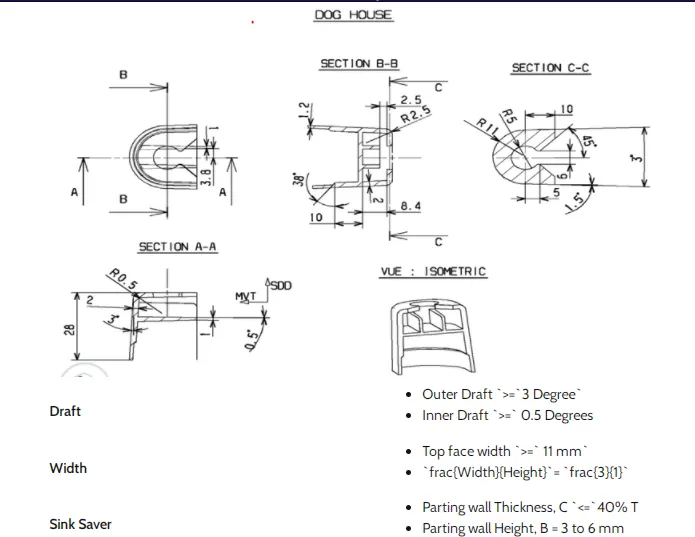
- Dog House
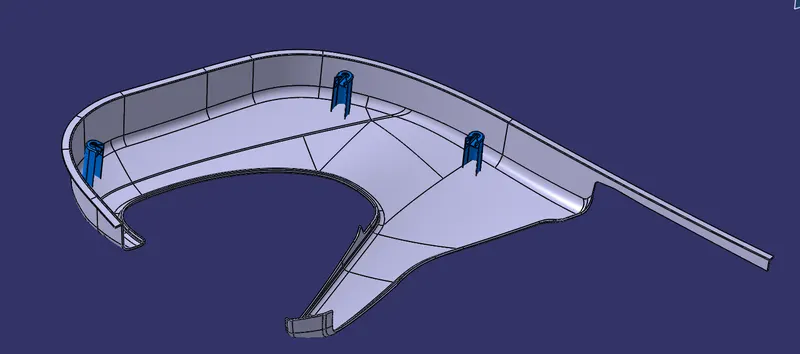
Dog houses are included as support to guide pins and push pins. Using dimensions given in the drawing three dog houses have been created at different locations on the lower substrate. The purpose of creating a dog house is to support the push pins which are gonna attached to the sheet metal part of the door.
Dog House Dimensions
Dog House on Lower substrate
Draft Analysis of Dog House with respect to main tooling axis
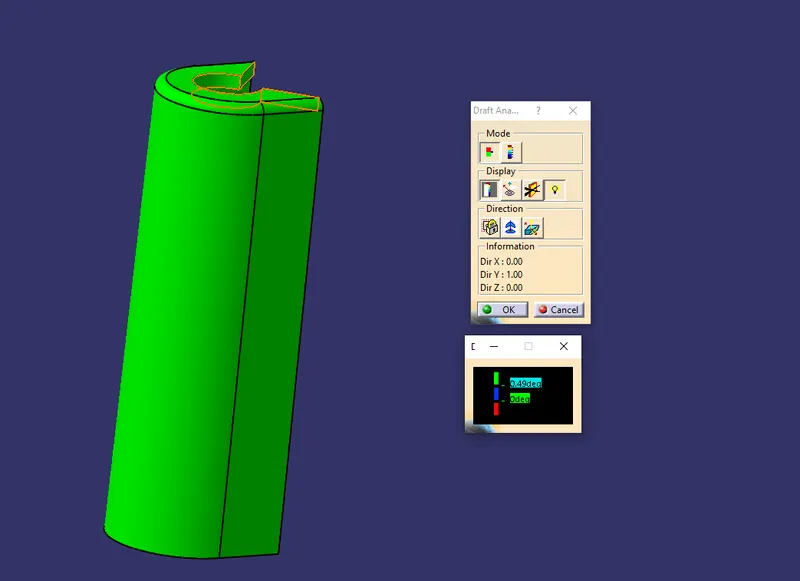
Draft Analysis of Dog House with respect to side core tooling axis
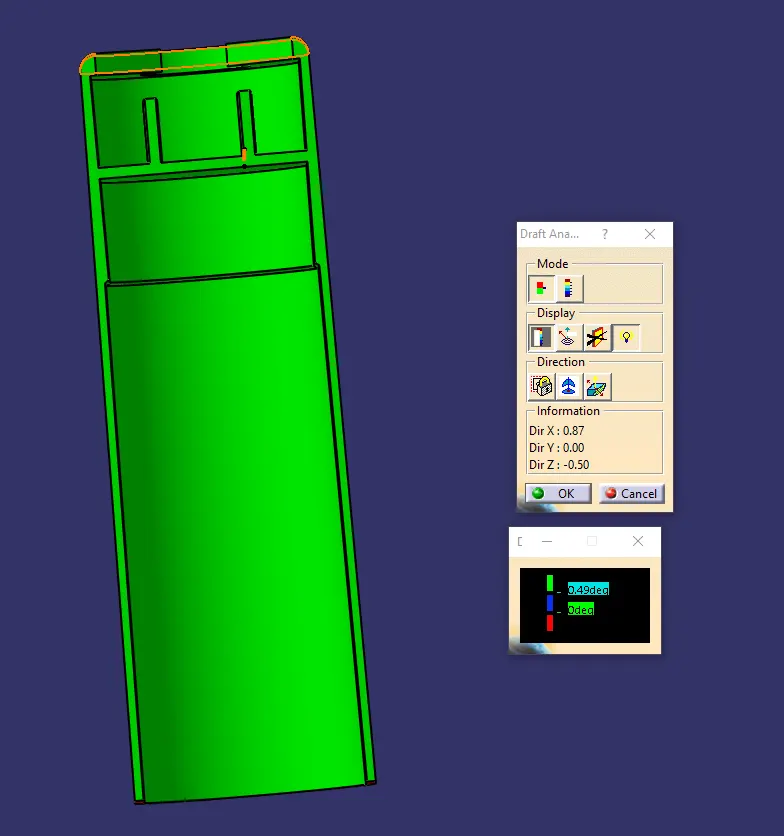
As per the color scale minimum draft angle for all faces should be 0.49 degrees or above that. Inside the color scale, green shows a draft angle of 0.49 or above 0.49 degrees. Blue shows between 0 and 0.49 degrees. And red shows a negative draft angle. As per the above figure, all faces are green. Hence our part has cleared the draft analysis successfully with respect to the main tooling axis and side core side tooling axis.
D) ASSEMBLY OF PUSH PINS
The use of push pins was to attach the plastic door panel to the sheet metal part of the door.
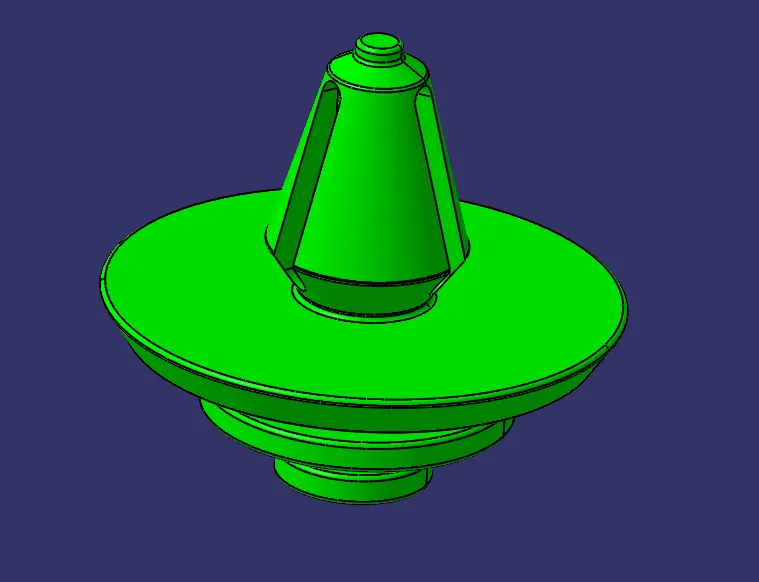
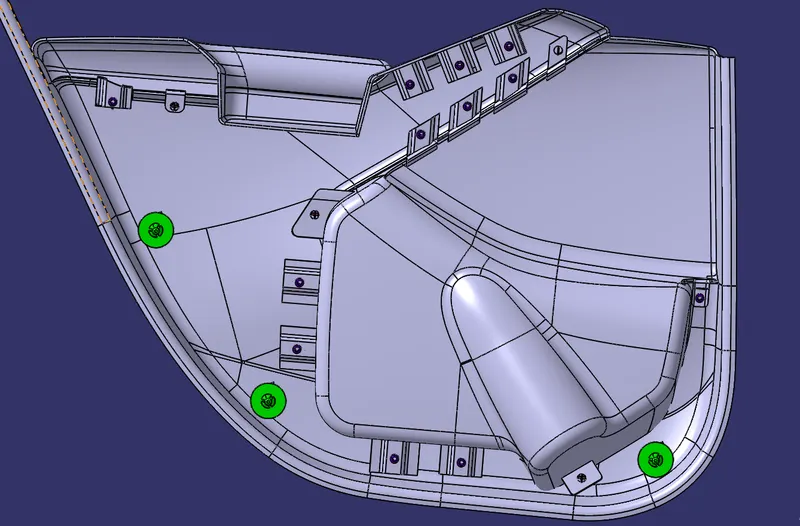
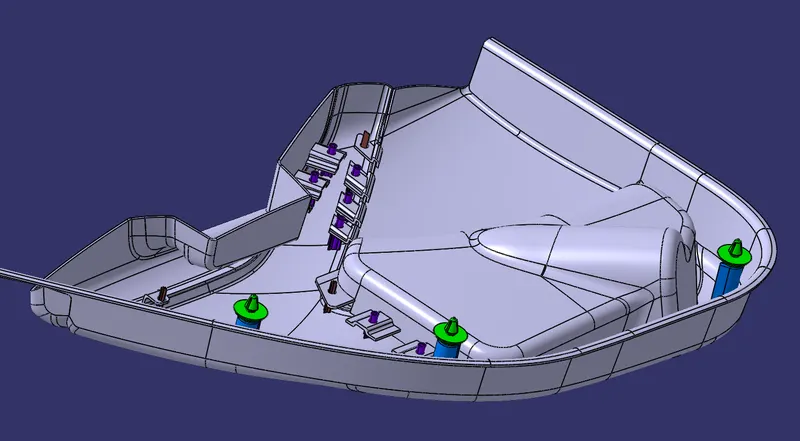
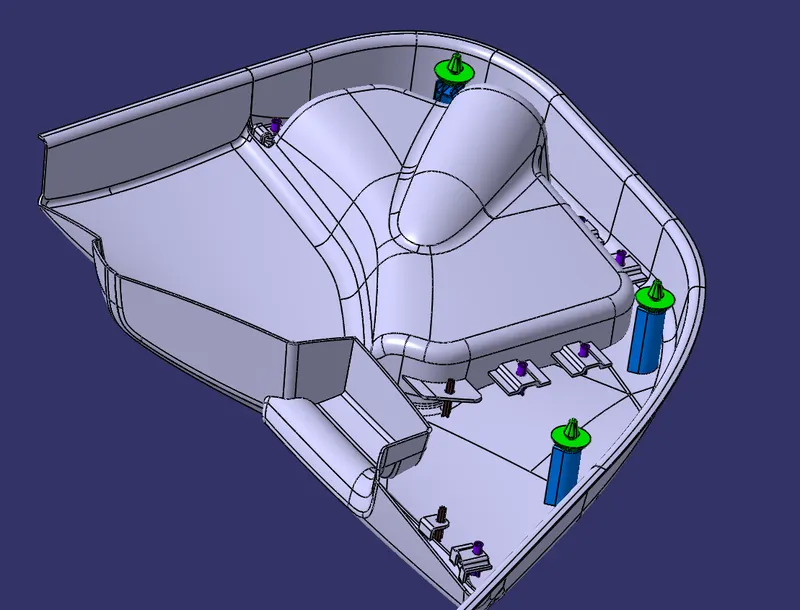
Pushpins were placed on the dog house. Total three push pins were used. Following mates are used to fixing the push pins to the dog house.
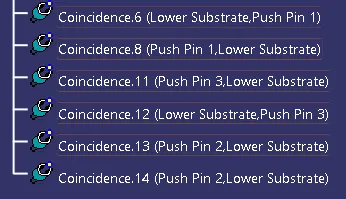
The axis of push pin 1 is coincident with the dog house axis. The same is done for push pins 2 and 3.
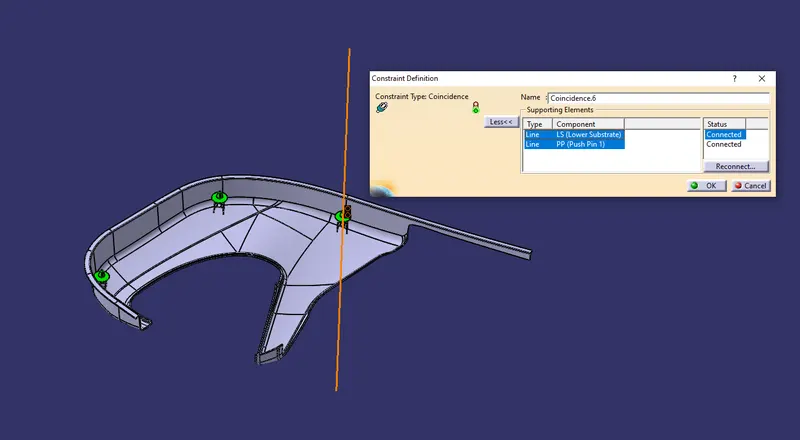
The Middle Face of push pin 1 is coincident with the dog house face as shown in the below figure. The same is done for other push pins.
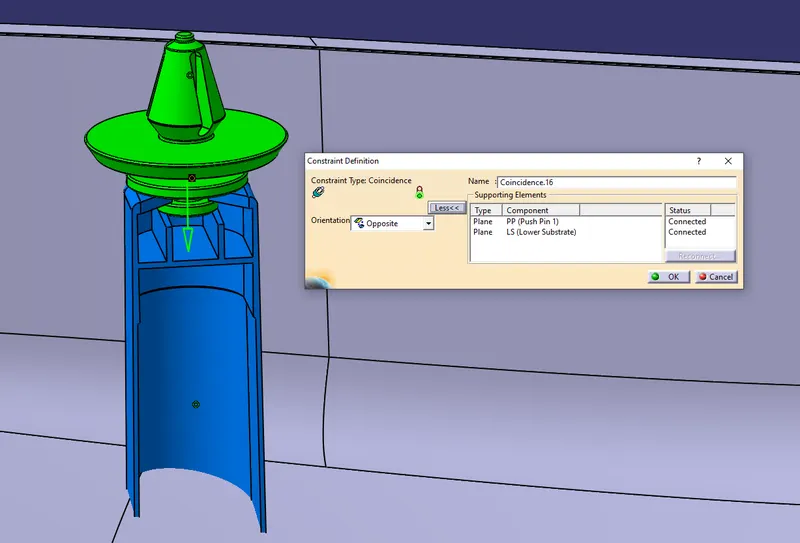
In this way, all the push pins are assembled to the dog houses of the lower substrate.
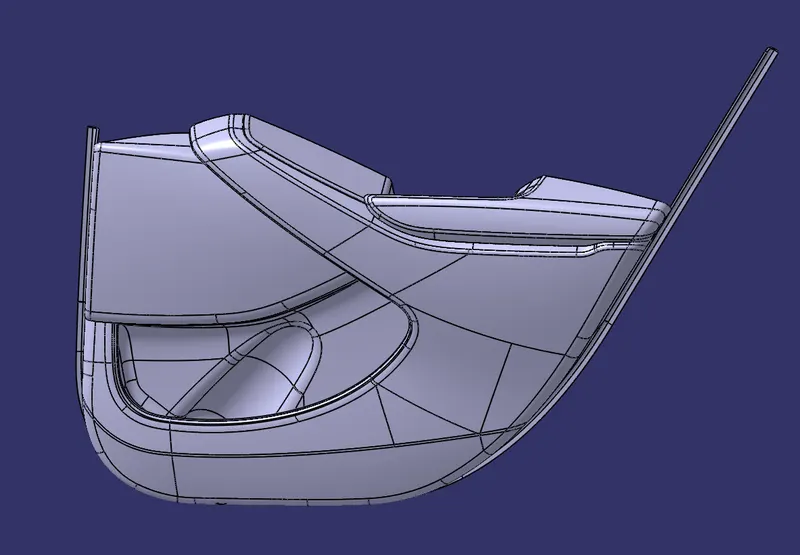
E) Final Assembly Images
CONCLUSION -
The door Panel has been successfully designed by following OEM standards used in Automotive Industry. All the attachment features are properly placed at different locations. The designed part meets all the defined objectives.