Preparing Schedule & Cost Estimation for a building using REVIT
1)
Aim - To use the shortcut keys in Revit discussed in class to complete the following tasks and list them below .
Introduction - 1) Shortcut keys are generally used to save the time and increase the speed of the work
2) It also increase the efficiency of the work .
3) In Revit if you click on View - User Interface - Keyboard Shortcuts will appear .
4) Following are some shortcut keys -
a) Section Box - BX
b) Create Similar - CS
c)Thin Lines - TL
d) Visibility Graphics and override settings - VG
e) View Range - VR
f) Reselect - Ctrl+<
g) Dimension - DI
h) Align - AL
i) Rotate - R
j) Move - MV
k) Copy - CO
Procedure -
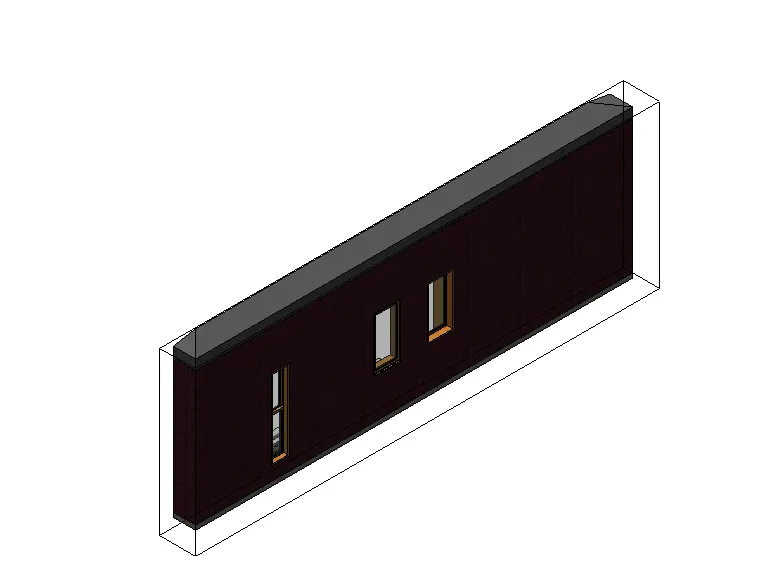
Step 1) Section Box - BX
i) To use this command , Click on 3D view
ii) Select the particular view which you want to see
iii) Click on that and Give command Section Box -
Step 2) Create Similar - CS
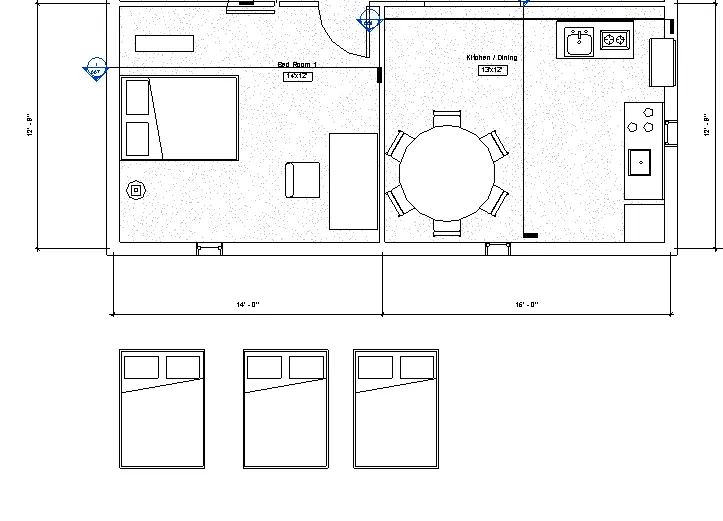
i) To create a similar element
ii) Click on particular element and Command CS
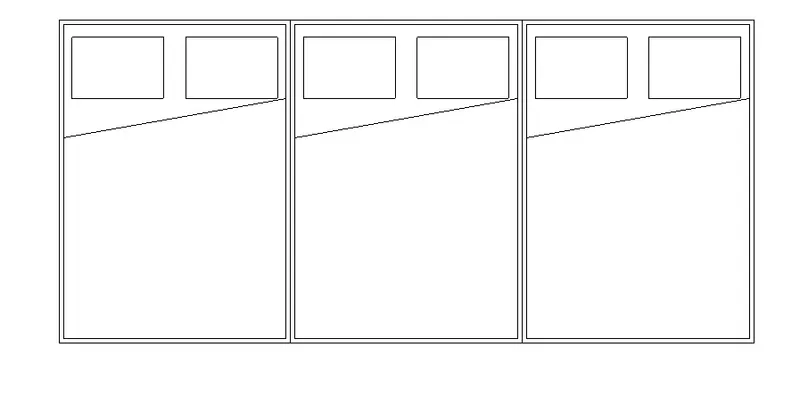
iii) For eg we have select Bed and created similar bed as shown in below
Step 3) Thin Lines - TL
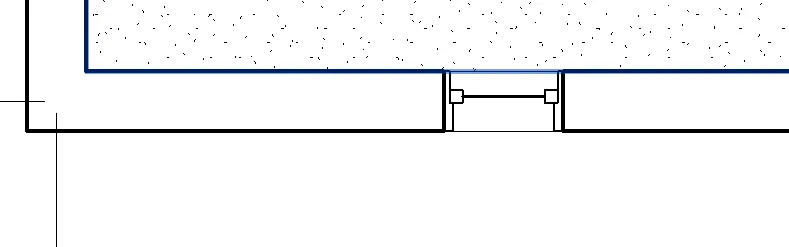
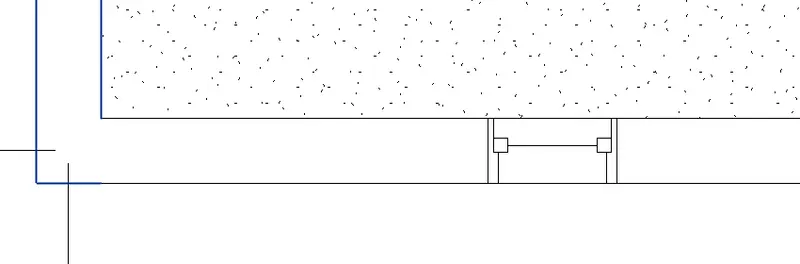
i) This is command is used to see the line thickness of the material
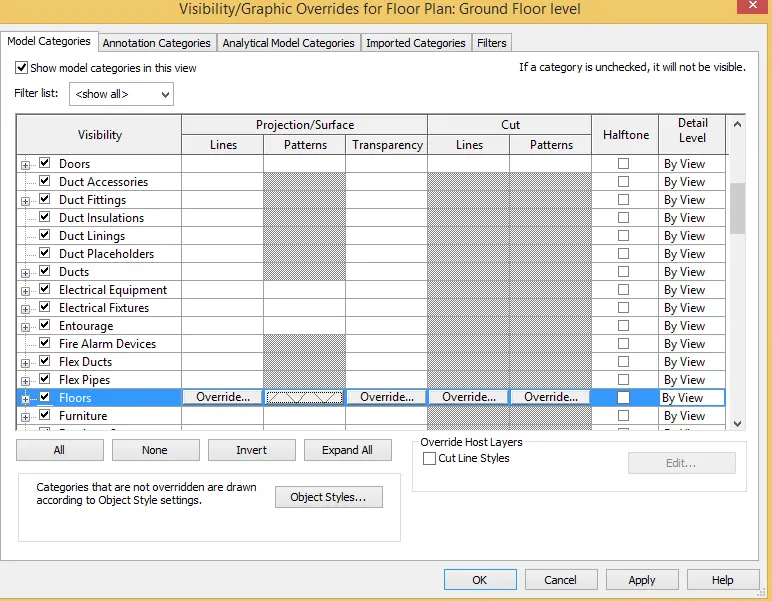
Step 4) Visibility Graphics and override settings - VG
i) This command is used to see the visibily of the materials
ii) You can directly edit the elements such as floor wall doors etc
iii) Command VG
iv) Click on Pattern and you can edit directly from here.
Step 5) View Range - VR
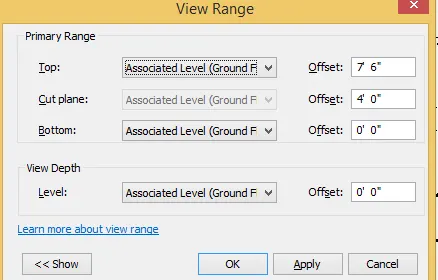
i) This command is used to see the view range
ii) and increase the range of visibility in a plan view
Step 6) Reselect - Ctrl+<
i) This command is used to Reselect the last view which we have selected
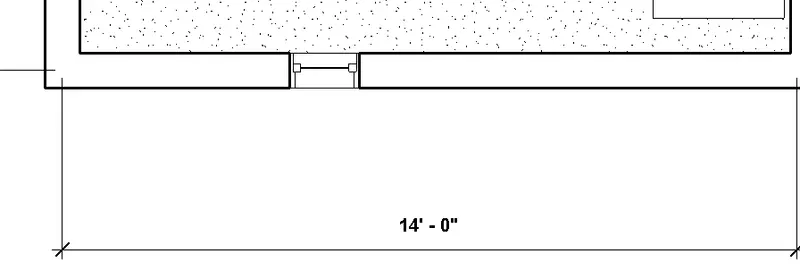
Step 7) Dimension - DI
i) This command is used to messure the dimension
Step 8) Align - AL
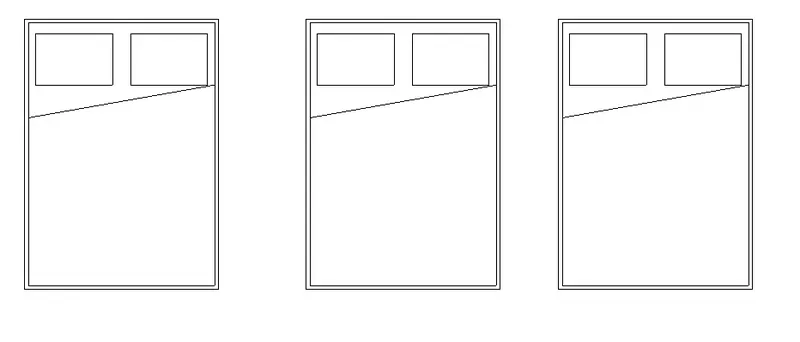
i) This command is used to align the element
ii) First select the line in which we have to align
iii) Then select the element which you have to align
iv) For eg we have align the beds which we have created by using CS command
Step 9) Rotate - R
i) This comman is used to rotate the element
Step 10) Move - MV
i) This commad is used to Move the elements
Step 11) Copy - CO
i) This command is used to Copy the elements
Step 12) Mirror - MM
i) This commad is used to mirror the elements
ii) Select the object - Command Mirror and specify the reference line and rotate the object .
Step 12) Array - AR
i) This commad is used to create an array of the elements .
Results - All the Shortcuts keys are used .
2)
Aim - To prepare a schedule of week 6 to week 8 project .
Introduction -
1) A schedule is a tabular display of information, extracted from the properties of the elements in a project. A schedule can list every instance of
the type of element you are scheduling, or it can collapse multiple instances onto a single row, based on the schedule's grouping criteria.
2) The schedule can be created at any point in the design process. If any changs are made in the model that affects the schedules . It
automatically updates to reflect those changes.
3) Using revit softwares cost estimates can also be developed. By providing the unit cost of materials, total cost can be derived.
Procedure
Step 1)
i) Open the Architectural file of Project 2 which we have create in week 6 to 8
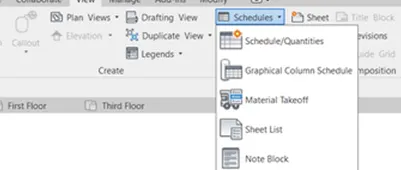
ii) Click on view tab
iii) Click on Schedue tab
iv) Again click on Schedule and Quantities
Step 2)
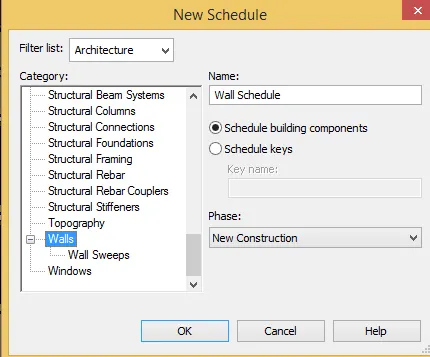
i) Once you click Schedule / Quantities a following dialog box will open
ii) Click on Wall
Step 3)
i) Once you click okay a following dialog box will open
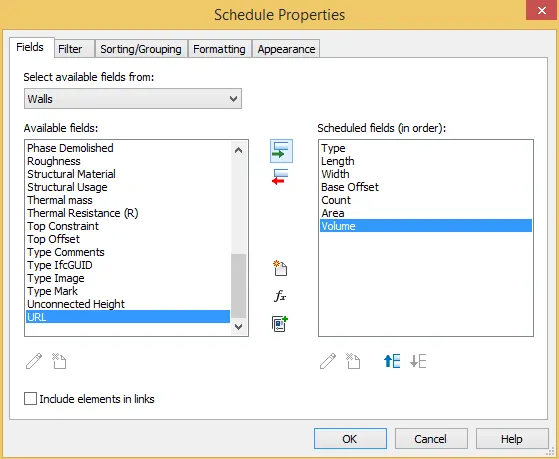
ii) Now select the parameters whic you want
iii) For eg Area , Count , Length etc as shown below
Step 4 )
i) Click on Okay
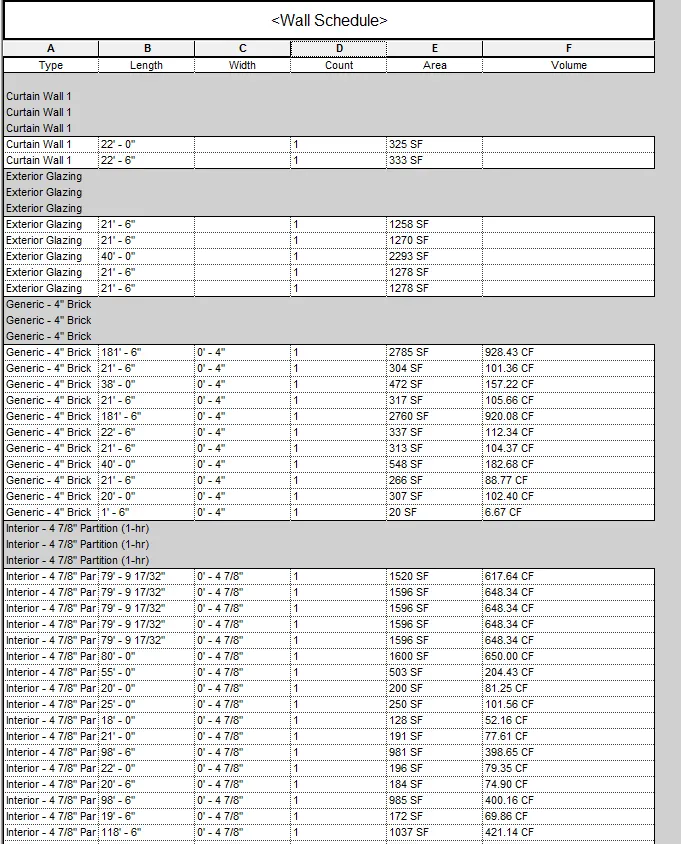
Step 5)
i) Similarly we have to create a Schedule of Doors also
ii) Follow the same procdure
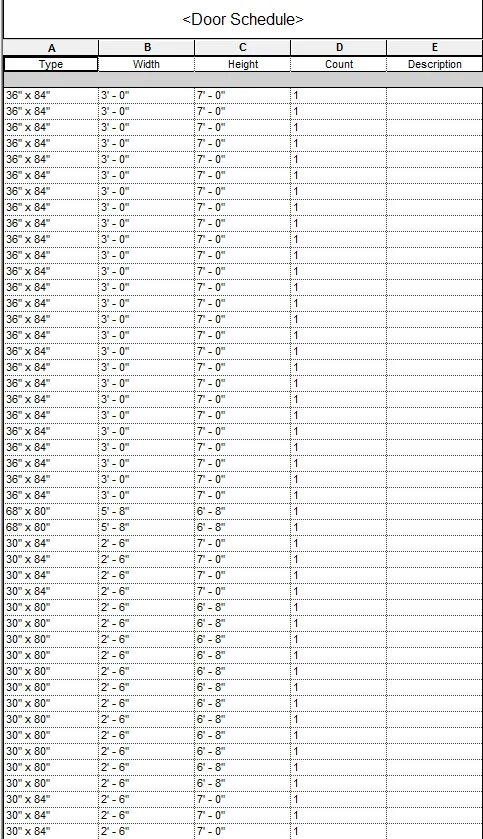
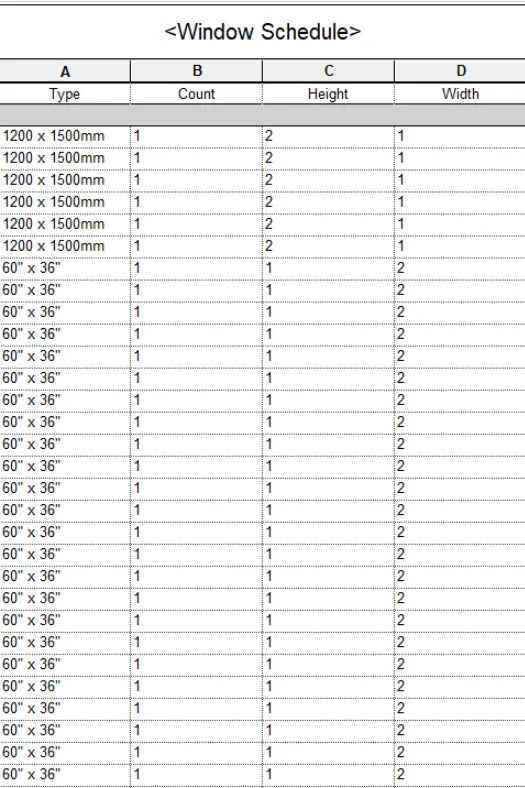
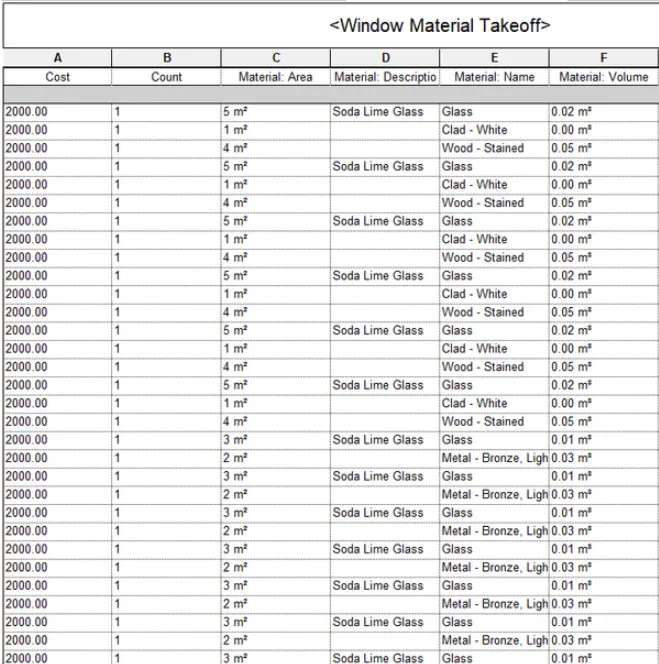
Step 6) Window take off
i) Follow the same procedure to create a Schedule of windows also
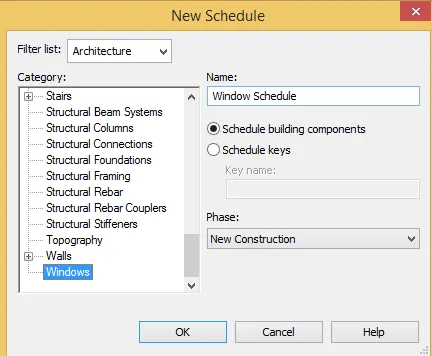
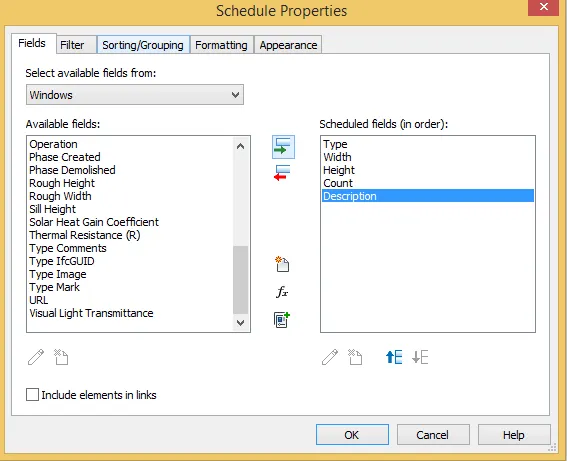
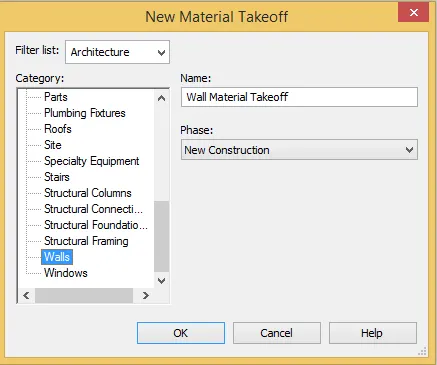
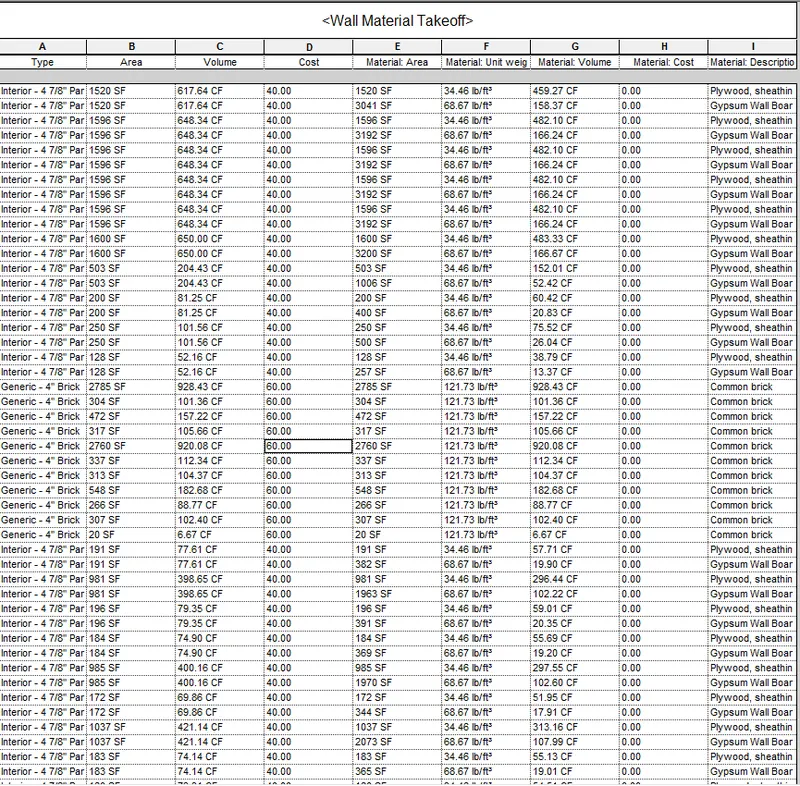
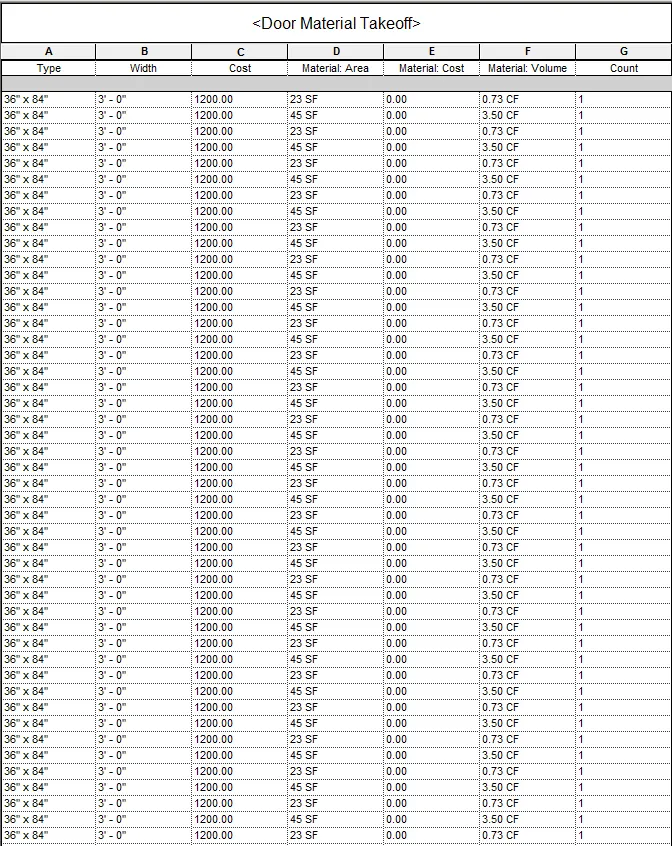
Step 7) Material Take off - Wall
i) Now we have to calculate the material take off for Concrete and wood
ii) So click on Schedule - Material Take off
iii) Select - Wall
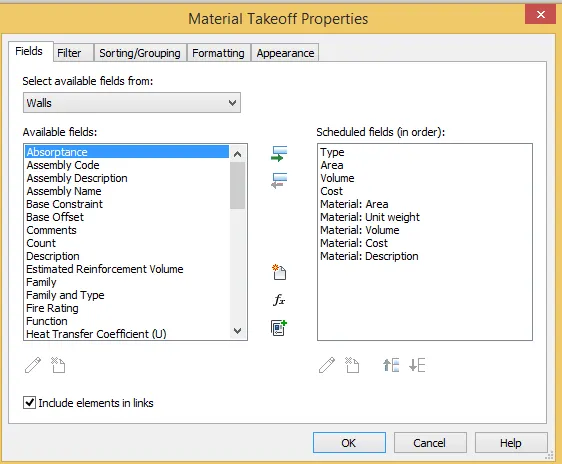
iv) Select the parameters as shown in fig
Step 7) Material Take off - Door
Step 8) Material take off - Window -
Results - A Schedule is prepared for given elements
1) Wall
2) Door Schedule
3) Window -
4) Material -
3)
Aim - To Calculate area and volume of each room in the model and to prepare Schedule reoport .
Introduction -
1) A schedule is a tabular display of information, extracted from the properties of the elements in a project. A schedule can list every instance of
the type of element you are scheduling, or it can collapse multiple instances onto a single row, based on the schedule's grouping criteria.
2) The schedule can be created at any point in the design process. If any changs are made in the model that affects the schedules . It
automatically updates to reflect those changes.
3) Using revit softwares cost estimates can also be developed. By providing the unit cost of materials, total cost can be derived.
Peocedure
Step 1)
i) Click on view tab
ii) Click on Schedue tab
iii) Again click on Schedule and Quantities
Step 2)
i) Once you click Schedule / Quantities a following dialog box will open
ii) Click on Room
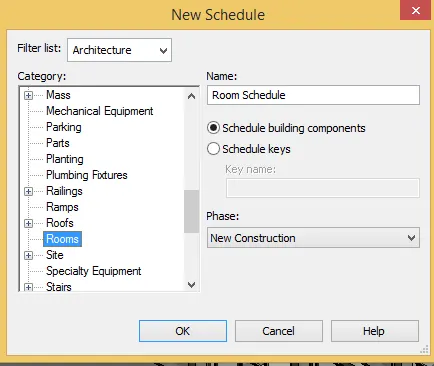
Step 3)
i) Click on Okay
ii) Select following parameters as shown in fig .
iii) click on okay
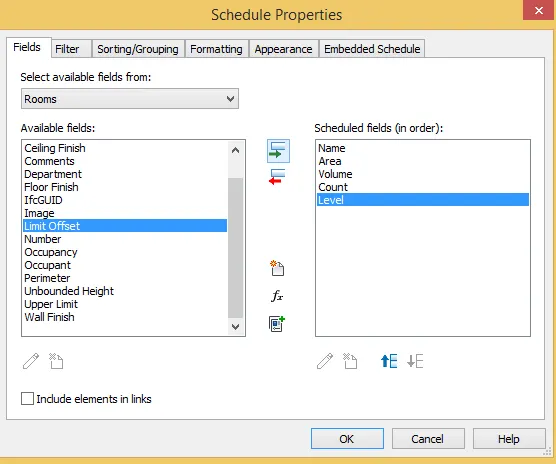
Step 4)
i) Click on Okay
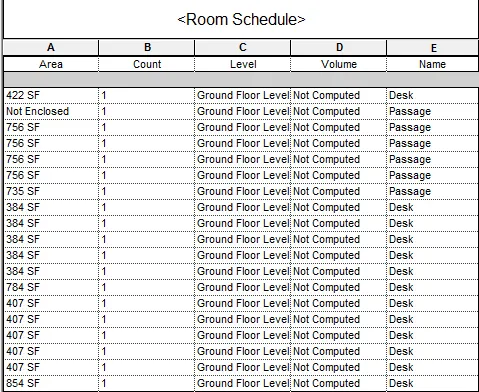
First Floor , Second and Third floor
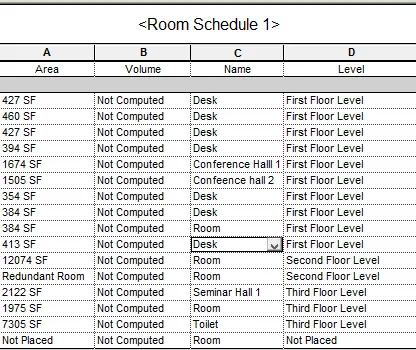
Results - A Schedule Report is created .
4)
Aim - To prepare the schedule of total cost of materials
Introduction -
1) A schedule is a tabular display of information, extracted from the properties of the elements in a project. A schedule can list every instance of
the type of element you are scheduling, or it can collapse multiple instances onto a single row, based on the schedule's grouping criteria.
2) The schedule can be created at any point in the design process. If any changs are made in the model that affects the schedules . It
automatically updates to reflect those changes.
3) Using revit softwares cost estimates can also be developed. By providing the unit cost of materials, total cost can be derived.
Procedure -
Step 1)
i) To prepare the schedule of total cost
ii) Click on View - Schedule - Material take off
iii) First will create Total cost of wall
A) For wall
i) Open the Material take off
ii) Select the parameters as shown in below
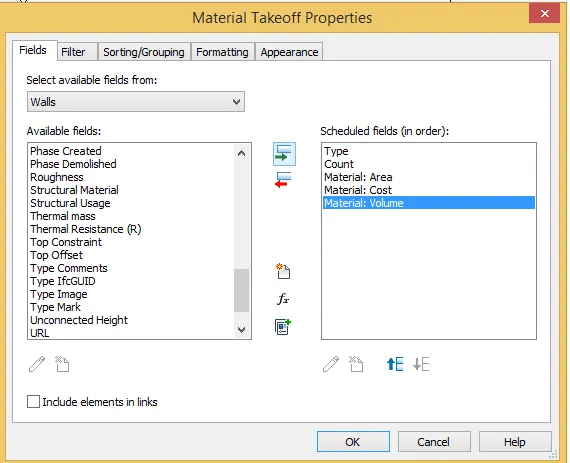
iii) Click on okay
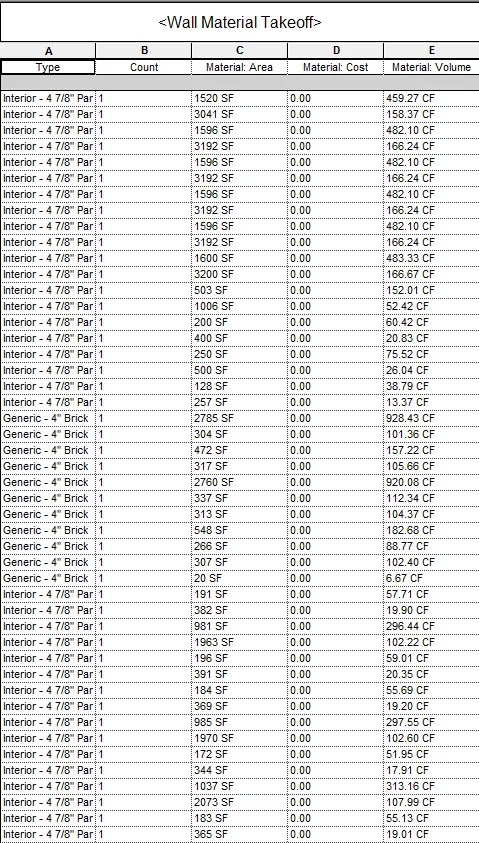
iv) Here we can see that Cost is zero , So go to the floor plan and select the wall
v) Click on edit and there is an option of Cost
vi) Enter the cost
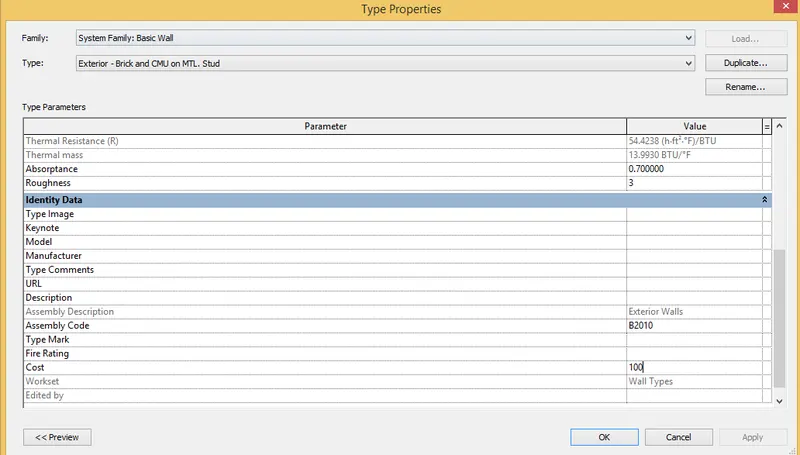
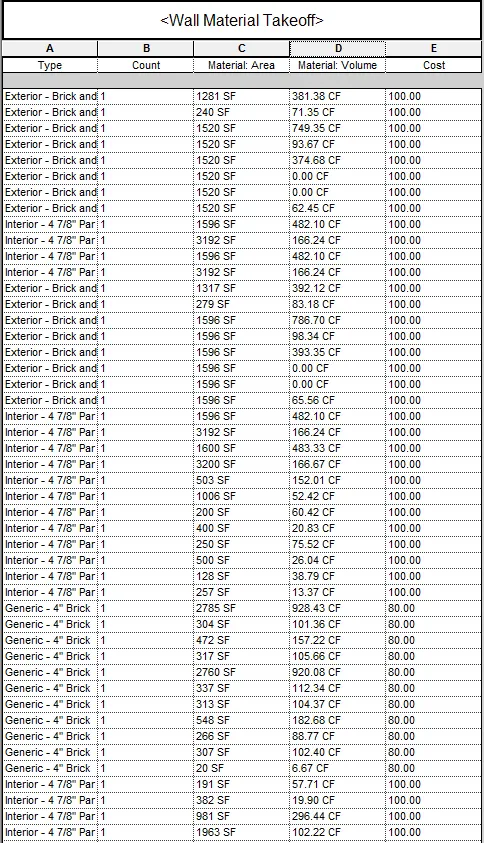
vii) To calculate Total Cost - Add dummy parameter
viii) Right Click and Insert the Column - Comment
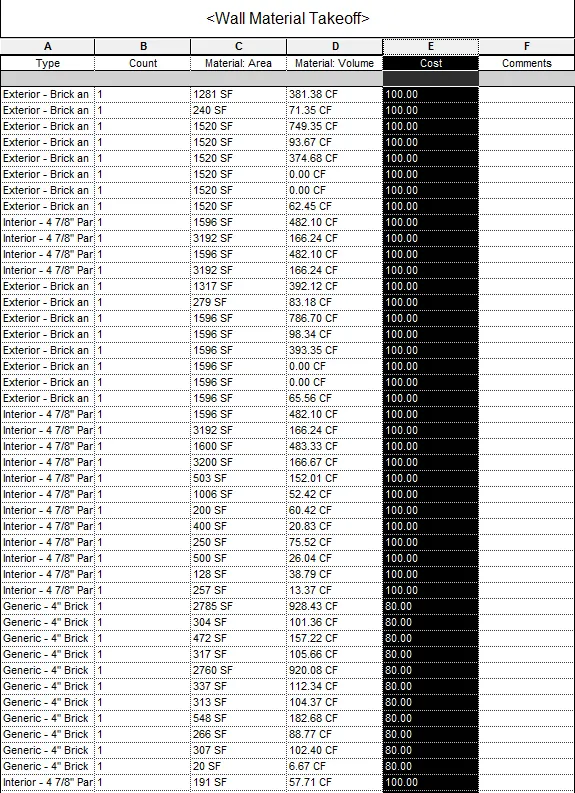
ix) Click on Dummy parameter - In Ribbon bar there is an option called Calculated
x) Click on that - Enter the Formula as shown in below
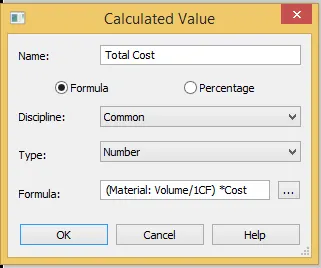
xi) Once you Click Okay - Tota Cost is calculated
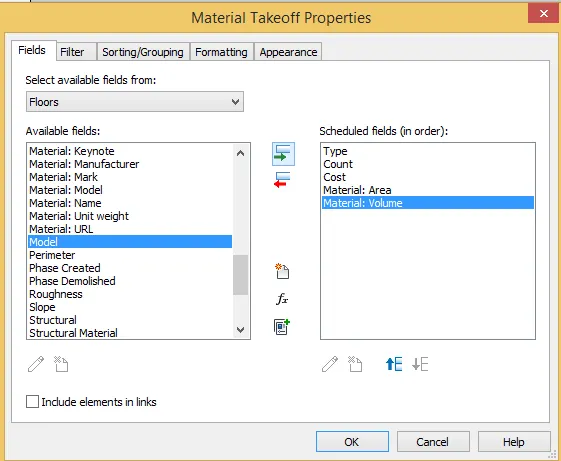
B) For Floor -
i) Follow the same procedure to calulate the Total Cost of floor
ii) Following parameters are considered
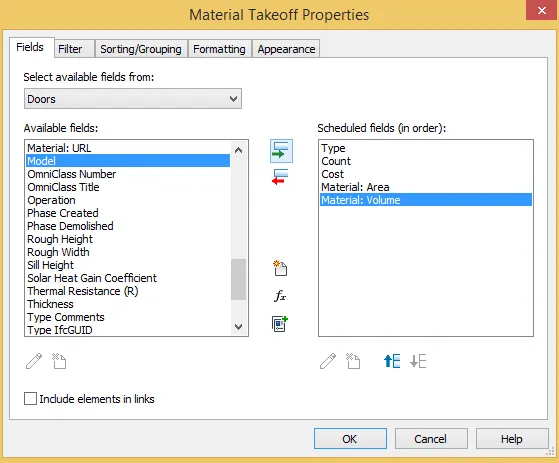
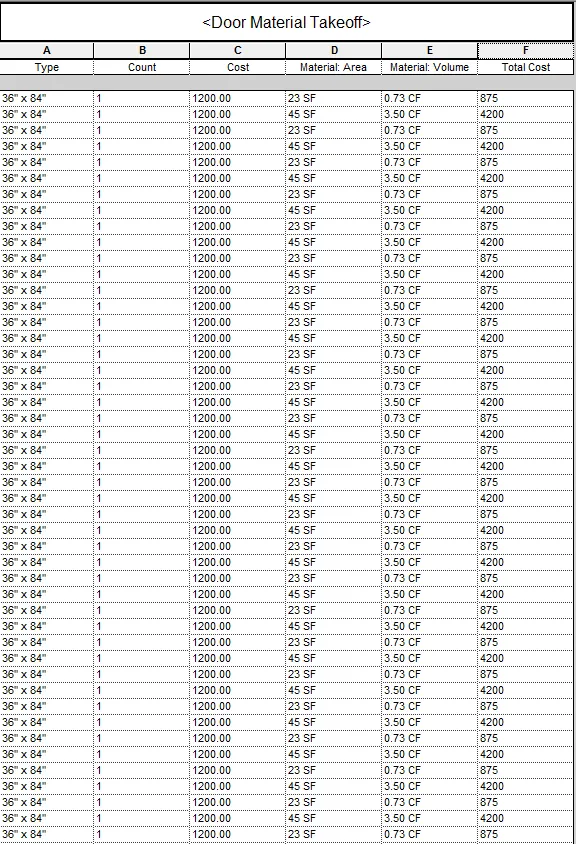
C) For Doors -
i) Follow the same procedure to calculate total Cost of Doors
ii) Following parameters are considered
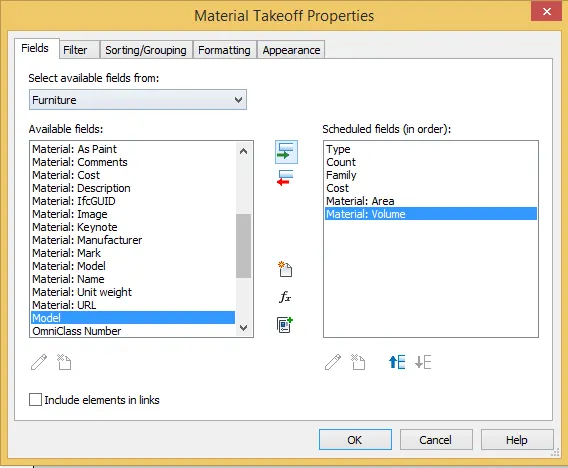
D) For Furnitures
i) Follow the same procedure to calculate total Cost of Furnitures
ii) Following parameters are considered
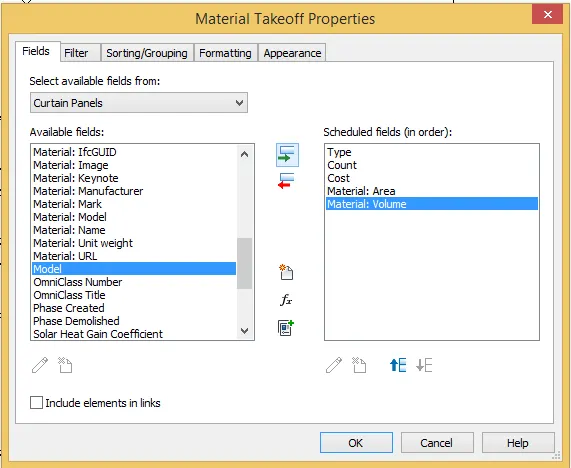
E) Curtain Panel
i) Follow the same procedure to calculate total Cost of Curtain Walls
ii) Following parameters are considered
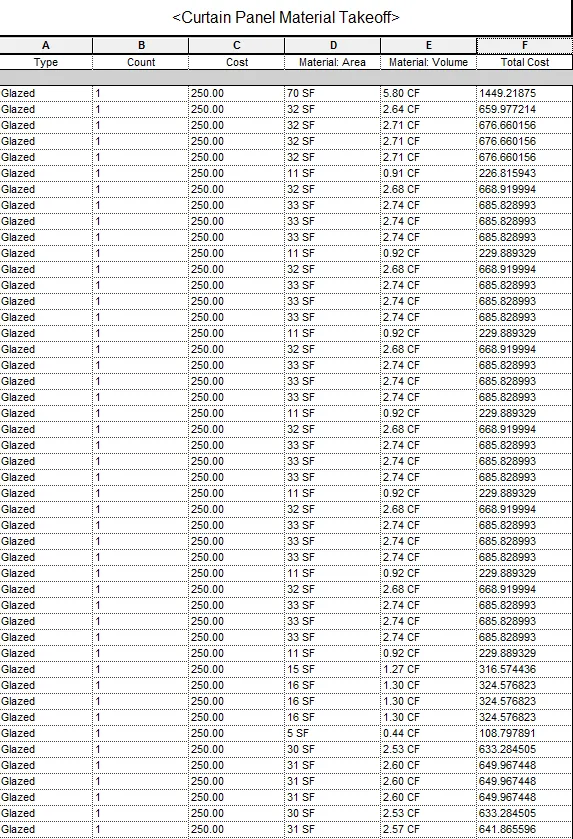
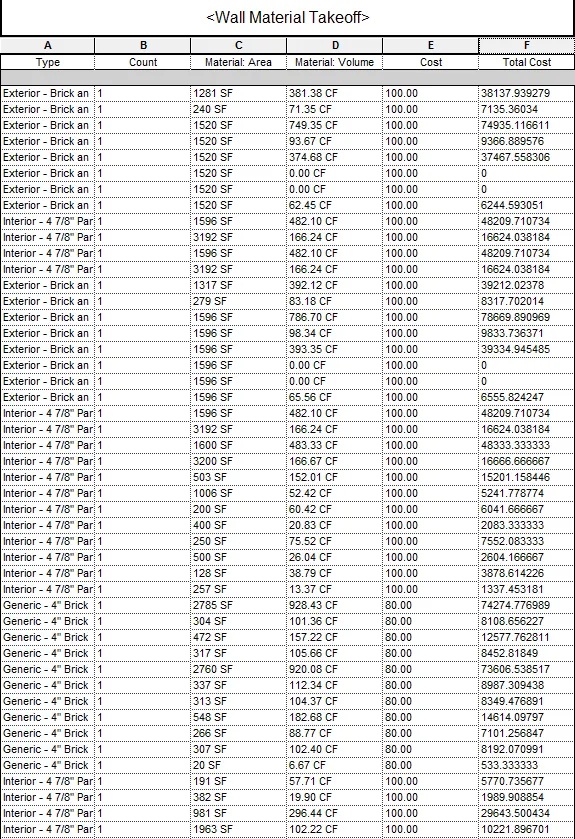
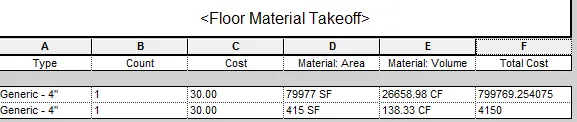
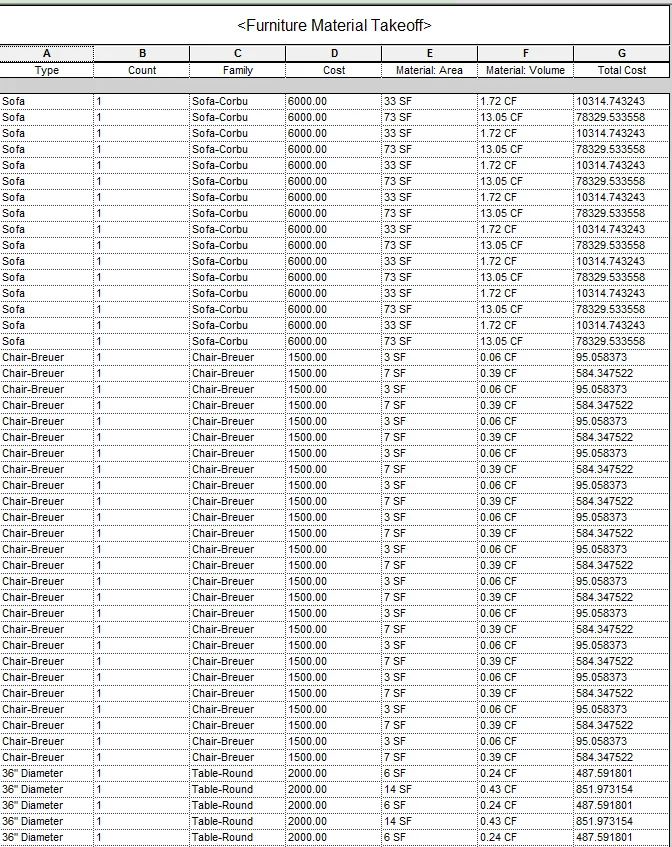
Results - A Material take off and Total cost of material is calculated and Schedule report is created as follows
1) For Wall
2) For Floors -
3) For Doors -
4) For Furnitures
5) For Curtain walls -
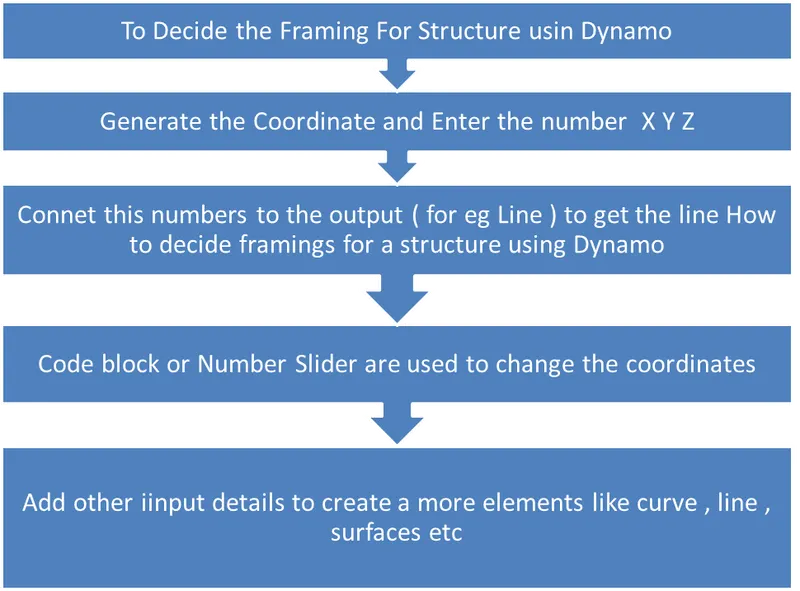
5) Flowchart
a) How to decide framings for a structure using Dynamo
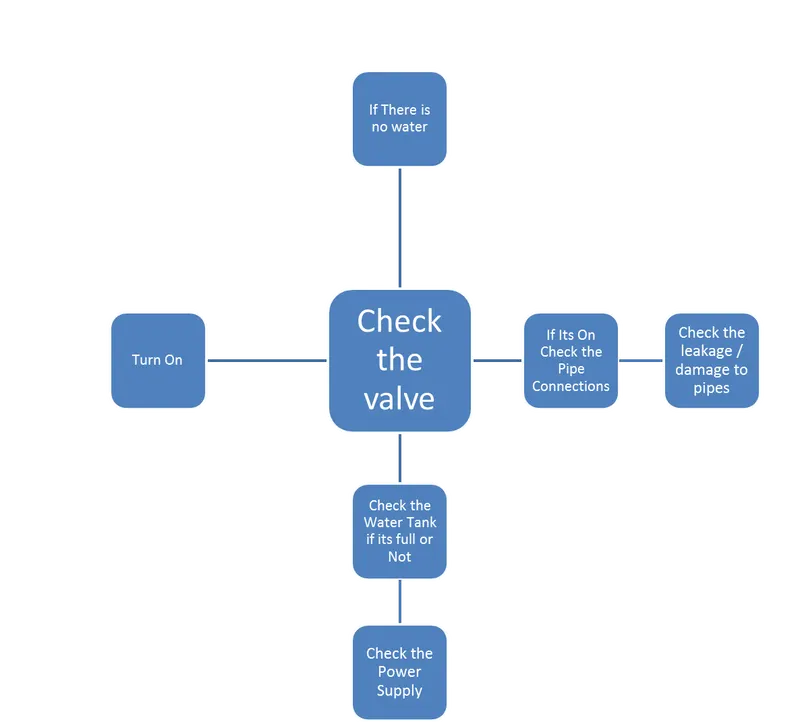
B) If there is no water coming from the pipes
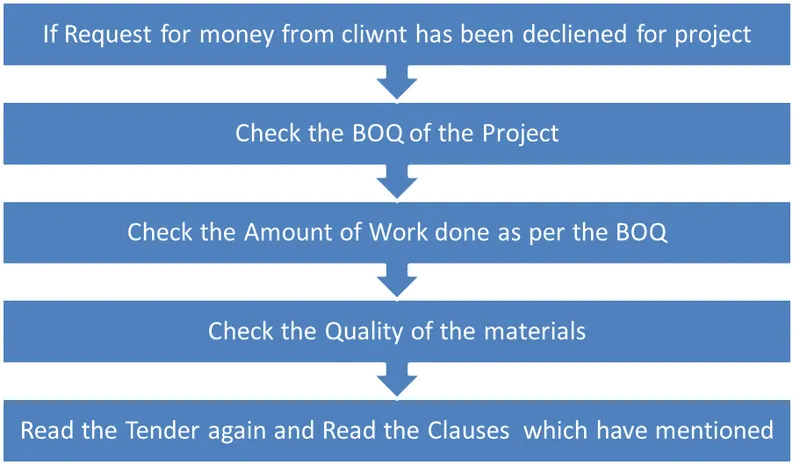
C) If request for money from client has been declined for the project
6) List the Parameters
a) Wall -
i) Wall type
ii) Wall description
iii) Wall length
iv) Wall thickness
v) Wall height
vi) Wall materials
vii) Wall location
viii) Material cost
ix) Structural Material
x) Wrap
xi) Function and Coarse pattern
b) Floor
i) Floor type
ii) Function and Coarse pattern
iii) Floor area
iv) Floor Offset
v) Floor Dimensions
vi) Floor Material
vii) Floor thickness
viii) Floor Roughness
viii) Cost
c) Door
i) Door Family
ii) Door Type
iii) Door Width
iv) Door Height
v) Door Thickness
vi) Functions
vii) Cost
d) Window
i) Window Family
ii) Window Type
iii )Window Width
iv) Window Height
v) Window Thickness
vi) Functions
vii) Cost
e) Table
i) Table Family
ii) Table length
iii) Table width
iv) Table weight
v) Table Thickness
vi) Table material
vii) Cost
f) Building
i) Building type
ii) Building FSI ( Floor Space Index / Floor Area Ratio )
iii) Building perimeter
iv) Building location
v) Building Storey
vi) Plot area
vii) Material
viii) Cost of the building