Week 8 - Simulation of a backward facing step in OpenFOAM
Objective
In this challenge, we are going to simulate an incompressible-laminar-viscous flow through the backward facing step geometry. We are performing a transient simulation. The solver is chosen based on the described physics of the flow.
Procedure
- The first step is to use the tutorials folder in openfoam. In that there is a folder called incomprerssible which inturn has another folder called icofoam. This is the one that we will use for this challenge.
- In icofoam there will be a folder called cavity. In that another folder with the same name cavity. This is the folder that we require.
- To run the simulation we first have to copy the cavity folder to the run folder under a new name cavity_test.
- When we open the cavity folder we get 3 folder 0,constant,system.
- In the system we have a file named blockmeshdict. In this file we have to change the values according to our diagram the file and values are given below.
/*--------------------------------*- C++ -*----------------------------------*\
  =========                 |
  \\      /  F ield         | OpenFOAM: The Open Source CFD Toolbox
   \\    /   O peration     | Website:  https://openfoam.org
    \\  /    A nd           | Version:  9
     \\/     M anipulation  |
\*---------------------------------------------------------------------------*/
FoamFile
{
    format      ascii;
    class       dictionary;
    object      blockMeshDict;
}
// * * * * * * * * * * * * * * * * * * * * * * * * * * * * * * * * * * * * * //

convertToMeters 0.01;

vertices
(
    (0 0 0)
    (8 0 0)
    (8 0.5 0)
    (0 0.5 0)
    (8 1 0)
    (0 1 0)
    (20 1 0)
    (20 0.5 0)
    (20 0 0)
    (20 -1 0)
    (8 -1 0)
    (0 0 0.1)
    (8 0 0.1)
    (8 0.5 0.1)
    (0 0.5 0.1)
    (8 1 0.1)
    (0 1 0.1)
    (20 1 0.1)
    (20 0.5 0.1)
    (20 0 0.1)
    (20 -1 0.1)
    (8 -1 0.1)
);

blocks
(
    hex (0 1 2 3 11 12 13 14) (200 20 1) simpleGrading (1 1 1)
    hex (3 2 4 5 14 13 15 16) (200 20 1) simpleGrading (1 1 1)
    hex (2 7 6 4 13 18 17 15) (200 20 1) simpleGrading (1 1 1)
    hex (1 8 7 2 12 19 18 13) (200 20 1) simpleGrading (1 1 1)
    hex (10 9 8 1 21 20 19 12) (200 20 1) simpleGrading (1 1 1)
);

edges
(
);

boundary
(

    inlet
    {
        type patch;
        faces
        (
            (0 11 14 3)
            (3 14 16 5)
        );
    }

    outlet
    {
        type patch;
        faces
        (
            (9 8 19 20)
            (8 7 18 19)
            (7 6 17 18)
        );

    }
    fixedWalls
    {
        type wall;
        faces
        (
            (5 16 15 4)
            (0 1 12 11)
            (4 15 17 6)
            (10 9 20 21)
            (10 21 12 1)
        );
    }
    frontAndBack
    {
        type empty;
        faces
        (
            (11 12 13 14)
            (14 13 15 16)
            (13 18 17 15)
            (12 19 18 13)
            (21 20 19 12)
            (0 3 2 1)
            (3 5 4 2)
            (2 4 6 7)
            (1 2 7 8)
            (10 1 8 9)
        );
    }

);

mergePatchPairs
(
);

// ************************************************************************* //
After blockmeshdict file we have to change the values in the controldict file as below.
/*--------------------------------*- C++ -*----------------------------------*\
  =========                 |
  \\      /  F ield         | OpenFOAM: The Open Source CFD Toolbox
   \\    /   O peration     | Website:  https://openfoam.org
    \\  /    A nd           | Version:  9
     \\/     M anipulation  |
\*---------------------------------------------------------------------------*/
FoamFile
{
    format      ascii;
    class       dictionary;
    location    "system";
    object      controlDict;
}
// * * * * * * * * * * * * * * * * * * * * * * * * * * * * * * * * * * * * * //

application     icoFoam;

startFrom       startTime;

startTime       0;

stopAt          endTime;

endTime         3;

deltaT          0.001;

writeControl    timeStep;

writeInterval   20;

purgeWrite      0;

writeFormat     ascii;

writePrecision  6;

writeCompression off;

timeFormat      general;

timePrecision   6;

runTimeModifiable true;


// ************************************************************************* //- After the controldict file we have to come back to the cavity_test folder and go into another folder called constant . Here, there is a file named transportproperties. Then the changes are made as shown below.
*--------------------------------*- C++ -*----------------------------------*\
  =========                 |
  \\      /  F ield         | OpenFOAM: The Open Source CFD Toolbox
   \\    /   O peration     | Website:  https://openfoam.org
    \\  /    A nd           | Version:  9
     \\/     M anipulation  |
\*---------------------------------------------------------------------------*/
FoamFile
{
    format      ascii;
    class       dictionary;
    location    "constant";
    object      transportProperties;
}
// * * * * * * * * * * * * * * * * * * * * * * * * * * * * * * * * * * * * * //

nu              [0 2 -1 0 0 0 0] 1e-6;


// ************************************************************************* //- After the constant folder we have to go back to the cavity_test folder where there is another folder called 0.
- In the 0 folder there are 2 files p & U.
- The p & U files are as shown below.
/*--------------------------------*- C++ -*----------------------------------*\
  =========                 |
  \\      /  F ield         | OpenFOAM: The Open Source CFD Toolbox
   \\    /   O peration     | Website:  https://openfoam.org
    \\  /    A nd           | Version:  9
     \\/     M anipulation  |
\*---------------------------------------------------------------------------*/
FoamFile
{
    format      ascii;
    class       volScalarField;
    object      p;
}
// * * * * * * * * * * * * * * * * * * * * * * * * * * * * * * * * * * * * * //

dimensions      [0 2 -2 0 0 0 0];

internalField   uniform 0;

boundaryField
{
    inlet
    {
        type            zeroGradient;
    }

     outlet
    {
        type            fixedValue;
        value           uniform 0;
    }

    fixedWalls
    {
        type            zeroGradient;
    }

    frontAndBack
    {
        type            empty;
    }
}

// ************************************************************************* //
/*--------------------------------*- C++ -*----------------------------------*\
========= |
\\ / F ield | OpenFOAM: The Open Source CFD Toolbox
\\ / O peration | Website: https://openfoam.org
\\ / A nd | Version: 9
\\/ M anipulation |
\*---------------------------------------------------------------------------*/
FoamFile
{
format ascii;
class volVectorField;
object U;
}
// * * * * * * * * * * * * * * * * * * * * * * * * * * * * * * * * * * * * * //
dimensions [0 1 -1 0 0 0 0];
internalField uniform (0 0 0);
boundaryField
{
inlet
{
type fixedValue;
value uniform (1 0 0);
}
outlet
{
type zeroGradient;
}
fixedWalls
{
type noSlip;
}
frontAndBack
{
type empty;
}
}
// ************************************************************************* //- After this ve have to go out of the cavity_test folder to run it.
- In the we have to run it in parafoam using the paraview command
Result
1.Case - 1
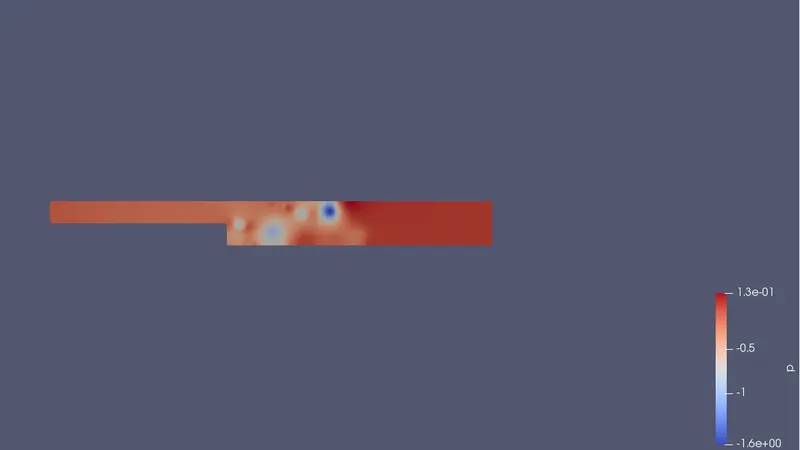
The pressure diagram without any grading factor
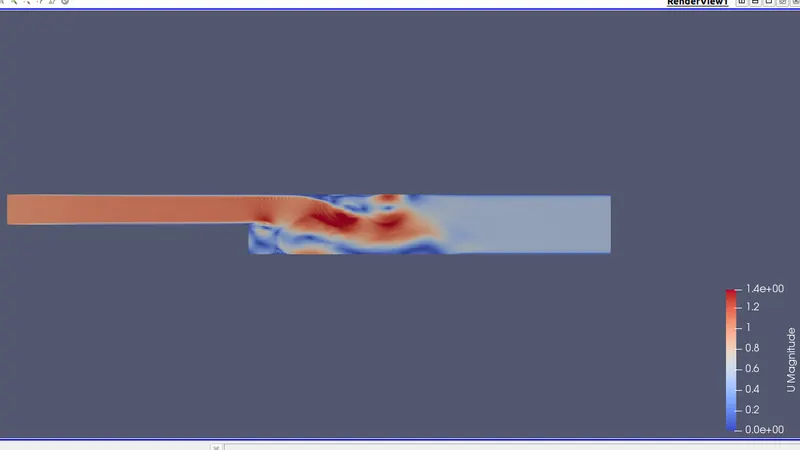
The velocity diagram without any grading factor
2. Case - 2
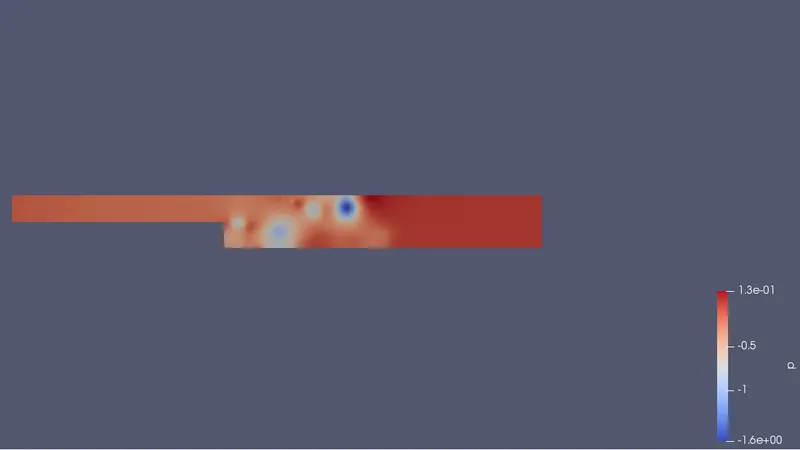
The pressure diagram for grading factor 0.2
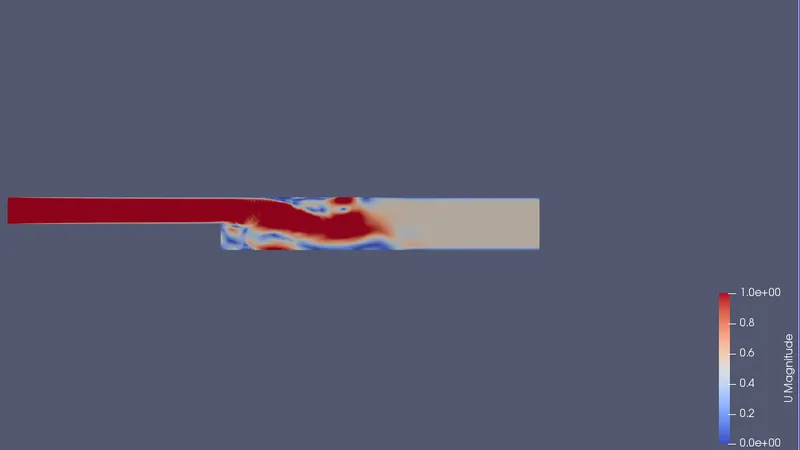
The velocity diagram for grading factor 0.2
Conclusion
By changing the grading factor from 1 to 0.2 the mesh becomes finer and the solution becomes accurate. Overall the chnage in the value of the grading factor the result is approximately the same.