Week 2:- BiW Fixture Basics Challenge
- What is the process of project execution activity?
Project execution is the stage of the project where everything has been planned is put into action. The main objectives are:
- To keep the work on track
- To organize team members
- To manage timelines
- To make sure the work is being done according to the original plan.
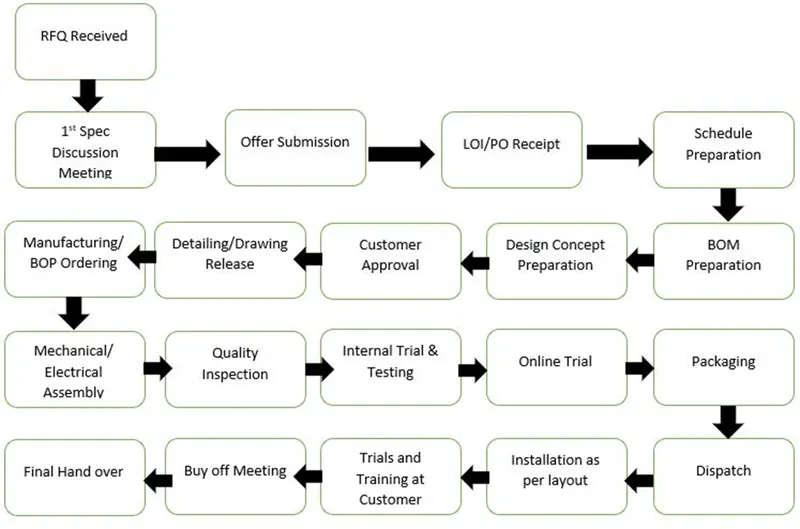
RFQ – Request for Quotation.
In this where the customer gives the requirement/specifications in detail for the given projects in the form of data or documents.
Also, the customer specifies its technical offer, commercial offer, etc, how the project will be executed & the timeline of the project also will be mentioned.
First spec discussion meeting:
After the RFQ is received, there will be a discussion meeting about the technical offer, commercial offer, project execution, timeline required to complete the project and the crew will make a final decision based on the result.
In addition, the time required to complete the project from the begining of data study,3d concept design, simulation validation, quality check,2D drawing release,manufacturing,etc., are calculated and prepared in the technical offer.
Based on technical offer commercial offer will be finalized.
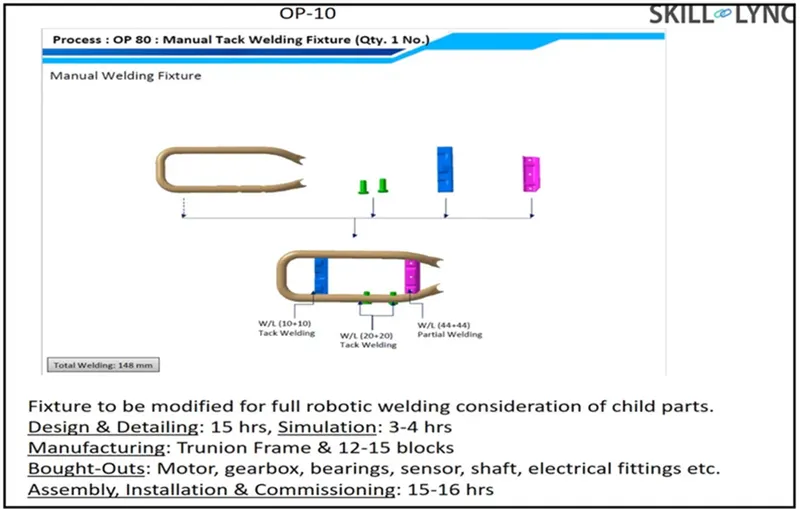
Offer submission:
After the finalization the offer is submitted to the customer end.
The customer will also receive more offers from other companies. The customer will go through the offers and analyse it.
PO/LOI receipt:
Once we submitted the offer customer will study the offer at the same time he will get offers from different suppliers & vendors. He compares these technical offers & based on cost whichever suit best for his requirement. Then he will release LOI or PO with its terms & conditions as stated earlier.
SCHEDULE PREPARATION:
Once the PO is released from the customer, we will be working on the preparation of the schedule which should be matched our planned commitment in the technical offer/customer required time.
Schedule preparation is nothing but dividing the different activities like kick-off meeting, design data study, DAP, simulation, Quality check 2D detailing, drawing check, Release of BOM, Manufacturing, bought outs of electrical & mechanical components, Assembly of the fixture, paint, trial run out, installation and commissioning at the customer end, etc.
These activities will be traced in the schedule preparation chart.
The date-wise schedule should be matched the committed date. Otherwise have to revise the schedule and prepare accordingly by discussing it in the meetings.
BOM preparation:
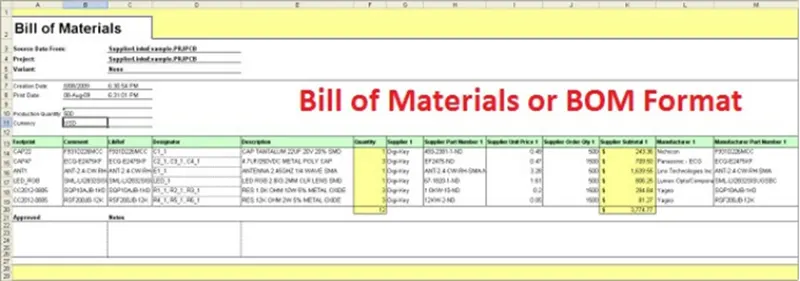
Bill of materials like cylinders, motors,bolts, nuts,etc., are listed and prepared.
DESIGN CONCEPT PREPARATION:
Before designing the concept, we have to thoroughly study consumer requirements data, which is carried out in design data study activities.
During the design data study, we will proceed with rough sketches to get a flow while designing concepts.
The concept preparation would include the process like load act on panels, clamping process, which spot should be welded first, and travel of the gun.
In this concept preparation, we should conceptualize the basic data like spot plan, cycle time, etc,
The weld gun should not collapse while traveling, so by considering this have to make a concept preparation.
To avoid collapses of weld guns or robots during traveling, a spot plan will be done at the initial stage.
In design concept preparation, the design of the layout is been prepared at a very initial level which gives the information on the placements of robots and fixtures
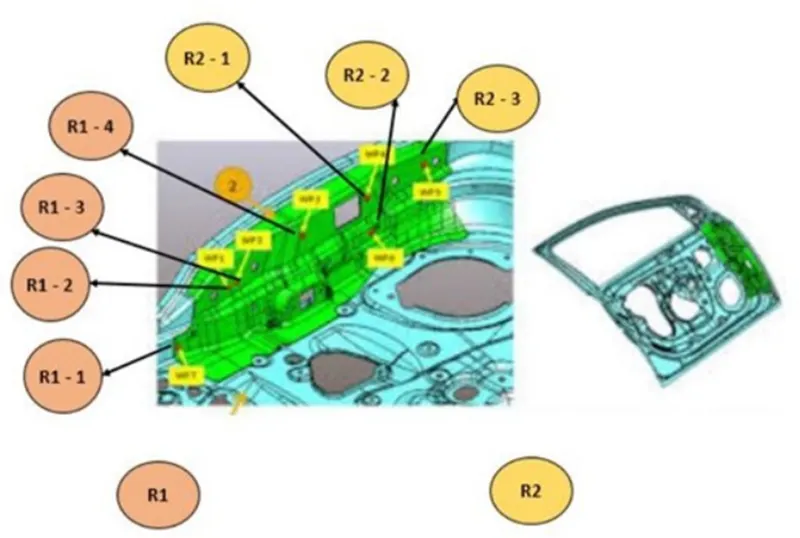
Spot plan should be taken into consideration during concept design preparation
The spot plan clears us how many robots are to be used and the sequence of the spot will be decided along with which robot will cover certain spot places.
Also, the cycle time should be considered while preparing the concept design. To calculate the cycle time, we should go to the cycle time study.
Cycle time study includes min per shift, No. of shifts, No. of days per year, No. of components per year, and the total number of minutes.
Cycle time study includes min per shift, no. of shifts, no of days per year, no of components per year, the total number of minutes, efficiency, Total no of seconds, take time seconds, average time per spot, total no of spot, no of robots placed. From the cycle time study, we can get time taken per spot, time taken for a single component, and efficiency of production. If the efficiency is not satisfied, we have to do some reconsideration in the design.
Customer approval:
Once the design concept is ready then it will be sent to the customer for their approval. It is also known as the design approval process (DAP) or customer approval process. In that, the customer will check whether all his specification considers or not in specifications. Whether it is as per the technical offer submitted then only he approves the prepared concept. Some points will be raised by the customer. These changes have been updated to the design team by the project team. The design team will again work on it, some modifications or changes are necessary to improve the design like clamping needs to be improved or this mechanism will work fine, the sensor should be of this make. These changes are again being updated to the customer. Once he gives final approval we will move further for detailing & dwg. release.
DETAILING & DRAWING RELEASE:
Once the customer approved the process, the detailing of the fixture parts which is to be manufactured has been done by giving appropriate dimensions and GD&T symbols.
All the dimensions which are necessary for manufacturing should be included with GD&T in the drawing before releasing the picture to the manufacturing team.
Manufacturing/BOP ordering:
In this stage the required components for manufacturing like motors,cylinders,sensors,gripper,etc., are ordered as per the specifications required.
MECHANICAL / ELECTRICAL ASSEMBLY:
After the materials ordered are received at our end. The quality will check the working conditions and technical specs, which meet our requirements.
After the quality check, the mechanical & electrical parts are assembled as per design.
Internal trial & testing:
Internal trial & testing:
After the approval of QC team, Internal trials & testing started. The first step involves putting the assembly in the fixture manually to check that it is being fixed properly, locating the pin to match with the hole, clamping is OK, and loading & unloading of part is easy. The operating height is also checked, it is ergonomically correct. Then start taking trials on fixtures for welding feasibility and gun approachability in fixtures. Then go for an online trial.
Online trial:
It is done in automated mode by using electrical connections.The process sequence is checked as per the designed way in front of the customer for further approval
PACKAGING:
To avoid damage, that occurs in the fixture while transportation which may also lead to affect the Aesthetic look & proper function of fixture packaging has been done.
After the trials taken have to get the QC confirmation whether the panels met the standards/specs, given by the customer also whether the fixture meets the customer's standards.
After approval of QC, the packaging is been done as per standards. Certain companies follow certain packaging standards, So the packaging should be as per customer standards.
Dispatch:
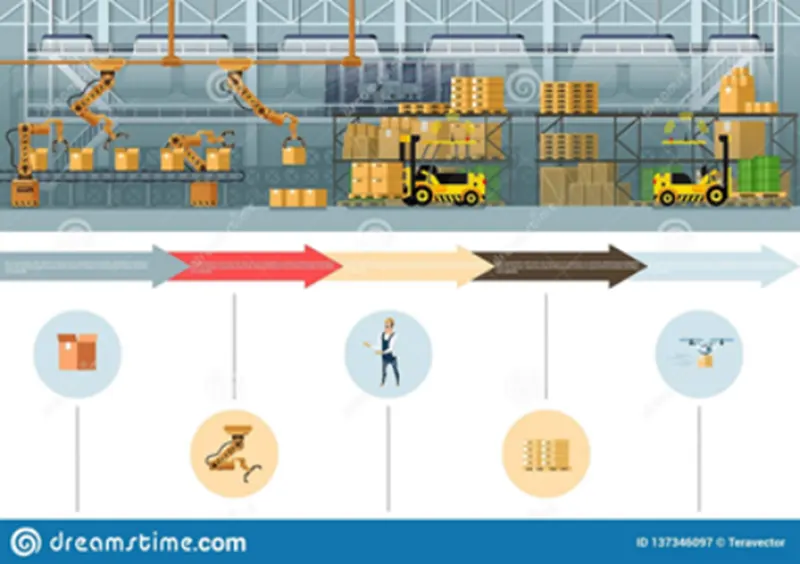
All materials are transported at the customer site through trucks, containers, and ships or by air.
Installation as per layout:
At the initial stage itself the layout for the fixture assembly is prepared which defines the space for the robots,fixture,etc.,
The layout is prepared by considering the functionality,application, process sequence,etc., Hence the installation is to be done as per the layout.
TRAILS & TRAINING AT CUSTOMER:
Production trials will be taken at the customer end.
During the technical offer, we will be confirmed that the n-number of assemblies will be produced within 8hrs/12hrs shifts. So in the customer trial, we have to achieve the confirmed quantity of assemblies.
Once it is achieved training will be given to the operator, staff, and engineers who are involved in this process. The sequence of the working process by the fixture will be explained in detail.
The checkpoints which have to be done after placing the panels into the fixture will be made clear to them.
Buy-off meeting:
Once the training is completed, there will be a buy-off meeting between the customer & project team with a discussion on if their other things need to be incorporated, or if anything is missing that is described in LOI/PO or offer submission. The customer will raise a point or sometimes the customer wants modifications that will lead to extra quotations and extra costing according to when work is done as per buy of meeting.
Final handover:
In this step, the product is finally handed over to the customer.
The documents like clamp validation document, ergo sheets, BOMs,etc., will also be handed over to the customer along with the fixture.
We can carry a proof for our work done as documents.
Every automobile industries will follow some document standards like ISO & IATF.
IATF(International Automotive Task Force) is a group which is followed by most industries now-a-days.
2.What are the types of joining processes?
JOINING COMPRISES a large number of processes used to assemble individual parts into a larger, more complex component or assembly.
The individual parts of a component meet at the joints.
Joints transmit or distribute forces generated during service from one part to the other parts of the assembly.
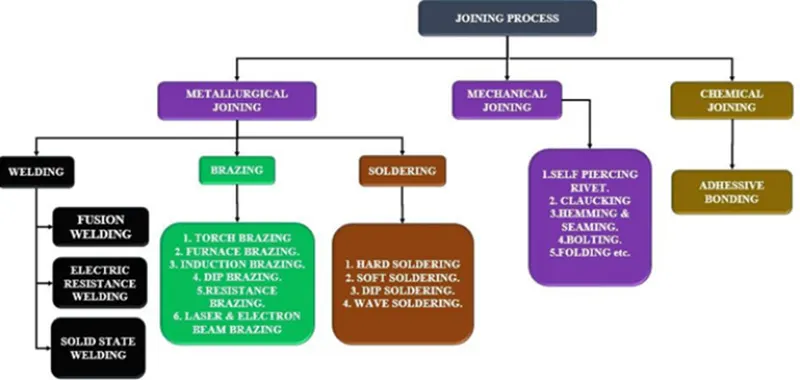
TYPES OF JOINING PROCESS:
The durability & performance of any structure largely depends on the quality & the design of the component joints.
The whole structure cannot be made in one piece.
Two fundamental options for joining materials & components are,
1.Metallurgical joining
2.Mechanical joining
- Chemical joining
METALLURGICAL JOINING:
Metallurgical joining is classified into,
WELDING.
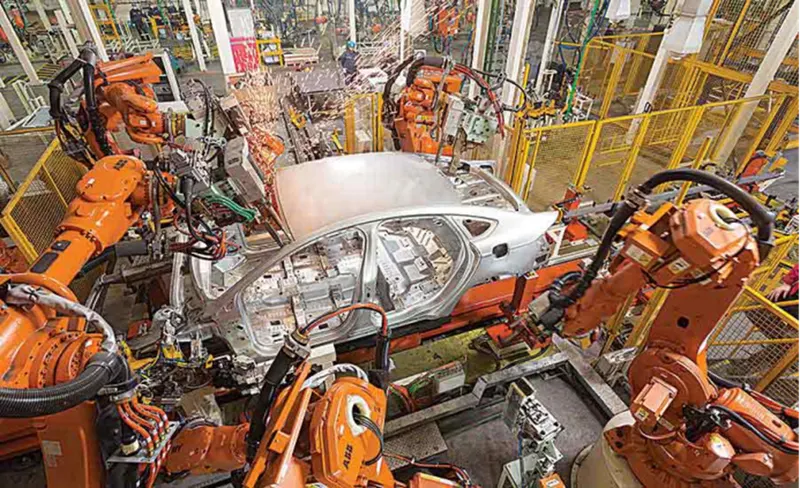
Welding is the process of permanently joining material welding joins different metals/ alloys with a number of processes in which heat is supplied either electrically or by means of a torch. Welding is done by the application of heat or both heat & pressure. Pressure may be employed, but this is not in many processes essential. The welding process involves applying heat to the work piece. The heat applied should be such that the work piece should melt, i.e. the temperature at which welding is done should be more than the melting point of the work piece to be welded. Welding is a fabrication or sculptural process that joins materials, usually metals or thermoplastics, by using high heat to melt the parts together and allowing them to cool, causing fusion. Welding is distinct from lower-temperature metal-joining techniques such as brazing and soldering, which do not melt the base metal. In addition to melting the base metal, a filler material is typically added to the joint to form a pool of molten material (the weld pool) that cools to form a joint that, based on weld configuration (butt, full penetration, fillet, etc.), can be stronger than the base material (parent metal). Pressure may also be used in conjunction with heat or by itself to produce a weld. Welding also requires a form of shield to protect the filler metals or melted metals from being contaminated or oxidized. Many different energy sources can be used for welding, including a gas flame (chemical), an electric arc (electrical), a laser, an electron beam, friction, and ultrasound. While often an industrial process, welding may be performed in many different environments, including in open air, underwater, and outer space. Welding is a hazardous undertaking and precautions are required to avoid burns, electric shock, vision damage, inhalation of poisonous gases and fumes, and exposure to intense ultraviolet radiation. Below fig. shows the principles of welding.
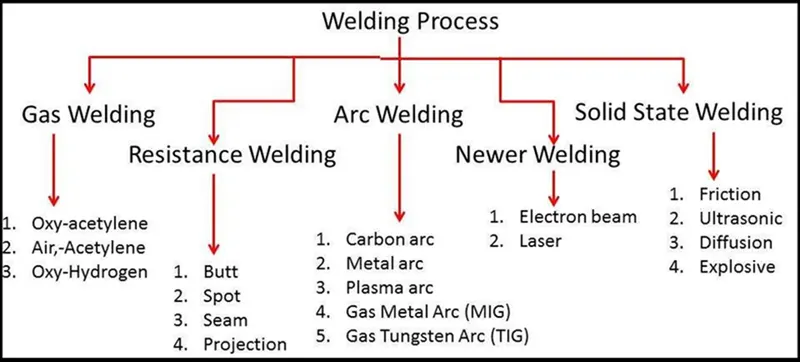
There are many different types of welding operations, such as the various arc welding, resistance welding, and oxyfuel gas welding methods. Below fig. illustrate different types of the welding process.
Solid State Welding:
• In this method, joining is done by application of pressure only or a combination of heat and pressure.
• Even if heat is used, the temperature in the process is less than the melting point of the metals being welded (unlike in fusion welding).
• No filler metal is utilized. Diffusion welding: Two part surfaces are held together under pressure at elevated temperature and the parts join by solid state diffusion. Friction welding/Stir welding: Joining occurs by the heat of friction and plastic deformation between two surfaces. Ultrasonic welding: Moderate pressure is applied between the two parts and an oscillating motion at ultrasonic frequencies is used in a direction parallel to the contacting surfaces.
Brazing:
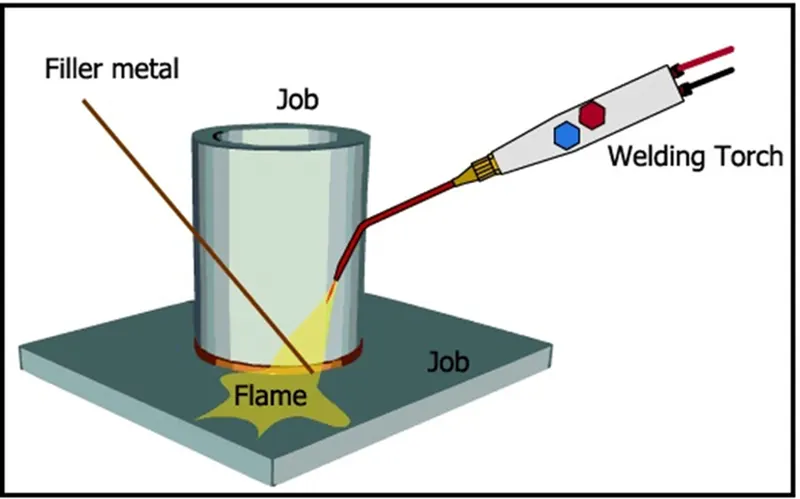
During the brazing process, a filler metal is melted & distributed between multiple solid metal components after they have been heated to the proper temperature. The filler metal must have been a melting point that is above 840. Brazing is a metal-joining process in which two or more metal items are joined together by melting and flowing a filler metal into the joint, the filler metal having a lower melting point than the adjoining metal.Brazing differs from welding in that it does not involve melting the work pieces and from soldering in using higher temperatures for a similar process, while also requiring much more closely fitted parts than when soldering. The filler metal flows into the gap between close-fitting parts by capillary action. The filler metal is brought slightly above its melting (liquid's) temperature while protected by a suitable atmosphere, usually a flux. It then flows over the base metal (in a process known as wetting) and is then cooled to join the work pieces together. A major advantage of brazing is the ability to join the same or different metals with considerable strength. The figure below shows the brazing process
Soldering:
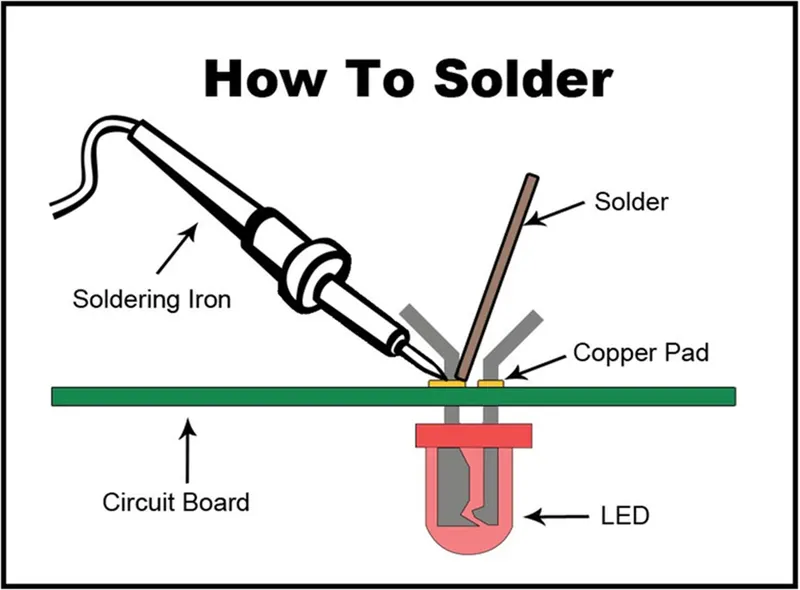
Soldering is a process in which two or more items are joined together by melting and putting a filler metal (solder) into the joint, the filler metal having a lower melting point than the adjoining metal. Unlike welding, soldering does not involve melting the work pieces. In brazing, the workpiece metal also does not melt, but the filler metal is one that melts at a higher temperature than in soldering. In the past, nearly all soldiers contained lead, but environmental and health concerns have increasingly dictated the use of lead-free alloys for electronics and plumbing purposes. Soldering is used in plumbing, electronics, and metalwork from flashing to jewelry and musical instruments. The figure below is shown as a piece of information.
3.What is Resistance Welding & its application in the automotive sector?
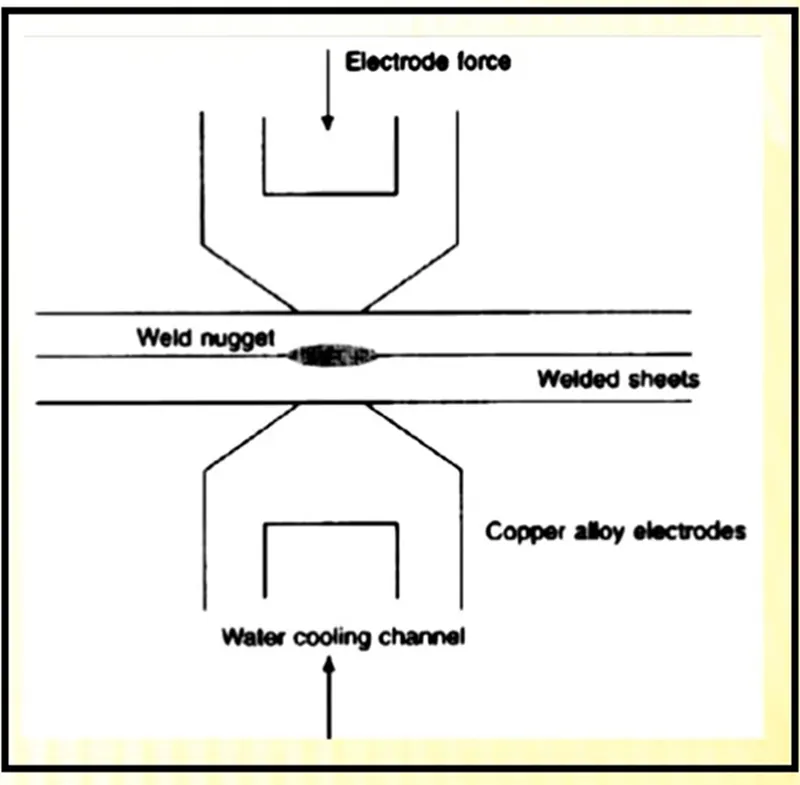
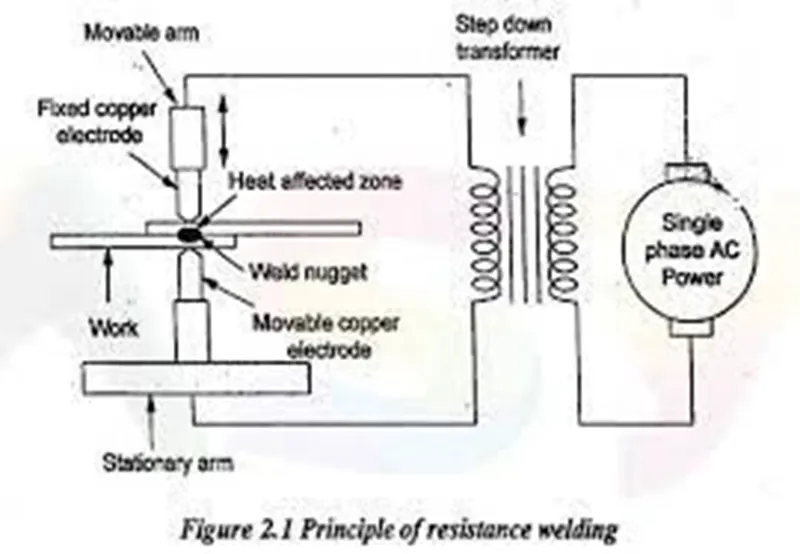
Resistance welding is a technology widely used in the manufacturing industry for joining sheet metal & components.The weld is made by conducting a strong current through the metal combination to heat up & finally melt metal at localized points predetermined by the design of electrodes and or the work piece to be welded.A force is always applied before, during & after the application of currents to confine the contact area at the weld interface & in some work pieces to forge the work piece. Below fig. shows resistance welding techniques.
Types of resistance welding:
- Resistance spot welding
- Resistance seam welding
- Resistance projection welding.
Resistance spot Welding:
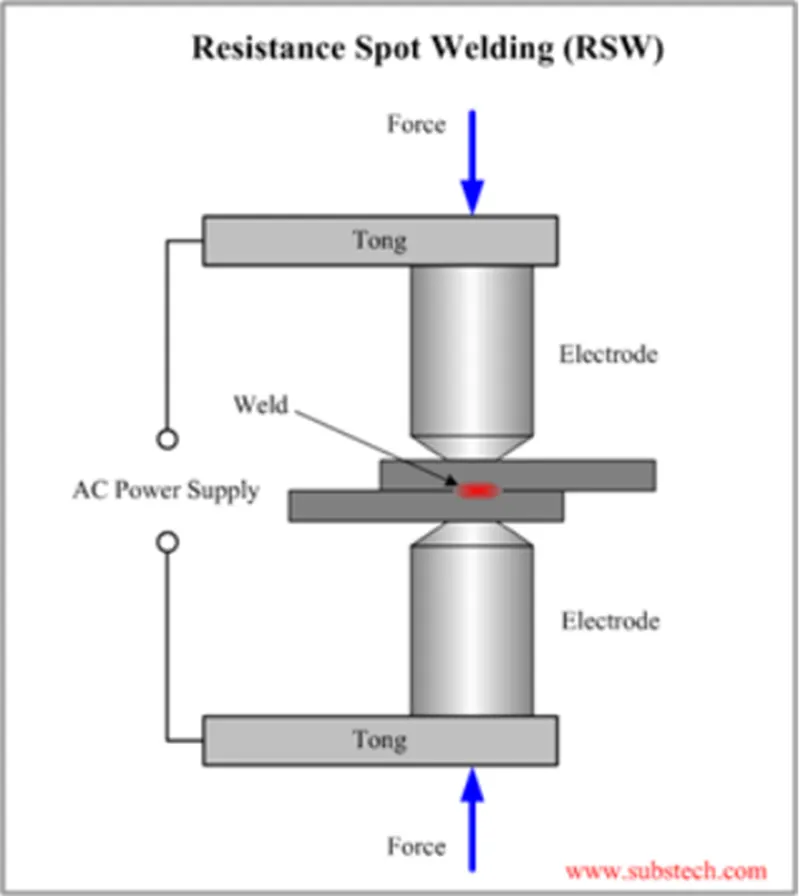
The process is used for joining sheet materials & uses shaped copper-chromium or zirconium alloy electrodes to apply pressure and convey the electrical current through the work piece.
Heat is developed mainly at the interface between two sheets, eventually causing the material being welded to melt, forming a molten pool, the weld nugget.
The molten pool is contained by the pressure applied by the electrode tip & the surrounding solid metal.
Resistance Projection Welding
Like other Resistance Welding Processes, Projection Welding uses heat generated by resistance to the flow of welding current, as well as force to push the work pieces together, applied over a defined period of time. Projection Welding localizes the welds at predetermined points by using projections, embossments or intersections, all of which focus heat generation at the point of contact. Once the weld current generates sufficient resistance at the point of contact, the projections collapse, forming the weld nugget.
Solid Projections are often used when welding fasteners to parts. Embossments are often used when joining sheet or plate material. An example of Projection Welding using material Intersections is cross-wire welding. In this case the intersection of the wires themselves localizes heat generation, and therefore resistance. The wires set-down into one another, forming a weld nugget in the process.
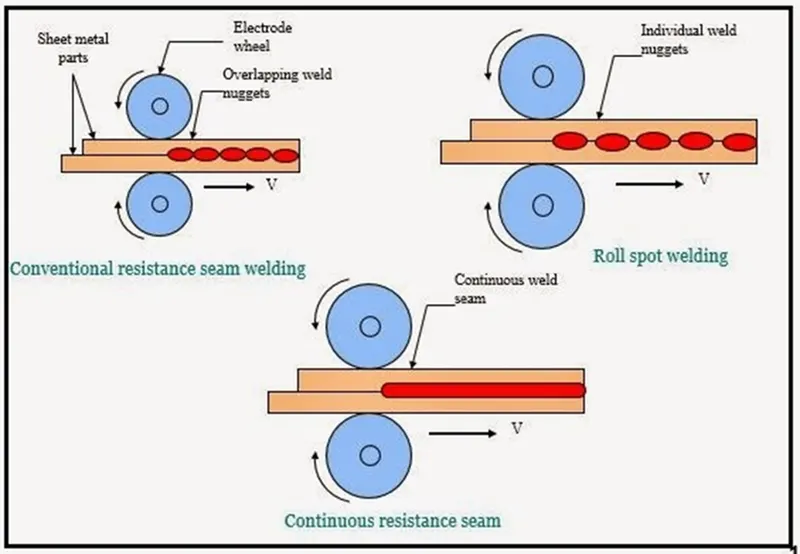
Resistance seam welding:
Resistance seam welding is a welding process for joining metal sheets in continuous, often leak-tight, seam joints by directly applying opposing forces with electrodes consisting of the rotary wheel. It differs from flash welding in that flash welding typically welds the entire joint at once and seam welding forms the weld progressively, starting at one end. The current & the heat generation is localized by peripheral shapes of the electrode wheel Seam welding is mostly applied in the manufacturing of containers radiators & heat exchangers etc. Resistance seam welding is used where leakage-proof continuous welding is required. Like spot welding, seam welding relies on two electrodes, usually made from copper, to apply pressure and current. The electrodes are often disc-shaped and rotate as the material passes between them. This allows the electrodes to stay in constant contact with the material to make long continuous welds. The electrodes may also move or assist in the movement of the material. Seam welding produces an extremely durable weld because the joint is forged due to the heat and pressure applied. A properly welded joint formed by resistance welding can easily be stronger than the material from which it is formed. A common use of seam welding is during the manufacture of round or rectangular steel tubing. Seam welding has been used to manufacture steel beverage cans but is no longer used for this as modern beverage cans are seamless aluminum. In automobile industries, this welding process is used to produce leak-proof fuel tanks.
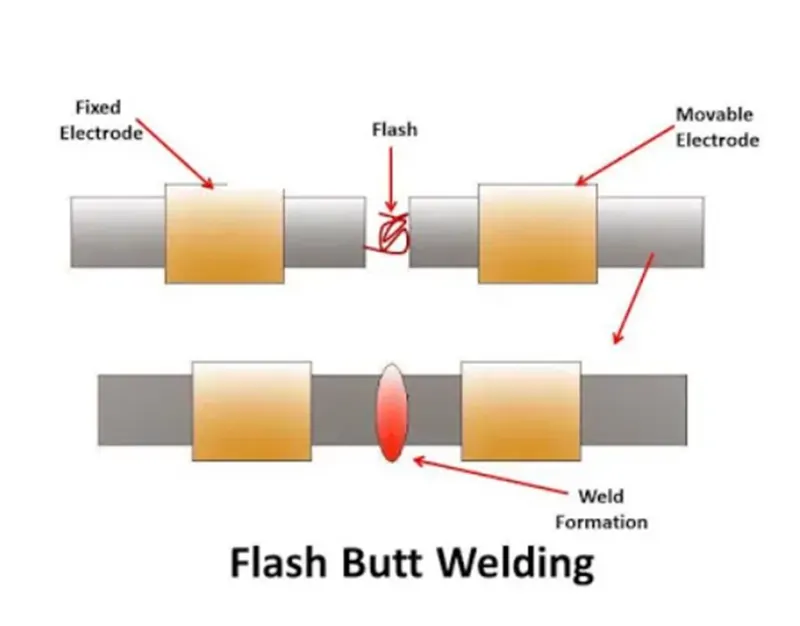
FLASH BUTT WELDING
It is another type of resistance welding which is used to weld tubes and rods in steel industries.
In this process, two work pieces which are to be welded will be clamped in the electrode holders and a high pulsed current in the range of 100000 ampere is supplied to the work piece material.
In this two electrode holders are used in which one is fixed and other is movable.
Initially the current is supplied and movable clamp is forced against the fixed clamp due to contact of these two work pieces at high current, flash will be produced.
When the interface surface comes into plastic form, the current is stopped and axial pressure is increased to make joint. In this process weld is formed due to plastic deformation.
APPLICATIONS
- Resistance welding is widely used in automotive industries.
- Projection welding is widely used in production of nut and bolt.
- Seam welding is used to produce leak prove joint required in small tanks, boilers etc.
- Flash welding is used to welding pipes and tubes.
- What is fusion welding and types of fusion welding with its application in the automotive sector?
In fusion-welding processes, heat is applied to melt the base metals. In many fusion welding processes, a filler metal is added to the molten pool during welding to facilitate the process and provide strength to the welded joint. When no filler metal is used, that fusion welding operation is referred to as an autogenous weld. Fusion welding is unique, however, because of its ability to “fuse” the respective objects. Assuming the objects are made of the same or similar materials, the heat produced by a welding rig will melt their surfaces, thereby allowing the objects to fuse together. Fusion welding is categorized according to the source of heat for example electric arc, electric resistance, gas, and high energy.
Arc Welding:
The most popular type of fusion welding is arc welding. The process involves either a consumable or non-consumable electrode rod or wire. Arc welding lives up to its namesake by relying on an electric arc to join two or more objects. An arc is produced between the tip of the electrode & workpiece to be welded by an AC or a DC power supply. With electric arcs measuring up to 6,000 degrees Fahrenheit, this fusion welding process is highly capable of melting even the toughest metals. Furthermore, arc welding can be performed underwater, making it an ideal solution for offshore welding projects. This process can be categorized into two different types; consumable and non-consumable electrode methods. Below figure shows.
Types of arc welding:
- Manual Metal Arc Welding
- MIG
- TIG
- Submerged Arc Welding
- Plasma Arc Welding
- Atomic Hydrogen Arc Welding
- Carbon Arc Welding
- Eletroslag Welding
Manual Metal Arc Welding/ Shielded Metal Arc Welding:
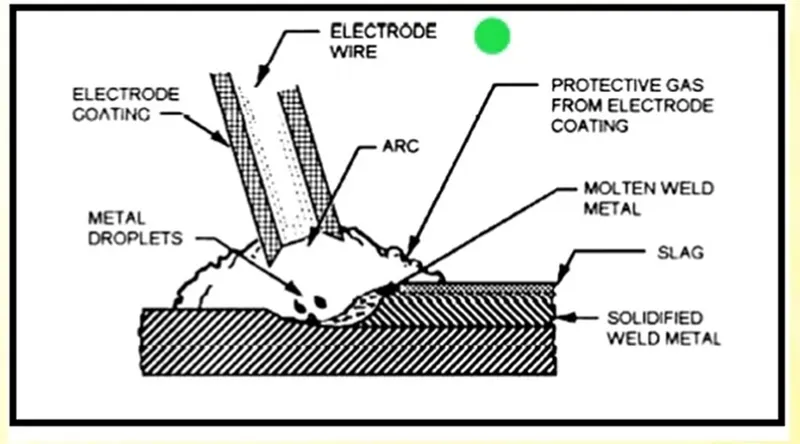
Fig shows: Shielded Metal Arc Welding (SMAW)
Manual Metal Arc Welding (MMAW/MMA) also known as Shielded Metal Arc Welding (SMAW) and informally known as stick welding.
Stick welding is a process where the arc is struck between the metal rod (electrode flux coated) and the work piece, both the rod and the work piece melts to form the weld.
An electric current either AC/DC is used as electric power supply.
That power supply is used to form an electric arc between the electrode and the work-pieces.
The work piece and electrode melts to form a molten pool which solidifies then to form the joint.
As the weld is laid, the flux coating of the electrode provides the shielding gas as a layer of slag. These protects the weld area from atmospheric contamination.
It is used in the joining of base parts of chassis and doors of the automobiles.
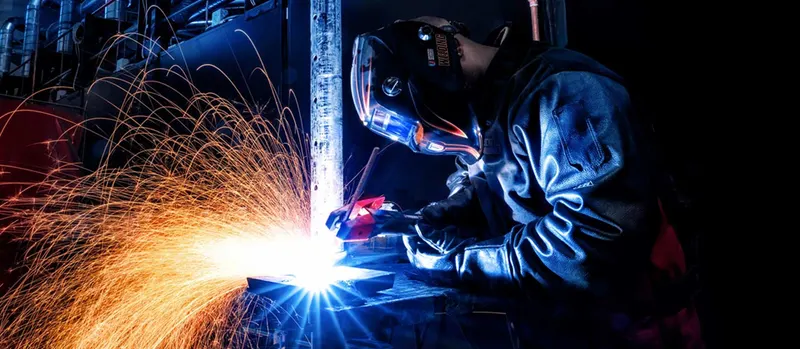
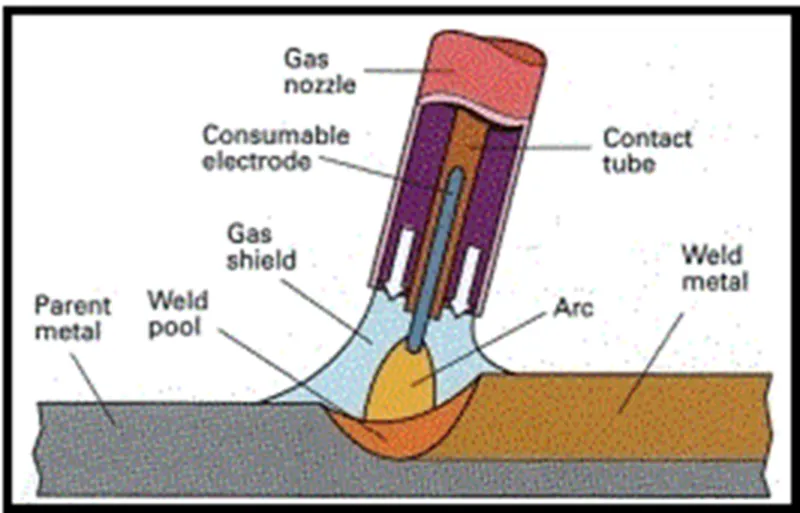
Metal Inert Gas welding (MIG)
Metal inert gas (MIG) is an arc welding technique in which a consumable electrode is used to weld two or more work pieces. MIG welding is the most common arc welding process, in which arc forms between consumable wire electrodes & work pieces leading them to melt & join. Both use a shielding gas to protect the weld from airborne contaminants or oxidation in the case of MIG welding. The process can be automatic or semi-automatic. A constant voltage, direct current power is most commonly used with GMAW, but a constant current system, as well as AC, can be used. There are four primary methods of metal transfer in GMAW, called globular, short-circuiting spray, each of which has distant properties & corresponding advantages & limitations. MIG welding makes use of the following components,
Consumable electrode
Inert gas supply
Welding head
AC and DC power supplies.
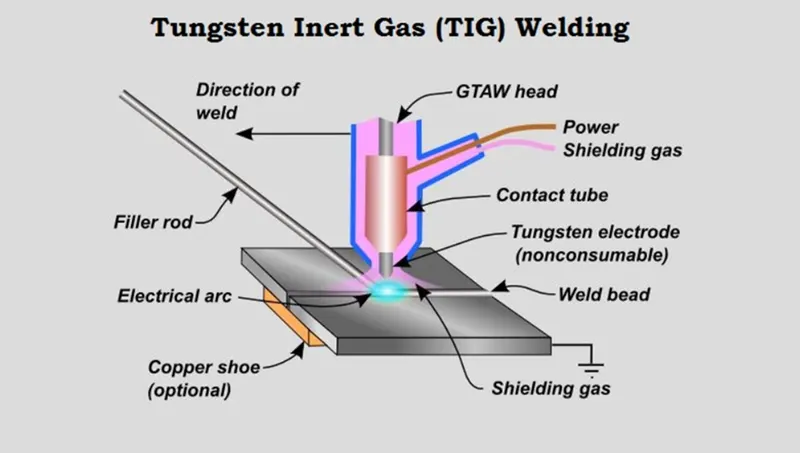
TIG - Tungsten Inert Gas Welding.
It is an arc welding technique that uses a non-consumable electrode tungsten electrode to weld 2 or more work pieces.
The following components are required to perform TIG welding. They are:
- Power supply
- Non-consumable tungsten electrodes
- Inert gas supply
- Filler rod(depends on nature of work piece)
- Welding head
An inert shielding gas is used to protect from oxidation or other atmospheric contamination.
A constant current welding power supply produces electrical energy, which is conducted across the arc through a column of highly ionized gas and metal vapors known as plasma.
TIG welding is most commonly used to weld thin sections of stainless steel and non-ferrous metals such as aluminium BIW structures of automobile.
4.SUBMERGEED ARC WELDING
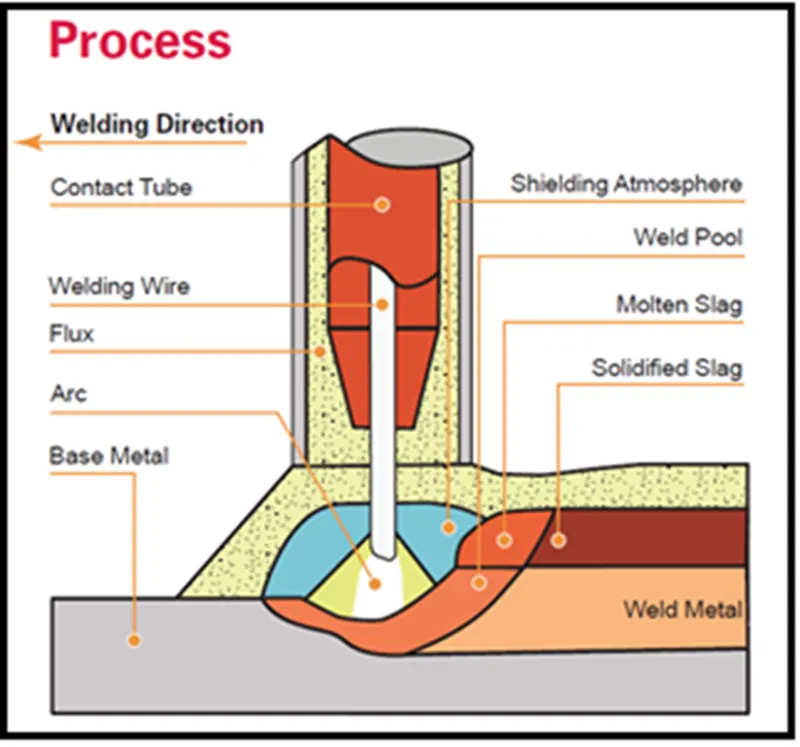
SAW works with a granular flux that creates a thick layer during welding, which completely covers the molten metal and prevents sparks and spatter.
This method enables deeper heat penetration because it acts like a thermal insulator. SAW is used for high-speed sheet or plate steel welding.
It can be semiautomatic or automatic. However, it is limited to horizontal welds.
Plasma arc welding:
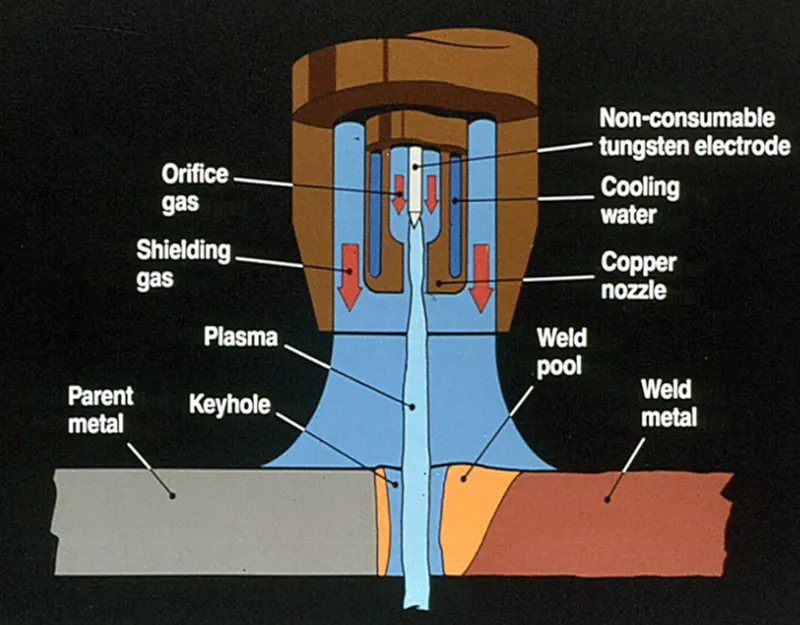
Plasma arc welding (PAW) is similar to GTAW or gas tungsten welding. In this kind of welding process, the arc will generate among the work part as well as the tungsten electrode. The major dissimilarity between plasma arc welding and gas tungsten welding is that the electrode is located within the torch of Plasma arc welding. The gas can be heated at the temperature of 30000°F & change into plasma to attack the welding region. The figure below shows the working principles of plasma arc welding.
Oxy-Fuel Welding
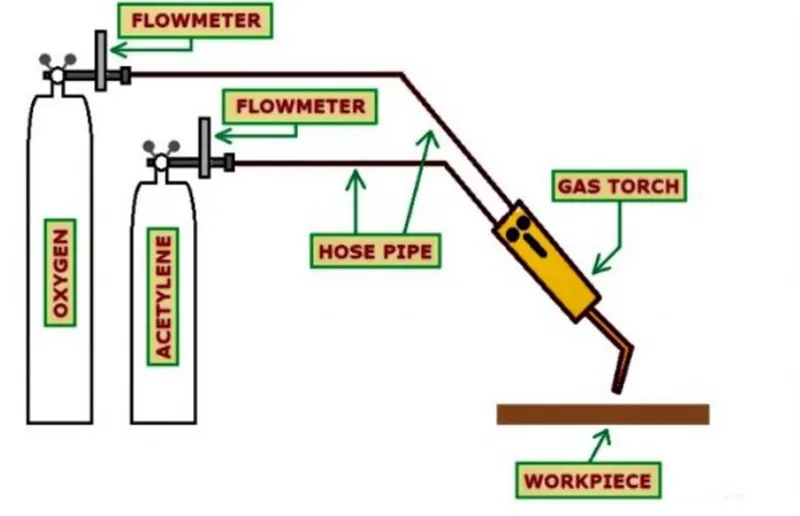
Oxy-fuel welding uses a filler rod to join two pieces together. The difference is that instead of an open flame, oxygen and fuel gases are used to heat the metal. This type of welding works well on thicker metals that cannot join with gas welding. This type of welding can get done manually or with a machine. Depending on the project’s size and scale, it can be semi-automatic or automatic if a machine is used.
5.What is the 3-2-1 principle?
A fundamental concern in metalworking is locating the part to be machined, punched, bent, or stamped relative to the work platform (fixture). For example, a CNC machine tool starts its process at a specific point relative to the fixture and proceeds from there. Hence, the accuracy with which a part is machined is quite dependent on the accuracy with which it is positioned in the fixture.
Accurate locating of not just one part, but each and every part that is loaded into the fixture is crucial. Any variation in part location on the fixture adds to the dimensional tolerance that must be assigned to the finished parts.
Additionally, the method of supporting and securing the part in the fixture affects not only dimensional tolerances, but surface finishes as well. This is true because improper supporting or clamping can temporarily or permanently deform the part. Hence, techniques for supporting and clamping must be considered together with the method of locating in order to assure repeatability from part-to-part.
Locating of a part to be machined is a three-step process:
1. Supporting
2. Locating (positioning)
3. Holding (clamping)
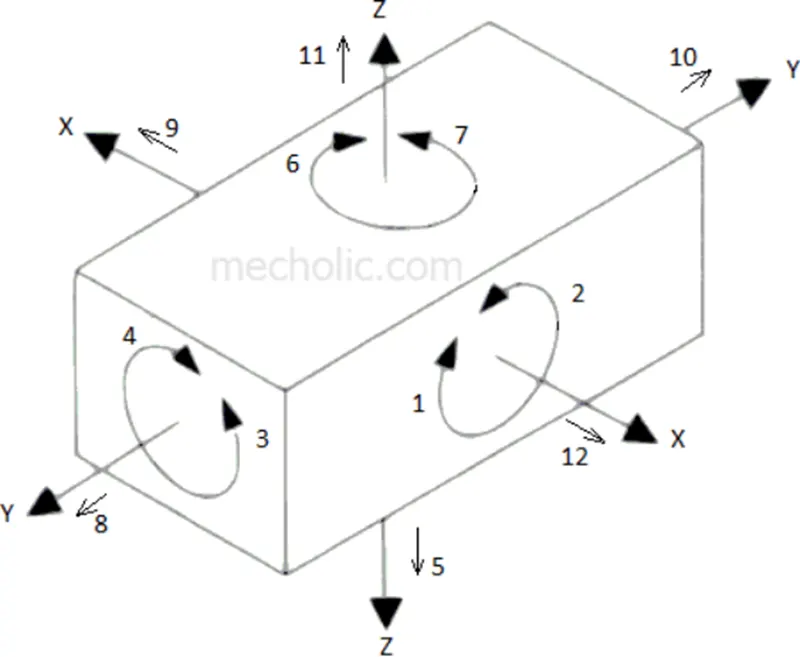
For a fixture designer, the major portion of design time is spent deciding how to locate the workpiece in the fixture.
You know that any free body has a total of twelve degrees of freedom as below:
6 translational degrees of freedom: +X, -X, +Y, -Y, +Z, -Z And
6 rotational degrees of freedom:
Clockwise around X-axis (CROT-X)
Anticlockwise around X-axis (ACROT-X)
Clockwise around Y-axis (CROT-Y)
Anticlockwise around Y-axis (ACROT-Y)
Clockwise around Z-axis (CROT-Z)
Anticlockwise around Z-axis (ACROT-Z)
First Plane
Geometry tells us that three points are required to define a plane. This is the "3" in 3-2-1. So, three specific points are used to define the first plane. Fewer than three points cannot define a plane, and in the real world dimensional tolerances mean that four or more points will not be coplanar. A real-world, less than ideally perfect part placed on four or more reference points will, in fact, rest on only three of the points due to its less than perfect surface. Different parts may rest on different combinations of three points, resulting in variation between finished parts. A stool can be used to illustrate this concept. A two-legged stool would certainly be unstable. A three-legged stool sits rock-solid. A four-legged stool is often found to rock. In the illustration, a three dimensional part, represented by a cube, is placed on a datum plane defined by three support points. The part’s six degrees of freedom have now been reduced to three. It can still move along the X or Y axes, and it can still be rotated about the Z axis. (The part cannot move along the Z axis because it is held against the plane by clamping force.
Second Plane
A second plane, if it is perpendicular to the first, can be defined by two points, the "2" in 3-2-1. The part is now constrained to one degree of freedom: movement along the Y axis. (The part cannot move along the X or Z axes because it is held against the planes by clamping force.)
Third Plane
A third plane, if it is perpendicular to both of the first two planes, can be defined by one point, the "1" in 3-2-1. The part is now entirely constrained. It cannot move along or rotate about the X, Y, or Z axes. (Remember that the part is held against each of the three planes by clamping force.)
Repeatability
Repeatability is a paramount concern. It means that each part should be nearly identical to each other part coming off the same fixture. "Nearly identical" actually has a specific, quantifiable meaning: key dimensions of all parts produced on the same fixture must fall within defined tolerances.
In order to stay within tolerances, it’s best if the work piece surfaces intended to contact the support points are machined. Cast surfaces are usable, but they tend to create tolerance problems. Machined holes are the number one choice, because two machined holes can be used to eliminate all but one degree of freedom.
The next best feature to use for consistent locating is machined surfaces at right angles. The "machined surface" desired here can simply be a tab or small flat specifically included for locating purposes.
Repeatability is achieved through application of the 3-2-1 method to the three aspects of the locating process:
1. Supporting
2. Locating (positioning)
3. Holding
Supporting
The part is supported from "below" with reference to the Z axis. (Introduction of the first reference plane.)
Gravity positions the part against the support locator.
Provide adjustable auxiliary support points as needed to prevent deflection.
Vertical location with respect to the fixture is now established
The part is positioned horizontally, in the X-Y plane. (Introduction of the second and third reference planes.)]
Holding
The part is clamped against fixed locators. Therefore, a known and unvarying position of the part is maintained with respect to the X, Y, and Z axes.
One strap clamp or clamp arm will restrict the work piece in three dimensions due to friction between the work piece and clamp. However, friction alone may not be enough to prevent the work piece from moving during machining.
Cutting forces will not move a properly supported and clamped part.
Locating
The part is positioned horizontally, in the X-Y plane. (Introduction of the second and third reference planes).
Summary: Clamping Rules of Thumb
Define three reference planes on the work piece and fixture.
Provide one opposing clamping force opposite each plane to restrict movement.
When in doubt, rely on additional cylinders to take up uncertainty.
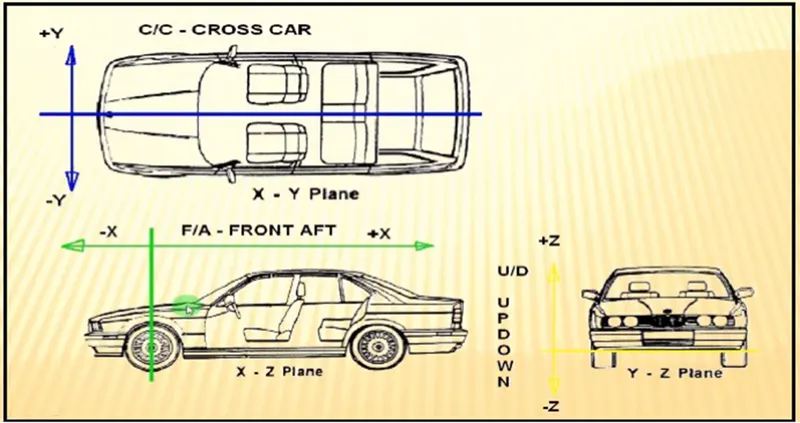
6) Define Body coordinate system?
The coordinate system is the reference system consisting of set of points,lines and surfaces used to define the positions of the points in space in either 2 or 3 dimensions.BCS is also known as car line and body line.
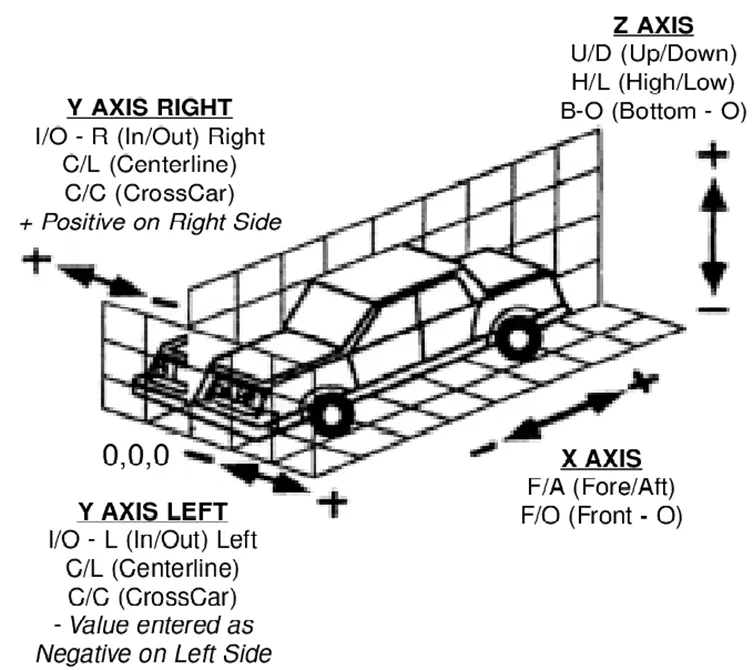
X direction- Longitudinal direction
Y direction- Transverse direction
Z direction- Vertical direction
The origin of the body coordinate system is defined at the front center of the vehicle. Along X axis it indicates the length of the car, along Z axis indicates height of the car, and along Y axis indicates width of the car.
Body coordinate system is mainly used in automotive industry for designing the body parts
VEHICLE ORIENTATION:
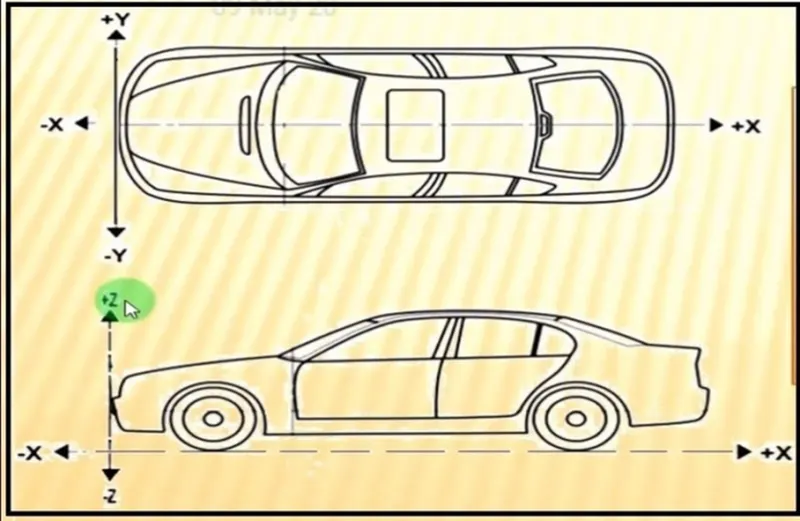
All vehicle product drawings are identified numerically relative to the three vehicle planes described and shown below.
X= longitudinal direction (fore & after-F/A) or (Front O line-FOL). Y= transverse direction (Cross car-C/C) or (Centre O line-COL).
Z= Vertical direction (Up & down- U/D) or (Bottom O Line-BOL).
The origin of the body coordinate system (OX) is defined at the front center of a vehicle. It indicates the length of the car & the coordinate system (OZ) is below its underbody indicates the height of the car & the coordinate system (OY) whose starting point is the center of the car's body indicates the width of the car.
Maintaining X, Y & Z coordinates in the fixture is a very important factor.
We should try that the coordinates of locating & clamping points should not be in three decimal (e.g. X=100.124, Y=245.127, Z=450.458)
They should be in the whole nos or max up to 1 decimal. Once these coordinates are maintained automatically the BIW base structure is maintained
7.Elaborate Body Plane System & its essentials.
BODY PLANE SYSTEM
Body planes are reference planes in an automotive car. These planes are used to define the GD&T of all parts in an automotive domain.
Body planes are 3 mutually perpendicular imaginary planes.
The measurement from body plane to parts are called body plane dimensions.
The planes are generally considered to be present in the driver position or sometimes at engine location or at the front end of the car depending on the customer.
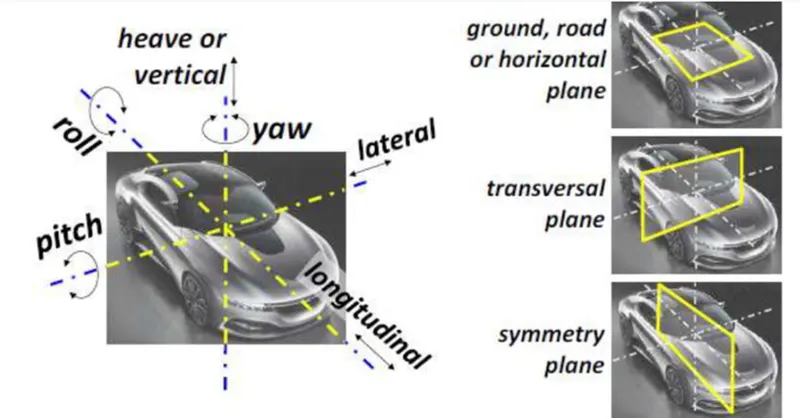
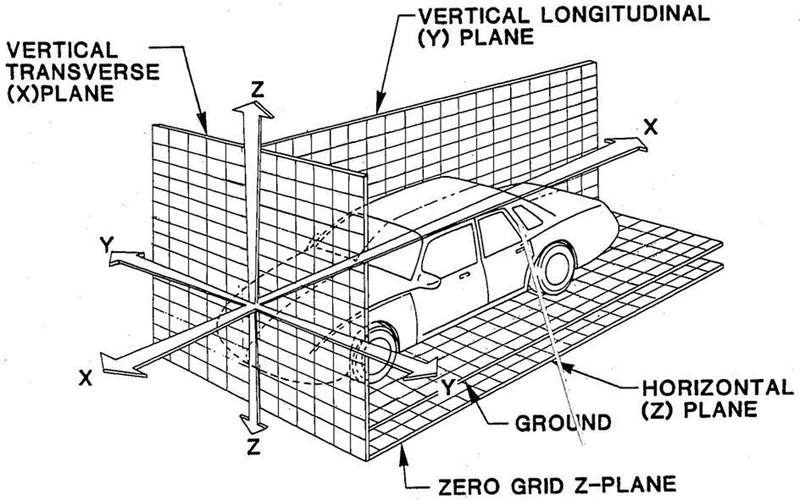
The measurement from the body planes to the parts are called the body line dimensions.
X = Longitudinal direction[(Fore and After- F/A) or (Front O Line- FOL)]
Y = Transverse direction[(Cross car- C/C) or (Centre O Line- COL)]
Z = Vertical direction[(Up and Down- U/D) or (Bottom O Line- BOL)
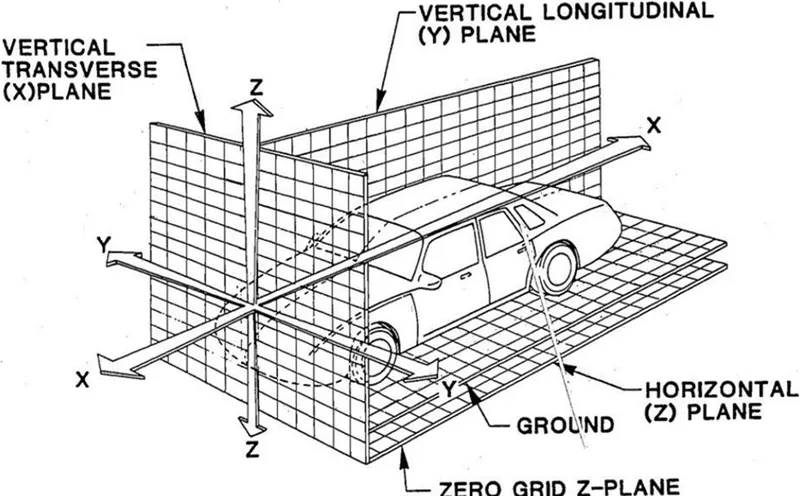
Fig shows: Typical body plane of a car
Body line dimensions are essentials for the following reasons:
It defines exact position of each product in the vehicle with respect to a fixed origin.
It ensures flawless design for assembly.
While designing lines, all the designs are carried out relative to the body lines viz.fixtures,turntables,etc.,
It assists in easy location of different parts in the vehicle.
It aims in creating a standardized system.
It assists in quality check.
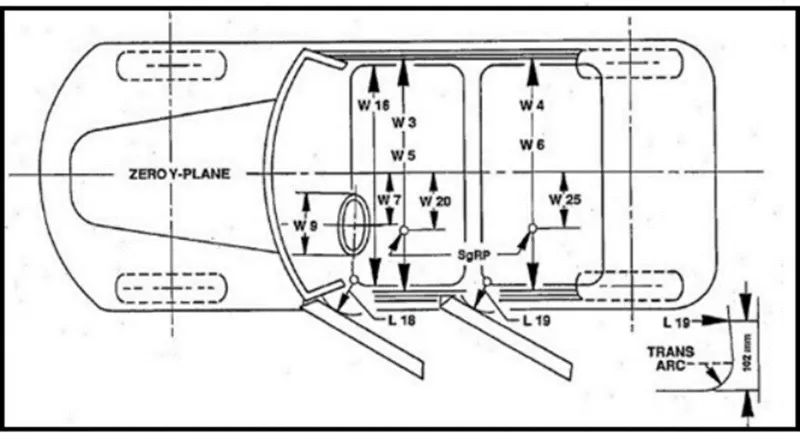
These are basic essential things that body line dimension would help in BIW. It could help in designing lines like welding lines, assembly lines, or car bodies through fixtures & turntables, etc. This help in designing every tool. Particular assemblies or parts are designed w.r.t body lines or an axis system or car line also helps in quality while doing CMM of that system. CMM is basically done with the help of coordination. It has related to a particular fixture with that car part because the dimension and coordinates of the hole & pin should match so it will help in the quality check also. We just give coordinates that belong to that hole both coordinate should match. With this matching means quality is approved. The below figure shows some examples.