Hood design-Week 2
HOOD DESIGN
AIM:Design Hood Outer Panel, Inner Panel and the necessary reinforcements by following the Master Section mentioned with the Design parameters.
OBJECTIVE: It is required to create a hood assembly including hood outer panel,hood inner panel along with necessary reinforcements.Also master section is given to check and find the required measurements and required modififcatios that to be made to the hood inner part and also to the outer part.In the end to perform draft anlaysis for the hood innner part component that is made according to the master section.
METHODOLOGY:
- Creating an assembly of hood outer panel,hood inner panel,striker and hinge
- Creating hood inner panel according to the master section given and creating embosses with minimum draft angle of '7 degree'
- Creating hood outer panel with hemming
- Developing of mountings for both hinge and striker
- To position all parts in assembly and creating a proper hood assembly
HOOD INTRODUCTION
A car hood, also referred to as a “bonnet”, is the hinged cover that rests over the engine bay of a front-engine vehicle. The car hood protects the engine and connected parts from the elements while providing easy access for repairs and maintenance.A standard hood on a modern car with an engine in the bonnet has hinges on the edge facing the windshield and a latch near the center of the bumper edge that holds it in place.This design is simple and intuitive.A well-fitted hood will connect with its latch and have a flush edge with the rest of the vehicle’s body. Extra space may indicate a bad fit or an improperly latched hood.Lifting the hood lightly and reaching towards the middle of the bumper should reveal the latch enough to release it. Some vehicles have hoods with hinges near the bumper.When opened, the hood tilts forward and exposes most of the engine block; this style is common on big rigs. Even more rarely, two-panel hoods with a split down the middle of the vehicle are used, but they are typically a cosmetic decision.
MATERIALS USED FOR HOOD CONSTRUCTION:
Mainly there are four types of materials are there which are commonly used in construction of hood by considering safety satndards and also weight reduction of the vehicles as well.
- Steel
- Aluminium
- Fibre glass
- Carbon fibre
in these carbon fibre and fibreglass are prefered by some after market companies to reduce the weight of the part.
HOOD TYPES:
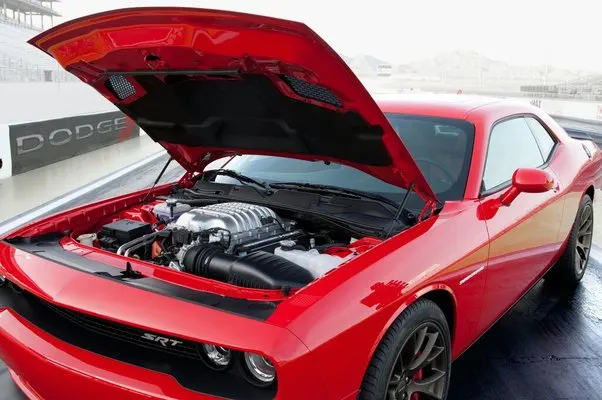
FRONT HOOD:It is the most common type of hood present in the market nowadays.The hinged part will be near to the wind shield.
FLIP-FRONT HOOD:It is another type of hood that is attached near to the bumper part.

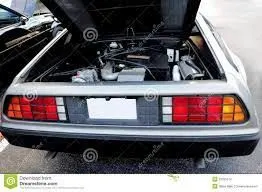
REAR HOOD:It is the type of hood that is attached to the rar side of the automobile.
HOOD COMPONENTS:
- HOOD INNER PANEL
- HOOD OUTER PANEL
- STRIKER
- HINGES
- SUPPORT ROD OR GAS STAY
HOOD OUTER PANEL
A car hood panel is one of the most important components of the BIW (body in white), it is considered as the closure sheet-metal component. A hood panel consists of two panels that are hemmed together to form the automotive hood assembly.The inner panel of the hood is not visible to the customer but this is the engineering feature of the outer panel. The outer panel has the aesthetic look to it but on its own is very weak and not capable of handling force during impact.
HOOD INNER PANEL
It is the engineering feature that gives support and stranght tho the hood outer panel.This part is not visible to the outside.
HINGES
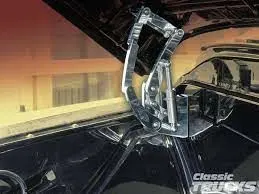
A hood hinge mechanism having a pivot pin having a D-shaped cross sectional shape positioned within a recess. The hood and pin are pivotal to a position whereat the D-shaped cross section is oriented to pass through a slotted opening to the recess to thereby allow the hood to be removed or installed on the vehicle.
STRIKER
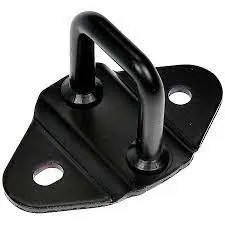
Our Hood Latch Striker is designed for long-lasting use. It's durable steel construction safeguards against body damage, ensuring the vehicle hood won't unexpectedly open while driving. Easy to install - latch restores proper hood functionality.
SUPPORT ROD OR GAS STAY
Support Rod - Support rod is basically long cylindrical rod. It safely keep an engine hood in an open state even if external forces are abruptly generated due to vibration & wind.
Gas stays, also known as lift supports or lift struts, are essential parts of our cars, trucks, boats, and more. We rely on them almost daily to easily open and close the vehicle's hood, trunk, or tailgate and it is preferred for heavy hoods
DESIGN CONSIDERATIONS FOR HOOD
OPENING ANGLE OF HOOD
- The opening factor is very important factor in hood design. While accessing the engine compartment hood will be open at desirable angle.This angle should be more than the height of the person that is going to interacdt with the part because then only he can freely work on the part. The opening angle is decided based on the average height of the person in that region.And there are certain standards like JAPAN,EUROPE,USA which are most commonly followed around the world.
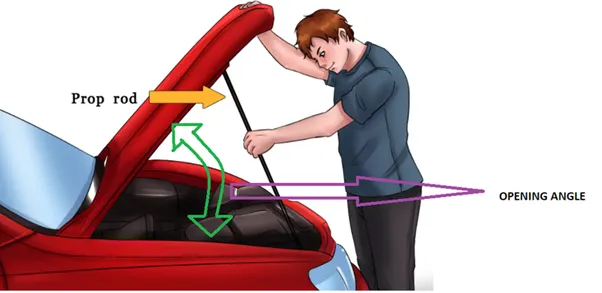
The support rod is fixed accoridngly to which how much opening angle is needed.
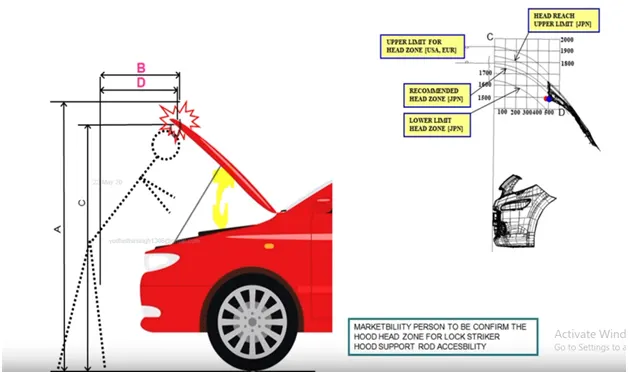
HOOD RULES REGULATIOS
EURO NCAP Assessment:
- The European New Car Assessment Programme (Euro NCAP) is a European voluntary car safety performance assessment programme.
- It is an independent crash-test safety body, which rigorously assesses the safety of cars, and helps to further the advancement of car safety technology. With safety at the forefront of all car makers minds, and many firms and organisations signing up to the ‘Vision Zero’ initiative – which aims to eliminate all deaths and serious injuries from our roads – Euro NCAP’s test programme is an ever-evolving one, with its architects periodically updating crash-test regimes to ensure cars are assessed using the most stringent criteria possible.
CATEGORY 1
PEDESTRAIN SAFETY: Euro NCAP tests three accident scenarios in which the pedestrian crosses directly in front of the path of the test vehicle, one in which the pedestrian is walking in the same direction as the vehicle, one in which the pedestrian is crossing a road into which the test car is turning and one where a pedestrian is behind the reversing car.Regulations have come into effect that place a limit on the severity of pedestrian head injury when struck by a motor vehicle. This is leading to more advanced hood designs
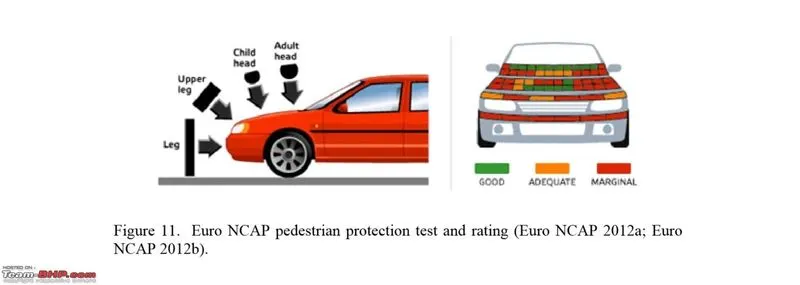
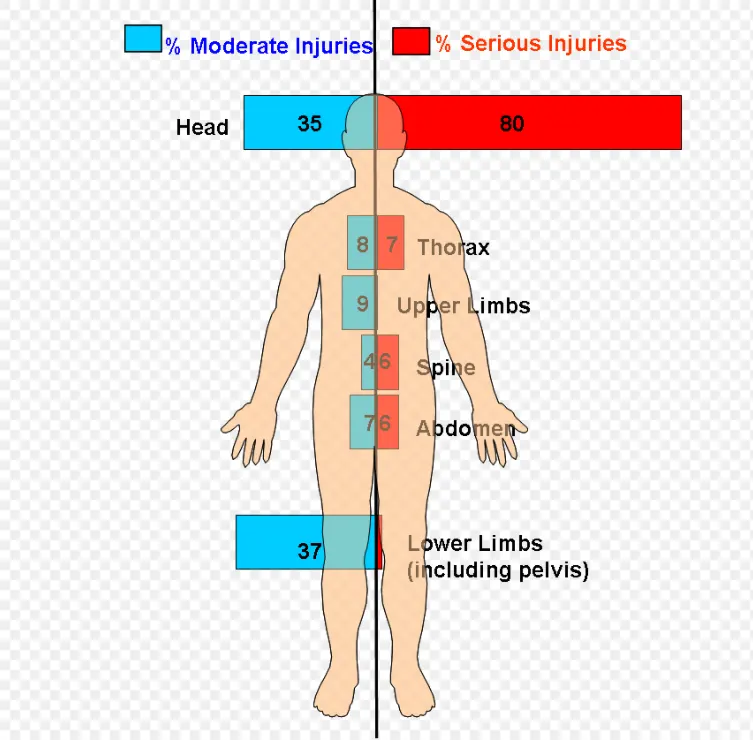
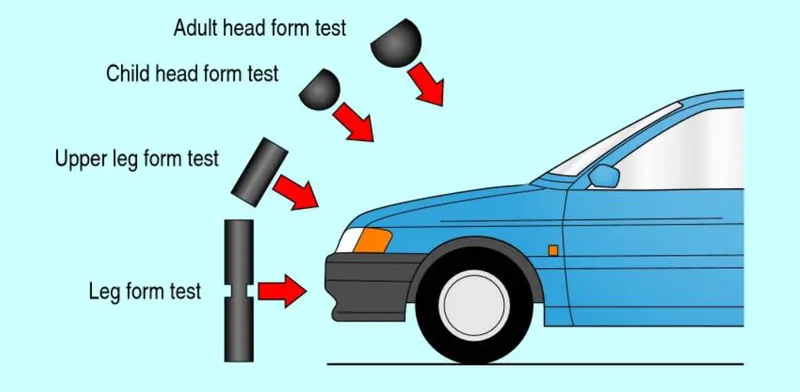
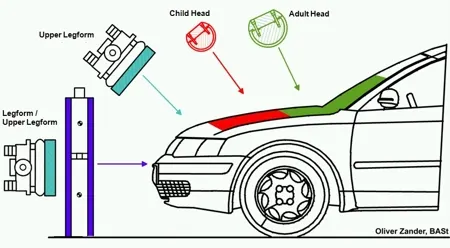
HEAD IMPACT:Car-pedestrian accidents account for a considerable numbers of automobile accidents in industrialised countries. Head injury continues to be more concerned with automobiles impacts, because the head is the most seriously injured part in many collisions including in pedestrian automobile collisions. To reduce the severity of such injuries international safety committee have proposed sub-system tests in which head foam impactors are impacted upon the car hood
- Safety is the most important criteria in automobile design which concentrates on both pedestrian and occupant safety. The pedestrians are the most vulnerable road users are at high risk of traffic accidents. The major reason for fatality of the pedestrian in traffic accidents is due to the head injury resulting from the hard impact of the head against the stiffer hood of the ground. This leads to the necessity of new inner hood panel which is less stiffer an pedestrian friendly.
- In this, the Adult and Child impact zone is taken into consideration and calculated by plotting the regions from the model data. In the model in this case the outer panel is offset to generate the deformation space in the engine compartment below the styling surface and thereby determining the interference. All these tests are conducted with the help of a dummy that is been hit by a car at 40 km /hr speed.
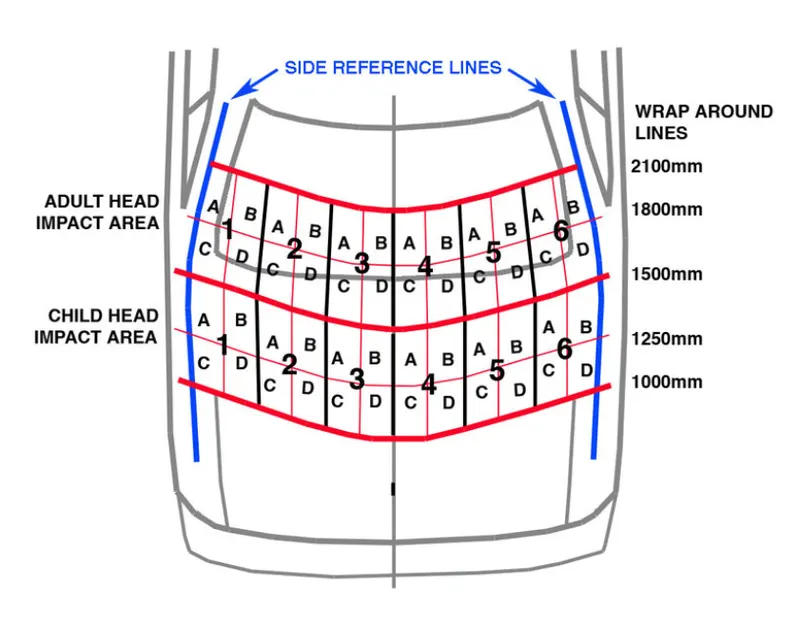
WRAP AROUND DISTANCE:During most pedestrian-vehicle crashes the car front impacts the pedestrian and the whole body wraps around the front shape of the car. This influences the head impact on the vehicle. Meanwhile the windscreen is a major impact point and tested in NCAP conditions. The severity of injuries is influenced by car impact speed; type of vehicle; stiffness and shape of the vehicle; nature of the front (such as the bumper height, bonnet height and length, windscreen frame); age and body height of the pedestrian; and standing position of the pedestrian relative to the vehicle front. The so called Wrap Around Distance WAD is one of the important measurements for the assessment of protection of pedestrians.
- When a car crashes on the pedestrian, the whole human body wraps around the front shape of the car, and the head impacts on the bonnet or the windscreen.
- The severity of the injury caused by the frontal crash depends on the type and shape of the vehicle, the speed of the vehicle, and the movement of the pedestrian relative to the vehicle. In addition to these parameters, the wrap around distance plays a major role in the safety measures of a pedestrian.
- During crash analysis, based on the wrap around distance, two test areas will be created namely the Child Head Impact Zone and the Adult Head Impact Zone.
Test Reports
- The head impact zone for child is around 1000 WAD to 1500 WAD.
- The head impact zone for adult is around 1500 WAD to 2100 WAD.
CATEGORY 2
PASSENGER SAFETY
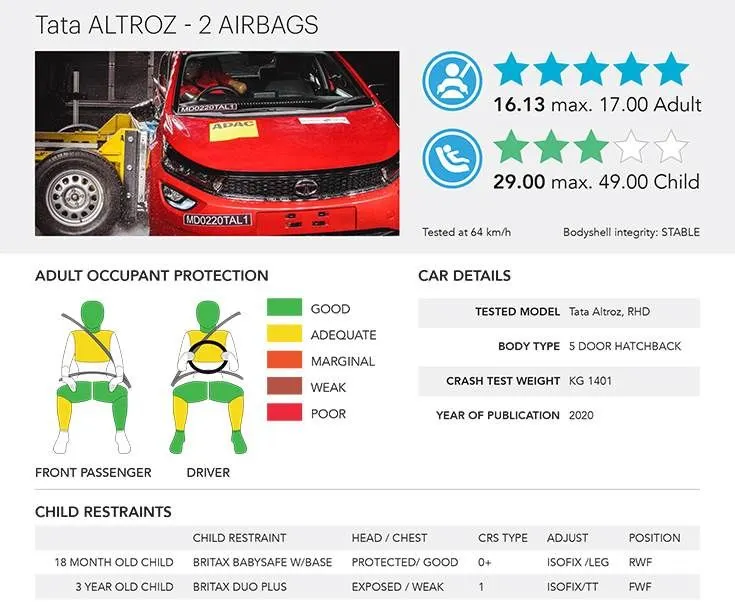
- The passenger safety is also important in NCAP. Adult Occupant Protection The Adult Occupant Protection score is determined from frontal impact, lateral impact and whiplash tests, which are done to evaluate the protection of adult driver and passengers offered by the vehicle, and from an assessment of the measures provided for prompt and safe rescue and extrication.
- The Passenger safety test taken for TATA Altroz.
MASTIC SEALANTS
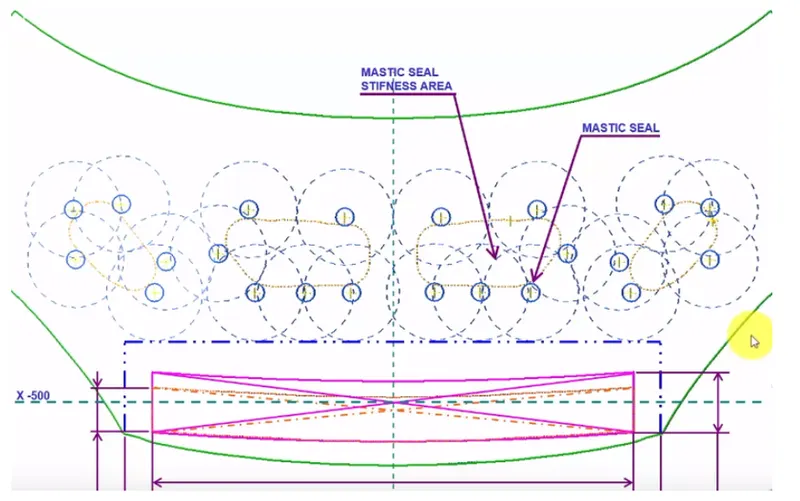
- The mastic sealant can act as a protecting layer between elements. The features of this sealant and how it works makes it different from the others. It forms a smooth exterior which makes the surface flexible while maintaining a hard plastic beneath the surface.Due to its flexibility, the sealant can be sued on different surfaces without preparing the surfaces first. To improve NVH (noise, vibrations, harshness), mastic sealants were provided on the inner panel to attach with outer panel. Here mastic points on the inner panel plays a major role to avoid Noise and Vibration into the cabin. NVH is measured by the instruments, namely microphones, accelerometer and force gauges, or load cells. Component and sub-assembly NVH tests are most commonly performed using a vibration shanker while entire vehicles usually on the test track or road simulator test-beds.
EMBOSS
- Emboss are provided in the inner panel of the hood assembly. This helps in weight reduction of the hood and also to dissipate the force during collision
MANUFACTURING PROCESSES OF HOOD
POINTS TO BE CONSIDERED FOR FEASIBLE MANUFACTURING
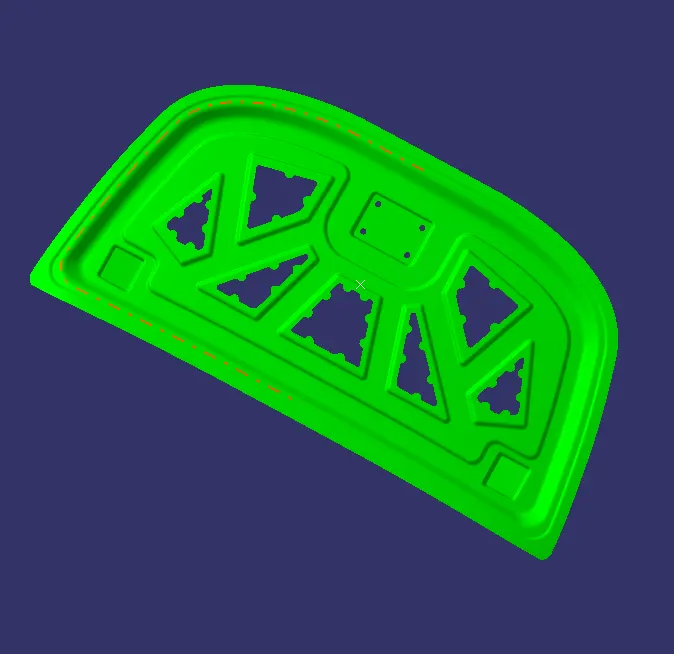
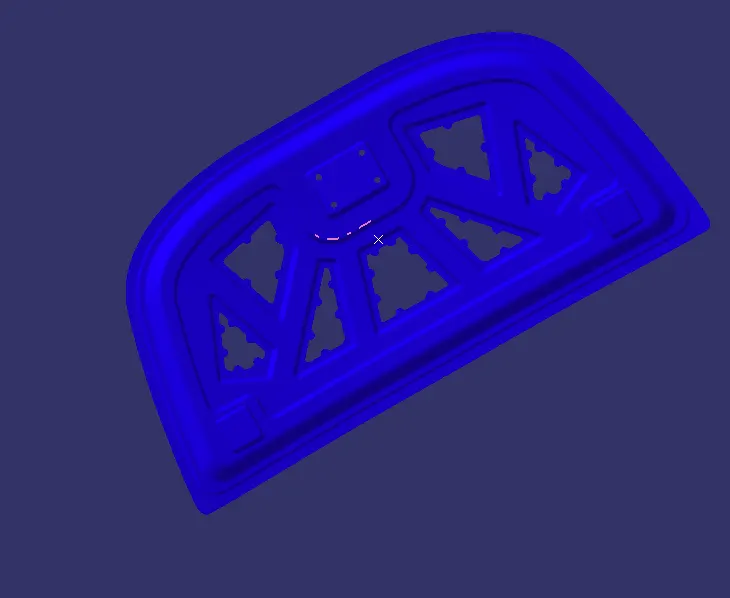
- First, the draft analysis of the sheet metal should be minimum 7 degrees.
- Then there should not be any sharp edges in the BIW component while manufacturing.
SHEETMETAL OPERATIONS
- Embossing
- Hemming
- Deep Drawing
EMBOSSING OPERATION
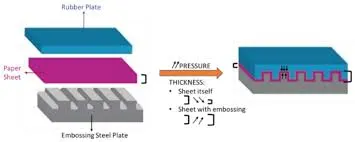
- Embossing is a stamping process for producing raised or sunken designs or relief in sheetmetal. This process can be made by means of matched male and female roller dies, or by- passing sheet or a strip of metal between rolls of the desired pattern, theoretically with no change in metal thickness, or by passing sheet or a strip of metal between rolls of the desired pattern.
- Metal sheet is drawn through the male and female roller dies producing a pattern or design on the metal sheet. Depending on the roller dies used, different patterns can be produced on the metal sheet.
- Emboss should be in 7 degree to 25 degree inclined in angle and it should not be in 90 degree angle, why because when we do stamping in manufacturing the stamping tool fits the sheet metal hence it will not come out of that sheet metal.
HEMMING OPERATION
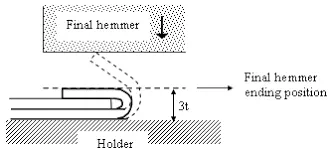
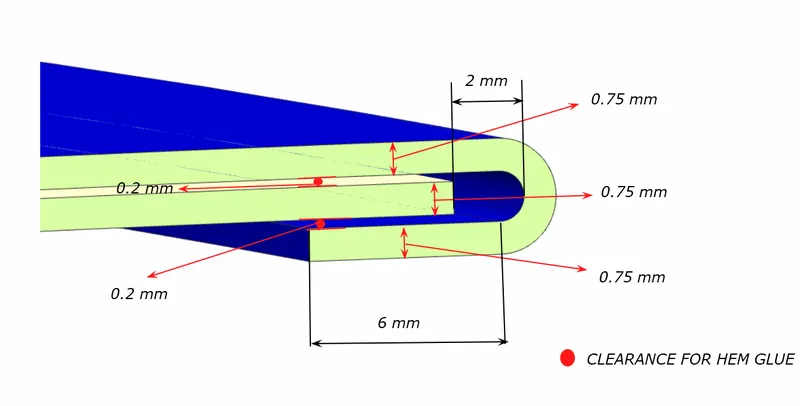
- Hemming is a forming operation in which the edges of the sheet are folded or folded over another part in order to achieve a tight fit. Hemming is a technology used in the automotive industry to join inner and outer closure panels together (hoods, doors, tailgates, etc.). It is the process of bending/folding the flange of the outer panel over the inner one. The accuracy of the operation significantly affects the appearance of the car’s outer surfaces and is therefore a critical factor in the final quality of a finished vehicle.
- In hood design, hemming is used in assembly as a secondary operation after deep drawing, trimming and flanging operations to join two sheet metal parts (outer and inner) together.
- In roller hemming process, a robot guides a small roller across the flange to fold a sheet onto itself or onto another sheet. The process is oriented to low volume automotive applications, providing a distinct advantage in manufacturing closures and subassemblies with developed flanges.
DEEP DRAWING OPERATIOIN
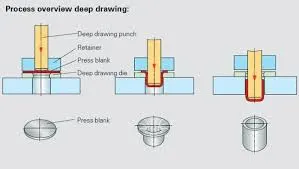
- It is a sheet metal forming process in which a sheet metal blank is radially drawn into a forming die by the mechanical action of a punch. It is thus a shape transformation process with material retention. The process is considered "deep" drawing when the depth of the drawn part exceeds its diameter. This is achieved by redrawing the part through a series of dies. The flange region (sheet metal in the die shoulder area) experiences a radial drawing stress and a tangential compressive stress due to the material retention property. These compressive stresses hoop stresses result in flange wrinkles (wrinkles of the first order). Wrinkles can be prevented by using a blank holder, the function of which is to facilitate controlled material flow into the die radius.
CONSIDERATIONS FOR HOOD CREATION:
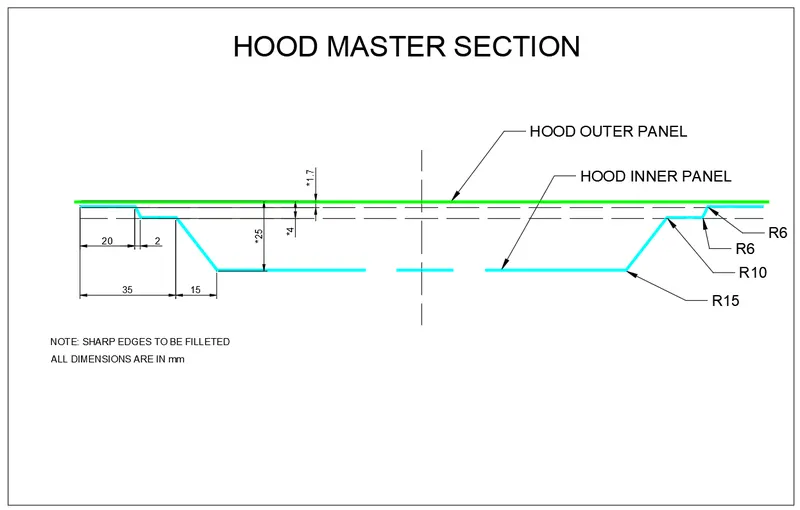
The master section is given to us to find out the necessary operations that is to be carried out and measurments that is to be followed and also other parts where reliefs are needed are also given to us to provide such necessary reliefs for the outer part of the hood.
HEMMING OPERATION DETAILS:
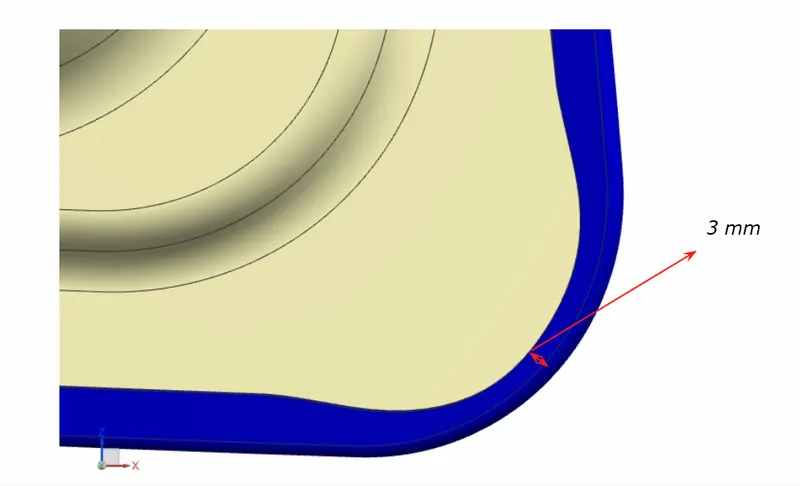
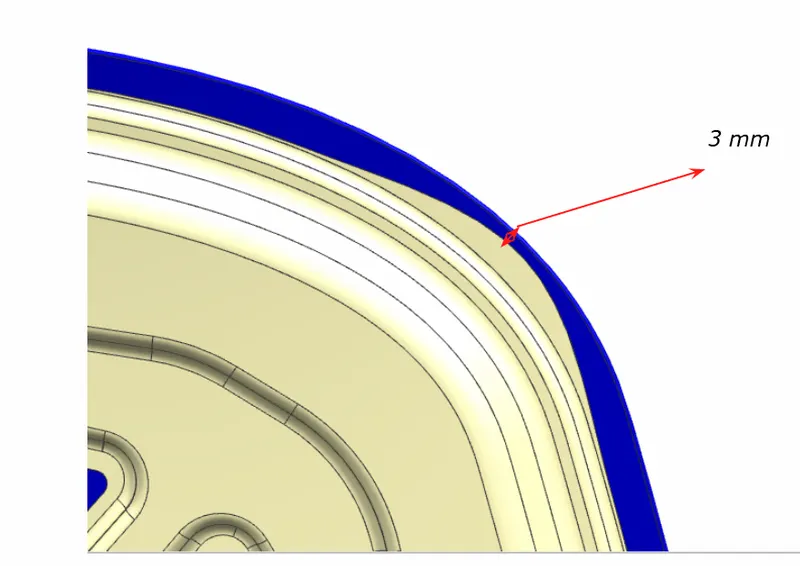
RELIEFS:
HOOD INNER PANEL CREATION:
Hood inner panel is created according to the requirements and necessary engineering features are provided as per requirements.
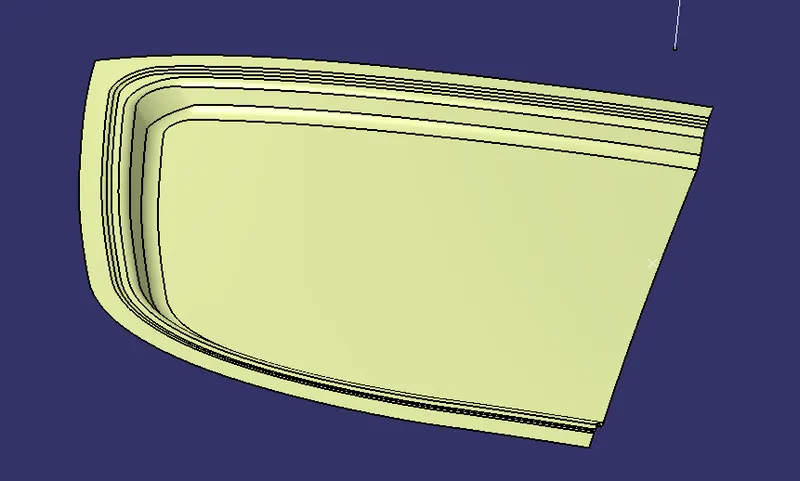
STEP 1:CREATING FLANGES
- Hood inner panel is created by offseting CLASS A surface of the outer panel to a disrtance of 1.7mm
- The outer panel is splitted into half using YZ plane
- Then flanges are created according to the master section by offseting and splitting in required distances using sweeps that is made by curve smoothed parallel curves
- Three flanges are created as per the master section and they are connected using multisection
- Then these parts are joined together using SHAPE FILLET by giving the necessary fillets as per the master section
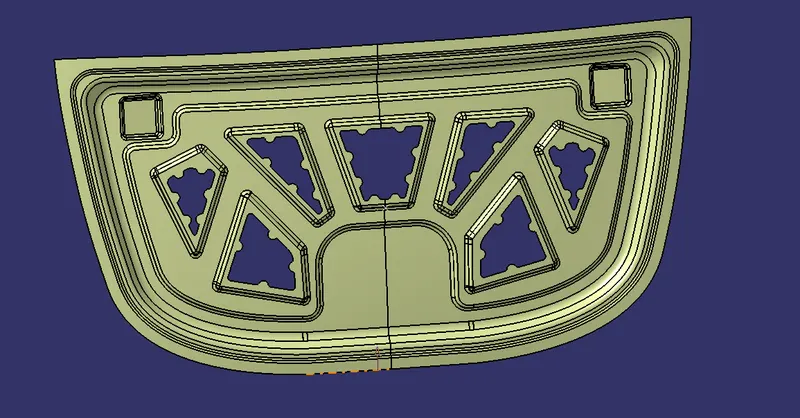
STEP 2:CREATING EMBOSSES
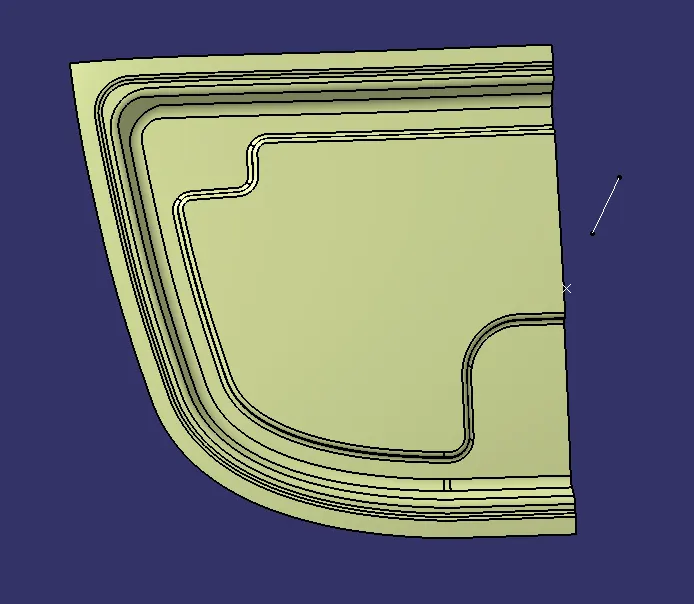
- Embosses are created by creating a sketch as per our requirments inorder to fit in by leaving space for both latch mounting and hinge mounting to be created
- The reference surface is offseted to a distance of 16.5mm
- And the sketch is sweeped after curve smoothing the sketch and also by giving the necessary draft direction where the minimum draft direction for the sheet metal is 7 degree
- And it is joined using SHAPE FILLET by giving any radius above the thickness of the component which is 3.7
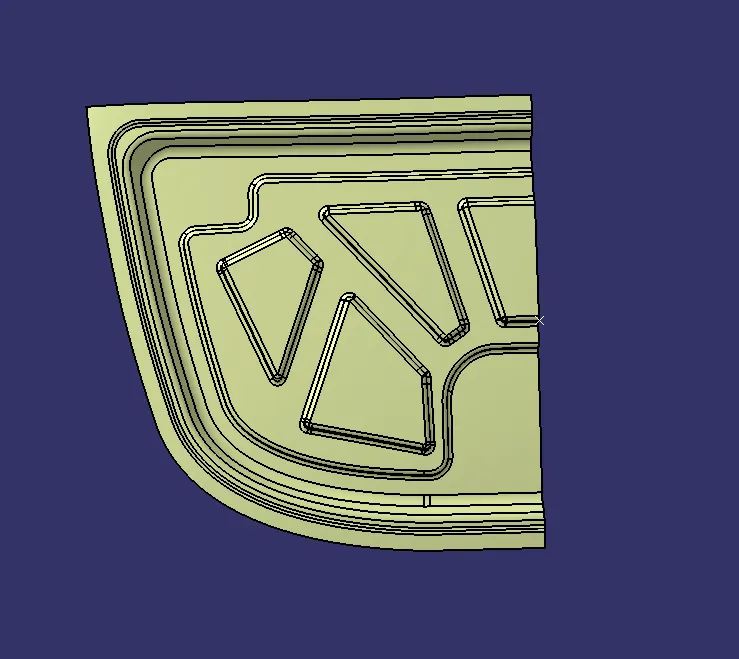
- Then other small embosses are created abive this emboss by creating necessary sketches as per our conviction and it should be created in a way that the impact should be carried away to the outside as much as possible
- For these small embosses the ref. surface is offseted to a distance of 6.5mm
- which is also created by creating sweeps for the skethces that are made and then joined using shape fillets later
- Between these embosses,its edges should be parallel to each other
STEP 3:CREATING CUT OUTS
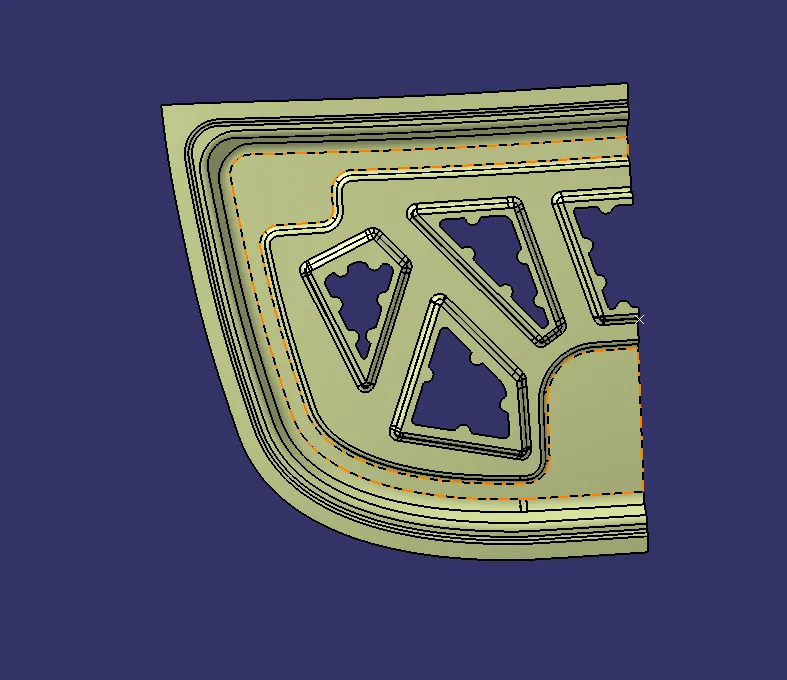
- Cutouts are created by creating sketches that is same shape as the samll embosses that we are created and keeping a 7mm distance from its edge to inside by using offset tool in sketcher tool bar we can achieve that
- circular shapes of 15mm diameter is provided on it
- Then these sketches are used to split the embosses to achieve necessary shapes.
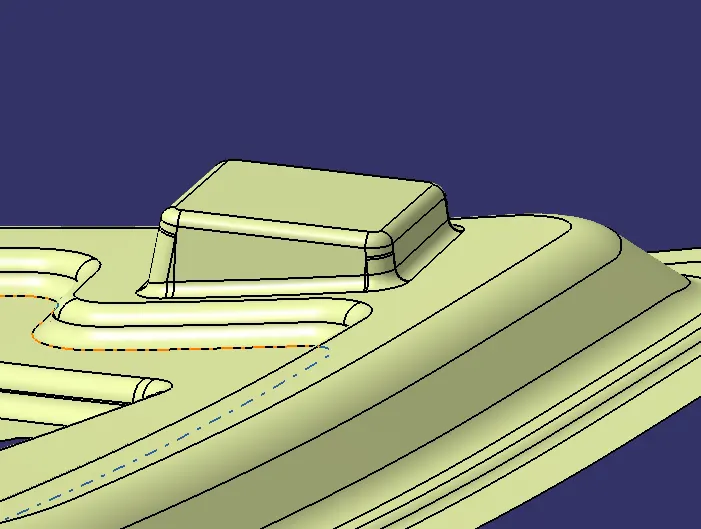
STEP 4:HINGE MOUNT CREATION
- Hinge mount is created in order to house the hinge that is provided and it is created in the opposite direction to that of embosses
- It is created by creating a line and creating an extrude surface which is planar to house the hinge
- Then we create a sketch of rectangular shape to house the hinge and by sweeping the sketch we create the rectangular box
- Then using shape fillet attach it to the inner part of hood
- Then using symmetry tool using the centre plane create the whole object
STEP 5:LATCH MOUNT CREATION
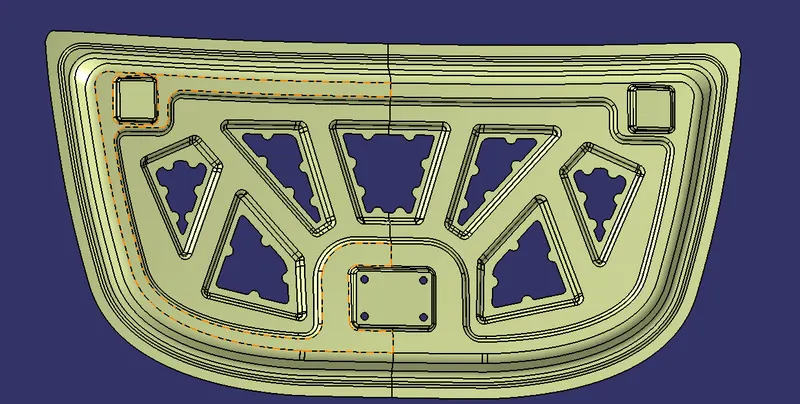
- Latch mount is created by extracting the latch surface and extrapolating it
- Then take the latch boundary and use it to sweep to the inner part of the hood so that it can be placed on the hood
- Then shape fillet can be used to join the latch mount to the inner panel by giving necessary fillets
HOOD OUTER PANEL CREATION
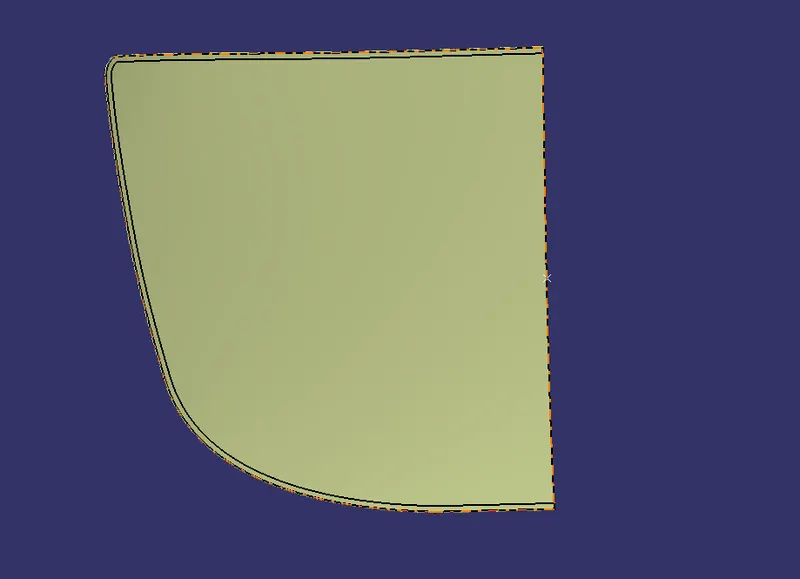
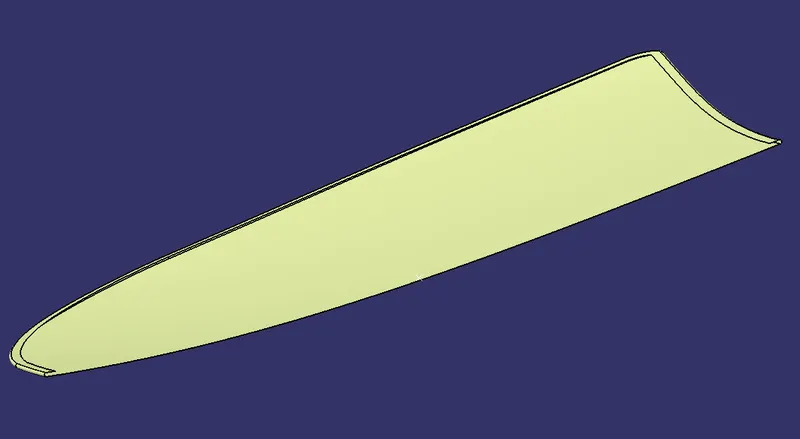
- Hood outer panel is created to fit the inner panel insdie and also by providing the necessary hemming to the part.Then the necessary reliefs are provided to the part as per requirements
- Hemming is done by offseting the surface to a distance of 2.65mm
- Then extract the boundary and sweep it by giving the necessary draft angle
- Then using the shape fillet (tri tangent fillet) create the hem by removing the vertical face
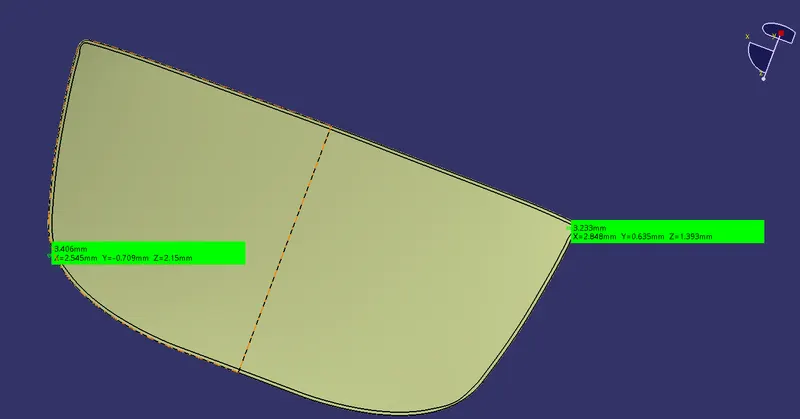
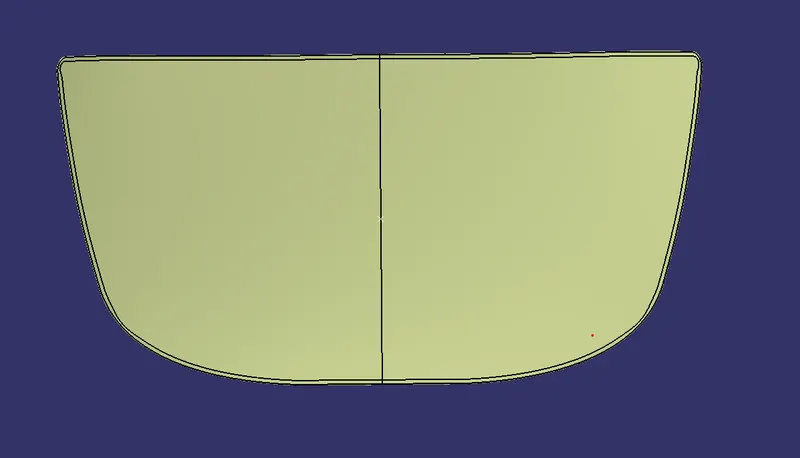
- After the hemming process the necessary reliefs should be provided to corners
- For reliefs,sketches should be created by creating four points and using spline it is connected as there should be minimum gap of 3mm between that and the edge.
TRAJECTORY CIRCLE
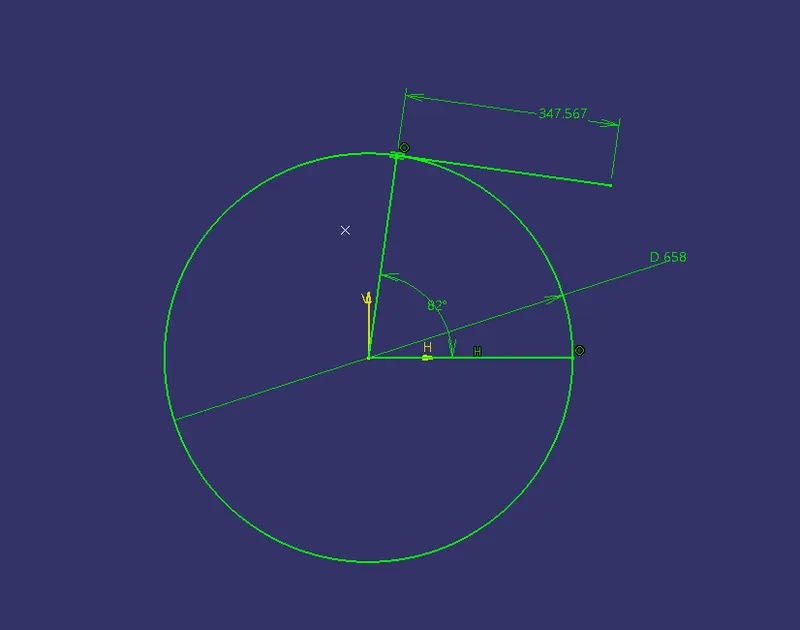
- This circle is used to locate the striker on the inner panel hood with respect to the aligning angle of about 82 to 85 degrees.
DRAFT ANALYSIS
ASSEMBLY
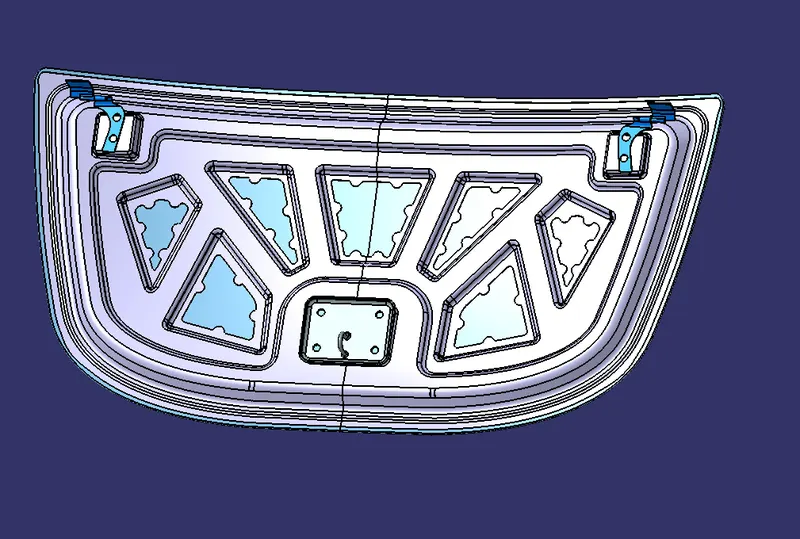
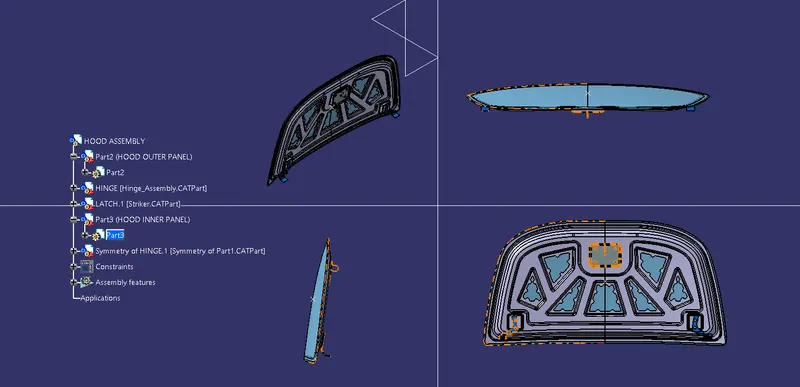
The hood outer panel,hood inner panel,striker and hinge are assembled together where the hinge is assembled on the hinge mount by giving the offset distance as zero and manipulating and then it is mirrored to the other side also.Then latch is also attached by considering the striker direction.
CONCLUSION
Thus the Hood Outer Panel, Inner Panel and the necessary reinforcements were designed and assembled as per the requirements in the master section.