Drafting of various geometries using Chamfer, Fillet tool in AutoCad
1.
AIM
To recreate the provided drawing using auto cad software
Steps
- Open new drawing in autocad
- Set decimal in advanced setup and finish it by givng next steps
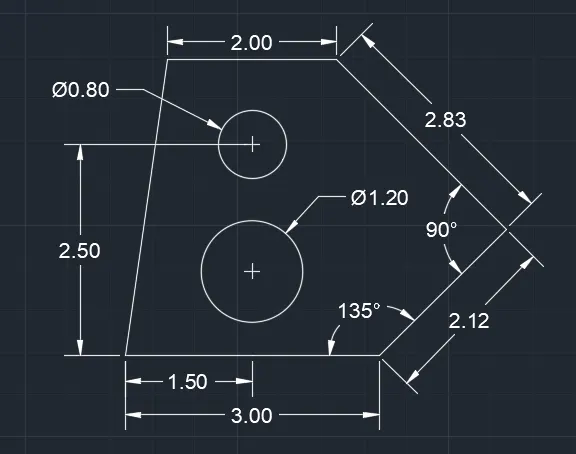
- Line command specify a point then move cursor in x axis and then specify 2 units
- Line command specify the last point then move cursor in negative y axis and then specify 2.83 units @45 degree
- Line command specify the last point then move cursor in negative y axis and then specify 2.12 units @perpendicular
- Line command specify the last point then move cursor in negative x axis and then specify 3 units @135 degree
- Line command specify the last point then move cursor in y axis and then join at initial point
- Circle command specify the centre at by using osnap midpoint of baseline at a distance of 1 unit and give diameter of 1.20units
- Circle command specify the centre at by using osnap midpoint of baseline at a distance of 2.50 unit and give diameter of 0.80units
- Give dimensions
Result
2.
AIM
To recreate the provided drawing using auto cad software
Steps
- Open new drawing in autocad
- Set architectural in advanced setup and finish it by givng next steps
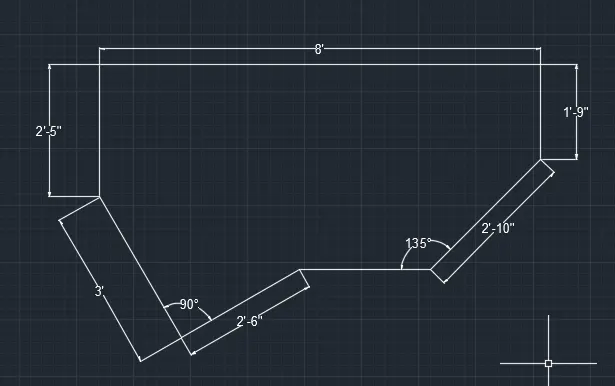
- Line command specify a point then move cursor in x axis and then specify 8' units
- Line command specify the last point then move cursor in negative y axis and then specify 1'-9'' units
- Line command specify the last point then move cursor in negative y axis and then specify 2'-10'' units @135 degree
- Line command specify the inital origin point then move cursor in negative y axis and then specify 2'-5'' units
- Line command specify the last point then move cursor in negative y axis and then specify 3' units @210 degree
- Line command specify the last point then move cursor in x axis and then specify 2'-6'' units @perpendicular
- Line command specify the last point then move cursor in x axis and then join the points previously did on right side
- Give dimensions
Result
3.
AIM
To recreate the provided drawing using auto cad software
Steps
- Open new drawing in autocad
- Set enginering in advanced setup and finish it by givng next steps
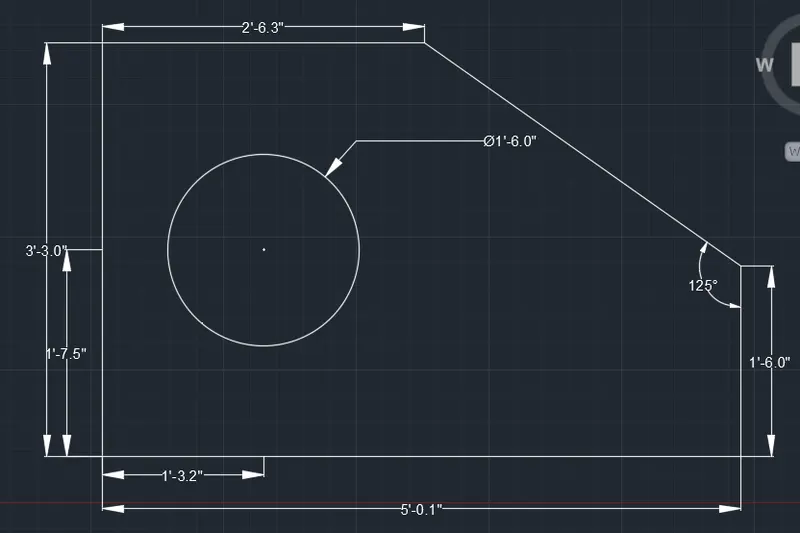
- Line command specify a point then move cursor in negative x axis and then specify 2'-6.3'' units
- Line command specify the last point then move cursor in negative y axis and then specify 3'-3.0'' units
- Line command specify the inital origin point then move cursor in x axis and then specify 5'-0.1'' units
- Line command specify the last point then move cursor in y axis and then specify 1'-6.0'' units
- Line command specify the last point then move cursor in x axis and then join the points previously did on right side
- Circle command specify the centre at the intesection of mid points of left most line on x axis and y axis and give radius of 1'-6.0''
- Give dimensions
Result
4.
AIM
To recreate the provided drawing using auto cad software
Steps
- Open new drawing in autocad
- Set decimal in advanced setup and finish it by givng next steps
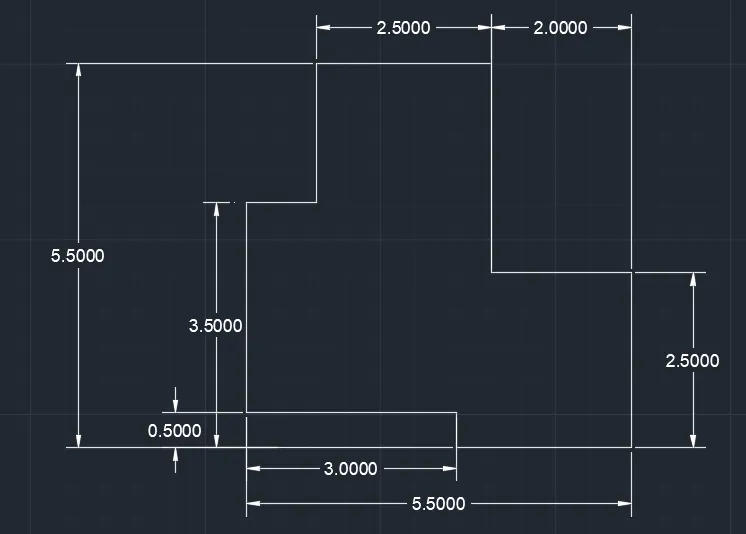
- Line command specify a point then move cursor in x axis and then specify 2.5 units
- Line command specify the last point then move cursor in negative y axis and then specify 3.5 units
- Line command specify the inital origin point then move cursor in x axis and then specify 2 units
- Line command specify the last point then move cursor in negative y axis and then specify 2.5 units
- Line command specify the last point then move cursor in negative x axis and then specify 2.5 units
- Line command specify the last point then move cursor in y axis and then specify 0.5 units
- Line command specify the last point then move cursor in negative x axis and then specify 3 units
- Line command specify the last point then move cursor in y axis and then specify 3.5 units
- Line command specify the last point then move cursor in x axis and then specify 1 units
- Line command specify the last point then move cursor in y axis and join with the origin point
- Give dimensions
Result
5.
AIM
To recreate the provided drawing using auto cad software
Steps
- Open new drawing in autocad
- Set decimal in advanced setup and finish it by givng next steps
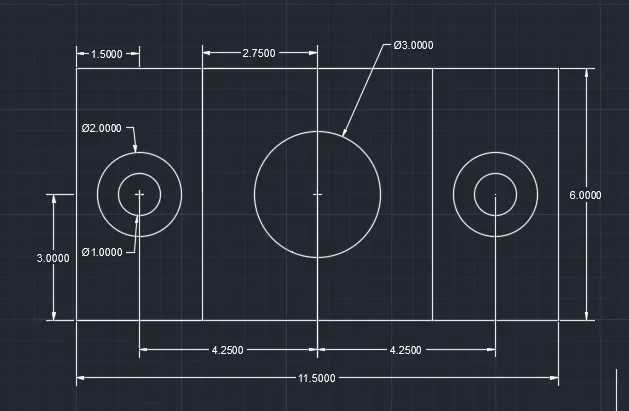
- Rectangle command specify dimensions Length = 11.50 units Width = 6.0 units
- Line command specify the inital origin point then move cursor in x axis and then specify 3 units
- Line command specify the last point then move cursor and join at other side of rectangle
- Offset command specify the distance of 5.50 units, select the last line drawn and move the cursor on right side and fix the line
- Circle command specify the centre as midpoint of vertical line move at a distance of 2.75 in x axis and give dia 3.00 units
- For right side section, Circle command specify the centre as midpoint of vertical line move at a distance of 1.5 in x axis and give dia 1.00 units, repeat the circle command specify centre of previous circle and give radius of 2.00 units, repeat the same for left side
- Give dimensions
Result
6.
AIM
To recreate the provided drawing using auto cad software
Steps
- Open new drawing in autocad
- Set decimal in advanced setup and finish it by givng next steps
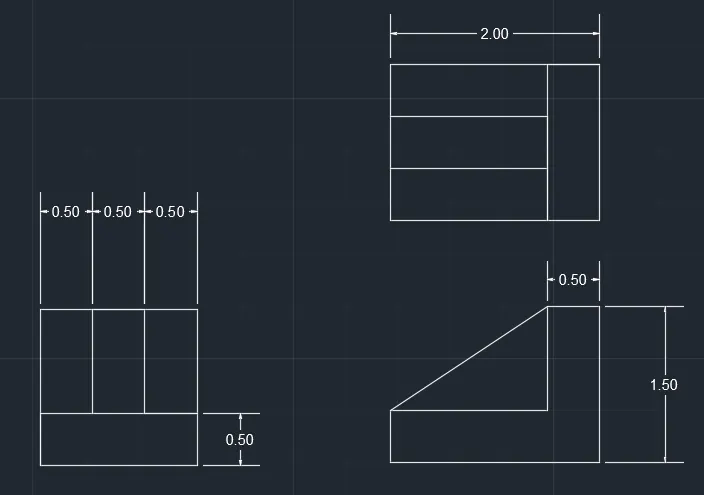
- Rectangle command specify dimensions Length = 1.50units Width = 1.50 units
- Line command specify the lower left corner of rectangle then move cursor in y axis and specify 0.5 units
- Line command specify the last point then move cursor and join at other side of rectangle
- Line command specify the upper left corner of rectangle then move cursor in x axis and specify 0.5 units and then join prevoiusly drawn line
- Offset command specify the distance of 0.50 units, select the last line drawn and move the cursor on right side and fix the line
- Repeat the same steps for other rectangle follow the dimensions given in the drawing
- Give dimensions
Result
7.
AIM
To recreate the provided drawing using auto cad software
Steps
- Open new drawing in autocad
- Set decimal in advanced setup and finish it by givng next steps
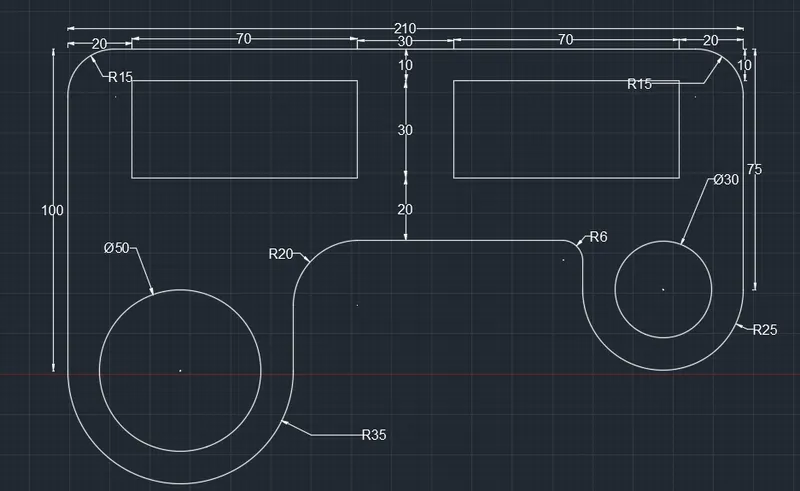
- Line command specify a point then move cursor in x axis and then specify 210 units
- Line command specify the last point then move cursor in negative y axis and then specify 75 units
- Arc command (start centre angle)specify the last point as start , for centre move cursor in negative x axis to 25units specify centre and angle 180 degree
- Line command specify the initial origin point then move cursor in negative y axis and then specify 100 units
- Arc command (start centre angle)specify the last point as start , for centre move cursor in x axis to 35 units specify centre and angle 180 degree
- Line command specify the last point then move cursor in y axis and then using osnap specify endpoint of arc draw a line
- Line command specify the last point then move cursor in x axis and then join the the previous arc
- Using circle command specify the centre of arc as centre then give radius as specified
- Using fillet command select first line then give radius and slect the second line and give the specified radius in drawing follow these steps for all corner
- Rectangle command specify dimensions Length = 70 units Width = 30 units move it and fix it x = 20, y = 10 from upper left corner
- Copy it move it at adistance of 30 units in same x axis
- Give dimensions
Result
8.
AIM
To recreate the provided drawing using auto cad software
Steps
- Open new drawing in autocad
- Set decimal in advanced setup and finish it by givng next steps
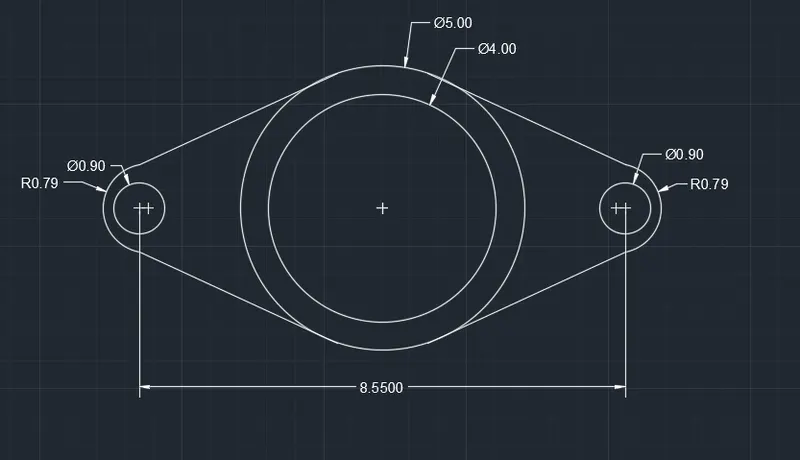
- Circle command specify centre and diameter of 4.00 units and repeat with same centre and specify centre of 5.00 units
- Circle command specify centre at a distance of 4.275 from the centre of previous circle and diameter of 0.90 units on both sides of circle
- Draw tangent line to the circle on all four sides at 45 degree
- Arc command specify start end radius specified in the drawing
- Give dimensions
Result
9.
AIM
To recreate the provided drawing using auto cad software
Steps
- Open new drawing in autocad
- Set architectural in advanced setup and finish it by givng next steps
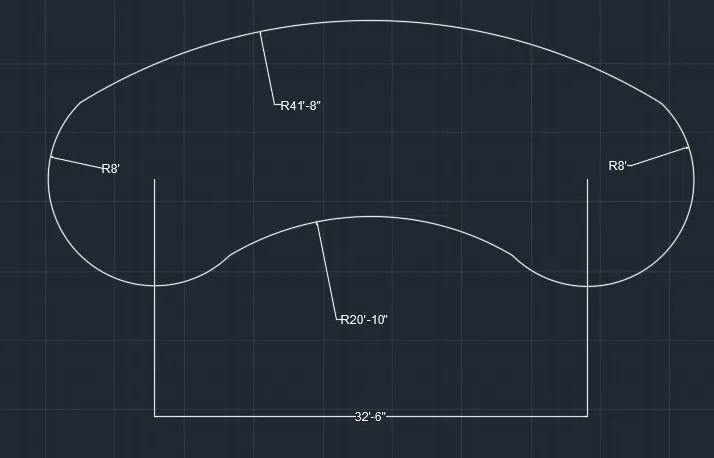
- Line command specify a point then move cursor in x axis and then specify 32'-6''units
- Line command specify last point then move cursor in y axis and then specify 8' units
- Arc command specify last point as start and end point of previous line as centre and then angle 180 degree and rotate the arc to 135 degree
- Mirror command copy the arc on the other side
- Join the end points of these arc by another two arc specified radius
- Give dimensions
Result
10.
AIM
To recreate the provided drawing using auto cad software
Steps
- Open new drawing in autocad
- Set decimal in advanced setup and finish it by givng next steps
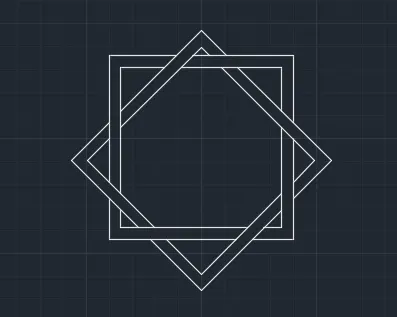
- Rectangle command specify dimensions
- Offset command specify distance of small units
- Copy command and then rotate it to 45 degree
- Move command and fix it at the midpoint of vertex and at small units below
- Trim command and trim it as specified in the drawing
- Give dimensions
Result
11.
AIM
To recreate the provided drawing using auto cad software
Steps
- Open new drawing in autocad
- Set architectural in advanced setup and finish it by givng next steps
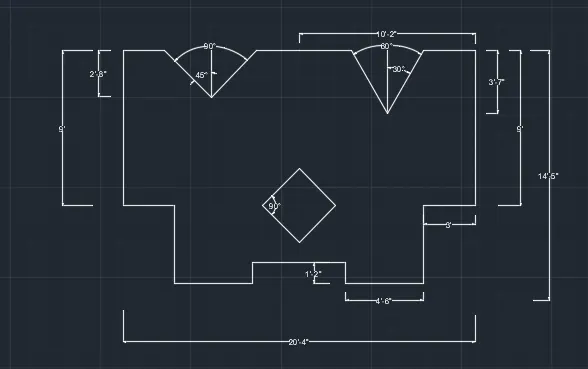
- Line command specify a point then move cursor in x axis and then specify 10'-2'' units and repeat the same
- Line command specify the last point then move cursor in negative y axis and then specify 9' units
- Line command specify the inital origin point then move cursor in x axis and then specify 3' units
- Line command specify the last point then move cursor in negative y axis and then specify 5'-5'' units
- Line command specify the last point then move cursor in negative x axis and then specify 4'-6'' units
- Line command specify the last point then move cursor in y axis and then specify 1'-2''units
- Line command specify the last point then move cursor in negative x axis and then specify the end point of upper side and draw line 45 degree and 30 degree at both sides of the lines respectively
- Rectangle command give dimensions 3' on all sides rotate 45 degree specify at a distance given in the drawing
- Give dimensions
Result