AutoCAD Essentials for Mechanical Engineers: Exploring Dynamic Inputs, Limits, and Editing Commands
Master dynamic inputs, limits, and key editing commands in AutoCAD 2D and 3D with this guide for mechanical engineers. Learn how to improve precision, set units, and use move, copy, and array commands for efficient drafting.
Welcome back to the AutoCAD Essentials for Mechanical Engineers series. In this guide, we’re going to delve deeper into dynamic inputs, setting limits and units, and exploring essential editing commands like move, copy, and array. These tools are crucial for creating accurate, well-structured drawings, whether you're working on AutoCAD 2D or AutoCAD 3D designs for mechanical or civil engineering projects.
In this blog, we’ll cover:
- The role of dynamic inputs in enhancing your design precision
- How to set limits and units in your workspace
- Key editing commands for seamless drafting
- Different methods to array objects, including rectangular and polar arrays
This content will help you understand how to effectively use these tools to improve your AutoCAD drawings and workflow.
Understanding Dynamic Inputs in AutoCAD
Dynamic inputs provide real-time information while drafting and allow you to enter coordinates and dimensions directly on the screen. This makes it easier to interact with your design, providing live feedback and improving accuracy.
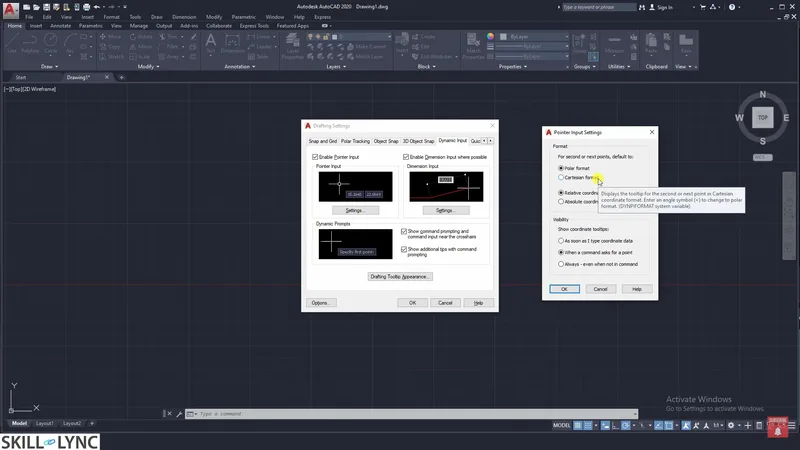
To access dynamic inputs, go to the Drafting Settings tab, where you’ll find options for Pointer Input, Dimension Input, and Dynamic Prompts.
1. Pointer Input
With Pointer Input, once you enter the first point, it prompts for the next input, helping you seamlessly plot points in your drawing. The default input uses polar coordinates, but you can switch to Cartesian coordinates by pressing the comma (,). Similarly, you can toggle between relative and absolute coordinates by using the @ symbol for relative and # for absolute coordinates.
For example, if you're drawing a line starting at 50,50, you can input the next point using relative coordinates like @30,40 to indicate a distance from the previous point. This versatility is helpful in tasks such as precise AutoCAD mechanical engineering drawings, where accurate measurements are critical.
2. Dimension Input
Dimension Input allows you to see dimensions, angles, and changes in real-time while you draft. You can input multiple fields, such as length, angle, and radius, which makes it easier to modify objects dynamically as you create them.
3. Dynamic Prompts
Dynamic prompts provide real-time instructions as you draw. They appear as small tooltips near your cursor, making it easier to follow commands without frequently switching your attention to the command line.
These features are especially helpful for AutoCAD for beginners, offering an intuitive way to enter values and make modifications on the go.
Setting Limits and Units
Setting limits and units is crucial to ensuring your drawings stay within the required boundaries and scales. This is particularly important for AutoCAD mechanical engineers, as projects often require precision down to millimeters or microns.
1. Setting Limits
Limits define the boundaries of your model space. This keeps your drawing within specified dimensions, which can prevent objects from being created outside the visible area.
To set limits:
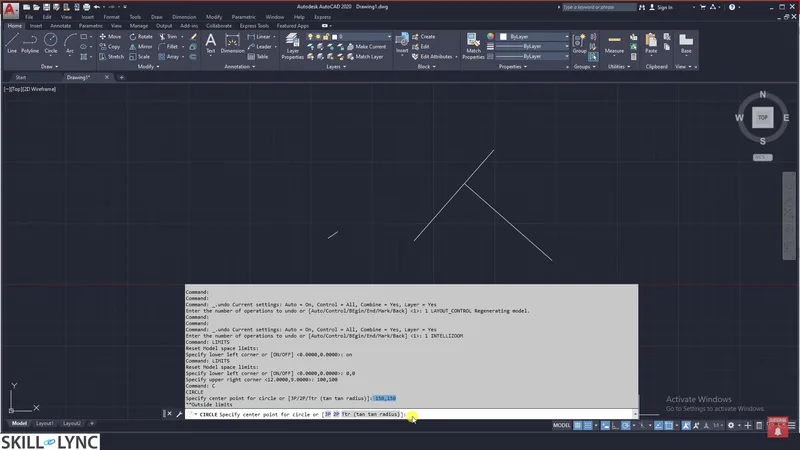
- Type LIMITS in the command prompt.
- Specify the lower-left corner, such as 0,0.
- Enter the upper-right corner, such as 100,100.
- Finally, type ON to enable the limits.
If you try to draw outside the limits (e.g., a circle centered at 150,150), AutoCAD will prevent it, ensuring your designs stay within the defined workspace.
2. Specifying Units
To ensure the precision of your design, you need to set appropriate units. This can be done using the UNITS command, where you can choose between different unit types such as architectural, decimal, engineering, fractional, or scientific.
For most mechanical designs, decimal units are commonly used. You can also specify the precision (e.g., two decimal places) and adjust angular measurements (degrees, gradients, or radians).
For example, if you're designing a machine part, setting units to millimeters ensures that all dimensions are correctly scaled to industry standards.
Mastering Editing Commands: Move, Copy, and Array
AutoCAD provides a suite of editing commands that make modifying your drawing quick and efficient. Let’s explore three key commands: Move, Copy, and Array.
1. Move Command
The move command lets you reposition objects without deleting them. You can move an object by typing MOVE, selecting the object, and specifying a base point and a destination point.
For instance, if you’ve misplaced a rectangle and want to move it within a circle, simply select the rectangle, choose a base point on the rectangle, and move it to the desired position within the circle. This ensures you don't have to redraw objects, saving valuable time.
2. Copy Command
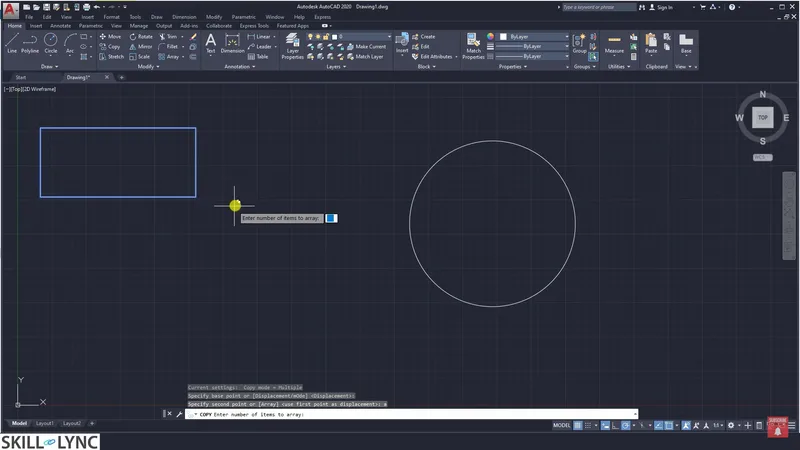
The copy command (COPY) duplicates objects in your drawing. You can select the object, choose a base point, and place as many copies as needed. The command allows you to place multiple copies by pressing Enter after each placement.
This is useful when designing repetitive components in AutoCAD mechanical drawings, such as bolts or machine parts that need to be duplicated at various locations.
3. Array Command
The array command is an advanced version of the copy command, where you can replicate objects in a rectangular or polar pattern.
- Rectangular Array: Creates multiple rows and columns of the object. You can specify the number of rows, columns, and the spacing between them. This is useful for creating evenly spaced patterns, like rows of fasteners on a flange.
- Polar Array: This type of array arranges objects in a circular pattern around a center point. You can specify the number of items and the angle between them. For example, you could arrange bolts evenly around a circular plate using a polar array.
You can access array settings in the ribbon after initiating the command, or use the command prompt for more precise control.
Undo and Redo Commands
Mistakes are inevitable, but AutoCAD offers flexible ways to reverse actions. The undo (U) and redo (REDO) commands allow you to easily backtrack or redo steps without losing progress.
- Undo lets you revert to previous steps, rolling back actions like moves, copies, or array creations.
- Redo is used to reinstate undone actions, helping you to recover your previous commands.
Remember, the oops command is also useful for restoring accidentally deleted objects without undoing all the other actions.
Conclusion and Assignment
In this guide of the AutoCAD Essentials for Mechanical Engineers, we explored dynamic inputs, how to set limits and units, and mastered key editing commands like move, copy, and array. These tools not only streamline your drafting process but also ensure that your drawings remain precise and within the desired specifications.
As you continue with your AutoCAD training, try applying these commands in practice. Create a design with specific limits, use arrays to duplicate components, and see how dynamic inputs help improve accuracy in your drawings.
Whether you're advancing your skills in AutoCAD mechanical engineering or just starting with AutoCAD 2D drawing for beginners, mastering these commands will help you work efficiently and with confidence.
Explore more resources such as AutoCAD online courses or earn a free AutoCAD certificate to further enhance your skills.
This blog is part of our ongoing AutoCAD Design Series. If you missed the previous posts, check them out here.
Would you like to have a more interactive experience going through the AutoCAD essentials?
Skill-Lync has released a FREE comprehensive course covering AutoCAD Essentials for Mechanical Engineers in detail! Check it out here.
If you’re looking to go deeper into AutoCAD Essentials check out Skill-Lync’s AutoCAD certification course.
Check out our hands-on course today and add AutoCAD to your list of skills!
Let’s get #IndustryReady together, one skill at a time!


