Wiring harness design in CATIA V5 - 3D modeling Week 4 Challenge
Aim - To construct the given wiring harness bundle using the specified connectors and to add protective coverings on the branches using Catia V5.
Given Connectors -
- DT06-4S
- DT06-6S
- DT06-2S
- DT06-08SA
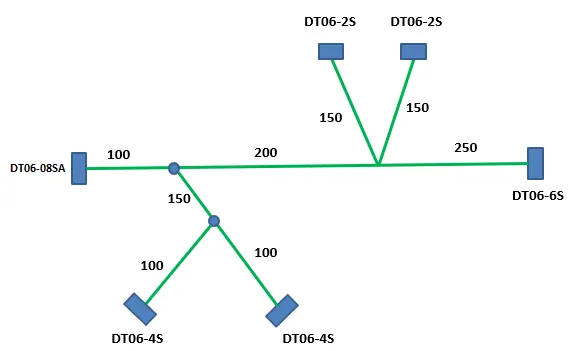
Given Bundle -
Procedure -
- We first download all the specified connectors from www.te.com
- We import all the .stp files into catia V5 and define all the connectors as electrical connectors by defining geometric properties ie. points and axis systems which are needed for constructing the wiring harness bundles and we save all the connectors as electrical components and as CAT part files.
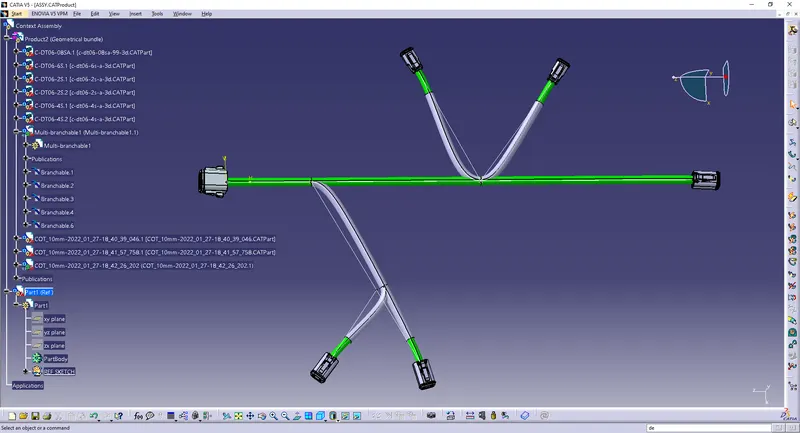
- The next step is to create a new product and name it Context assembly, and in this new product file, we create another product file named "Product2" and make a sub-assembly containing all the electrically defined connectors as shown in the image above.
- We then go to the electrical harness assembly workbench and define "Product2" as a Geometrical bundle.
- We create another part file with the context assembly as the parent and create a geometrical set called "Ref Sketch" and using sketching workbench, we sketch the given wiring harness bundle with the exact dimensions and fully constrain this sketch.
- We now use the assembly design workbench to snap all the connectors t their respective locations as shown in the image given above.
- Now, we define the "Product2(Geometrical Bundle) as the current object and use the multi-branchables option in the wiring harness assembly workbench to create the wiring harness bundles and this will take us to the wiring installation workbench
- Here we create the branch points and create the sub branches as in the image given above.
- Finally we create protective coverings using the cot tube catalogue that we have previously created only to cover all the sub branches. Here, a 10mm cot tube is used to do the protective covering and a 30mm space is given from the connector ends across all the sub branches.
- Finally we save all the parts we created by using the save management feature and place the assembly and all the parts in a single file.
-> I have compressed the assembly file and all the parts into a single file called "week 4 challenge.rar"
please find the file attached below.