Week 8 - Challenge 6 - Core & Cavity Design
CORE AND CAVITY DESIGN - SWITCH BEZEL
AIM:
To create a core and cavity Blocks for the Switch Bezel Plastic Component using a Class 'A' Surface and by using the Close Surface Feature to create a solid part from the surface.
OBJECTIVE:
- To Create a Plastic Component by using the Class 'A' surface.
- To create a Tooling axis for a class 'A' Surface, which meeting the requirement of the draft angle and to analyse the solid model.
- To create a core and cavity Block for the switch Bezel plastic component.
- To create a solid model from the surface using the Closed Surface Feature with the thickness of the component wil be 2.5mm.
- To create a report which explains the Draft analysis and Tooling Axis cration and colour scale varient.
- To attach the screenshots of the expanded Tree Structure for the Geometrical Sets .
- To attach the screenshots of the 3D Part Model in different orientations.
PUBLICATION:
- Tooling Axis.
- Switch Bezel Solid Part
- Parting Surface
- Parting Line
INTRODUCTION:
TOOLING DIRECTION:
The Tooling Direction is the direction that the mold pulls apart. The mold is built in two separate pieces,
- A Cavity side and
- The Core side.
The Core pulls apart from the Cavity and that's the Dyeline or the Tooling Direction. The direction in which the mold or core and cavity opens is the tooling axis.
FEATURES OF TOOL:
- Cavity half – The cavity half is the side of a tool that does not move. It is typically attached to the side of the molding machine.
- Core half – The side of the tool that opens and closes with the mold machine against the cavity half. It opens when removing the part from the tool.
- Cooling lines – Channels that allow coolant to flow throughout the tool and control the cooling of the plastic part.
- Ejector system – Pins on the core half of the tool that helps push the cooled part out after molding.
- Runner – A flow path for the plastic resin allowing the press to inject material directly into the part cavity.
- Side actions – Moving pieces within the part cavity added to allow for undercuts.
PARTING SURFACE:
A parting surface is a separable contact surface that separates the mold to remove the product and the congealed material from the pouring system. A mold may have one or two or more parting surfaces depending on the need. The parting surface may be perpendicular to the closing direction, or parallel or inclined to the closing direction.
The parting surfaces provide support to the mold during the injection process and help to distribute the molten plastic evenly. It is important to design the parting line and parting face carefully to minimize potential defects in the molded part.
PARTING LINE:
The plastic parting line is to allow the two mold halves to separate so that the molded part can be ejected by the ejector. The position of the parting line flash has a significant impact on the appearance of the molded part and its structural integrity. Unqualified parting lines will result in flash on the product after injection Molding. Secondary operations to remove parting line flash will result in higher labour costs and affect the aesthetics of the product.
CATIA 3-D SURFACE SOLID PART MODEL - SWITCH BEZEL PLASTIC COMPONENT
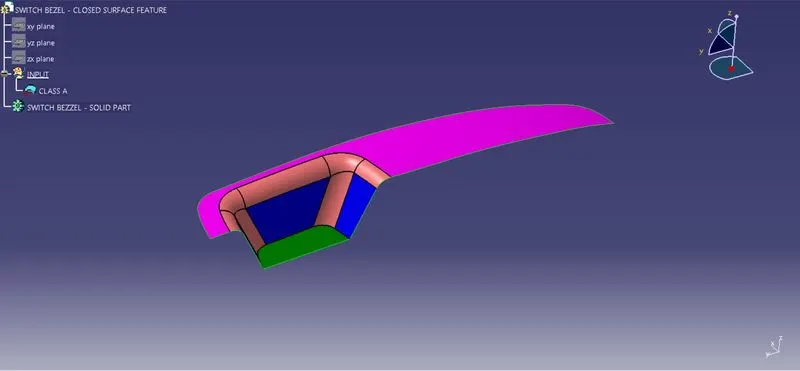
CLASS 'A' SURFACE:
DESIGN CHECK:
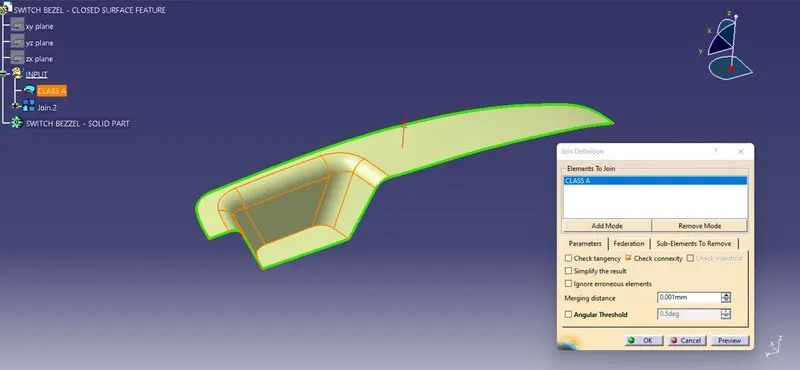
The Class A Surface are Checked Visually by using the Join Feature or by using the boundary feature the Class A surface are selceted and Disassembled the Surface to check the surface are created without the gaps.
The Class A Surface should be created without the boundary Gaps. By using the Join Definition with the Merging distance of 0.001 mm the Class A surface are Joined Together to check the connectivity.
CREATING TOOLING AXIS:
The Tooling for the Class A Surface are Created in the diection in which the parts are getting Ejected from the Tool. The Tooling Axis which defines the core and cavity pulls apart from the Tooling Direction.
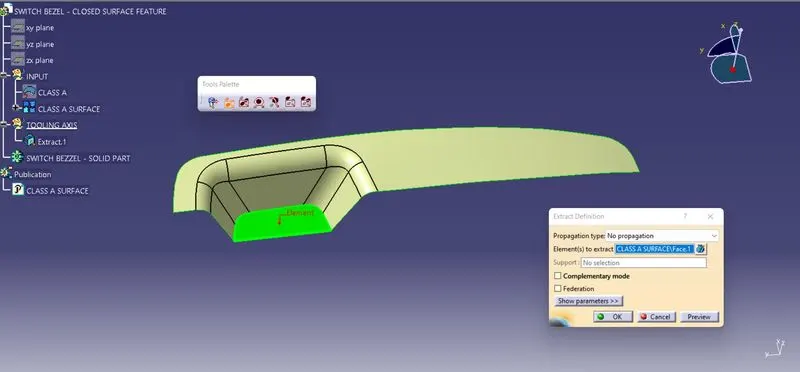
In the Switch Bezel plastic component the base on the side walls are been extracted to create a tooling axis on the surfaces.
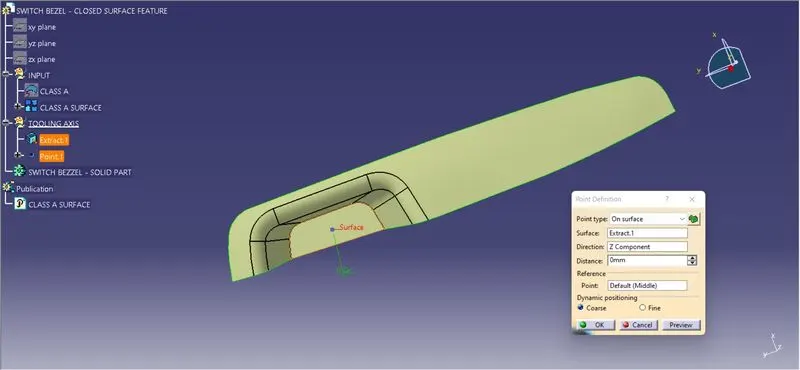
By using the Point Definition, The point type has been selected on surface and direction along Z components are been selected.
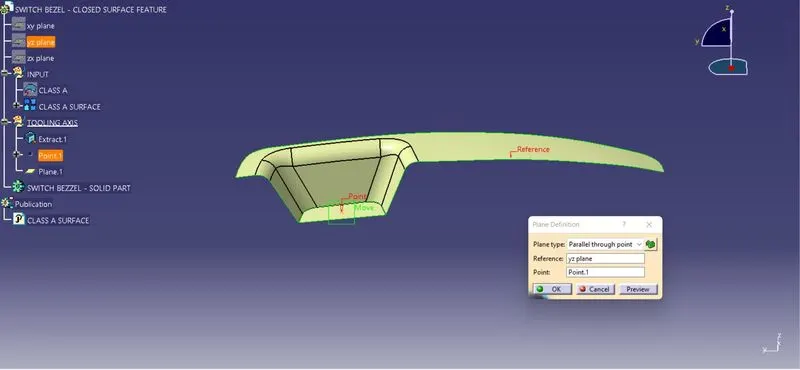
By using the Plane Definition the planes are created from the yz plane and moved through the point created from the origin.
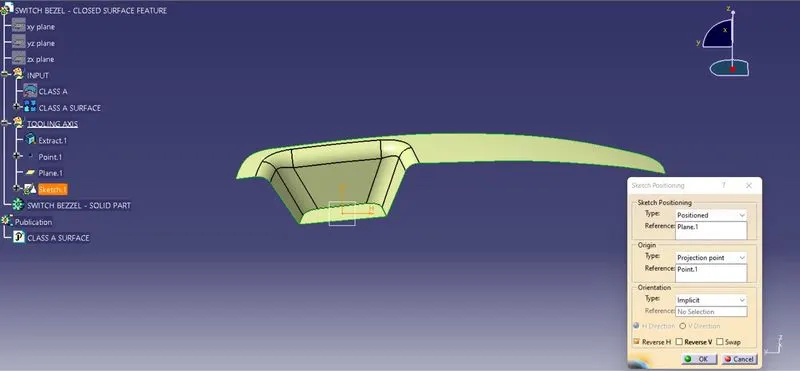
After defined the point into the axis the sketch position is to be defined in order to select the plane to create a sketch. In the planer support the type is seleceted as positioned and the reference are selected based on the geometry. The origin type is selected as projection point in which the defined point are selected based on the references.
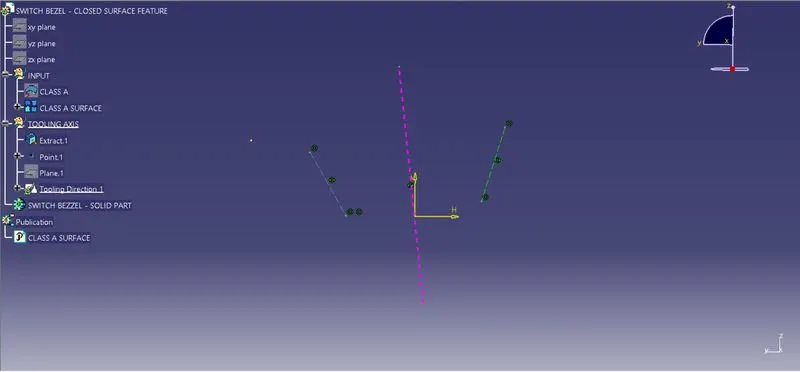
By using the Intersection feature, the class A are been intersected along the plane axis and using the bisecting line the Main Tooling Axis along the Y direction walls are been created.
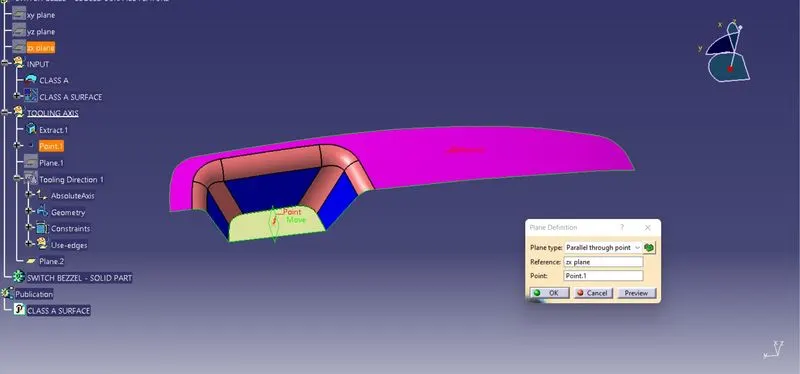
By using the Plane Definition the planes are created from the yz plane and moved through the point created from the origin.
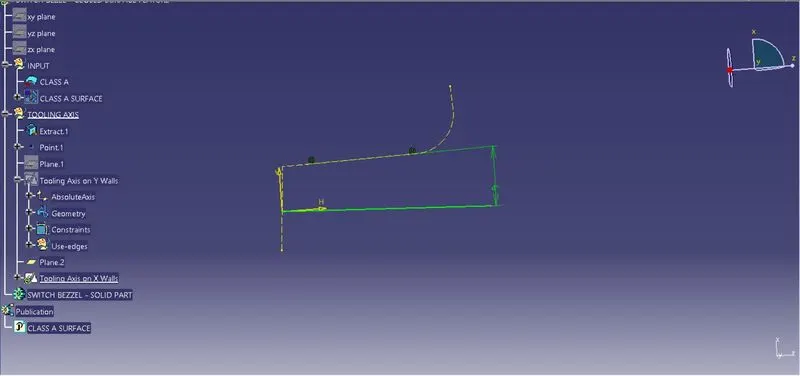
By using the Intersection feature, the class A are been intersected along the plane axis and using the bisecting line the Main Tooling Axis along the X direction walls are been created. The Minimum angle are been created from the wall to the Bi sected line as 6 degeree. The Two lines are created from the intersection, The lines are created which makes or slightly parallael to the Reference Tooling axis.
BI- SECTING METHOD:
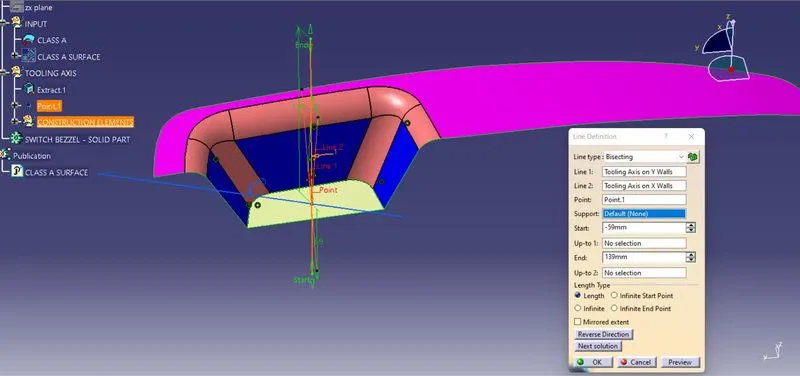
By Using Line Type Bisecting, The Main Tooling Axis are created by selecting the Parallel Lines which are parallel to the tooling Axis. By Selecting the point as a support the Bi- Secting lines are created In- between Two parallem Lines. That line is the Main Tooling Axis.
The Bi- Secting Line divides a line into two equal halves. Thus, the perpendicular bisector of a line segment between lines, it implies: It divides two lines which are parallel/ slightly parallel to the Tooling Axis into two equal halves or bisects it.
MATERIAL MODES:
For the Draft Analysis, the material modes are Selected from the Shading Type.
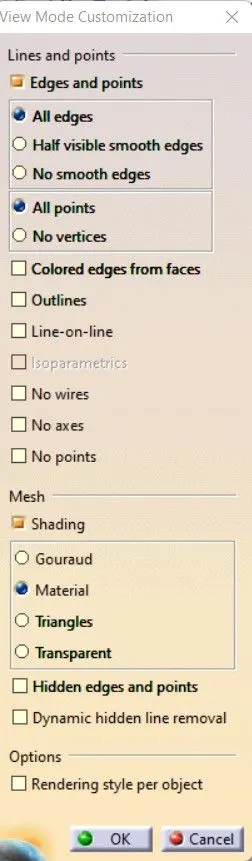
DRAFT ANAYSIS ON CLASS A SURFACE:
For a Class A Surface, The Draft analysis are to be performed in order to meeting te requirement of the draft angle to the required Tooling Axis. For Plastic component the Minimum angle required for the daft to be 3 degrees.
The Direction compass are to be selected and placed it on the Main Tooling Axis line and the comass are been locked using the lock feature in te direction.
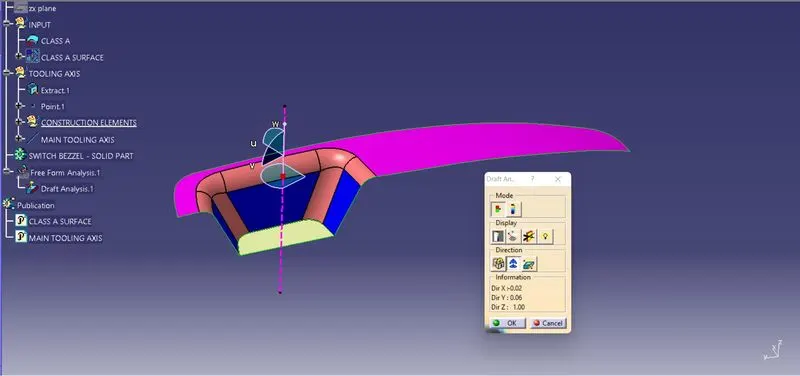
In the Display window the clour code varients are been selected, to know the range of the draft in the Class A surface. In the Display Window the colour varient shows,
- For 3 degeree - Green Colour Varient (Positive)
- For 0 degeree - Red colour varient.
- For Negative degeree- Blue colour Varient.
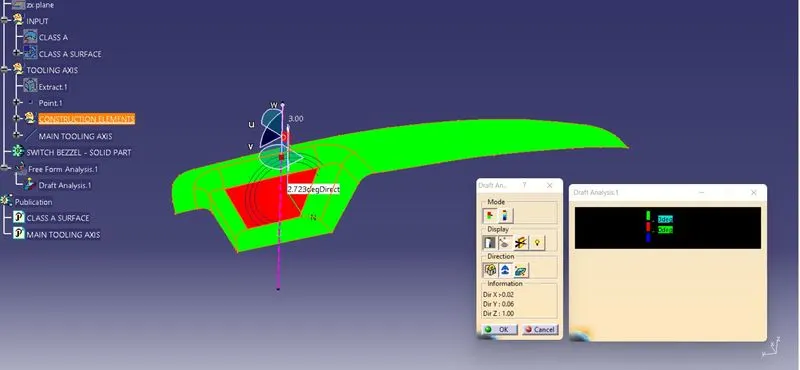
By Using the Running pointer feature in the Display the draft are been analysed for each individual points. The points perpendicular to the toling axis are displayed as 2.723 Degeree Direction.
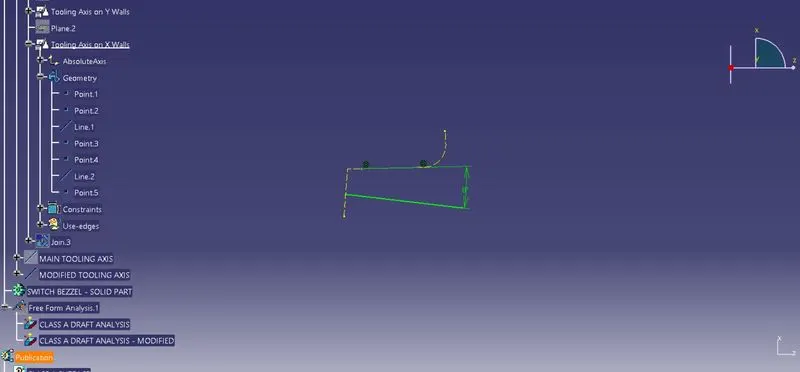
The Tooling axis along the walls on the X direction are been modified from 4 degeree to 6 degree.
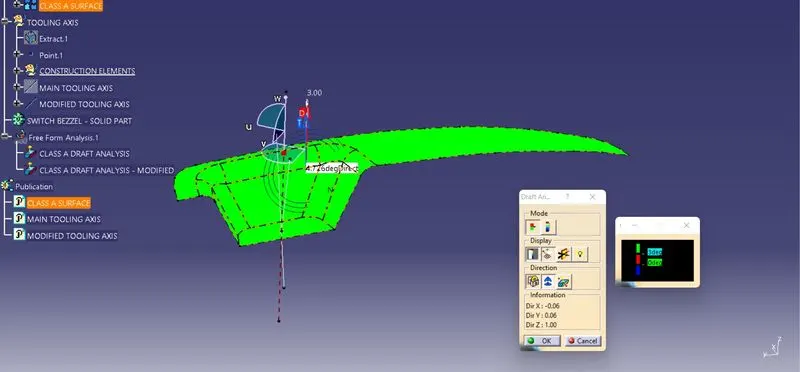
After the Modification the Tooling Axis on the X direction walls the drafting are been performed in both the core and cavity side of Class A Surface. The Green colour Implies the draft angle are in the positive region. if The draft angle are been inverted the colour of the surface are imled as Blue colour.
CREATION OF CLASS 'B' SURFACE:
SWITCH REST SURFACE:
The Switch Rest surface are selected from the Class A Surface and are extracted by selecting the elemets to be extracted from the class A Surface. The Extracted surfaces are been Untrimmed using the Untrim Feature and all the elements which are extracted are been Un trimmed.
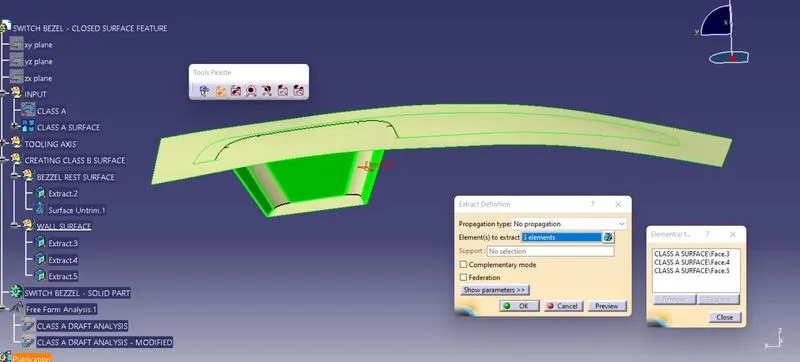
The Side wall surface are selected from the Class A Surface and are extracted by selecting the elemets to be extracted from the class A Surface. The Extracted surfaces are been Untrimmed using the Untrim Feature and all the elements which are extracted are been Un trimmed.
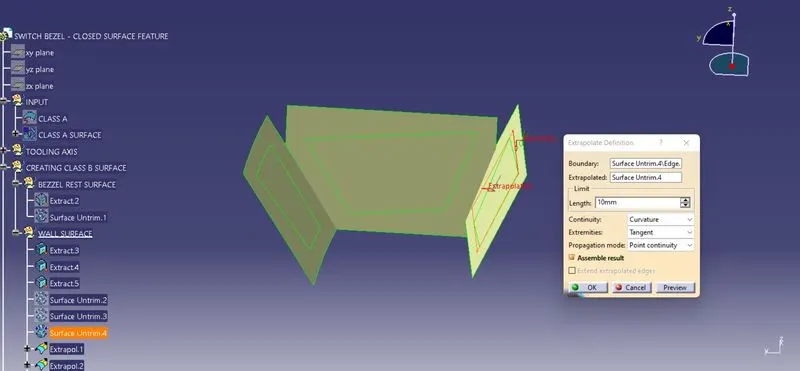
By using the Extrapolate feature the Untrimmed surfaces are been extrapolated by selcting the boundaries and also the extrpolands. The continuty for the extrapolation are selected as curvature and propogation mode are been selected as point continuity. By selecting te features the untrimmed surfaces are been extrapolated to the respectie length provided. The Base surface are selected from the Class A Surface and are extracted by selecting the elemets to be extracted from the class A Surface.
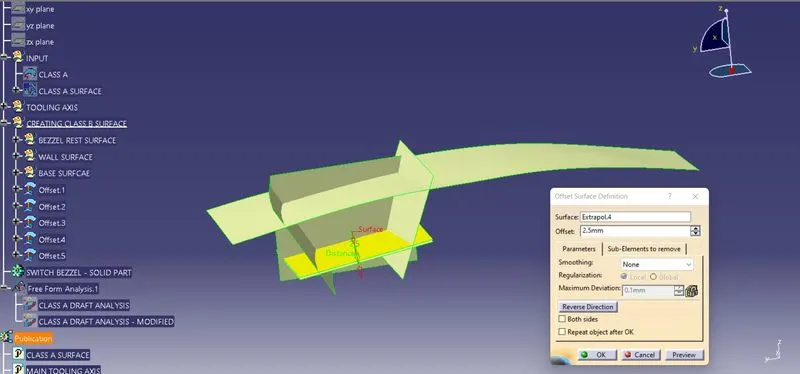
By using the offset feature the created Surface areas are been offsetted to 2.5 mm from the orign. The same method has been implemented for the creation of the wall and base surfaces.
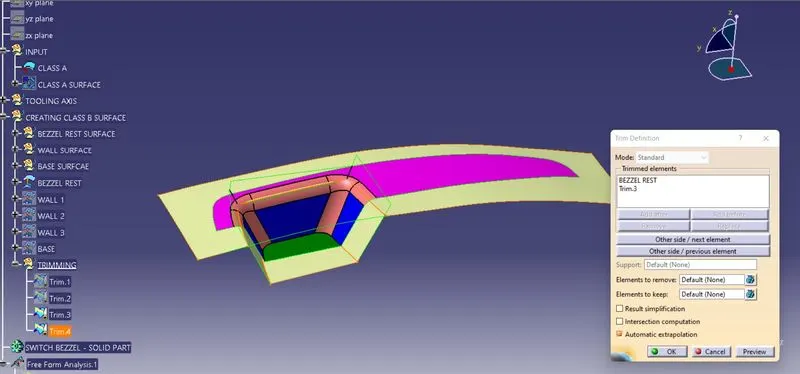
By using the Trim feature the extrapolated surfaces are been trimmed to the sides which make the Rib as same as Class A Surface.
EDGE FILLETS:
From the Class A Surface , the fillets are been measured. By using the Extract definition the surfaces are been selcetd which are not able to measure te fillet values. The Fillet values from the side wall surfaces whic are extraceted are been Untrimmed and the radius values are been measured accorndingly.
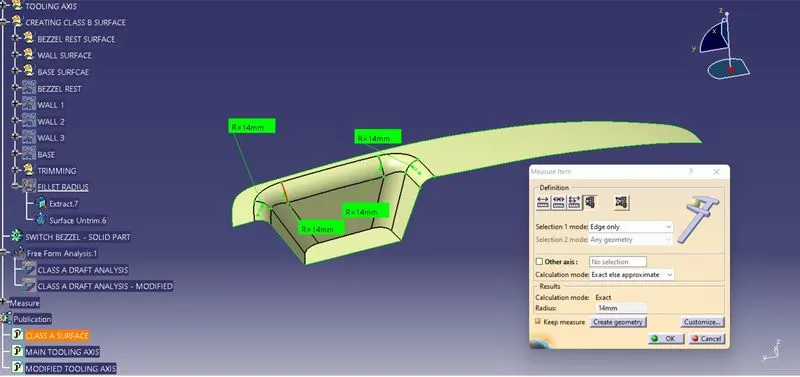
The Fillet Radius from the switch rest are been measured as R 14 mm.
By using the Edge Fillet feature the edges are been selected and filleted.
- To Make the Inside Fillet = Class A Fillet Radius + Thickness of the Part.
- To Make the Outside Fillet = Class A Fillet Radius - Thickness of the Part.
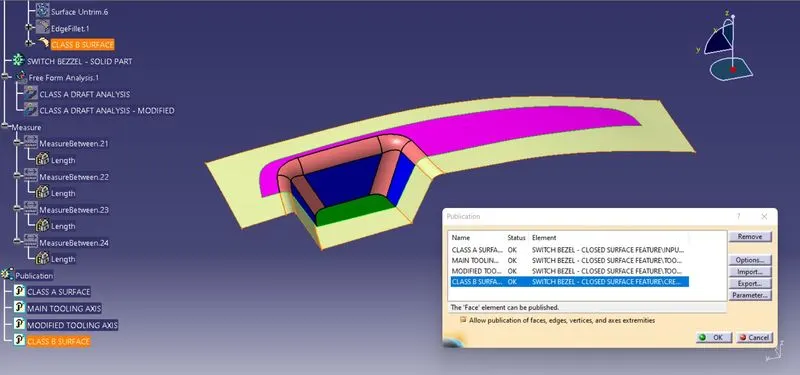
The Class B surfaces are been Pblished using the Publication option.
CREATING CLASS 'C' SURFACE:
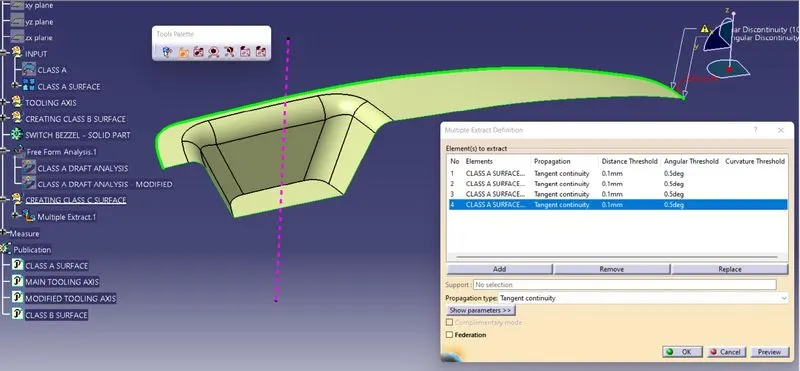
To make the Class C Surface, the Boundaries are been Extracted from the Class A Surface. The outer Boundary from the switch rest are been selected and extracted using the Multiple Extract option with the propogation type as tangent Continuity another boundaries are been Extracted.
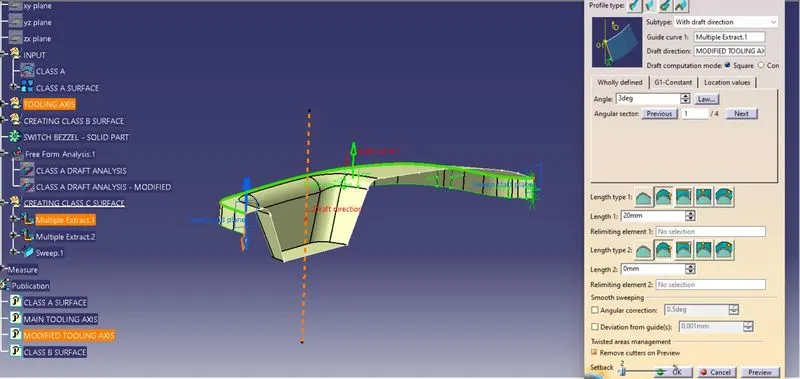
By using the Sweep surface Creation definition, The respective profile type are been selected and subtype with draft direction are been selected. In that the Guide curve are selected as the. Boundary in the Class A Surface, and draft direction are selected as Tooling Direction wit the draft angle of 3 degree are perforemed and the creation of Class C Surface.
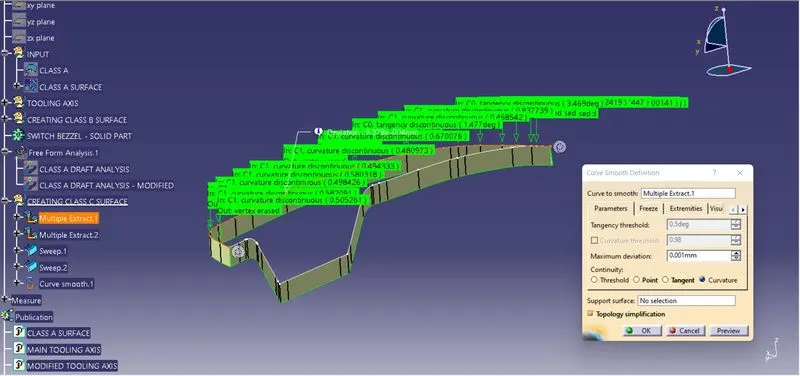
After the creation of class C Surface, By using the Smooth curve option the cuve to smooth are been selected and using the curvature continuity the curves are been smoothend.
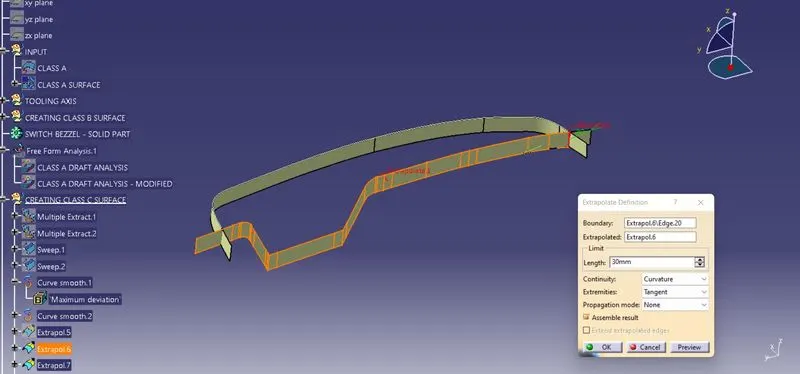
The end surfaces are craeted with te smaller gaps, inorder to avoid those gaps the Boundaries are been extrapolated. By using the Trim Feature the Extrapolated Surfaces are been trimmed together.
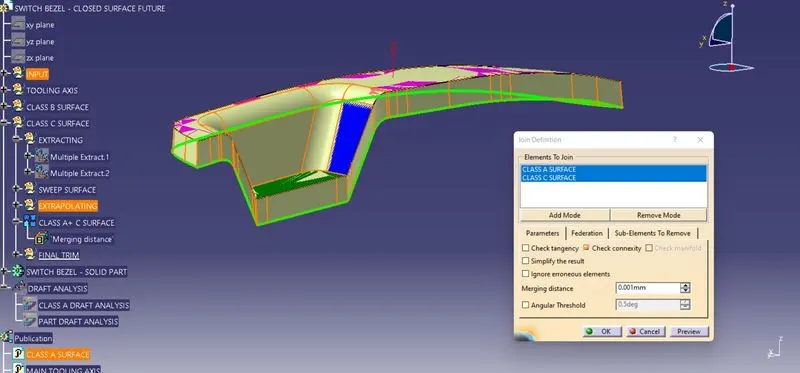
By using the Join feature the Class A and Class C Surface are Joined Together wit the Merging Distance of 0.001 mm. For Joining with the Class C Surface both the created Holes are been selected and Joined Together.
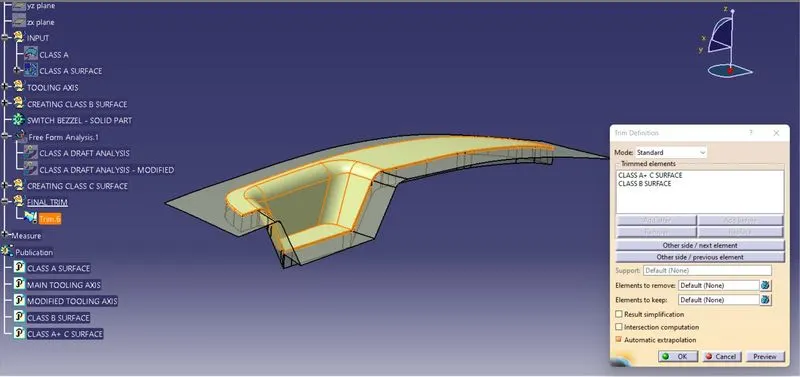
The Final Trimming Has been performed on the Class B and Joined Class A and C surfaces. The Trimming as been performed.
CLOSED SURFACE:
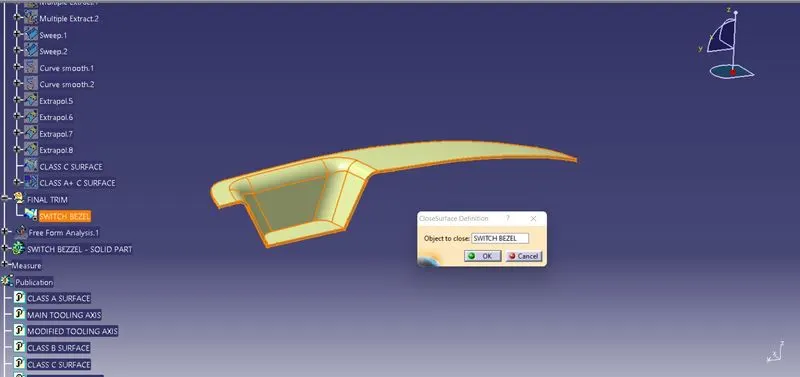
By using the close surface definition the part surface are selected to make them into solid part from the part workbench.
DRAFT ANALYSIS ON SWITCH BEZEL COMPONENT SOLID PART:
The Draft Analysis has been performed on the Fianl component created as a closed body using the part design Closed Surface Feature. For Plastic component the Minimum angle required for the daft to be 3 degrees.
The Direction compass are to be selected and placed it on the Main Tooling Axis line and the compass are been locked using the lock feature in te direction.
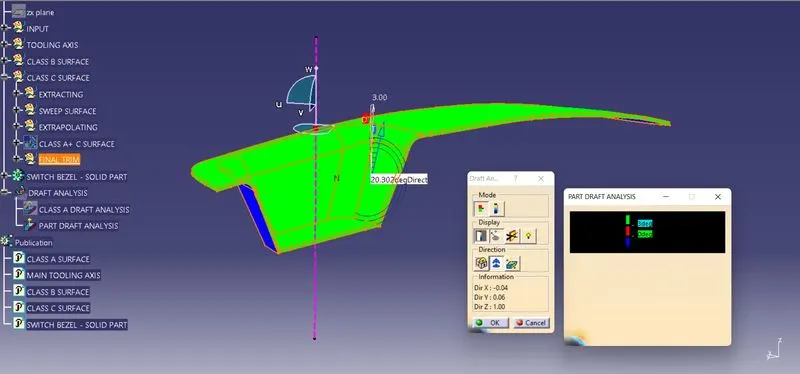
In the Display window the clour code varients are been selected, to know the range of the draft in the Class A surface. In the Display Window the colour varient shows,
- For 3 degeree - Green Colour Varient (Positive)
- For 0 degeree - Red colour varient.
- For Negative degeree- Blue colour Varient.
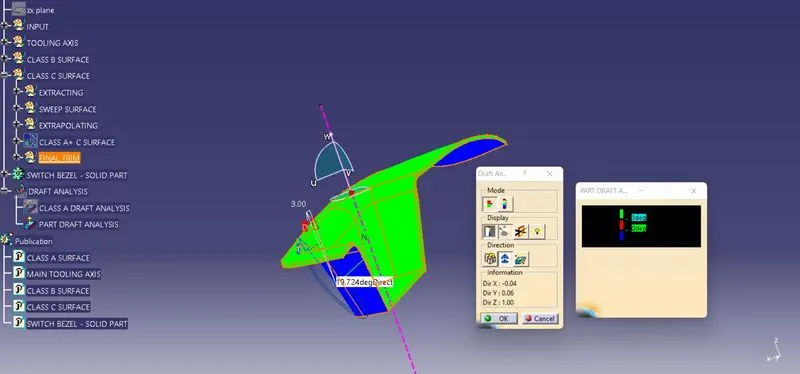
By Using the running pointer feature in the Display the draft are been analysed for each individual points. The points perpendicular to the toling axis are displayed as 90 Degeree Direction and the Wall Surfaces are analysed as 20.302 degeree angle.
The drafting are been performed in both the core and cavity side of Class A Surface. The Green colour Implies the draft angle are in the positive region. if The draft angle are been inverted the colour of the surface are implies as Blue colour.
SWITCH BEZEL PLASTIC COMPONENT - CORE AND CAVITY DESIGN
CREATING PARTING SURFACE:
A parting surface is a surface that separates the mold block into two parts – the core and the cavity. Angled parting surfaces also help to reduce friction and wear by providing a smoother contact surface.
By using the Boundry feature the Boundaries of the class A Surface are been selected.
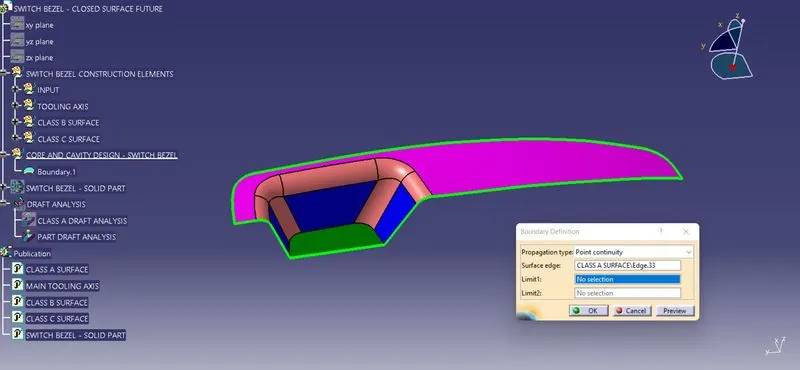
By using the Extrapolate feature the Untrimmed surfaces are been extrapolated by selcting the boundaries and also the extrpolands. The continuty for the extrapolation are selected as curvature and propogation mode are been selected as point continuity.
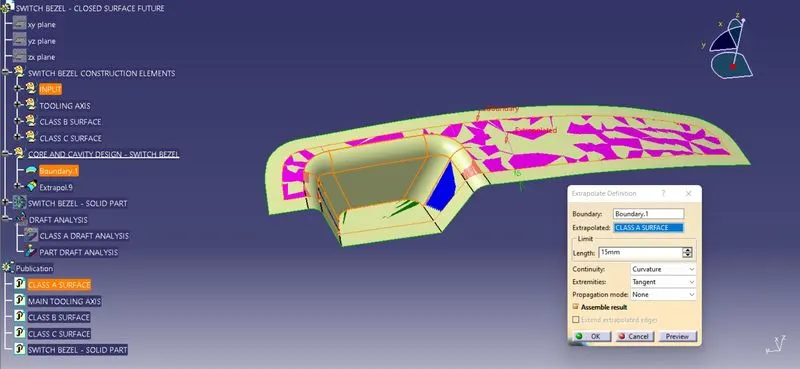
By selecting the features the boudaried surfaces are been extrapolated to the respectie length provided along all directions. The switch rest arm surface are selected from the Class A Surface and are extracted by selecting the elemets to be extracted from the class A Surface.
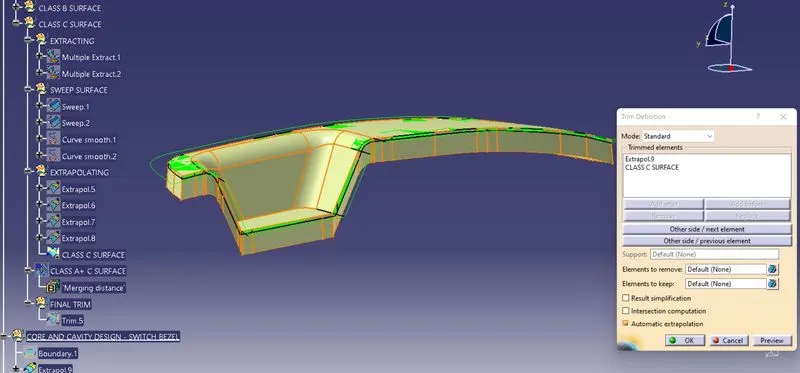
The created Class C surfaces are been trimmed with the Extrapolated Class A Surface.
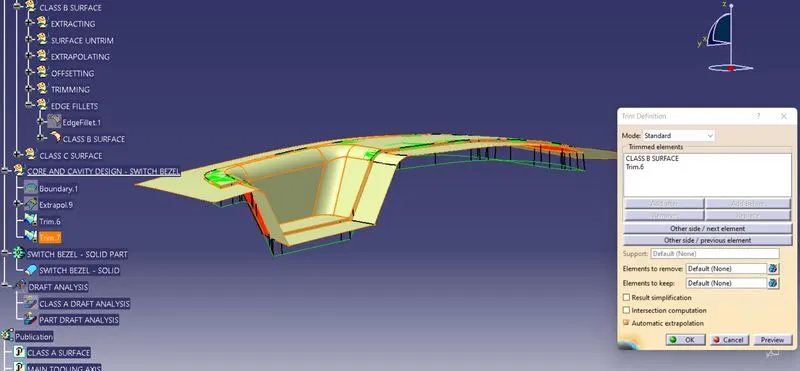
From the trimmed Class A and Class C surface the class B surface are been Trimmed with the adjecent surfaces to form the Parting surface between the Class A and Class C Surface.
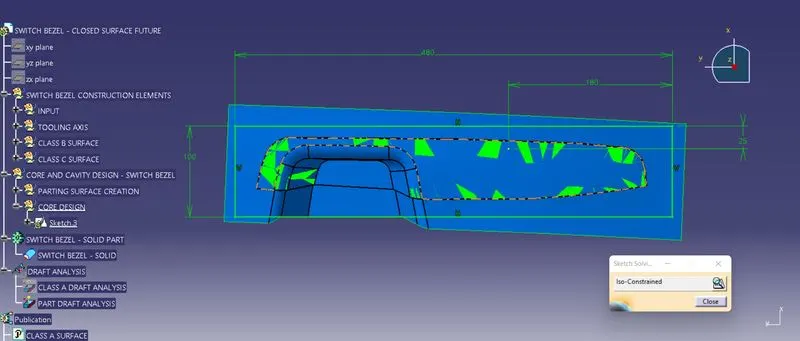
By using the positioned sketch, the plane has been selected in the base profile and the rectangle as been drawn In between the Parting surface and the sketches are been Iso - Constrained.
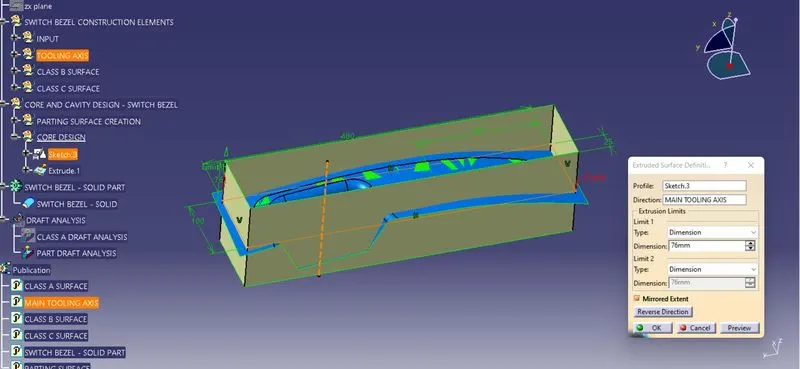
By using the Extrude feature the Skethces are been extruded to the respective lengths to form the core block from the parting surface.
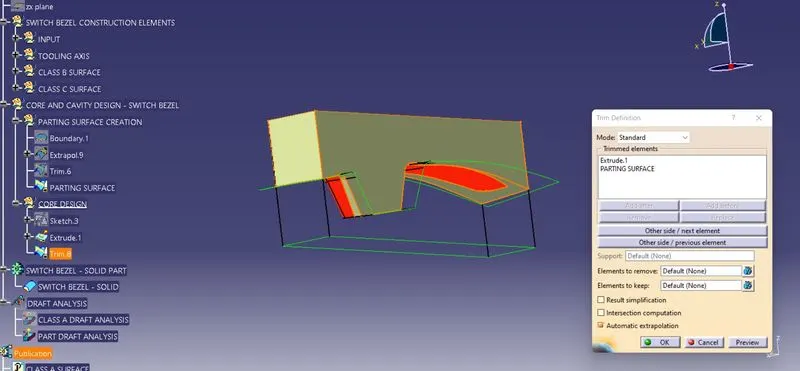
By using the Trim definition the Core blocks are been formed by trimming with the parting surface.
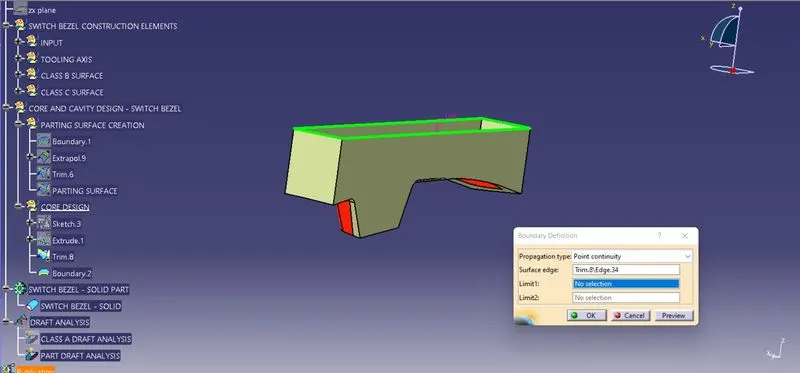
By using the Boundary definition feature the Top surface outer boundary are been selected and by using nthe propogation type as point continuity.
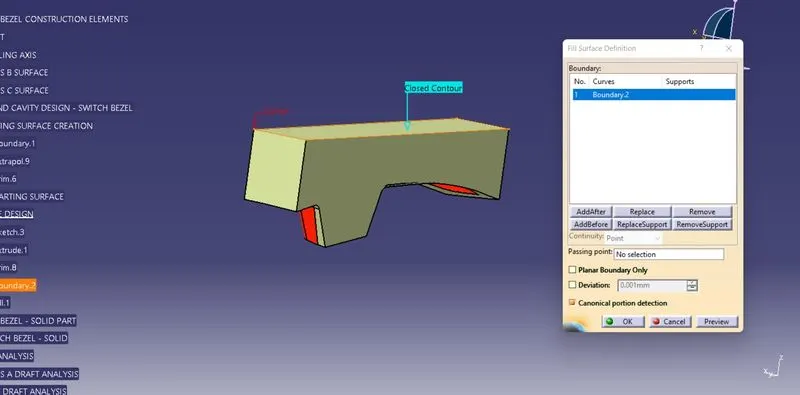
By using the Fill feature the outer boundary are been selected and the closed counter profiles are formed to fill the surfaces. Then by using the join command or by using the extrapolation and and trim feature the Core Block are been closed or Joined.
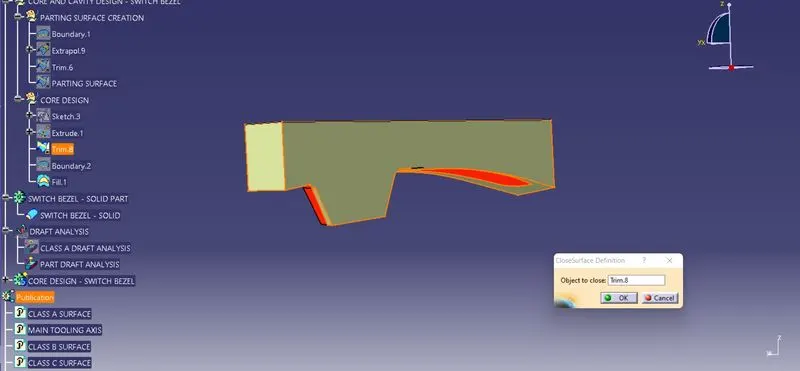
By using the close surface definition the part surface are selected to make them into solid part from the part workbench to form the core block.
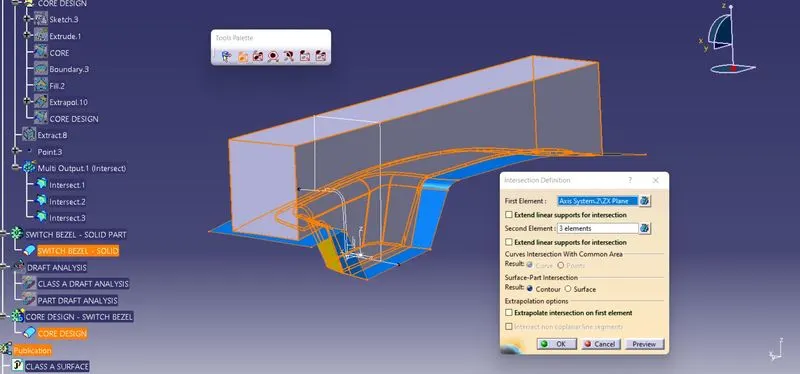
By using the intersection feature the Intersection from the Switc Bezel Solid Part, Switch Bezel core Block and the axis system are been selected to form the Intersection of the core Block.
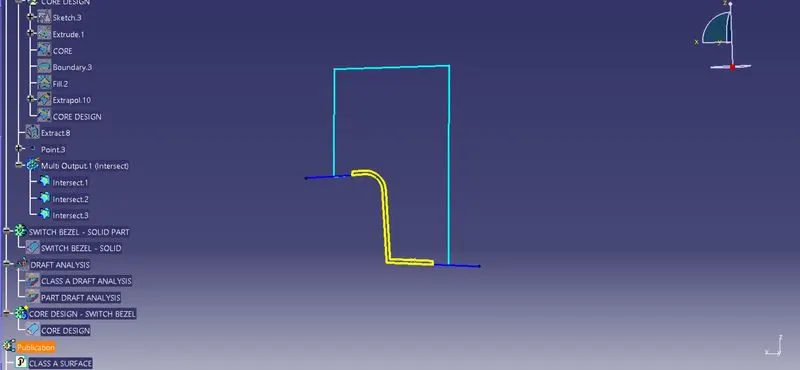
From the Intersections, the Yellow colour describes the Core Block in the switch bezel solid compnent faces and the parting surfaces are shown as the Blue in colour.
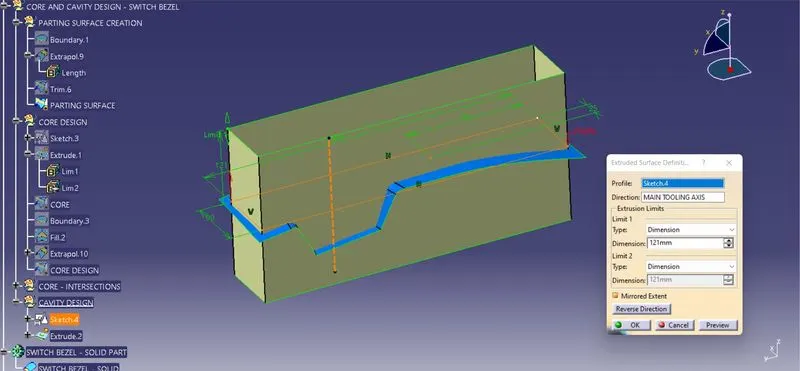
To form the Cavity Block, by using the Exrude feature, the sketches are been extruded along the tooling direction.
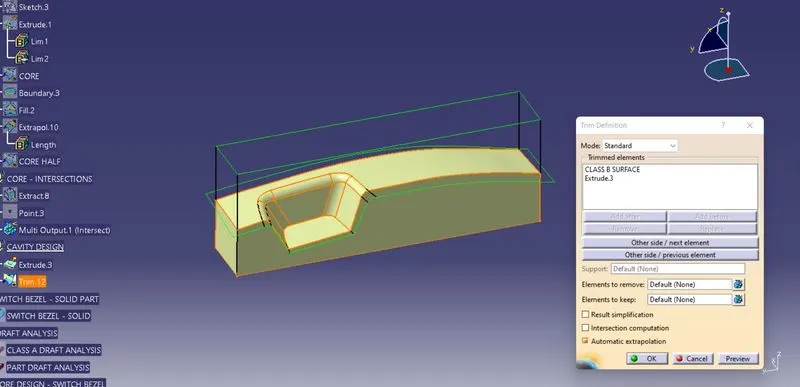
B using the Trim feature, the Extruded Sketches are been Trimmed with the Calss B Surface to form the Cavity Block for the Switch Bezel plastic component.
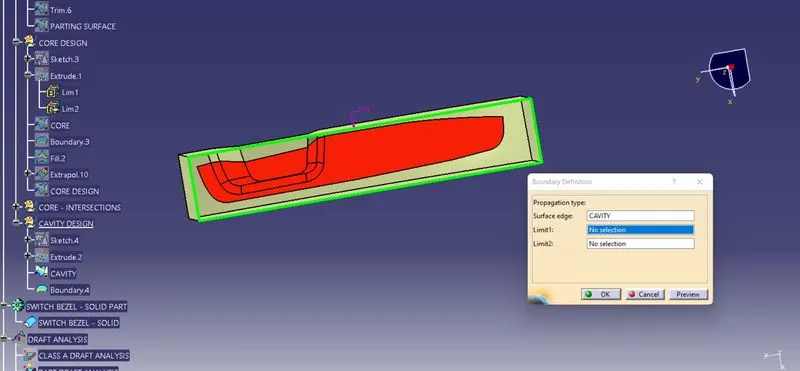
By using the Boundary feature the bottom unclosed Biundaries are been selected to form the closed form by using the Joinig feature or Extrapolate and Trimming feature.
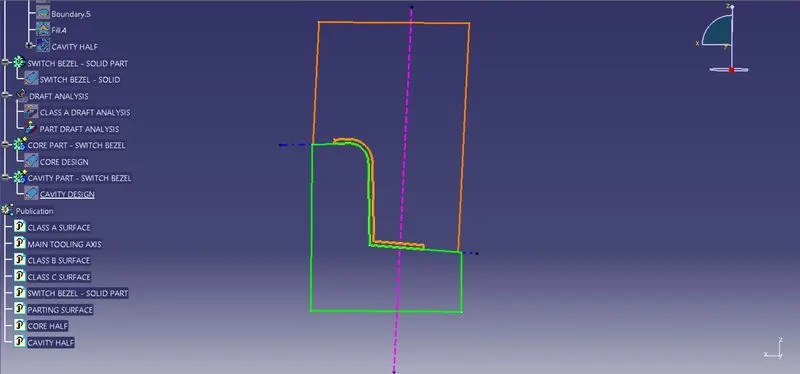
By using the Intersection feature the Switch Bezel plastic component, core and cavity blocks are identified with the parting surface, and the filling of the switch bezel plastic component are been formed.
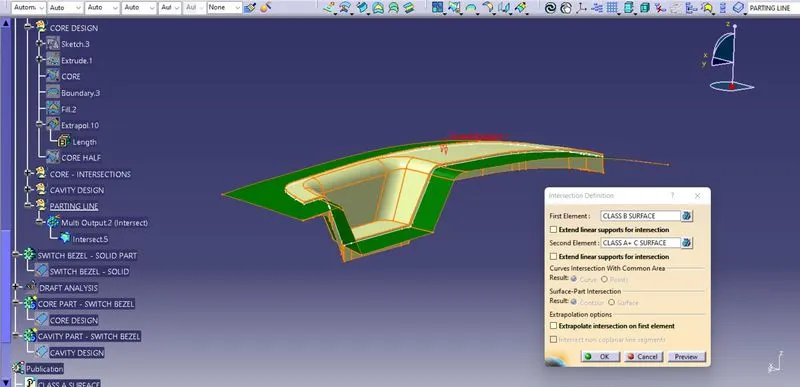
By using the Intersection feature Class B Surface and the Joined Class A and the Class C surface are been selected for the intersection to form the parting line.
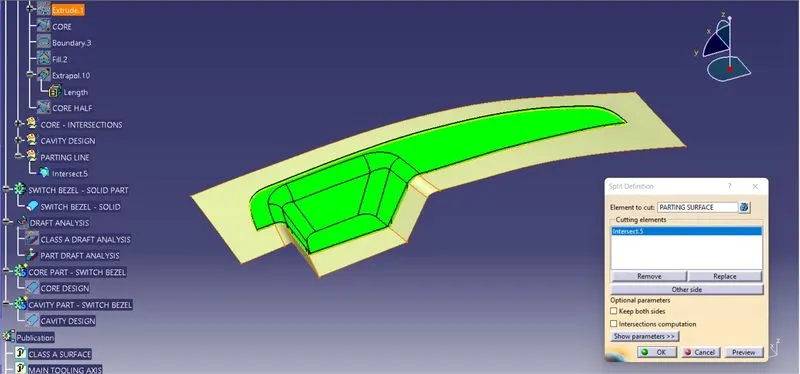
By using the split definition feature the Parting surface are been splitted with the parting line. Te outer area from te switch bezel plastic part are reffered to as parting surface.
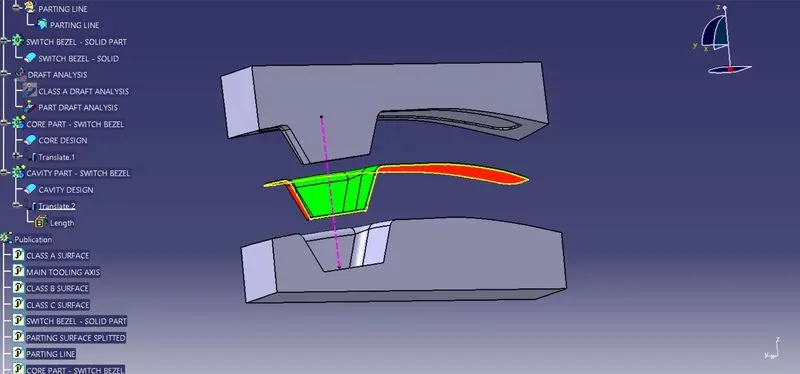
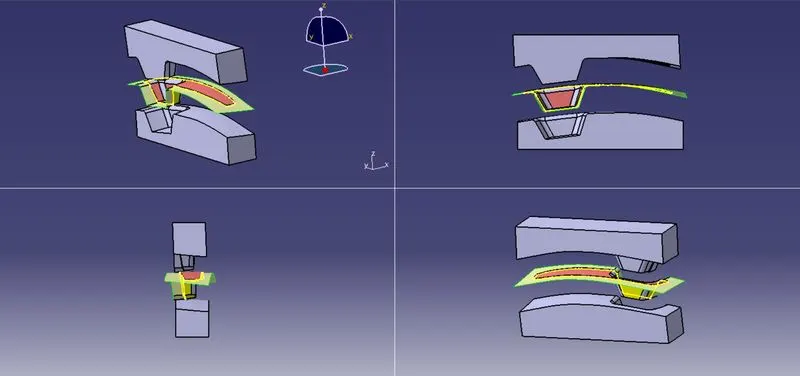
By using the translate feature te core and cavity blocks are been tralated to respective lengths along the Tooling direction from whic the moilded compnents are been formed.
ISOMETRIC VIEW, FRONT VIEW, SIDE VIEW AND BOTTOM VIEW:
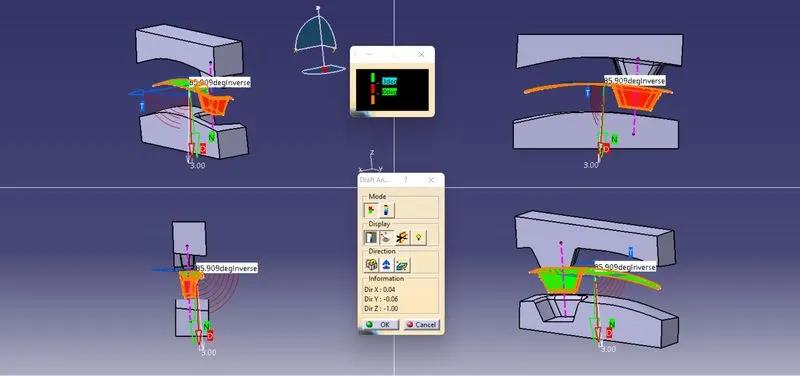
EXPANDED TREE STRUCTURE:
In CATIA the sketches and te surface operations are been defined using the Geometrical sets. By using the profiles like line, circle, hexagon, polygon, arc the 2 -D sketches are been created with reference to the Geometrical sets. According to the selection of plane from the possitioned sketch the 2-D sketch has drawn with the referene plane.
Te surface opeartions like Extrude, extract, trim, split, edge fillets, surface untrim, sweep, smooth curves, extrapolating, Boundary and Fills are deined using te respective geometrical sets.
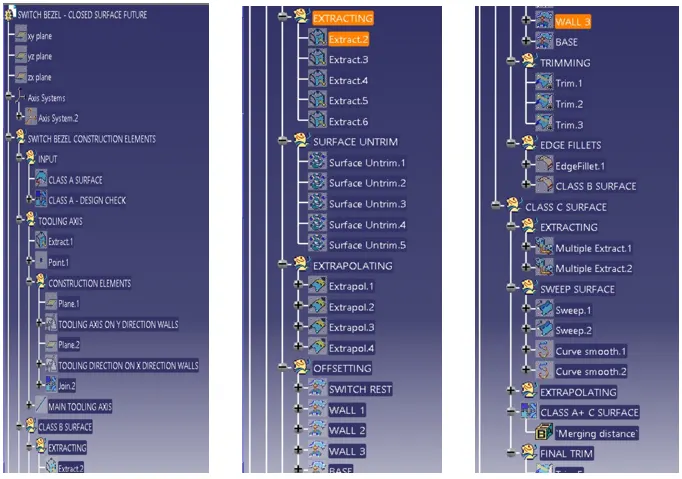
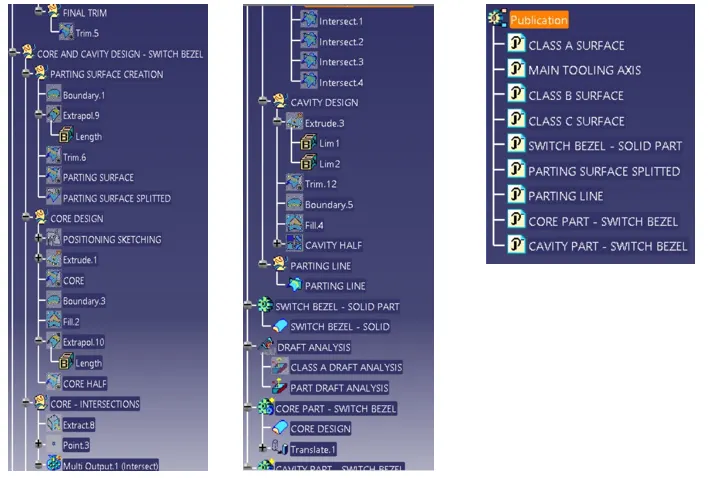
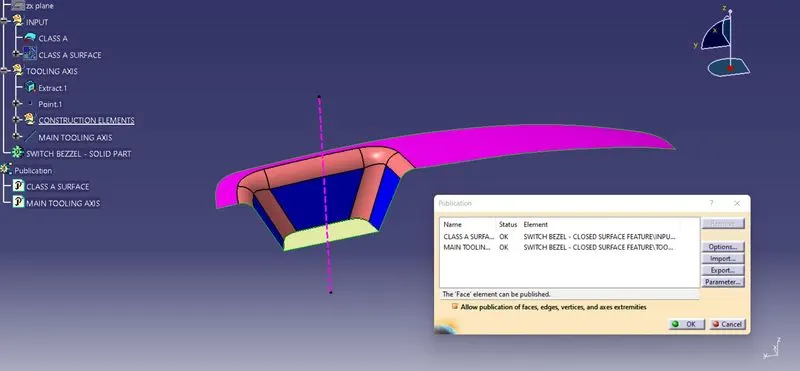
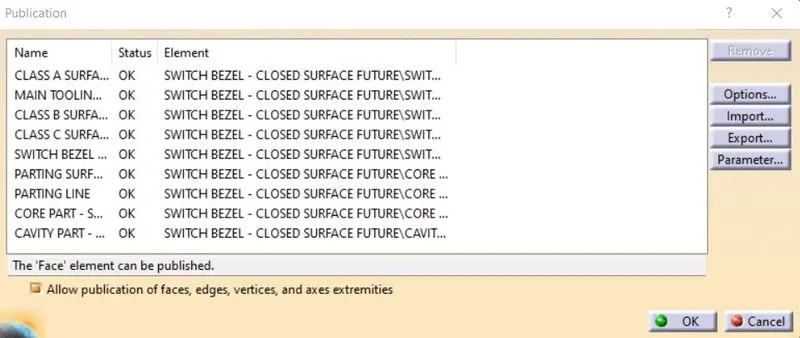
The Publications for the Class A , B and C Surface are Published and also the Min Tooling Axis are been Published using the Publication feature.
3 DIMENSION PART AND ORIENTATIONS:
ISOMETRIC VIEW, FRONT VIEW, SIDE VIEW AND BOTTOM VIEW:
CONCLUSION:
- The Core and Cavity Blocks for the switch bezel plastic component are created.
- The Switch Bezel Plastic Part Component using the Class 'A' surface are Created.
- The Tooling axis for a class 'A' Surface, which meeting the requirement of the draft angle are analysed and perfrmed.
- The solid model from the surface are created by using the Closed Surface Feature to the Thickness of 2.5 mm.
- The detailed report which explains the Draft analysis and Tooling Axis cration and colour scale varient are explained.
- The Class A, B and C surfaces and parting line and parting surface are Published using the publication option.
- The expanded Tree Structure for the Geometrical Sets are explored .
- The expanded tree structure for part design are explored.
- The 3D part Model for te core and cavity blocks with various orientations are attached.