Week 8:- 3D Finishing - Challenges 1
- What do you understand by the 3D finish process?
The 3D finish is a process where the design is brought finished and ready for final simulation &2D detailing
The following points need to be considered while finishing your design
- Hole concentricity & Hole sizes should be checked to ensure that the parts are aligned properly or there are any mismatches with the assembly.
- Machining area the surface that is to be machined should be represented with proper finishing and to represent the machining surface should be indicated any color
- The nomilnality of the holes is checked which ensures the parts and base unit are aligned properly is there any interference between the unit and to unit? if there are any unwanted gaps or interferences we should adjust the spacings.
- The hole coloring standard for the fasteners and dowel holes should be some standard colors. Clearance holes are aqua_blue color and threaded holes are Yellow color and Dovel Navy_blue color
- Gaps Checking the gap between different units and assemblies and weld areas and other small parts need to be checked for proper assembly
- Fasteners Implementation as per the hole sizes & the standard color codes and as per the customer requirements we need to finalize the holes whether it is a simple hole counterbore hole or threaded hole.
- Avoiding clashes between different parts of every unit and parts having some gaps from panel to mylar or a pin and checking the Weld gun clearances for welding.
- Mylar splitting as per panel profile if any mylar was located in an embossing or any curved or profile surface then the mylar must have the panel profile.
After completing all the above steps the model was sent to simulation and 2D detailing
2. What are the points that need to be taken care of while finishing the design?
- Hole concentricity & Hole sizes
All the holes should be checked to ensure that the parts are aligned properly or there are any mismatches with the assembly. the fasteners and parts are in concentric clearance holes and threaded holes.
- Machining area of the surface
which are to be machined should be represented with proper finishing and to represent the machining surface that should be indicated any color.
- Nomilnality of the holes
The nominalality of the holes is checked which ensures the parts and base unit are aligned properly is there any interference between the unit to unit? if there are any unwanted gaps or interference we should adjust the spacings.
- Hole coloring standard
The fasteners and dowel holes should be some standard colors. Clearance holes are aqua_blue color and threaded holes are Yellow color and Dovel Navy_blue color
- Gaps Checking
The gap between different units and assemblies weld areas and other small parts need to be checked for proper assembly
- Fasteners Implementation
as per the hole sizes & the standard color codes and as per the customer's requirements we need to finalize the holes whether it is a simple hole counterbore hole or threaded hole.
- Pneumatic Layout
The pneumatic layout is collected of different pneumatic pipes which work as an inlet to the pneumatic cylinder .it should be done proper function of the unit
- Avoiding clashes between different parts
every unit and part has some gaps from the panel to the mylar or a pin for checking the Weld gun clearances for welding.
- Mylars splitting as per panel profile
if any mylar was located in an embossing or any curved or profile surface then the mylar must have the panel profile.
- Proper renaming of parts/assemblies as per standard:
Proper renaming of parts and assembly should be done while finishing the design so that every person can understand the design.
3. What are rough Locators & what is their use?
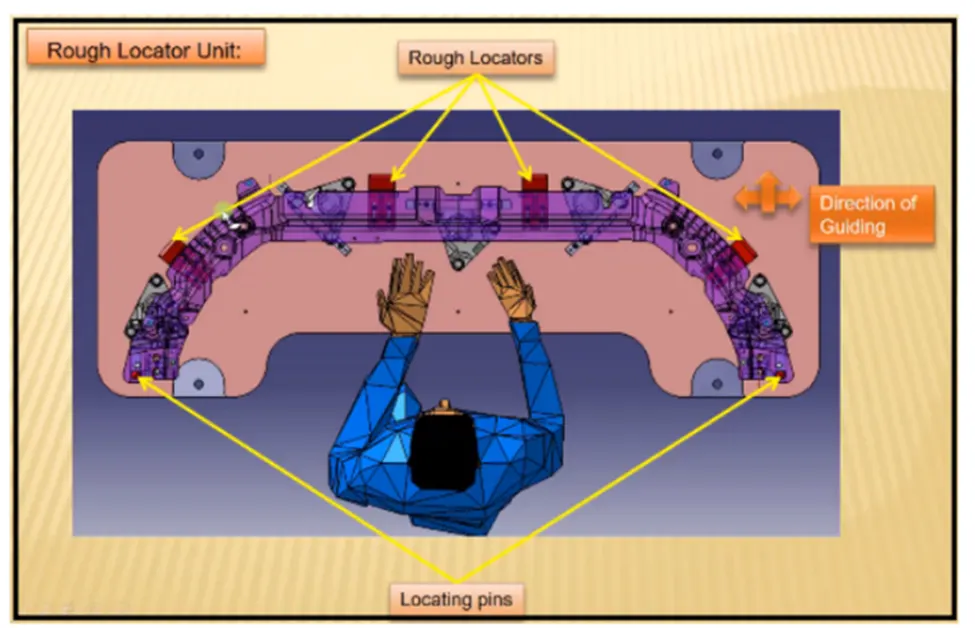
Rough locators are used and designed to guide the operator to locate the panel in the exact location before entering the pin .it can be a standard part of a self-designed part
Uses of Rough Locator
- Rough locators are used to locate workpieces in a BIW fixturing process. to place the panel into an exact location.
- The accuracy of the locating components directly affects the consistency and how the final product will come out. this is why these components are essential to the panel setup.
- Rough locators are used where manual loading of panels is implemented on the fixture.
- These are used to guide the panels in the correct position and orientation
- Rough locators must never touch the parts when it is nested or controlled by the primary tool locator.
- If not required to finish cold /hot rolled steel for rough locators mounted use NAAMS standard rough locators when possible
- A rough locator should have minimal parts in contact so that the operations can load the parts to the work location with ease. excessive parts contact may cause difficult parts loading and unloading
- It can be called as Fool Proofing method also because due to rough locators, the parts can not be loaded incorrect position. the rough locators are set according to the angle of the respective panel hence parts can only be loaded in direction and orientation.
4. What are the points you need to consider while designing a rough locator?
The following points need to be considered while designing the rough locators
- A rough locator should be placed at the edges of the panel which has to guide the panel.
- A rough locator has to be placed at the same angle as the car parts edge with a minimum of 2-5mm from the edge of the panel.
- A rough locator should arrest the direction of the panel. and the guiding should start 10-15mm before the pin engagement
- The rough locater should be designed with an entry angle for the panel and the rough locator should have two slots to mount for easy adjustments
- The height of the locator should not be more than the permissible ergo height of the fixture
- The entry point of the locator should be 10mm to 15 mm above the panel surface and the angle ranges from 30 -45 degrees
- A rough locator cab is a rod-type or flat type. depends upon the standard based on the requirement
5. What is the gun study process?
In the automotive industry, car panels are predominantly joined by various welding processes. A weld study is performed on the panel to be welded later which includes the required weld spots on the panel. These weld spots are taken into consideration while designing the fixture. Once the design of the fixture is completed, the weld gun that we intend to use in the actual process is put into the software, and the feasibility of the process is checked. This process of inserting the weld gun in the fixture design to check if the position of any part needs to be modified is called the gun study
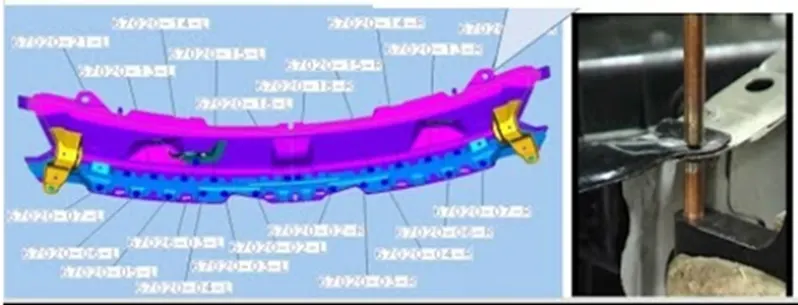
Fig weld study(spot locations)
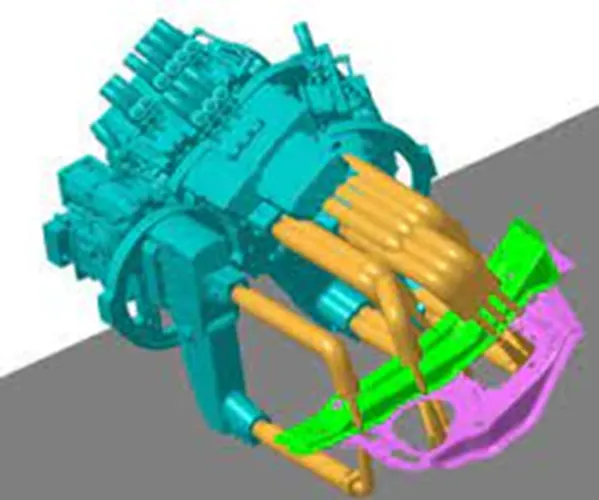
Fig weld gun
Welding is mostly used in automobile industries and their requirement for fixtures that ease the welding process is a continuous development task in any industry. In the weld study process, the major procedure insert the gun in the tool assembly and place the gun on the weld spots by creating a point on the tip, adjusting the weld gun so as not to get any clashes from the 3D concept. Once all the weld spots are cleared without any clashes they will be moved on to the next procedure of simulation.
In the simulation, first, we have to check the reach concerning the weld spots because robots also have some limitations if it exceeds the robot will not work 100 percent. So first we moved with the reach check and then tried to adjust the weld gun concerning the 3D concept design, if any clashes arise in the simulation, we will get cleared with CATIA software.
Car body in white (BIW) is a complicated steel structure including 300-500 sheets with complex shapes and are assembled using welding in a high rhythm through 55-75 robotic workstations. The foremost step taken before starting the welding fixture design, we must declare the weld spot location for every panel.
The location and orientation of other critical units of the fixture including clamps, location, etc are decided based on the weld spot distribution.
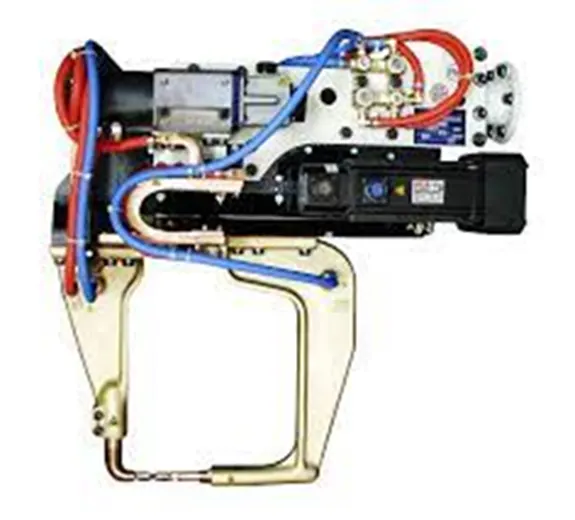
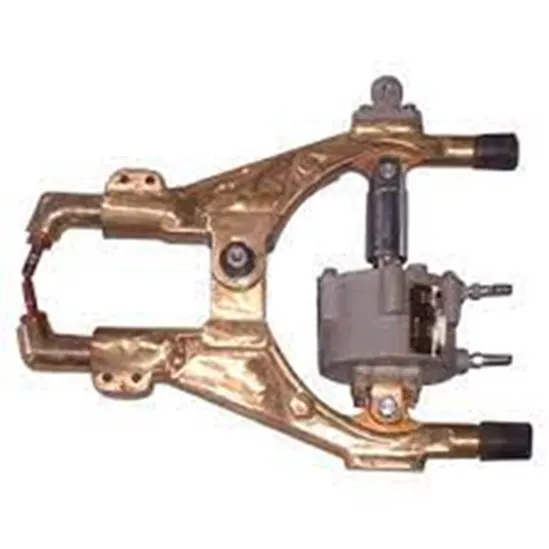
c-Type Gun X_Type gun
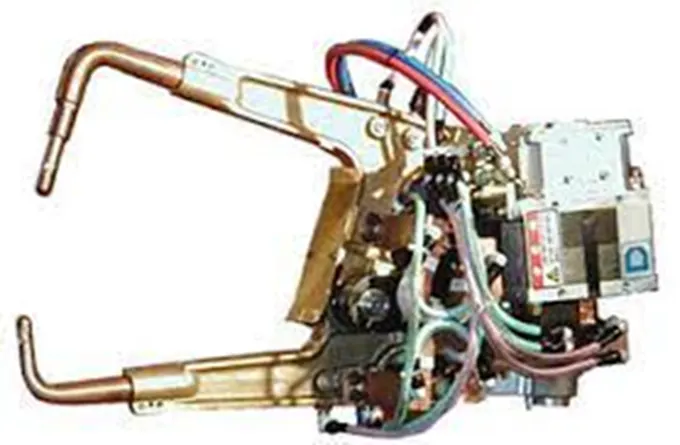
Scissor Type gun
6. What are the points that need to be considered during the gun study?
Weld gun study is a very time-consuming process, the entire welding cycle time study depends on the number of spots and the weld gun study
These are a few points which we need to take care of when we perform the gun study
The axis of the weld spot along the welding direction must be normal to the weld
The gun study should be performed once before the actual simulation
The position of the gun should be manipulated first in case of a collision with other parts.
If the position of the gun cannot be manipulated further, the location of the part must be modified or it can also be modified depending on the situation The entire given weld points must be cleared.
During the gun study, we have to consider client cycle time and we have to maintain the cycle time compared to client requirements
There are two types of weld spots they are:
Geo-spot and respot have different timings
Geo-spot-3 sec.
Respot-2 sec.
If we have one or more device models and we want to program, the behavior of each model in the work cell can be simulated over time. Instruction for each device is coded by giving a sequence.
If we have no issue with the weld gun we have to move on to the next procedure to run the paths( pathways) to analyze if there is any clash while the weld gun reaches a weld spot then if we do that and finally move to the sequence of operation.
After sequencing all the devices and paths finally simulation is run with a collision check to make sure all the weld spots and paths are clear from a collision using safe robots.
7) What is pneumatic routing?
Pneumatic systems should be efficient and leak-free. Sometimes, they are not, because of improper tube line routing which resulted in either a lack of knowledge, corners cut on planning time, or both.
Planning tube line routing is a time investment, but it can have a big ROI, especially for complex systems. During system design, routing should be developed as the next step after sizing the tube lines and selecting the appropriate fittings.
There are some guidelines provided for routing as shown below
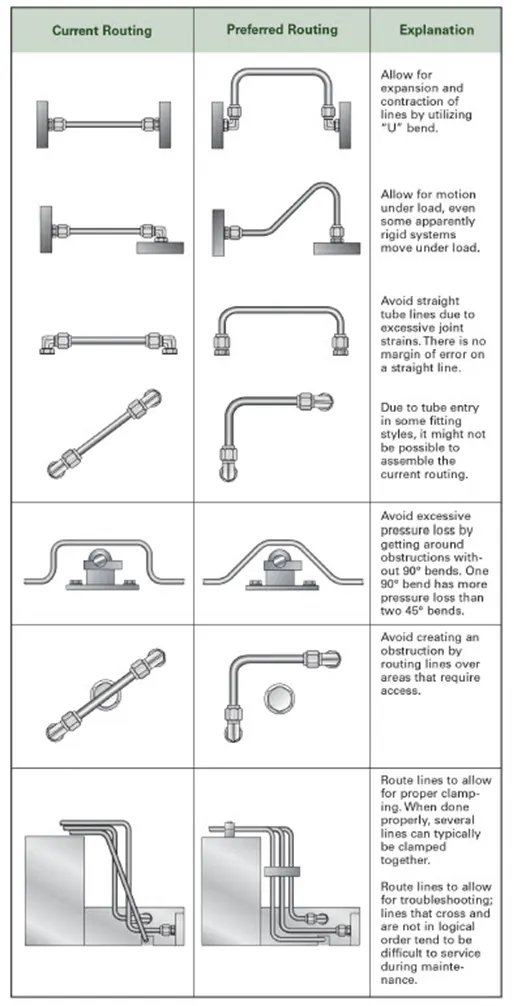
- Leave fitting joints as accessible as possible. Inaccessible joints are difficult and time-consuming to assemble, tighten, and service.
- Use software tools to make labor-intensive calculations such as pressure drop.
- Employ U-bends to allow for line contraction and expansion.
- Include offset bends to allow for motion under load, regardless of how ‘rigid’ the system seems.
- Favor bends rather than straight tube lines, because a straight line tube assembly with no bends, like the example of the test stand mentioned above, can cause joint stain, which may lead to leaking.
- Make sure the routing design allows room for the assembly of any connections required.
- Minimize pressure drop by getting around obstructions with as few 90° bends as possible. One 90° bend has more pressure loss than two 45° bends.
- Route lines around rather than over areas that require regular access or maintenance.
- Design routing with clamping in mind. Appropriate design leads logically to proper clamping. Often, it’s possible to clamp several lines together.
- Keep troubleshooting and maintenance in mind: focus on logical design and avoid crossed lines.
- Design the tube line routing to reduce the likelihood of users standing or climbing on plumbing
8) What is the solenoid valve?
A solenoid valve is an electromechanical valve. Solenoid valves differ in the characteristics of the electric current they use, the strength of the magnetic field they generate, the mechanism they use to regulate the fluid, and the type and characteristics of the fluid they control. The mechanism varies from linear action, and plunger-type actuators to pivoted-armature actuators and rocker actuators. The valve can use a two-port design to regulate a flow or use a three or more-port design to switch flows between ports. Multiple solenoid valves can be placed together on a manifold. Solenoid valves are the most frequently used control elements in fluidics Their tasks are to shut off, release, dose, distribute, or mix fluids. They are found in many application areas. Solenoids offer fast and safe switching, high reliability, long service life, good medium compatibility of the materials used, low control power, and compact design.
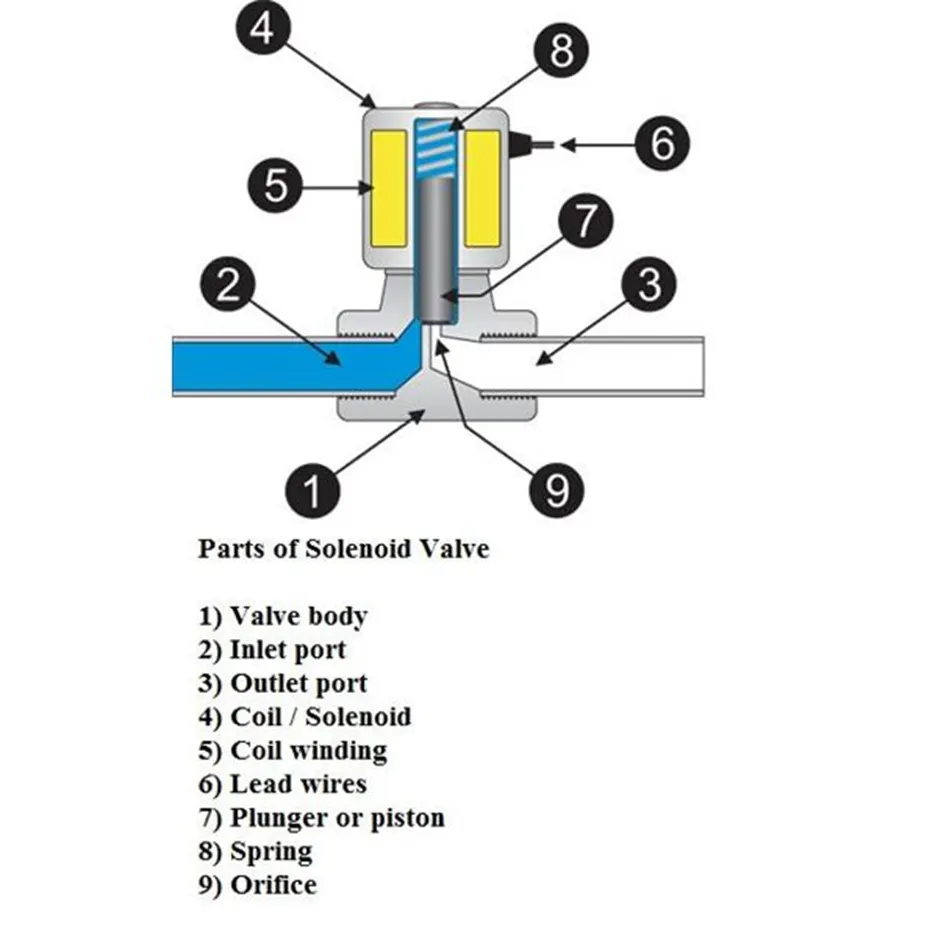
1) Valve body: This is the body of the valve to which the solenoid valve is connected. The valve is usually connected in the process flow pipeline to control the flow of certain fluids like liquid or air. Ordinarily, the flow from the valve is controlled by the handle, but in the case of the automatic valve, the solenoid valve is connected to the valve.
2) Inlet port of the valve: This is the port through which the fluid enters inside the automatic valve and from here it can enter into the final process.
3) Outlet port: The fluid that is allowed to pass through the automatic valve leaves the valve through the outlet port. The solenoid valve controls the flow of the fluid from the inlet port to the outlet port. The outlet port is eventually connected to the process where the fluid is required.
4) Coil/ Solenoid: This is the body of the solenoid coil. The body of the solenoid coil is cylindrical, and it is hollow from the inside. The body is covered with steel covering and it has a metallic finish. Inside the solenoid valve, there is a solenoid coil.
5) Coil windings: The solenoid consists of several turns of the enameled wire wound around the ferromagnetic material like steel or iron. The coil forms the shape of the hollow cylinder. Externally this coil is covered with the steel covering and inside the hollow part, there is a plunger or the piston, whose motion inside the hollow space is controlled by the spring.
6) Lead wires: These are external connections of the solenoid valve that are connected to the electrical supply. The current is supplied to the solenoid valve from these wires. When the solenoid valve is energized, the current flows through these wires to the solenoid valve, and when the solenoid valve is de-energized the flow of current stops.
7) Plunger or piston: This is the solid round metallic part cylindrical in shape and placed in the hollow portion of the solenoid valve. When the electrical current is passed through the solenoid valve, the magnetic field is generated inside the hollow space. Due to this, the plunger tends to move vertically in the hollow space. When the electrical current is stopped at the solenoid valve, the magnetic field is stopped and the plunger remains in the existing place due to the force of the spring.
8) Spring: The plunger moves inside the hollow space due to the action of the magnetic field against the action of the spring. The magnetic field generated inside the solenoid valve tends to move the plunger, but the spring tends to stop the motion of the plunger in whichever position it is. This action of the spring against the magnetic field helps keep the plunger in the position where the flow of current to the solenoid valve is stopped. The spring performs very crucial action inside the hollow space. For one, the plunger is in the vertical position, so the spring helps keep it at the desired position instead of allowing the plunger to fall to the bottom due to gravity when the current to the solenoid valve is stopped. Secondly, the spring also prevents the movement of the plunger due to the force of the fluid flowing through the valve body. If the spring was not there the plunger would have moved up when the fluid is present and moved down when the fluid is not there. Thus the spring forces the plunger to carry out the control of the fluid. It allows the movement of the plunger only to the extent when the electric current is flowing through the solenoid valve.
9) Orifice: The orifice is an important part of the valve through which the fluid is flowing. It is the connection between the inlet and the outlet port. The flow of fluid from the inlet port to the outlet port takes place from this port. In ordinary valves, this port is covered with the valve disc at the bottom of the stem of the valve to which the handle is connected. Thus in ordinary valves, the opening of the orifice is controlled by the handle, but in the case of the solenoid valves, the opening of the orifice is controlled by the plunger. The movement of the plunger is in turn controlled by the spring and the current flowing through the solenoid valve.
Basic working of solenoid valve:
Initially, the sensor senses the process towards the outlet side of the solenoid valve. When it senses that a certain quantity of the flow of the fluid is required, it allows the current to pass through the solenoid valve. Due to this, the valve gets energized and the magnetic field is generated which triggers the movement of the plunger against the action of the spring. Due to this, the plunger moves in the upward direction, which allows the opening of the orifice. At this instant, the flow of the fluid is allowed from the inlet port to the outlet port.
If the current passing through the solenoid valve is constant, the position of the plunger and hence opening of the orifice remains constant. If the sensor senses that more flow of the fluid is required, it allows the increase in current to pass through the solenoid valve, which creates more magnetic field and more upward motion of the plunger. This leads to further opening of the orifice and more flow of the fluid from the inlet port to the outlet. If the required flow of fluid is less, the sensor allows passage of the lesser current to the solenoid valve.
When the sensor senses that the fluid is no longer required in the process, it stops the flow of the current to the solenoid valve completely. Due to this, the solenoid valve gets de-energized and the plunger reaches the bottommost position and closes the orifice completely thus stopping the flow of fluid from the inlet port to the outlet port.
In this way, the solenoid coil operates the valve as if it is being operated by a human being. When the flow of a certain quantity of fluid is required it opens the valve to the required extent and when the flow is not required it shuts the valve entirely.
9)What is the valve bank?
A valve bank is the arrangement of no. of solenoid valves. The valve bank will have a common inlet port, a single servo line to each of the pneumatic valves, and independent vent passages for each solenoid. On the solenoid bank, each of the solenoid valves separately controls the feed of high-pressure servo air to a single pneumatic valve. The valve is actuated by selectively energizing the corresponding solenoid to allow servo air to the servo port of the valve. To return the valve to its fail-safe position, the solenoid is de-energized to vent the servo port of the valve to the ambient.
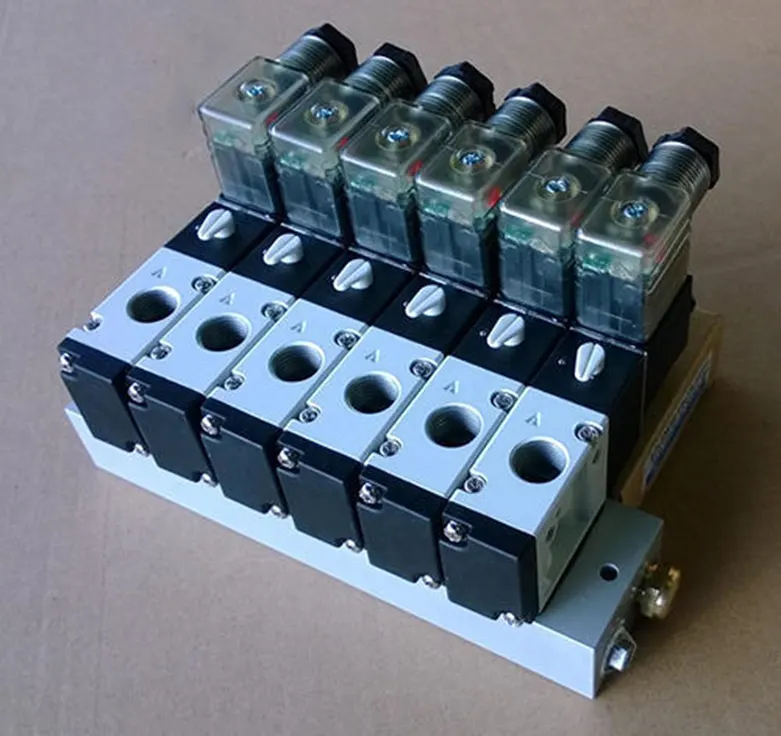
common features of valve bank-
- These are Designed for high-vibration levels
- It Uses aluminum alloy manifolds for lightweight
- These are designed for high-temperature environments
- Design architecture allows easy selection of two to six solenoid valve
10) What is a sensor & brief about its application in automation?
A sensor is a device that detects or measures a physical property and records, indicates or otherwise responds to it. A unit designed to sense car panels using electrical sensors is called a sensor unit. The from the sensors is sent to the PLC so the next process is executed by this signal. The sensor is very sensitive & easily damagable part so a sensor cover is provided to the sensor for safety purposes.
Sensors in Automation:
In the industrial automation section, sensors play a very important role in making the products intelligent and highly automatic. These allow one to detect, analyze, measure, and process various changes like change in position, length, height, appearance, and displacement that occurs in the production sites. These sensors also play an important role in predicting and preventing many future events, thus, catering to the needs of many sensing applications.
The following are the various types of sensors used in industrial automation: Proximity sensors, Vision sensors, Ultrasonic sensors, Position sensors, Photoelectric sensors, Temperature sensors, Inclination sensors, etc. The applications for position sensors as a whole are broad. They can be used in anything from motion control of a robot, tank-level sensing, or even in semiconductor process equipment.
For example, displacement sensor is used in the precision positioning of objects at the nanometer level and the measurement of precision thickness of disk drives, assembly line testing, and machine tool metrology. It is widely used in machining.
11) What are the types of sensors?
The following is a list of different types of sensors that are commonly used in various applications. All these sensors are used for measuring one of the physical properties like Temperature, Resistance, Capacitance, Conduction, Heat Transfer, etc.
- Temperature Sensor
- Proximity Sensor
- Accelerometer
- IR Sensor (Infrared Sensor)
- Pressure Sensor
- Light Sensor
- Ultrasonic Sensor
- Smoke, Gas, and Alcohol Sensor
- Touch Sensor
- Color Sensor
- Humidity Sensor
- Tilt Sensor
- Flow and Level Sensor
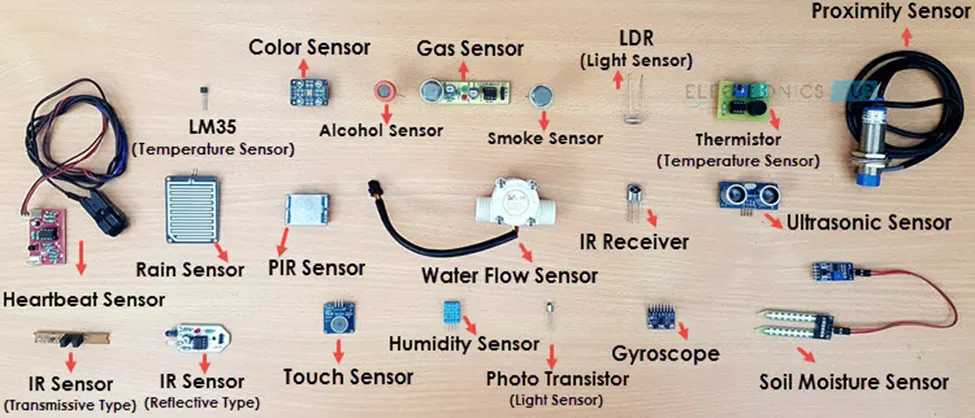
Sensors
12) What are the fundamental points that need to be considered while designing or selecting of sensor?
The fundamental points to be considered while designing or selecting of sensor are:
- A sensor unit is a unit designed to sense the car panel by using Electrical sensors.
- The signal from sensors will be fed to the PLC and the next process will be executed will be this signal.
- Sensors are used for confirming there is a panel/component present or not.
- it should help to avoid human error.
- Basically sensors should be equal numbers as compared to number of panels in an assembly. for ex. if 9 panels are in assembly, there should be at least 9 sensors used.
- sensors should be designed in such a way that they can be adjusted in 3 directions.
- Sensors should provide safety to the operator.
- Typically Proximity, LASER, Photoelectric Sensors are used in fixtures.
- Some Major sensor manufacturers are IFM, Pepperi-Fuchs, SICK, OMERON, etc