Week 8:- 3D Finishing Challenge 2
INTRODUCTION
The accuracy achieved during a machining process depends upon the precision with which the tool and the work piece are mounted in the machine tool along with their accurate movement. Normal work holding devices such as chucks and vices are suitable for general purpose work, but when required to be used repeatedly for a large number of identical parts, the setup and clamping time become unacceptable. Hence for production work involving large number of parts, it is necessary to have separate jigs and fixtures to be designed for specific application such that the setup time is reduced to the absolute minimum that is possible.
Jigs and fixtures are the production devices that are used for the accurate production of repeated parts essentially for mass production. The required accuracy is achieved by maintaining the precise relationship between the various surfaces of the fixture and the part to be manufactured. A jig or fixture needs to provide the following functionality to be an effective production device:
● Location
● Clamping
● Support
● Resistance to Cutting forces
● Safety
FUNCTIONAL SURFACES:
The essential reason for machining is that these surfaces are to be mated with surfaces machined in the other parts. There is no need to machine surfaces which are not likely to come into direct contact with other surfaces, except when the appearance may be important. Alternatively in some cases of high speed rotors or flywheels, machining all over the surface may be resorted to reduce the possibility of unbalance. It is always necessary to consider the fact that machining increases the final cost of the component and hence should be minimised as far as possible. With that in background we may identify, from the basic shape of the part, the critical surfaces to be machined based on the following three criteria:
● Surface finish to be achieved
● Basic geometry
● Tolerance on the dimension or surface
The finish of the surface to be achieved is often a limiting factor in choosing a given surface for machining
besides the other criteria. More discussion on the choice of machining surfaces would be done in the latter part
of this chapter. There are certain surfaces in the part which should be identified because of their functional
importance from the following stand point of
● location
● support
● clamping for each of the machined surface.
SUPPORT SURFACES:
This is the type of surface chosen in the end after all the surfaces are identified. It is not necessary that all work pieces are to be provided with support for all operations. At times, for some components the cutting forces or clamping forces would distort a part of the work piece, because of the low rigidity of that section. As far as possible this should be avoided, but the geometry of the work piece may not allow it. In such cases proper support would have to be provided before clamping the work piece at critical points. Thus the need arises for the methods to be followed in order to identify the surfaces for support. The following are some principles that could be used while selecting the support surfaces.
● Select a surface where there is maximum likelihood for the part to deflect under the action of clamping
and cutting forces.
● Support areas selected should not disturb the location of the work piece in any manner nor displace the
locators while providing the support.
● Support areas selected should not interfere with the loading and unloading of the component into the
work holding fixture.
CLAMPING SURFACES:
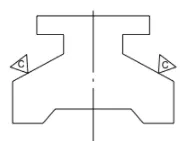
The selection of clamping (holding) surfaces should be done in such a way that clamping of the part can be done easily in the shortest possible time with little skill. The following are some principles that should be considered while selecting areas for clamping.
● Generally the clamping surface should be opposite to that of a location surface, for clamping to be effective. However, normally the surface opposite to location would be the surface to be machined. Hence this choice would only be possible if that entire surface is not to be machined or a parallel surface to this is available.
● If the surface opposite to location is not available for clamping, alternate surfaces should be chosen for clamping such that
resultant clamping force is acting against the locators as shown in Figure
● As far as possible already machined surfaces should be avoided as clamping surfaces, as they are likely to be spoiled under the clamping forces. If there is no alternative then the sequencing of the operations may be altered in such a way that this operation can be done earlier.
● Always choose the clamping surface area large enough such that the clamping forces are properly distributed and no surface plastic deformation takes place on the component. The clamping force used should take care of the cutting forces likely to develop and maintain the stability of the work piece within the fixture. Thus care has to be exercised to distribute this large clamping force over a large area of the work piece surface.
● Choose a surface with enough rigidity such that no deformation of the component takes place under
the clamping forces.
LOCATING PRINCIPLES:
The location of a component is one of the most important parameters to achieve the required accuracy at the lowest cost. Any wrong choice in this may lead to inaccuracy or higher manufacturing costs. The choice of location is essentially to control the equilibrium of the component in the work holding fixture under all the disturbing forces during the machining operation.
Any free body has six degrees of freedom (3 linear and 3 rotary) as shown in Figure (for a simple cube). Whenever location is planned it is necessary to plan the arresting of all these six degrees of freedom to ensure the mechanical stability of the component in the fixture.
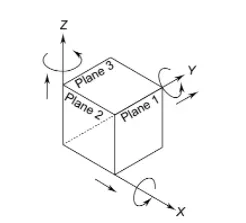
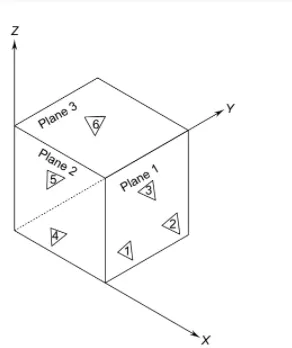
The principle that is used for constraining all the DOF is the 3-2-1 principle. This is used for locating the cartesian coordinate system of components. The 3,2,1 are the number of pins provided in three mutually perpendicular planes for arresting the required number of degrees of freedom of the panel.
Minimum: three locator blocks to establish part plane. Three locators, or supports, are placed under the workpiece. The three locators are usually positioned on the primary locating surface. This restricts one axial movement downward, and 4 radial movements. Together, the three locators restrict five degrees of freedom. Round locating pin in a round hole that defines location in four directions (4-way) perpendicular to the plane Previously established. This restricts four axial movement Round locating pin in a slot that defines two of the directions of the other pin (2-way).This restricts two axial movements
OBJECTIVE
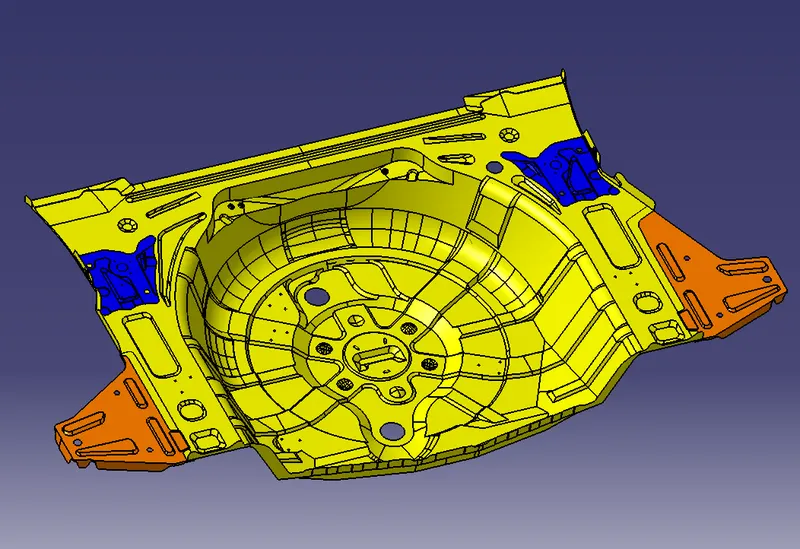
The objective of the project is to design the fixture for the given car panel that restricts the motion of the panel in all the DOF. Designing the fixed pin unit, retractable unit, power clamp unit, swivel clamp unit and base unit in the CATIA V5 following all the design considerations.
3) DESIGN METHODOLOGY
The fixture units for the given car panel are modelled in the CATIA V5. The feature tree is named “P01_Z01_ST010_00_00” in which
P01 – Project 1
Z01 – Zone 1
S010 – Station 10
00 – Unit number
00 – Part number
For every unit, the unit number and part number change but the project, zone and station remain the same.
1) FIXED PIN UNIT
A fixed pin unit is a unit designed to locate the car panel using pins.
pin unit consists of
- Pin
- Pin retainer
- Shim / spacer
- Block
- Blade or Adapter plate
- Riser.
- The centre of the hole is taken and the pin outline is modelled as per the standards.
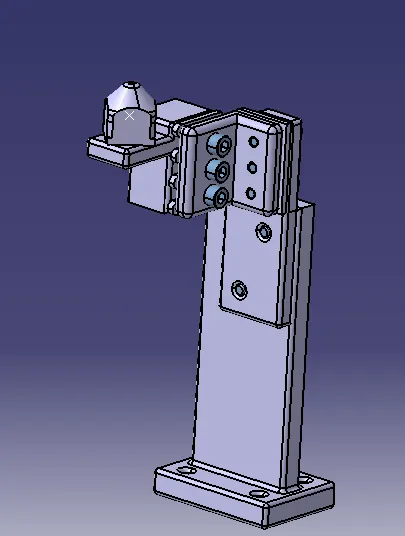
Pin units with the workpiece
- The blocks are modelled in such a manner that the pin can be adjusted in longitudinal and translational directions.
- A 5 mm space is provided between the block and retainers as the shims or spacer blocks are present.
- The dowel holes are present in all the parts of the pin units which are to be assembled with tolerance should be designed with 2 dowels and at least 1 to 6 treated / free holes (depends on size). And to be finely machined for the mounting surface with 3 to 5 mm step machining.
- The blade is a plate that connects the riser to the block, usually, the blades are standard parts if needed can be designed.
- The riser is a part on which all the parts of a unit are mounted and is mounted on the base plate of a tool. In general, the riser can either be made part of a standard part.
2) RETRACTABLE UNIT
A retractable pin unit is a unit designed to locate the car panel using pins. when loading direction and unloading direction of panel is different then we use retractable pin unit
retractable pin unit consists of
- Pin
- Pneumatic cylinder
- Shim / spacer
- Block
- Riser.
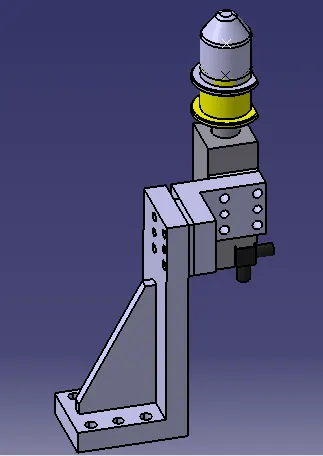
Retractable Pin units designed for the Fixture
- The blocks are modelled in such a manner that the pin can be adjusted in longitudinal and translational directions.
- A 5 mm space is provided between the block and retainers as the shims or spacer blocks are present.
- The dowel holes are present in all the parts of the pin units which are to be assembled with tolerance should be designed with 2 dowels and at least 1 to 6 treated / free holes (depends on size). And to be finely machined for the mounting surface with 3 to 5 mm step machining.
- The riser is a part on which all the parts of a unit are mounted and is mounted on the base plate of a tool. In general, the riser can either be made part of a standard part.
3) POWER CLAMP/PIN CLAMP UNIT
A Power Clamp unit is a unit designed to clamp/hold the car panel with NC blocks/ Mylars/ Rest by using a pneumatic clamp cylinder.
The parts of the clamp unit are:
- Rest block /Mylar
- L - block
- Shim / spacer
- Blade or Adapter plate
- Riser.
- Clamp Arm
- Pneumatic cylinder
- The standard pneumatic cylinders are downloaded from Tunker's website.
- The L- blocks / Mylars / Rest blocks are modelled in such a manner that there won’t be any movement of the car panel in the transverse direction. The clamp unit restricts the transverse direction translation and rotation.
- The clamp arm is a bought-out part, to which all the movable parts are fixed. In general, a clamp arm is a part of a clamp cylinder. Clamp arms are different for the different bore of cylinders. Clamp arms are available in different hole patches. Clamp arms are available as Middle arm – A10, Right arm – A11, Left arm – A12.
- A 5 mm space is provided between the clamp arm and mylars as the shims or spacer blocks are present.
- The dowel holes are present in all the parts of the pin units which are to be assembled with tolerance should be designed with 2 dowels and at least 1 to 6 treated / free holes (depends on size). And to be finely machined for the mounting surface with 3 to 5 mm step machining.
- A clamp cylinder is a pneumatic device that works with pressurised air. The clamping cylinder is used to open and close the parts fixed to the clamp arm fixed to the clamp body. Clamp cylinders are in general 40,50,63 and 80 bore capacity. Opens up to 135° for horizontal clamp mounting. Opens up to 105° for vertical clamp mounting.
- The riser is a part on which all the parts of a unit are mounted and is mounted on the base plate of a tool. In general, the riser can either be made part of a standard part.
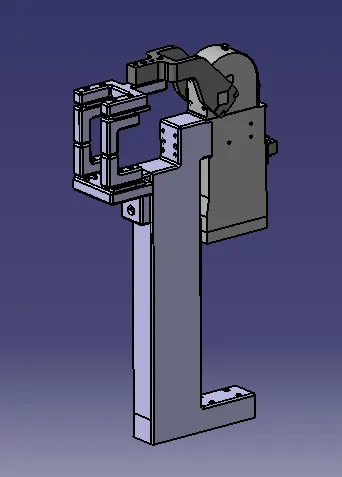
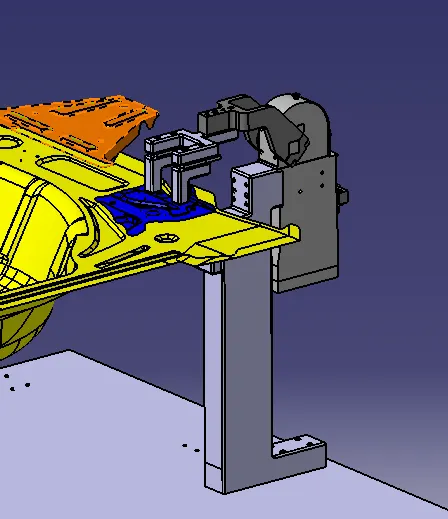
Power pin Clamp unit with the workpiece
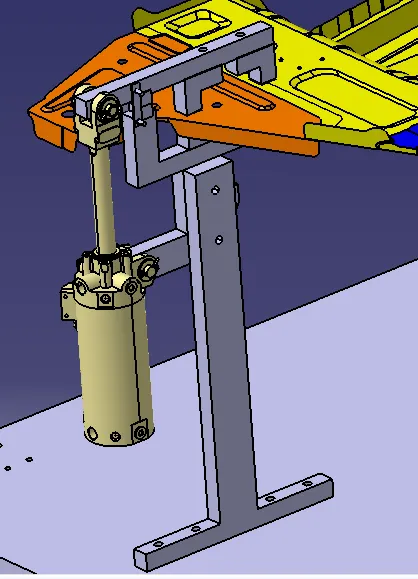
4) SWIVEL CLAMP/ PIN CLAMP UNIT
A Swivel Clamp unit is a unit designed to clamp/hold the car panel with NC blocks/ Mylars/ Rest by using a swivel cylinder.
The parts of the clamp unit are:
- Rest block /Mylar
- L - block
- Shim / spacer
- Blade or Adapter plate
- Riser.
- Clamp Arm
- Swivel cylinder
- The swivel cylinder (CKG-1B-63-100Y) is imported as the name suggest the stroke of the cylinder in the y-direction is 100 mm.
- The L- blocks / Mylars / Rest blocks are modelled in such a manner that there won’t be any movement of the car panel in the transverse direction. The clamp unit restricts the transverse direction translation and rotation.
- The clamp arm is consisting of pivots connected to the blade and swivel cylinder. The open condition of the clamp arm must be below the stroke length of the cylinder and exactly in line with the swivel cylinder in a vertical direction.
- A 5 mm space is provided between the clamp arm and mylars as the shims or spacer blocks are present.
- The dowel holes are present in all the parts of the pin units which are to be assembled with tolerance should be designed with 2 dowels and at least 1 to 6 treated / free holes (depends on size). And to be finely machined for the mounting surface with 3 to 5 mm step machining.
- The blade is modelled in the way that; it gives support to the bottom rest blocks and also connects the cylinder. A stopper is present in the blade which helps to stop the clamp arm at a certain distance in the closed condition.
- The riser is a part on which all the parts of a unit are mounted and is mounted on the base plate of a tool. In general, the riser can either be made part of a standard part.
5) REST UNIT
The rest unit is used to support/rest the car panel using NC blocks/ Mylars
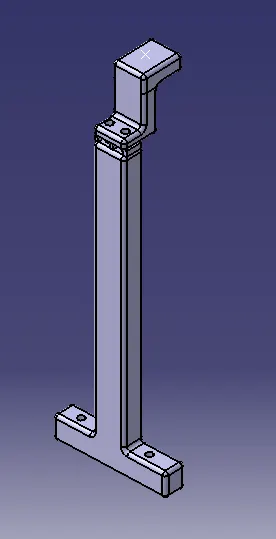
Rest unit designed for the Fixture
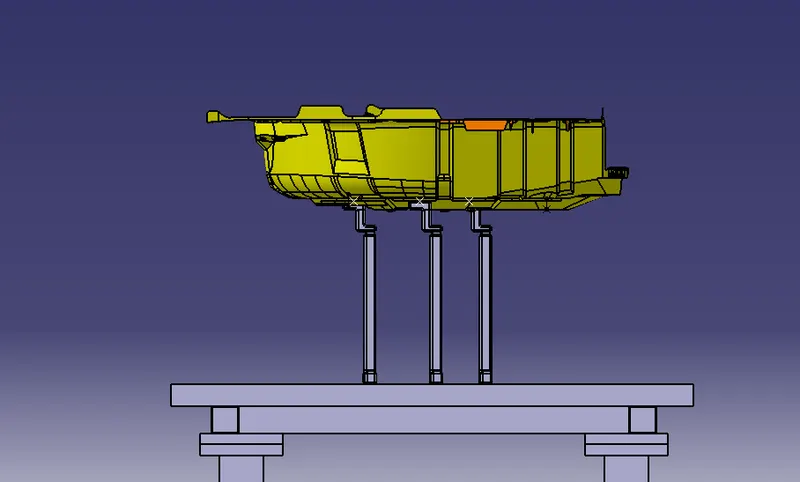
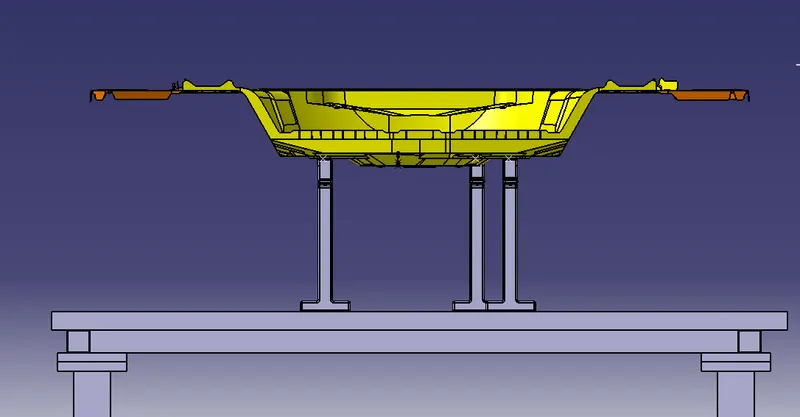
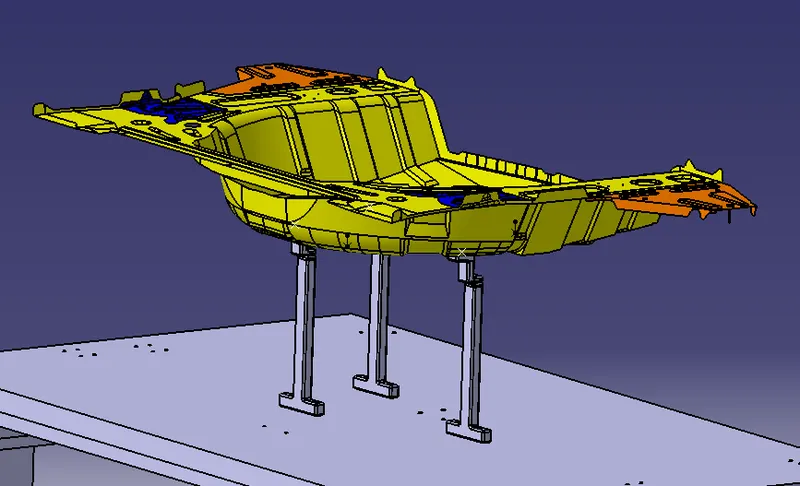
Rest units supporting the workpiece
6) BASE UNIT
A Base unit is a unit designed to mount all the other units(Clamp, pin, rest units) of the tool, also other parts necessary for a tool like a pneumatic valve box, trunking cable path will be mounted onto the base unit.
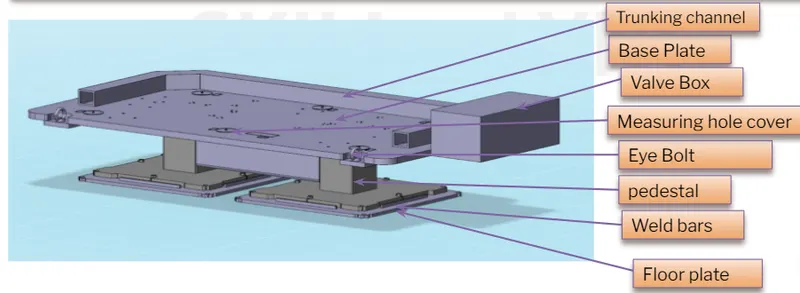
A typical Base unit
- A Base unit should cover all the units with its outer periphery including openings.
- A base plate is preferred to be designed to BCS coordinates.
- A base plate should be drilled with datum holes/measuring holes in line with a pitch of 1000 mm in general.
- The number of datum holes is dependent on the size of the base plate.
- Datum holes must be drilled in nominal values of coordinates and terms of 50 and 100.
- Datum holes should be drilled with a diameter 100 mm away from other units.
- Datum holes should be covered with a cover plate.
- There must be a minimum space for the trunking channels.
- The weld gun position and the weldment have to be checked. A minimum of 5 mm gap must be present between the gun and the units.
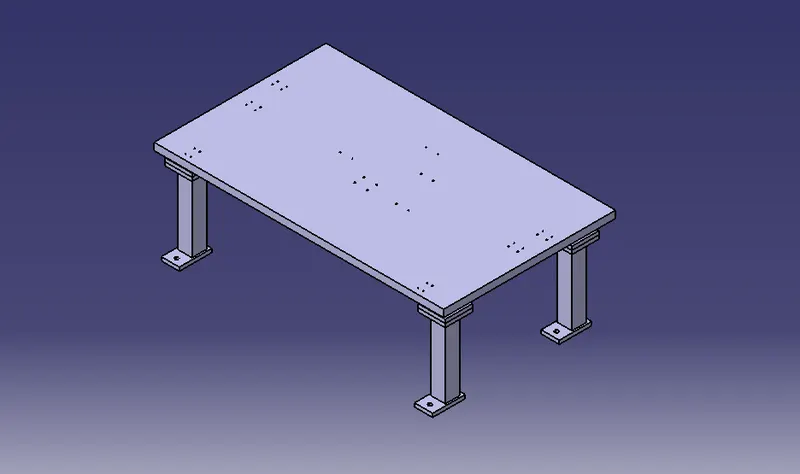
Base unit designed for the Fixture
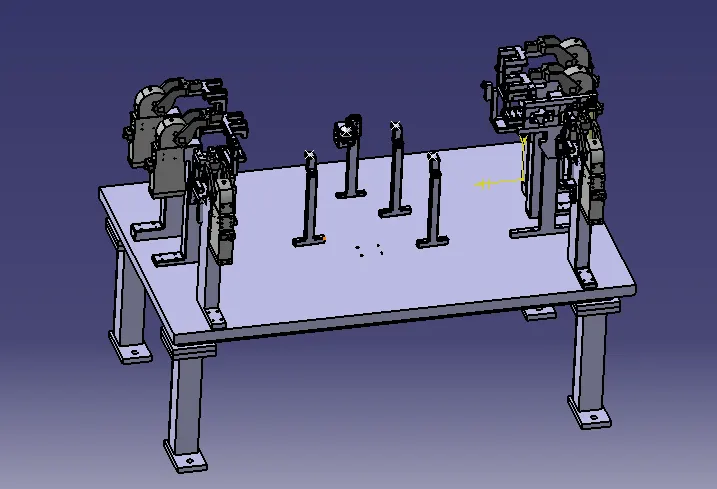
Base unit with Fixture units mounted on it
7) ROUGH LOCATORS
- Rough locators are used where manual loading of panels are to be implemented on the fixture.
- These are used to guide the panels in the correct position and orientation.
- These also help for proper Poka-Yoke, which means to avoid errors
- Materials used for rough locators are mild steel or similar metal.

Rough Locators with the workpiece
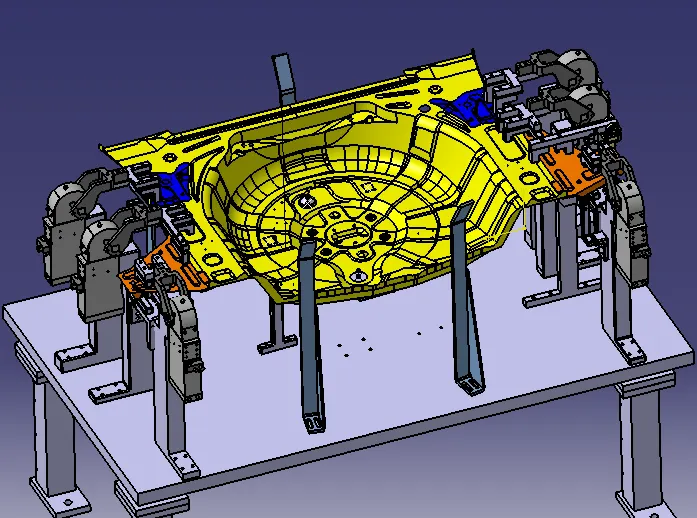
Fixture Assembly without Rough locators
8) 3D-FINISH
3D finish is the process where the design is finished and to be ready for final simulation and 2D detailing.
Points to consider:
- Hole concentricity and sizes have to be checked for the rest blocks, mylars, blades and riser. All the holes must be concentric.
- If any surface of a part comes in contact with the other surface of the part, the surface has to be machined. To indicate the machined surface light brown colour is indicated in the design.
- All the units must be nominally designed. The pin is anyhow fixed so the pin is considered as the reference point and all the unit surfaces must be nominal with the pin unit.
- Pneumatic cylinder pipes, wires from different units has to be done in pneumatic lay-outing.
- There should be adequate gaps between the units and the weld gun.
- All the hardware required for the units has to be checked. It helps in documenting the project.
- Holes must be coloured as per the requirements. The dowel holes must be sky blue colour, open holes must be dark blue colour and threaded holes must be yellow colour.
- The parts and assemblies must be properly named as per the company standards.
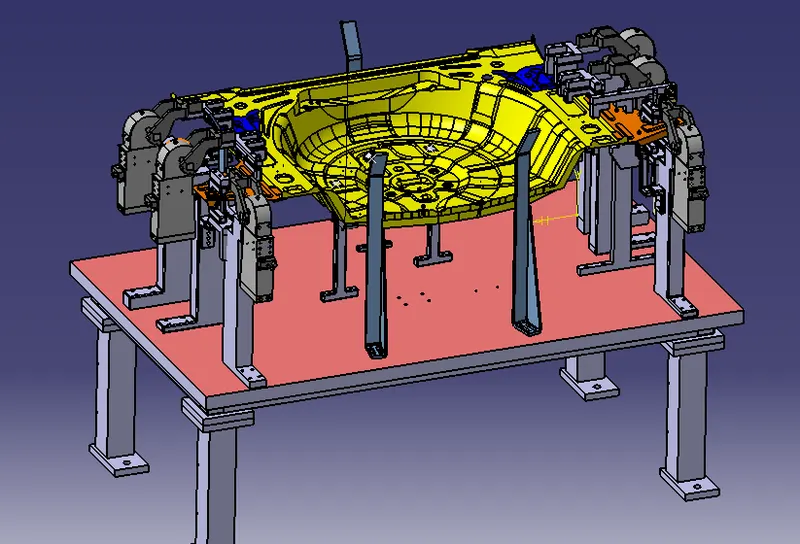
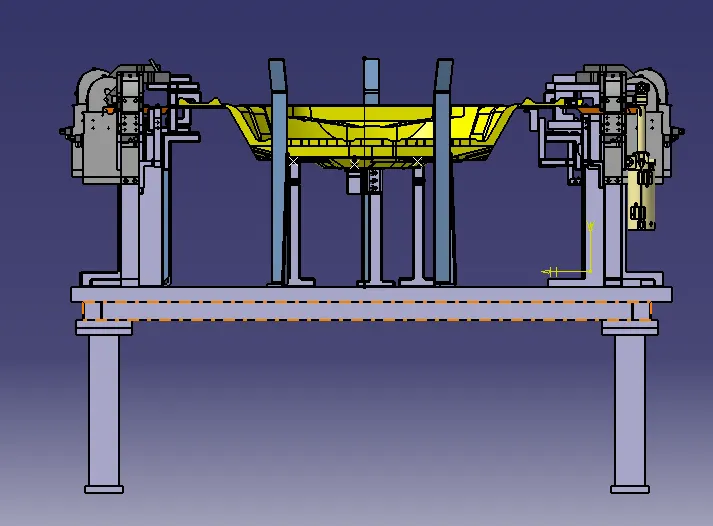
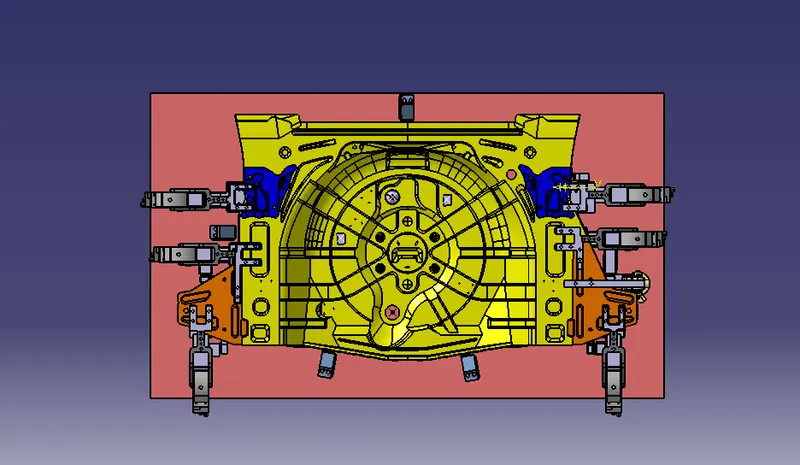
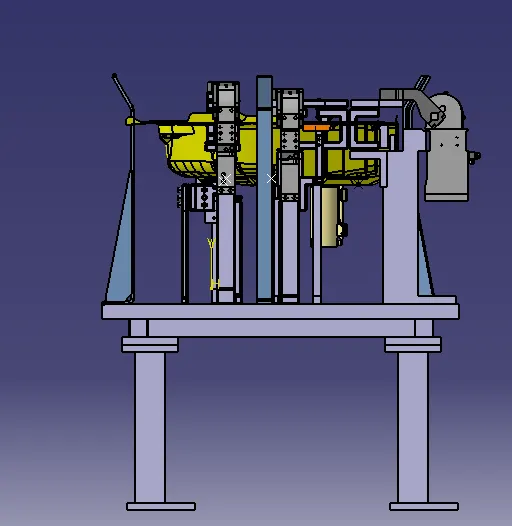
Different views of the Assembly
CONCLUSION
The fixture is designed for the car panel with all the design considerations. The positioning and locating of the car panel are done.