Week - 4
(1)
Block used:
1. Constant: The Constant block generates a real or complex constant value signal. Use this block to provide a constant signal input. 2 Constant Blocks are used.
2. Display: The Display block shows the value of the input data. You can specify the frequency of the display. For numeric input data, you can also specify the format of the display. 7 display blocks are used.
3. Chart: A finite state machine is a representation of an event-driven (reactive) system. In an event-driven system, the system responds to an event by making a transition from one state (mode) to another. This transition occurs if the condition defining the change is true. 1 chart is used.
4. Lamp: The Lamp block displays a color indicating the value of the input signal. You can use the Lamp block with other Dashboard blocks to build an interactive dashboard of controls and indicators for your model. You can specify pairs of input values and colors to provide the information you want during the simulation. 7 lamps are used.
5. Switch: The Switch block toggles the value of the connected block parameter between two values during simulation. For example, we can connect the Switch block to change its state during simulation. A switch from the dashboard library is used with a constant to supply the power and water supply. A lamp is used to indicate the power status & water status. The power status is checked at the entry for every state and the water supply is checked for the soaking and the rinsing process. The timing for each state is as per the given inputs. The status of the running process can be seen by the glowing lamp corresponding to the process name. 2 switches are used.
Parameters Explanation:
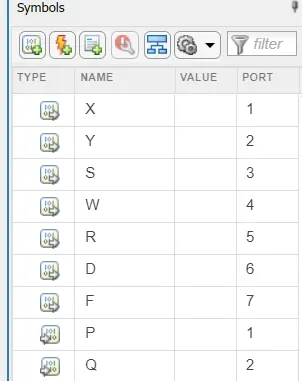
- X : (Output side) Power Supply -> Connected with display block 1
- Y : (Output side) Water supply -> Connected with display block 2
- S : (Output side) Soaking -> Connected with display block 3
- w : (Output side) Washing -> Connected with display block 4
- R : (Output side) Rinsing -> Connected with display block 5
- D : (Output side) Drying -> Connected with display block 6
- F : (Output side) Cycle finish -> Connected with display block 7
- P : (Input side) Power Supply -> Connected with constant block 1
- Q : (Input side) Water Supply -> Connected with constant block 2
Block diagram explanation:
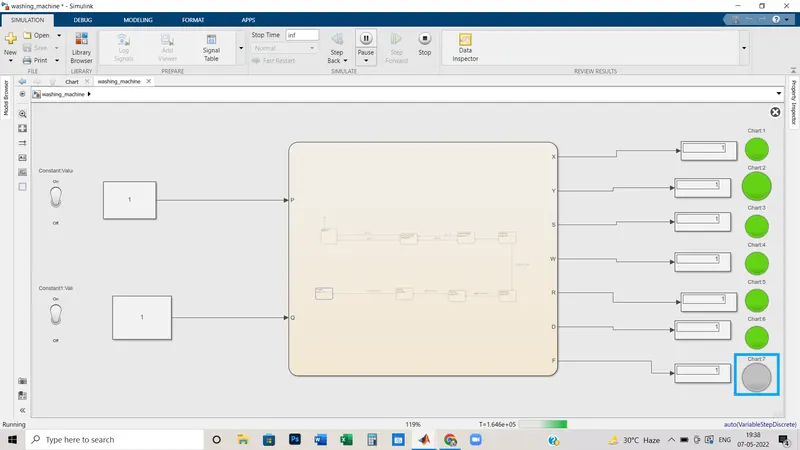
- 2 switches that are associated with constant blocks in input sides.
- When the value became 1 then power and water supplies both had been turned ON.
- As per the chart, different states had come and lamps associated with that state had glowed.
Chart Explanation:
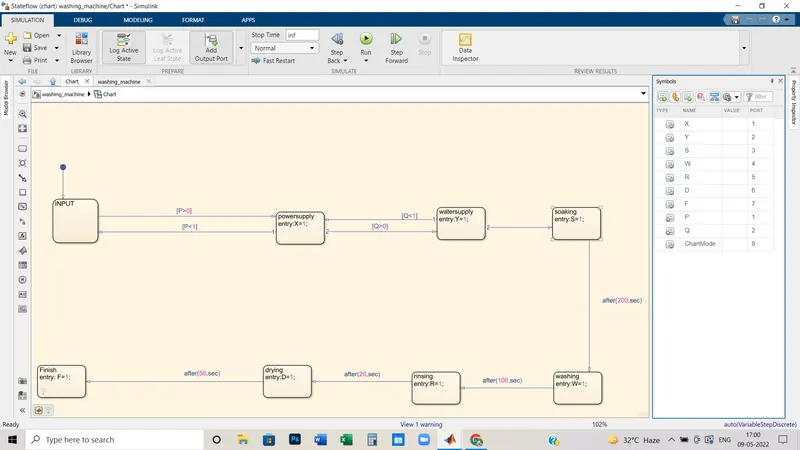
- In the chart, there are 8 numbers of states.
- 1st one is the input state which will decide the power supply values and as per the values the system will be activated.
- When P=1, Power flows, and power_supply is activated.
- When Q=1 Water flows, and water_supply is activated.
- After water supply, Soaking gets activated and the cycle has begun.
- As per the question, after 200-sec washing gets activated.
- After 100-sec, Rinsing gets activated.
- After 20-sec, Drying gets activated.
- After 50-sec, The cycle stops and the system turns OFF.
Process:
1. Start Simulink and create a blank model.
2. Search for chart block in the Stateflow category of the library browser.
3. Open the chart block and select the junction feature from the state flow window.
4. Control logic for washing m/c is such that it should soak the water for the first 200sec followed by a washing time of 100sec. Rinsing the water for the next 20sec followed by a drying time of 50sec.
5. After finishing the control logic run the STATEFLOW and check the sequence of operations for 370sec.
(2)
Block used:
- Display: The Display block shows the value of the input data. You can specify the frequency of the display. For numeric input data, we can also specify the format of the display. (2 display blocks are used for output values)
- Constant: The Constant block generates a real or complex constant value signal. Use this block to provide a constant signal input. (2 constant blocks are used)
- Lamp: The Lamp block displays a color indicating the value of the input signal. You can use the Lamp block with other Dashboard blocks to build an interactive dashboard of controls and indicators for your model. You can specify pairs of input values and colors to provide the information you want during the simulation. (6 Lamp blocks are used)
- Chart: A finite state machine is a representation of an event-driven (reactive) system. In an event-driven system, the system responds to an event by making a transition from one state (mode) to another. This transition occurs if the condition defining the change is true. (1 chart block is used for the Stateflow diagram)
- Switch: The Switch block toggles the value of the connected block parameter between two values during simulation. (1 switch block is used)
- Slider: The Slider block tunes the value of the connected block parameter during the simulation. For example, you can connect the Slider block to a Gain block in your model and adjust its value during the simulation. You can modify the range of the Slider block's scale to fit your data. Use the Slider block with other Dashboard blocks to create an interactive dashboard to control your model. (1 slider Block is used)
Chart Explanation:
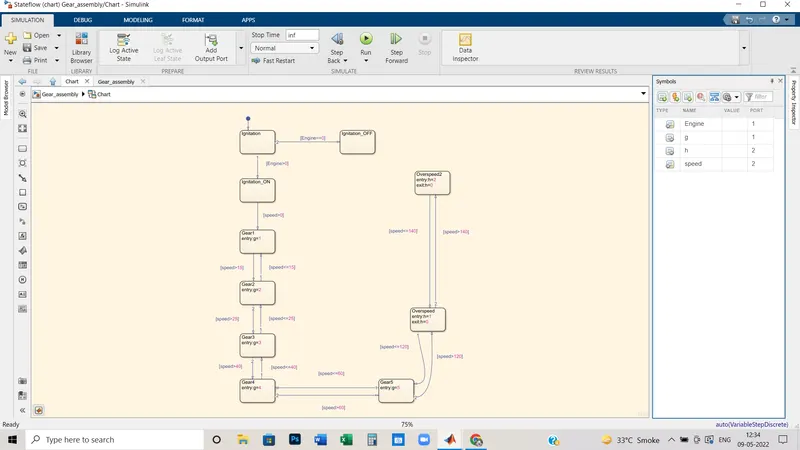
- Ignition is the first state in which the action of setting something on starting.
- When the Engine input value will be more than 0 then Ignition will be started or ON state and if the value is equal to zero then it will go on OFF stage.
- When the Engine value is more than 0(zero) it means, the engine has been ignited, and now we have to give some speed input.
- As per the question, we put the values.
- whenever speed will lie between 0 to 15 kmph, the vehicle will run on gear_1.
- whenever speed will lie between 16 to 25 kmph, the vehicle will run on gear_2.
- whenever speed will lie between 26 to 40 kmph, the vehicle will run on gear_3.
- whenever speed will lie between 40 to 60 kmph, the vehicle will run on gear_4.
- whenever speed will lie between 60 to 120 kmph, the vehicle will run on gear_5.
- whenever speed will be more than 120 kmph, the vehicle will hit the overspeed state and overspeed light will be glowed up.
Block Diagram explaination:
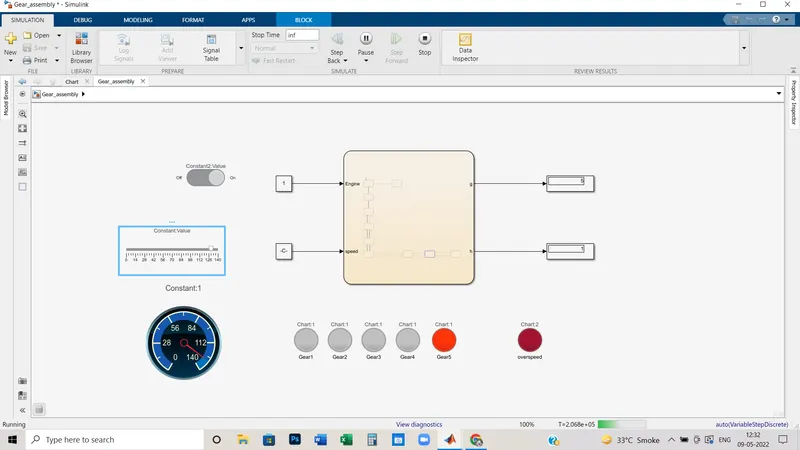
- Switch is connected with constant block which is used to start the Engine. Here as we can see that, the value is 1 so the engine is in start mode.
- Slider and Gauge are associated with 2nd constant block for the speed value.
- How much speed we will set, that will be displayed in Gauge.
- Chart as I described before, Here is 2 output section. one is g and the other is h. g is for the gear value i.e. according to the speed gear values will be displayed in display block.
- in h section, if the speed gets more than 120 kmph, h value will be 1 and the overspeed light will have glowed.
- 5 lamps are associated with the g output section. As per the gear runs, lights will have glowed.
- Here is the above picture, speed is more than 120 so gear 5 and Overspeed lamp both are glowing.
- Now I will put different pictures in different gear mode.
When Gear_1 is ON:
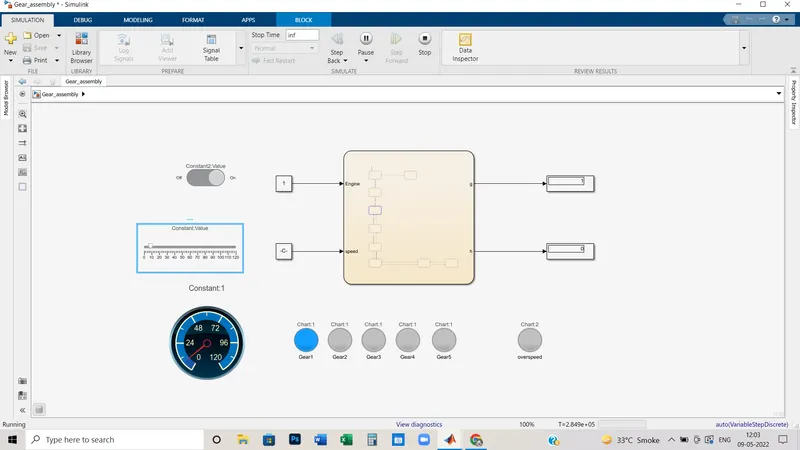
Speed is between 0 to 15 kmph and so Gear_1 is ON and 1st(Blue) light is glowing.
When Gear_2 is ON:
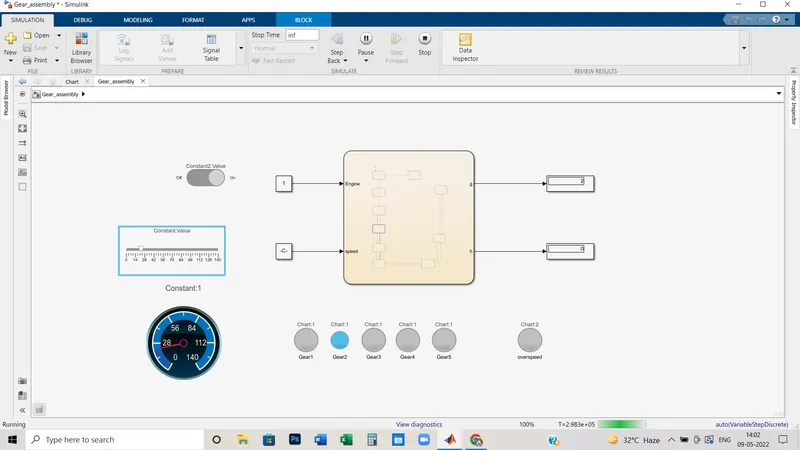
Speed is between 16 to 25 kmph and so Gear_2 is ON and the 2nd(skyblue) light is glowing.
When Gear_3 is ON:
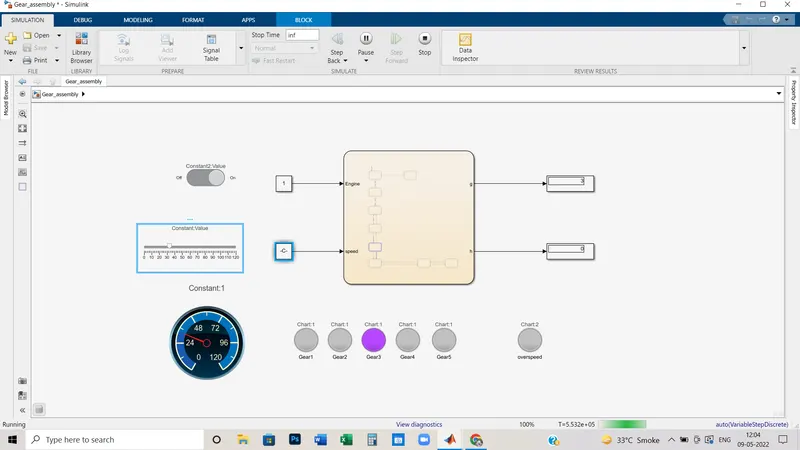
Speed is between 26 to 40 kmph and so Gear_3 is ON and 3rd(Purple) light is glowing.
When Gear_4 is ON:
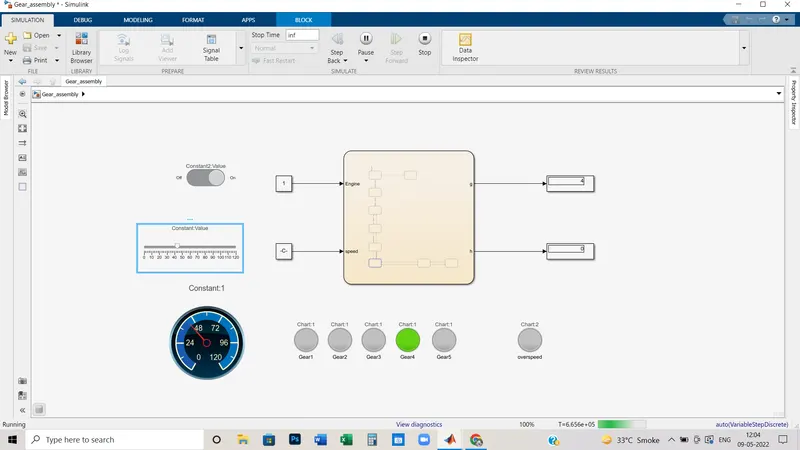
Speed is between 41 to 60 kmph and so Gear_4 is ON and the 4th(Green) light is glowing.
When Gear_5 is ON:
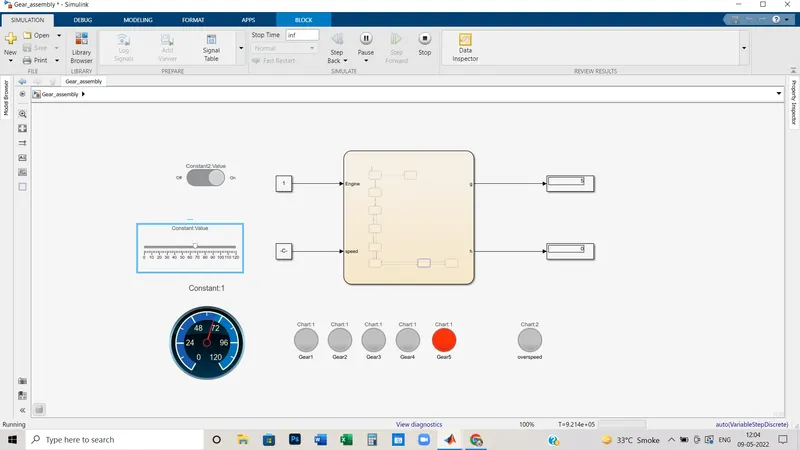
Speed is between 60 to 120 kmph and so Gear_5 is ON and the 5th(orange) light is glowing.
When vehicle is overspeed state:
Speed is beyond 120 kmph and so overspeed is ON. The 5th(orange) and overspeed lamp both are glowing.