Week - 3 Drop test Challenge
Aim: To perform a drop test simulation of a cell phone dropped on a floor under initial velocity using LS-Dyna.
OBJECTIVE:
- To create the material card.
- To create a section card.
- To assign material and section card to the part.
- To create the boundary conditions for floor.
- To assign initial velocity to the cell phone.
- To assign control termination card.
- To create a contact interface between cell phone and floor.
- To define the output database as both binary D3 plot and ASCII.
- Model checkup and run the simulation.
PROCEDURE:
Open the LS-PrePost software, and then we have to import the required file i.e. Drop_Test_onlymesh, which is in .K format. So, in order to import the .K file format model in LS-PrePost, we have to follow:
File--->Import---->LS-DYNA Keyword File---->File: select file--->Import.
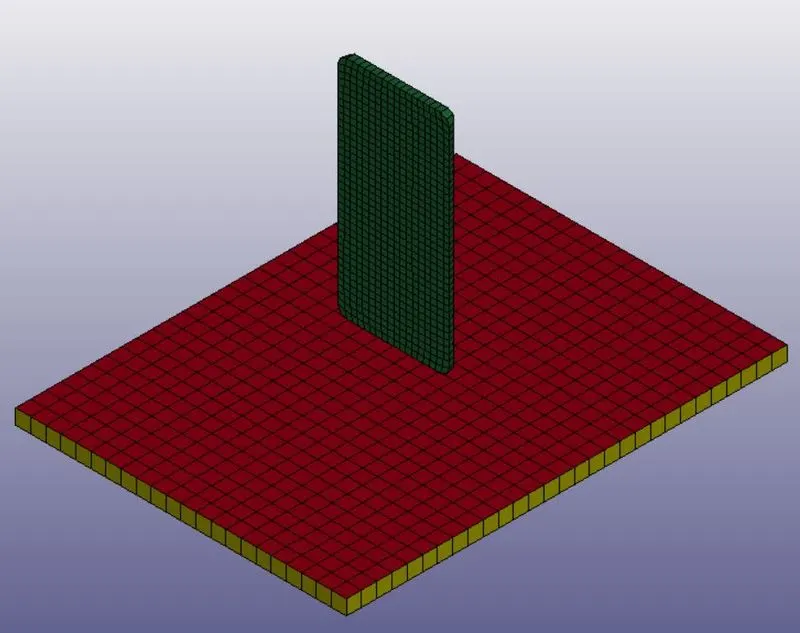
Once model is opened, it will look like as shown picture in below.
In order to check the keywords contained in the file we have to follow:
Model and Part---->Keyword Manager---->check: Model
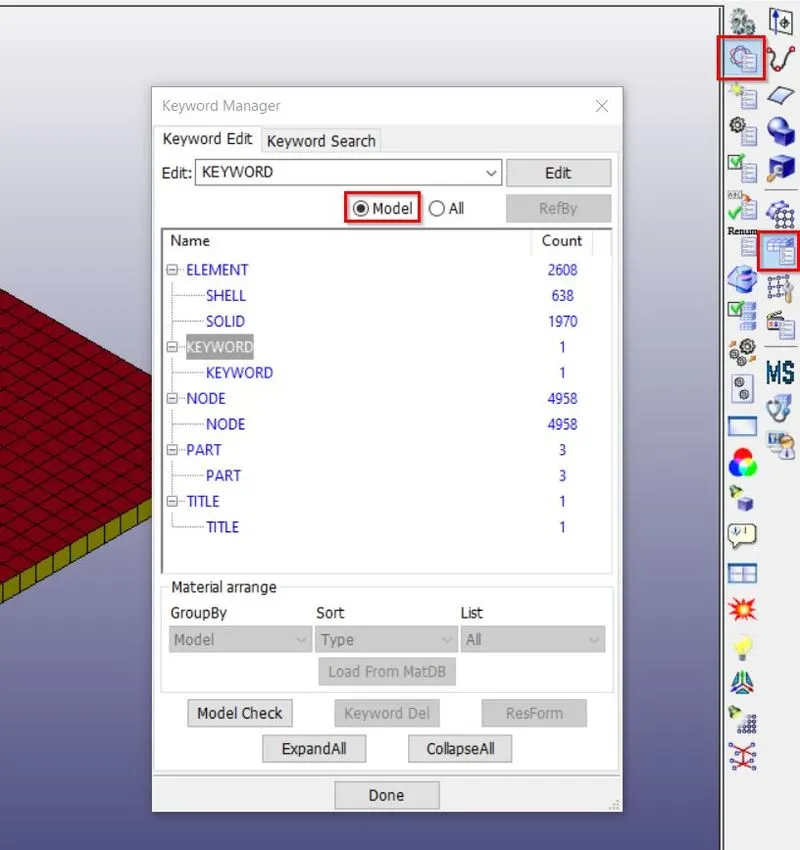
From above we can notice, we have shell and solid element present in the model. But according to analysis point of view, we need only solid element. And other unnecessary shell element will get remove from model. Also we have not find any material and section card defined in the model.
Before creating these cards, first we will check duplicates of element. If find, we will remove them first then proceeds further.
To check duplicate elements:
In order to check duplicate elements. First we have to check duplicated node by following:
Element Tools---->Duplicate Nodes---->Select node: by area---->Show Dup Nodes
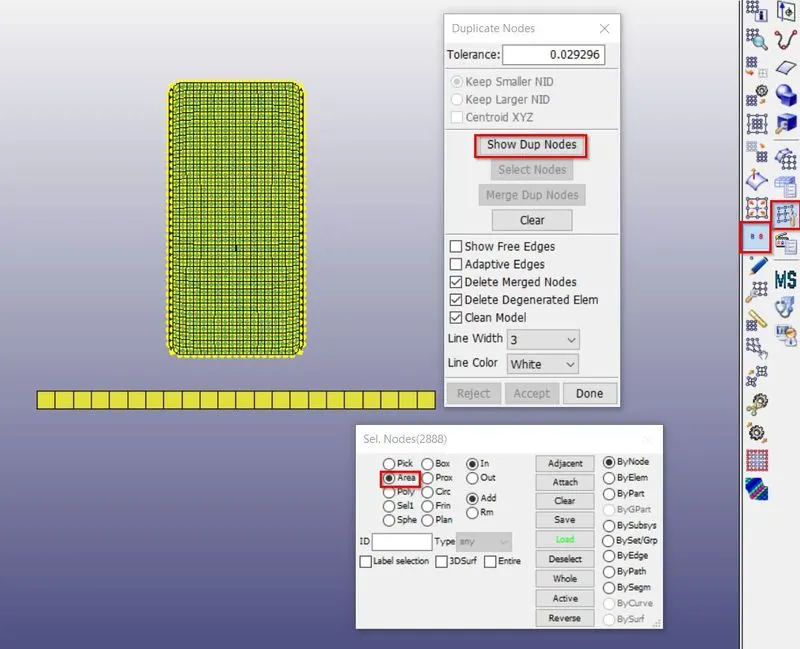
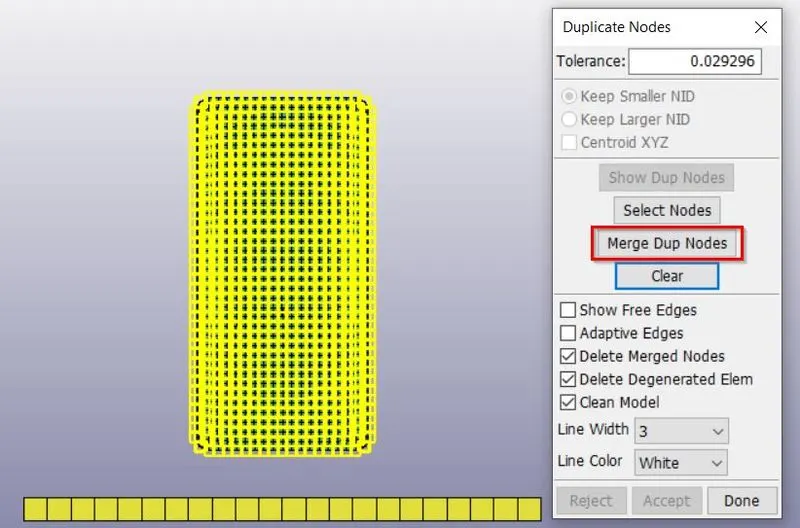
If duplicate nodes are found the we have to merge these nodes because one, two or three elements belong to same node. Now we have to merge the duplicate nodes, by following steps shown in picture below.
Now in order to show duplicate elements we have to follow:
Element Tools---->Element Editing ---->Check---->Solid---->Duplicate---->Check
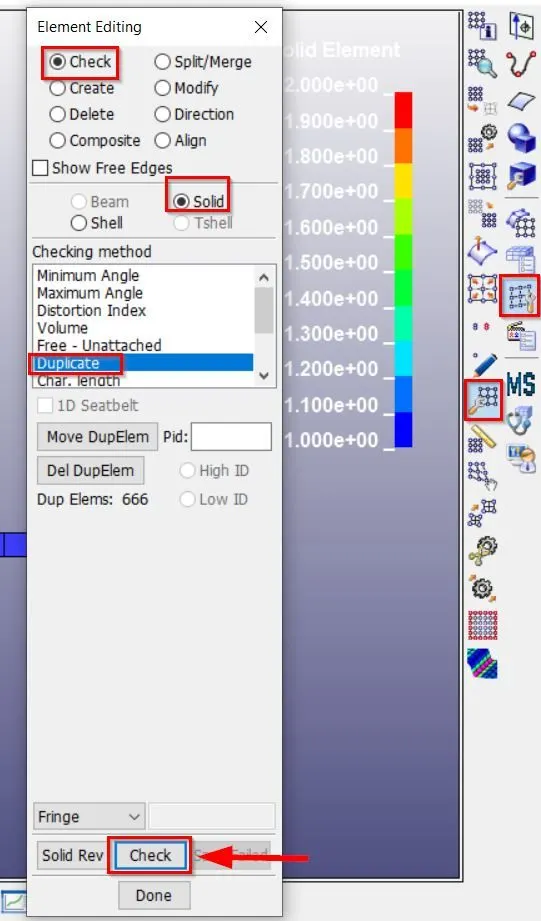
So, 666 duplicate elements are found as shown in above picture. Now in order to delete these duplicates element we have to follow steps shown in picture below.
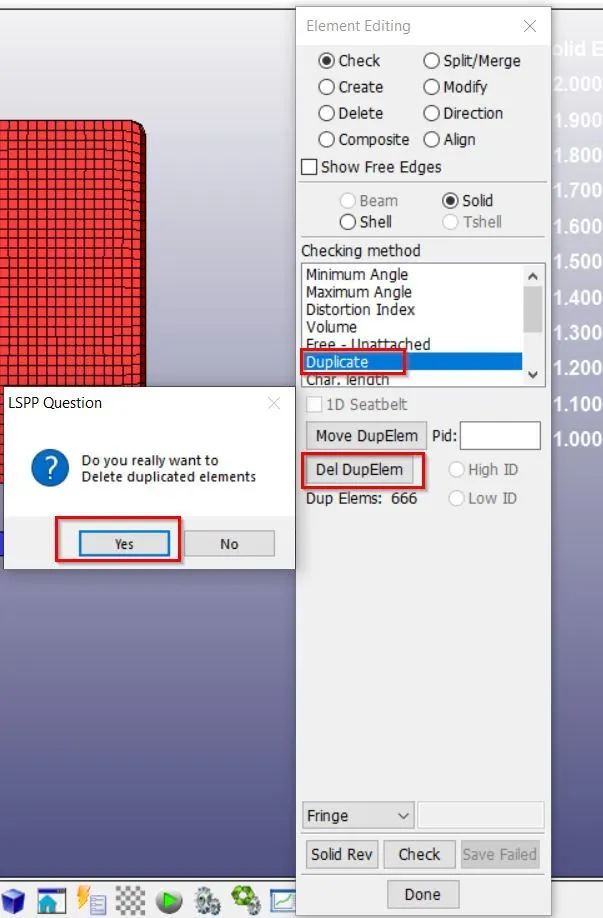
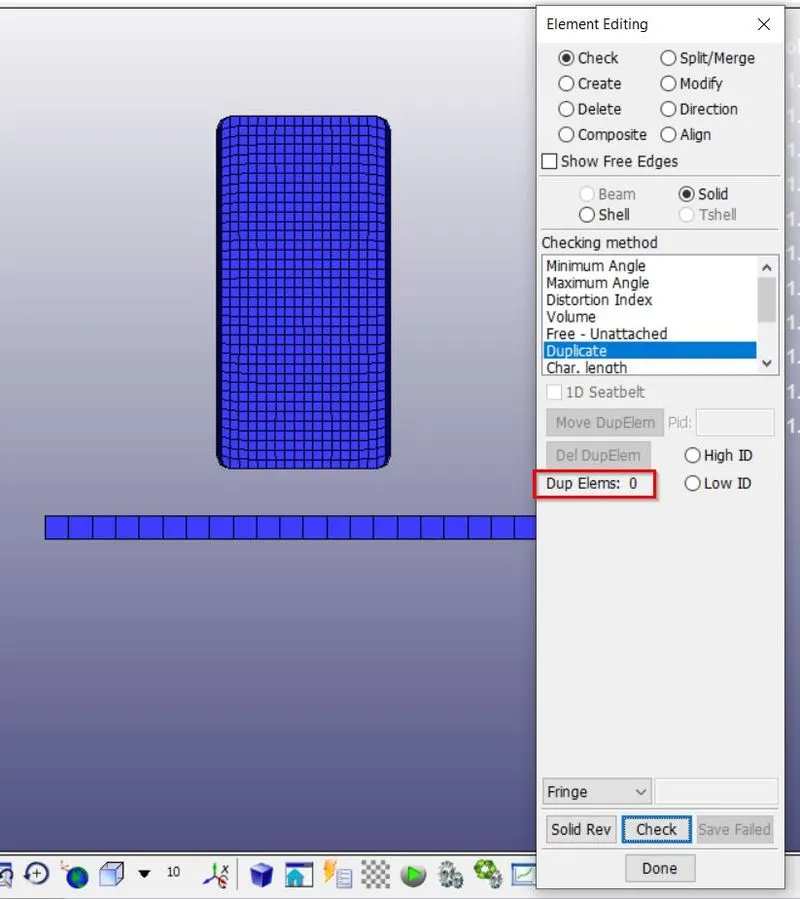
Once duplicate elements are deleted, model is cleaned. Which we can see in picture below.
- To create the material card.
Now we have to assign material card for both cell phone and floor. In order to assign material we have to follow steps shown below
Model and Part---->Keyword Manager---->All---->MAT.
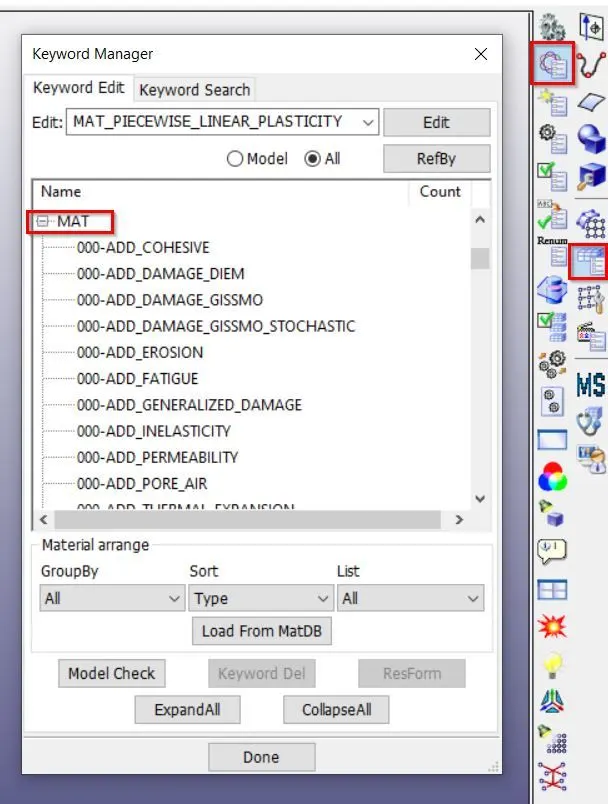
1.1 For cell phone we have assign MAT_PIECEWISE_LINEAR_PLASTICITY. This is Material Type 24, which is an elasto-plastic material. In order to assign material we have to follow.
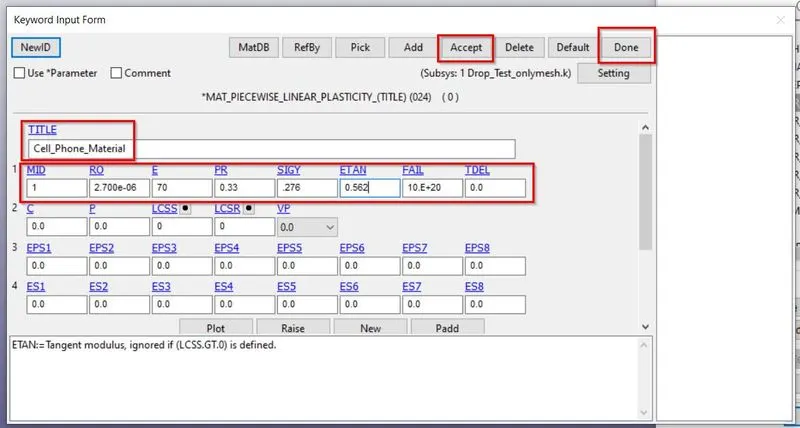
Where,
MID: Material identification.
RO: Mass density
E: Young’s modulus
PR: Poisson’s ratio
SIGY: Yield stress
ETAN: Tangent modulus;
FAIL: Failure flag:
TDEL: Minimum time step size for automatic element deletion
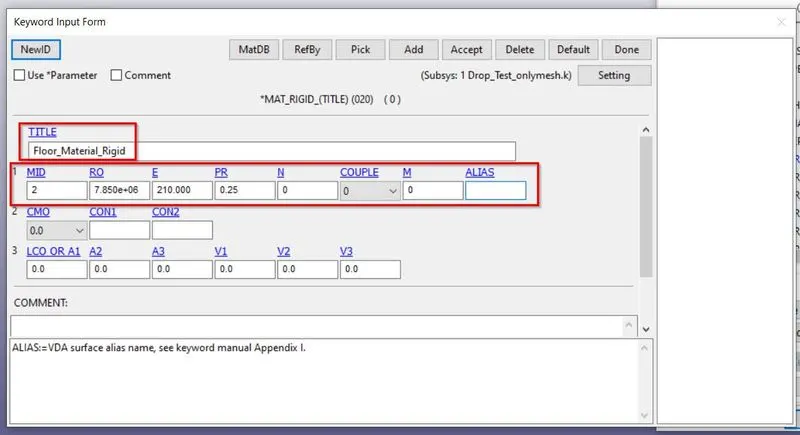
1.2 For Floor we have assign MAT_RIGID. This is Material 20. Parts made from this material are considered to belong to a rigid. In order to assign material we have to follow.
- To create a section card.
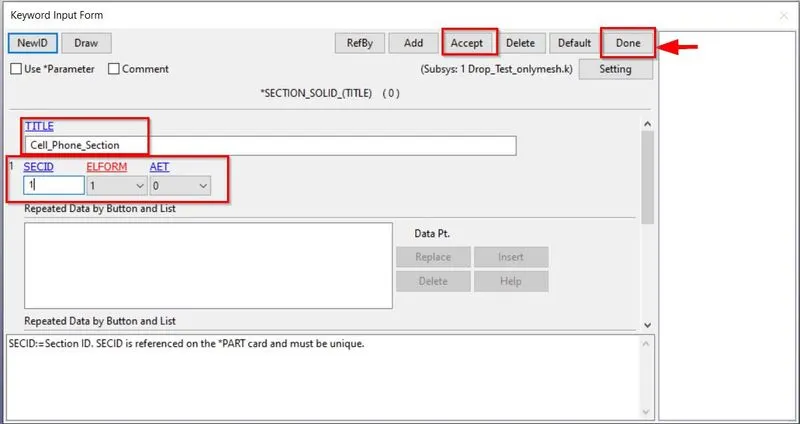
In this section, the element formulation, integration rule, nodal thicknesses, and crosssectional properties are defined. All section identifiers (SECIDs) defined in this section must be unique, i.e., if a number is used as a section ID for a beam element then this number cannot be used again as a section ID for a solid element. The keyword cards in this section are defined in alphabetical order. Now, we are having solid elements, so we will use section solid.
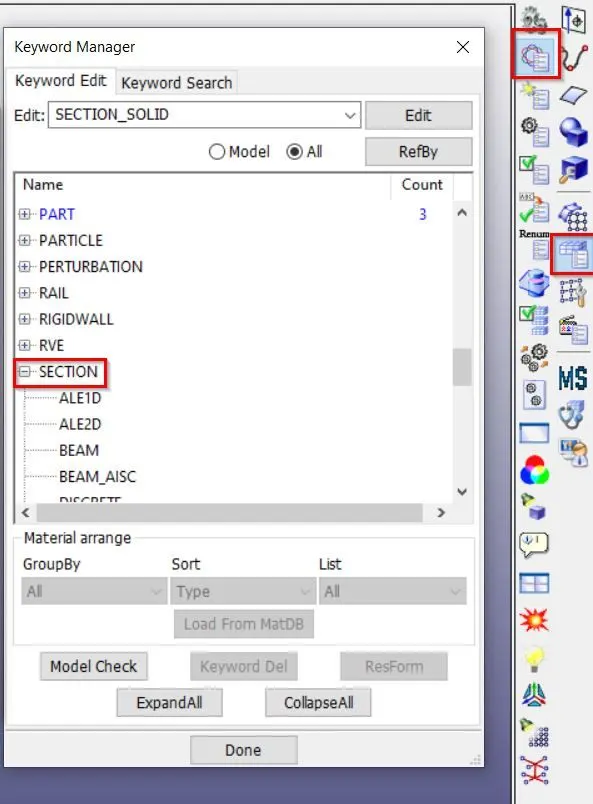
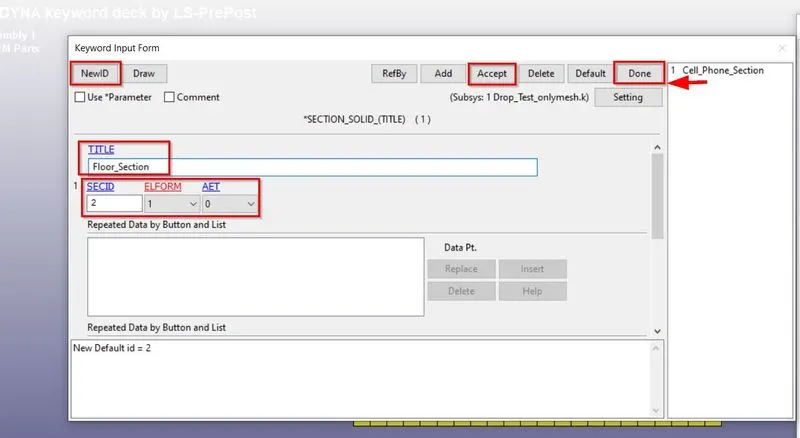
In order to create section solid we have to follow steps as shown:
Model and Part---->Keyword Manager---->All---->SECTION.
2.1 First we will create section solid for cellphone as shown in picture below.
2.2 Now we will create section solid for floor as shown in picture below.
- To assign material and section card to the part.
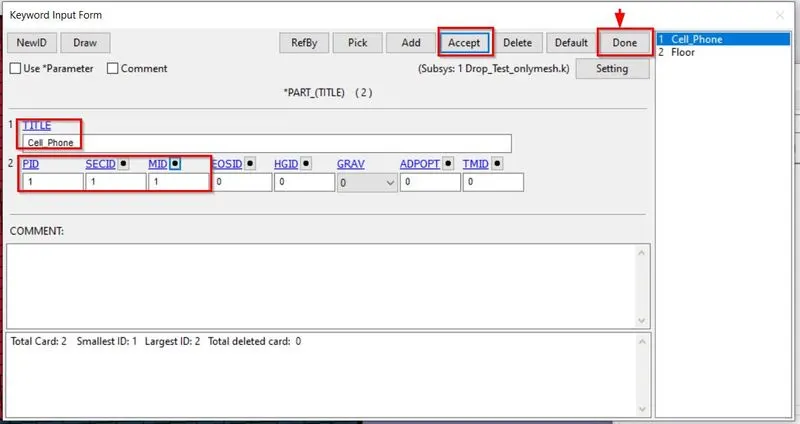
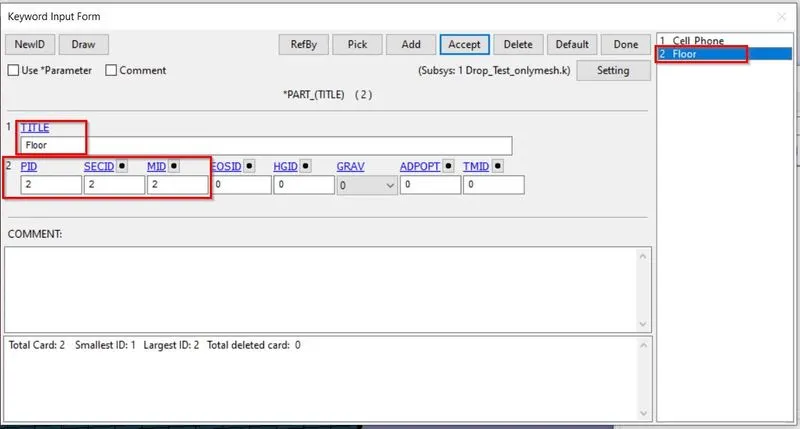
Once material and section card is created for each part i.e. cell phone and floor. Now we have to assign both cards to their respective parts as shown in picture below.
 |
 |
- To create the boundary conditions for floor.
The keyword *BOUNDARY provides a way of defining imposed motions on boundary nodes.
Before creating boundary conditions first we have to create node set identity for floor. In order to create node set id we have to follow:
Model and Part---->Create Entity---->Set Data---->Set Node.
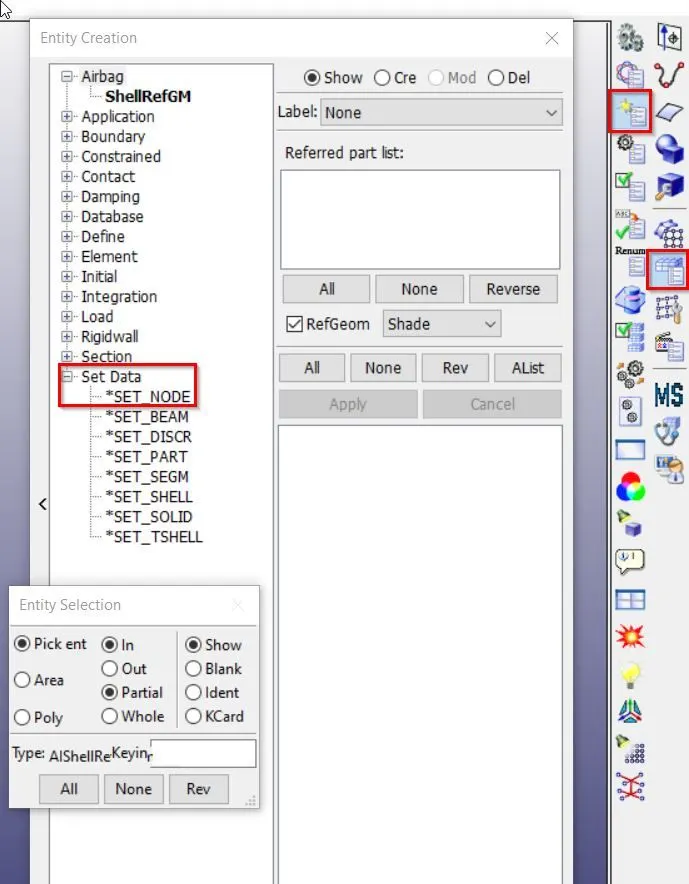
In order to create node set id for floor we have to follow steps shown in picture below.
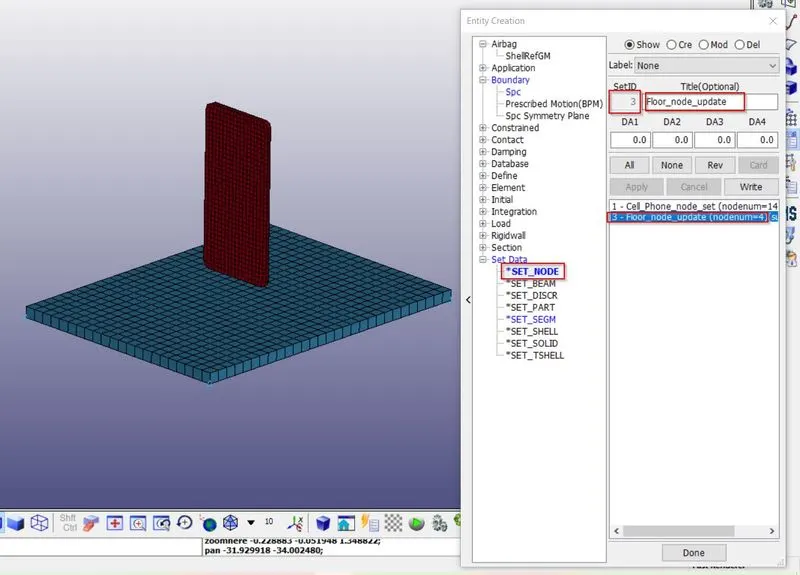
Now we have to assign boundary condition to floor by using *BOUNDARY_SPC. It specifies whether the SPC applies to a single node or to a set. In order to assign *BOUNDARY_SPC we have to follow steps shown in picture below.
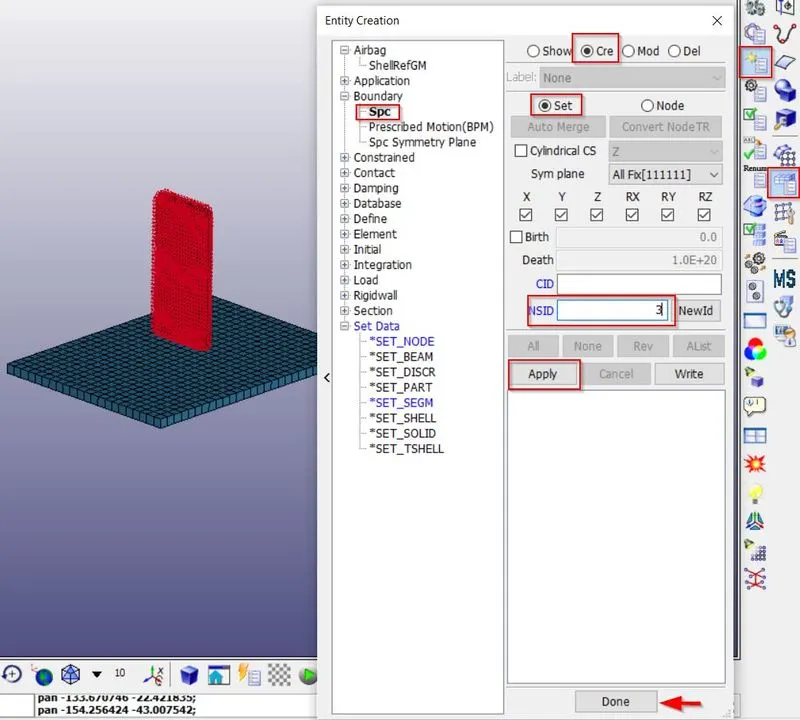
NID/NSID: Node ID or nodal set ID, see *SET_NODE.
- To assign initial velocity to the cell phone.
Define initial nodal point velocities using nodal set ID’s. This may also be used for sets in which some nodes have other velocities.
In order to assign initial velocity, first we have to create node set id for cellphone. Procedure to create node set id is similar as explained in above case. Once node set it is created for cellphone it will look like as shown in picture below.
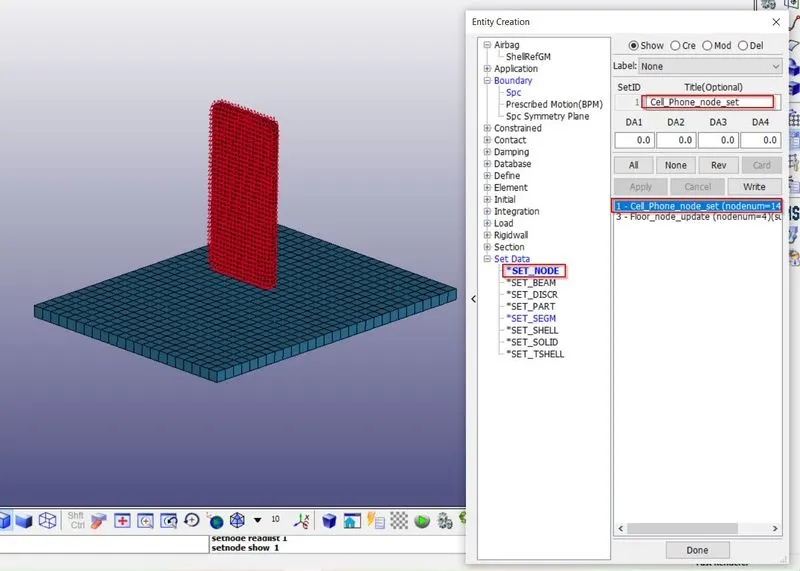
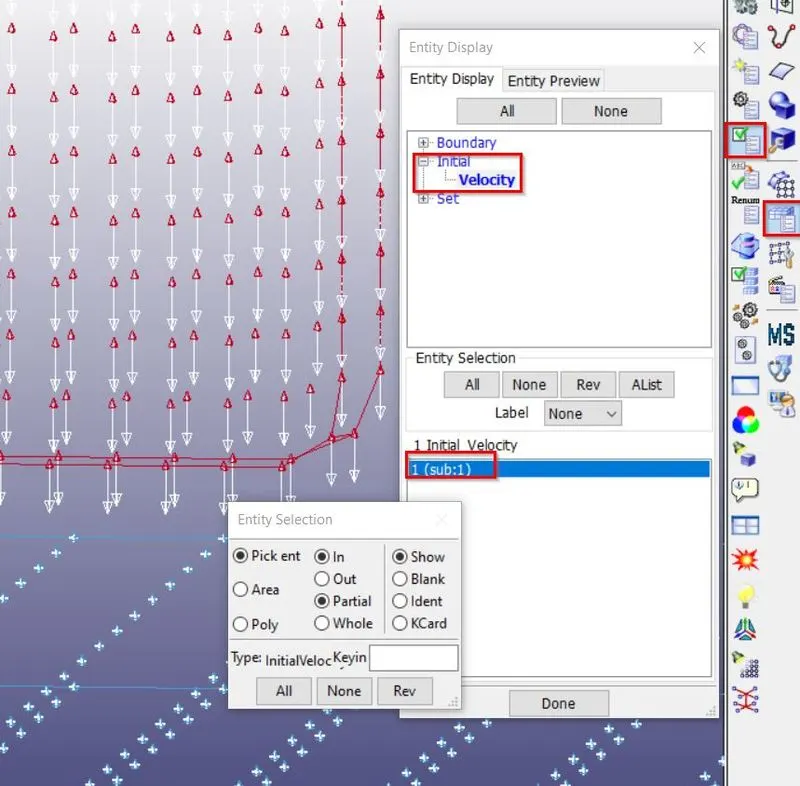
Now we have create initial velocity to selected set nodes of cell phone as shown in picture below.
Model and Part---->Keyword Manager---->INITIAL---->VELOCITY.
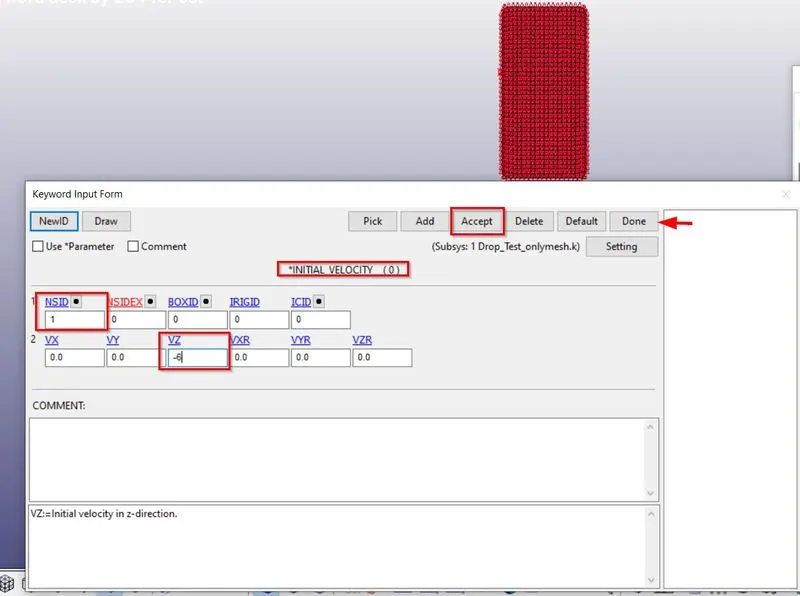
In order to check vector direction of applied velocity, we have to follow steps shown in picture below.
- To assign control termination card.
The main purpose of control termination card is to stop the job. In order to assign control termination card we have to follow:
Model and Part---->Keyword Manager---->CONTROL---->TERMINATION.
Once control termination card is set, model will look like as shown in picture below.
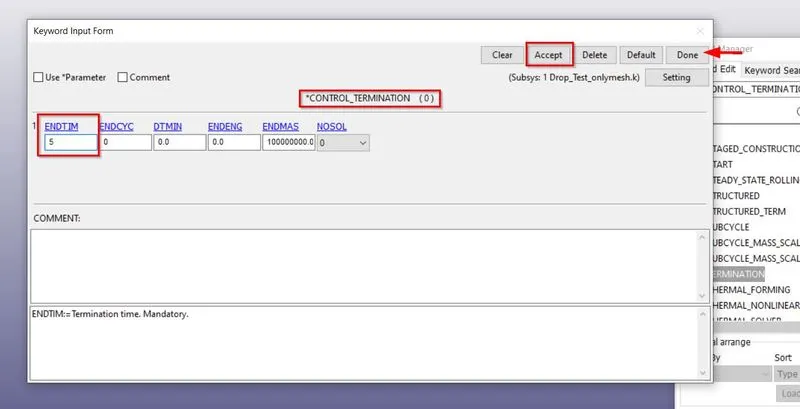
ENDTIM: Termination time. Mandatory.
ENDMAS: Percent change in the total mass for termination of calculation.
This option is relevant if and only if mass scaling is used to limit the minimum time step size.
- To create a contact interface between cell phone and floor.
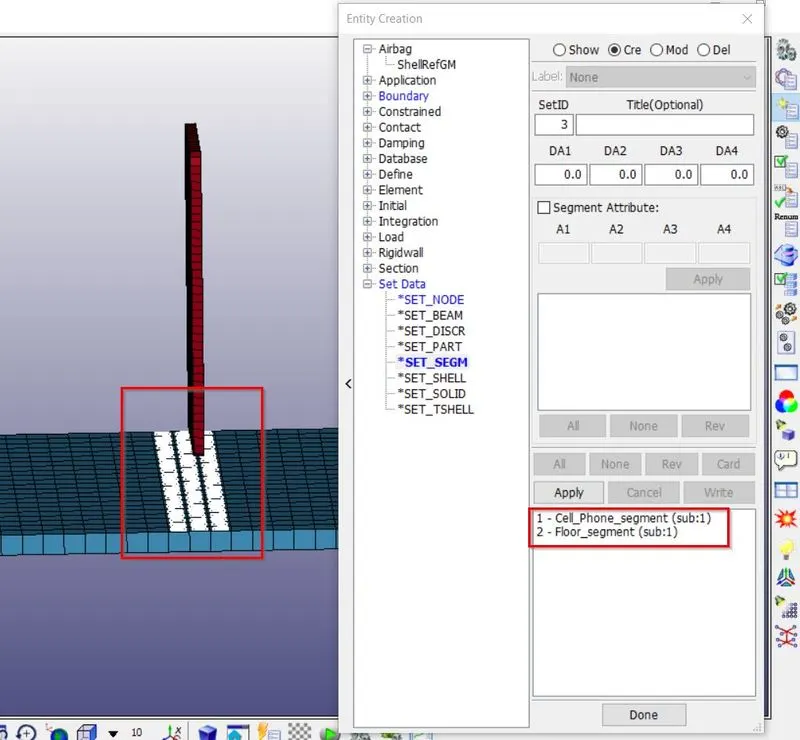
The keyword *CONTACT provides a way of treating interaction between disjoint parts. Now we have to define contact interface between cell phone and floor. Before defining contact card, first we have to create set data segment, in which we will create different segments for cell phone and floor (in which we will select those elements which are going to interact during simulation).
Define a set of segments with optional identical or unique attributes. For three-dimensional geometries, a segment can be triangular or quadrilateral. For two dimensional geometries, a segment is a line defined by two nodes and the GENERAL option does not apply. In order to create set of segments we have to follow:
Model and Part---->Create Entity---->Set Data---->SET_SEGM.
Once segments are created, it will look like as shown in picture below.
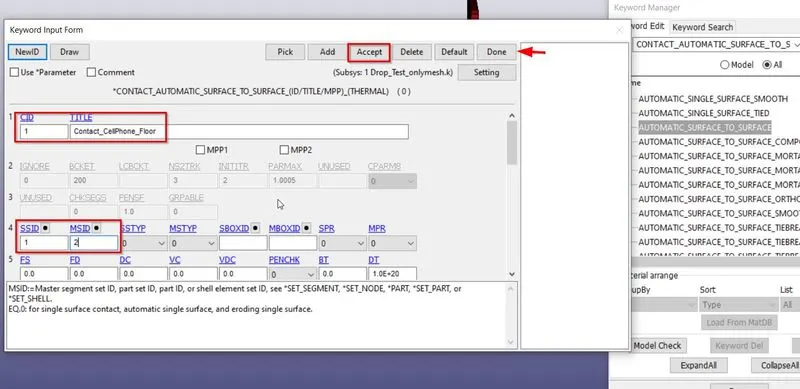
In order to create contact card, we have to select Automatic surface to surface contact between cell phone and floor. In which master will be floor and slave is cellphone. In order to create contact card we have to follow:
Model and Part---->Keyword Manager---->CONTACT.
Once card is created and all parameters are assigned, contact card will look like as shown in picture below.
- To define the output database as both binary D3 plot and ASCII.
The database definitions are optional, but they are necessary to obtain output files containing results information. The ordering of the database definition cards in the input file is completely arbitrary. The purpose of database binary is to request binary output file.
DATABASE_BINARY_D3PLOT ensures d3plot files in which it stores stress strain contours of the entire deformed model. In order to create DATABASE_BINARY_D3PLOT we have to follow:
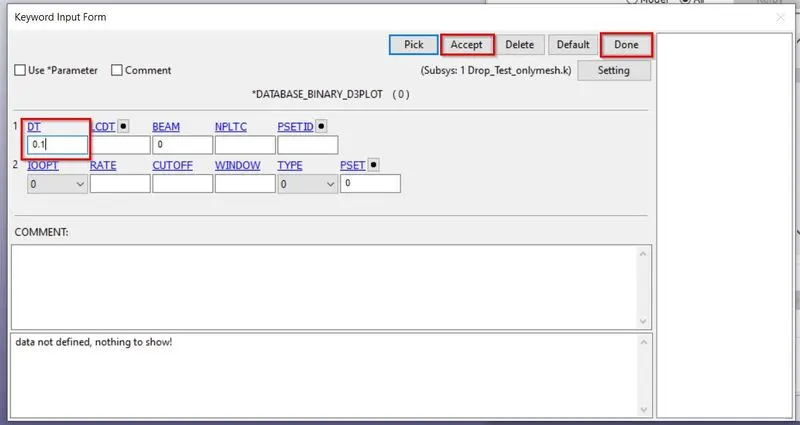
Where, DT defines the time interval between output states.
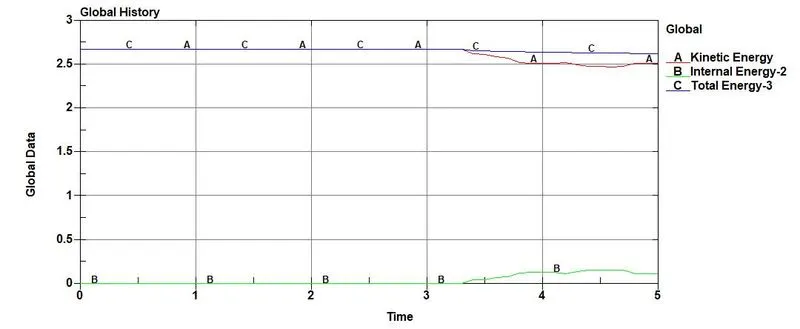
ASCII can generate different outputs such as force generated in a contact like total energy, material energy etc. In which we will request GLSTAT, MATSUM are been requested as shown in picture below.
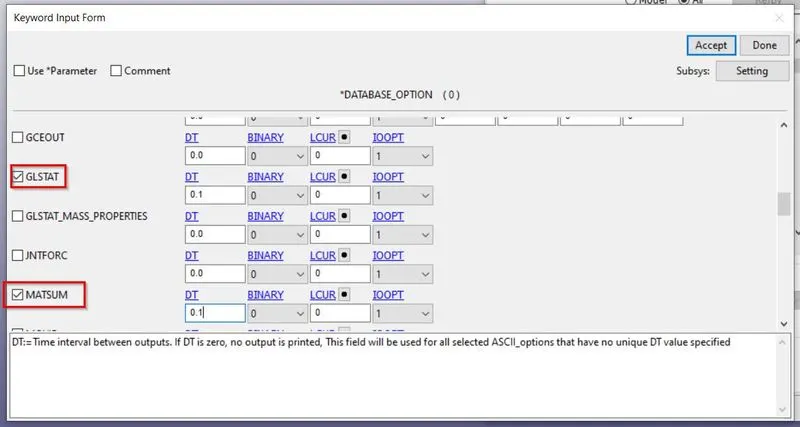
GLSTAT is global statistics and energies.
MATSUM is part energies.
- Model checkup and run the simulation.
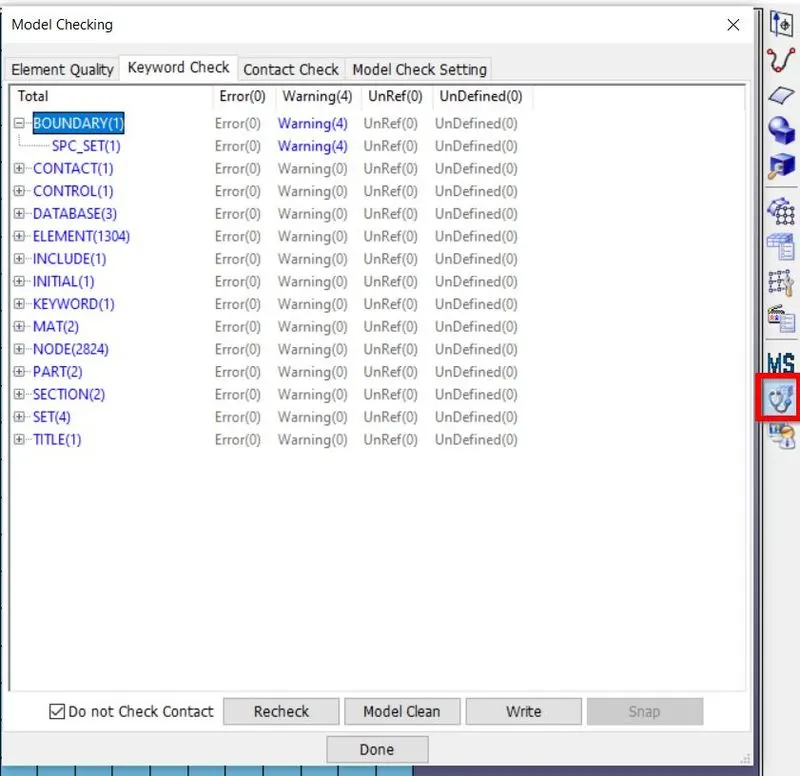
Now model will be check for errors, if found it needs to correct. Warnings we can ignore. Once model check is run, it will look like as shown in picture below.
To run simulation:
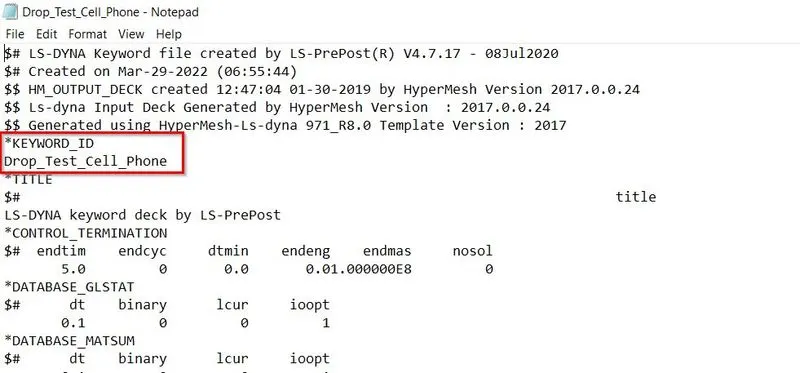
Before running simulation we have to edit the K file and have to edit the KEYWORD ID, so that after simulation all files should be generated with proper format as shown.
Now we have to run simulation, in order to run simulation we have to use LS-Run. Once LS-Run is opened, then we have to assign all required parameters then simulation will process as shown in picture below.
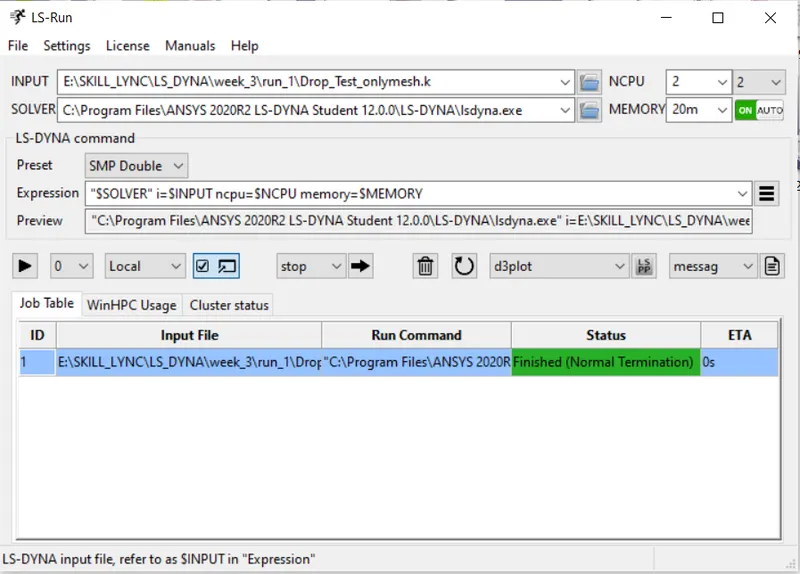
During simulation run window will pop up as shown in picture below.
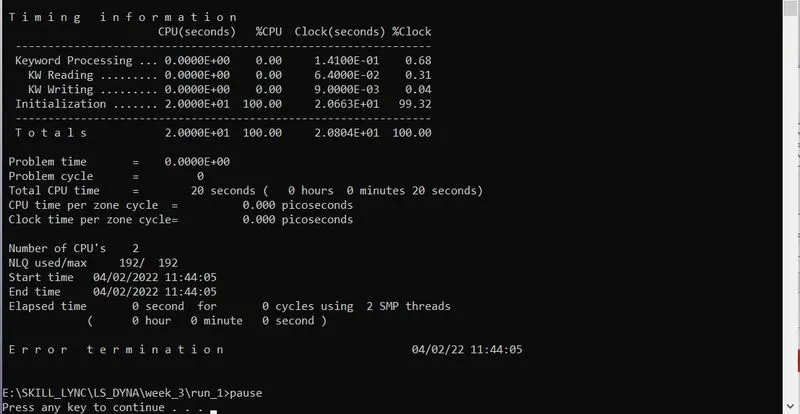
If normal termination occurs after running, it means the model is ready for post-processing.
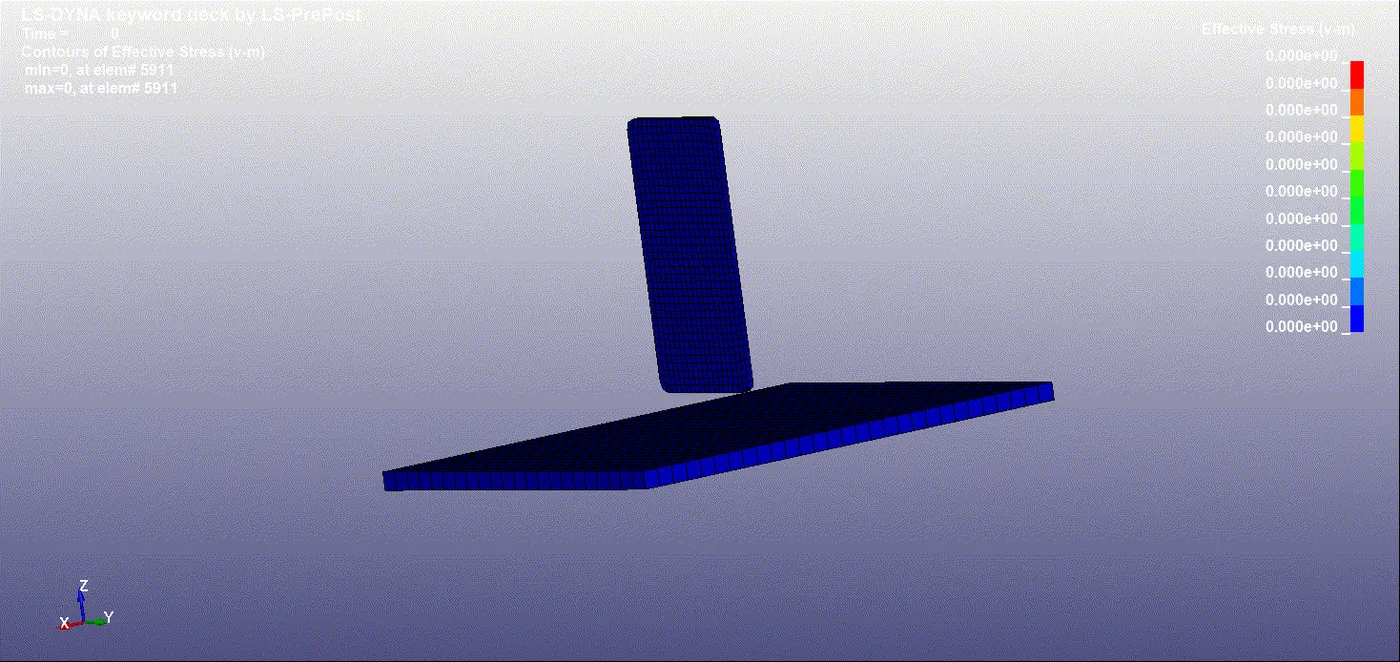
In order to see simulation results, we have to open output file .d3plot file in LS-PrePost.
Contour plot for Von Misses stress
ENERGY PLOT:
CONCLUSIONS
- Drop test simulation has been done successfully on cellphone as per given requirement.
- All the output requests have been calculated such as von misses stress, energy plot.