Week 2- 2R Robotic Arm Challenge
Aim- To create one animation of the robotic arm movement in Matlab by a code.
Methodology- To animate the rotation o the robotic arm we have to use the for loop in which we can rotate the arm from 0 to 90 degrees for both the first part of the arm and the second part of the arm.
#) For loop- For loop is a control flow statement, by which a specifying iteration allows the code to be executed in a repeated manner.
Code-
clear all
close all
clc
% Creating Inputs

% length of the arm 1 is l1
l1= 1 ;
% length of the arm 2 is l2
l2= 0.5 ;
% Angle of the arm 1
theta1=linspace(0,90,10);
% Angle for arm 2
theta2=linspace(0,90,10);


 % creating the animation of the robotic arm by varying the theta1 and
 % theta2 so that for a particular value of theta1 different theta2 exists.
ct=1 ;
 for i=1: length(theta1)
     THETA1 = theta1(i) ;
     for j=1: length(theta2)
         THETA2= theta2(j) ;


xo= 0 ;
yo=0 ;
x1=l1* cosd(THETA1) ;
y1= l1* sind(THETA1) ;
% end co-ordinates of the arm
x2=x1+l2* cosd(THETA2) ;
y2= y1+ l2* sind(THETA2) ;
% plotting the arm
figure(1)

plot([ xo x1],[yo y1],[x1 x2],[y1 y2],'linewidth', 3);
axis([-0.1 1.5 0 1.5])

M(ct) = getframe(gcf) ;


ct=ct+1 ;

     end
 end
% Code required for the animation
 videofile= VideoWriter('roboticarmskillproject.avi' ,'uncompressed AVI' ) ;
 open(videofile)
 writeVideo(videofile,M);
 close(videofile)
Explanation- 1
1) First we describe the length of the two arms of the robot of different lengths.
2) then by using the linspace command we vary the angle of the two arms from o to 90 degrees by 4 equal divisions.
3) Then we need to define the coordinates of arm 1 and arm 2 starting from x0=0 to x1 and y0 to y1 so by using the cosd and the sind trigonometric function.
4) By using the for loop in i is taken as the loop variable and inside the for loop j is also taken as the loop variable.
5) The plot command is used to find plot the arm whose angle is varied from 0 to 90 degrees.
6) After these many frames are obtained and we have to create one animation film from these by creating an array called M
which can store these frames and one video is created by using the videofile and writevideo command.
7) the axis is made by giving the x-axis and the y- axis.
8) pause button is used to denote the time between two frames. Finally, all the frames are stitched together to form an animation.
#) Errors faced during the project:-
1) 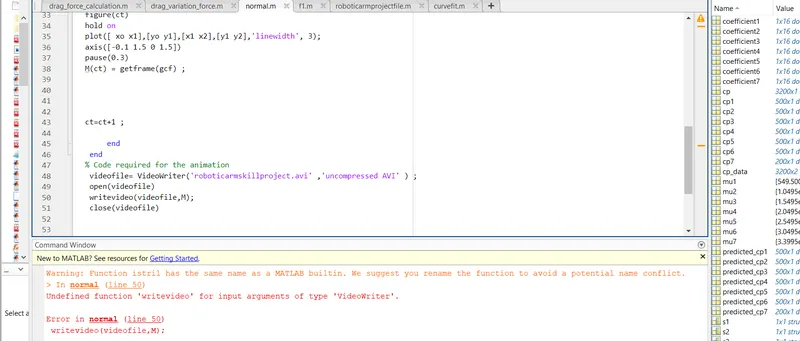
The (v) in video is case sensitive because it has to be written in the writeVideo and the videoWriter is also case sensitive .
2)Errors were faced during animation making because I was using the figure ct command and increasing the command thats why 100 pictures were popping up and the video was not good.
3) In y2 calculation I was using the x1 that's why the arm was not rotating properly.After I used y1 in place of x1. and the transition of the second arm was smooth.
Screenshot-
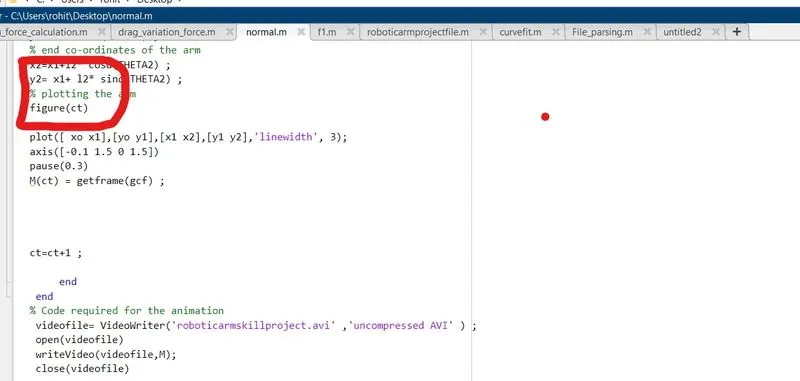
4) I put M array or movie array after counter increment and there was an error in animation. So I gave the M(ct) command before the counter increment. so that the frames are properly put together in animation.
Screenshot-
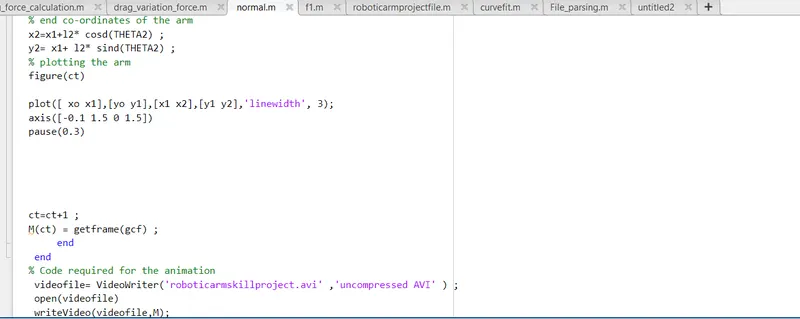
Result--
#) Animation of the frames obtained by rotating the arm for different angles.
Link for the video in google drive-https://drive.google.com/file/d/14E34rawAUFD8aaiCBYGD-uTVeJE_O3j7/view?usp=sharing
Link of the video on youtube-https://youtu.be/EzFXT-jP3J0.
Please see the animation in these two links.