Week 2- 2R Robotic Arm Challenge
1] AIM -
To write a program in Matlab to simulate the forward kinematics of a 2R robotic arm.
2] OBJECTIVE -
*To write a program in Matlab
*To create an animation file of the plot
3] INTRODUCTION -
Robotic arms often perform industrial tasks requiring complex dextrous manipulation within constrained spaces. For example, automobile unibodyassembly can require more than 5000 welds, with many performed within the vehicle’s interior. An arm can be designed specifically for this type oftask by permuting link lengths and degrees of freedom (DOF) to find a set of feasible designs.
This is a typical problem in robotics that needs to be solved to control a robotic arm to perform tasks it is designated to do. In a 2-dimensional input space, with a two-joint robotic arm and given the desired coordinate, the problem reduces to finding the two angles involved. The first angleis between the first arm and the ground (or whatever it is attached to). The second angle is between the first arm and the second arm.
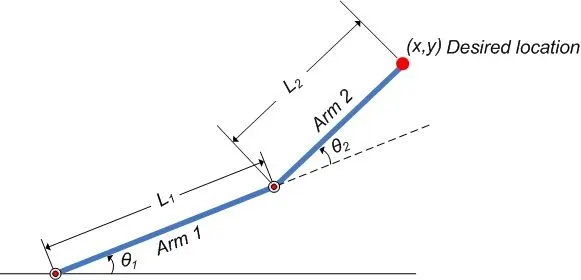
Starting point of link 1 -
`x_0=0`
`y_0=0`
End point of link 1 and start point of link 2 -
`x_1 = L_1*costheta_1`
`y_1 = L_1*sintheta_1`
Ending point of link 2 -
`x_2 = x_1+ L_2*costheta_2`
`y_2 = y_1+ L_2*sintheta_2`
Where,
L1 = Length of link 1
L2 = Length of link 2
`theta_1="Angle between ground and link1"`
`theta_2="Angle between link1 and link2"`
4] MATLAB CODE AND EXPLANATION -
clear all
close all
clc
L1 = 1 ;
L2 = 0.5;
theta1 = linspace(0,90,10);
theta2 = theta1;
ct = 1;
for i = 1:length(theta1)
    THETA1 = theta1(i);
     for j=1:length(theta2)
        THETA2 = theta2(j);
        x0 = 0;
        y0 = 0;

        x1 = L1*cosd(THETA1);
        y1 = L1*sind(THETA1);

        x2 = x1+L2*cosd(THETA2);
        y2 = y1+L2*sind(THETA2);

        plot([x0 x1],[y0 y1],[x1 x2],[y1 y2],'linewidth',3)
        axis([-0.1 1.5 0 1.5])
        pause(0.01)
     M(ct) = getframe(gcf);
      ct = ct+1;
     end
end
movie(M)
V=VideoWriter('forward_kinematics','MPEG-4');
open(V)
writeVideo(V,M)
close(V)
Line 1 - clear all => Clears any previously present variables from the workspace
Line 2 - close all => Closes all plots
Line 3 - clc => Clears command window
Line 4 - L1 = 1 ; => This is the length of link 1
Line 5 - L2 = 0.5; => This is the length of link 2
Line 6 - theta1 = linspace(0,90,10); => Angle between horizontal axis and the link 1.Linspace command will generate 10 integers between 0 and 10.
Line 7 - theta2 = theta1; =>
Line 8 - ct = 1; => This is the counter variable and will be helpful in storing frames.
Line 9 - for i = 1:length(theta1) => For loop will repeat certain actions upto specified number of times.This is the loop for link 1 .Here for loopwill start at 0 degrees and and will go upto length of theta1 which is 10 integers upto 90 degrees and then stops.
Line 10 - THETA1 = theta1(i); => We are storing i'th value of theta1 in THETA1.This will make our code much more neat and clean,otherwise we would have to use theta1(i) everywhere and this will make code look crude and also is time consuming.
Line 11 - for j=1:length(theta2) =>This is the loop for link 2.Here for loop will start at 0 degrees and and will go upto length of theta2 which is 10 integers upto 90 degrees and then stops. This loop will repeat for one value of theta 1 and for all values of theta2.Then loop 1 will get to the next value of theta 1 and for this value loop 2 will repeat for all the values of theta 2.
Line 12 - THETA2 = theta2(j); => We are storing i'th value of theta1 in THETA2.This will make our code much more neat and clean,otherwise we would have to use theta2(j) everywhere and this will make code look crude and also is time consuming.
Line 13 - x0 = 0; => We are assuming that starting point of link 1 has co-ordinates as x=0 and y=0.
Line 14 - y0 = 0; =>
Line 16 - x1 = L1*cosd(THETA1);Line 17- y1 = L1*sind(THETA1); => Here we are calculating the position of the second point of link1 in relation to the angle of the link1 to the horizontal axis.
Line 19- x2 = x1+L2*cosd(THETA2);Line 20 - y2 = y1+L2*sind(THETA2); => The ending point of link 1 is the starting point of link 2.Thus we added coordinates for starting point of link 2 and are calculating the position of the second point of link2 in relation to the angle of the link2 to the horizontal axis.
=>
Line 22 - plot([x0 x1],[y0 y1],[x1 x2],[y1 y2],'linewidth',3) => Here we are creating links by combining x and y components of the links .We are using plot command to plot the lines.
Line 23 - axis([-0.1 1.5 0 1.5]) => This will create horizontal and vertical axis.With horizontal axis starting at -0.1 and ending at 1.5. Simillarly vertical axis starting at 0 and ending at 1.5.
Line 24 - pause(0.3) =>This will pause the program for 0.3 seconds before executinng next step.This will create nice and decent moving plot animation.
Line 25 - M(ct) = getframe(gcf); => Here we are collecting each frame after every individual for loop and storing it in a variable M.And M will have a corresponding ct value from the previous loop.
getframe capture axes or figure as movie frame and gcf capture the interior of the figure window, excluding the menu and tool bars.
Line 26 - ct = ct+1; => ct value gets updated and will be used in next for loop by variable M to store next animation frame.
Line 27 - end => End of second for loop
Line 28 - end => End of first for loop
Line 29 - movie(M) => This creates a movie frame from the current figures.plays the movie frames in array M.
Line 30 - V=VideoWriter('forward_kinematics','MPEG-4'); => Creates a video file from an array or MATLAB movie.This contains information about the video and the properties that control the output video.Here we are writing video data to a MPEG-4 file and storing it in videofile V.
Line 31 - open(V) => The open(v) opens the file associated with v for writing
Line 32 - writeVideo(V,M) => Writes movie frames returned by the getframe function.
Line 33 - close(V) =>Closes the fine and saves it inside current working folder.
5] OUTPUT -
2R robotic arm animation link -https://www.youtube.com/watch?v=xhpaAX8fyH0
From the plot animation we can clear see that for a single angle of link 1 ,link 2 is moving through all the specified angles.This helps us to predict the possible workspace for the robot arms.
6] CONCLUSION -
* By simulating the robotic arm in Matlab, we are able to predict the work space required for the robot.
*Thus we have successfully simulated motion of a 2R robotic arm.