Week - 11 - Element quality check
AIM:
To create a Tk window which can be used to check the quality of elements.Entry boxes should accept the input and the buttons in it should display the failed elements for that quality using the temp nodes .This is used to locate the elements failed for respective quality criteria.So we need to do this process manually in hypermesh and later we analyse the command.tcl file and then we prepare the code to automate this process.
PROBLEM STATEMENT
When we used to carry out manually the quality checks of the model we meshed, the failed elements will be difficult to find out entirely when the model is quite large and complex.So in such cases we need to locate the failed elements to understand the entire elements failed elements for the respective quality criteria.
TCL CODE EXPLANATION
*clearmarkall 1 ;

*clearmarkall 2 ;

set a .window

catch { destroy $a }

toplevel $a -class Toplevel

wm title $a "Quality Check"

wm geometry $a 350x450+10+10

wm resizable $a 0 0

wm deiconify $a

entry $a.01 -textvariable w ; place $a.01 -x 140 -y 34

entry $a.02 -textvariable as ; place $a.02 -x 140 -y 70

entry $a.05 -textvariable j ; place $a.05 -x 140 -y 105

entry $a.08 -textvariable s ; place $a.08 -x 140 -y 135

entry $a.09 -textvariable mil ; place $a.09 -x 140 -y 165

entry $a.11 -textvariable mal ; place $a.11 -x 140 -y 200

entry $a.12 -textvariable mit ; place $a.12 -x 140 -y 230

entry $a.14 -textvariable mat ; place $a.14 -x 140 -y 265

entry $a.15 -textvariable miq ; place $a.15 -x 140 -y 295

entry $a.17 -textvariable maq ; place $a.17 -x 140 -y 325

entry $a.22 -textvariable tet ; place $a.22 -x 140 -y 352

proc warpage { a } {

*nodecleartempmark

*createmark elements 1 "displayed"

*elementtestwarpage elements 1 $a 2 2 0 " 2D Warpage "

*maskentitymark elements 2 0

*maskreverse elements

*createmark nodes 1 "displayed"

*nodemarkaddtempmark 1

*unmaskall2

}

proc aspect { a } {

*nodecleartempmark

*createmark elements 1 "displayed"

*createmark elements 2

*elementtestaspect elements 1 $a 2 2 0 " 2D Aspect Ratio "

*maskentitymark elements 2 0

*maskreverse elements

*createmark nodes 1 "displayed"

*nodemarkaddtempmark 1

*unmaskall2

}

proc jacobian { a } {

*nodecleartempmark

*createmark elements 1 "displayed"

*elementtestjacobian elements 1 $a 2 2 0 "Jacobian"

*maskentitymark elements 2 0

*maskreverse elements

*createmark nodes 1 "displayed"

*nodemarkaddtempmark 1

*unmaskall2

}

proc skew { a } {

*nodecleartempmark

*createmark elements 1 "displayed"

*elementtestskew elements 1 $a 2 2 0 "Skewness"

*maskentitymark elements 2 0

*maskreverse elements

*createmark nodes 1 "displayed"

*nodemarkaddtempmark 1

*unmaskall2

}

proc minl { a } {

*nodecleartempmark

*createmark elements 1 "displayed"

*elementtestlength elements 1 $a 2 1 2 0 "Minl"

*maskentitymark elements 2 0

*maskreverse elements

*createmark nodes 1 "displayed"

*nodemarkaddtempmark 1

*unmaskall2

}

proc maxl { a } {

*nodecleartempmark

*createmark elements 1 "displayed"

*elementtestlength elements 1 $a 2 0 2 0 "Maxl"

*maskentitymark elements 2 0

*maskreverse elements

*createmark nodes 1 "displayed"

*nodemarkaddtempmark 1

*unmaskall2

}

proc mintria { a } {

*nodecleartempmark

*createmark elements 1 "displayed"

*elementtestinterangle elements 1 $a 2 2 2 2 0 "Minangle"

*maskentitymark elements 2 0

*maskreverse elements

*createmark nodes 1 "displayed"

*nodemarkaddtempmark 1

*unmaskall2

}

proc maxtria { a } {

*nodecleartempmark

*createmark elements 1 "displayed"

*elementtestinterangle elements 1 $a 2 2 0 2 0 "Maxangle"

*maskentitymark elements 2 0

*maskreverse elements

*createmark nodes 1 "displayed"

*nodemarkaddtempmark 1

*unmaskall2

}

proc minquad { a } {

*nodecleartempmark

*createmark elements 1 "displayed"

*elementtestinterangle elements 1 $a 0 2 1 2 0 " Min quad Angle "

*maskentitymark elements 2 0

*maskreverse elements

*createmark nodes 1 "displayed"

*nodemarkaddtempmark 1

*unmaskall2

}

proc maxquad { a } {

*nodecleartempmark

*createmark elements 1 "displayed"

*elementtestinterangle elements 1 $a 0 2 0 2 0 " Max Angle quad "

*maskentitymark elements 2 0

*maskreverse elements

*createmark nodes 1 "displayed"

*nodemarkaddtempmark 1

*unmaskall2

}

proc tetcollapse { a } {

*nodecleartempmark

*createmark elements 1 "displayed"

*elementtesttetracollapse elements 1 $a 2 0 " Max Angle quad "

*maskentitymark elements 2 0

*maskreverse elements

*createmark nodes 1 "displayed"

*nodemarkaddtempmark 1

*unmaskall2

}

button $a.03 -text "Warpage" -command { warpage $w } -font {times 7 bold } ; place $a.03 -x 10 -y 30

button $a.04 -text "Aspect Ratio" -command { aspect $as } -font {times 7 bold } ; place $a.04 -x 10 -y 65

button $a.06 -text "Jacobian" -command { jacobian $j } -font {times 7 bold } ; place $a.06 -x 10 -y 100

button $a.07 -text "Skew" -command {skew $s } -font {times 7 bold } ;place $a.07 -x 10 -y 130

button $a.10 -text "Min Length" -command {minl $mil } -font {times 7 bold } ; place $a.10 -x 10 -y 165

button $a.16 -text "Max Length" -command {maxl $mal } -font {times 7 bold } ; place $a.16 -x 10 -y 200

button $a.13 -text "Min Angle Tria" -command { mintria $mit } -font {times 7 bold } ; place $a.13 -x 10 -y 230

button $a.18 -text "Max Angle Tria" -command { maxtria $mat } -font {times 7 bold } ; place $a.18 -x 10 -y 260

button $a.19 -text "Min Angle Quad" -command { minquad $miq } -font {times 7 bold } ; place $a.19 -x 10 -y 290

button $a.20 -text "Max Angle Quad" -command { maxquad $maq } -font {times 7 bold } ; place $a.20 -x 10 -y 320

button $a.21 -text "Tet Collapse" -command { tetcollapse $tet } -font {times 7 bold } ; place $a.21 -x 10 -y 350
set a .windowcatch { destroy $a }
toplevel $a -class
Toplevelwm title $a "Quality Check"
wm geometry $a 350x450+10+10wm
resizable $a 0 0wm deiconify $a
This is the usual code for creating a window having a title and the with fixed size and to made the window current window. entry $a.01 -textvariable w ; place $a.01 -x 140 -y 34
entry $a.02 -textvariable as ; place $a.02 -x 140 -y 70
entry $a.05 -textvariable j ; place $a.05 -x 140 -y 105
entry $a.08 -textvariable s ; place $a.08 -x 140 -y 135
entry $a.09 -textvariable mil ; place $a.09 -x 140 -y 165
entry $a.11 -textvariable mal ; place $a.11 -x 140 -y 200
entry $a.12 -textvariable mit ; place $a.12 -x 140 -y 230
entry $a.14 -textvariable mat ; place $a.14 -x 140 -y 265
entry $a.15 -textvariable miq ; place $a.15 -x 140 -y 295
entry $a.17 -textvariable maq ; place $a.17 -x 140 -y 325
entry $a.22 -textvariable tet ; place $a.22 -x 140 -y 352
These are the entry boxes creation code for each quality criteria.through this entry boxes we suppy the value of the variable of each quality criteria.
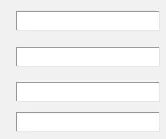
These type of entry boxes are created using the entry command
roc warpage { a } {

*nodecleartempmark

*createmark elements 1 "displayed"

*elementtestwarpage elements 1 $a 2 2 0 " 2D Warpage "

*maskentitymark elements 2 0

*maskreverse elements

*createmark nodes 1 "displayed"

*nodemarkaddtempmark 1

*unmaskall2

}
Through the command.tcl file we find out the code for checking the warpage and we also created temp nodes on those failed elements.Then we created a procedure to do this . *nodecleartempmark This is to clear the temp nodes if already present in the model when we check for any other quality criteria. *elementtestwarpage elements 1 $a 2 2 0 " 2D Warpage " This is the command for checking the warpage with the syntax as *elementtestwarpage entities markmask angle outputmark dimension contour title. The angle should be the variable as the user may have multiple values when meshed with differant quality criteria.Then an output mark is also given to store the failed elements. And the dimension is having two values , and the value of 2 is for instructing the code to check for the warpage of the 2D elements. The contour value of 0 and the value of 2 is for instructing the code to display the results manually.Then we create the temp nodes using the *nodemarkaddtempmark command. The very same thing is for the other quality criterias as well.The same synatx is for aspect,skew,jacobian,tetcollapse .
proc minl { a } {

*nodecleartempmark

*createmark elements 1 "displayed"

*elementtestlength elements 1 $a 2 1 2 0 "Minl"

*maskentitymark elements 2 0

*maskreverse elements

*createmark nodes 1 "displayed"

*nodemarkaddtempmark 1

*unmaskall2
This is the procedure for checking for the minimum length quality of the elements.Syntax for the command *elementtestlength is *elementtestlength entities markmask length outputmark wantmin dimension contour title .The only differance in with the other commands for quality check is that this is having the input wantmin.This is totell the command whtehr we need to check for the minimum length or for the maximum length of the elements.If we need to check for the minimum length , then we need to give the want min as a non -zero value to it. And for getting the results of the maximum length quality we need to supply the value of wantmin as zero.
proc mintria { a } {

*nodecleartempmark

*createmark elements 1 "displayed"

*elementtestinterangle elements 1 $a 2 2 2 2 0 "Minangle"

*maskentitymark elements 2 0

*maskreverse elements

*createmark nodes 1 "displayed"

*nodemarkaddtempmark 1

*unmaskall2

}
This procedure is for checking the minimum angle of the tria elements in the model.Synatx for the command is *elementtestinterangle entities markmask testangle trias outputmark wantmin dimension contour title .Trias in the input is to ask the code to check for the angle of quad or tria elements.If value of trias is given as non zere then the code will check for the tria elements and the value is zero then it will check for the QUAD elements angle. Similarly the value of wantmin , if it is non zero then the code will check for the smallest tria of quad angle and if it is zero then the largest angle of the respective element will be checked.
button $a.03 -text "Warpage" -command { warpage $w } -font {times 7 bold } ; place $a.03 -x 10 -y 30

button $a.04 -text "Aspect Ratio" -command { aspect $as } -font {times 7 bold } ; place $a.04 -x 10 -y 65

button $a.06 -text "Jacobian" -command { jacobian $j } -font {times 7 bold } ; place $a.06 -x 10 -y 100

button $a.07 -text "Skew" -command {skew $s } -font {times 7 bold } ;place $a.07 -x 10 -y 130

button $a.10 -text "Min Length" -command {minl $mil } -font {times 7 bold } ; place $a.10 -x 10 -y 165

button $a.16 -text "Max Length" -command {maxl $mal } -font {times 7 bold } ; place $a.16 -x 10 -y 200

button $a.13 -text "Min Angle Tria" -command { mintria $mit } -font {times 7 bold } ; place $a.13 -x 10 -y 230

button $a.18 -text "Max Angle Tria" -command { maxtria $mat } -font {times 7 bold } ; place $a.18 -x 10 -y 260

button $a.19 -text "Min Angle Quad" -command { minquad $miq } -font {times 7 bold } ; place $a.19 -x 10 -y 290

button $a.20 -text "Max Angle Quad" -command { maxquad $maq } -font {times 7 bold } ; place $a.20 -x 10 -y 320

button $a.21 -text "Tet Collapse" -command { tetcollapse $tet } -font {times 7 bold } ; place $a.21 -x 10 -y 350
This is the button creation and placement of the buttons in the tk window .And we assign the command to the buttons .We we click the buttons the assigned procedure will be called and executed.
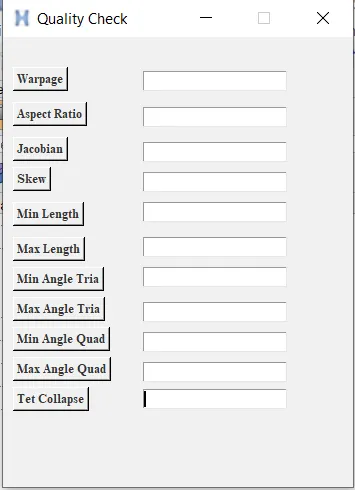
Tk widget for quality checks
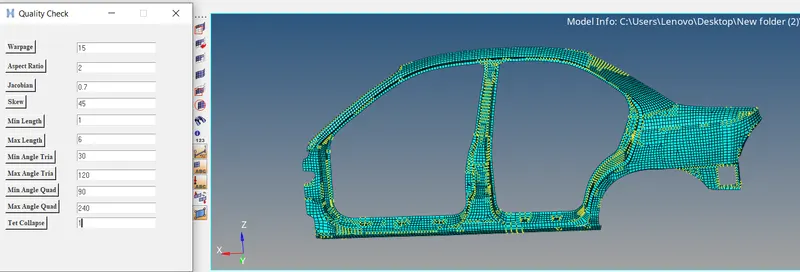
Fig 1 The Tk GUI window created for checking the quality of elements with the entry boxes will be used to suppy the values of the quality and the button click will check for the quality
CONCLUSION
This code for checking the quality of the elements will ensure that we didn't miss much time on checking the failed elements which are difficult to find out through normal view. Most of the times we need to zoom in to differant differant areas to find out the failed elements in the model and then we need to fix those quality issues.But with this code it will highlight the failed elements with the temp nodes.So having this code in hand is very worthy and helps in fast solving of issues.