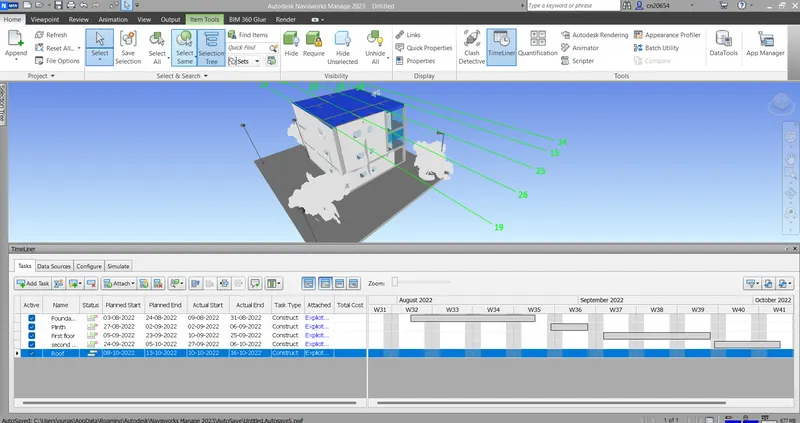
Usage of Navigation tool , Timeliner and Clash Detection test using Naviswork
1a. Aim: To export the rivet architecture and rivet structural model to the navis work work cache from the rivet to the Navis work manage software.
- Navis work manage is the soft ware which is used to coordinate and riview the project which is developed in the rivet soft ware.
- The project which is cretated in the rivet is to be reviewed to get to know the querries if any developed while creating the model and the reviewing the project developed in the rivet software by exporting the file from the rivet soft ware to the the navis work manage.
- The navis work manage is the autodesk product and it is the commercial licensed product to coordinate and review the project developed in the rivet soft ware.
- In the navis work manage the model elements can be easily viewed and the model elements can be easy to accesss, the model size can be modified easily with out undulations.
Procedure:
- A model can be reviewed or coordinated in the navis work manage after the importing the file from the rivet software. The model is the is rivied with out any modifications.
- Click on the new option and select the architectural template of the model in the file menu click on OK then the file with the architectural template is opened.
- After creating the model in the rivet then the model is to be exported to the navis work manage, To export the model to the navis work manage click on the file icon and select the export option in the file menu and again select the 'NWC' option in the file menu if the 'NWC' is not found in the rivet then the utility is to be downloaded and installed in the navis work manage.
- After the installing the Navis work manage tool then the rivet file is exported to the navis work manage software for the review process and simulation analysis.
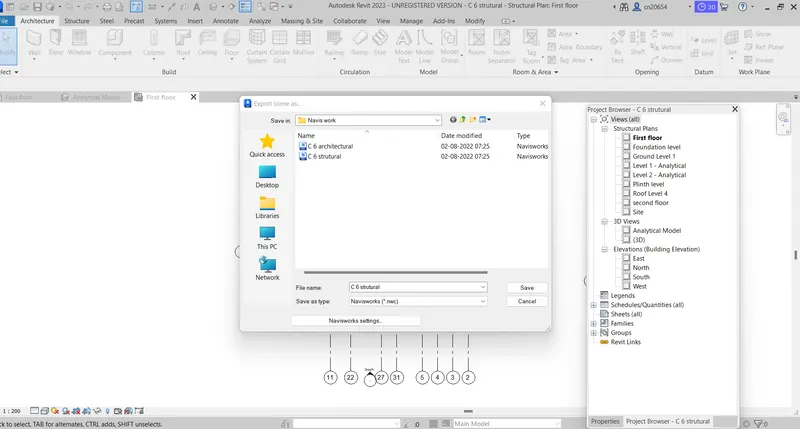
- After the creation of the rivet model now click on the file icon and select the export option and change the folder to the desired destination and change the save in type option as the 'NWC' type and click on the ok option then the file is exported to the navis work mange and if we want another file is to be exported then repeat steps and insert the model in the Navis work manage.
- Now export the arcitectural and structural file which is developed in the cahllenge 6 in the rivet.Open the architectural file in the rivet and made the changes if any needed in the rivet file Now click on the export option in the file menu andselect the NWC option and select the ok then the file is exported to the Navis work manage.
- The result exporting the rivet file to the Navis work manage is shown as below.
2a. Aim: To export the rivet architecture and rivet structural model to the navis work work cache from the rivet to the Navis work manage software.
- Navis work manage is the soft ware which is used to coordinate and riview the project which is developed in the rivet soft ware.
- The project which is cretated in the rivet is to be reviewed to get to know the querries if any developed while creating the model and the reviewing the project developed in the rivet software by exporting the file from the rivet soft ware to the the navis work manage.
- The navis work manage is the autodesk product and it is the commercial licensed product to coordinate and review the project developed in the rivet soft ware.
- In the navis work manage the model elements can be easily viewed and the model elements can be easy to accesss, the model size can be modified easily with out undulations.
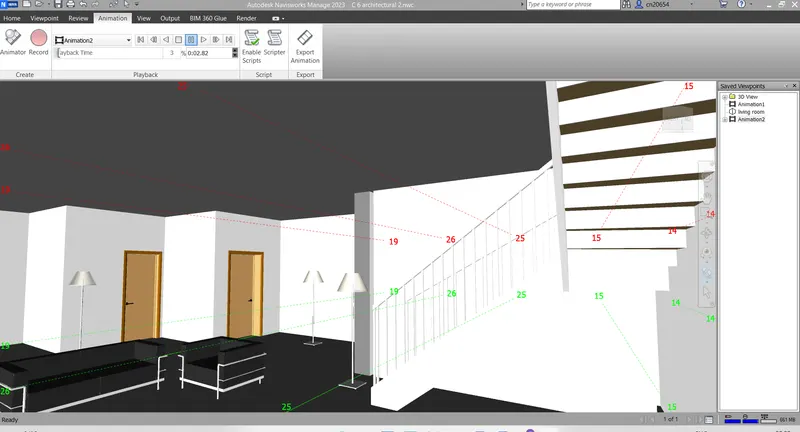
- Any model after exporting in to the Navis work manage from the rivet we can have a clear view in inside or outside the model by the walk tool in the ribbon and the animation can be recorded to get the view of the building of all the rooms at any time of the designing of the model.
Procedure:
- A model can be riviewed or coordinated in the navis work manage after the importing the file from the rivet software. The model is the is reviewed with out any modifications.
- The model which is exported from the rivet is opened in the Navis work manage, Click on the append option in the navis work manage and select the files which is to be managed to the walk option.The files will be opened in the navis work manage and the model can be zoom in or zoom out by the cursor of the and by zooming in we can see the inside view of the building model.
- Click on the walk option in the ribbon and zoom in to the building model and select the save view point in the ribbon and the select the view point name and now the walk option can be applied in the building and using the cursor we can move step by step in the building model and the view can also be recorded by clicking the record option in the menu bar and the record is to be started from the first step to the last step of the view of the model.
- The view can be stopped or paused after the desired time and clicking on the stop/pause option in the building.
- The walking video can be viewed with in the desired time and design of the building.
- The final result of the view of the building by the walking tool is formed as shown below.
3a. Aim: To Create the animation of the building model by applying the realism option in the ribbon for the files which is imported from the rivet soft ware.
- Navis work manage is the soft ware which is used to coordinate and riview the project which is developed in the rivet soft ware.
- The project which is cretated in the rivet is to be reviewed to get to know the querries if any developed while creating the model and the reviewing the project developed in the rivet software by exporting the file from the rivet soft ware to the the navis work manage.
- The navis work manage is the autodesk product and it is the commercial licensed product to coordinate and review the project developed in the rivet soft ware.
- In the navis work manage the model elements can be easily viewed and the model elements can be easy to accesss, the model size can be modified easily with out undulations.
- Any model after exporting in to the Navis work manage from the rivet we can have a clear view in inside or outside the model by the walk tool in the ribbon and the animation can be recorded to get the view of the building of all the rooms at any time of the designing of the model.
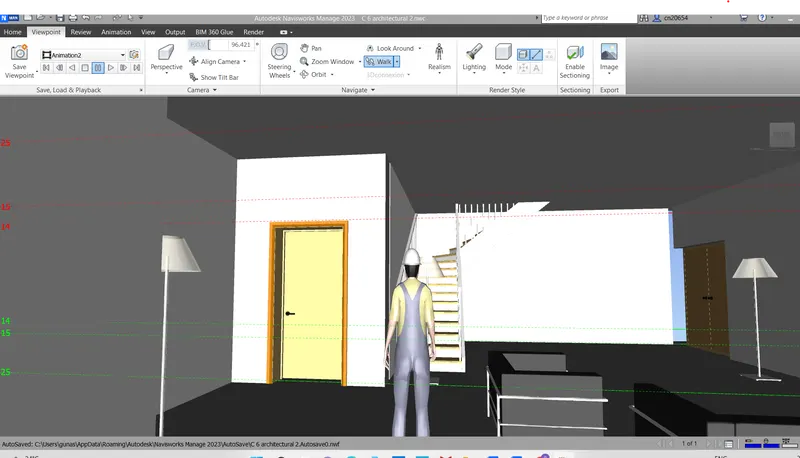
- The realism is nothing but the walk option in which the third person will reflect in the view point and the view is developed by placing the third person position.
Procedure:
- A model can be riviewed or coordinated in the navis work manage after the importing the file from the rivet software. The model is the is reviewed with out any modifications.
- The model which is exported from the rivet is opened in the Navis work manage, Click on the append option in the navis work manage and select the files which is to be managed to the walk option.The files will be opened in the navis work manage and the model can be zoom in or zoom out by the cursor of the and by zooming in we can see the inside view of the building model.
- Click on the view point option in the ribbon and select the realism option in the ribbon and select the third person in the realism tool after selecting the realism tool a person image is appeared in the window and place the image where we required for the desired view of the building model. and zoom in to the building model and select the save view point in the ribbon and the select the view point name and now the walk option can be applied in the building and using the cursor we can move step by step in the building model and the view can also be recorded by clicking the record option in the menu bar and the record is to be started from the first step to the last step of the view of the model.
- The view is developed based on the position of the third person at the model.
- The realism animation can be stopped or paused after the desired time and clicking on the stop/pause option in the building.
- The walking video can be viewed with in the desired time and design of the building.
- The final result of the realism view of the building by the walking tool is formed as shown below.
4a. Aim: To Create the clash detection test for the architectural or structiral model which are imported from the rivet soft ware.
- The model which is created in the rivet may occur clash, i.e the building model elements may clah with each other the beams, columns,doors,walls, stairs and the clashes canbe reviewd,resolved and approved for the better design and if th clashes are not resolved then the execution of th building is slightly difficult to avoid the clash and to make correction for the design and drawing of the building.
- The clash can be detected by conducting the clash detection test in the navis work manage the list of the clashes which are identified and they can be approved to some extent.
- In general the resolving of the clashes makes the effective model of the building,while the clashes are reviewed and approved by the building model, and it may cause little difference in the size of the model.
Procedure:
- A model can be reviewed or coordinated in the navis work manage after the importing the file from the rivet software. The model is the is reviewed with out any modifications.
- The model which is exported from the rivet is opened in the Navis work manage, Click on the append option in the navis work manage and select the files which is to be managed to conduct the clash detection test.
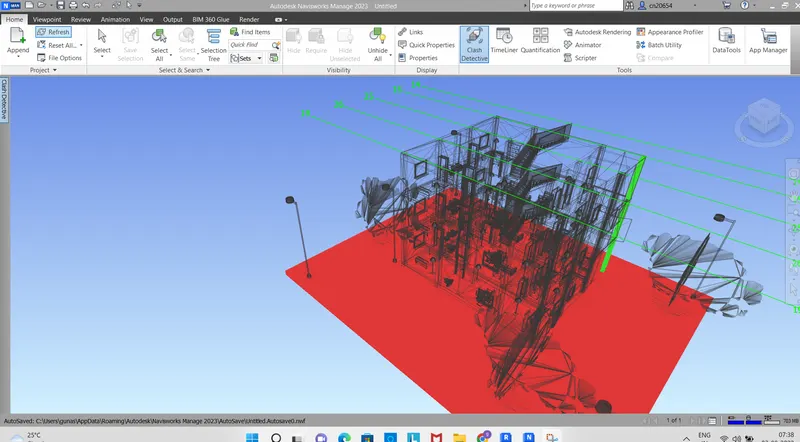
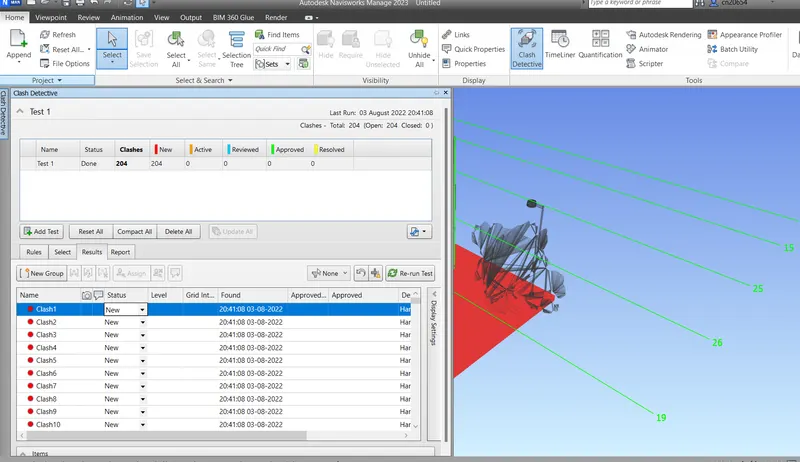
- Click on the clash detective icon in the ribbon bar and the clash detective menu bar is opened and then click on the add test option and select the files for which we need to conduct the clash detective test and then the name of the test is changed according to the desired state and then click on the run test option in the bottom and the test is conduted for the models which we selected and it displays the total number of the clashes obtained in the model.
- The clashes Which are developed for the models are under the active state and we can change the status of the clashes according to the situation.
- The clashes can be reviewed, resolved and approved and the status can be chnaged according to the condition of the clsh of the model we can also get to know date of the clash when it formed in the building model and they can be resolved according to the date condition.
- After resolving the clashes developed in the model we can reconduct the clash detective test for the model and we can reduce the clashes and it avoid disturbance during the disturbance and as well as during the construction of the building.
- After changing the status of the clashes then the list is formed for the resolved clashes,reviewd clashes and approved clashes of the model, the list helps to know about the clashes which are changed during any time of the design of the building model.
- The final result of the clash detective test for the building model can be formed as shown below.
5a. Aim: To Create the project schedule by adding the reasonable assumptions dates and to simulate the project using the timeline feature in the Navis work for the architectural or structural model which are imported from the rivet soft ware.
- A project is a combination of the various tasks in which one by one is executed in a line which forms the out put in a systematic way with definite properties.
- To complete or execute the tasks in a wy of time, a time schedule is prepared by mentioning the dates or the time period required for the tasks to complete.
- The time schedule is prepared by the time line option in the ribbon bar and the time schedule helps to fix the time period of the project which is useful in the period of the amendment or for the tendering process.
Procedure:
- A model can be reviewed or coordinated in the navis work manage after the importing the file from the rivet software. The model is the is reviewed with out any modifications.
- The model which is exported from the rivet is opened in the Navis work manage, Click on the append option in the navis work manage and select the files which is to be managed to conduct the clash detection test.
- Click on the time liner icon in the ribbon bar and the time liner menu bar is opened and then click on the selection tree and it contains all the levels of the building model like Plinth level,first floor level,second floor level,roof level these levels are used to fix the tasks of the project .
- Click on the add task option in the time liner option and add the first task which is foundation level,Then the assumed start date and end date is entered and then actual start date and actual end date is also eneterd.
- The name of the task of the level is also changed to the respective elevation.
- After the editting the of the task name then the tasktype is also entered whether it may be construction or demolish.Select construction type in the task name type.
- Now attach the task level in the rivet model.click on the attach option in the selection tree option and select the option as select the current selection then the file is attached to the schedule prepared using the task time limit.
- Now the model is simulated to get to know the animation video of the total project which are consructed by the all the tasks involved in the project of the building model.
- Now click on the simualte option in the time liner option and select the save view point in the file menu option,then the animation video of the project is developed and it tells us how the construcion of the project will takes place.
- To see the animation video of the building model click on the play option and it shows the animation video how the each individual task is completed.
- The final result of the Time liner option in the building model can be formed as shown below.