Creation of geometries by Coordinate system methods using AutoCad
1a. Aim:
- To create the geometries from the P1 to P2 using all the coordinate systems and create the rest of drawings with any of the coordinate systems.
Generally the AUTO CAD consists of the various co ordinate systems
- Absoulte coordinate system
- Relative coordinate system
1)Relative rectangular coordinate system
2)Relative polar coordinate system
- Direct distance entry method
Absolute coordiinate system:In this sytems the pionts are established with reference to Origin.
Relative rectangular coordinate system:In this system the first point of the specified drawing is established with reference to the origin and the remaining points are plotted with reference to their previous point. The point in the command bar is enetered in the form of @X,Y.
Relative polar coordinate system: In this type of system the points are established with reference to the angle with X and Y axis by entering the distance and specific angle with the axis in the command bar.
Direct distance entry method:In this method the distance between the two points is entered directly in the command bar. The line can be drawn by entering the distance in the command bar and the line drawn by dragging the cursor in the required direction.
P 1
Absolute coordinate system:
- Enter the line command i.e 'l' in the command bar and it ask to specify the first point then eneter the first point (2,1).
- Enter the next point as (8,1)
- Enter next point as (8,2)
- Enter next point as (2,2)
- Enter next point as (2,6)
- Enter next point as (8,6)
- Enter next point as (8,7)
- Enter next point as (2,7)
- Enter the last point as (2,1). If the last point is of different coordinates then the we should enter the the coordinates and the last point is merging eith the fisrst point we can also use close option in the command bar.
- Using dimension in the Ribbon or Dim linear command we can give dimension to the drawing.
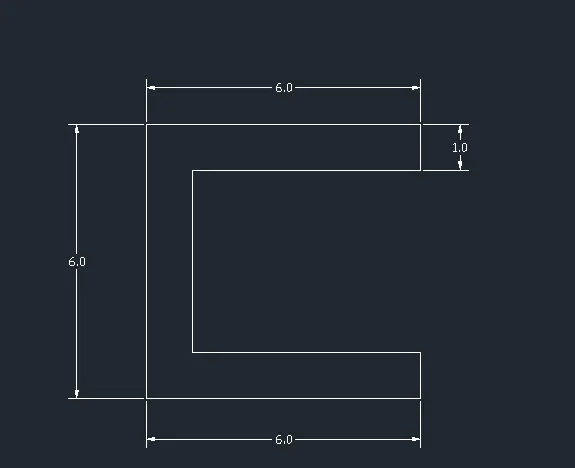
Relative rectangular coordinate systems:
- Enter line command i.e 'l' in the command bar amd enter the first point as (2,1) in the commnad bar.
- Now enetr the next point as @6,0 which is in the positive X direction and the next point as @0,1 which specifies that the point is in the positive Y direction.
- Enter the next point as @-5,0 which states that the point is moving in the negtive x direction with zero y axis displacement.
- Enter the next point as @0,4 and the next point as @5,0
- Enter the next point as @0,1and the next point as @-6,0 states that the point is moiving in negative x axis.
- Now eneter the last point as either @0,-6 or simply entering the close command in the command bar.
- Using Dim linear command specify the dimension of the drawing.
- The result of the drawing is same as that of the above drawing.
Relative polar coordinate system:
- In this system the drawing is plotted with reference to the angle with the X and Y axis.
- Enter the first point as (2,1)
- Enter the second point as @6<0 degrees it states the distance of the line and the angle made by the line with reference to positive x -axis.
- Enter the next point @1<90 states the distance and the angle made by the positive Y-axis and the next point as @5<180 states that the angle made by the line with the negative X axis.
- Enter the next point as @4<90 and the next point as @5<0.
- Enter the next point as @1<90 and the next point @5<180.
- Now eneter the next point as either @6<270 or enetring the close command in the command bar.
- The result of the drawing is same as that of the above drawing.
Direct distance entry method:
- This is the simplest form of the method if we know the all the lengths or measurements of the drawing.
- The drawing can be plotted by entering the length of the line directly on the command bar.
- Enter the line command and enter the first point (2,1) and place the cursor in the horizontal direction and enter 6 in the command bar and now place the cursor in the direction of the consecutive line of the drawing and enter the length as 1.
- This process will be done with out any change until we reach the line we need to join with first point or the endpoint.
- If the first point and last point is same then we can use close command to complete the drawing.
- The final drawing will be formed as shown above.
P2
Absolute coordinate system:
- Enter the line command i.e 'l' in the command bar and it ask to specify the first point then eneter the first point (2,1).
- Enter the next point as (5,1)
- Enter next point as (5,5)
- Enter next point as (6,5)
- Enter next point as (6,1)
- Enter next point as (9,1)
- Enter next point as (7,8)
- Enter next point as (4,8)
- Enter the last point as (2,1). If the last point is of different coordinates then the we should enter the the coordinates and the last point is merging with the fisrst point we can also use close option in the command bar.
- Using dimension in the Ribbon or Dim linear command we can give dimension to the drawing.
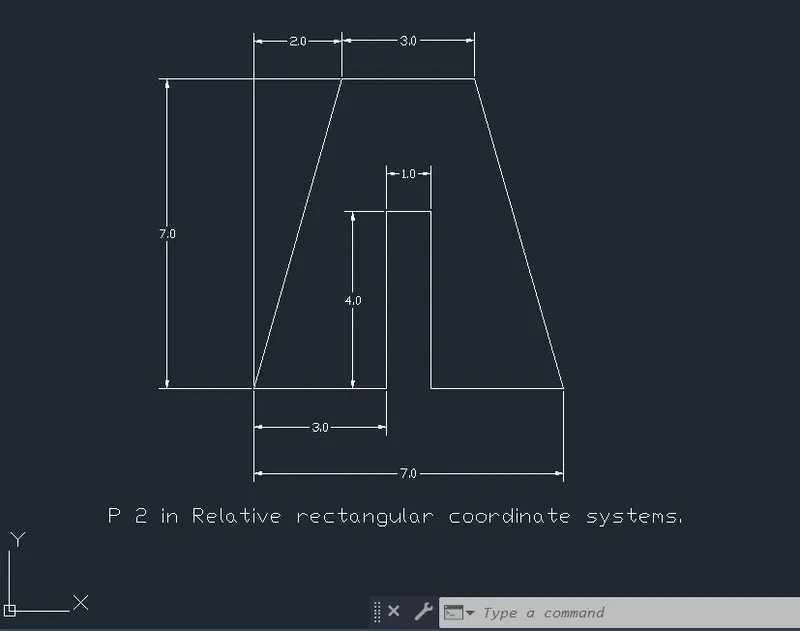
Relative rectangular coordinate system:
- Enter line command i.e 'l' in the command bar amd enter the first point as (2,1) in the commnad bar.
- Now enetr the next point as @3,0 which is in the positive X direction and th enext point as @0,4 which specifies that the point is in the positive Y direction.
- Enter the next point as @1,0.
- Enter the next point as @0,-4 which states that the point is moving in the negtive Y direction with zero X axis displacement.
- Enter the next point as @3,0.
- Enter the next point as @-2,7 states that the point is moiving in negative x and positive Y axis.
- Enter the next point as @-3,0.
- Now eneter the last point as either @-2,-7 or simply entering the close command in the command bar.
- Using Dim linear command specify the dimension of the drawing.
Relative polar coordinate system:
- In this system the drawing is plotted with reference to the angle with the X and Y axis.
- Enter the first point as (2,1)
- Enter the second point as @6<0 degrees it states the distance of the line and the angle made by the line with reference to positive x -axis.
- Enter the next point @1<90 states the distance and the angle made by the positive Y-axis and the next point as @5<180 states that the angle made by the line with the negative X axis.
- Enter the next point as @4<90 and the next point as @5<0.
- Enter the next point as @1<90 and the next point @5<180.
- Now eneter the next point as either @6<270 or enetring the close command in the command bar.
Direct distance entry method:
- This is the simplest form of the method if we know the all the lengths or measurements of the drawing.
- The drawing can be plotted by entering the length of the line directly on the command bar.
- Enter the line command and enter the first point (2,1) and place the cursor in the horizontal direction and enter 3 in the command bar and now place the cursor in the direction of the consecutive line of the drawing and enter the length as 4.
- This process will be done with out any change until we reach the line we need to join with first point or the endpoint.
- In this make sure that the inclined position is perfect to get this we need to place the cursor of the in the exact direction in which the line is to be drawn.
- If the first point and last point is same then we can use close command to complete the drawing.
- The final drawing will be formed as shown above.
P 4
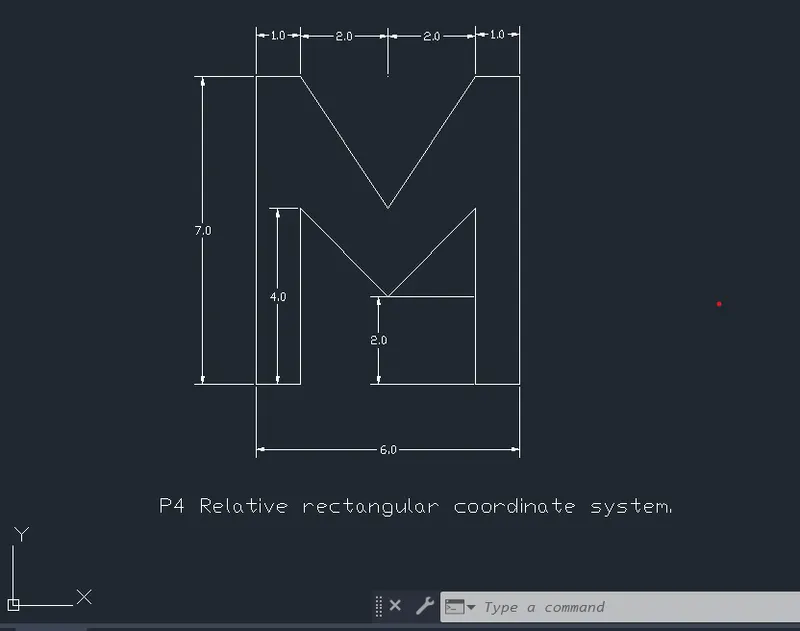
Relative rectangular coordinate system:
- Enter line command i.e 'l' in the command bar amd enter the first point as (2,1) in the commnad bar.
- Now enetr the next point as @1,0 which is in the positive X direction and the next point as @0,4 which specifies that the point is in the positive Y direction.
- Enter the next point as @2,-2 which states that the point is moving in the negtive X and Y direction.
- Enter the next point as @2,2.
- Enter the next point as @0,-4 states that the point is moiving in negative Y axis.
- Enter the next point as @1,0.
- Enter the next point as @0,6 and the next point as @-1,0.
- Enter the next point as -2,-3 which states that the point is moving in both negative X and Y directions and the next point as @-2,3, and the next point as @-1,0.
- Now eneter the last point as either @0,-7 or simply entering the close command in the command bar.
- Using Dim linear command specify the dimension of the drawing.
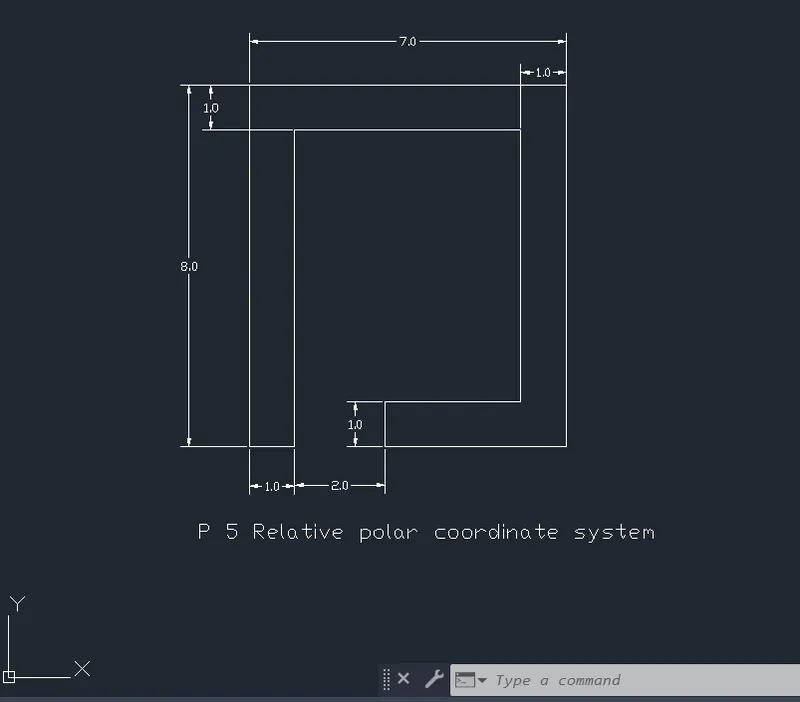
P5
Relative polar coordinate system:
- Enter the line command i.e 'l' in the command bar and specify the first point as (2,1).
- Enter the next point as @1<0 and the next point @7<90.
- Enter the next point as @5<0 and the next point as @6<270.
- Enter the next point as @3<180 and the next point as @1<270.
- Enter the next point as @4<0 and the next point as @8<90
- Enter the next point as @7<180.
- Enter the last point as either @8<270 or Enter the close command n the command bar.
- The result will be obtained in the form of the below drawing.
P 7
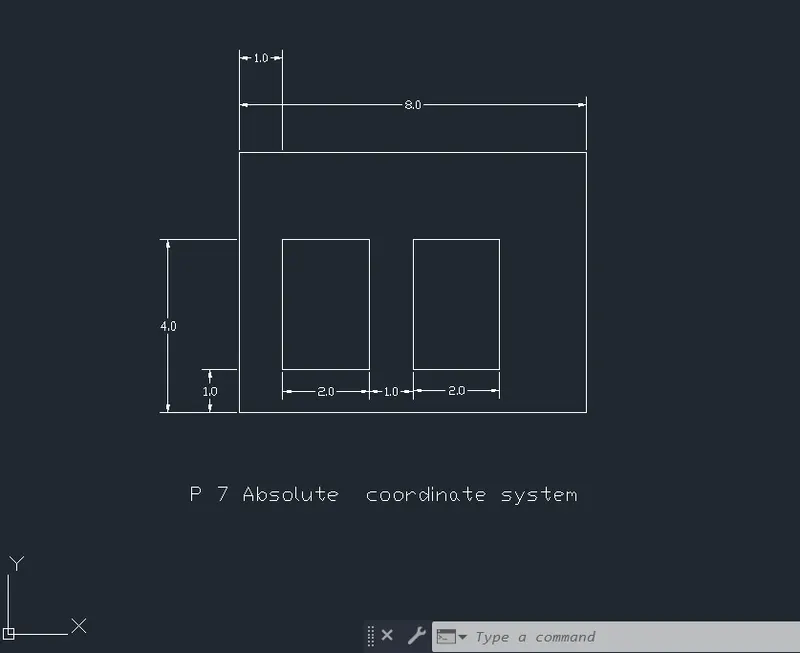
Absolute coordinate system:
- Enter the line command i.e 'l' in the command bar and enter the first point as (2,1).
- Enter the next point (10,1) and the next point (10,7).
- Enter the next point as ( 2,7) and the next point as either (2,1) or enter close command then the outside rectangle will be formed.
- Now enter the line command and enter the point (3,2) and enter the next points (5,2) and (5,5).
- Enter the point (3,5)and enter the close command and the first rectangle from the left side will be formed in the drawing.
- Enter the line command and enter the point (6,2) and enter the next points as (8,2) and (8,5).
- Enter the next point (6,5) and enter the close command in the command bar and the second rectangle will be formed.
- Using the dim linear command mention the dimension of the drawing.
- The final drawing will be obtained as beow shown.
P 8
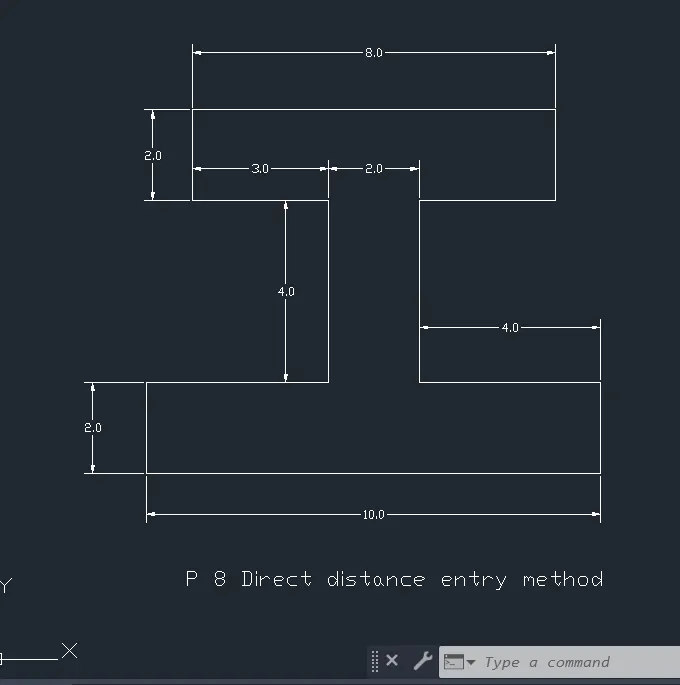
Direct distance entry method:
- This is the simplest form of the method if we know the all the lengths or measurements of the drawing.
- The drawing can be plotted by entering the length of the line directly on the command bar.
- Enter the line command and enter the first point (0,0) and place the cursor in the horizontal direction and enter 10 in the command bar and now place the cursor in the direction of the consecutive line of the drawing and enter the length as 2.
- This process will be done with out any change until we reach the line we need to join with first point or the endpoint.
- If the first point and last point is same then we can use close command to complete the drawing.
- The final drawing will be formed as shown below and the drawing obtained is an I section.
- Using the dim linear command we can specify the dimensions of the drawing.
P 9
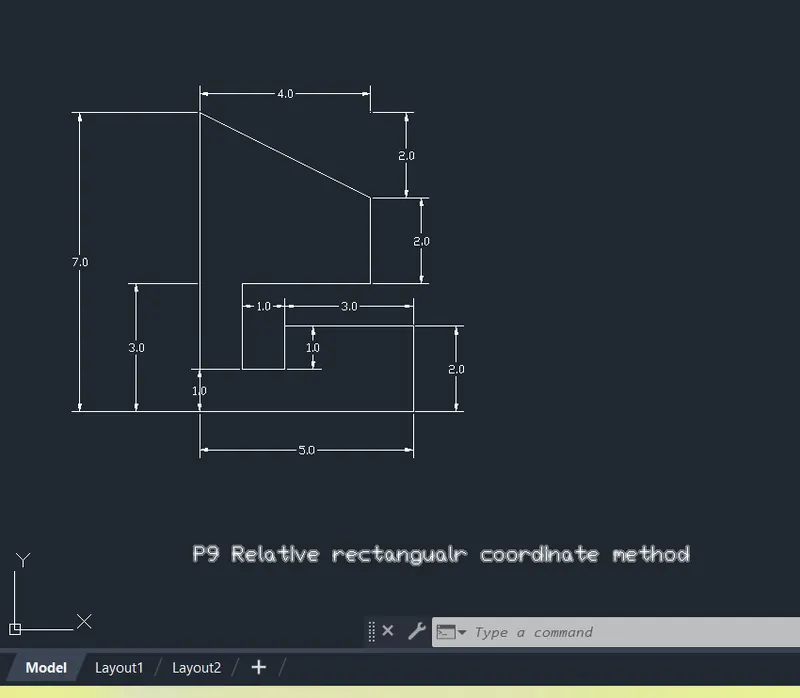
Relative rectangular coordinate system:
- Enter line command i.e 'l' in the command bar amd enter the first point as (1,1) in the commnad bar.
- Now enetr the next point as @5,0 which is in the positive X direction and the next point as @0,2 which specifies that the point is in the positive Y direction.
- Enter the next point as @-3,0 which states that the point is moving in the negtive X direction.
- Enter the next point as @0,-1.
- Enter the next point as @-1,0 states that the point is moiving in negative x axis.
- Enter the next point as @0,2.
- Enter the next point as @3,0 and the next point as @0,2.
- Enter the next point as -4,2 which states that the point is moving in negative X and positive Y directions.
- Now eneter the last point as either @0,-7 or simply entering the close command in the command bar.
- Using Dim linear command specify the dimension of the drawing.
P 10
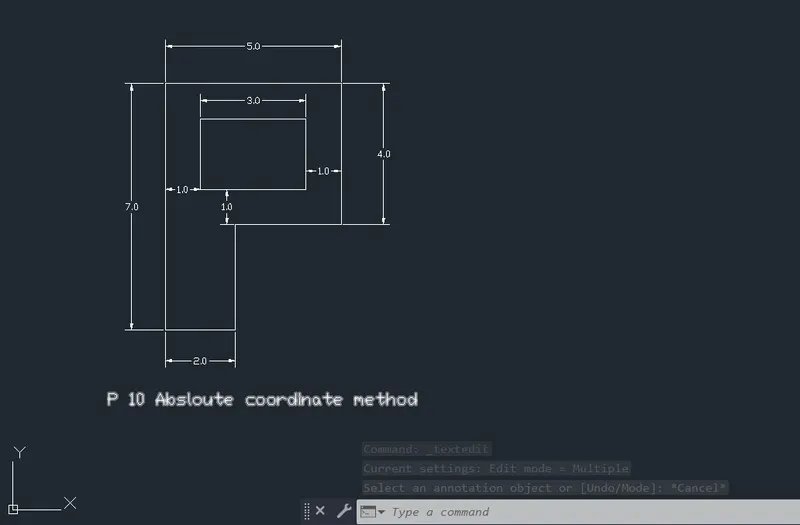
Absolute coordinate system:
- Enter the line command i.e 'l' in the command bar and enter the first point as (1,1).
- Enter the next point (3,1) and the next point (3,4).
- Enter the next point as ( 6,4) and the next point (6,8) .
- Enter the next point as (1,8) and enter close command outer plot is formed as shown below.
- Now enter the line command and enter the point (2,5) and enter the next points as (5,5) and (5,7).
- Enter the point (2,7)and enter the close command and the inside rectangle is formed in the drawing.
- Using the dim linear command mention the dimension of the drawing.
- The final drawing will be obtained as beow shown.
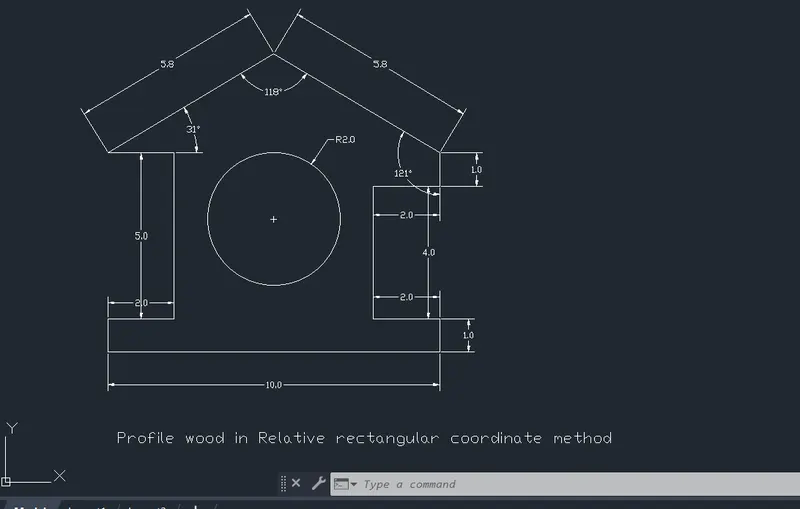
Profile wood
Relative rectangular coordinate system:
- Enter line command i.e 'l' in the command bar amd enter the first point as (0,0) in the commnad bar.
- Now enetr the next point as @10,0 which is in the positive x direction and the next point as @0,1 and @-2,0 which specifies that the point are in the positive y and negative x directions.
- Enter the next point as @0,4 which states that the point is moving in the positive y direction.
- Enter the next point as @2,0.
- Enter the next point as @0,1 states that the point is moiving in positive y axis.
- Enter the next points as @-5,3 and @-5,-3
- Enter the next point as @2,0 and the next point as @0,5.
- Enter the next point as @-2,0 and enter the close command to form out line of the drawing.
- Now enter circle command and specify the center point(5,4) and ener the radius of the circle as 2 and the drawing of the profile wood is formed.
- Using Dim linear command specify the dimension of the drawing.
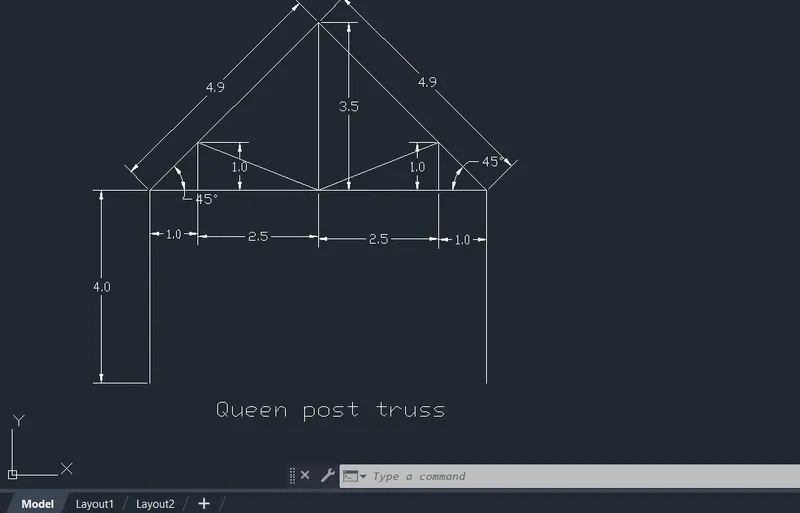
Queen post truss
Relative rectangular coordinate system:
- Enter line command i.e 'l' in the command bar amd enter the first point as (1,1) in the commnad bar.
- Now enetr the next point as @0,4 which is in the positive y direction and the next point as @7,0 and @0,-4 which specifies that the point are in the positive x and negative y directions.
- Enter the line command and enter the point as (1,5) and enter the next points as @3.5,3.5 and @3.5,-3.5.
- Enter the lne command and enter the point (2,5).
- Enter the next points as @0,1 and @2.5,-1.
- Enter the next points as @2.5,1and @0,-1.
- Enter the line command and enter the point (4.5,5) and enter the next point as @0,3.5 and the queen post truss is formed .
- Using Dim linear command specify the dimension of the drawing.
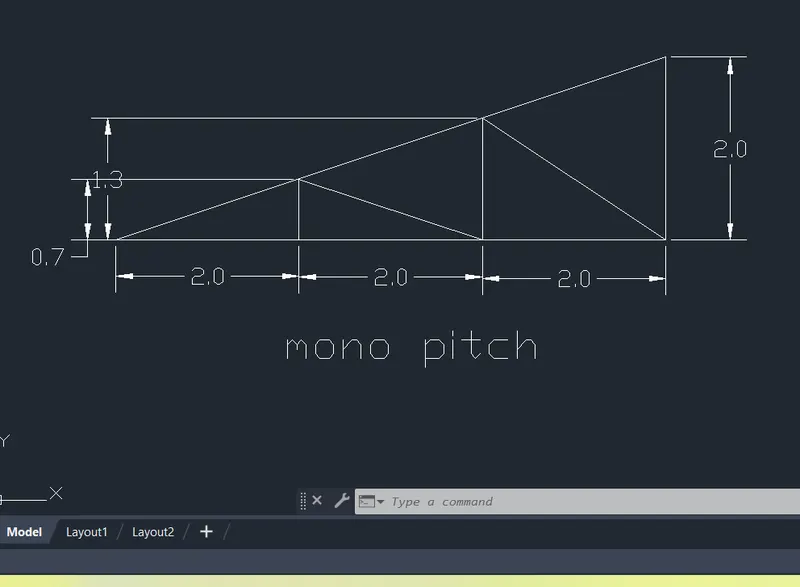
Mono pitch
Relative rectangular coordinate system:
- Enter line command i.e 'l' in the command bar amd enter the first point as (1,1) in the commnad bar.
- Now enetr the next point as @6,0 which is in the positive x direction and the next point as @0,2 which specifies that the point are in the positive y direction.
- Now enter the close command and the out line of the monopitch truss is formed.
- Enter the line commansd and enter the point (3,1) and next point as @0,0.7 which states that the point is moving in the positive y direction.
- Enter the next point as @2,-0.7 states that the point is moving in positive x and negative y axis.
- Enter the next points as @0,1.3 and @2,-1.3 and the drawing of the mono pitch is formed.
- Using Dim linear command specify the dimension of the drawing.