Project 2
Aim & Introduction
ORD has diverse range of tools to create the existing conditions and future designs. This context will discuss the scenario of road rehabilitation by adding a turn lane.
Procedure
The procedure for crating the existing condition and proposed design will be discussed in detail below.
Open ORD=>T&E=>TI
Browse new 2D seed file=> name the file as Corridor Basics=>Blank file opens up
Go attach file => attach eterrain.dgn via interactive method with surface to grid factor 1:1.00012=> live nesting depth=>1
Now attach the geometry file=>attach project mainline alignment file with surface to grid factor 1:1 and nesting depth 0 => fit view.
Open corridor tab=> click new corridor=>new window appears =>FD=> Design and name it Corridor=>and locate the project base line (C/L) and message appears on cursor 'Locate profile reset for active profile (Do right click or clicks) and new corridor lines appears on both sides of C/L.
Now go to Template=> create a new template =>ITL window opens up=> create a new folder name Project2=>go to Templates =>Rural=>undivided 2 lane=> copy template and paste it in the Project 2 folder. Now edit the template to create the existing conditions with 11' lane, 4' shoulder and 2% slope and now delete the end conditions, go to End conditions=> combined=>select cut and fill table 2, mirror it and paste it to the hinge point. Now test the end conditions and save the template.
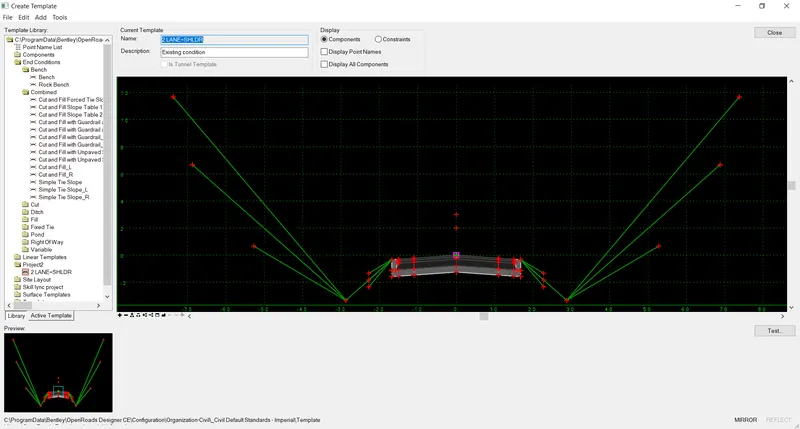
Now click on the 'New Template Drop command=> New window appears=>expand the Template check box in the window=>right click on the file path and select folder Project2=> select 2lanes+Shldr (which created earlier)
Turn off the display for eterrain file and lock the start to '0' and select end chainage as 51+50.00 and hit enter => select the drop interval as 10' and click on the outer corridor lines to accept it.
A template drop appears with new additional graphics and civil handles.
Now hit right click and hold inside the window=> view control=> select 3views (Plan, XS, 3D)=> command window appears for cross section => click OK and select corridor and do a data point=> now the 3D visualization and plan can be seen in different views(3D has been created without end conditions).
In order to view the end conditions=>go to the reference attachment window=>make the eterrain file visible=> make it active from flyout menu=> click process corridor=>select corridor and end conditions are attached to the model.
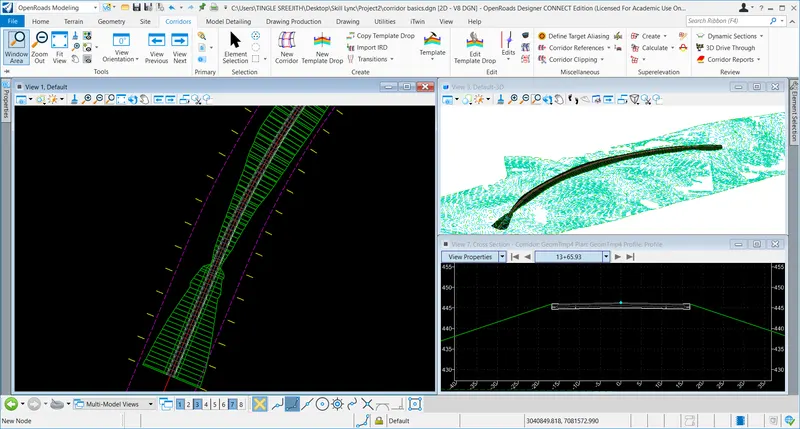
Now the existing conditions has been created as shown above.
In order to create a 12' lane, an additional turn lane and 8' shoulder from the existing road, it is necessary to create point controls. So go ahead and make changes in the roadway plan.dgn. Add an additional turn lane of 12' and draw the lane width 12' on each side using offsets. Also draw the 10' shoulder lane on each side of the pavement using the offset method. Use appropriate FD for shoulder and Edge of pavement.
Now go to corridors=>create => create Template =>ITL file opens up=> Go to the file and insert a point at 6' from the center on both sides (EOP_L1 and EOP R1) and using edit method give horizontal and slope constraints for the two points. Save the changes and close window, come back to corridor basics.dgn. Click on the template and with the Flyout menu, synchronize the changes to the corridor.
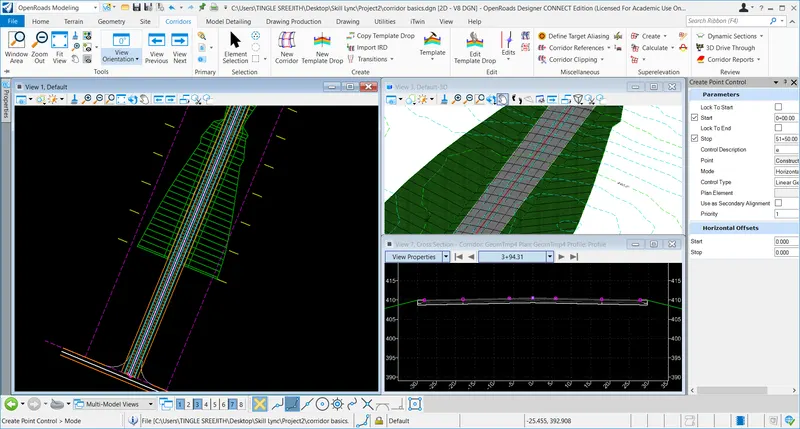
Now attach the Roadway plan 2LANE+SHLDR to the corridor using the interactive method. Go to Edit=>create point controls=>window opens up=>Locate corridor=>Give the start and end points=> First create the point description as CL for centerline=>Locate the point on the corridor=>mode=> both (for CL only) =>locate the point on the template and finally give offsets as '0' for vertical and horizontal. Lastly accept the command and it processes and point control for the CL is visible on the cross-section view.
Do the point control for EOP_L1, EOP_R1, EOP_L, EOP_R, EOS_L and EOS_R with the above-mentioned method. Mode is given as Horizontal for all these points and finally the corridor has been processed with 2Lane+ Turn lane graphics.
Results
Thus, an undivided 2lane +shldr corridor can be converted into an undivided 2 lane+Turn lane +shldr format.