Project 1- Traffic Jam Assistant Feature
Traffic Jam Assistant Feature
Objective:
To develop one specific requirement of Traffic Jam Assistant algorithm which would predominantly feature in the IPC algorithm.Please note that the whole Traffic Jam Assistant is a very huge algorithm & only one small part of the logic is implemented here. Idea is to familiarize with concepts of Model Based Development in MATLAB Environment. The Project must be done keeping in mind the following processes & steps.
- This model must be developed in MATLAB Simulink as per MBD guidelines.
- Code Generation Profile must be in Embedded Coder.
- Simulink Data Dictionary must be created for the model & must be linked to the model.
- Model Advisor Report is mandatory & this will be followed by Code Generation.
Overview:
Traffic Jam Assistant is one of the most common feature in Advanced Driver Assistance System. Traffic Jam Assistant helps the driver arrive more relaxed at their destination, even in dense traffic or in traffic jams. As a partially automated comfort function, the system takes over the longitudinal & lateral guidance of the vehicle. This means that the car can drive off, accelerate & brake automatically, as well as steer the vehicle within certain constraints. The driver has to permanently supervise the system & be ready to take over the complete control of the vehicle at any time.
Traffic Jam Assistant system helps to avoid rear end collisions in dense traffic conditions & traffic jams. In Traffic jams, the vehicle takes over driving off, acceleration, braking and steering within same lane.
Basic Working Principle:
Traffic Jam Assistant is based on the sensors and the functionality of the Adaptive Cruise Control (ACC) with stop & go and Lane Keeping Support (LKS). When ACC ‘Stop & Go’ is turned ON, the Traffic Jam Assistant continuously analyses the speed of the surrounding vehicles and compares it with the own driving speed. If the system detects dense traffic or a traffic jam at speeds less than 60 kmph, the driver can activate the functionality by press of a button. The vehicle will now automatically follow the vehicle in front, takes over driving off, acceleration, braking and steering within same lane.
Information regarding the Traffic Jam Assistant will be available to be displayed to the driver in the Instrument Panel Cluster (IPC). The Algorithm which the students need to implement here in this project is predominantly based on IPC units.
Signals & Calibration Data List:
The following table shows the given signals and calibration data list.
Input Signals:
|
Name of the Signal |
Data Type |
Range |
|
Input_Voltage |
uint8 |
0 - 255 |
|
Input_Switch |
boolean |
0 – 1 |
|
Enable_Display |
uint8 |
0 - 255 |
Output Signal:
|
Name of the Signal |
Data Type |
Range |
|
Output_Display |
uint8 |
0 - 255 |
Calibration Signals:
|
Name of the Signal |
Data Type |
Range |
Initial Value |
|
VOLTAGE_MINIMUM_RANGE |
uint8 |
0 – 255 |
30 |
|
VOLTAGE_MAXIMUM_RANGE |
uint8 |
0 – 255 |
50 |
|
OFF_MODE |
uint8 |
0 – 255 |
2 |
|
ON_MODE |
uint8 |
0 – 255 |
1 |
|
STANDBY_MODE |
uint8 |
0 – 255 |
3 |
|
INTERRUPT_1 |
boolean |
0 – 1 |
1 |
|
INTERRUPT_2 |
boolean |
0 - 1 |
1 |
|
NO_DISPLAY |
uint8 |
0 – 255 |
0 |
Local Signal:
|
Name of the Signal |
Data Type |
Range |
|
Optimum_Voltage |
boolean |
0 - 1 |
First we have to design this data in the Simulink Data Dictionary that is the form of SLDD.
SLDD CREATION:
The SLDD data files are related to the MATLAB/Simulink. Mathworks Simulink is a multidomain simulation and Model-Based Design for dynamic systems. The SLDD file stores some kind of data used by MATLAB. The following procedure shows how to create and add data to the SLDD file.
- To create a SLDD file, Open the simulink model and go to Modeling section.
- Then select Link to Data Dictionary option from Modeling section. Which is shown in the following figure.
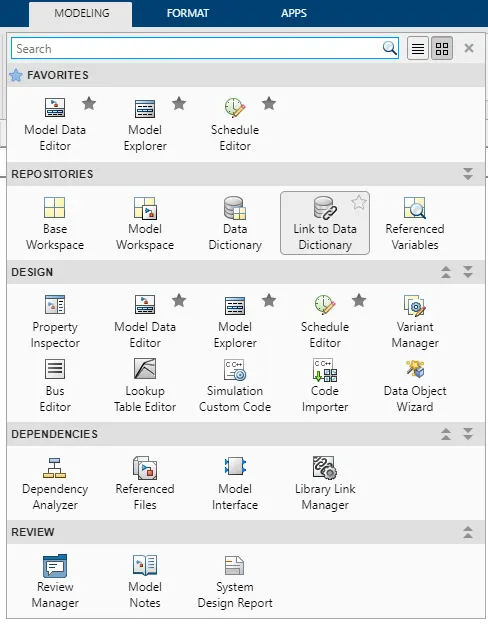
After clicking on the Link to Data Dictionary, the following popup window will appears which ask us about data dictionary. If already created and to open SLDD, click on browse option and then select the respective file then click on ok. Here we are creating the new SLDD file so,
- Click on New and then save with a name. After saving the new SLDD file, uncheck the enable model access to base workspace because as it is new file there is no data to add workspace. If it is already created one then we can click on enable model access to base workspace.
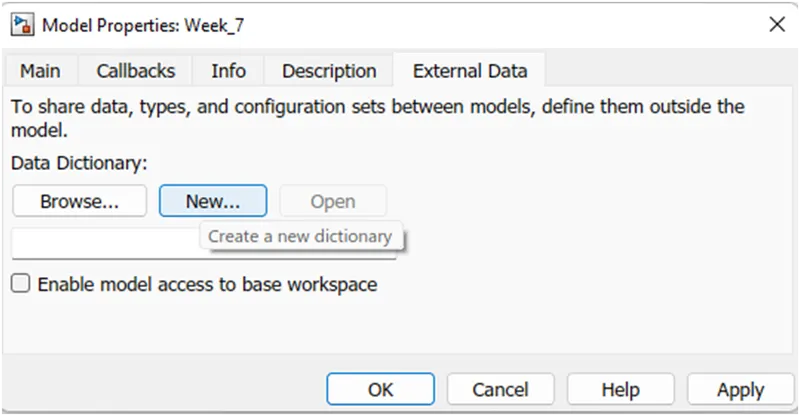
After saving the file the above popup window will closes.
- To open the SLDD file go to the Modeling section and then select Model explorer. Which is showing in the following figure.
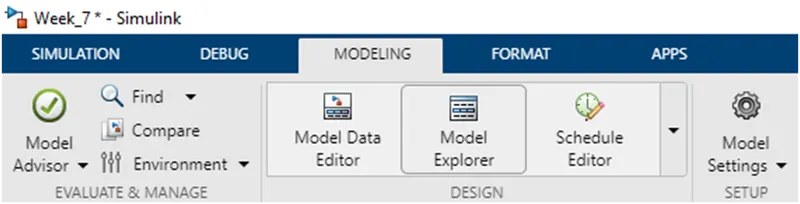
After clicking on the Model explorer, the following window will opens. Where we can see our created SLDD file at left side of the window if we extend that will be able to see Design Data. By clicking on that we can add our given signals or parameters.
- I have given the name as sldd_direction to the SLDD file, if we extend the file design data option appears as shown in the following figure.
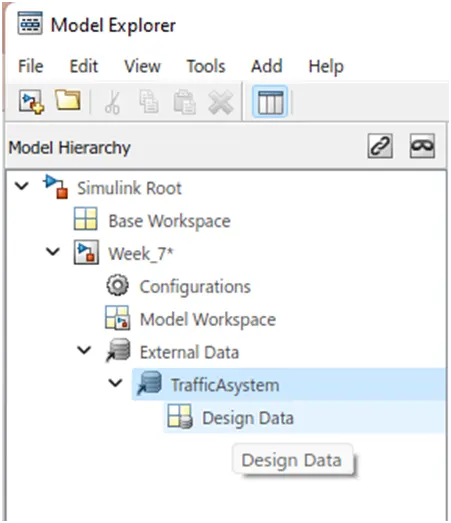
If we see at the top left side of the window, there are few option like file, edit, view, tools, add and help. If we click on add button it will show some options as shown in the following figure.
- From the options we can select our variable according to its natuure.
- If it is a signal then will select simulink signal if it is constant will select simulink parameter like that.
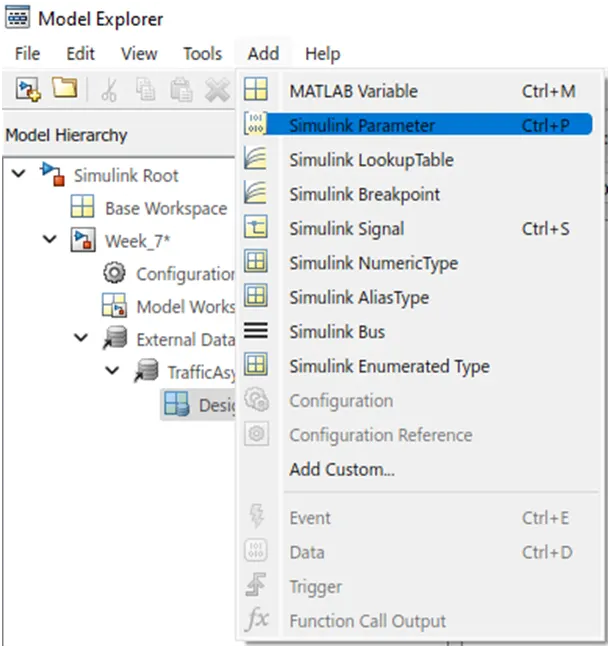
Now enter all signals and parameters according to the given signals and calibration data.
- To avoid the errors just copy paste the given signal/calibration name.
- And fill all the respective details accordingly.
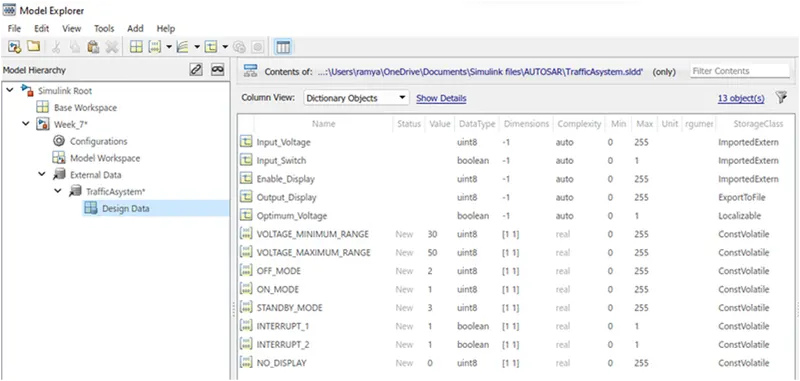
- The given details are: Signal type, Data type, Dimension, Min & Max value, Storage class and Value for calibration parameter.
- The following figure shows the all designed data according to the given table.
This section of the dictionary stores variables that are visible to the Simulink models that reference this dictionary. These variables can be used to parameterize model, block and signal data.
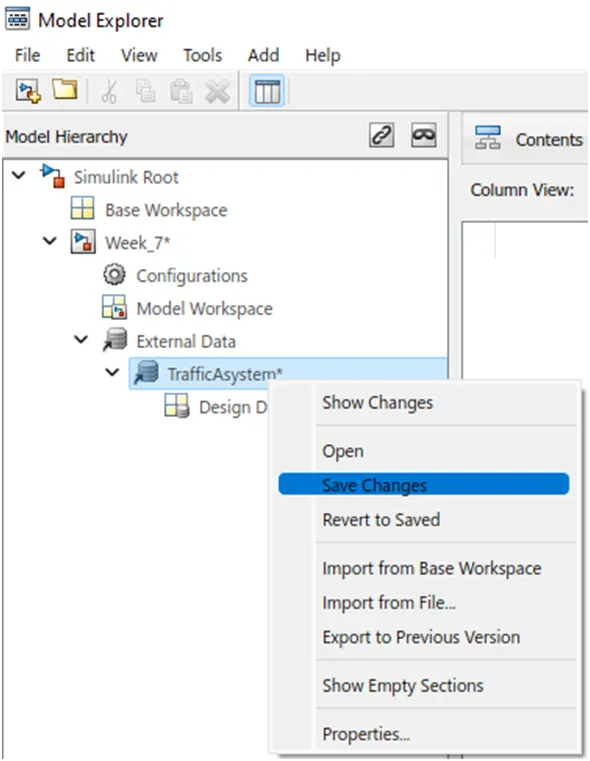
After designing the SLDD file, right click on the SLDD form here it is saved as sldd_direction. Righ click on it and save changes. Which is shown through following figure.
- After saving the data we can close the model explorer window and we can start modelling.
MODELING:
The modeling can be done according to the given requirements. So as we have two given requirements, we are taking a main subsystem first and naming it as Traffic_Jam_Assistant.
- Added a subsystem to the empty simulink model. And named it as Traffic_Jam_Assistant.
- Taken its inports and outports according to the given data.
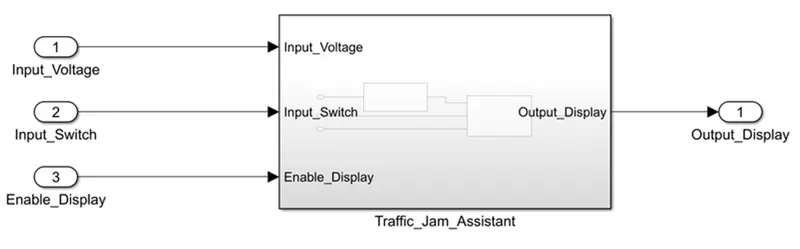
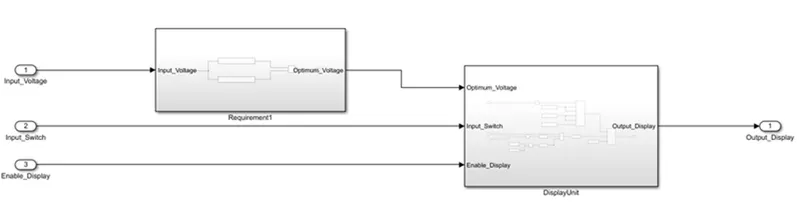
After making a subsystem, double click on it to model the given requirements. The following figure shows the two subsystems under the Traffic_Jam_Assistant subsystem.
- These two subsystems are named as Requirement1 and DisplayUnit.
- The inports and outports are considered according to the given data.
- Now will see how these subsystems are modeled.
Requirement No 1:
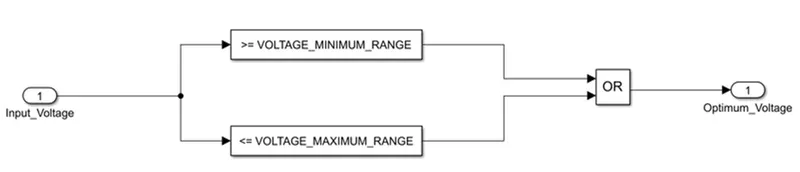
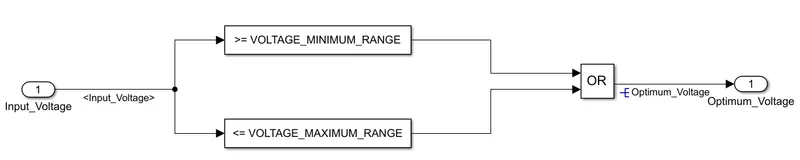
- Input Signal “Input_Voltage” is compared against voltage values “VOLTAGE_MINIMUM_RANGE” & “VOLTAGE_MAXIMUM_RANGE”.
- Incoming input signal “Input_Voltage” must be greater than – equal to “VOLTAGE_MINIMUM_RANGE” and less than – equal to “VOLTAGE_MAXIMUM_RANGE”.
- Output signal from here is “Optimum_Voltage” which will be one of the inputs to the subsystem “DisplayUnit”.
The signal names and calibration values are copy pasted to avoide the errors. Because we have taken exact values in SLDD form so to match them again i have did the same. All the ports and blocks are named according to the requirement. According to the given requirement conditions i have modelled the requirement1 subsystem, which is showing in the following figure. Where the input voltage is compared with the minimum and maximum voltage ranges, here the ouput gives the input to another subsystem callled DisplayUnit,
Requirement No 2 (DisplayUnit Subsystem):
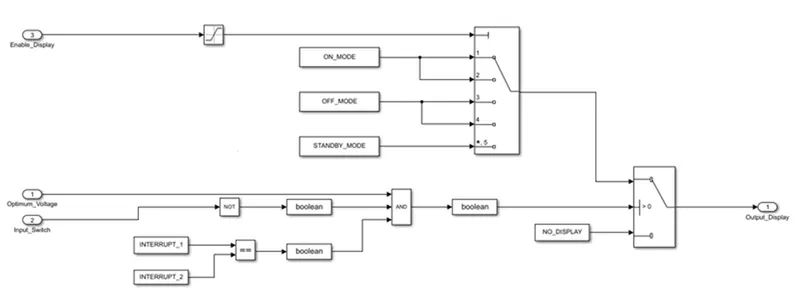
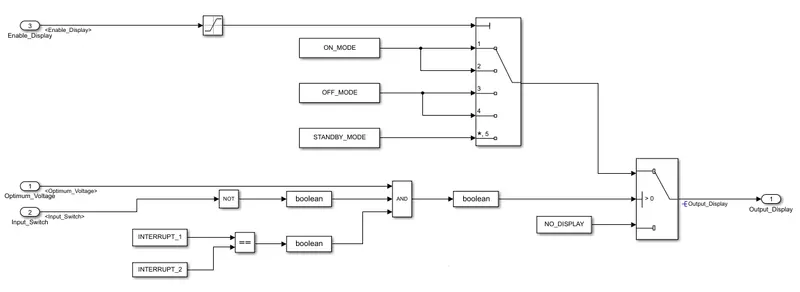
- Input Signals are “Optimum_Voltage”, “Input_Switch”,“Enable_Display”. Signal “Enable_Display” must be saturated between the range 0 – 7. Output signal from the subsystem is “Output_Display”.
- Input Signal “Enable_Display” is compared against pre – defined set of values in a multiport switch. Total data ports in the multiport switch is 5.
- Multiport switch inputs 1 & 2 is connected to calibration signal “ON_MODE”, Multiport switch inputs 3 & 4 is connected to calibration signal “OFF_MODE” while Multiport switch input 5 is connected to calibration signal “STANDBY_MODE”.
- The output from Multiport switch is connected to the first input port of the Switch block. The third input port of the Switch block is connected to the calibration signal “NO_DISPLAY”.
- Meanwhile NOT value of input signal “Input_Switch” is compared in an AND gate against input signal “Optimum_Voltage” and the output from comparing if calibration signals “INTERRUPT_1” & “INTERRUPT_2” are equal. The output of the AND gate is the second input of the switch block.
- The output from the switch block is “Output_Display”.
Here also to avoid the errors i have copy pasted the signal and calibration values given in the table. As per the given dat and conditions the simulink model has been developed, which is shown in the following figure. The previous subsystem outut is given as input to the not gate and then given to AND gate via Boolean block. All the inputs and outputs are named as per the given names.
RESOLVING & PROPAGATING:
By resolving and propagrating the signals we can migrate design attribbutes from existing simulink signal objects into the model by using block parameters and signal properties here in the model explorer we have designed the attributes in SLDD form. To force signal resolution for a signal in a MATLAB Function block, follow these steps:
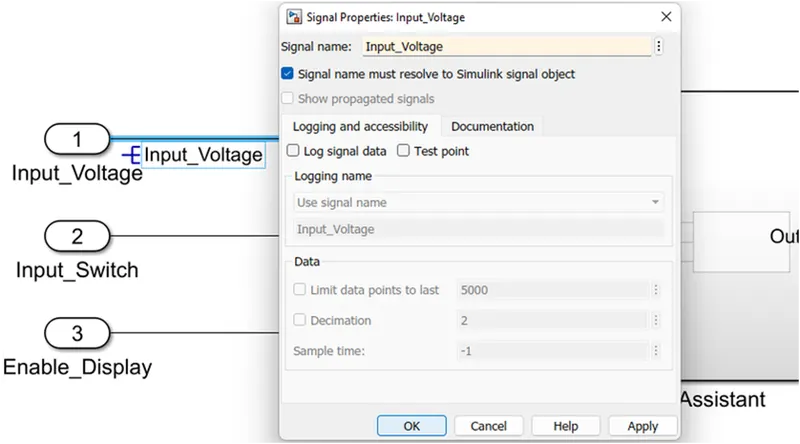
- In the Simulink model, right-click the signal line connected to the respective input or output that you want to resolve and select Properties from the context menu.
- In the Signal Properties dialog, enter a name for the signal that corresponds to the signal object.
The following figures shows the process of signal Resolving. As said right click on signal go to properties then the following procedure should follow. Give exact same as the input or output we have used and click on resolve to simulink object. Then a symbol with name shows at the signal line.
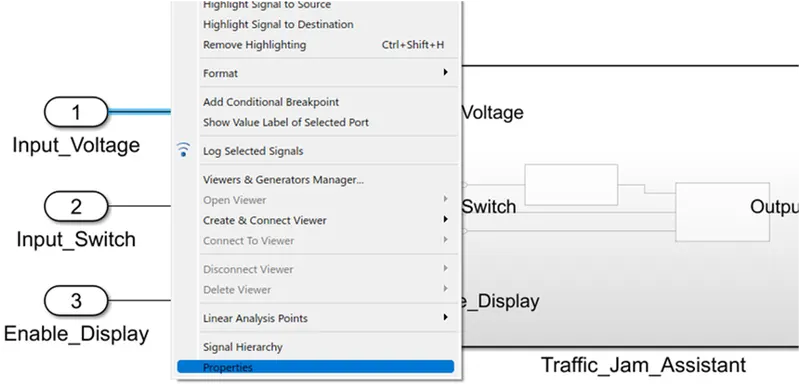
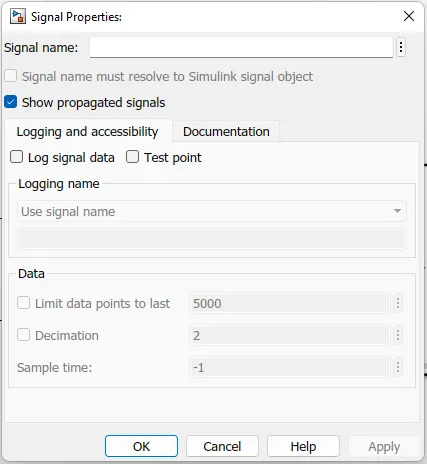
To propagate the signal, right click on it then select properties. And tick the option show propagated signals. Which is shown in the following figure.
or
Double click on signal and type '<>' then click on enter button in the keyboard. Then it will appears as shown below.
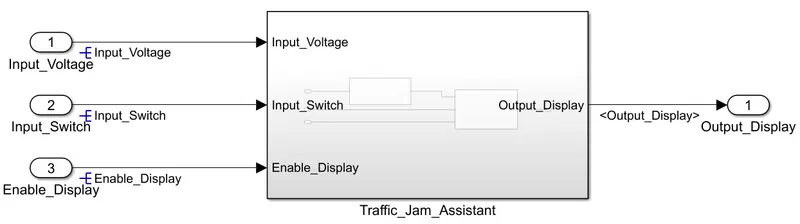
Once the signal is resolved then noo need to resolve again just propagate the signal. After making all siganls resolved and propagated the Vehicle_Direction subsystem is shown as below.
- The two inputs are resolved at input side. The output will be resolved at its intial condition then it will propagate till final output.
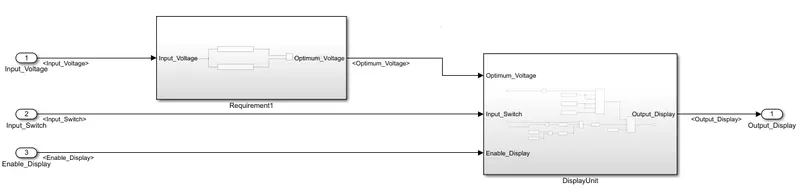
Requirement1 and DisplayUnit subsystems are shown below after resolving and propagation of signals.
- As the inputs are already resolved they are propagated to the subsystems. As outputs are resolved inside subsystem they are propagated to outside of susbsystems.
Requirement1 subsystem Simulink model is shown in the following figure after resolving and propagation of signals.
- Inputs are propagated from the subsystem and output is resolved as it is the intial condition of output of the requirement1 block.
DisplayUnit subsystem Simulink model is shown in the following figure after resolving and propagation of signals.
- Inputs are propagated from the subsystem and output is resolved as it is the intial condition of output of the DisplayUnit.
TAGGING:
To perform Tagging first we have to create a word file with all details reagarding about the model we are creating. Tagging enables us to view the procedure which is used to build the model or to know more details about the designed model. To tag the given requirement blocks the followinng procedure has been followed.
- First we need select the respective heading in the word file. Like in the followinng figure we can see that Requirement1 is a heading in which the procedure to build the model has been given.
- The word file which is created must be saved in the same folder of our simulink model.
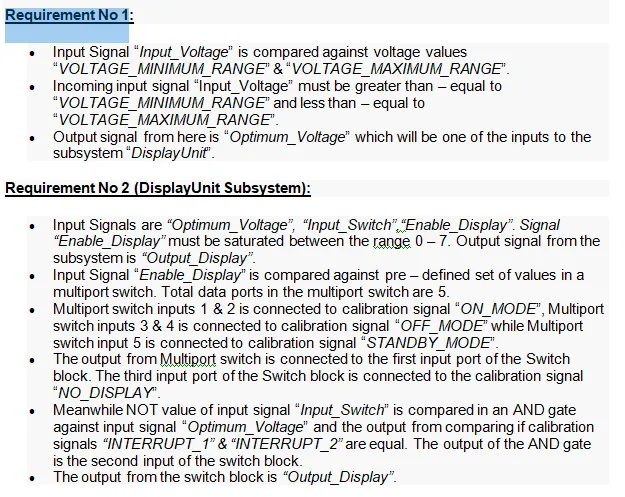
In the above figure it show the selection of word, now to tag this to the subsystem:
- Right click on the respective subsystem, as we have selected a word regarding about requirement1 we are right clicking on 1 subsyetm.
- Go to Requirements option from the context. In requirements select Link to selection in word.
- If we click on that it is automatically tagged to the word in word file.
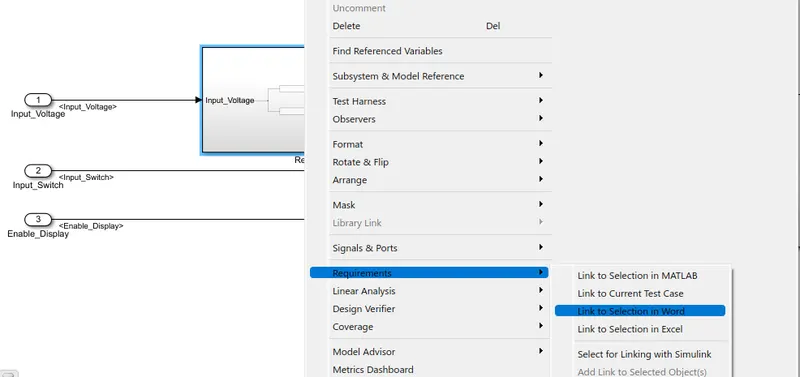
Now will be able to see the tagging. Repeat same procedure like right click on subsystem go to requirements and from the options, the top 1. represents the word which is tagged to the subsystem.
- To know about the subsytemm building or any other details which are written in the word file, click on that 1st option it will take you to the word file requirement1 section.
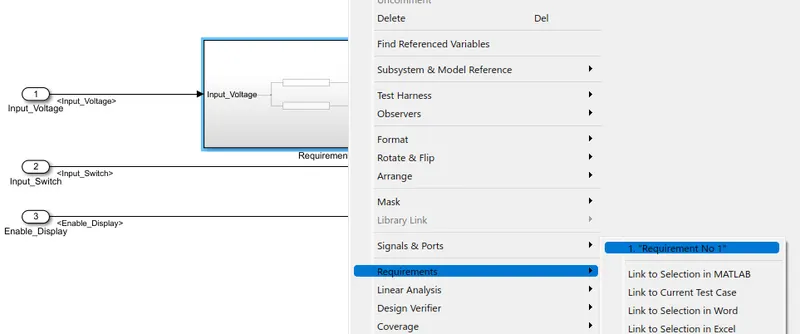
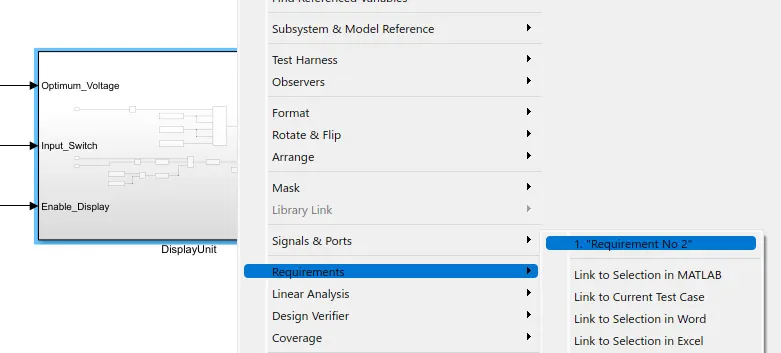
Repeat the same procedure for DisplayUnit subsystem also. Select the relatable heading in the word file and do the same procedure.
- After the proccedure will be able to the Requiremet2 word which is tagged at the top of requirements section.
- Which is shown in the following figure.
SOLVER SETTINGS:
Solver settings are important to simulate the model. To open the solver setings, go to the Modeling section which is at the top of simulink window. And select the Model settings under the modeling section. Which is shown in the following figure.
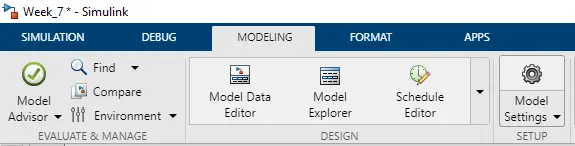
After clicking on model settings the following window will appears. The window presents the configuration of the parameters in our simulink mode.
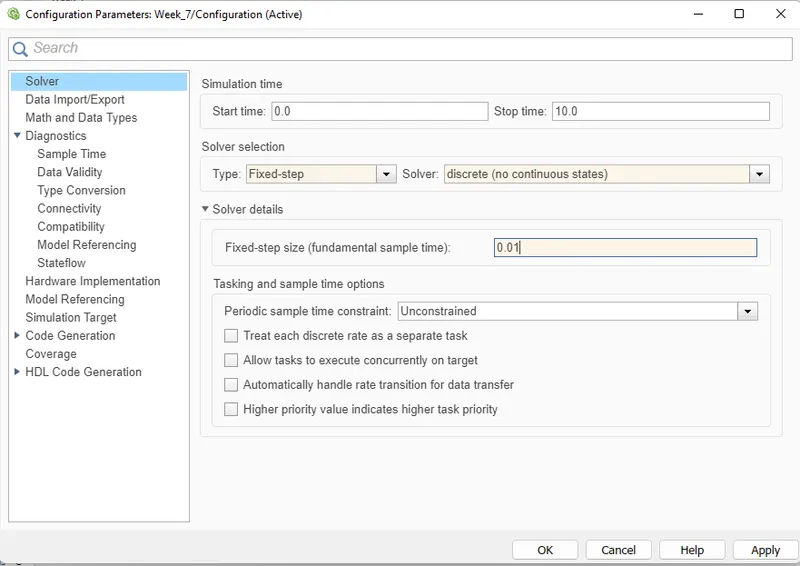
- In the configuration window, click on solver to model the solver parameters.
- Now change the type to Fixed-step, Solver to discrete(no continuous states) and take sample time as 0.01sec. Then click Ok.
- This settings are shown in the following figure.
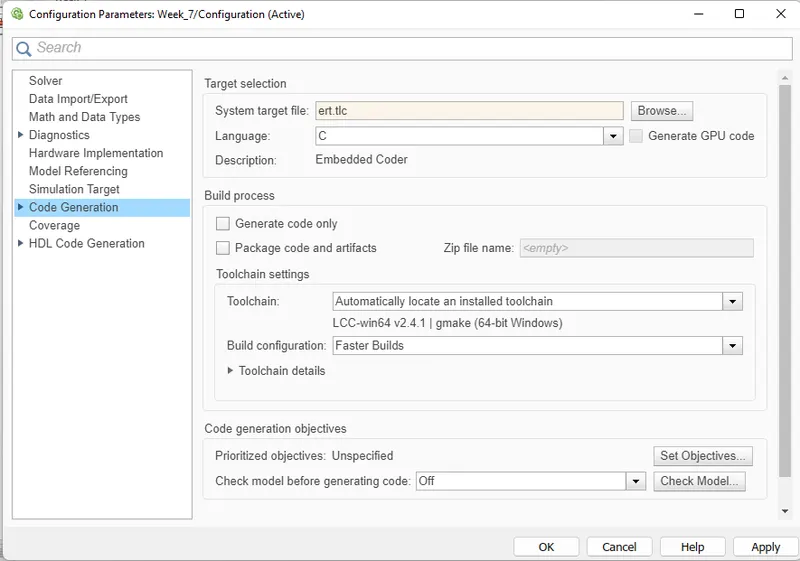
In the same configuration window there another settings to model, which is Code generation. Click on code generation,
- Choose the system targer file as ert.tlc (Embedded coder) by clicking on the browse option.
- Then click on Ok and close the window.
MAB GUIDEINES:
The MAB (MathWorks Advisory Board) Guidelines are a set of modeling guidelines developed by an independent industry working group for the usage of MATLAB, Simulink, Stateflow and Embedded Coder. The guidelines are the culmination of years of engineering expertise and best practices for developing, maintaining and documenting control algorithm models used in the development of production software.
- To perform the MAB guidelines test on our simulink model, go to modeling section and select Model Advisor which is at the top left corner of the window.
- You can use the Model Advisor to verify compliance of your model with the MathWorks Advisory Board (MAB) guidelines.
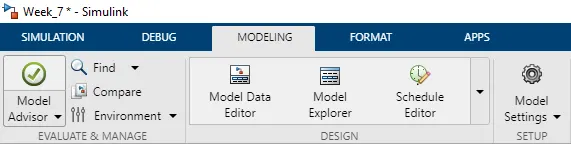
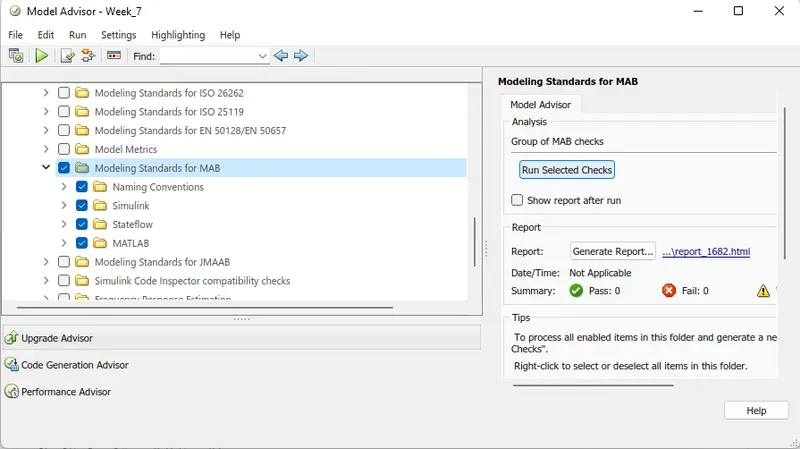
By clicking on the Model Advisor, a window will ask us to confirmation if we click on Ok then it will opens a window which is shown in the following figure.
- In the Model advisor there are number of guidelines, among them will select only Modeling Standards fro MAB.
- If we expand the section will be able to see which are tested under the MAB guidelins. If we again expand there will be many sub sections in each section.
- After selecting MAB guidelines, click on Run Selected checks.
- Then it asks again for confirmation, click on continue. Then the testing will begins. It takes time to perform the guidelines test.
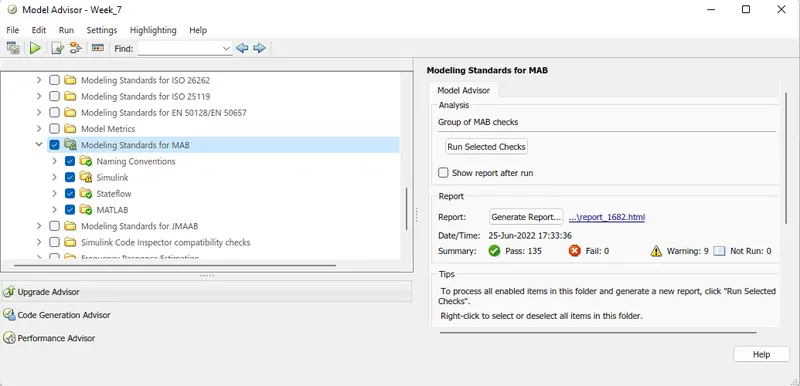
After the MAB guidelined test completion, it should be mandatory that 0 fail conditions. If any fail conditions are there rectify them and again make them to 0. The warnings are permittable to some limit.
- After getting 0 fails click on Generate report. This report will gives all data about the smulink model we have created.
After clicking Generate report in the above window, a popup window will appears as shown in the followinng figure.
- It shows the directory, at where the report is going to save. It will save in the same folder of our simulink model.
- Give a name to the report. Then click on OK.
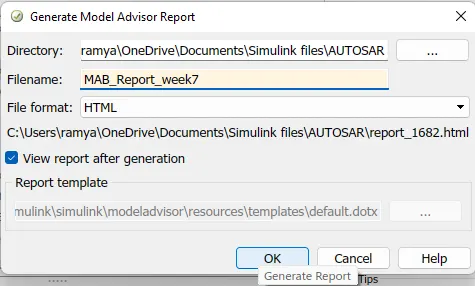
After clicking on Ok. It will save in the folder and opens as shown in the followig diagram.
- The report shows all the checks performed under MAB guidelines.
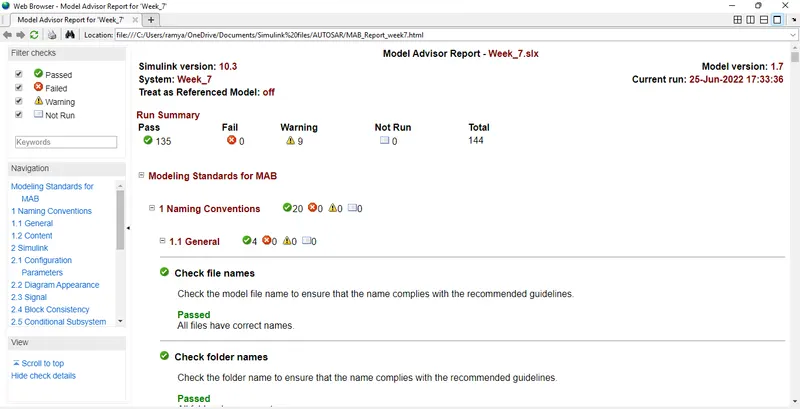
C CODING:
Now we are converting all our model in terms of C Code. To create C code of our simulink model, follow the procedure as explained below.
- Go to the Apps section which is at top of the window.
- Under Apps section, click on Embedder coder which is shown in the following figure.

After clicking on EMbedded codel option, aother window will creates as C CODE, which is shown in the following figure.
- Go to the C Code section, and click on Build option to build the code.
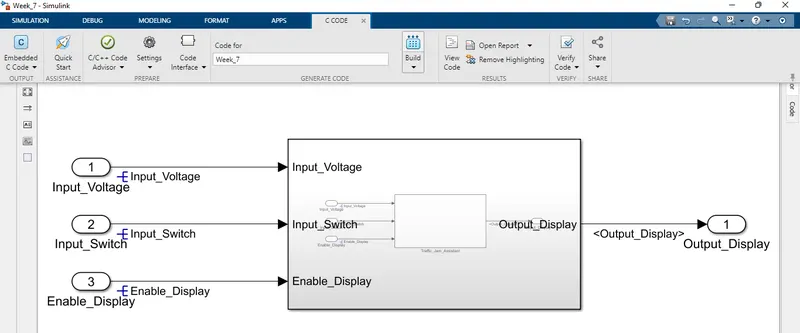
After clicking on Build it will generate the C Code of our simulink as shown inn the following figure.
- The C code shows all the data of our simulink model. The C code file is also saved in the same folder of our simulink model.
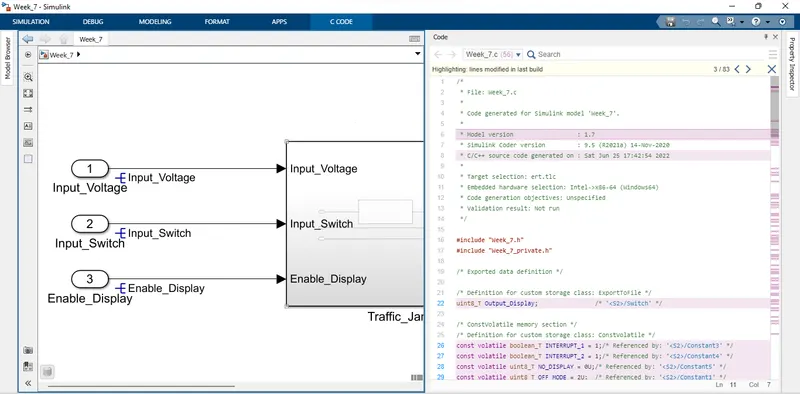
Generated C CODE:
/*
 * File: Week_7.c
 *
 * Code generated for Simulink model 'Week_7'.
 *
 * Model version                  : 1.7
 * Simulink Coder version         : 9.5 (R2021a) 14-Nov-2020
 * C/C++ source code generated on : Sat Jun 25 17:42:54 2022
 *
 * Target selection: ert.tlc
 * Embedded hardware selection: Intel->x86-64 (Windows64)
 * Code generation objectives: Unspecified
 * Validation result: Not run
 */

#include "Week_7.h"
#include "Week_7_private.h"

/* Exported data definition */

/* Definition for custom storage class: ExportToFile */
uint8_T Output_Display;                /* '/Switch' */

/* ConstVolatile memory section */
/* Definition for custom storage class: ConstVolatile */
const volatile boolean_T INTERRUPT_1 = 1;/* Referenced by: '/Constant3' */
const volatile boolean_T INTERRUPT_2 = 1;/* Referenced by: '/Constant4' */
const volatile uint8_T NO_DISPLAY = 0U;/* Referenced by: '/Constant5' */
const volatile uint8_T OFF_MODE = 2U;  /* Referenced by: '/Constant1' */
const volatile uint8_T ON_MODE = 1U;   /* Referenced by: '/Constant' */
const volatile uint8_T STANDBY_MODE = 3U;/* Referenced by: '/Constant2' */
const volatile uint8_T VOLTAGE_MAXIMUM_RANGE = 50U;/* Referenced by: '/Constant' */
const volatile uint8_T VOLTAGE_MINIMUM_RANGE = 30U;/* Referenced by: '/Constant' */

/* Real-time model */
static RT_MODEL_Week_7_T Week_7_M_;
RT_MODEL_Week_7_T *const Week_7_M = &Week_7_M_;

/* Model step function */
void Week_7_step(void)
{
  /* local block i/o variables */
  boolean_T Optimum_Voltage;
  uint8_T tmp;

  /* Logic: '/Logical Operator' incorporates:
   *  Constant: '/Constant'
   *  Constant: '/Constant'
   *  Inport: '/Input_Voltage'
   *  RelationalOperator: '/Compare'
   *  RelationalOperator: '/Compare'
   */
  Optimum_Voltage = ((Input_Voltage >= VOLTAGE_MINIMUM_RANGE) || (Input_Voltage <=
    VOLTAGE_MAXIMUM_RANGE));

  /* Switch: '/Switch' incorporates:
   *  Constant: '/Constant3'
   *  Constant: '/Constant4'
   *  Inport: '/Input_Switch'
   *  Logic: '/Logical Operator'
   *  Logic: '/Logical Operator1'
   *  RelationalOperator: '/Relational Operator'
   */
  if (Optimum_Voltage && (!Input_Switch) && (INTERRUPT_1 == INTERRUPT_2)) {
    /* Saturate: '/Saturation' incorporates:
     *  Inport: '/Enable_Display'
     */
    if (Enable_Display < 7) {
      tmp = Enable_Display;
    } else {
      tmp = 7U;
    }

    /* End of Saturate: '/Saturation' */

    /* MultiPortSwitch: '/Multiport Switch' */
    switch (tmp) {
     case 0:
      /* Switch: '/Switch' incorporates:
       *  Constant: '/Constant'
       */
      Output_Display = ON_MODE;
      break;

     case 1:
      /* Switch: '/Switch' incorporates:
       *  Constant: '/Constant'
       */
      Output_Display = ON_MODE;
      break;

     case 2:
      /* Switch: '/Switch' incorporates:
       *  Constant: '/Constant1'
       */
      Output_Display = OFF_MODE;
      break;

     case 3:
      /* Switch: '/Switch' incorporates:
       *  Constant: '/Constant1'
       */
      Output_Display = OFF_MODE;
      break;

     default:
      /* Switch: '/Switch' incorporates:
       *  Constant: '/Constant2'
       */
      Output_Display = STANDBY_MODE;
      break;
    }

    /* End of MultiPortSwitch: '/Multiport Switch' */
  } else {
    /* Switch: '/Switch' incorporates:
     *  Constant: '/Constant5'
     */
    Output_Display = NO_DISPLAY;
  }

  /* End of Switch: '/Switch' */
}

/* Model initialize function */
void Week_7_initialize(void)
{
  /* (no initialization code required) */
}

/* Model terminate function */
void Week_7_terminate(void)
{
  /* (no terminate code required) */
}

/*
 * File trailer for generated code.
 *
 * [EOF]
 */
If you closes the C code window then you can click on View code option which is showing in the following figure. If you click on that the code will displays.

CONCLUSION:
The Traffic Jam Assistant is modeled as per the given requirements, all the signals and calibrated values are defined in the Simulink Data Dictionary(SLDD). All input and output signals are resolved and propagated. Model Advisory check is done with MAB guidelines and there are 0 fail conditions. Since there are no errors in Model Advisory report C Code has been generated sucessfully by using Embedded coder.