Project 1 (Mini Project on Vehicle Direction Detection
Project Overview:
Identifying the direction of the vehicle is one of the important & diverse features in Autonomous driving & Advanced Driver Assistance Features. This particular sub-feature of identifying the direction of the vehicle is basically identifying the direction the vehicle is taking based on the camera input.
The camera reads the road signs & stores into its memory unique values for a left turn, right turn & straight drive. Depending on the direction it is taking, the final indication is given to the driver – as an indication if he is driving in the recommended direction or not.
Vehicle Direction Determination can also be coupled alongside features like GPS systems to identify whether the vehicle is reaching its destination in an optimized manner. This sub-feature can also be used along with Lane Detection, Highway Warning, Ramp Entry / Exit in Wrong Way Detection, etc.
The objective of the Mini Project:
- Development of MATLAB Simulink model as per requirement.
- Tag the requirements to the Simulink model; tagging requirements 1 & requirement 2 to their corresponding subsystems is fine.
- MBD-compliant changes, Data Dictionary creation & code generation is added advantage, and that is not the scope of this project.
- If choosing code generation, the Storage class for Input signals: ImportedExtern; the Storage class for Output signal: Is exported to File; the Storage class for local signals: is localizable; the Storage class for calibration signals: is Const.
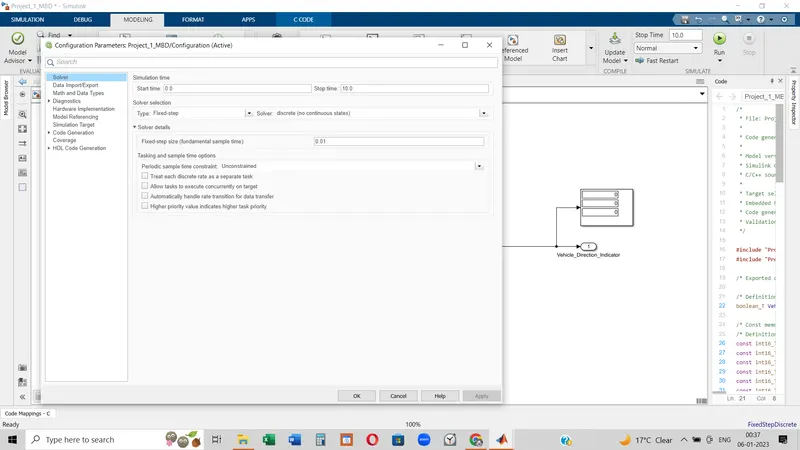
- Choose the sample time for all signals as 0.01s.
Requirement - 1:
- Steering wheel input as yaw rate (Signal name: SteeringWheel_YawDegreeInput) is the input for this system.
- This is compared against 3 angular values, one each for left turn, right turn & straight drive (Calibration Values: Right_Turn_AngularLimit, Left_Turn_AngularLimit, Straight_Drive_Steering_Angle) to say which specific direction the steering wheel is turning towards.
- Use switch blocks to compare & develop this requirement. Keep this requirement in a subsystem & output of this requirement is a local signal (Signal Name: Vehicle_Turn_Status).
Requirement – 2:
- Keep this requirement as a separate subsystem. Inputs to this requirement are local signal from requirement 1 (Signal Name: Vehicle_Turn_Status) & an input signal from camera (Signal Name: CameraInput_RoadSign), which confirms the occurrence of a road sign.
- Signal Vehicle_Turn_Status is compared against calibration values (Calibration Values: RightTurn_RoadSign, LeftTurn_RoadSign, Straight_RoadSign), if each of them is found equal, then each of the three corresponding output is compared against the camera input signal,
- Using a logical operator block, only one among them is finally given as output signal (Signal Name: Vehicle_Direction_Indicator).
Steps followed to develop the model:
- We have to make the data dictionary(or sldd file) for feeding the values. So to make the data dictionary following process should be maintained:
Modelling tab --> Model Settings --> Model Properties --> (pop up window) --> External data --> New --> choose the name and put all the data which will be conducted during operation.
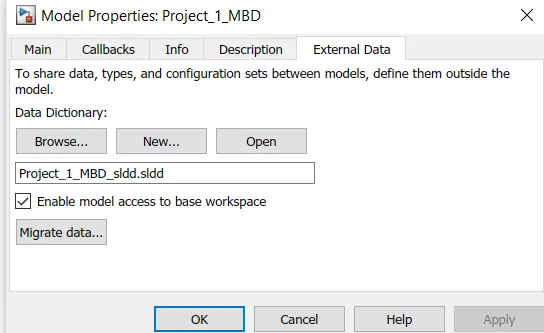 (in left) This is the pop-up window.
 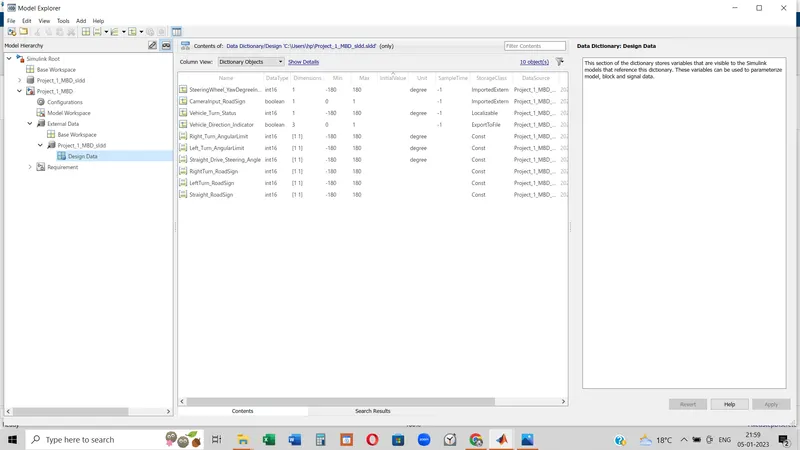 (in left) This is the sldd file.
- After creating the sldd file, the file has been saved along with the sldd file.
- Requirement_1:
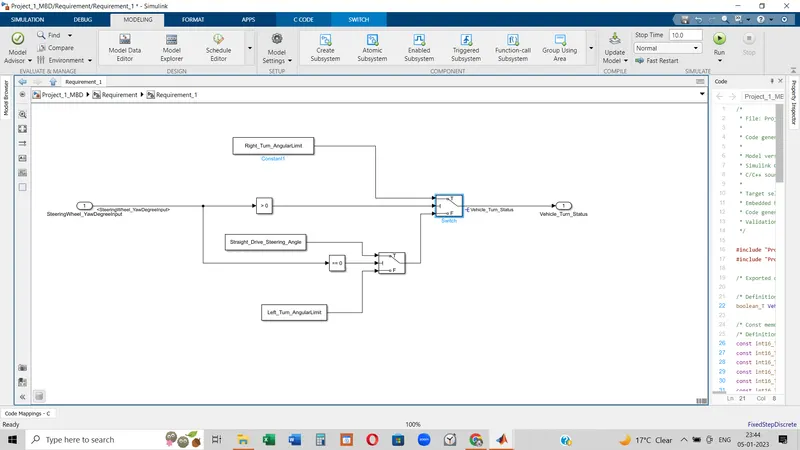
Three constant blocks have been taken left turn angular limit, straight drive, and right turn angular limit. By Switching those values are compared and the true value is conducted.
Here if the input value is greater than 0 then the vehicle will turn right and if the value is exactly the 0 or less than 0 then the first for the first switch that will be the false condition. So operation for equals to 0 and less than 0 value the second switch has been taken where if the value is 0 then the vehicle will not turn any direction and if less than 0 then the vehicle will move in the left direction.
This requirement 1 is from the steering perspective.
- Requirement_2:
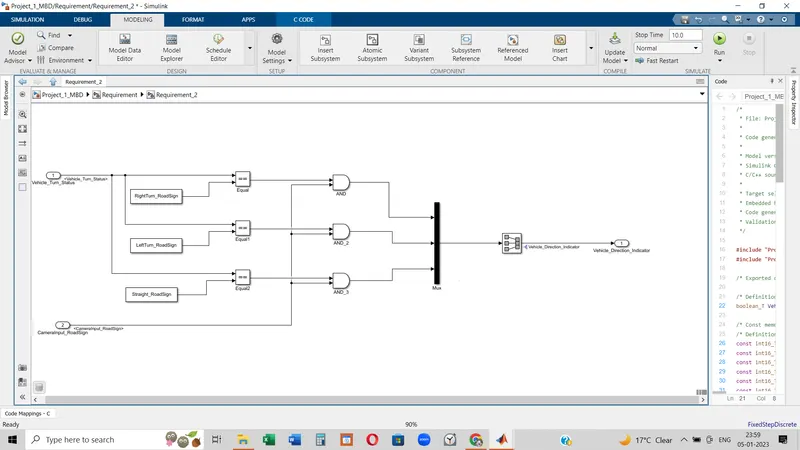
Here the two inputs are Vehicle turn status(output of Requirement_1) and Camera input road sign. So here the inputs from requirement_1 are compared to Road_sign values. If any of these is equal then the output will go to the AND block. Here the selection of AND block is for conducting only the true value. Because AND logical operator only shows 1 when its inputs are 1. Next through Mux block the output is fed to the signal conversion block as the data type of the Vehicle_Direction_Indicator is set to boolean.
Requirement_2 is the comparison between the Camera signal and Vehicle turn status.
- Next, the two separate subsystems is clubbed into one subsystem named Requirement, and the scope has been connected for the result.
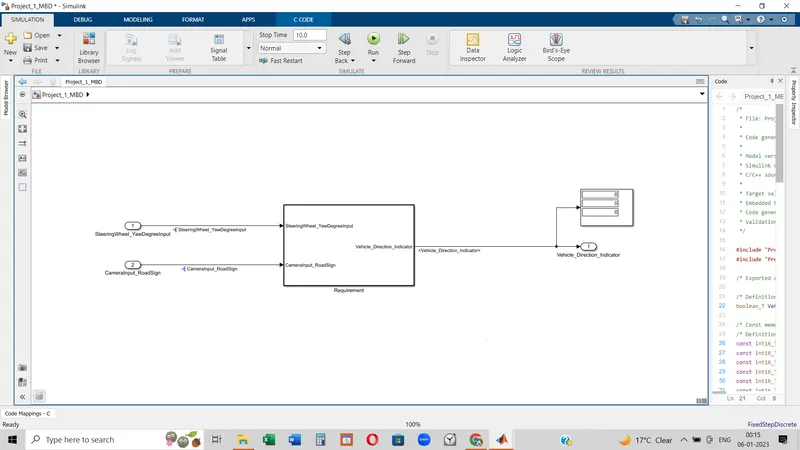
- Resolving and Propagation:
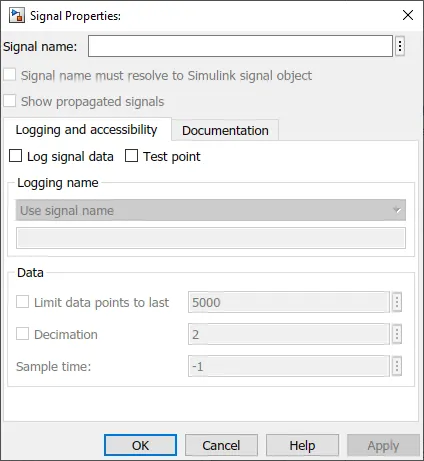 Right-click on the signal will through a pop-up where signal properties will come up. In the signal properties option, a window(on the left side) will be opened. We need to put the name of the input block at the source of the input signal and check the first box. Then the signal will be resolved. To propagate, we need to choose signals which are coming out from different blocks and have to check the box of 'Show propagated signal'.
- Run the model.
- Model Advisor:
To choose the model advisor option first go to the modeling tab. On the left corner of the window, the model advisor option will appear.
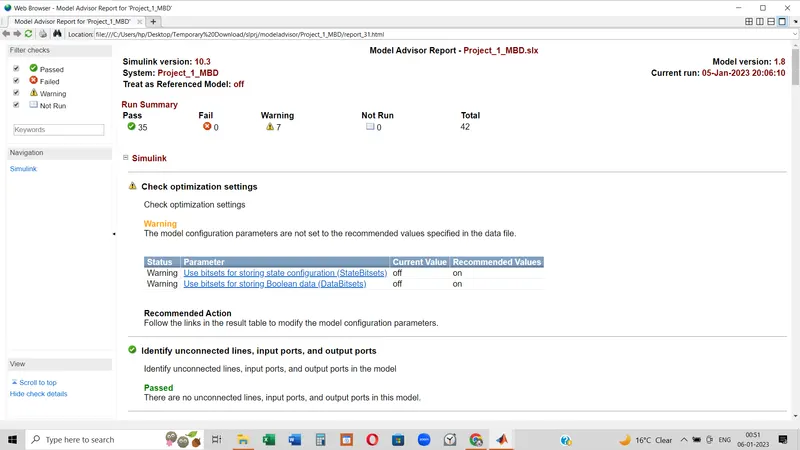
'By task' is concerned with the different guidelines and 'By-product' is associated with the checking requirement. Following are the different screenshots of choosing options from by product and by task.
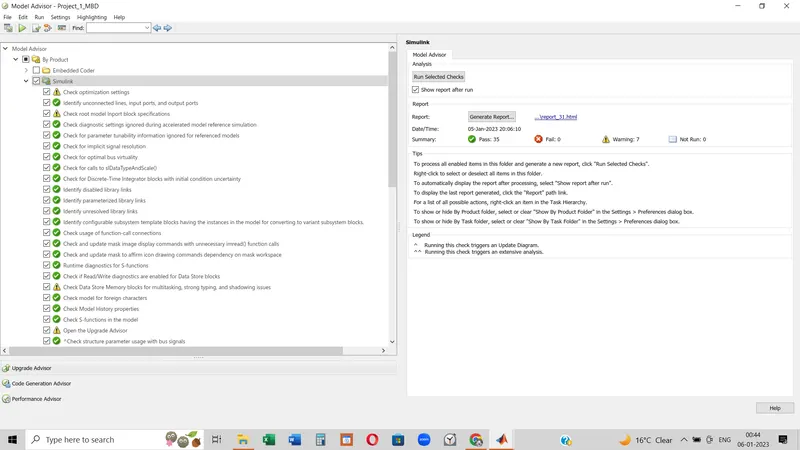
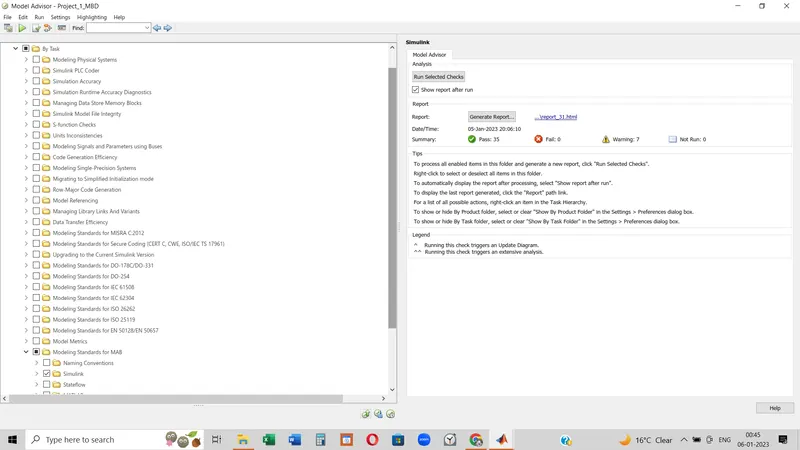
- Model advisor report:
- Code Generation:
To generate code without SIL testing, first we need to correct the Solver Settings. The screenshot of the solver configuration has been attached.
and in the Code generation section we should choose the system target fire as ert.tlc.
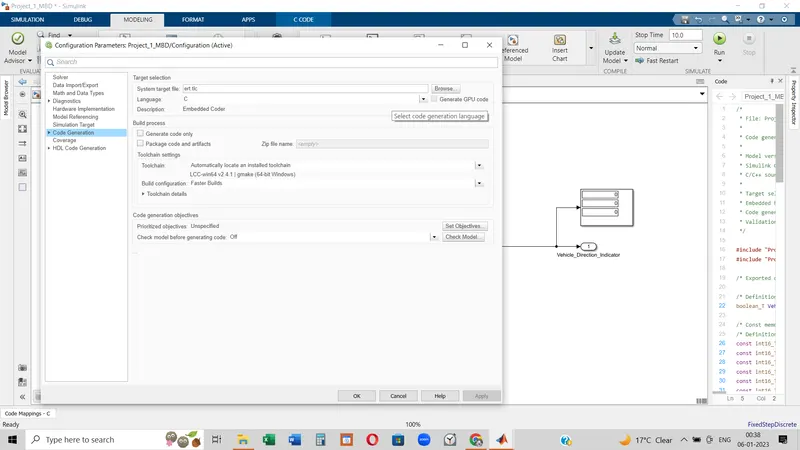
Next from the 'Build' option we can generate the code. The generated code file has been attached.
- Generated Code:
/*
 * File: Project_1_MBD.c
 *
 * Code generated for Simulink model 'Project_1_MBD'.
 *
 * Model version                  : 1.9
 * Simulink Coder version         : 9.5 (R2021a) 14-Nov-2020
 * C/C++ source code generated on : Thu Jan  5 21:11:35 2023
 *
 * Target selection: ert.tlc
 * Embedded hardware selection: Intel->x86-64 (Windows64)
 * Code generation objectives: Unspecified
 * Validation result: Not run
 */

#include "Project_1_MBD.h"
#include "Project_1_MBD_private.h"

/* Exported data definition */

/* Definition for custom storage class: ExportToFile */
boolean_T Vehicle_Direction_Indicator[3];/* '/Signal Conversion' */

/* Const memory section */
/* Definition for custom storage class: Const */
const int16_T LeftTurn_RoadSign = 120; /* Referenced by: '/Constant1' */
const int16_T Left_Turn_AngularLimit = 120;/* Referenced by: '/Constant' */
const int16_T RightTurn_RoadSign = 30; /* Referenced by: '/Constant' */
const int16_T Right_Turn_AngularLimit = 30;/* Referenced by: '/Constant1' */
const int16_T Straight_Drive_Steering_Angle = 0;/* Referenced by: '/Constant2' */
const int16_T Straight_RoadSign = 0;   /* Referenced by: '/Constant2' */

/* Real-time model */
static RT_MODEL_Project_1_MBD_T Project_1_MBD_M_;
RT_MODEL_Project_1_MBD_T *const Project_1_MBD_M = &Project_1_MBD_M_;

/* Model step function */
void Project_1_MBD_step(void)
{
  /* local block i/o variables */
  int16_T Vehicle_Turn_Status;

  /* Outputs for Atomic SubSystem: '/Requirement' */
  /* Switch: '/Switch' incorporates:
   *  Constant: '/Constant'
   *  Constant: '/Constant'
   *  Inport: '/SteeringWheel_YawDegreeInput'
   *  RelationalOperator: '/Compare'
   *  RelationalOperator: '/Compare'
   *  Switch: '/Switch1'
   */
  if (SteeringWheel_YawDegreeInput > 0) {
    /* Switch: '/Switch' incorporates:
     *  Constant: '/Constant'
     */
    Vehicle_Turn_Status = Left_Turn_AngularLimit;
  } else if (SteeringWheel_YawDegreeInput == 0) {
    /* Switch: '/Switch1' incorporates:
     *  Constant: '/Constant2'
     *  Switch: '/Switch'
     */
    Vehicle_Turn_Status = Straight_Drive_Steering_Angle;
  } else {
    /* Switch: '/Switch' incorporates:
     *  Constant: '/Constant1'
     *  Switch: '/Switch1'
     */
    Vehicle_Turn_Status = Right_Turn_AngularLimit;
  }

  /* End of Switch: '/Switch' */

  /* SignalConversion: '/Signal Conversion' incorporates:
   *  Constant: '/Constant'
   *  Constant: '/Constant1'
   *  Constant: '/Constant2'
   *  Inport: '/CameraInput_RoadSign'
   *  Logic: '/AND'
   *  Logic: '/AND1'
   *  Logic: '/AND2'
   *  RelationalOperator: '/Equal'
   *  RelationalOperator: '/Equal1'
   *  RelationalOperator: '/Equal2'
   */
  Vehicle_Direction_Indicator[0] = ((Vehicle_Turn_Status == RightTurn_RoadSign) &&
    CameraInput_RoadSign);
  Vehicle_Direction_Indicator[1] = ((Vehicle_Turn_Status == LeftTurn_RoadSign) &&
    CameraInput_RoadSign);
  Vehicle_Direction_Indicator[2] = ((Vehicle_Turn_Status == Straight_RoadSign) &&
    CameraInput_RoadSign);

  /* End of Outputs for SubSystem: '/Requirement' */
}

/* Model initialize function */
void Project_1_MBD_initialize(void)
{
  /* (no initialization code required) */
}

/* Model terminate function */
void Project_1_MBD_terminate(void)
{
  /* (no terminate code required) */
}

/*
 * File trailer for generated code.
 *
 * [EOF]
 */
- Result:
So here I have come across the conclusion part. By changing the input values the result will be coordinated accordingly. So from the SLDD file, we can change the input values to verify and the result will appear on the scope block. As per the result, the vehicle will turn in a specific direction. All the result files for a single input value including the model orientation have been attached in form of a code generation report file. The model is as per the MAAB guideline and the proper test report of the Model advisor has also been attached.
The attached files are:
- Simulink Model file
- SLDD file
- Model Advisor Report
- Generated Code file in ZIP format.