Project 1 (Mini Project on Vehicle Direction Detection
AIM :
To create a Mini Project on Vehicle Direction Determination with given Requirements To Perform Code Generation, MIL & SIL Test Model Advisor Report and also creating an SLDD file.
OBJECTIVE :
- Development of MATLAB Simulink model as per requirement.
- Tagging the requirements to the simulink model; tagging requirement 1 & requirement 2 to their corresponding subsystems.
- MBD compliant changes, Data Dictionary creation & code generation is added advantage, and that is not scope of this project.
- If choosing code generation, Storage class for Input signals: ImportedExtern; Storage class for Output signal: Export to File; Storage class for local signals: localizable; Storage class for calibration signals: Const.
- Choose sample time for all signals as 0.01s
OVERVIEW :
- Identifying the direction of the vehicle is one of the important & diverse features in Autonomous driving & Advanced Driver Assistance Features. This particular sub-feature of identifying the direction of vehicle is basically identifying the direction the vehicle is taking based on the camera input.
- Camera reads the road signs & stores into its memory with unique values for left turn, right turn & straight drive. Depending on the direction it is taking, final indication is given to the driver – as an indication if he is driving in the recommended direction or not.
- Vehicle Direction Determination can also be coupled along - side features like GPS systems to identify whether the vehicle is reaching its destination in an optimized manner. This sub feature can also be used along with Lane Detection, Highway Warning, Ramp Entry / Exit in Wrong Way Detection etc.
CALIBRATION DATA LIST :
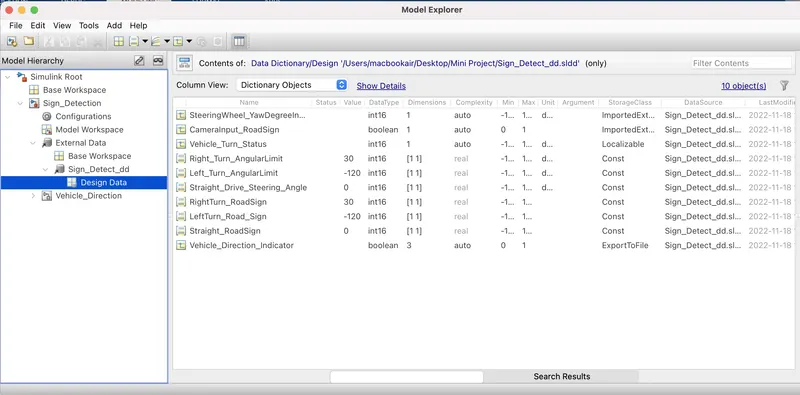
The following table shows the given signals and calibration data list.
|
Signal / Calibration Name |
Signal Type |
Data Type |
Dimension |
Min |
Max |
Initial Value |
Units |
|
SteeringWheel_YawDegreeInput |
Input |
Int16 |
1 |
-180 |
180 |
- |
Deg |
|
CameraInput_RoadSign |
Input |
Boolean |
1 |
0 |
1 |
- |
- |
|
Vehicle_Turn_Status |
Local |
Int16 |
1 |
-180 |
180 |
- |
Deg |
|
Right_Turn_AngularLimit |
Calibration |
Int16 |
[1 1] |
-180 |
180 |
30 |
Deg |
|
Left_Turn_AngularLimit |
Calibration |
Int16 |
[1 1] |
-180 |
180 |
-120 |
Deg |
|
Straight_Drive_Steering_Angle |
Calibration |
Int16 |
[1 1] |
-180 |
180 |
0 |
Deg |
|
RightTurn_RoadSign |
Calibration |
Int16 |
[1 1] |
-180 |
180 |
30 |
|
|
LeftTurn_RoadSign |
Calibration |
Int16 |
[1 1] |
-180 |
180 |
-120 |
|
|
Straight_RoadSign |
Calibration |
Int16 |
[1 1] |
-180 |
180 |
0 |
|
|
Vehicle_Direction_Indicator |
Output |
Boolean |
1 |
0 |
1 |
- |
- |
First we have to design this data in the Simulink Data Dictionary that is the form of SLDD.
SLDD CREATION :
The SLDD data files are related to the MATLAB/Simulink. Mathworks Simulink is a multidomain simulation and Model-Based Design for dynamic systems. The SLDD file stores some kind of data used by MATLAB. The following procedure shows how to create and add data to the SLDD file.
- To create a SLDD file, Open the simulink model and go to Modeling section.
- Then select Link to Data Dictionary option from Modeling section. Which is shown in the following figure.
MODELING :
The modeling can be done according to the given requirements. So as we have two given requirements, we are taking a main subsystem first and naming it as Vehicle_Direction.
- Added a subsystem to the empty simulink model. And named it as Vehicle_Direction.
- Taken its inports and outports according to the given data.
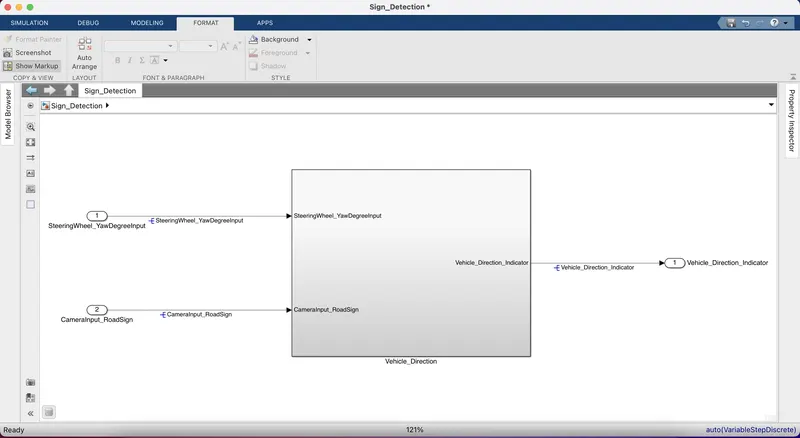
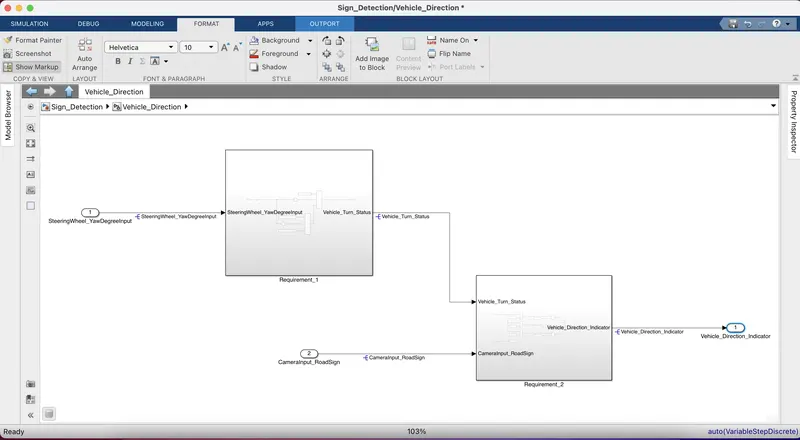
After making a subsystem, double click on it to model the given requirements. The following figure shows the two subsystems under the Vehicle_Direction subsystem.
- These two subsystems are named as Requirement1 and Requirement2.
- The inports and outports are considered according to the given data.
- Now will see how these subsystems are modeled.
Requirement - 1:
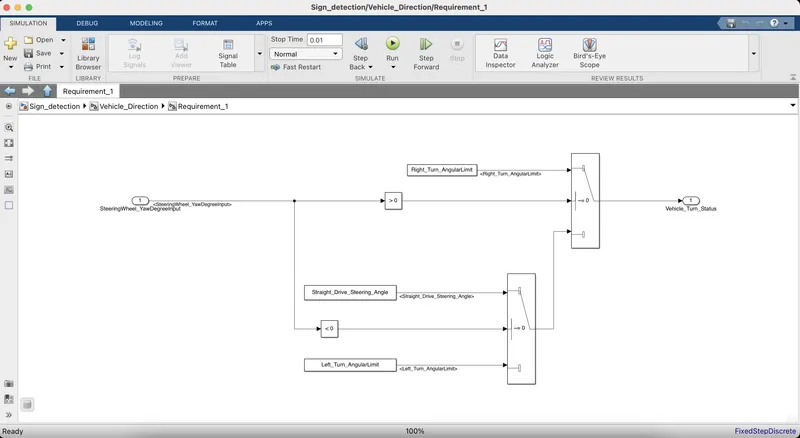
- Steering wheel input as yaw rate (Signal name: SteeringWheel_YawDegreeInput) is the input for this system.
- This is compared against 3 angular values, one each for left turn, right turn & straight drive (Calibration Values: Right_Turn_AngularLimit, Left_Turn_AngularLimit, Straight_Drive_Steering_Angle) to say which specific direction the steering wheel is turning towards.
- Use switch blocks to compare & develop this requirement. Keep this requirement in a subsystem & output of this requirement is a local signal (Signal Name: Vehicle_Turn_Status).
The signal names and calibration values are copy pasted to avoide the errors. Because we have taken exact values in SLDD form so to match them again i have did the same. All the ports and blocks are named according to the requirement. To compare the three angular values we have taken the compare to zero blocks and to give the output after comparison we have taken switch blocks. The following figure shows the model under requirement1 subsystem.
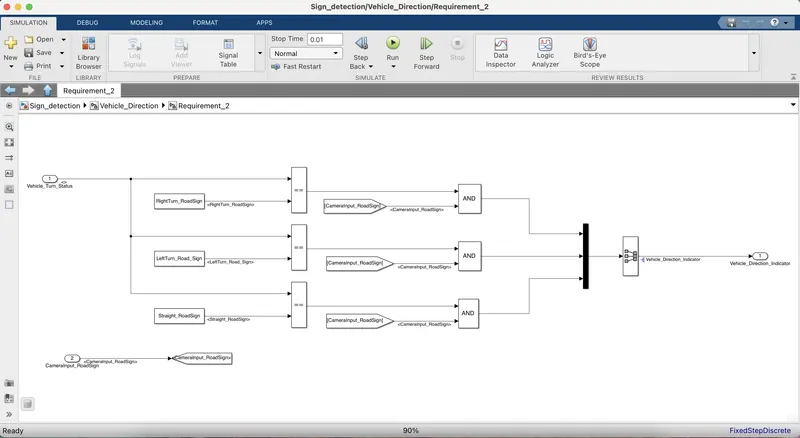
Requirement – 2:
- Keep this requirement as a separate subsystem. Inputs to this requirement are local signal from requirement 1 (Signal Name: Vehicle_Turn_Status) & an input signal from camera (Signal Name: CameraInput_RoadSign), which confirms the occurrence of a road sign.
- Signal Vehicle_Turn_Status is compared against calibration values (Calibration Values: RightTurn_RoadSign, LeftTurn_RoadSign, Straight_RoadSign), if each of them is found equal, then each of the three corresponding output is compared against the camera input signal,
- Using a logical operator block, only one among them is finally given as output signal (Signal Name: Vehicle_Direction_Indicator).
Here also to avoid the errors i have copy pasted the signal and calibration values given in the table. In req.2 we have two inputs as named above. To compare the input1 with given 3 calibration values i have taken relational operator block. To give output finally one among them AND operator block is taken. Mux block is used to give single output and to avoid the errors we have taken signal conversion block. To avoid the lines crossover taken from and go to blocks blocks. The following figure shows the model under requirement2 subsystem.
TAGGING :
To perform Tagging first we have to create a word file with all details reagarding about the model we are creating. Tagging enables us to view the procedure which is used to build the model or to know more details about the designed model. To tag the given requirement blocks the followinng procedure has been followed.
- First we need select the respective heading in the word file. Like in the followinng figure we can see that Requirement1 is a heading in which the procedure to build the model has been given.
- The word file which is created must be saved in the same folder of our simulink model.
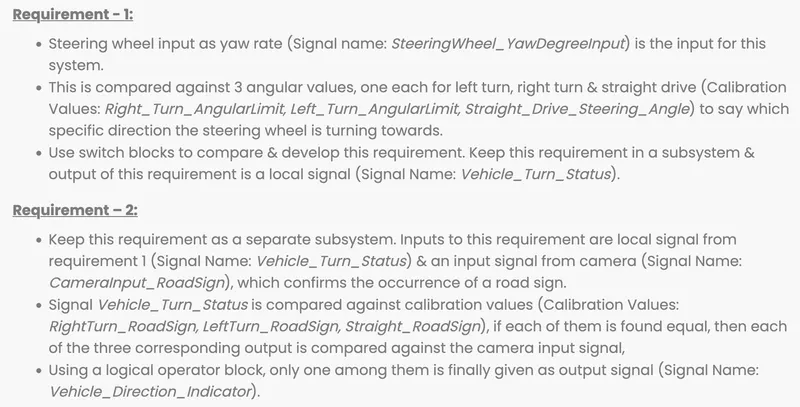
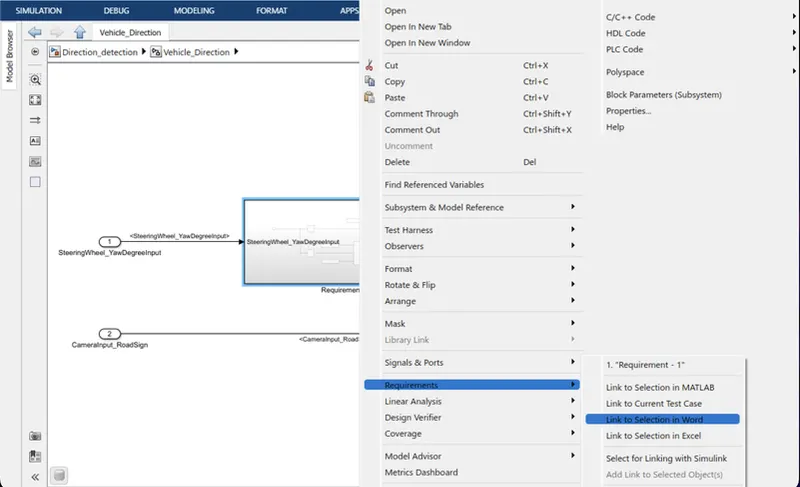
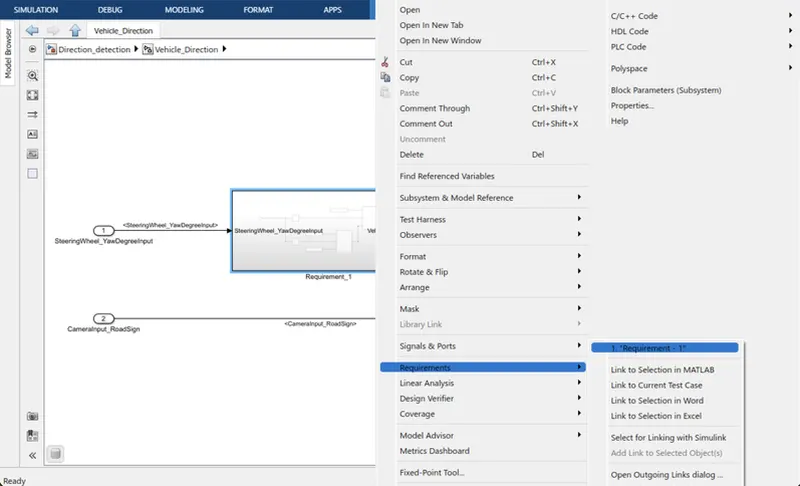
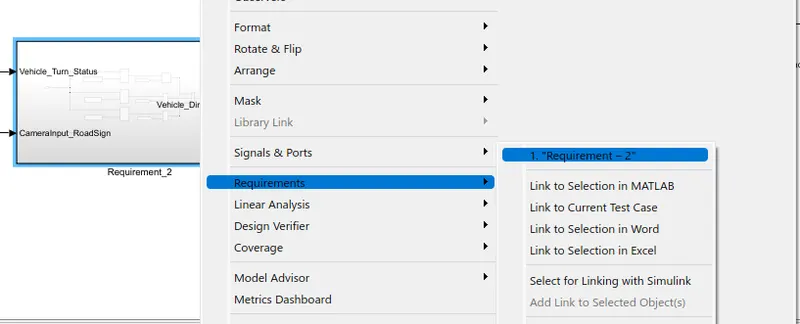
In the above figure it show the selection of word, now to tag this to the subsystem:
- Right click on the respective subsystem, as we have selected a word regarding about requirement1 we are right clicking on 1 subsyetm.
- Go to Requirements option from the context. In requirements select Link to selection in word.
- If we click on that it is automatically tagged to the word in word file.
SOLVER SETTINGS :
Solver settings are important to simulate the model. To open the solver setings, go to the Modeling section which is at the top of simulink window. And select the Model settings under the modeling section. Which is shown in the following figure.
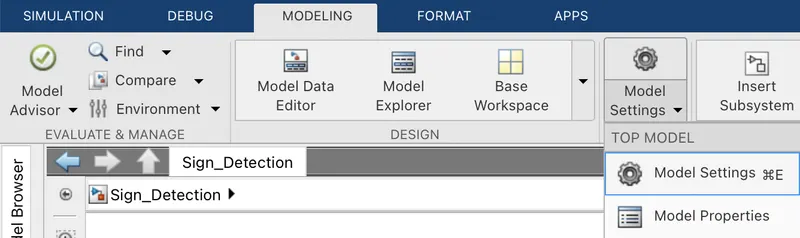
After clicking on model settings the following window will appears. The window presents the configuration of the parameters in our simulink mode.
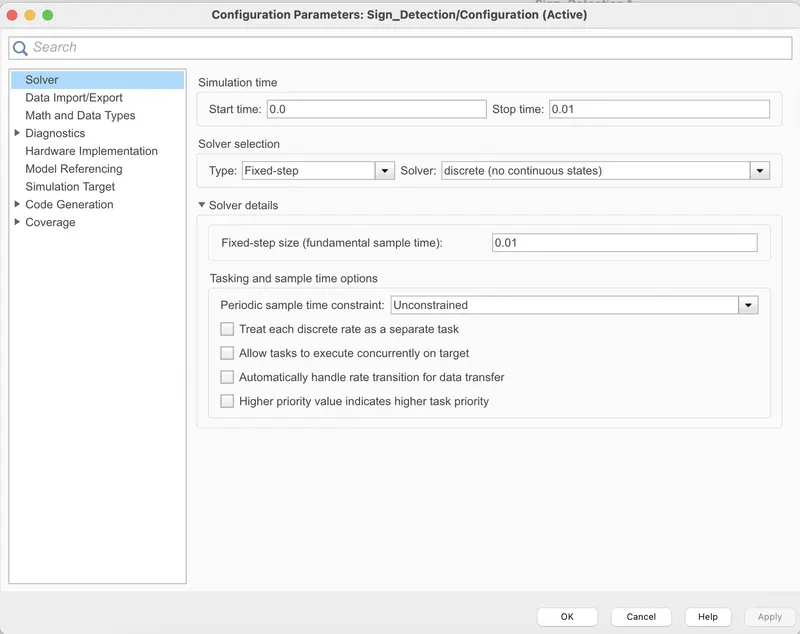
- In the configuration window, click on solver to model the solver parameters.
- Now change the type to Fixed-step, Solver to discrete(no continuous states) and take sample time as 0.01sec. Then click Ok.
- This settings are shown in the following figure.
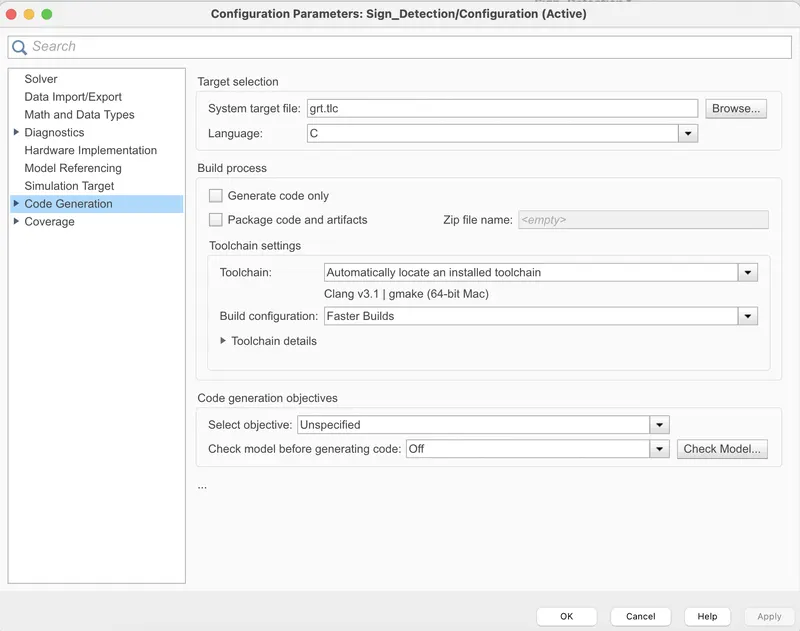
In the same configuration window there another settings to model, which is Code generation. Click on code generation,
- Choose the system targer file as ert.tlc (Embedded coder) by clicking on the browse option.
- Then click on Ok and close the window.
MAB GUIDLINES :
The MAB (MathWorks Advisory Board) Guidelines are a set of modeling guidelines developed by an independent industry working group for the usage of MATLAB, Simulink, Stateflow and Embedded Coder. The guidelines are the culmination of years of engineering expertise and best practices for developing, maintaining and documenting control algorithm models used in the development of production software.
- To perform the MAB guidelines test on our simulink model, go to modeling section and select Model Advisor which is at the top left corner of the window.
- You can use the Model Advisor to verify compliance of your model with the MathWorks Advisory Board (MAB) guidelines.
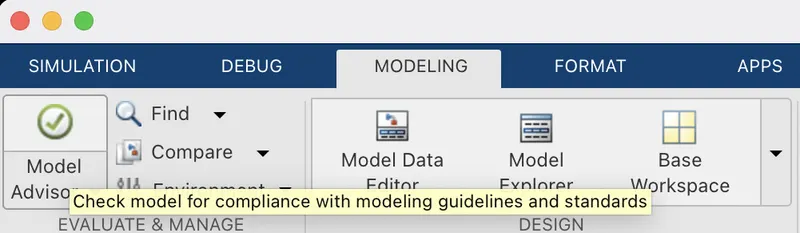
By clicking on the Model Advisor, a window will ask us to confirmation if we click on Ok then it will opens a window which is shown in the following figure.
- In the Model advisor there are number of guidelines, among them will select only Modeling Standards fro MAB.
- If we expand the section will be able to see which are tested under the MAB guidelins. If we again expand there will be many sub sections in each section.
- After selecting MAB guidelines, click on Run Selected checks.
- Then it asks again for confirmation, click on continue. Then the testing will begins. It takes time to perform the guidelines test.
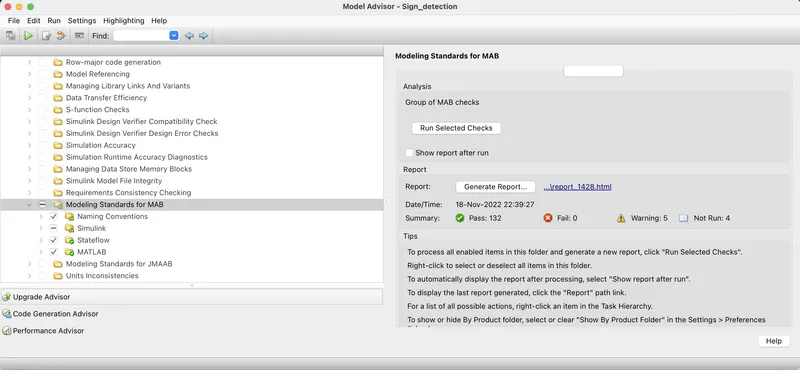
After the MAB guidelined test completion, it should be mandatory that 0 fail conditions. If any fail conditions are there rectify them and again make them to 0. The warnings are permittable to some limit.
- After getting 0 fails click on Generate report. This report will gives all data about the smulink model we have created.
After clicking Generate report in the above window, a popup window will appears as shown in the followinng figure.
- It shows the directory, at where the report is going to save. It will save in the same folder of our simulink model.
- Give a name to the report. Then click on OK.
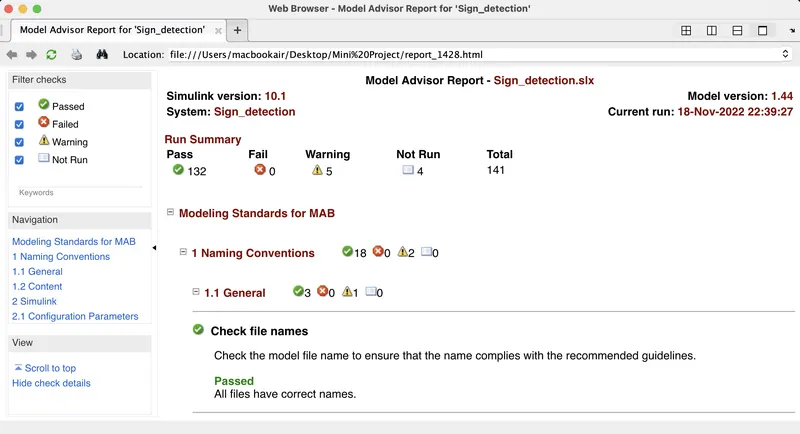
After clicking on Ok. It will save in the folder and opens as shown in the followig diagram.
- The report shows all the checks performed under MAB guidelines.
C CODING :
Now we are converting all our model in terms of C Code. To create C code of our simulink model, follow the procedure as explained below.
- Go to the Apps section which is at top of the window.
- Under Apps section, click on Embedder coder which is shown in the followinng figure.

After clicking on EMbedded codel option, aother window will creates as C CODE, which is shown in the following figure.
- Go to the C Code section, and click on Build option to build the code.
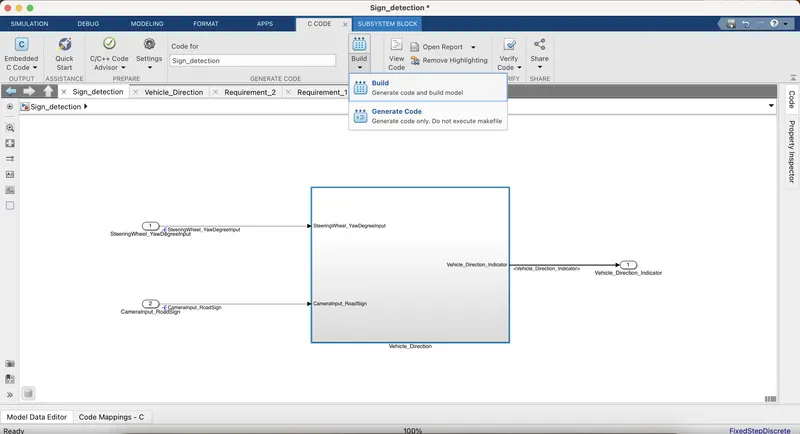
After clicking on Build it will generate the C Code of our simulink as shown inn the following figure.
- The C code shows all the data of our simulink model. The C code file is also saved in the same folder of our simulink model.
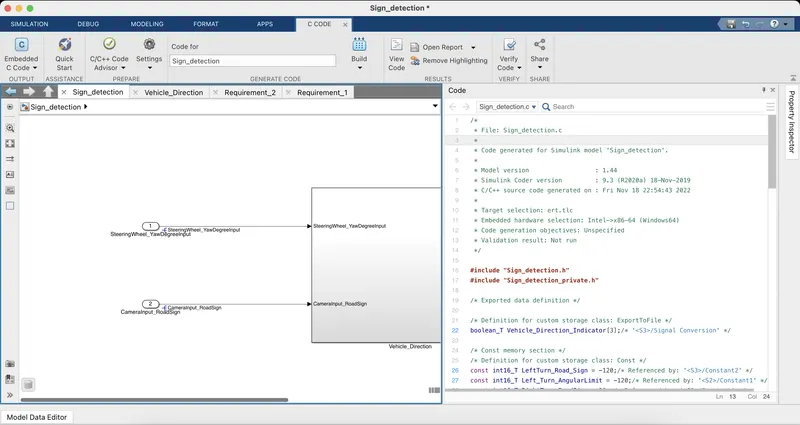
Generated C CODE :
/*
 * File: Sign_detection.c
 *
 * Code generated for Simulink model 'Sign_detection'.
 *
 * Model version                  : 1.44
 * Simulink Coder version         : 9.3 (R2020a) 18-Nov-2019
 * C/C++ source code generated on : Fri Nov 18 22:54:43 2022
 *
 * Target selection: ert.tlc
 * Embedded hardware selection: Intel->x86-64 (Windows64)
 * Code generation objectives: Unspecified
 * Validation result: Not run
 */
#include "Sign_detection.h"
#include "Sign_detection_private.h"
/* Exported data definition */
/* Definition for custom storage class: ExportToFile */
boolean_T Vehicle_Direction_Indicator[3];/* '/Signal Conversion' */
/* Const memory section */
/* Definition for custom storage class: Const */
const int16_T LeftTurn_Road_Sign = -120;/* Referenced by: '/Constant2' */
const int16_T Left_Turn_AngularLimit = -120;/* Referenced by: '/Constant1' */
const int16_T RightTurn_RoadSign = 30; /* Referenced by: '/Constant' */
const int16_T Right_Turn_AngularLimit = 30;/* Referenced by: '/Constant2' */
const int16_T Straight_Drive_Steering_Angle = 0;/* Referenced by: '/Constant' */
const int16_T Straight_RoadSign = 0;   /* Referenced by: '/Constant1' */
/* Real-time model */
RT_MODEL_Sign_detection_T Sign_detection_M_;
RT_MODEL_Sign_detection_T *const Sign_detection_M = &Sign_detection_M_;
/* Model step function */
void Sign_detection_step(void)
{
  int16_T rtb_Vehicle_Turn_Status;
  /* Switch: '/Switch' incorporates:
   *  Constant: '/Constant1'
   *  Constant: '/Constant2'
   *  Constant: '/Constant'
   *  Constant: '/Constant'
   *  Inport: '/SteeringWheel_YawDegreeInput'
   *  RelationalOperator: '/Compare'
   *  RelationalOperator: '/Compare'
   *  Switch: '/Switch1'
   */
  if (SteeringWheel_YawDegreeInput > 0) {
    rtb_Vehicle_Turn_Status = Right_Turn_AngularLimit;
  } else if (SteeringWheel_YawDegreeInput < 0) {
    /* Switch: '/Switch1' incorporates:
     *  Constant: '/Constant'
     */
    rtb_Vehicle_Turn_Status = Straight_Drive_Steering_Angle;
  } else {
    rtb_Vehicle_Turn_Status = Left_Turn_AngularLimit;
  }
  /* End of Switch: '/Switch' */
  /* SignalConversion: '/Signal Conversion' incorporates:
   *  Constant: '/Constant'
   *  Constant: '/Constant1'
   *  Constant: '/Constant2'
   *  Inport: '/CameraInput_RoadSign'
   *  Logic: '/AND'
   *  Logic: '/AND1'
   *  Logic: '/AND2'
   *  RelationalOperator: '/Relational Operator'
   *  RelationalOperator: '/Relational Operator1'
   *  RelationalOperator: '/Relational Operator2'
   */
  Vehicle_Direction_Indicator[0] = ((rtb_Vehicle_Turn_Status ==
    RightTurn_RoadSign) && CameraInput_RoadSign);
  Vehicle_Direction_Indicator[1] = ((rtb_Vehicle_Turn_Status ==
    LeftTurn_Road_Sign) && CameraInput_RoadSign);
  Vehicle_Direction_Indicator[2] = ((rtb_Vehicle_Turn_Status ==
    Straight_RoadSign) && CameraInput_RoadSign);
}
/* Model initialize function */
void Sign_detection_initialize(void)
{
  /* (no initialization code required) */
}
/* Model terminate function */
void Sign_detection_terminate(void)
{
  /* (no terminate code required) */
}
/*
 * File trailer for generated code.
 *
 * [EOF]
 */
TEST :
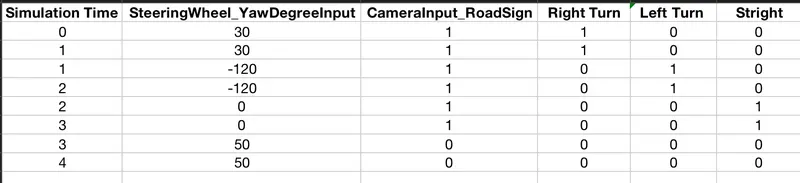
To perform any test case like MIL and SIL, first we have to develop an excel sheet which represents the inputs according to their outputs. Here input represents the Steeringwheel_yaw degreeinput values. And the respective directions according to thecamerainput_roadsign, outputs are taken. Which are considered by using the minimum and maximum values given in the table. The following figure shows the excel sheet we have created with the given input with the possible output. Save the excel sheet in the same folder of simulink model.
- In the creation of an Excel you can follow any waveform like ramp, step etc. Here will take the values in the form of step.
MIL TEST :
MIL(Model In Loop) testing means that the model and its environment are simulated in the modeling framework without any physical hardware components. Refers to the kind of testing done to validate the behavior of auto generated code used in the controller. The embedded software is tested within a simulated environment model but without any hardware. It is a method to test the model, first you have to check the model is working fine or not with out having any error. You need to send input Signals to model and take the simulated values. Compare simulated output values with the expected values if these two are matching then MIL is success else failed.
To perform MIL test, right click on the Vehicle_Direction subsystem and select Test harness from the context. And then select Create for Vehicle_Direction.
After clicking on create test harness option, the following window appears. Select inport as Signal Builder under source and sinks.
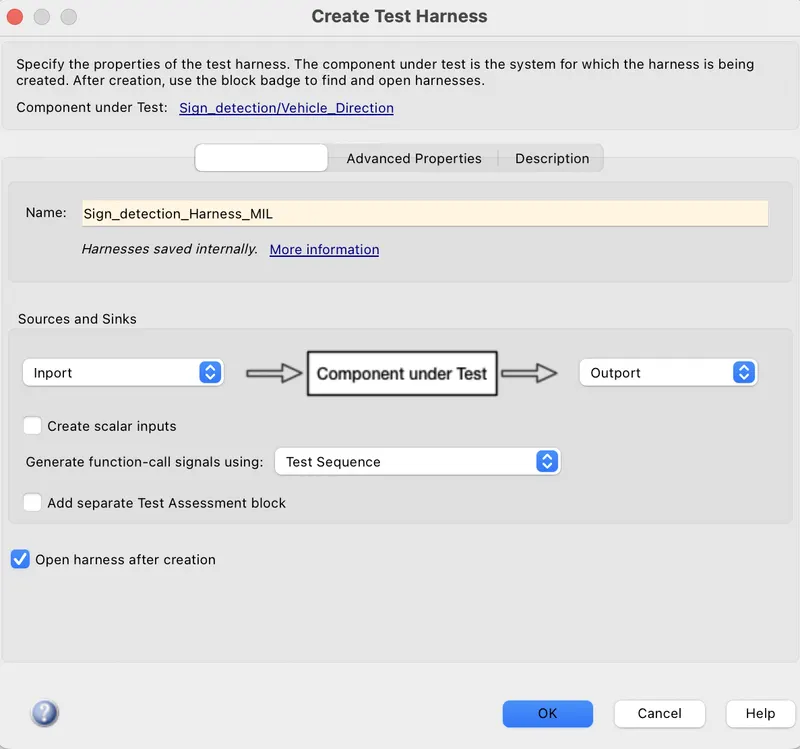
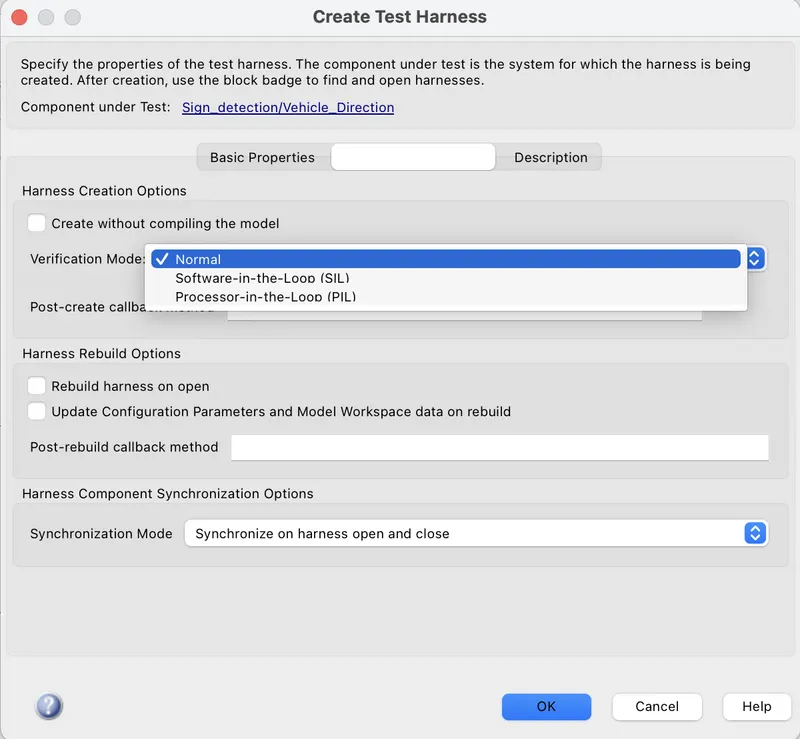
In the same window go to advanced properties and select the verification mode as Normal as shown in the following figure. After selecting the verification mode click on OK.
After clicking on Ok in the above create test harness window. A simulink window will opens with the test harness model. Which is connected with the signal builder at the input side, as we selected in the create test harness window. The following figure shows the simulink model for test harness. If we double click on the window will be able to see our model as it is.

Now we have to add the excel sheet we have created to perform the MIL test of our simulink model to signal builder.
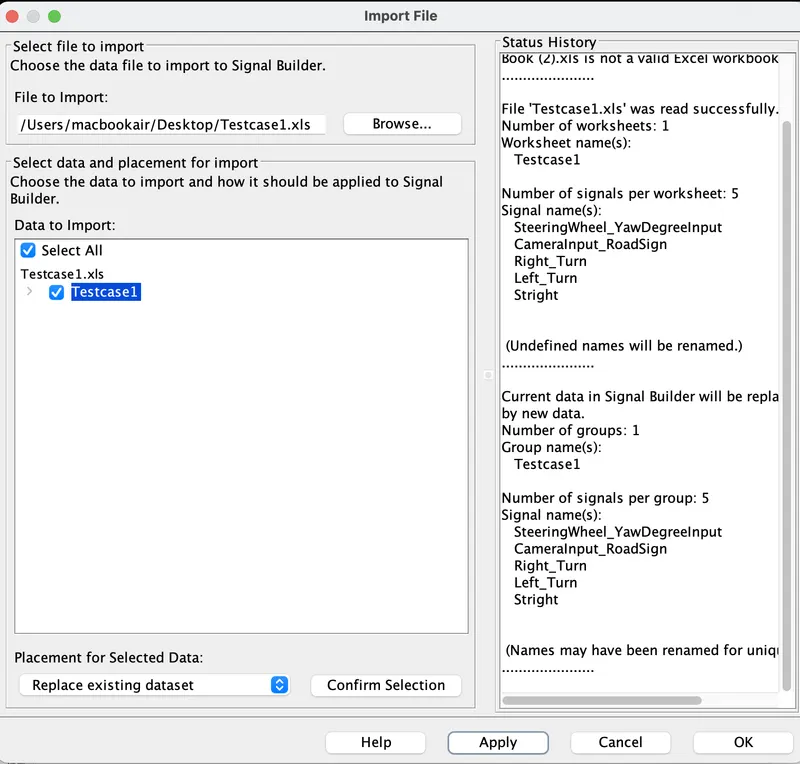
- To import the file, double click on the Signal builder block. Select import from file option from the File section. Which is shown in the following figure.
Then the following window will appears. By clicking on the browse option will be able to select the file we have saved. By selecting the file it will appears at 'data to import' section. Click on select all, and select replace existing data from the placement for selected data. Then click on confirm selection and then click on Ok.
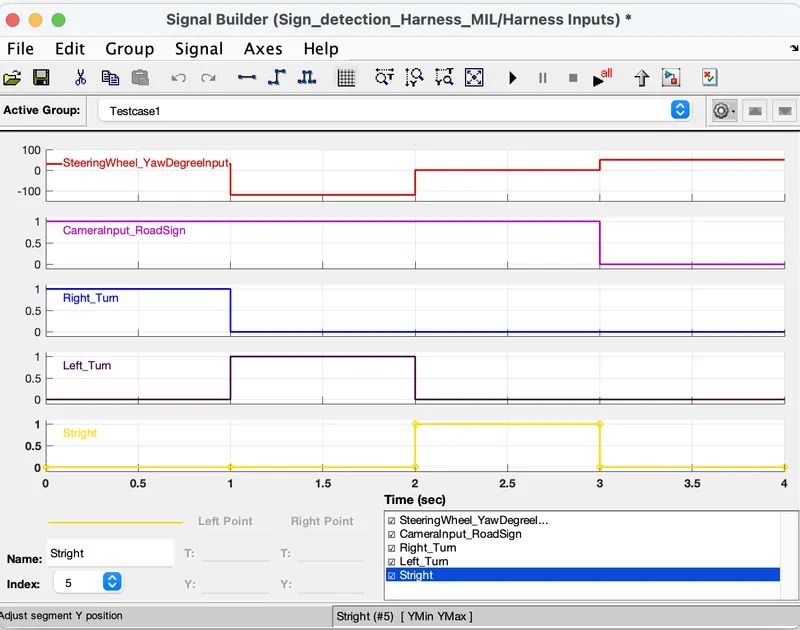
After the above procedure, the respective signals will be added to the signal builder block as shown in the following figure. Where the first plot and second plot shows the input signal, third plot one shows Right Turn, 4th one shows Left Turn data and %th plot shows stright way data. As we have created the excel sheet in the form of step wave, here we are seeing the step waveform.
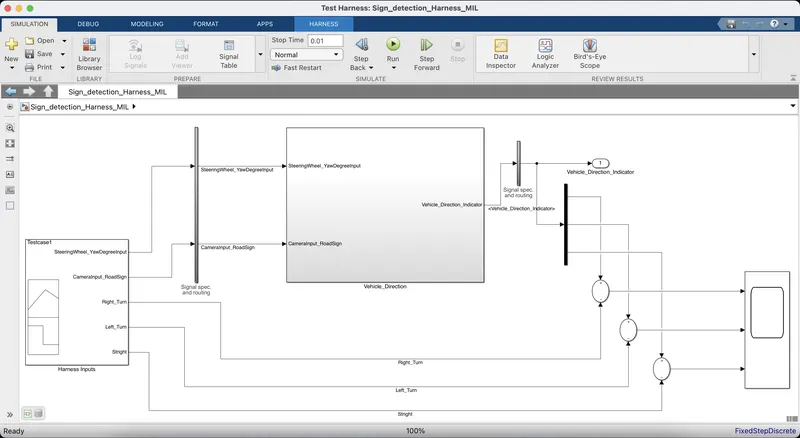
After adding the expected data to the signal builder, the signal builder block shows the signals we have added. The inputs are connected to the inputs of the subsystem and the direction turns are substracted with the actual outputs by using the Sum blocks.
- Three Sum block are taken to connect the three directions and the output from these Sum blocks are given to the scope block to verify that our expected data and actual data are matching or not.
- If they matches they both gets cancelled and shows output signal at constant zero. Otherwise it will shows the plot difference. The following figure shows these connections to verify the data.
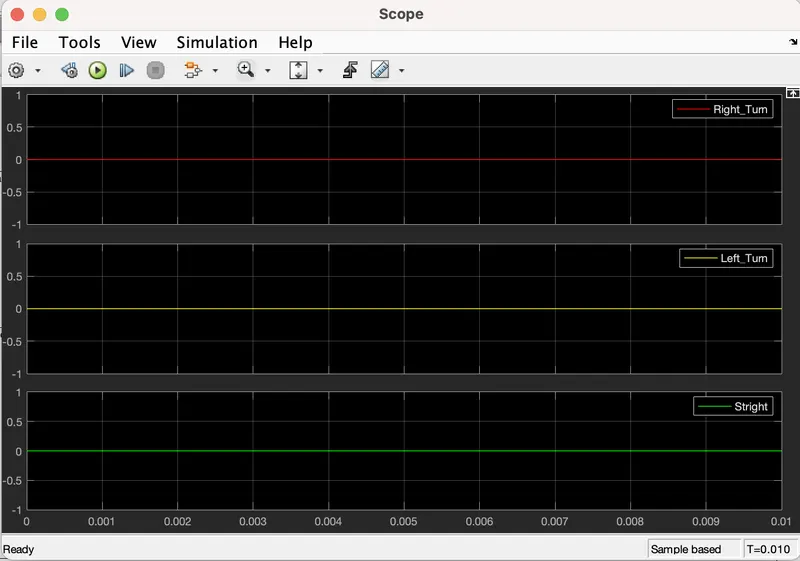
Now Run the test harness simulation for 4 seconds as we have created an excel sheet for 4 seconds. After running the simulation the following plot has been observed from the scope block. Where the block shows constant 0 signal. Which means our given outputs and actual outputs are matched and cancelled each other. There are no errors in the model.
- Befor starting the test harness simulation, check the solver settings of harness model also. Make it as fixed step and solver as discrete otherwise it will show errors.
SIL TEST :
Software-in-the-Loop testing which is also called SIL testig means testinng embedded software, algorithms or entire control loops with or without environment model on a PC, thus without ECU hardware. In fact, SIL Testing is an integral part of automative software testing. The source code for embedded system is compiled for execution on the PC and then tested. The biggest advantage of SIL Testing is that you can identify system bugs and errors as early as poosible. This is not only for quick fixes, but consequently reduces development time and keeps development costs to a minimum. In case of module or unit test, the SIL Test is conducted in the first stage for hand coded software. Within the context of so call MBD, SIL Testing is conducted in second phase that is after MIL testing.
- The MIL test and SIL tests are almost same in procedure of performing the test. The difference is to select the atomic unit. Which is selected through the following procedure.
- Right click on the subsystem and then select Block parameters(subsystem) from the context. This is shown in the following figure.
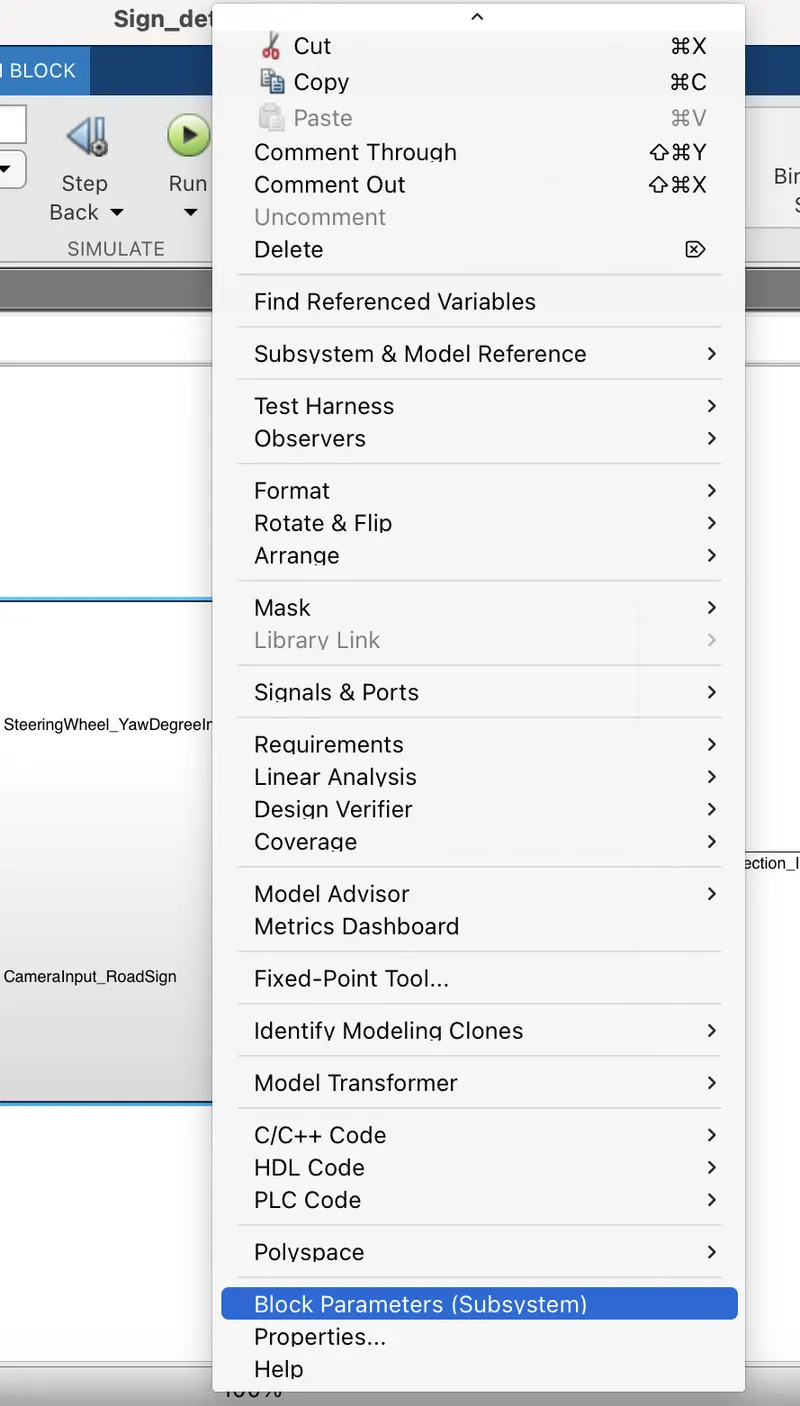
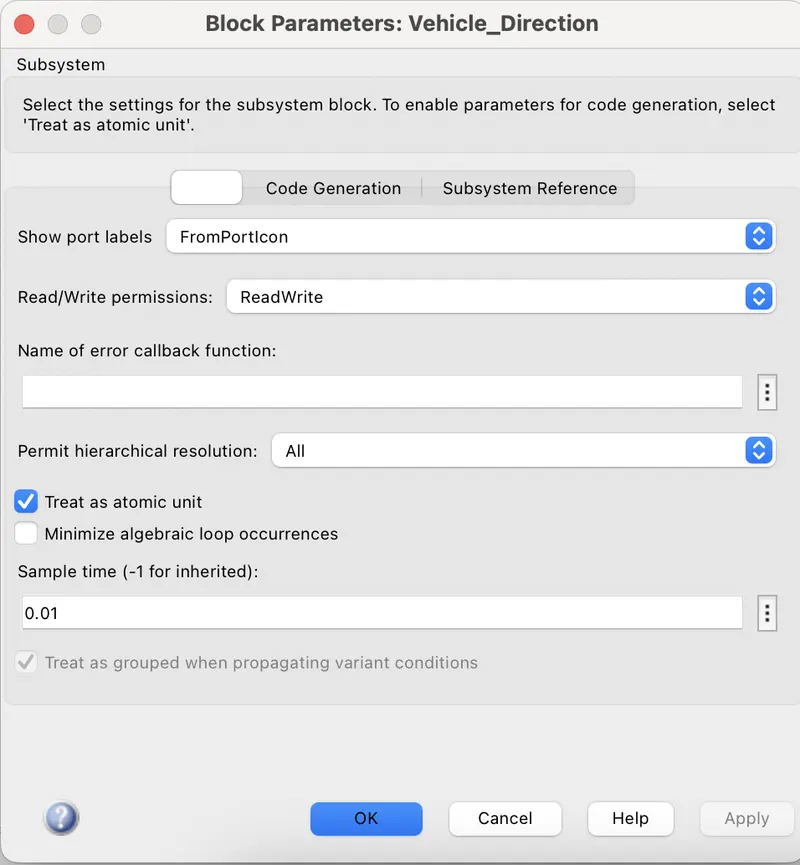
After clicking on block parameters from the above option will get a window which is showing in the following figure. Where we have tick the option 'Treat as atomic unit'. And give sample time as given in solver settings. As we have given 0.01sec in solver here also giving the same sampling time. After these editings click on OK.
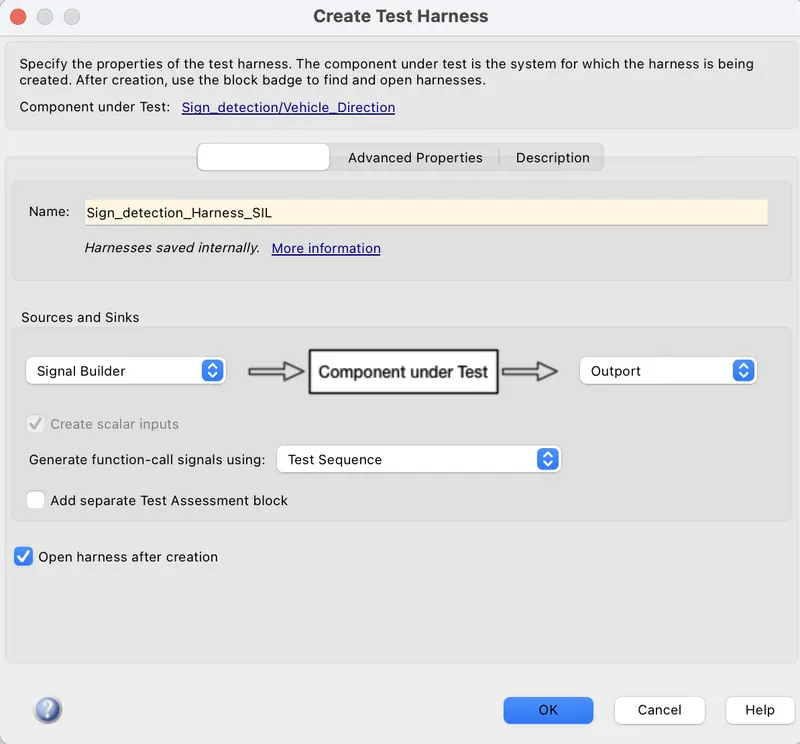
To perform SIL test, right click on the Vehicle_Direction subsystem and select Test harness from the context. And then select Create for Vehicle_Direction. After clicking on create test harness then a window will appears as shown in the following figure. Where we are selecting the inport as Signal Builder under the sources and sinks section.
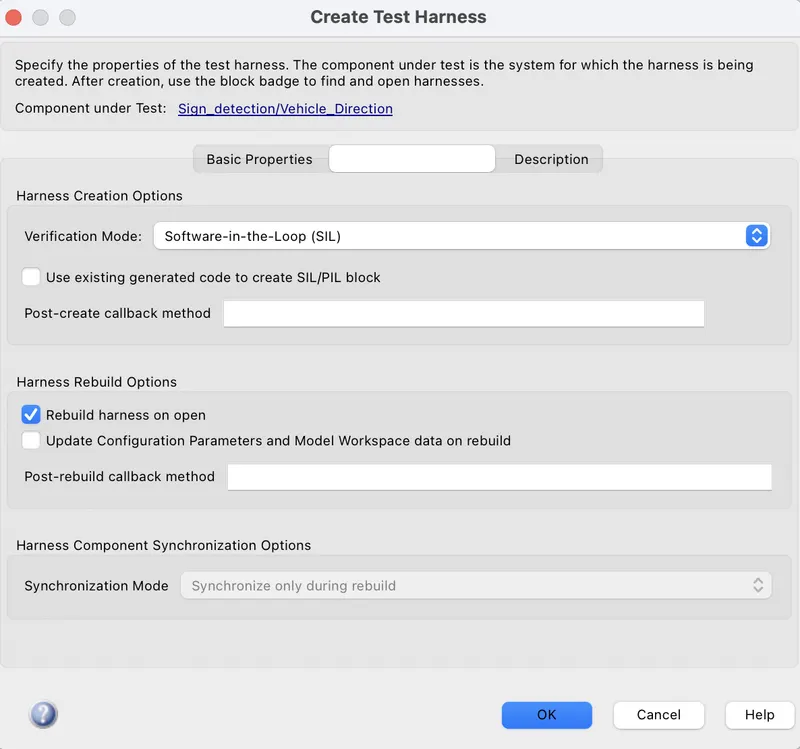
After clicking on Ok in the above create test harness window. A simulink window will opens with the test harness model. Which is connected with the signal builder at the input side, as we selected in the create test harness window. The following figure shows the simulink model for test harness.
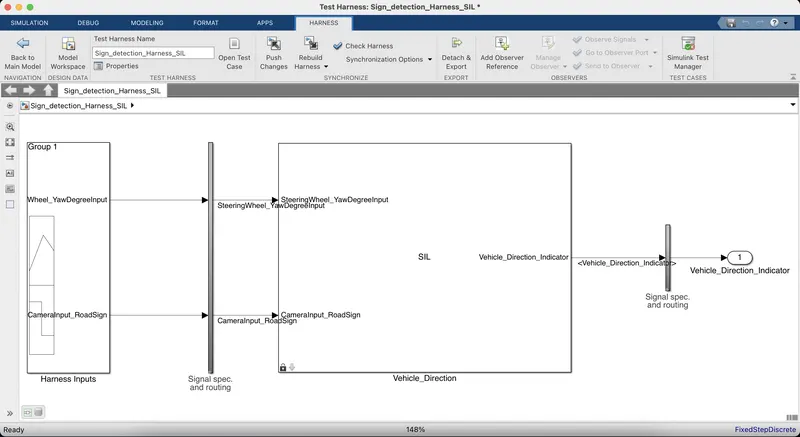
Now we have to add the excel sheet we have created to perform the SIL test of our simulink model to signal builder.
- Double click on signal builder block, selct import from file option, import the file and click on OK.
- After the above procedure, the respective signals will be added to the signal builder block as shown in the following figure.
- Where the first plot and second plot shows the input signal, third plot one shows Right Turn, 4th one shows Left Turn data and %th plot shows stright way data. As we have created the excel sheet in the form of step wave, here we are seeing the step waveform.
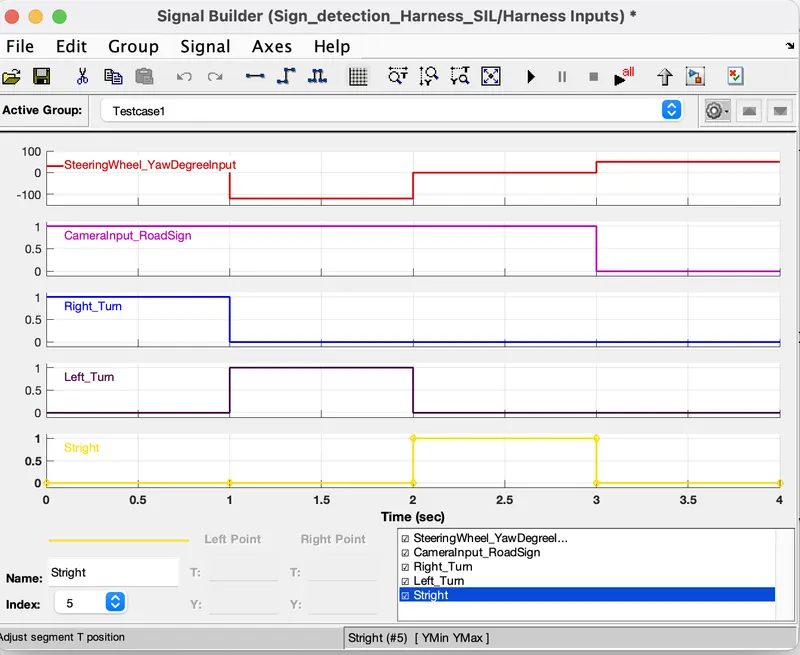
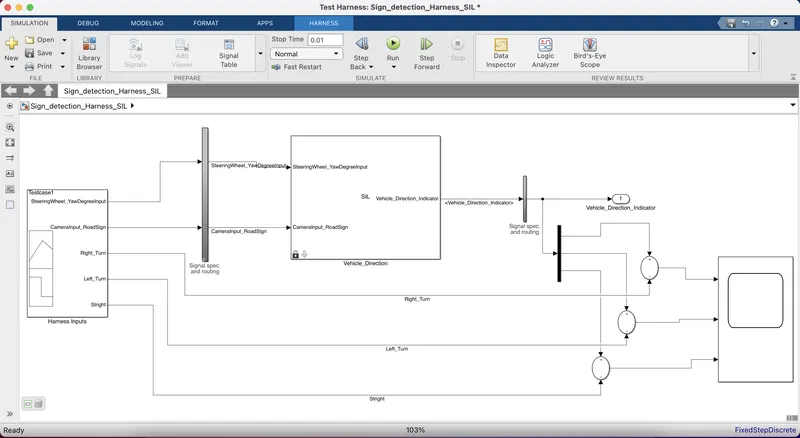
After adding the expected data to the signal builder, the signal builder block shows the signals we have added. The inputs are connected to the inputs of the subsystem and the direction turns are substracted with the actual outputs by using the Sum blocks.
- Three Sum block are taken to connect the three directions and the output from these Sum blocks are given to the scope block to verify that our expected data and actual data are matching or not.
- If they matches they both gets cancelled and shows output signal at constant zero. Otherwise it will shows the plot difference. The following figure shows these connections to verify the data.
- In the performance of SIL test, S(source) Code is generated and which is added to the same folder of our model.
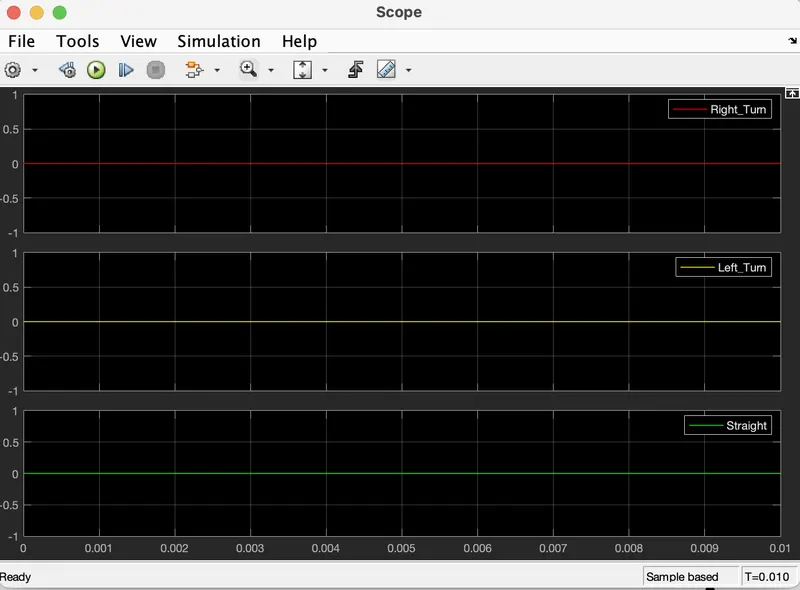
Now Run the test harness simulation for 4 seconds as we have created an excel sheet for 4 seconds. After running the simulation the following plot has been observed from the scope block. Where the block shows constant 0 signal. Which means our given outputs and actual outputs are matched and cancelled each other. There are no errors in the model. Before the test, check the solver settings once.
RESULT :
The Vehicle Direction Detection is modeled as per the given requirements, all the signals and calibrated values are defined in the Simulink Data Dictionary(SLDD). All input and output signals are resolved and propagated. Model Advisory check is done with MAB guidelines and there is 0 fail conditions. Since there are no errors in Model Advisory report C Code has been generated by using Embedded coder. MIL and SIL tests are also perfromed sucessfully.