Project 1 (Mini Project on Vehicle Direction Detection
EV LIVE BATCH 21
For Mini Project on Vehicle Direction Detection, provided with the information as,
General Overview:
Identifying the direction of the vehicle is one of the important & diverse features in Autonomous driving & Advanced Driver Assistance Features. This particular sub-feature of identifying the direction of vehicle is basically identifying the direction the vehicle is taking based on the camera input.
Camera reads the road signs & stores into its memory with unique values for left turn, right turn & straight drive. Depending on the direction it is taking, final indication is given to the driver – as an indication if he is driving in the recommended direction or not.
Vehicle Direction Determination can also be coupled along - side features like GPS systems to identify whether the vehicle is reaching its destination in an optimized manner. This sub feature can also be used along with Lane Detection, Highway Warning, Ramp Entry / Exit in Wrong Way Detection etc.
Objective of Mini Project:
- Development of MATLAB Simulink model as per requirement.
- Tag the requirements to the simulink model; tagging requirement 1 & requirement 2 to their corresponding subsystems is fine.
- MBD compliant changes, Data Dictionary creation & code generation is added advantage, and that is not scope of this project.
- If choosing code generation, Storage class for Input signals: ImportedExtern; Storage class for Output signal: Export to File; Storage class for local signals: localizable; Storage class for calibration signals: Const.
- Choose sample time for all signals as 0.01s
Also, Signals & Calibration Data List is given as,
|
Signal / Calibration Name |
Signal Type |
Data Type |
Dimension |
Min |
Max |
Initial Value |
Units |
|
SteeringWheel_YawDegreeInput |
Input |
Int16 |
1 |
-180 |
180 |
- |
Deg |
|
CameraInput_RoadSign |
Input |
Boolean |
1 |
0 |
1 |
- |
- |
|
Vehicle_Turn_Status |
Local |
Int16 |
1 |
-180 |
180 |
- |
Deg |
|
Right_Turn_AngularLimit |
Calibration |
Int16 |
[1 1] |
-180 |
180 |
30 |
Deg |
|
Left_Turn_AngularLimit |
Calibration |
Int16 |
[1 1] |
-180 |
180 |
-120 |
Deg |
|
Straight_Drive_Steering_Angle |
Calibration |
Int16 |
[1 1] |
-180 |
180 |
0 |
Deg |
|
RightTurn_RoadSign |
Calibration |
Int16 |
[1 1] |
-180 |
180 |
30 |
|
|
LeftTurn_RoadSign |
Calibration |
Int16 |
[1 1] |
-180 |
180 |
-120 |
|
|
Straight_RoadSign |
Calibration |
Int16 |
[1 1] |
-180 |
180 |
0 |
|
|
Vehicle_Direction_Indicator |
Output |
Boolean |
1 |
0 |
1 |
- |
- |
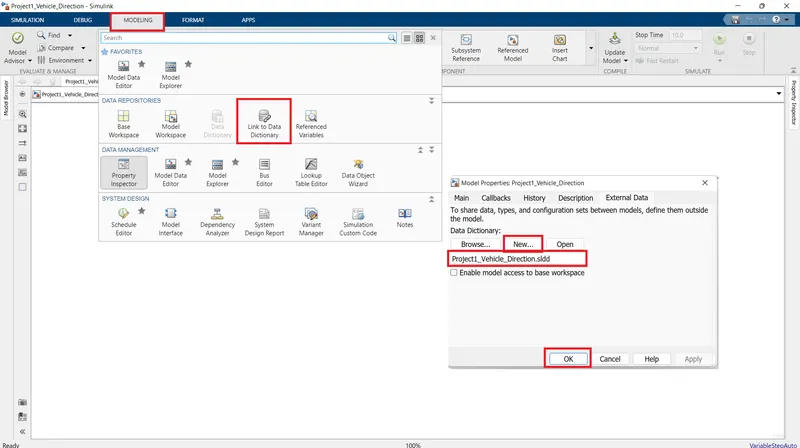
Now, these signals and parameters can be defined into a SLDD file file so that the file can be linked with the Project model and these values can be accessed through the linked SLDD file.
Here, a SLDD file can be created with the project model as, After opening the model saved with the name Project1_Vehicle_Direction, select the option Modelling - Expand it further - Link to Data Dictionary - a pop up window will open - select option New - save the file name, it will have .sldd extension by default - also uncheck the mark mentioned below file name stating Enable model access to base workspace, as it is not required. Then select OK and in this way SLDD file is created and can be linked to any model as required.
Now, to define parameters as signals and constants in the SLDD file, select Model explorer - expand model title - again expand external data - expand SLDD file name and select design data option.
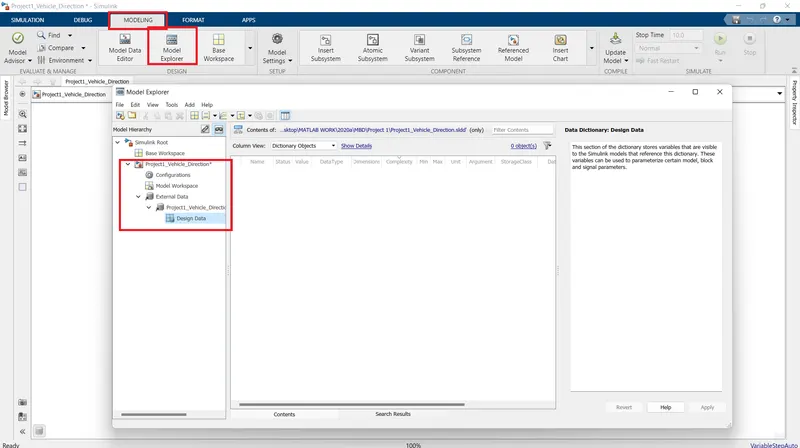
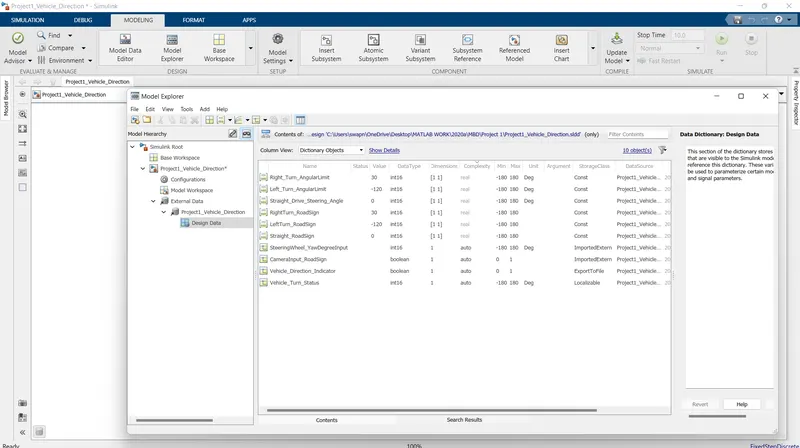
Now, to add given parameters, select the option Add,
to add signals - select simulink signal and to add constants - select simulink parameters and define the data as per given detailes. The linked SLDD file having required parameters can be given as,
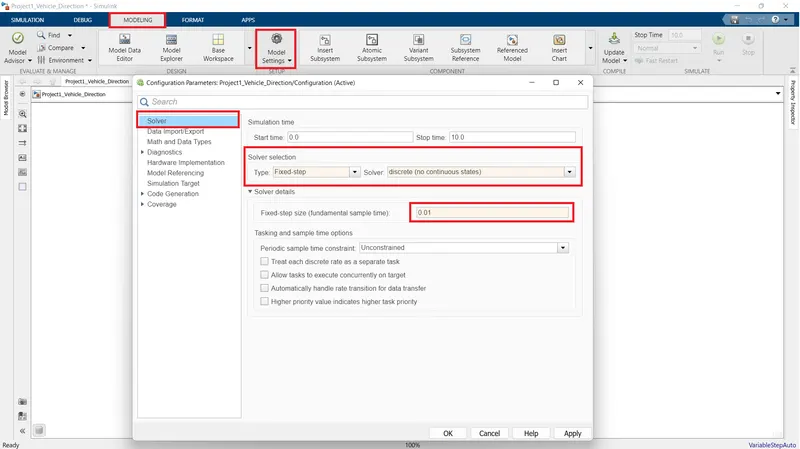
Also, sample time of the model can be changed as, Select Modeling - Model Settings - select Solver as Fixed step discrete - Expand solver detailes - set sample time as 0.01 as given.
now, as per the stated requirements, model can be designed as,
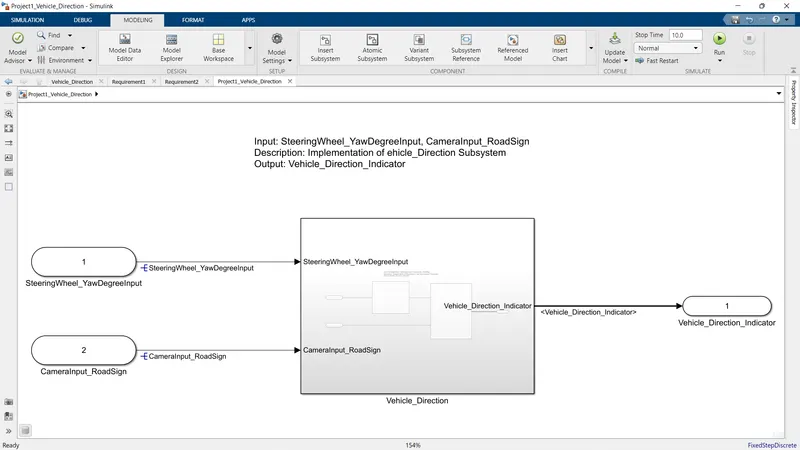
Subsystem is taken and named as Vehicle_direction with two input signals namely - SteeringWheel_YawDegreeInput, CameraInput_RoadSign and one output Vehicle_Direction_Indicator.
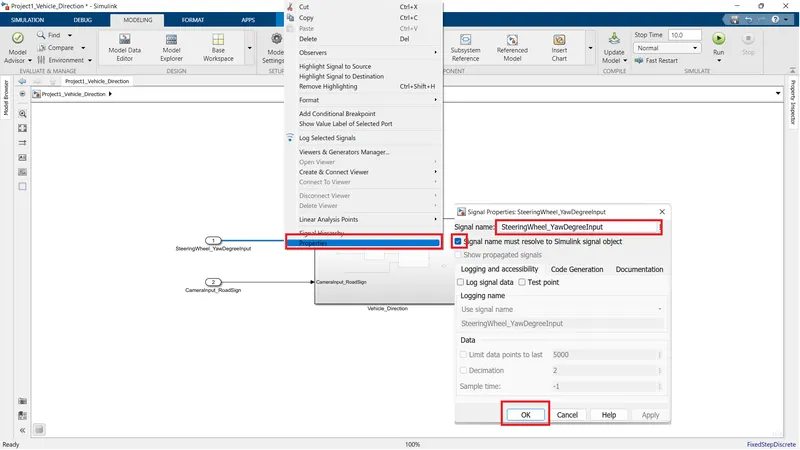
Also, according to the requirements, signals are to be resolved and propogated at every stage. Where signals are appearing for the first time, they are to be resolved and same are to be propogated further.
Here, Input signals SteeringWheel_YawDegreeInput, CameraInput_RoadSign are resolved as they are appearing for the first time for the Project model. To resolve the signal, right click on signal - select properties - state signal name - check the box below the name - select OK.
The subsytem Vehicle_Direction of the project model has modelled with two subsystems for the two given requirements.
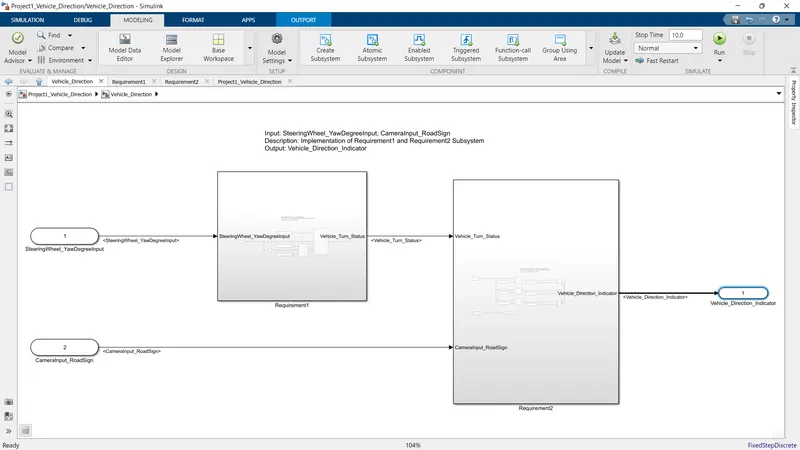
These two subsystems are modelled as given requirements,
Requirement - 1:
- Steering wheel input as yaw rate (Signal name: SteeringWheel_YawDegreeInput) is the input for this system.
- This is compared against 3 angular values, one each for left turn, right turn & straight drive (Calibration Values: Right_Turn_AngularLimit, Left_Turn_AngularLimit, Straight_Drive_Steering_Angle) to say which specific direction the steering wheel is turning towards.
- Use switch blocks to compare & develop this requirement. Keep this requirement in a subsystem & output of this requirement is a local signal (Signal Name: Vehicle_Turn_Status).
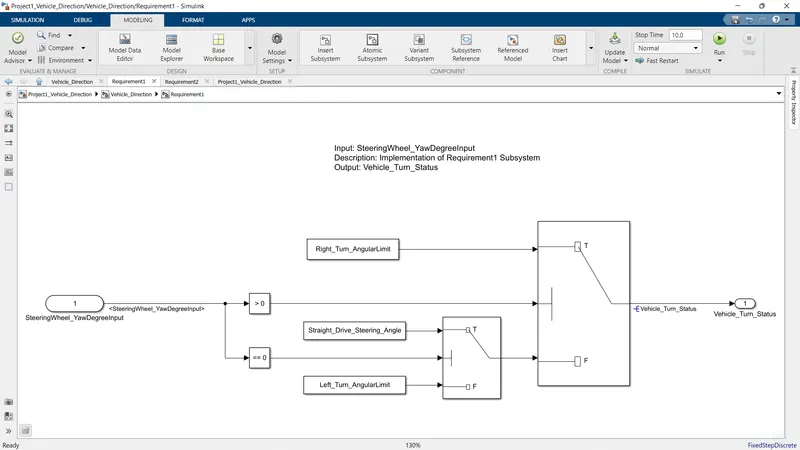
Here, as per requirement stated, switch blocks are used to compare & develop this requirement. Now, switch blocks control condition is set at ~=0 as per MAB Guidelines. So when Control port of switch will get signal value which is not equal to zero (~=0), Data or value of Port 1 will be taken as output and if control port receives signal value zero, port 2 data will go to output.
Input signal SteeringWheel_YawDegreeInput is fed to the compare to constant block. For input signal values greater than zero (between 1 to 180) fed to compare to constant block set as >0, will satisfy the condition and generate 1 i.e. high, which is given to control port of switch block. So, Right_Turn_AngularLimit value will get as output from switch block i.e. Vehicle_Turn_Status signal. Similarly, if input signal value is compared with compare to constant block set as ==0. So, for input signal value exactly equal to zero, control port of switch block will receive 1 i.e. high and value at port 1 i.e. Straight_Drive_Steering_Angle will receive as output. And for negative values ( between -1 to -180), Switch block will pass Left_Turn_AngularLimit value as output.
Now, this output of Requirement1 Subsystem i.e. Vehicle_Turn_Status signal is resolved and given as input to the Requirement2 subsystem. This subsystem is modelled as given Requirement,
Requirement – 2:
- Keep this requirement as a separate subsystem. Inputs to this requirement are local signal from requirement 1 (Signal Name: Vehicle_Turn_Status) & an input signal from camera (Signal Name: CameraInput_RoadSign), which confirms the occurrence of a road sign.
- Signal Vehicle_Turn_Status is compared against calibration values (Calibration Values: RightTurn_RoadSign, LeftTurn_RoadSign, Straight_RoadSign), if each of them is found equal, then each of the three corresponding output is compared against the camera input signal,
- Using a logical operator block, only one among them is finally given as output signal (Signal Name: Vehicle_Direction_Indicator).
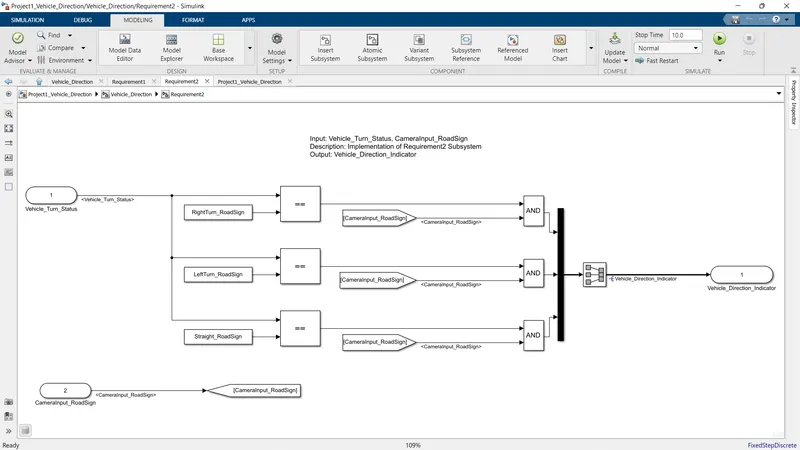
Here, two input signals are taken namely - Vehicle_Turn_Status, CameraInput_RoadSign. Now, using relational operator blocks, Vehicle_Turn_Status signal value is compared with given constant values of RightTurn_RoadSign, LeftTurn_RoadSign, Straight_RoadSign. Further more, these values and CameraInput_RoadSign value are given to AND logical operator block. CameraInput_RoadSign value is fed using GOTO and FROM tags to avoid crossing and overlapping of the signals.
With AND block, only one output signal with value 1 i.e. high will be generated as - with comparison of Vehicle_Turn_Status value with constants stated, only one condition among three will be satisfied and only if CameraInput_RoadSign signal value is availble. Other two signals will have value 0 i.e. low. i.e. if Vehicle_Turn_Status value is equal to RightTurn_RoadSign and CameraInput_RoadSign signal value is high, AND block will get both signals having value 1 and output will be generated as 1, 0, 0.
The AND block output signals are gien to a MUX block which combines inputs with the same data type and final output i.e. Vehicle_Direction_Indicator is obtained fed via a signal converter block. This signal is getting generated here for the first time, so is resolved and propogated further more.
Now, after modelling the Subsystems for Project as per requirement, model advisor check is performed - Modeling - Model Advisor - select Model name - OK
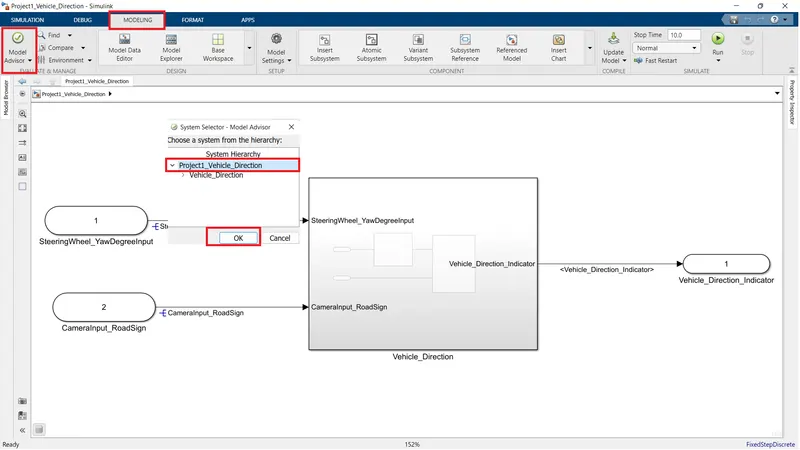
After selecting OK, a model advisor window will open. Select Model Advisor check by Task - unckeck all - select only Modeling standards for MAB - and hit the option - Run selected checks.
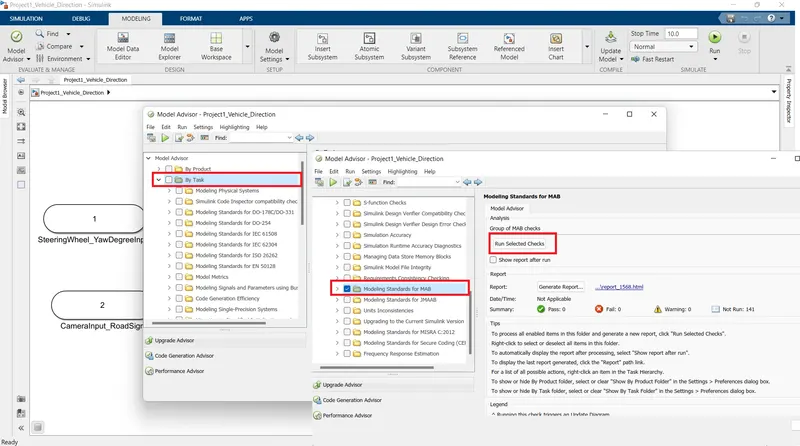
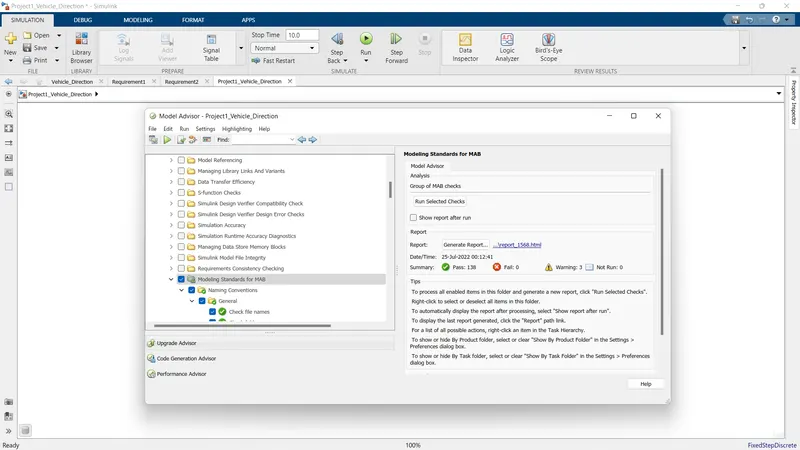
After running the checks, out of 141 checks, 139 are passed with 2 non-avoidable but acceptable warnings. Also, by selecting generated report option, report can be gaenerated and is named as MAB_Model_Advisor_Report.
Now, validation of the model is done by performing MIL and SIL test. To perform these tests, test harness is to be created.
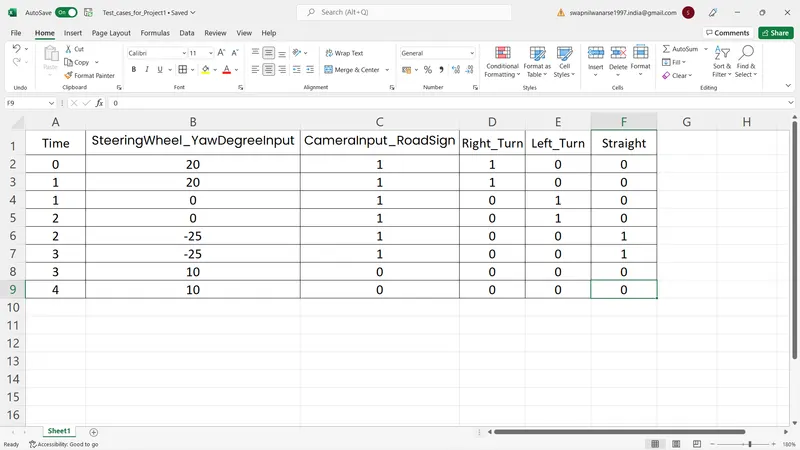
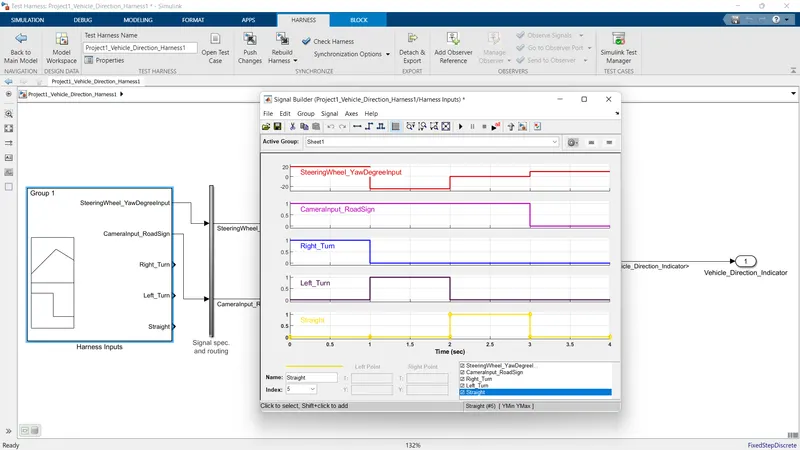
according to the given requirements, 4 test cases can be implemented for the model - three test cases for Right turn, Left turn, straight with camera input 1 i.e. high is available and forth test case is where camera input is zero i.e. low - not available.
These test cases are to be defined in a XL sheet and then implemented via signal builder input block. Test cases are defined in such a way that it will form step signal.
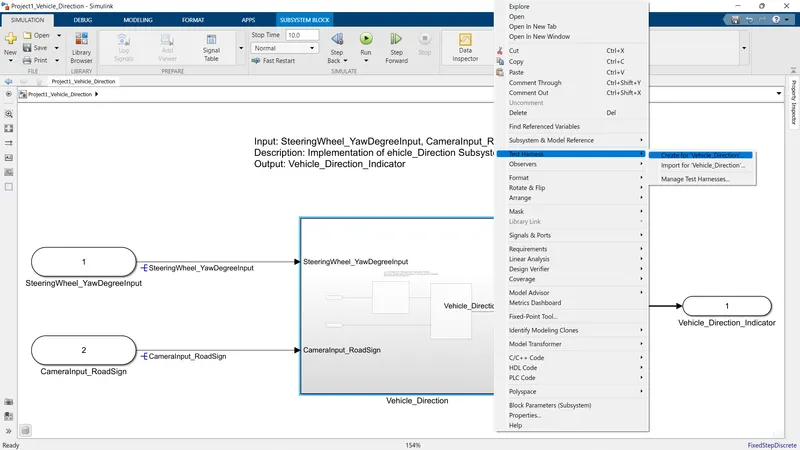
Now, Test harness for MIL test can be created as, Select the subsystem, right click on it and select the option Test harness - create for Vehicle_Direction, as the name of the subsystem is Vehicle_Direction.
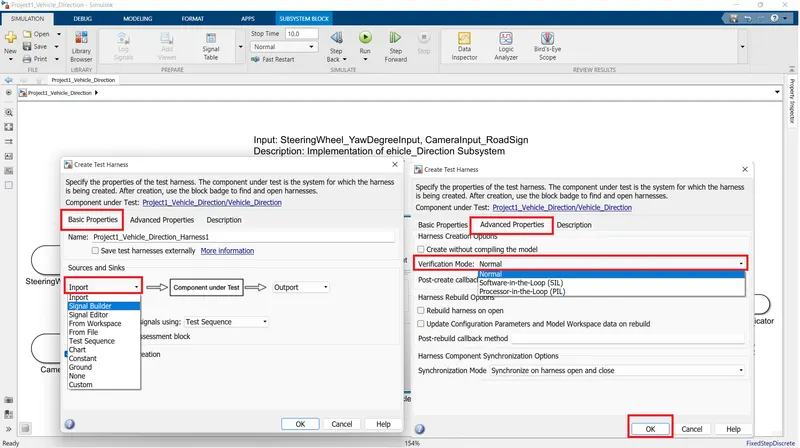
A pop up window for create test harness will open. In that, select sources and sinks. Here, source is input Signal builer in which test cases will be stated and sink is outputs obtained, while component under test is the subsystem Vehicle_Direction. Also for selecting MIL test, go to advanced properties, and select Normal under Verification mode.
After selecting all the aboove option and select OK, the MIL Test Harness will open, which is linked with actual model Subsystem,
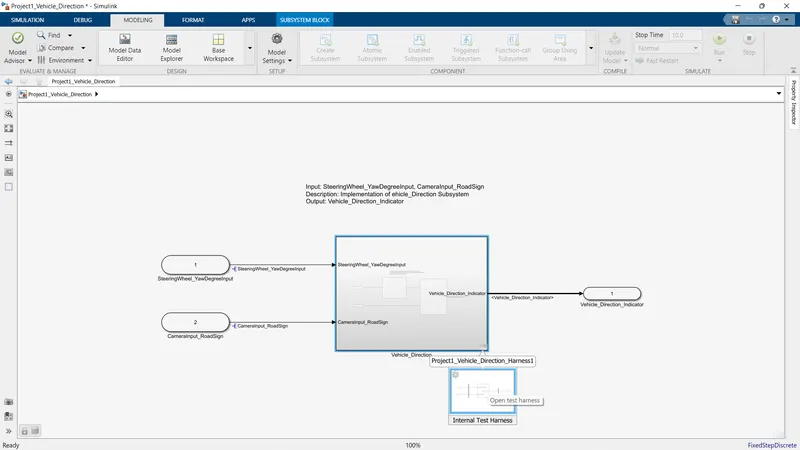
The created test harness will shown as internal test harness and will get open in separate window stating its name as Project1_Vehicle_Direction_Harness1,
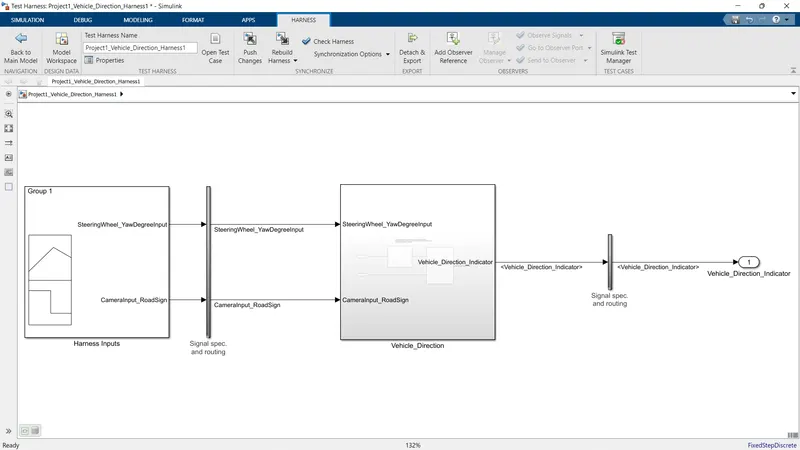
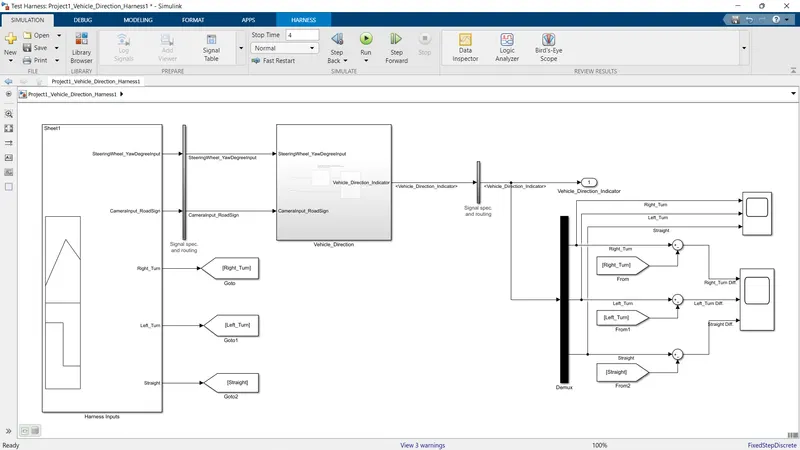
This created test harness is exactly as similar to the actual model with input as signal builder and some extra data conversion subsystem blocks at input and output given as Signal spec. and Routing.
To import this data into the signal builder, open signal builder - select file - import from file - browse - select XL file in which test cases are defined - Select open.
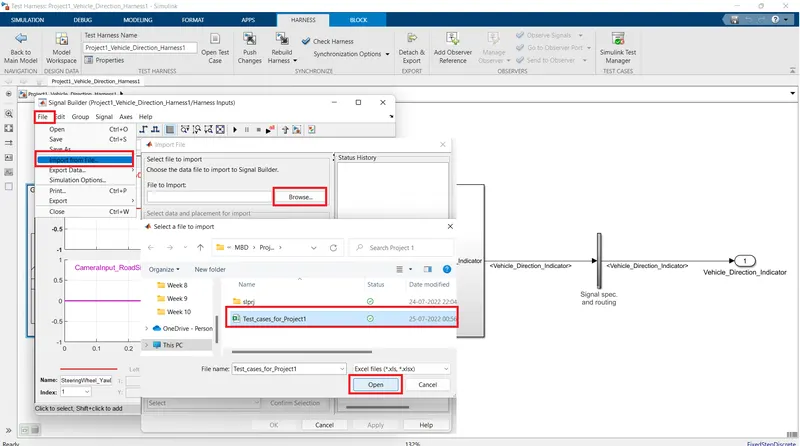
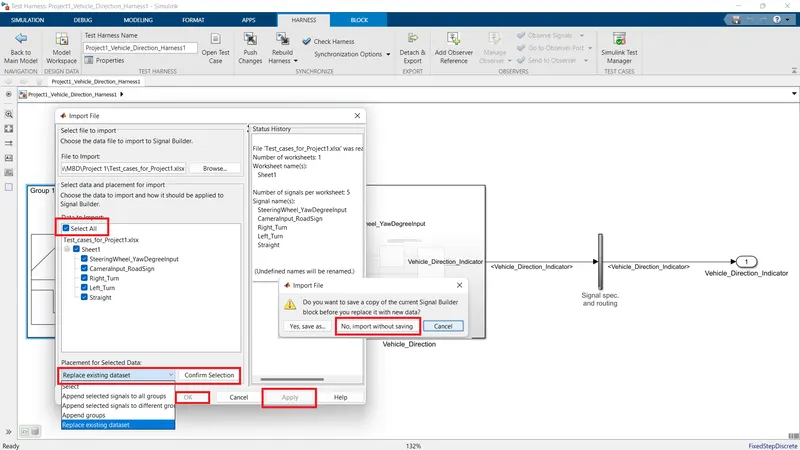
Also, after selecting file, Select all - select replace existing datasheet option - select no, import without saving current signal builder data - Select apply - OK.
In this way the required test case data can be imported to selected signal builder input,
After running the simulation if difference between the obtained output and given input is zero, then only the MIL test is performed successfully. So, the difference can be taken as adding data signals to the subtract blocks and check the results via scope,
The results obtained are,
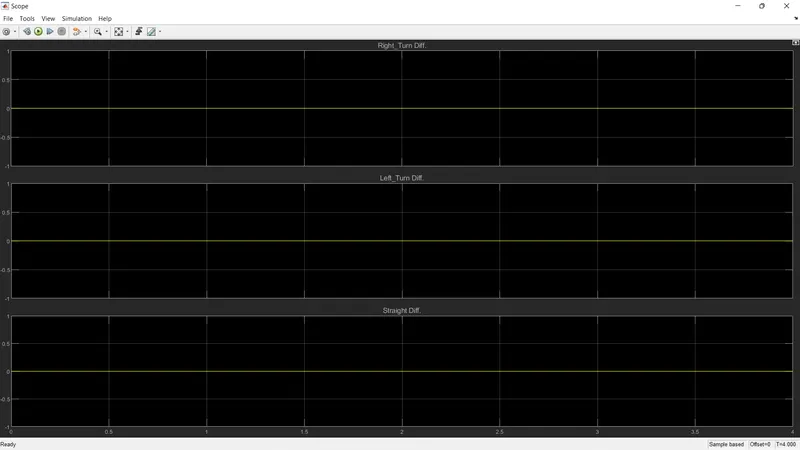
Here, as difference for all 3 values i.e. Right_turn, Left_turn and Straight between input and output is zero through out the simulation, hence created MIL test harness is correct and MIL test is performed successfully.
Also the actual output for Right_turn, Left_turn, Straight can be obtained as,
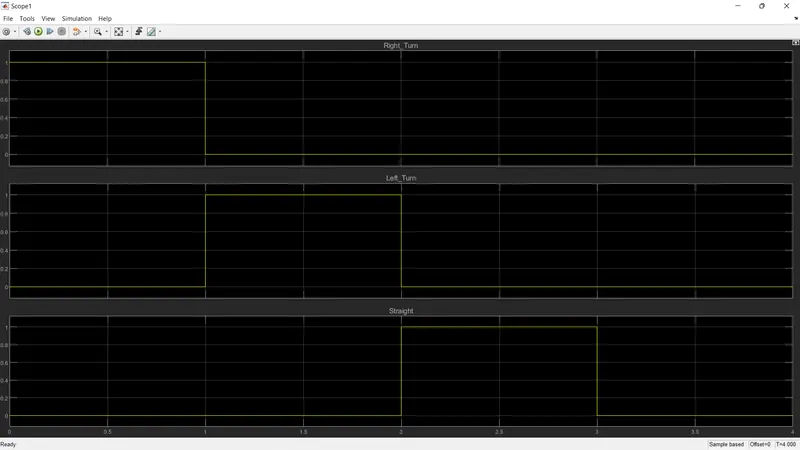
Here, as sample time for the simultion is set at 0.01 sec, output wil be taken at exactly after 0.01 sec. So, for every simulation time of 1 sec, 100 output samples are taken and according to the test cases defined, output is obtained exactly as stated. At t=0 sec, output values obtained are, Right_turn=1, left_turn=0, Straight=0. Similarly, at t=1 sec, Right turn=0, left_turn=1, , Straight=0 and At at t=2 sec, Right_turn=0, left_turn=0, , Straight=1. Finally at t=3 sec, as camera input is not available i.e. zero, values obtained are, Right_turn=0, left_turn=0, Straight=0.
Now, to perform SIL test, Code generation also need to be set. It can be set as - select Modeling - Model settings - Code generation - browse system target file - select as ert.tlc Embedded Coder - Apply - OK.
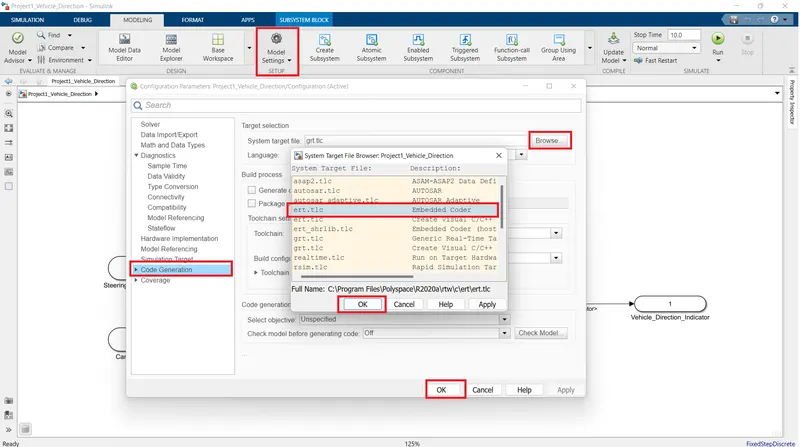
Now, to create a SIL test harness, it is required to set the created subsystem as Atomic subsystem. Otherwise the process for creating SIL test harness will be aborted and will show an error. So, the subsystem can be set as Atomic subsystem - right click on the subsystem - select Block Parameters (Subsystem) - select Treat as Atomic Subsystem. Here, the if the sample time will be given as -1 by default which will select the model sample time as it is. Otherwise as we are setting the subsystem as Atomic, here also model sample time can be set.
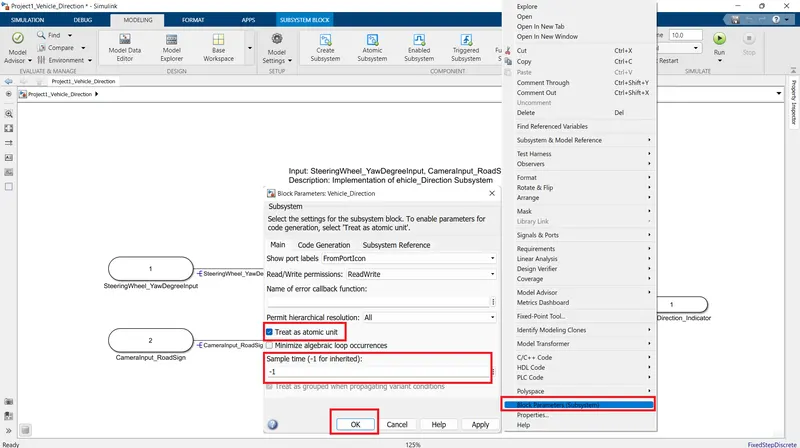
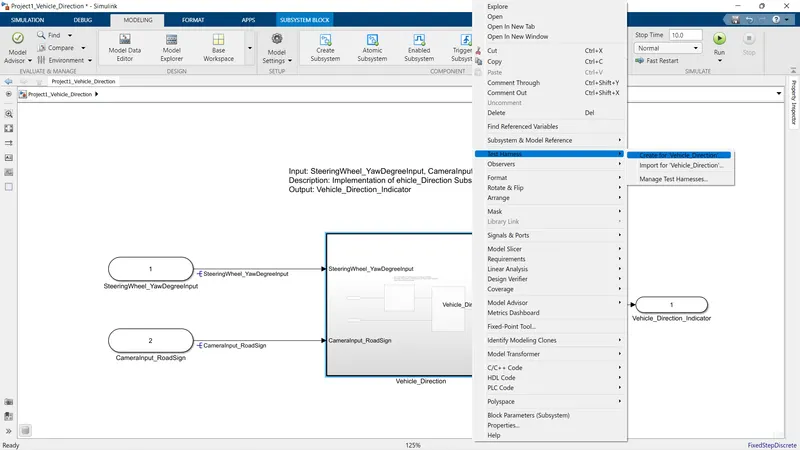
Now, to create SIL Test Harness - Select the subsystem Vehicle_direction, right click on it and select the option Test harness - create for Vehicle_direction, as the name of the subsystem is Vehicle_direction.
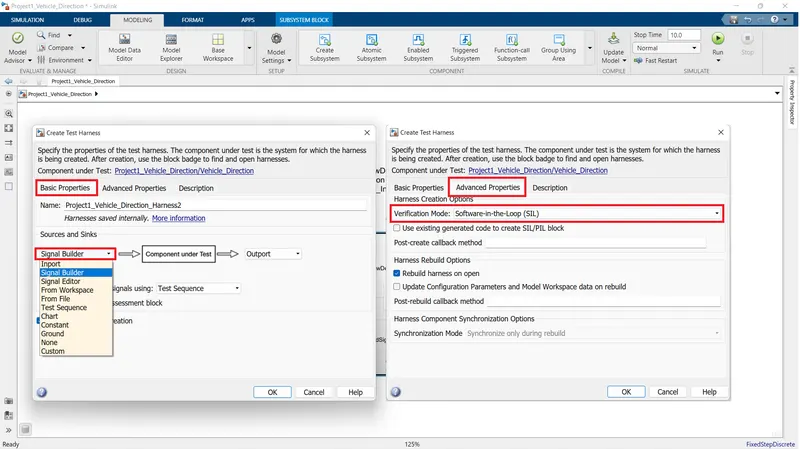
A pop up window for create test harness will open. In that, select sources and sinks. Here, source is input Signal builer in which test cases will be stated and sink is outputs obtained, while componenet under test is the subsystem Vehicle_direction. Also for selecting SIL test, go to advanced properties, and select Software-in-the-Loop (SIL) under Verification mode.
Now, once OK is selected, the model logic will be converted into a C-code and the subsystem will get converted into a SIL block. This SIL block will be linked with a code folder which will get created in the working directory folder and will be named as Vehicle_Direction_ert_rtw.
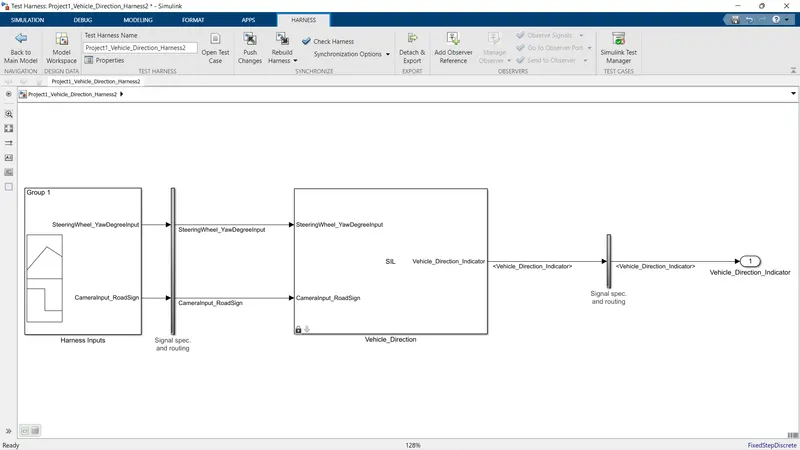
This generated SIL test harness is linked with actual model Subsystem,
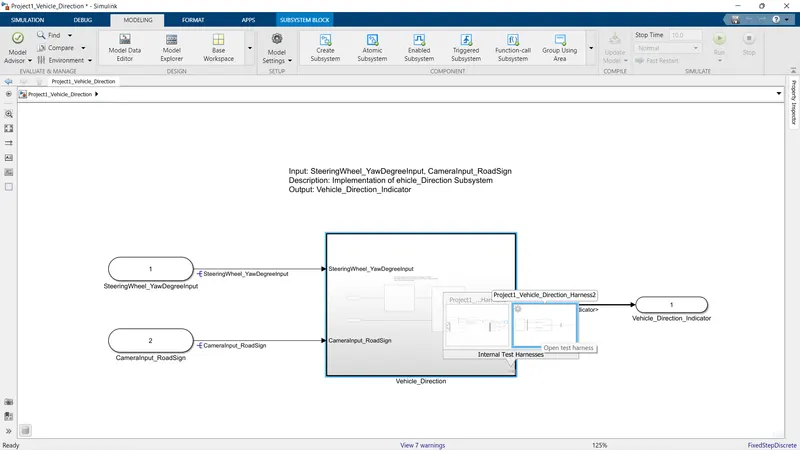
The created SIL test harness will shown as internal test harness and will get open in separate window stating its name as Project1_Vehicle_Direction_Harness2,
This created SIL test harness is exactly as similar to the actual model with some extra data conversion subsystem blocks at input and output given as Signal spec. and Routing. These subsystem blocks are added by simulink itself. When input is given, it goes to the C code and outputs also are generated from the C code. So overall SIL block tests the generated C code.
Further more, add the same test cases as input via the selected signal builder, which are defined in the XL file as,
the required test case data can be imported to selected signal builder input,
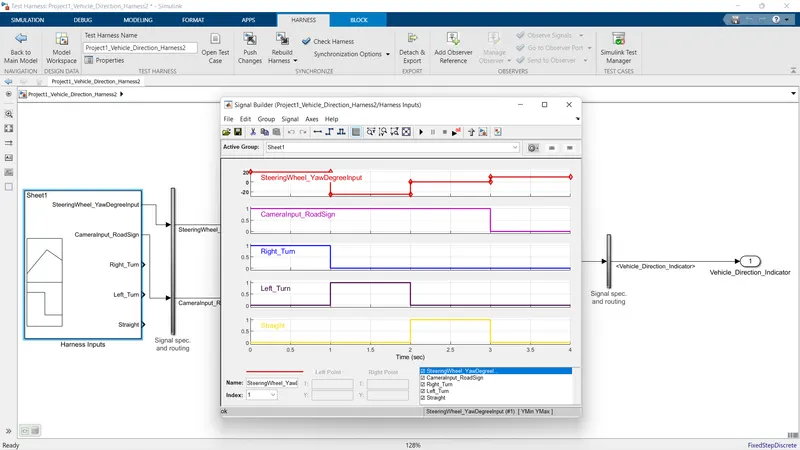
After running the simulation if difference between the obtained output and given input is zero, then only the SIL test is performed and testing of generated C code is done successfully. So, the difference can be taken as adding data signals to the subtract blocks and check the results via scope,
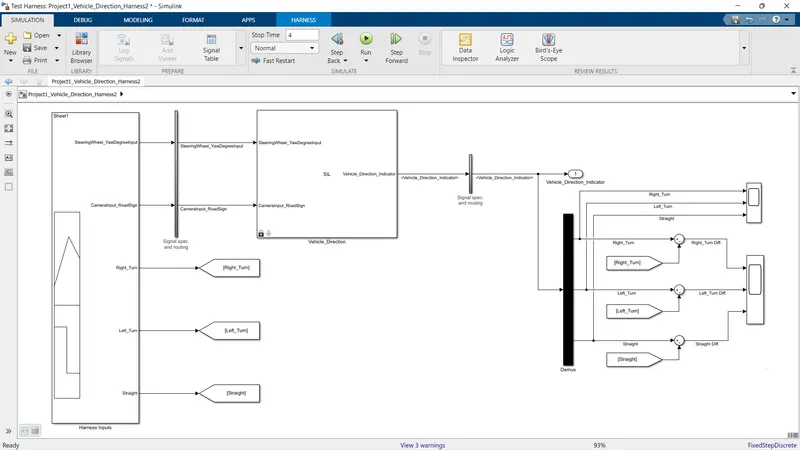
The results obtained are,
Here, as difference for all 3 values i.e. Right_turn, Left_turn and Straight between input and output is zero through out the simulation, hence created MIL test harness is correct and MIL test is performed successfully.
Also the actual output for Right_turn, Left_turn, Straight can be obtained as,
Here, as sample time for the simultion is set at 0.01 sec, output wil be taken at exactly after 0.01 sec. So, for every simulation time of 1 sec, 100 output samples are taken and according to the test cases defined, output is obtained exactly as stated. At t=0 sec, output values obtained are, Right_turn=1, left_turn=0, Straight=0. Similarly, at t=1 sec, Right turn=0, left_turn=1, , Straight=0 and At at t=2 sec, Right_turn=0, left_turn=0, , Straight=1. Finally at t=3 sec, as camera input is not available i.e. zero, values obtained are, Right_turn=0, left_turn=0, Straight=0.
Further more, After performing MIL test, model can be directly converted into the C code as - select Apps - Embedded Coder - select Build option
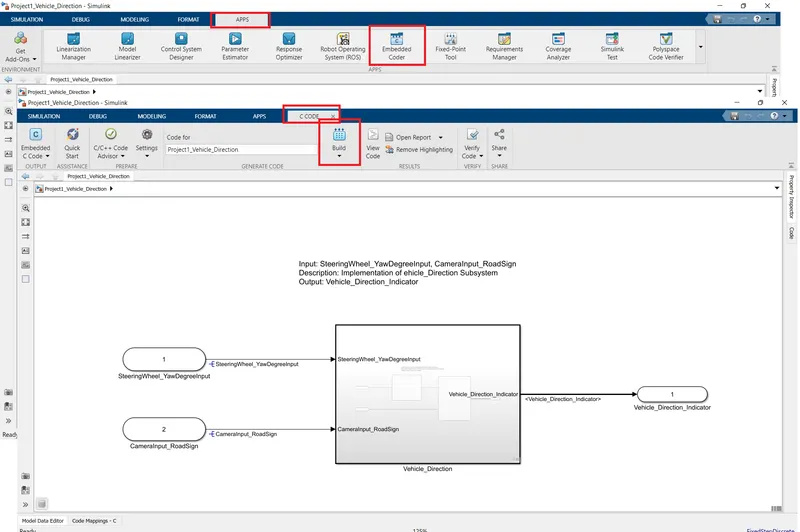
The generated C-code can be given as,