Plotting of a simulation to study the workspace of a 2R Robotic Arm using MATLAB
Week 2 Report.
- Aim: To plot a proper simulation of the two links and get the position of the manipulator of the Robotic Arm.
- Introduction:
Kinematics in robotics is a statement form about geometrical description of a robot structure. In other word, kinematics is the relationship between the positions, velocities, and accelerations of the links of a robot arm. The aim of kinematics is to define position relative of a frame to its original coordinates.
Using the kinematics model, a programmer can determine the configuration of input reference that should be fed to every actuator so that the robot can do coincide movements of all joint to reach the desired position. Using this, we can compute the workspace for the manipulator/ robotic arm.
The workspace can be said as all the possible locations that the robot can reach. The understanding of the workspace is very important as it can be used to design robots that can be used for complex applications such as welding, painting, material handling etc.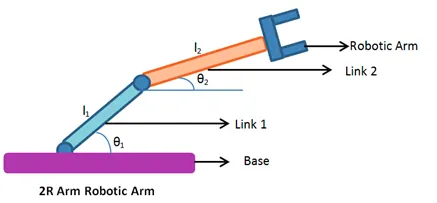
A typical 2R robotic Arm. - Question Set-up:
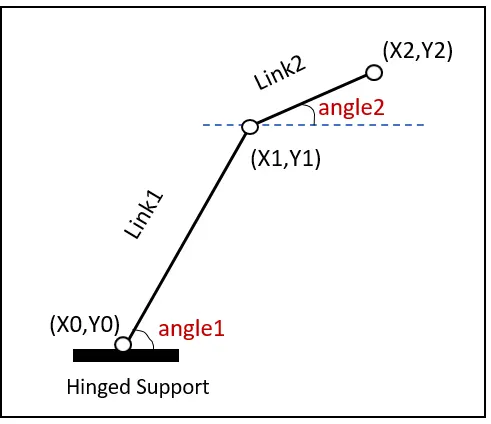
As we can see that, the Base of the robotic arm is fixed by an hinge support at an angle of θ1θ1 with the x-axis. The base co-ordinates can be taken as (x0,y0) We take the length of this link as "l1". The end point of this link is the starting point of the next link. The co-ordinates of the base are taken as (x1,y1). The second link is at an angle of θ2θ2 with the x-axis and the length of this link is "l2". The end point of the second link is where the manipulator is located at. The co-ordinates of the end of this link is (x2,y2).
Through basic trigonometry, we can conclude that:
x1 = l1 * cos(θ1θ1)
y1 = l1 * sin(θ1θ1)
and
x2 = l2 * cos (θ2θ2)
y2 = l2 * sin(θ2θ2)
- Program/Code:
1. We firstly need to clear and close all the previously entered codes and the preset values of the already used variables, hence we use the following commands:
close all
clear all
clc
2.In the next step we include all the inputs necessary for the simulation. All these inputs are the Lengths of the links, the angles made by the links with the x-axis.
All these inputs have been assigned a variable as well. For example: The length of the link1 is l1 and the angle made by the first link with the x-axis is θ1θ1.
We can create an array of angles that will be used to plot the animation. To create an array, we simply use the "Linspace" command. This command will linearly space a ceratin number of values between two numbers. Like for example:
Command: linspace (0,50,5) (Starting number=0 , Ending number=50 , Total number of Values=5)
Output: 0, 12.50, 25.00, 37.50, 50.00
3. Next, we define a for loop wrt all the theta values. In this loop, we create a Loop counter Variable that will also define something like an array between 1 and the Length of theta1, which in our case is 20. We then assign a variable of A to the values of theta at respective values of the loop counter.
In this command, we then define another for loop. The purpose of doing this is to make the first for loop command follow certain steps till the end of the loop.
So, in the second for loop, we define all the possible locations of the second link. We know that, the location of the link can be plotted by using only the Angle and the Length of the link.
Here, we assign another loop counter and then, assign another variable that hold tha array of all the values that we plotted using the second angle.
So, for every 5 values of the second loop,the position of the first link changes. Like this, we can get a Simulation of the workspace of the robot. Like this we can plot the Simulation of the movement of the robotic arm as well.
4. Next we plot all the lines in one single plot and then give the linewidth=2.
5. After the plotting is done, we then go onto stitch these plots together and create a movie from out of it. To do this, we simply have to assign a Variable (M in our case) and then assign all the frames to this variable. After all the variables were assigned, we then create a movie with this variable. We then have to create a Temporary Folder and then give the commands to open it and write and close the folder for this simulation. We can change the frame rate and other properties for the video as well. Those commands are also given below.
The Code will look something as the following:
close all clear all clc %Inputs %Length of the Links. l1 = 2 l2 = 1 %Angles with the x-axis. theta1 = linspace (0,90,20) theta2 = linspace (0,90,20) ct =1; for i = 1:length(theta1) A= theta1(i); for j = 1:length(theta2) B= theta2(j); %The coordinates of the Base of the first link. x0 = 0; y0 = 0; %The coordinates of the end point of the first link. x1= l1 * cosd(A); y1 = l1 * sind(A); %The coordinates of the manipulator. x2 = x1 + l2*cosd(B); y2 = y1 + l2*sind(B); %Animation Plot figure(1) plot([x0 x1],[y0 y1],[x1 x2],[y1 y2],'linewidth', 2) axis([-0.1 5.0 0.0 5.0]) grid on M(ct) = getframe(gcf) ct = ct + 1; end end movie(M) videofile = VideoWriter ('forward kinematics.avi' , 'Uncompressed AVI') videofile.FrameRate = 60 open(videofile) writeVideo(videofile,M) close(videofile) - Errors: The errors that I faced were majorly the typos and the parantheses while using specific commands. So, when MATLAB pointed out an error, I checked for the line number and then checked for any typos and corrected them right away.
- Conclusion: In conclusion, I would like to state that, this challenge helped me understand the kinematics of a 2R robotic arm and helped me understand how to make a simulation out of the desired frames and
Youtube Link for the simulation: https://youtu.be/f7aoOnGcBvs