Hood design-Week 2
REPORT WRITING FOR HOOD DESIGN :-
Introduction:
Hood
The Hood is the outer panel covering the front engine of the vehicle. It opens to allow access to the engine compartments for the ease of maintenance or repair of the vehicle. Hood is also considered as another door as it consists of the outer panel, an inner panel like side doors of a vehicle.
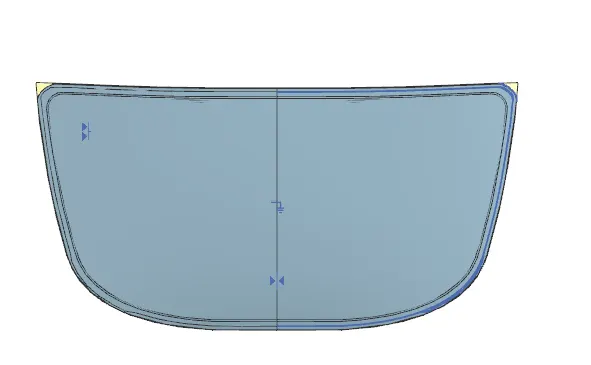
Outer panel: It is the aesthetic part of the hood. In other words, it is the outer skin of the hood which provides a luxurious look to the vehicle.
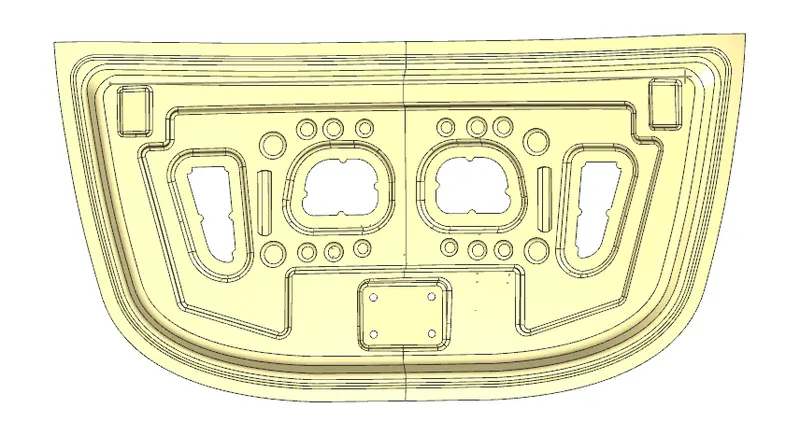
Inner Panel: The hood inner panel provides strength and rigidity to the hood. It also directs the force of the collision outwards instead of into the engine compartment of the car.
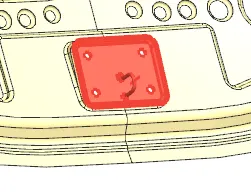
Striker: It is U shaped bend that attaches to the latch in order to lock the hood and prevent any loose movement during the car motion.
Hinge: It is the pivoting point from which the hood opens and closes.

Materials
Conventional car bonnets today are mostly made of steel or aluminum. Such car bonnets weigh about 10 kgs. This is considered too high and the potential for improvement by weight reduction is expected. The greatest change for weight reduction is material changes and redesign of the inner panel of the bonnet. The most important criteria to be considered is to reduce pedestrian head injury.
*Construction Of HOOD
Hood can be designed using different tools such as Siemens NX Cad and Catia , In my case i have used Siemens NX Cad . So, By the help of CAD data provided to us we have to design the Hood , So as we know Hood is divided into 2 parts - Inner pannel and Outer Pannel , so we Have to design the Inner pannel by using the CAD data of Outer pannel. Followings are the steps used to design Inner pannel by the master Section data provided :-
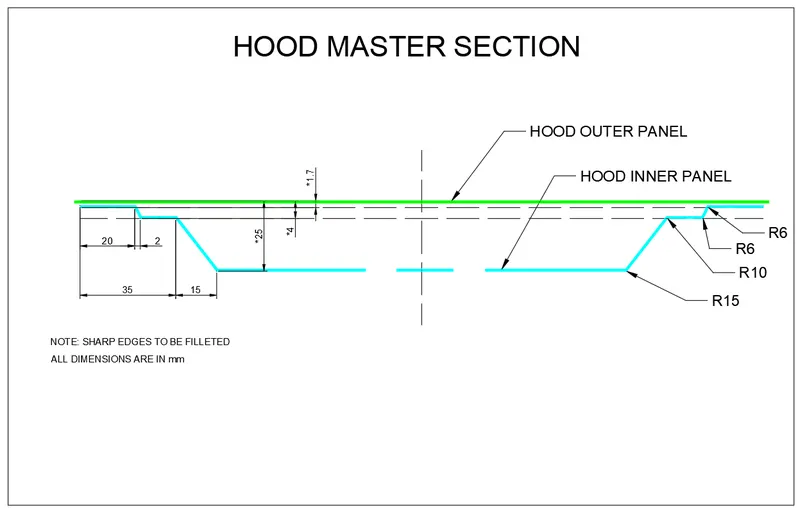
1) First we Have to create a Datum Coordinate system , then using Wave Geometry Linker we have to create a lonked body then we have to offset it.
2) Then we have to trim one side of the body , so we can work on one side of the inner panel then we can mirror it afterwards.
3) Then Using various tools such as - Offset surface, Trim Sheet , Offset in Face , Law extenstion , face blends, edge blends etc , we have design the inner pannel then we have to provide Embosses and cut outs for Wrap Around Distance.
*What is EMBOSS ?
Sheet metal embossing is the stamping process to obtained raised or sunken edges for the desired design pattern on the sheet metal. This is done with help of male and female dies between which sheet metal is placed and the dies are pressed against the sheet metal to obtain the designed pattern. In some cases, roller dies are used to get the raised edges in the sheet metal.
Manufacturing considerations for the emboss creation
1. The distance between the outer edges of the emboss should be a minimum of 5mm.
2. Draft angle should be provided to the emboss with 7degreedegree - 9degreedegree for the easy removal of the part from the die.
3. No sharp corners to be provided in the emboss can it would lead to inefficient manufacturing.
4. The height of the emboss should not be more than 5mm.
*What is Wrap Around Distance ( WAD) ?
The most important criteria in designing a bonnet are pedestrian safety from a frontal collision.
The EURO NCAP has developed series of crash test and rating systems for assessing pedestrian, driver, and passenger injuries during impact with of the vehicle.
The below image illustrates a pedestrian is in standing perpendicular to the road and a crash test performed with a head-on collision.
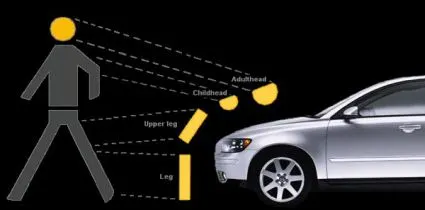
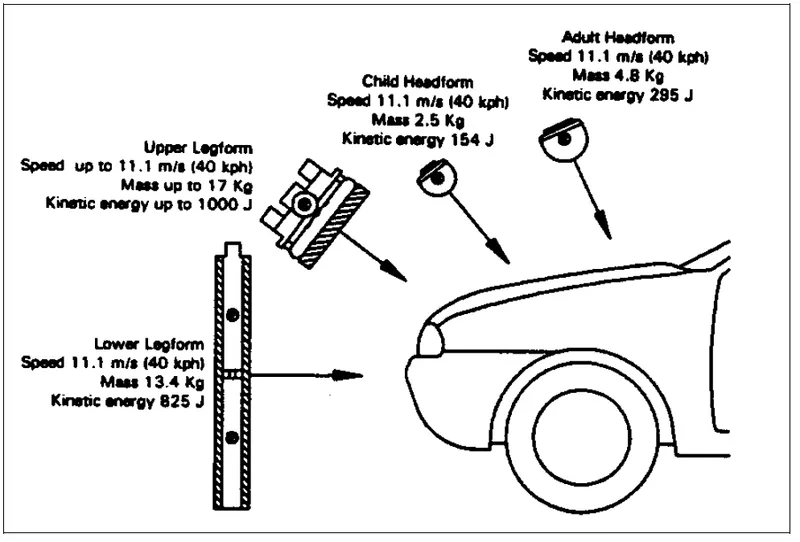
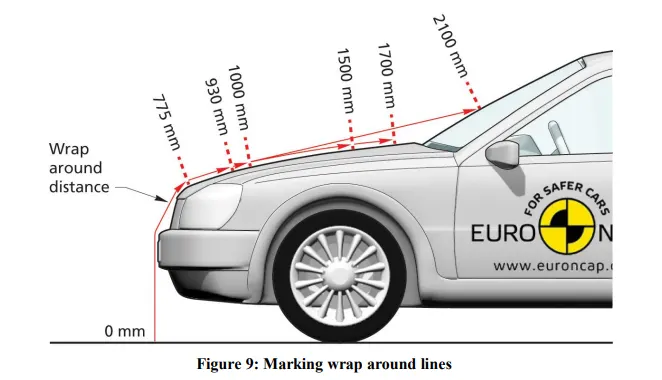
It is the distance from the road to the point where the head of the pedestrian collides with the hood.
In the below images we can see the wrap-around distance for adults and children.
*Under Bonnet clearance
The designed hood is offset to 90mm towards the engine compartment to check the interference of the hood with the hardpoints in the engine compartment.
This 90mm offset is considered the deformation caused due to the impact and package components that penetrate the deformation zone are checked with different colors as shown in the below figure.
HIC criteria
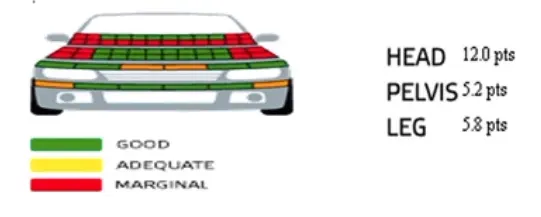
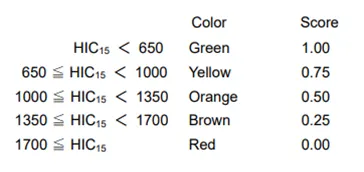
The responsibility of the design engineer is to reduce the red points and increase the green points to pass the safety criteria. This is done after the creation of emboss to reduce the deformation during a collision. Then cut-outs are made such that the penetration points are reduced.
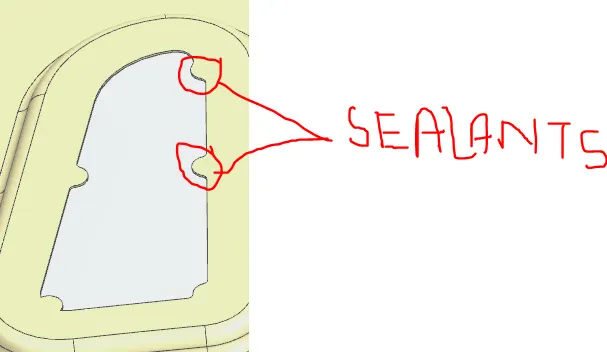
5) Now We have to provide Mastic Cut outs For Mastic Sealants .
*what is Mastic Sealants ?
Sealants are used to close the gap between two or more substrates. It also acts as a leakproof between the components. It forms a barrier through the physical properties of the sealant itself and by adhesion to the substrate.
Mastic Sealants are used to join one surface to another or protect the area to which it is applied. It has heat resistant properties and the ability to form a strong bond which is applied using a mastic sealant gun.
Mastic Sealants have an influence area of 80mm diameter.
Mastic Sealant points in the designed hood are shown below.
6) Then We have to Place the Hinges and give them constraints.
7) Then We can mirror Our Design Using Mirror Geometry Feature Thn Every Design will Associatively Mirrored
8) Then we have to make a trajectory path and place the Striker Emboss and Place the Striker in the inner pannel .
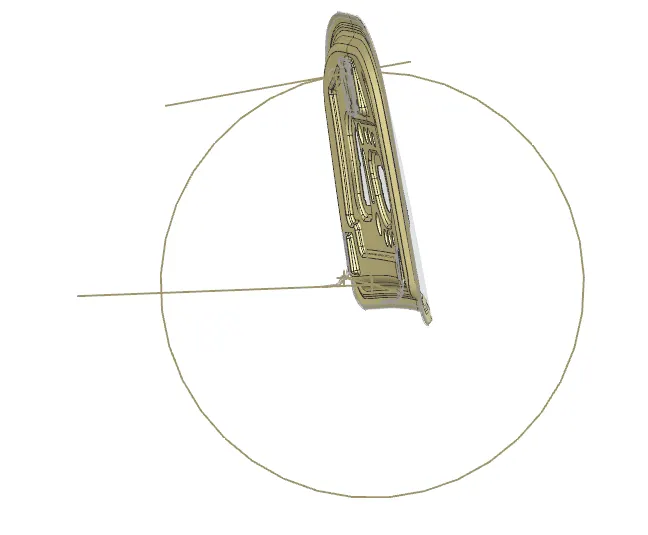
This is done because the latch where the striker strikes and locks the hood is positioned with respect to the trajectory circle. If the striker is not positioned accordingly then there will be difficulty in locking the hood.
Note: For all the closure components the position of the hinge and hinge axis is important and it influences the position and orientation of the striker.
9) Then We will Sew the pannels , Then Thicken the Inner pannel towards the outer pannel
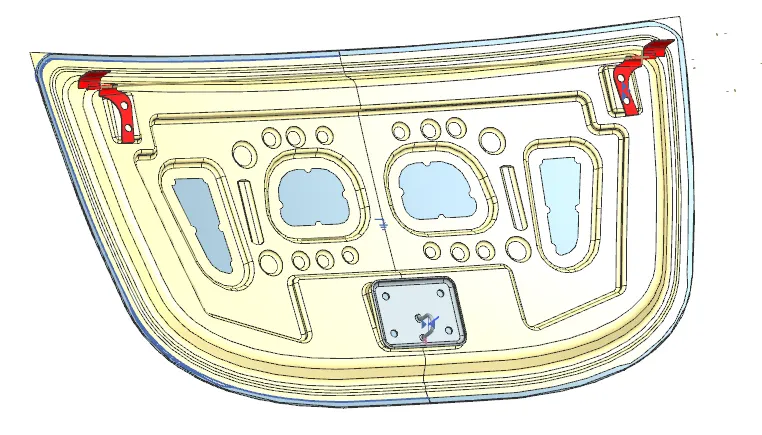
10) The inner panel is Created 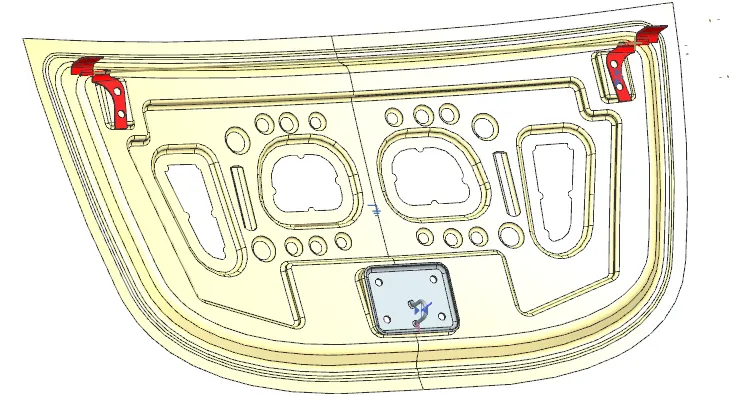
So , Accordingly We have to Design the Outer pannel . Following are the steps :-
1) First we have to create a Datum Coordinate System .
2) Then Using the CAD data of the Outer pannel , we have to design it , So we will trim it into half and work on it , then afterwards we will mirror it .
3) Then Using different tools Such as - Bridge Curve , Offset Surface , Offset in Face , Trim sheet , Law Extenstion , face Blend, Curve on surface etc. we have to design the Outer pannel for Aesthetics Looks of the car .
4) Then To Join the Outer Pannel and Inner Pannel we use a Process Called Hemming .
*What is Hemming ?
Hemming is a technology used in the automotive industry to join inner and outer closure panels together (hoods, doors, tailgates, etc.). It is the process of bending/folding the flange of the outer panel over the inner one. The accuracy of the operation significantly affects the appearance of the car’s outer surfaces and is, therefore, a critical factor in the final quality of a finished vehicle
Different types of hemming methods are
1. Die hemming method
2. Table-top hemming method
3. Robotic Roller hemming method.
Types of Hemming:
3t flat hem is used to join the outer and inner panel of the hood.
5) Then by using Curve on Surface Tool and then Trim sheets we provide Corner Relief .
* what is Corner Releif ?
Corner relief has to be provided for sheet metal bending. In this case, before the hemming process to control the deformation of the sheet metal and to avoid any tear of the sheet metal during bending.
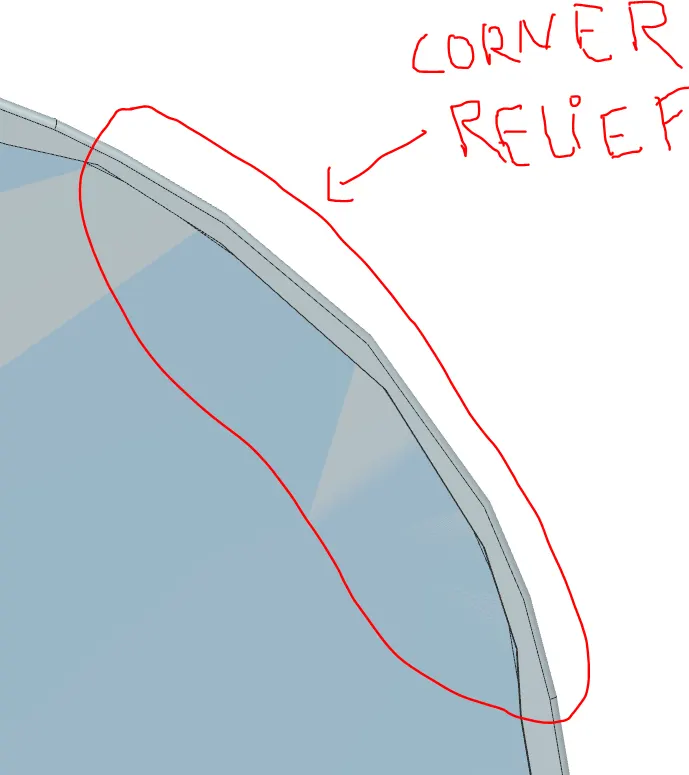
6) Then We Mirror it by using Mirror Geometry and Sew It and use Thicken Tool towards the Inner Pannel .
7) Outer Panel Is Created .
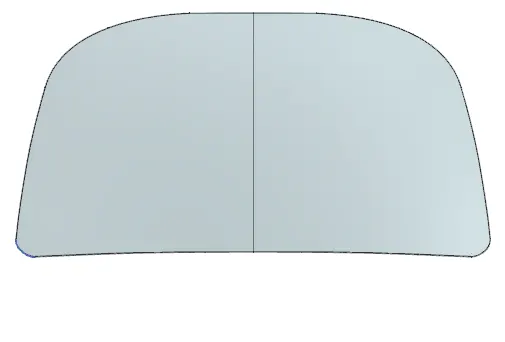
*HOOD DESIGN
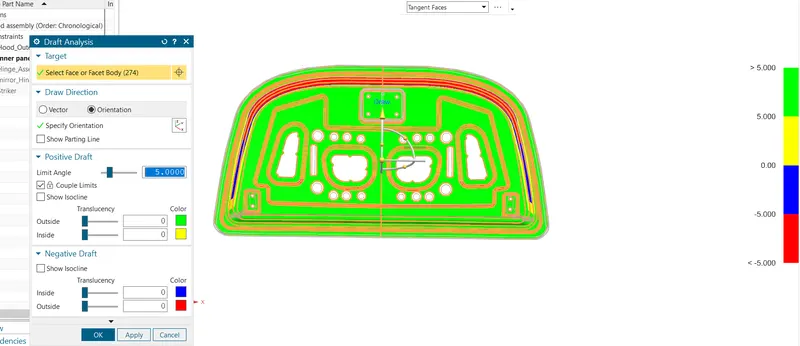
Draft Analysis for manufacturing feasibility:
Conclusion:
1. The design considerations for the Hood is taken are discussed and taken into consideration while designing the hood.
2. The manufacturing feasibility of the hood is taken into consideration.
3. Draft Analysis is performed to check if the faces are clearing for the required draft angle for manufacturing the emboss.