Hood design-Week 2
Object:
In this we will construct a well-defined hood assembly by modeling the different parts needed in creation of our hood assembly that are hood inner, outer panel, hinge assembly, striker.
Software used:
Siemens NX 10
Introduction:
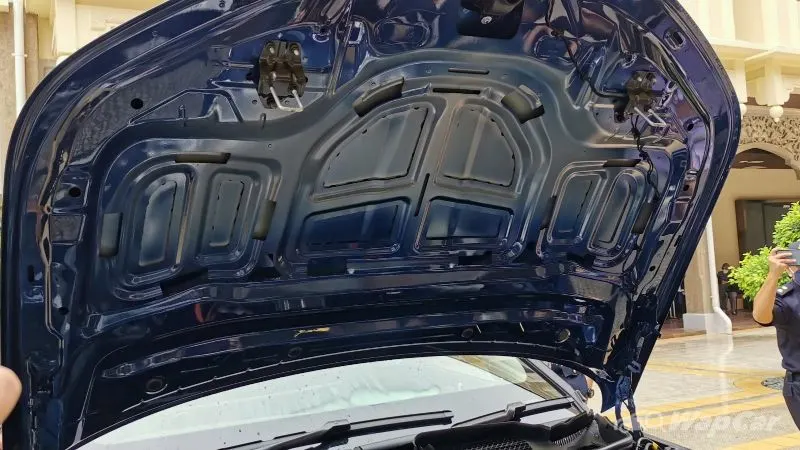
complete hood
Hood:
The hood (American English) or bonnet (commonwealth English) is the hinged cover over the engine of motor vehicles. Bonnet/hood is main component of a car at the front portion. It is used to decorate the car and add luxurious look. The shape of the bonnet is made aerodynamic in order to minimize the air effect. Bonnet is generally used to access the parts easily such as radiator, engine and many other parts. In automotive world the weight optimization plays an important role.
Terminology:
In British terminology, hood refers to a fabric cover over the passenger compartment of the car (known as the 'roof' or 'top' in the US). In many motor vehicles built in the 1930s and 1940s, the resemblance to an actual hood or bonnet is clear when open and viewed head-on; in modern vehicles it continues to serve the same purpose but no longer resembles a head covering.
Styles:
On front-engine cars, the hood may be hinged at either the front or the rear edge, or in earlier models (e.g., the ford model T) it may be split into two sections, one each side, each hinged along the center line. A further variant combines the bonnet and wheel arches into one section and allows the entire front bodywork to tilt forwards around a pivot near the front of the vehicle (e.g., that of the triumph herald).
Materials:
Hoods are typically made out of the same material as the rest of the body work. This may include steel, aluminum, fiberglass or carbon fiber. However, some aftermarket companies produce replacements for steel hoods in fiberglass or carbon fiber to make the vehicle lighter.
Release:
The hood release system is common on most vehicles and usually consists of an interior hood latch handle, hood release cable and hood latch assembly. The hood latch handle is usually located below the steering wheel, beside the driver's seat or set into the door frame. On race cars or cars with aftermarket hoods (that do not use the factory latch system) the hood may be held down by hood pins. Some aftermarket hoods that have a latch system are still equipped with hood pins to hold the hood buttoned down if the latch fails.
Design consideration in hood:
While designing a hood several design parameters are to consider such as the opening angle of the hood support system for the hood pedestrian safety rules
- Hood head zone for lock striker
- Hood stay
- Pedestrian safety
- Mastic data
- Emboss
- Latch trajectory
Hood head zone for striker locking:
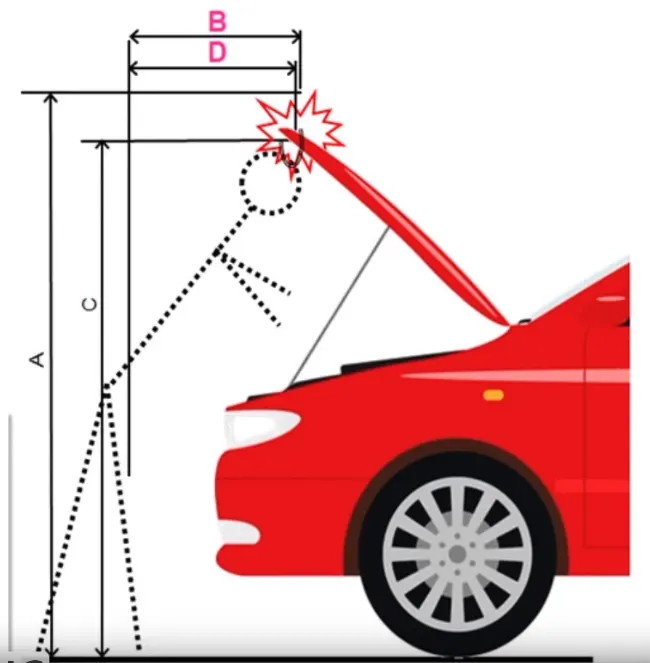
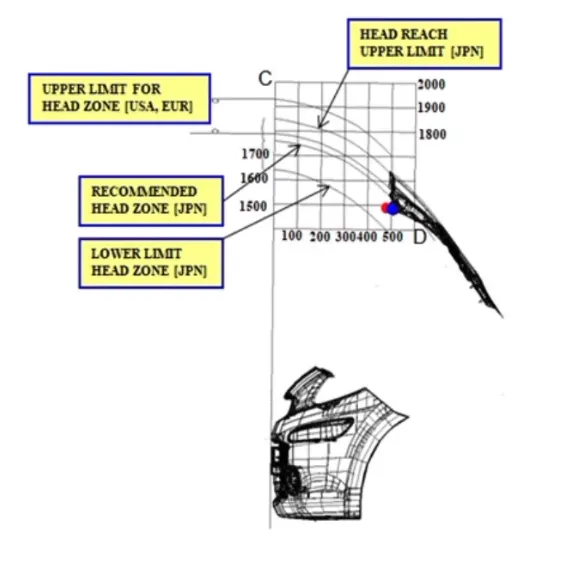
The opening angle of hood will give A, C, B and D with respect to the ground those A, B, C and D are decided in the head zone. opening angle varies from region to region depending on average human height. Depending on the standards we are deciding the angle .so from the angle data support rod or gas stay is designed. The position of support rod is on the other side of the battery
Hood stay:
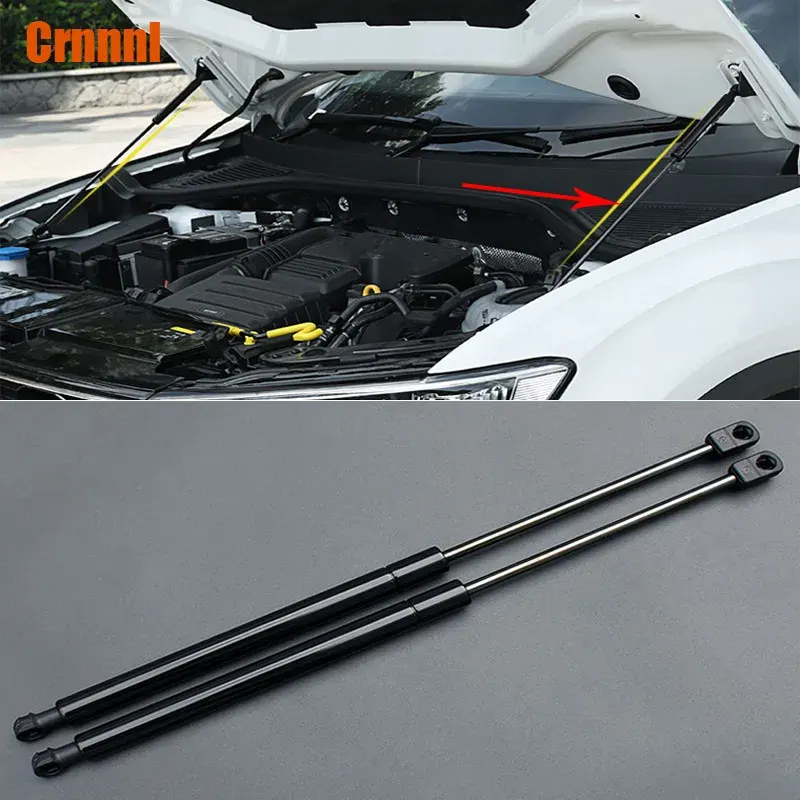
This is the support system for the hood when it is open. and we open hood we need to rest to keep it open position and this can be done by placing it over something or by providing support to it. while design this one should keep in mind that the support system should be self-sustainable to take the load of the hood even if any external force is applied on it due to wind or any other reason and it should facilitate easy opening and closing of hood.
These can be done by two types
- support rod
- gas stay
Support rod:
It is a rod that accommodates itself easily inside the engine compartment and support the hood when we open it by attaching the rod in the hook provided inside the hood. initial bends are been provided to the support rod to provide stiffness.
Gas stay:
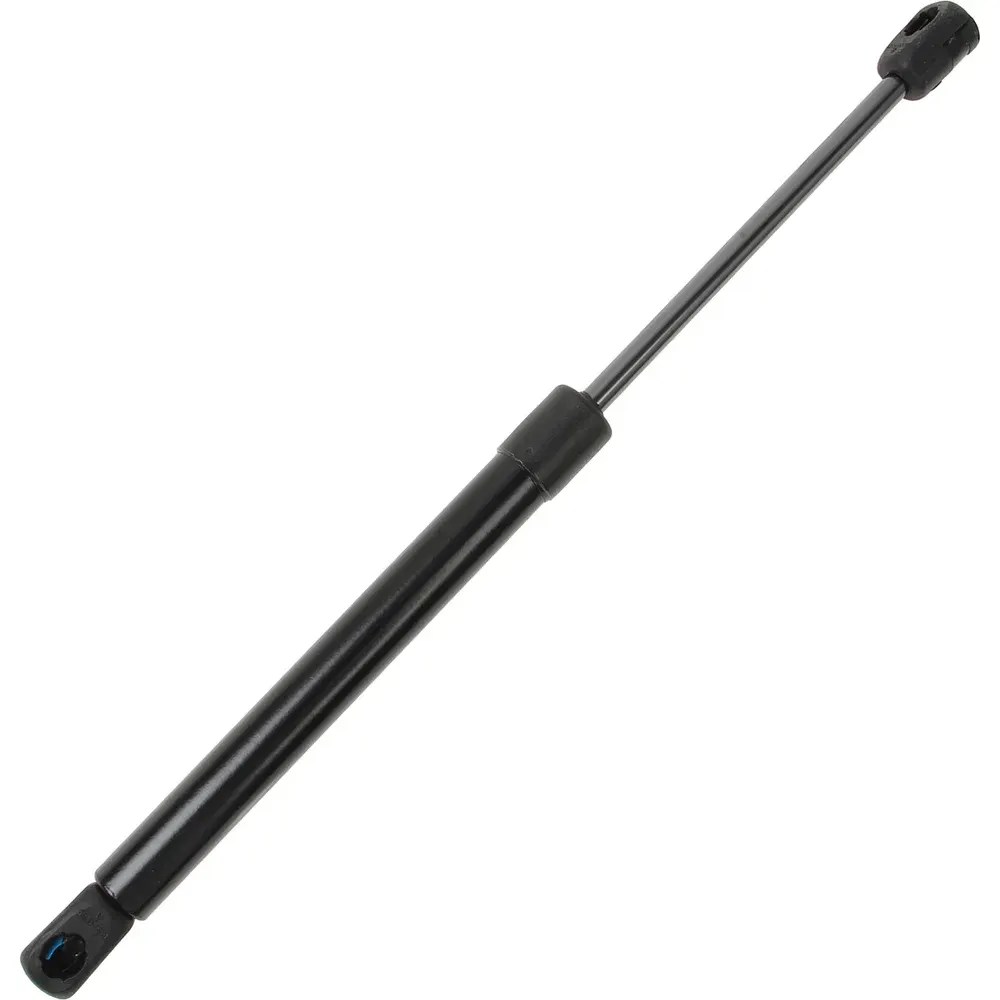
The gas stay holds up the hood of your vehicle. This allows you to access the engine compartment without holding the hood up by hand or with a prop rod. Failed hood gas stay can be both dangerous and annoying as they could allow the hood to fall on your head.
Pedestrian safety:
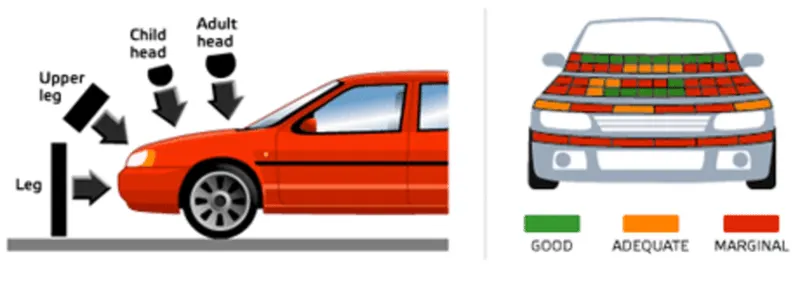
Euro-NCAP guideline for pedestrian safety
While designing the hood, it is vital to consider the safety of pedestrians as when your car hits the pedestrian during a crash, it is very important to study the areas over the hood where different body parts of pedestrians are going to hit. we should also take into account the average height of adults and children while designing our hood. So, whenever a new car is been launched, all these safety parameters are checked by taking a crash test and studying the data obtained from it to make changes accordingly to follow pedestrian safety.
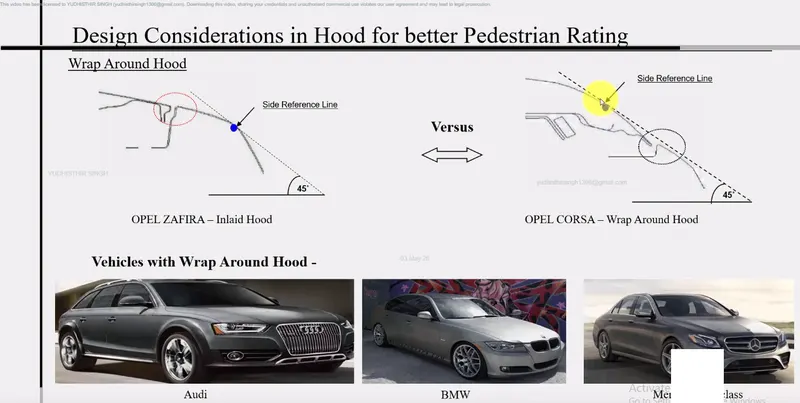
- Inlaid Hood:
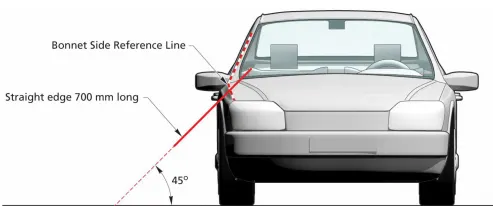
The line which is drawn 45 deg. from ground to Side Reference of car and which is meeting point on fender is called Inlaid Hood.
- Wrap Around Hood:
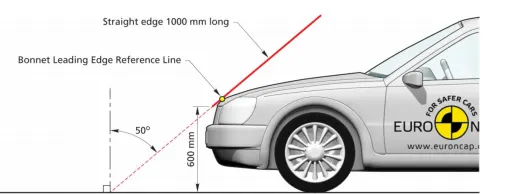
The line which is drawn 45 deg. from ground to front surface of the Hood and which is the meeting point on the outer panel is called Inlaid Hood. Depending on the Inlaid Hood & Wrap Around Hood we can design hood for head impact.
Mastic data:
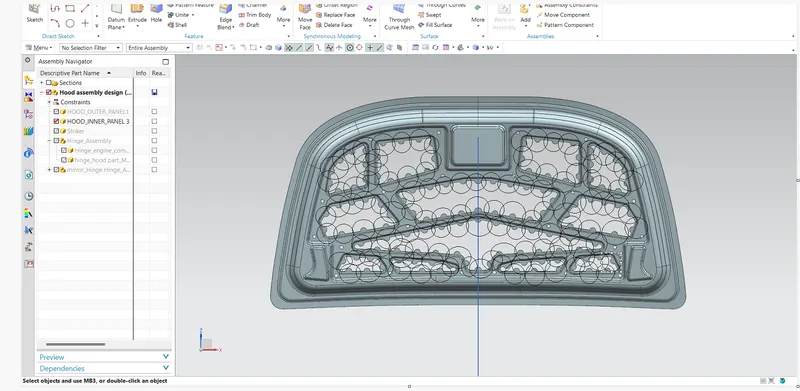
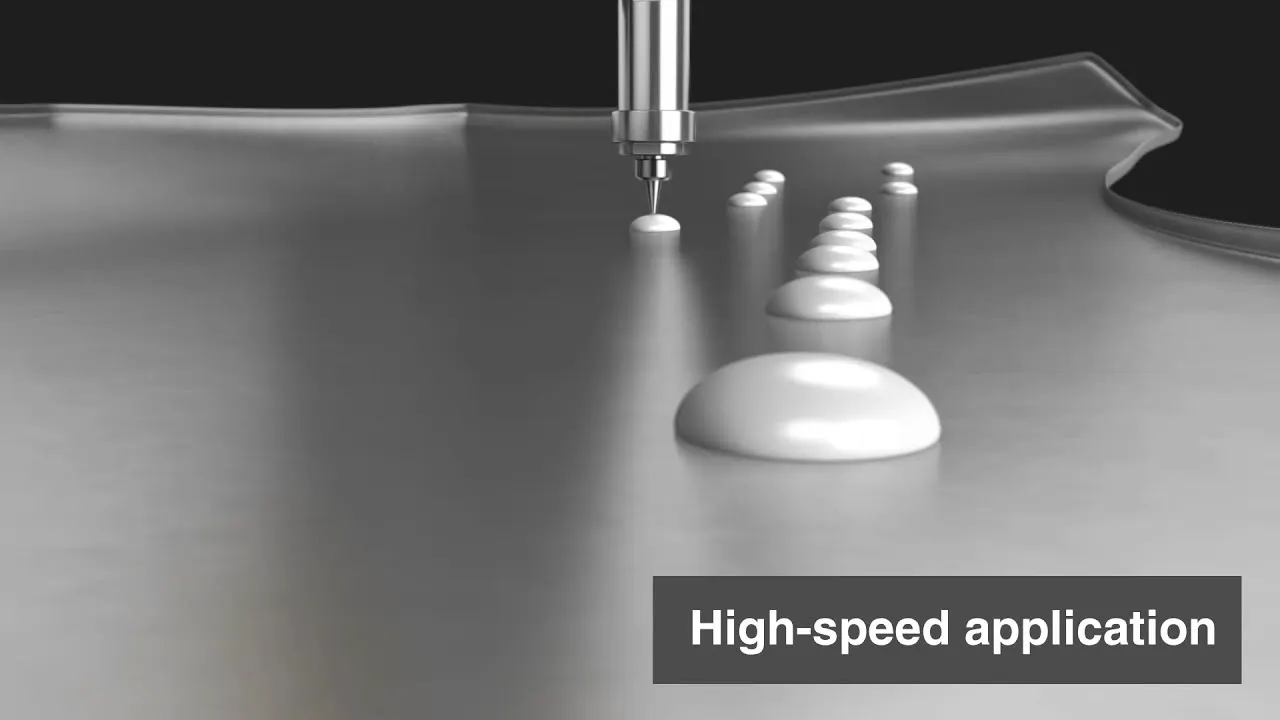
Hood Design Mastic data should be provided in between hood upper panel and inner panel to achieve better Noise, Vibration and Harshness to maintain the upper hood surface Generally mastic diameter should be about 80mm strengthen diameter of the mastic Dotted circle shown in figure, the Mastic data should be provided in between hood upper panel and inner panel to achieve better Noise, Vibration and Harshness Range, to avoid the spot to maintain the upper hood surface regularity. Generally, mastic diameter should be about 80mm which strengthen diameter of the mastic rubber. Dotted circle shown in figure indicate mastic position 6 Mastic data should be provided in between hood upper panel and to avoid the spot weld.
Emboss:
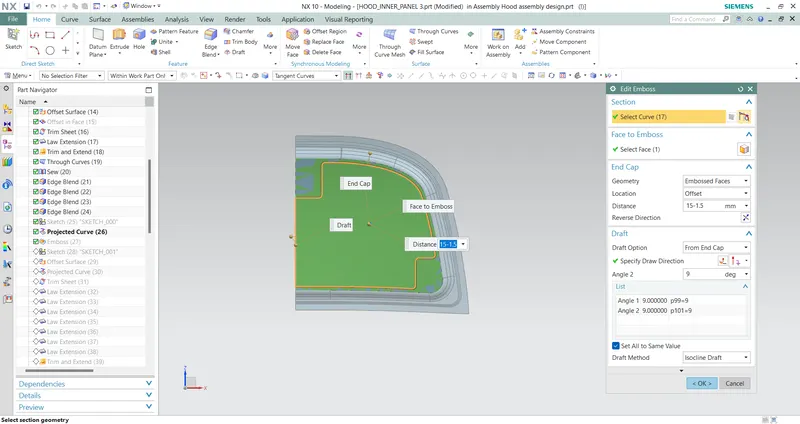
Emboss are provided in the inner panel of the hood assembly. This helps in weight reduction of the hood and also to dissipate the force during collision.
Latch trajectory:
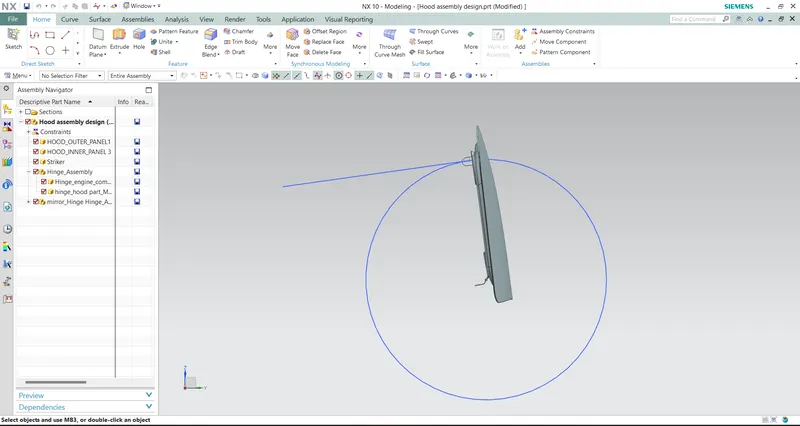
The opening and closing of hood path is latch trajectory. The opening angle varies from region to region so it may not touch the head of a person while opening it . for example , an average height of a person in india is 5.5 ft so the hood opening should in such way that the it will not touch head the person while open it.
Hood and its components:
Hood:
The hood (American English) or bonnet (commonwealth English) is the hinged cover over the engine of motor vehicles. Bonnet/hood is main component of a car at the front portion. It is used to decorate the car and add luxurious look. The shape of the bonnet is made aerodynamic in order to minimize the air effect. Bonnet is generally used to access the parts easily such as radiator, engine and many other parts. In automotive world the weight optimization plays an important role.
hood components
- Hood outer panel
- Hood inner panel
- Hinge assembly
- Striker
Hood outer panel:
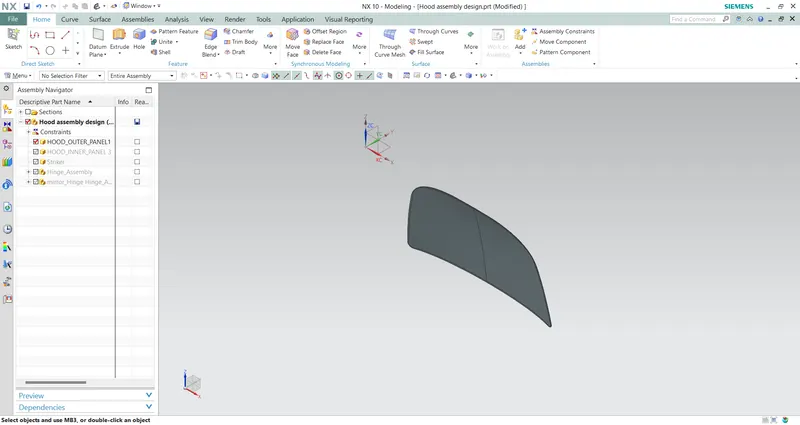
This part of the hood acts as a covering or casing for all the other parts of hood which are enclosed inside this part. The outer surface of this part is provided with a good surface finish, painted with corrosion-resistant paint to prevent the inner parts from corrosion and also to give an aesthetic look to the car from the outside. This part forms the shape of our hood and it is given different styling and shapes to enhance the look & performance of the vehicle to reduce the forces exerted by air when the vehicle is in motion.
Hood inner panel:
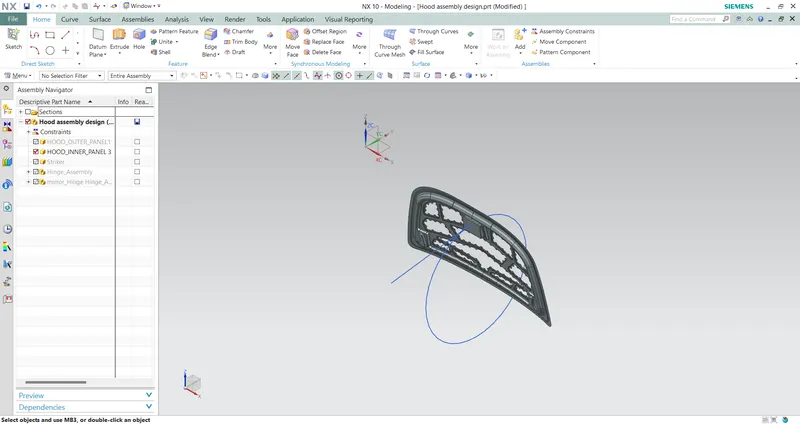
This part is enclosed in the outer panel it forms an integral part of the hood and provides rigidity to the hood, it is the part on which hinges, striker are to be fixed to make our hood fully functional it also consists of embossed sections for proper force distribution and mastic sealant points are also located on this part with reinforcement for hinge & striker. To reduce the weight of our hood some material is removed from the hood inner panel as shown below.
Hinge assembly:
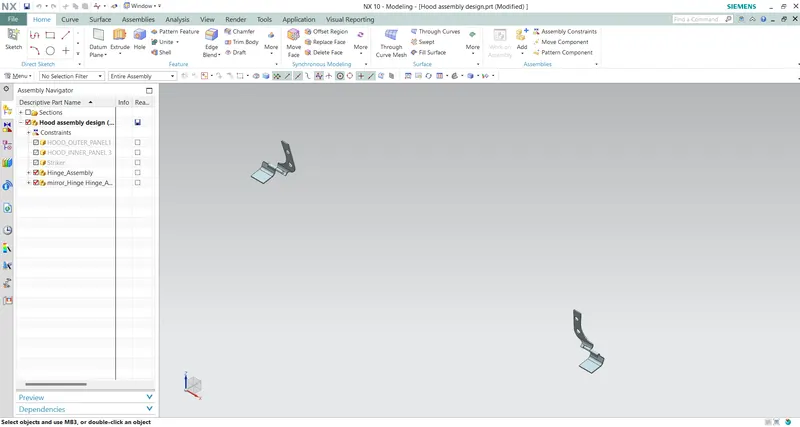
It is an important part of our hood because by use of this part only we are able to open and closed our hood whenever required with ease. This part should be strong enough to take the load of the hood and also the forces which act upon the hood in case of crash. So, this part should be designed with utmost care that it should not fail during its operation.
Striker:
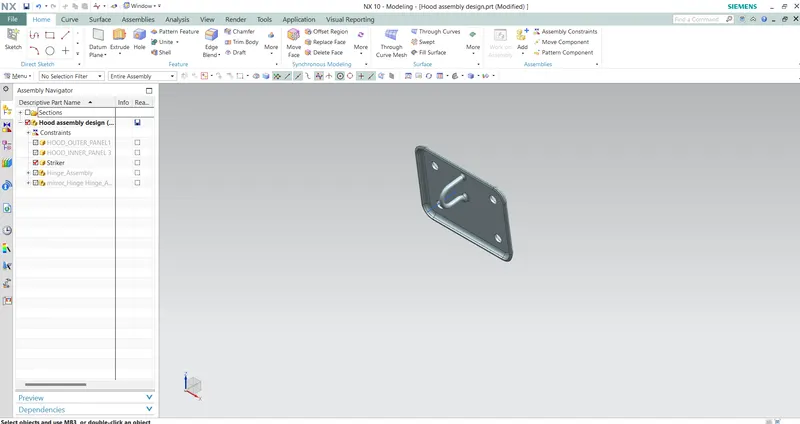
This part is used for providing locking to the hood it consists of a latch-type mechanism and it is located on the inner panel of the hood to decide the position of our striker, the trajectory method is used with the help of this method we can easily locate our striker. This part holds our hood in closed condition unless it is being open by pulling the latch lever to open our hood.
Manufacturing processes:
- Deep drawing
- Hemming
- Embossing
- Blanking and piercing
Deep drawing:
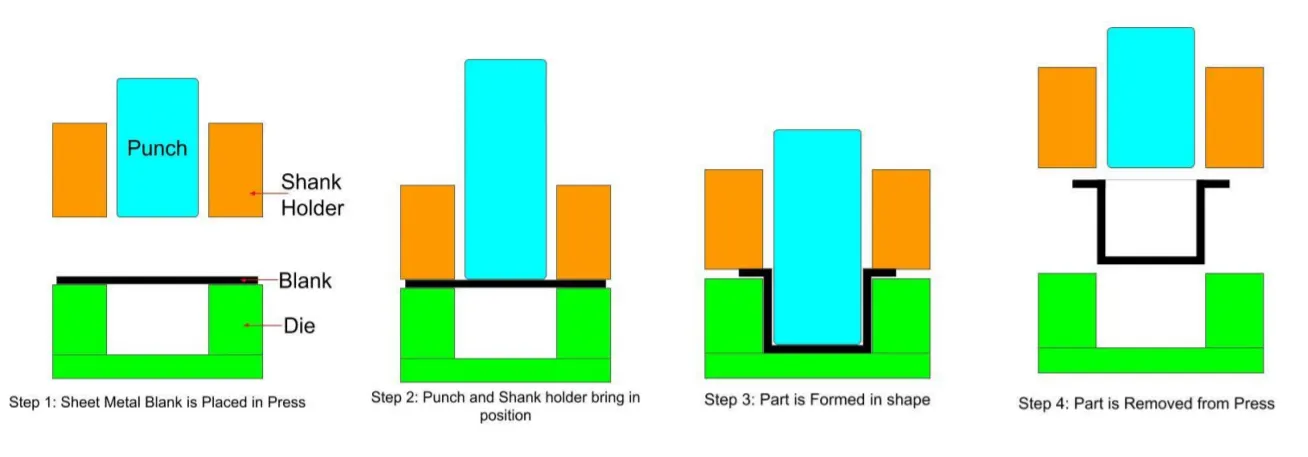
Deep drawing is one of the most widely used processes in sheet metal forming. Apart from its use in many other sectors, it is applied in the automotive industry for the manufacturing of car body parts.
Processes:
The deep drawing process is a forming process which occurs under a combination of tensile and compressive conditions. A flat sheet metal blank is formed into a hollow body open on one side or a hollow body is formed into a hollow body with a smaller cross-section.
Deep drawing processes are divided into three types:
- Deep drawing with tools
- Deep drawing with active means
- Deep drawing with active energy
In the automotive industry, deep drawing is usually carried out using rigid tools.
Illustration of the deep drawing process
The figure illustrates the deep drawing process. The rigid tools consist of a punch, die and binder. In deep drawing, the plate holder closes after the metal sheet blank has been inserted.
Next the sheet is clamped between the die and the binder. This process slows down the flow of the sheet while it is being drawn and thereby prevents wrinkles from forming under the binder. The punch stretches the sheet over the die radius and forms it in the die. The amount of punch force necessary for forming is thereby continually increased up to the lower dead center of the punch.
Whereas in pure deep drawing there is no reduction of sheet metal thickness, forming is achieved in stretch forming purely as a result of a decrease in sheet metal thickness. Stretch forming is extensively used for the forming of only slightly curved parts with low depth of draw (e.g., roofs, doors).
When drawing complex car body parts in practice, there is usually a combination of stretch and deep drawing involved. It is necessary that the sheet metal is stretched as well as possible without reaching the material’s limits (e.g., splits, wrinkles).
There are approximately 300 to 400 sheet metal parts which fit together to form the body of a car. In order to manufacture high quality sheet metal parts optimally for their particular use, specialized software simulates the complete deep drawing process.
Hemming:
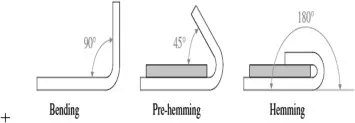
Hemming is a forming operation in which the edges of the sheet are folded or folded over another part in order to achieve a tight fit. Normally hemming operations are used to connect parts together, to improve the appearance of a part and to reinforce part edges.
In car part production, hemming is used in assembly as a secondary operation after deep drawing, trimming and flanging operations to join two sheet metal parts (outer and inner) together. Typical parts for this type of assembly are hoods, doors, trunk lids and fenders.
The accuracy of the hemming operation is very important since it affects the appearance of the surface and surface quality. Material deformations, which occur during the hemming process, can lead to dimensional variations and other defects in parts. Typical hemming defects are splits or wrinkles in the flange, material overlaps in the corner areas or material roll-in. This is why it is important to use simulation tools in order to, on the one hand, better understand the hemming process and, on the other hand, significantly reduce the number of “trial and error” loops during tryout und production.
There are various types of hemming operations:
- Conventional die hemming
- Roll hemming
In conventional die hemming, the flange is folded over the entire length with a hemming tool.
In roll hemming, the hemming roller is guided by an industrial robot to form the flange.
Conventional die hemming:
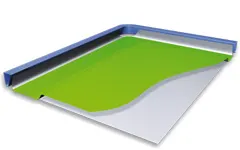
Conventional die hemming is suitable for mass production. In die hemming, the flange is folded over the entire length with a hemming tool. Normally the actual hemming is a result of a forming operation in which the flange is formed with a hemming tool after the drawing and trimming operations have been completed. The formed flange is then hemmed in several process steps. These steps include, for example, the pre-hemming and final hemming depending on the respective opening angle of the flange. Production plants for conventional die hemming are very expensive, but the cycle times are very low.
Roll hemming:
Roll hemming is carried out incrementally with a hemming roller. An industrial robot guides the hemming roller and forms the flange. Roll hemming operation can also be divided into several pre-hemming and final hemming process steps. Roll hemming is very flexible to use and tool costs are significantly lower as compared to those of conventional die hemming. However, the cycle times are much higher since the hemming is realized using a hemming roller which follows a defined path.
Embossing:
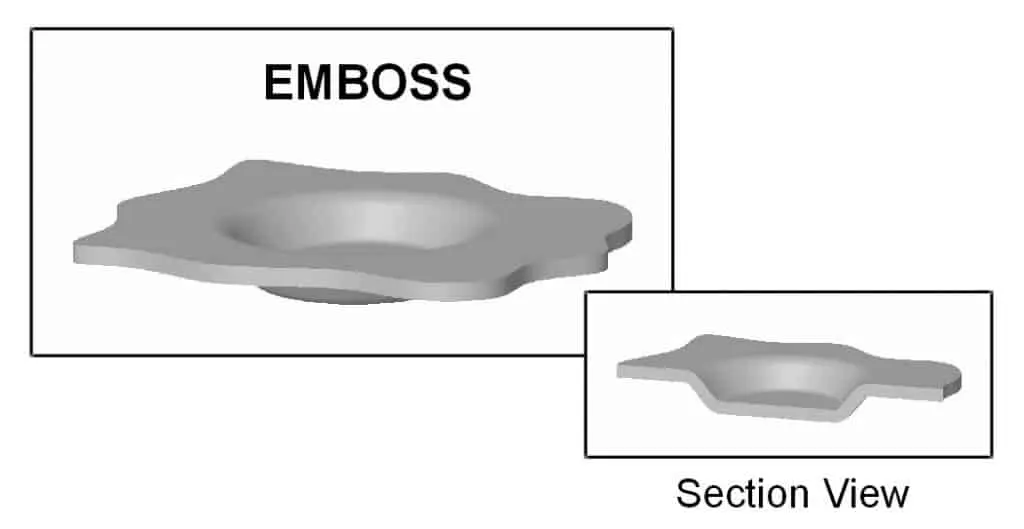
Embossing is a metal stamping process for producing raised or sunken designs or reliefs by passing metal sheet or strip between rolls of the desired pattern. The process enables repeated production without variation and does not change the metal's wall thicknesses.
Blanking and piercing:
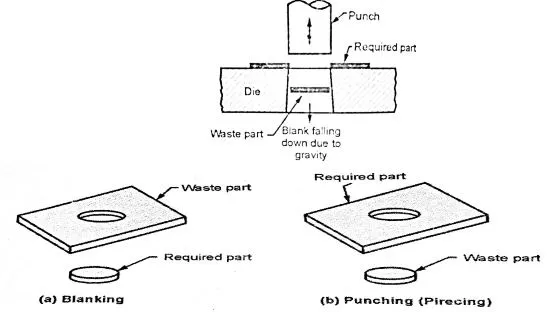
Blanking:
Blanking is a sheet metal cutting process that is used to manufacture an enclosed sheet metal part from a large piece of sheet metal by the application of high shear force.as a result of the blanking processes the blanking part is finished product.
Piercing:
It is a type of sheet metal punching operations there is used to create an extrude hole or slot in sheet metal workpiece. In other words, the piercing operation is a combination of cutting and forming operation.
Design procedure:
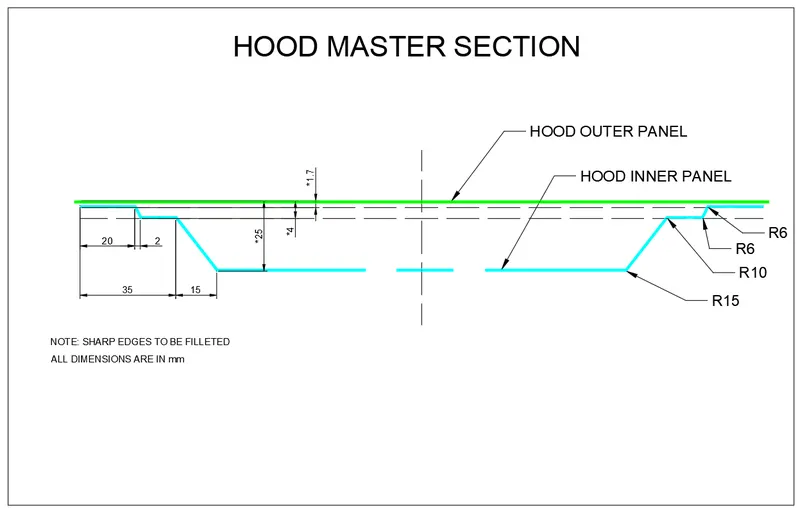
- Import the master section and design the hood inner panel using various commands
- And then design the outer panel from the same master section. And here provides the hemming to outer panel. The parameters of hemming are taken as per given value.
- Now on the inner panel create the embosses for the striker and hinge, and they are created by considering the given dimensions and assembly position.
- Now, on the inner panel, the embossing for hinge and striker are produced by considering their respective dimensions and assembly positions.
- And first the emboss for hinge is created and then by fixing the hinge into its position, we draw an axis passing through both side hinge axes to form a common axis.
- And then we position the striker such that it will move along circumference of a circle whose center is at midpoint of the common axis. Thus, position of striker is decided and we can create emboss for the same
- Using the hinge emboss we created, we can create our hinge reinforcements by creating new parts in the assembly itself.
Master section:
Important commands used in design:
- Offset surface: Offset Surface command to create an offset of one or more existing faces.
- Trim body: It is used to trim one or more bodies using a face or plane. You can also specify the bodies to retain and the bodies to discard.
- Offset curve in face: The curves are created on the face, and are measured along face sections normal to the original curves. Selected curve on surface to offset.
- Trim sheet: It is used to trim off a portion of a sheet body using curves, faces, edges or planes.
- Extend sheet: It will allow you to extend an existing surface to required distance.
- Law of extension: Use the Law Extension command to extend an existing surface or sheet based on the laws for distance and the angle of the extension.
- Through curves: through curves command use to create a body through multiple sections where the shape changes to pass through each section. Sections are curves, points, solid edges, solid faces.
- Edge blend: create fillets on edges.
- Face blends: create fillets between the faces
- Projected curve: to project curves, edges, or points that are external to the sketch, onto the sketch along the normal of the sketch plane.
- Emboss: this command creates an embossing by modifying a body with faces created by projecting a curve/section along a direction. You can modify the emboss using options like endcap location and draft angle.
- Trim and extend: It helps you to trim and extend intersecting surfaces and make corner at their intersection.
- Datum plane: create a planar reference feature to help define other features, such as swept bodies and features at angles to the faces of target solids.
- Datum coordinates systems: objects are created relative to some aspect of the datum object, such as a Point, Plane, or Axis
- Mirror geometry: As name suggests, it allows you to mirror geometries about selected plane or surface.
- Sew: It combines sheet bodies together by sewing their common edges. There shouldn’t be any gaps larger than specified tolerance.
- Thicken: It is used to convert a surface to solid body by providing thickness.
- Wave geometry linker: With this you can create, associative or linked copies of any entity of a part into other parts. It may be a surface, edge, curve, body, sketch etc. The changes made to the original entity will be reflected in the copy of that entity.
- Mirror assembly: The “Mirror Assembly” command is used to create mirrored parts and components.
Final hood assembly:
isometric:
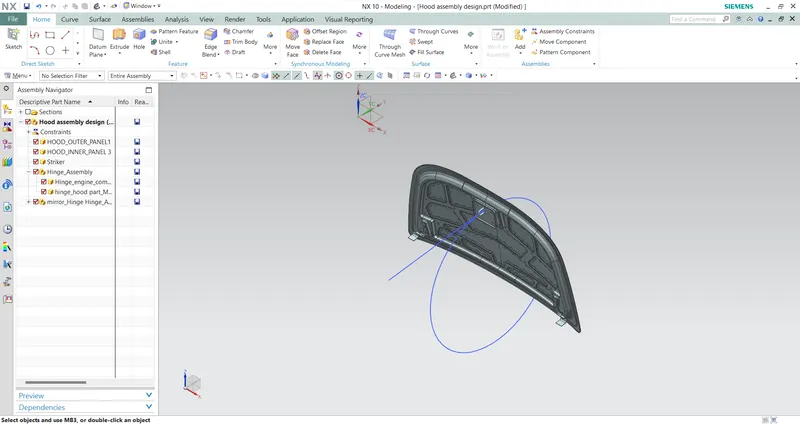
Front:
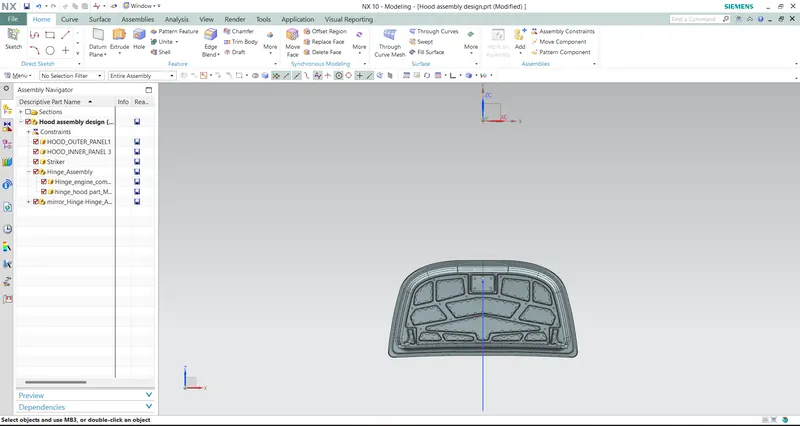
side:
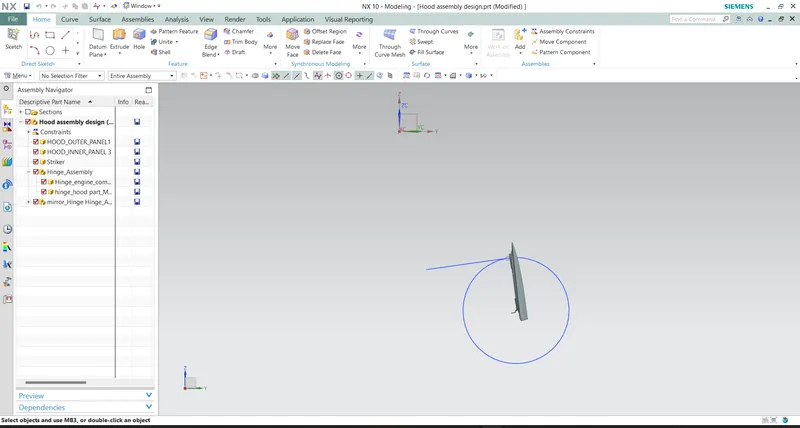
Top:
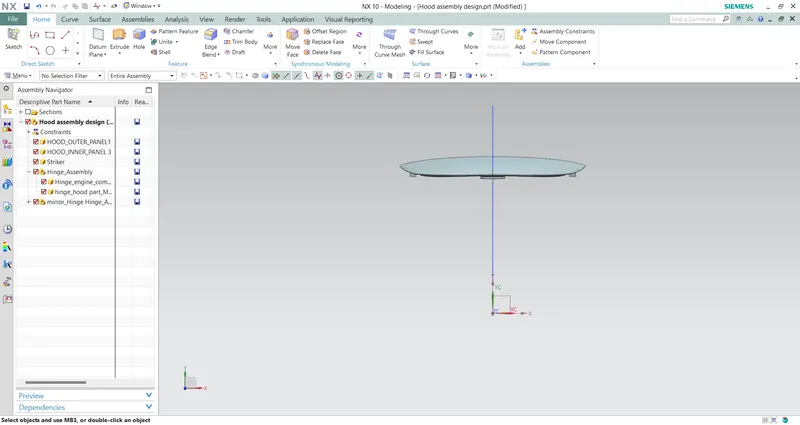
section view:
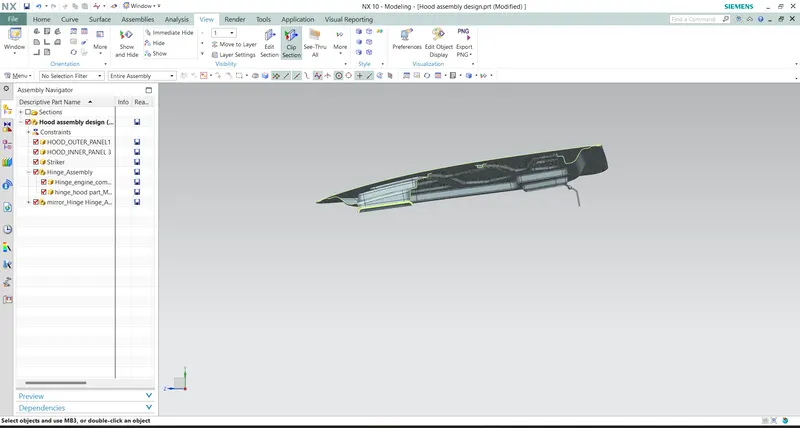
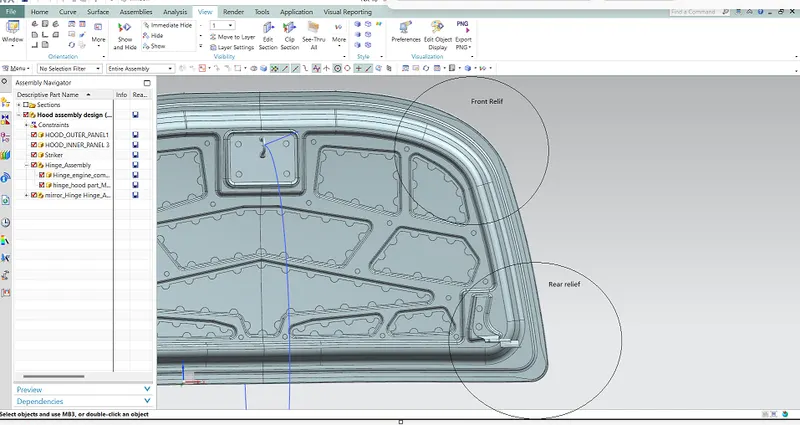
Front and rear Relief section: