Car Hood Design using Siemens NX.
Aim: Design the Hood's Inner and Outer Panels with the necessary reinforcements by following the Master Section mentioned with the proper design parameters and assemble all the parts to form a Hood Assembly.
Objectives:
- Designing the Hood Inner and Outer Panels using the Master Section given.
- Designing the reinforcements for the Striker and Hinge.
- Assembling all the parts to make Hinge Assembly.
- Giving proper thickness to the Hood with the help of hood thickness data mentioned.
- Creating the hemming for the Outer Panel with the Hemming data mentioned.
Data Given:
- Parts files required for NX: Skin Data of Hood, Hinge Assembly (Hinge Hood part and Hinge Engine part) and Striker of Hood.
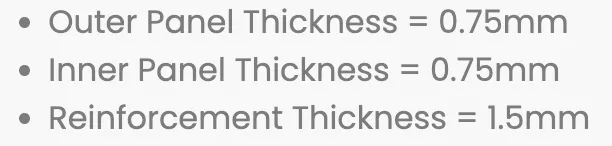
- Hood Thickness information: the Thickness of the Outer Panel, Inner Panel and Reinforcements.
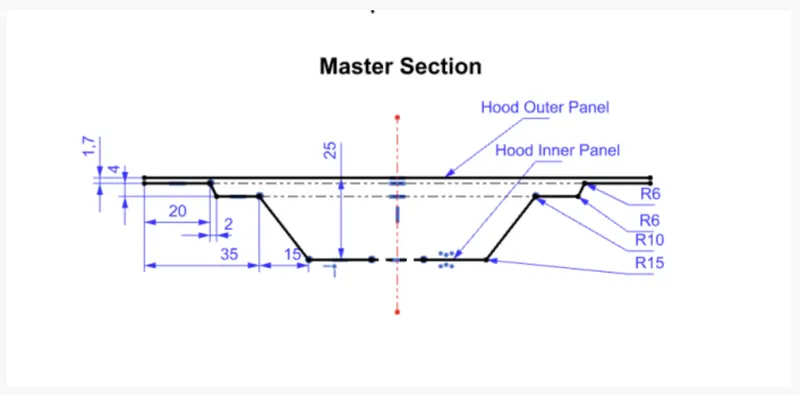
- Master Section data: Master Section for the development of the Outer and Inner Panel.
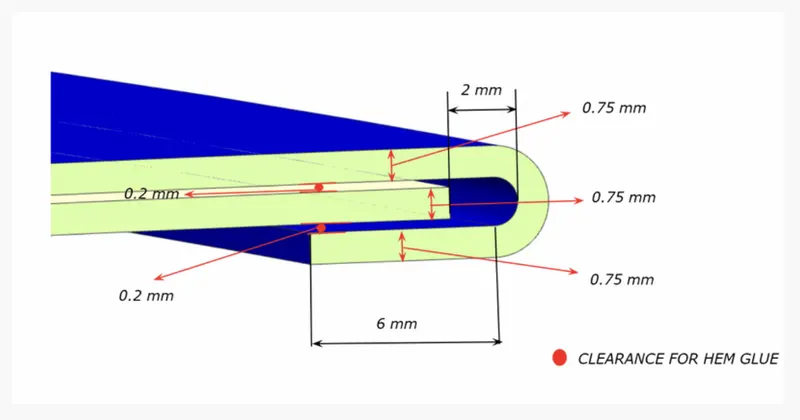
- Hemming data: Hemming data is required for the creation of the Outer Panel.
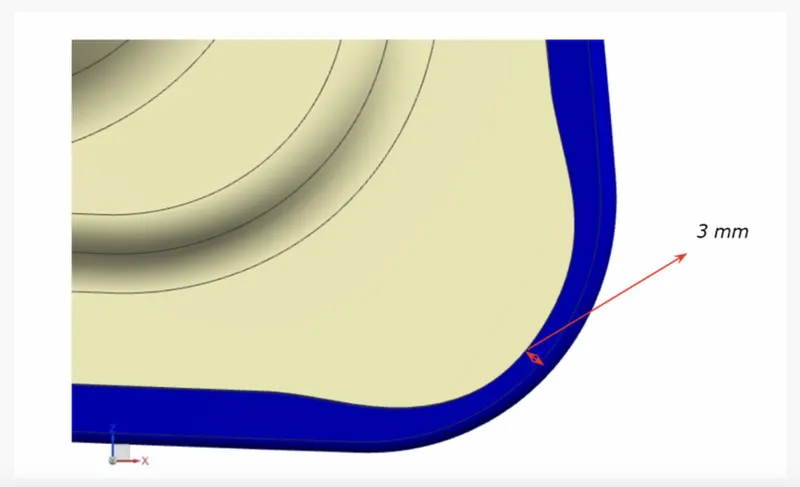
- Relief data for front and rear after hemming.
Theory:
Hood: A car hood is a hinged cover that rests over a front-engine vehicle's engine its purpose is to provide access to the engine for repair and maintenance. A latch is typically used to hold down the hood. In some vehicles, hood pins may be used to hold down the car hood. Hoods sometimes also contain a hood scoop, wiper jets, power bulge, and hood ornament. Car hoods are typically constructed from steel and sometimes from aluminium. Aftermarket car hoods may be constructed from various other materials, including carbon fibre, fibreglass, or dry carbon. A car hood is meant to protect the performance parts of your vehicle, including the engine, while also providing easy access for repairs and maintenance. The hood can incur damage as well. One of the most common types of damage is to the hinge, which is the device that connects the hood to the body of the vehicle. Over time, the hinge can become loose or may fall off completely. The hood is also prone to receiving scratches and dents.
The hood (North American English) or bonnet (Commonwealth English) is the hinged cover over the engine of motor vehicles. Hoods can open to allow access to the engine compartment or trunk on rear-engine and some mid-engine vehicles for maintenance and repair.
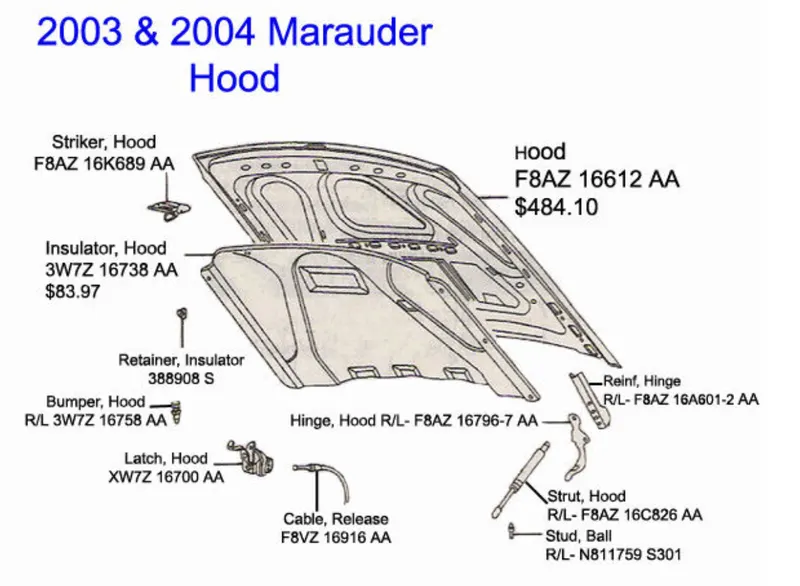
On front-engined cars, the hood may be hinged at either the front or the rear edge, or in earlier models, it may be split into two sections, one on each side, each hinged along the centre line. Hoods are typically made from the same material as the rest of the bodywork. This may include steel, aluminium, fibreglass or carbon fibre. However, some aftermarket companies produce replacements for steel hoods in fibreglass or carbon fibre to make the vehicle lighter.
Hood Opening Angle: The foremost thing to consider as a hood designer is the opening angle of the hood. This is a very important consideration since this has to be comfortable enough to open and view through the parts inside. This opening angle depends on the length of the support rod, either way, first the opening angle has to be defined. The opening angle varies according to the country zones. If the opening angles mismatch then it will make the customer lose the ease of access.
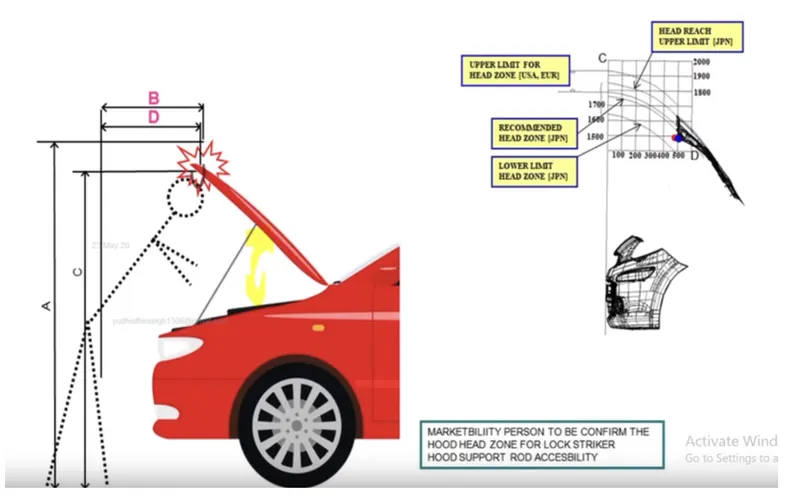
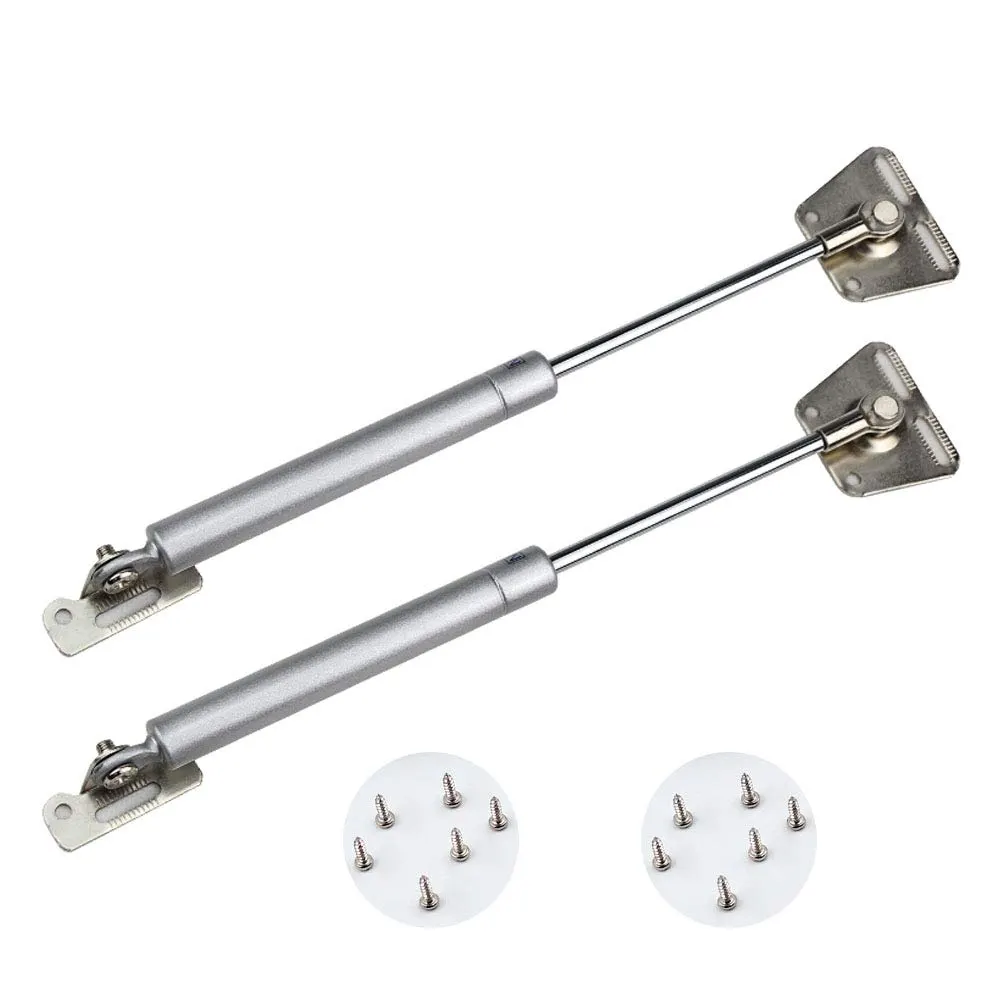
Hood Stay: This is the element that may be a support rod or gas stay type. The primary function of this element is to put the hood at a fixed opening angle. This stay should be rigid enough to support the weight of the hood, if not this will lead to serious injury to the person underneath it. The support rod doesn't have any specific standard design for it. Therefore the designer has freedom over it, but it is important to make sure the design strength. The loads experienced by the support rod were compressive and bending loads. It is also required to calculate the buckling load due to the eccentricity of the load impressed. Some consumers prefer using gas stay. The support rod is much more cost-effective than the gas stay. Then support rod mounting position has to be figured out. This can be either mounted on the inner panel of the hood or at the engine side. The support rod might dangle when in open conditions because of load and wind, this can be avoided by adding some distorted design. This little distortion might add strength to the Support rod.
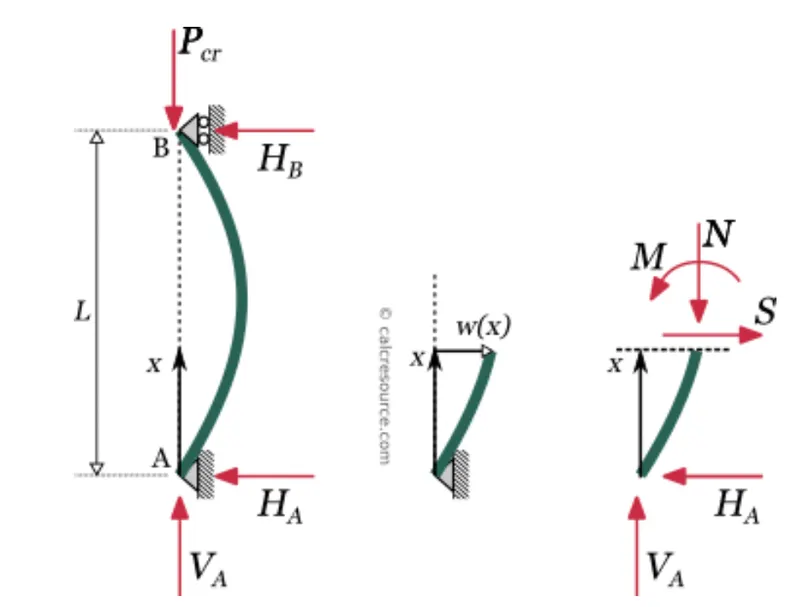
The support rod can't have a curvature which is more than 35mm from the mounting axis. By following this design standard the weight of the hood won't bend the support rod. If the support rod deviates more it consequently reduces its strength to hold the hood.
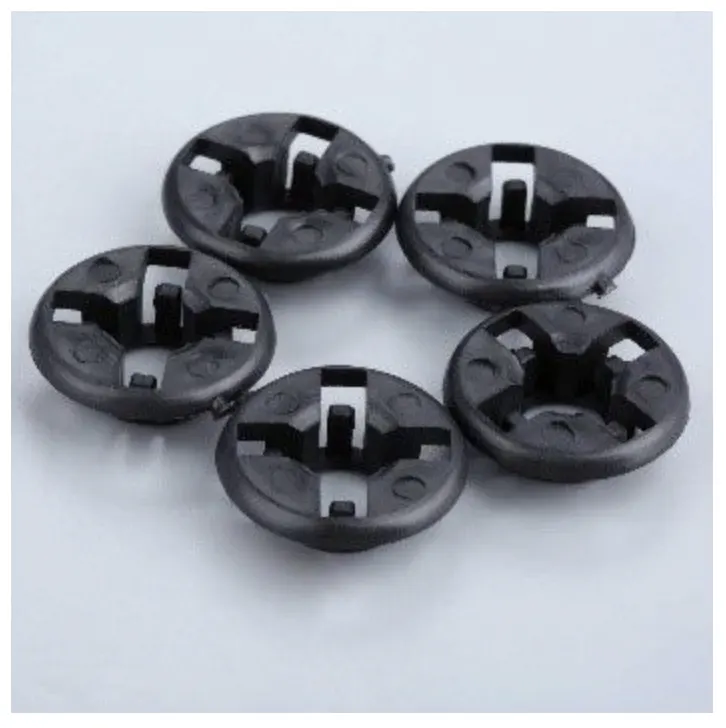
Support Rods: A hood rod is designed to hold your hood propped open whenever you need to do some work in your car's engine bay. When used, it must be firmly secured to ensure that it provides a stable hold on the hood. Meanwhile, when not in use, it must be kept stable in place and must not move around. The hood rod clip is the part assigned with that function. This clip clamps onto the rod and ensures that it is firm in its place when not in use. It keeps the rod from moving around under the hood and from causing trouble.
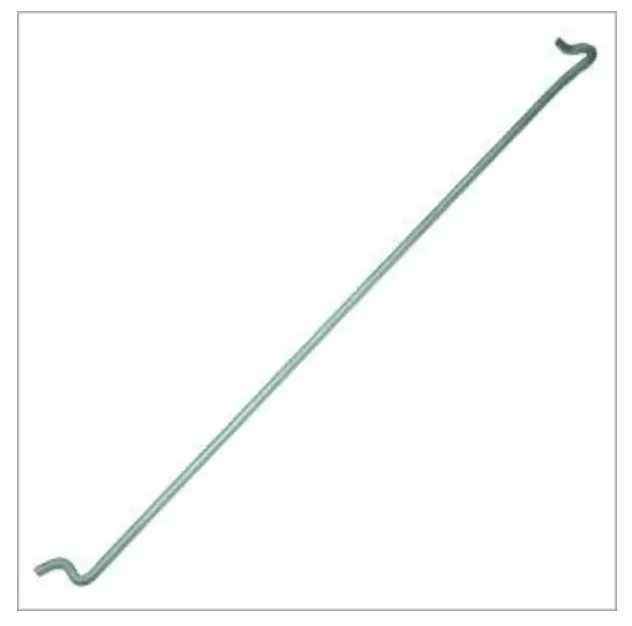
The support rod is fixed using grommets while the gas stay was fixed using ball studs.
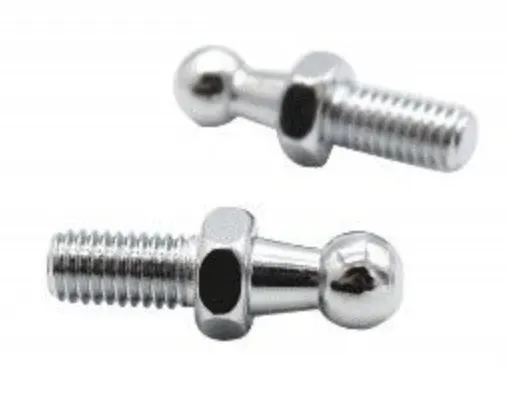
Gas Stay: This is used to open the car hood by just providing a little lift force. A small effort is all it needs and other work is done by gas pressure. It is normally found in high-end cars where the mass of the hood is more than normal.
Sheet Metal Operations:
- Blanking & Piercing: Blanking and piercing are shearing processes in which a punch and die are used to produce parts from coil or sheet stock. Blanking produces the outside features of the component, while piercing produces internal holes or shapes. The web is created after multiple components have been produced and are considered scrap material. The "slugs" produced by piercing internal features are also considered scrap. The terms "piercing" and "punching" can be used interchangeably.
- Deep Drawing: Deep drawing is a sheet metal forming process in which a sheet metal blank is radially drawn into a forming die by the mechanical action of a punch. It is thus a shape transformation process with material retention. The process is considered deep" drawing when the depth of the drawn part exceeds its diameter.
- Embossing: Sheet metal embossing is a stamping process for producing raised or sunken designs or relief in sheet metal. This process can be made using matched male and female roller dies, or by passing a sheet or a strip of metal between rolls of the desired pattern.
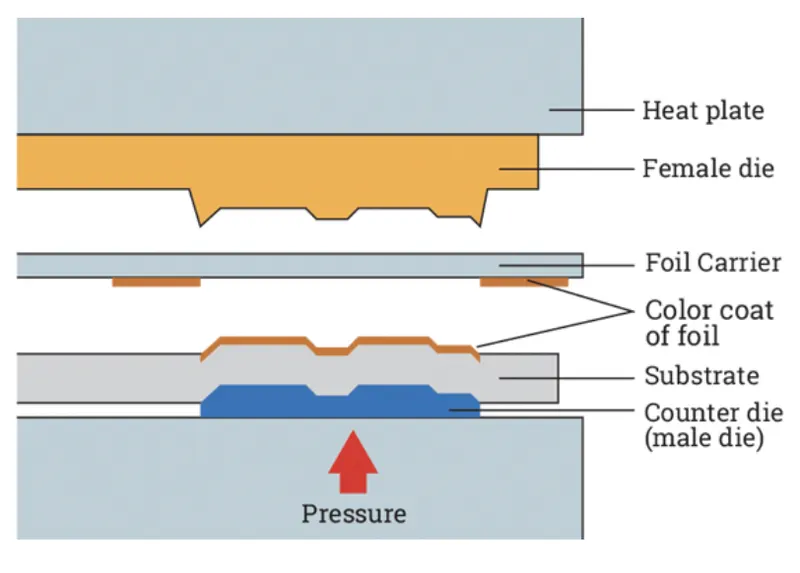
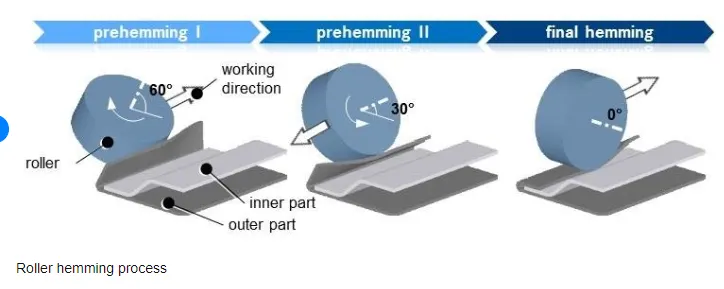
- Hemming: Hemming is a forming operation in which the edges of the sheet are folded or folded over another part to achieve a tight fit. Normally hemming operations are used to connect parts, improve the appearance of parts and reinforce part edges.
NVH Considerations:
- Reinforcements: The hood possesses some added weights like latch and striker, hinge assembly on both sides. Normally when some extra weight is added to the inner panel it losses some strength locally. To compensate for this loss the reinforcements were done. The reinforcement thickness might be like Imm, 1.5mm which depends upon the loss that we get. This feedback has to be inferred from the CAE team. Stiffener pads were also used as reinforcement.
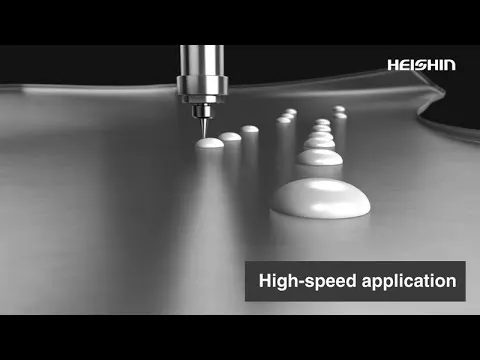
- Mastic Points: These are the spots where the inner panel and the outer panel of the hood are joined or can say sealed together using mastic glue. To fix the outer panel, if a process like bolting, riveting or welding is used, it will lose all its aesthetics. So, mastic sealant is used which is an elastic compound and acts like rubber. It is placed between both panels. Initially, it is in paste form and after a hot furnace bath, it gets solidified and gives strength to the panels together. One spot normally influences the diameter of 80 mm.
Hood Requirement:
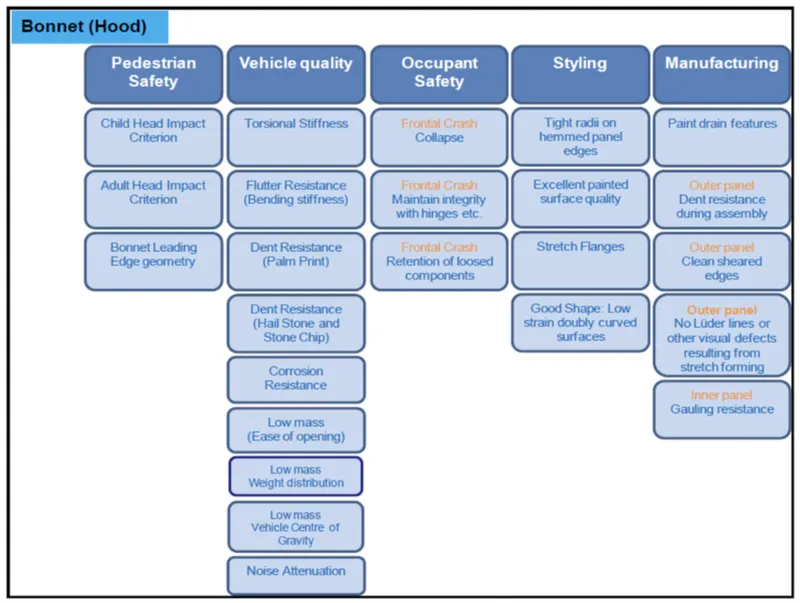
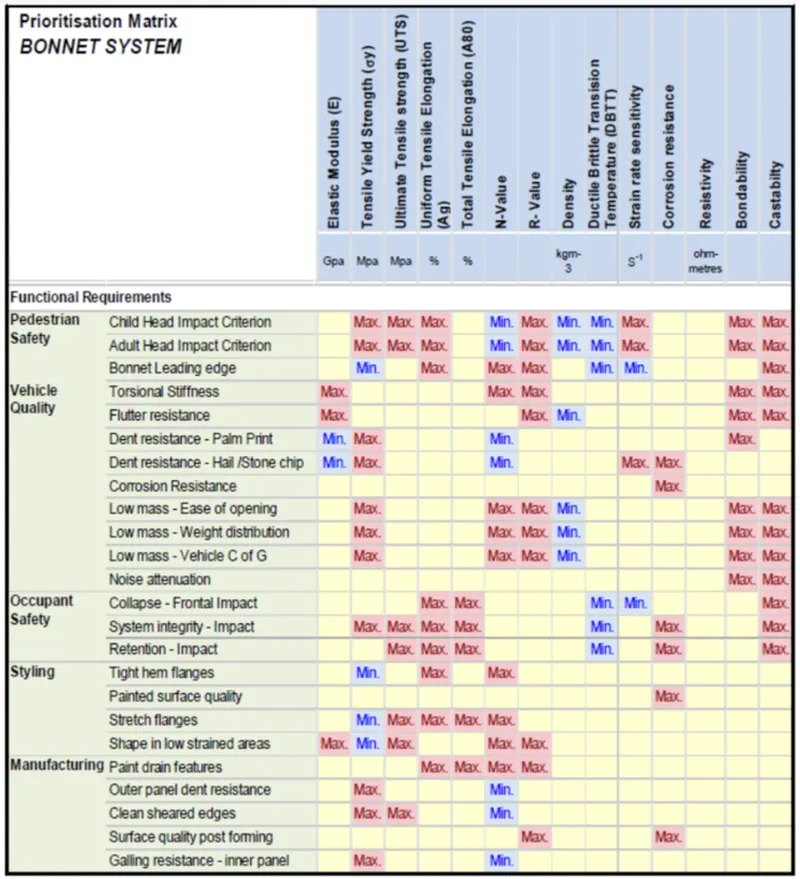
Material Selection Method: Material selection for bonnet can be done based on a prioritization matrix. The functional requirements, the design options and the system considerations have now been formalized. Each element of the design may now be assessed for material selection using a simple prioritization matrix.
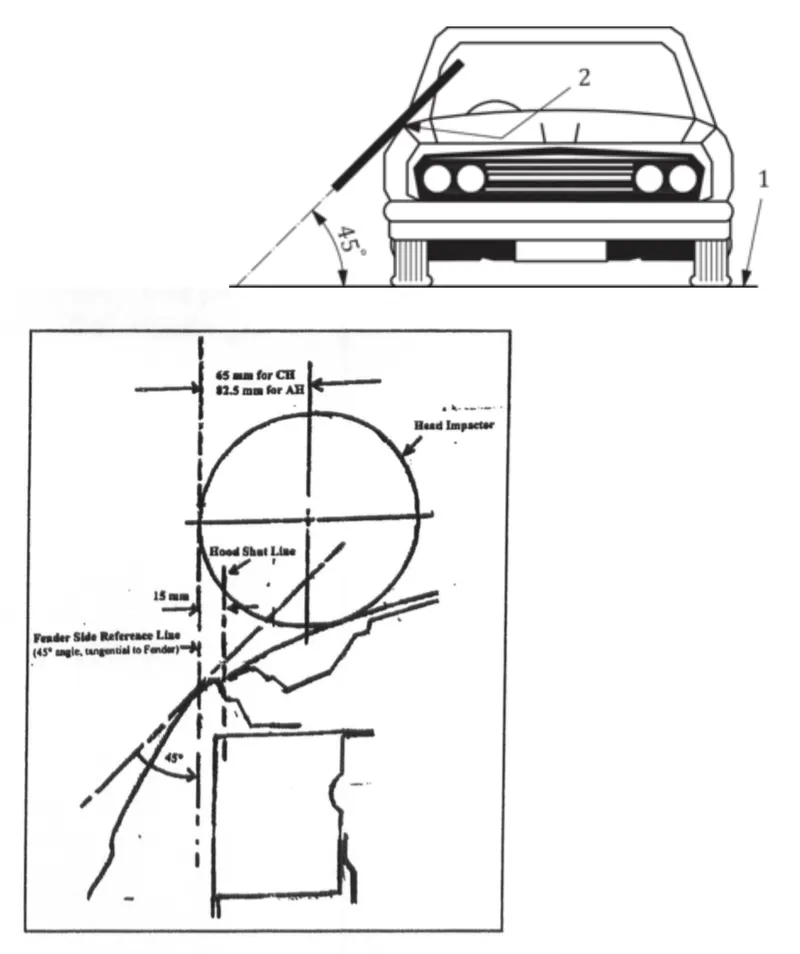
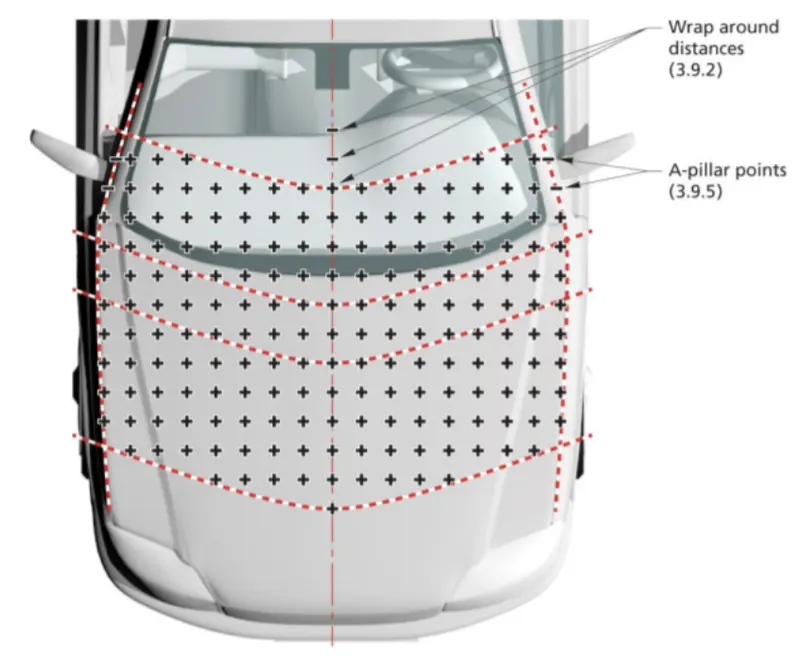
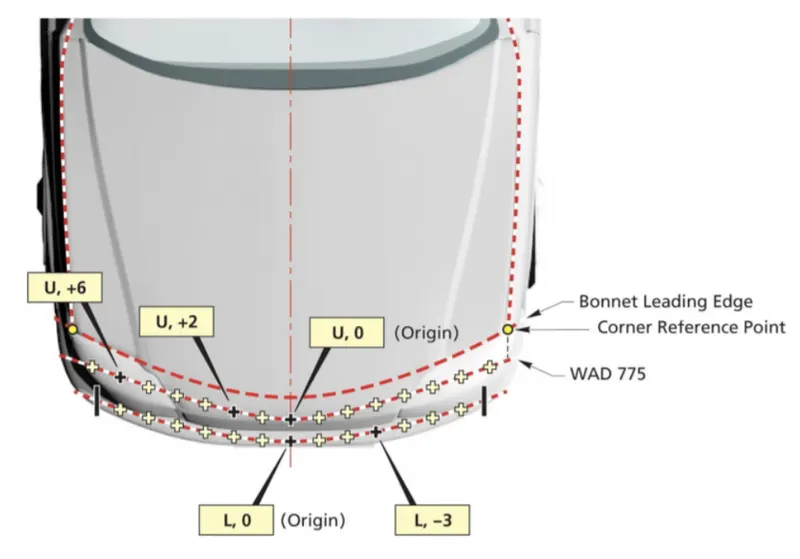
Bonnet Side Reference Line (SRL): The Bonnet Side Reference Line is defined as the geometric trace of the highest points of contact between a straight edge 700mm long and the side of a bonnet, when the straight edge, is held parallel to the lateral vertical plane of the car and inclined inwards by 45° is traversed down the side of the bonnet top and A-pillar, while remaining in contact with the surface of the body shell, any contact with door mirrors is ignored. Where multiple or continuous contacts Occur the most outboard contact shall form the bonnet side reference line.
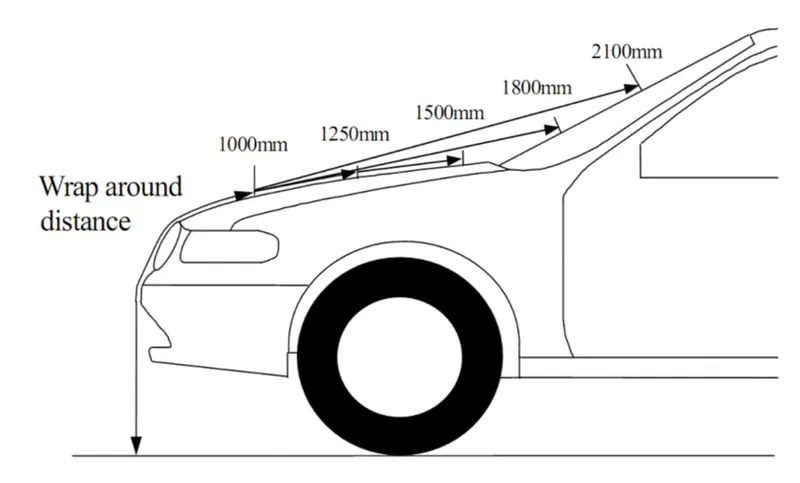
Wrap Around Distance: Wrap around Distance lines created by wrapping a tape measure from the ground onto the vehicle in successive X-Z planes.
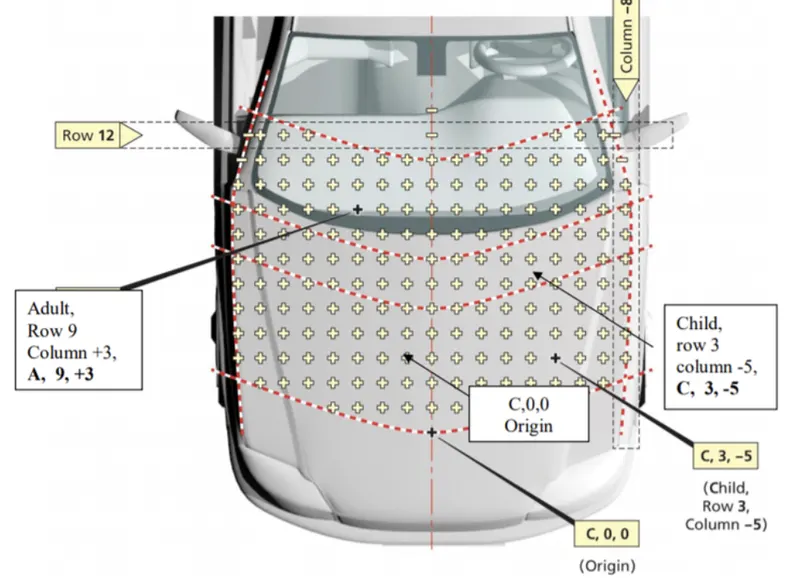
EURO-NCAP Pedestrian Safety: For adult and child head impacts, the EEVC WGI7 test protocol proposes a maximum HIC of 1000 during an EEVC WeI7 head impact zones of 40-km/h impact. The head impact zones are defined by boundaries in the vehicle's longitudinal (X) and transverse (Y) directions.
Head injury criteria (HIC) The head injury criterion (HIC) is a measure of the likelihood of head injury arising from an impact.

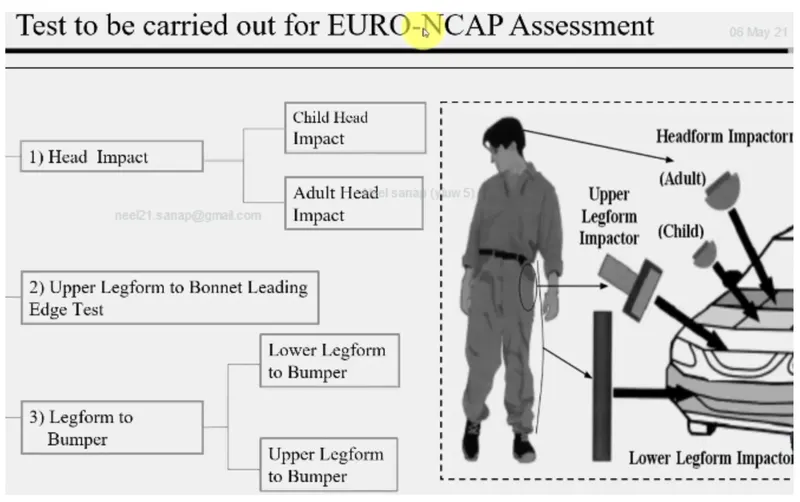
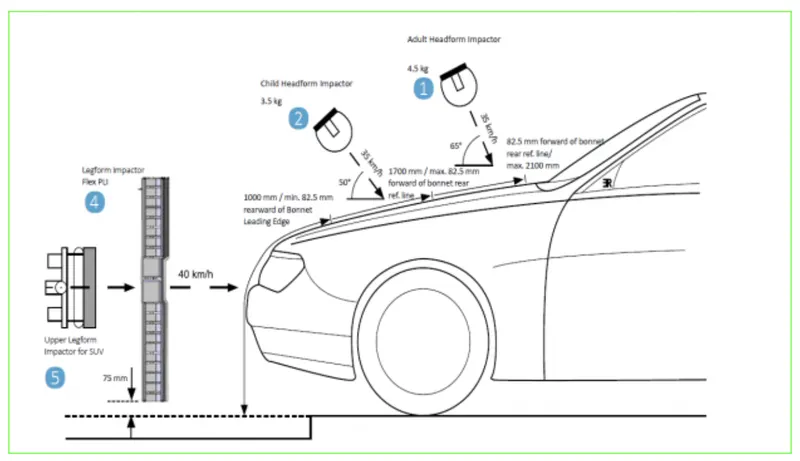
According to EURON-CAP pedestrian safety, the impact zone has to be higher for having a better safety rating. The | tests carried by EURO-NCAP were head impact test, upper leg form to bonnet leading-edge test and perform to bumper. The third most contact surface for head injuries was the hood of vehicles.
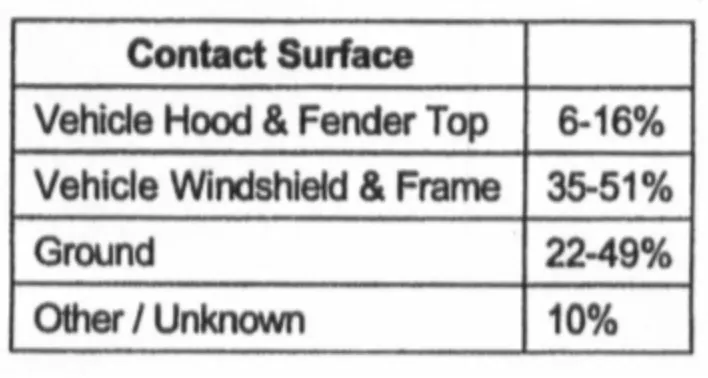
The deciding factor of a higher impact zone in the hood is the skin panel configurations. If the side reference line is on the fender then the wrap-around distance is more, consequently lesser impact zone oh hood. If the SRL is on the hood then WAD is less which increases the impact zone. The zones were child and adult impact zones. The area (mmA2) of these zones was plotted using skin panel data.
Under bonnet clearance: This is the clearance in which the whole hood setup is moved 90mm towards the hard points of components. The impact deformation space is built under the styling panel. After offsetting the bonnet this space is being an interference with the inner components of the hood. These points are called hard points and they were critical in design. These points have to be relocated.
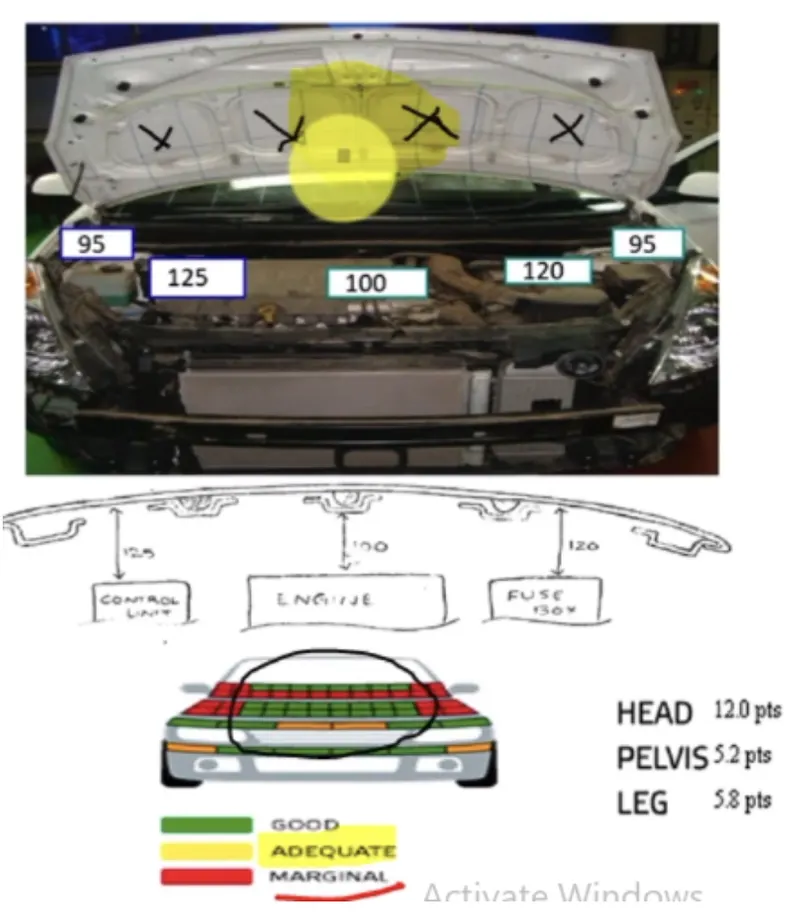
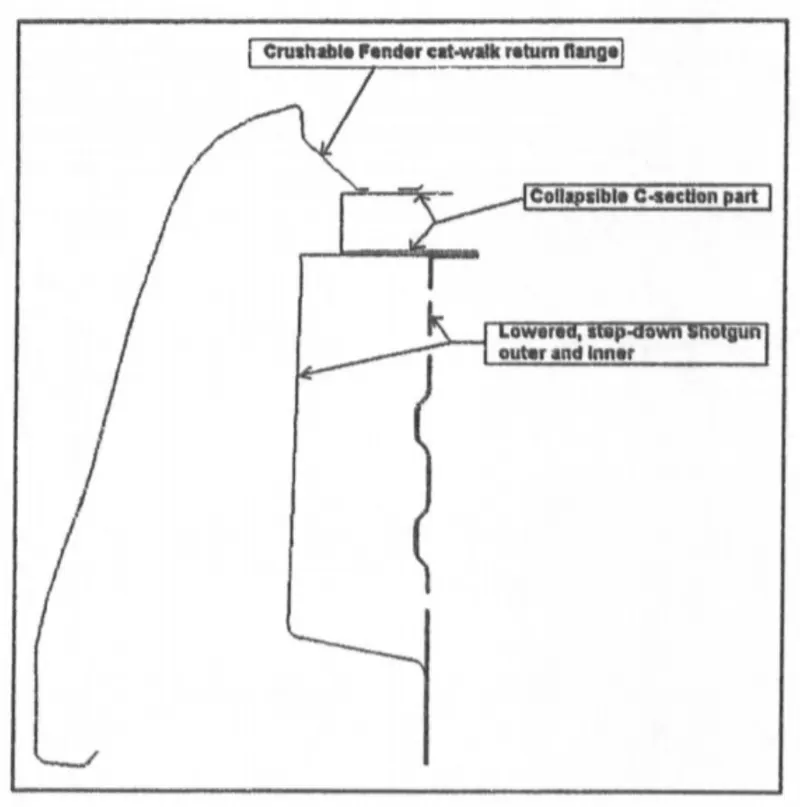
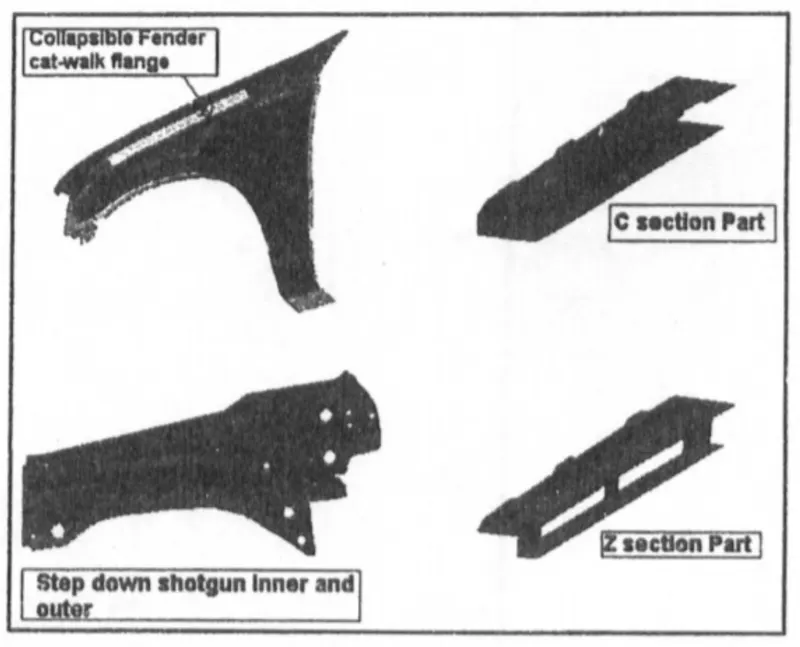
To reduce the number of red zones usually, the designers will take off back some materials from an inner panel of the hood to get extra under-bonnet clearance. Another technique to reduce the red zones was using deformable mounting points. This system is collapsible during crashes, hence this reduces the risk of hard points of interference.
Procedure:
1. Inner Panel:
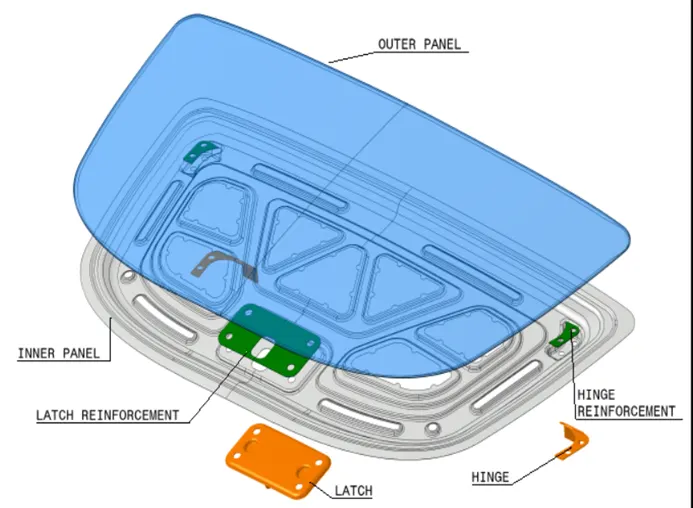
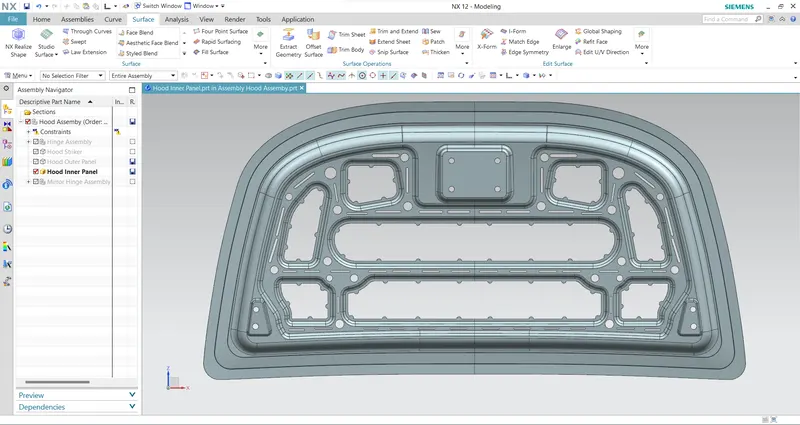
- Design: The inner panel is the BIW part of the hood. This part is designed by interpreting the master sketch given for the hood. The thickness of the inner panel is 0.75mm. The inner panel supports the outer panel. It consists of embosses & holes and mastic points. Embosses provide stiffness as well as dissipate energy towards reinforcement during a collision, Holes are provided so that the weight of the Hood can be reduced and the mastic points are provided to connect the inner panel and outer panel with good stiffness joining. The below image shows the final look of the Inner Panel after all the above-mentioned engineering features.
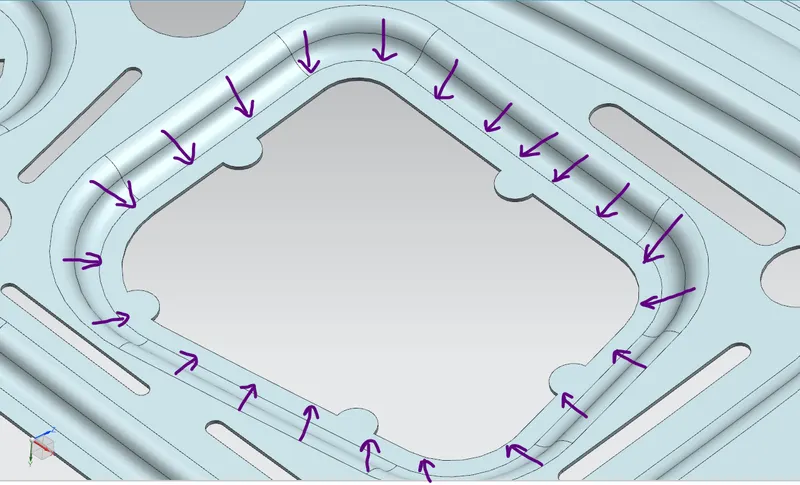
- Emboss: Embosses are projections made on sheet metal using deep drawing techniques. to stiffen the most to stiffen the flat surface and design in the inner panel. the major function of embossing is to dissipate the force acting on the hood during the collision of the car toward the hinges as early as possible. this helps to reduce the impact of the force on the passenger sitting inside.
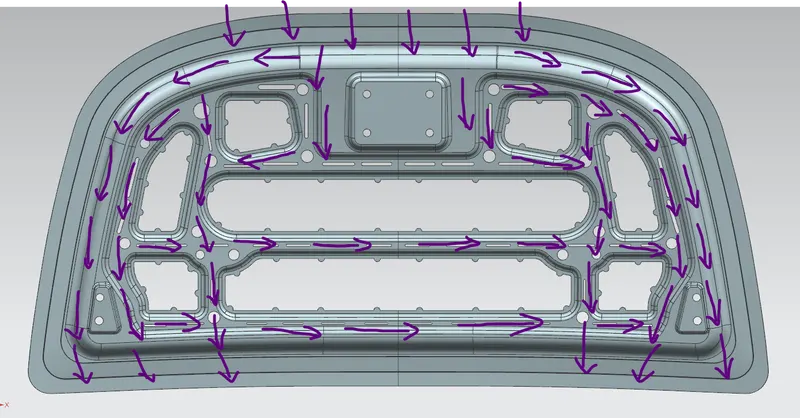
- Shock Flow: Embosses were designed to dissipate the force outside the structure and toward the hinges. This clearly illustrates the force vector flow of the inner panel and the majority of the forces have been deflected towards the hinges of the hood.
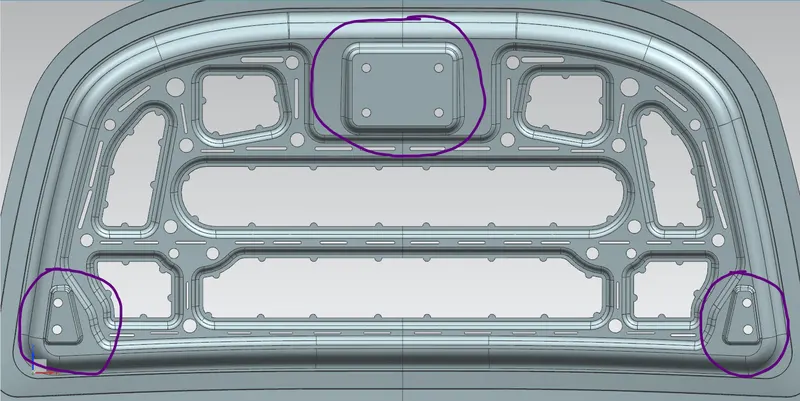
- Reinforcements: Generally reinforcements are enabled for compensating the loss of material or the structure strength locally. The reinforcements can be given in different forms. Even the inner panel is a type of reinforcement for the outer panel. The thickness of the reinforcements was about 1 to 1.5mm. Here 1.5mm thickness reinforcements are used. This value of reinforcements has to pick up from the CAE team as loss compensation feedback. The highlighted areas are the reinforcements given. The reinforcement material can be rubber, steel, etc. stiffener pads were also used. These reinforcements were significantly helpful in reducing the NVH score.
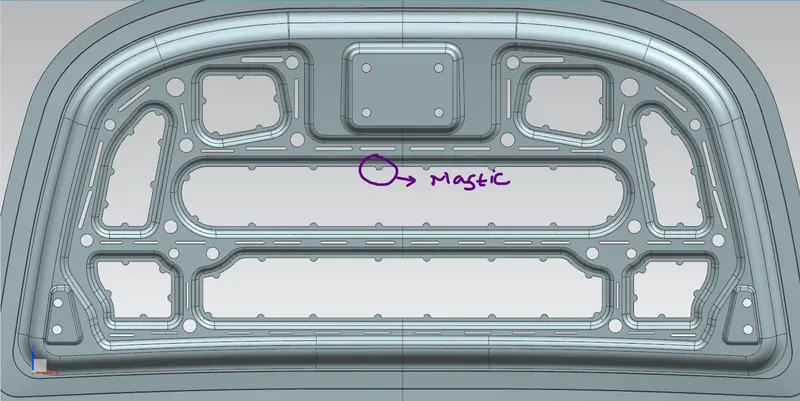
- Mastic Sealant: The Mastic sealant or mastic point is an elastic compound that behaves like rubber. it is applied between Hood's outer panel and inner panel. it has an influence area of about 80mm. The main purpose of using mastic sealant is to adhere to two surfaces, the outer panel and the inner panel. Although a hemming joining process is performed the mastic sealant makes the two panels adhere rigidly. This sealant makes the inner compartment of the panel air tight toward corrosive fluids. The sealants were applied with no dripping on the specified location. The applied vicinity of the drop is about 80mm. Therefore this sealing covers almost all the area between the inner and outer panels. The sealant becomes rigid or likes rubbery after coming out of the dry chamber for ED coating. The highlighted one is the mastic sealant the rest are also similar they are all over the panel.
2. Outer Panel:
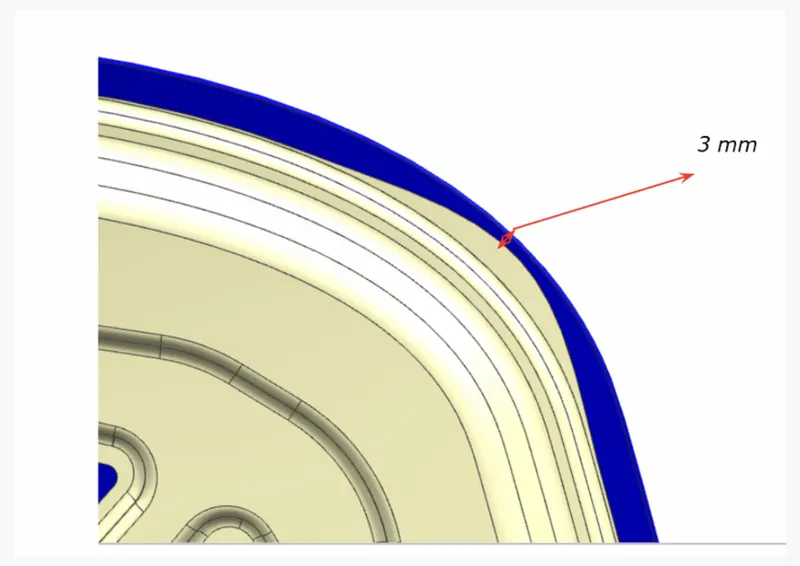
- Design: Outer panel is nothing but an outside cover for the engine and it a used to make a car look good. It has the engineering features such as the Hemming and gives corner relief to the outer panel so that the Hood has proper clearance and closes properly.
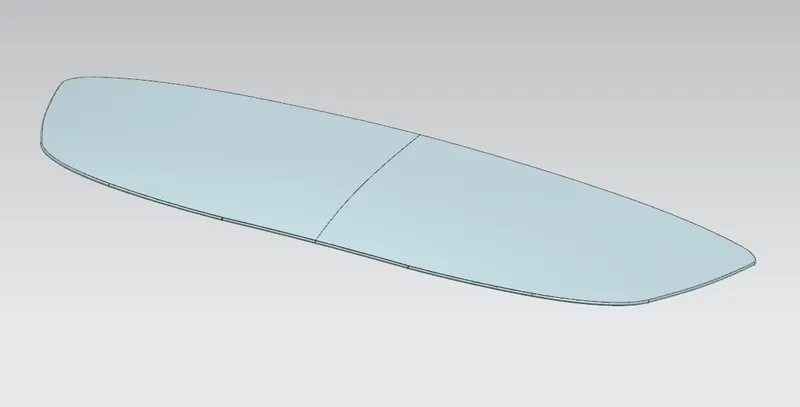
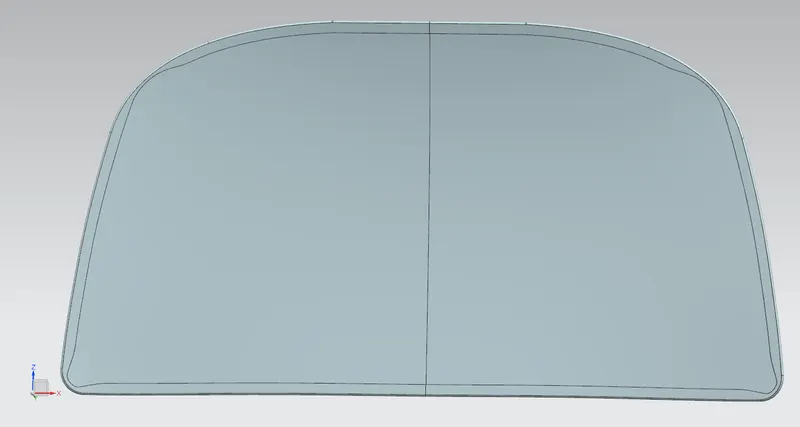
- Hemming: The outer panel & Inner panel cant join by any welding process if we did it will leave a spot on the outer panel and it will spoil the look of a car. So, to join inner and outer closure panels together we use the Hemming process. It is the process of bending/folding the flange of the outer panel over the inner one. The flange of the outer panel is bent over using the panel in progressive steps using the roller hemming head.
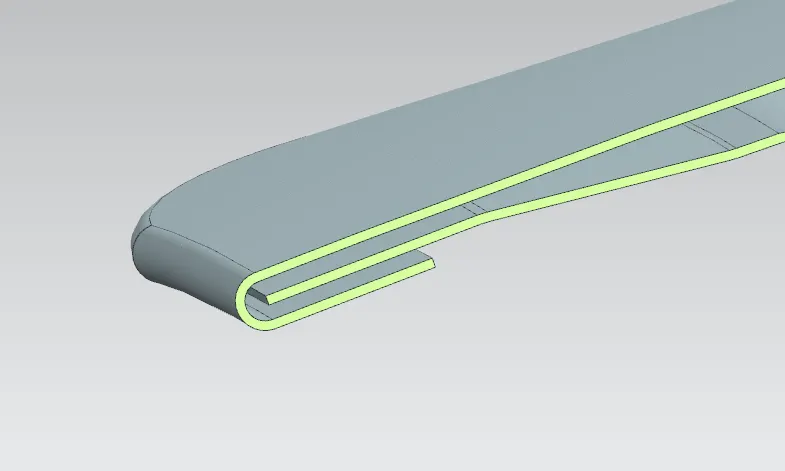
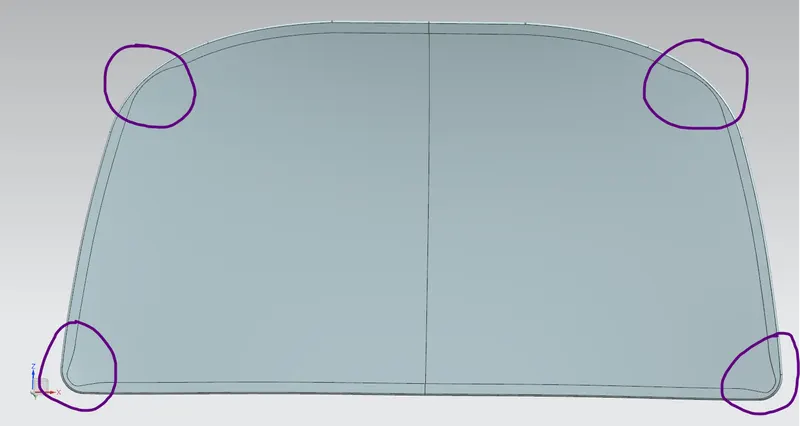
- Corner Relief: There are many types of Hemming processes but in Hoods Roller hemming is used. In this process, the roller will be rolling over the edges of the Outer panel to close it with the inner panel. These rollers will be rolling over 2-3 times for perfect closing. so, a certain force is being used by rollers to all the corners but there are some areas where the roller cannot tighten the part properly so that's why we give some relief to the corners.
3. Other Parts for Hood Assembly:
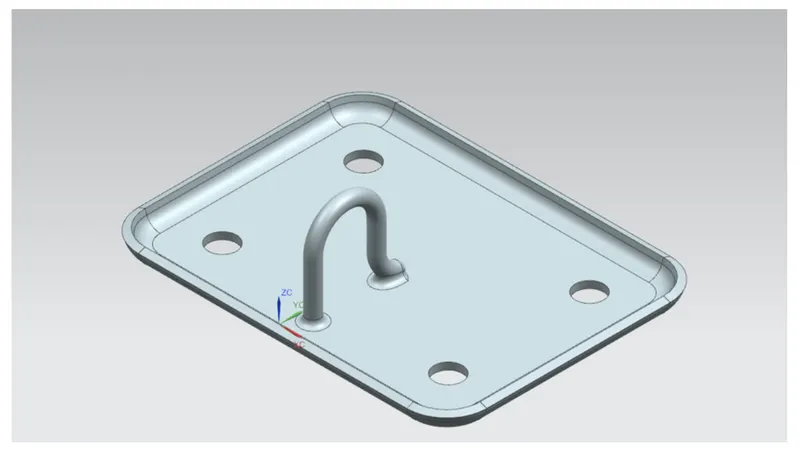
- Latch and Striker: Latch and Striker are used for locking the hood with the car. It's usually placed in the space provided on the inner panel.
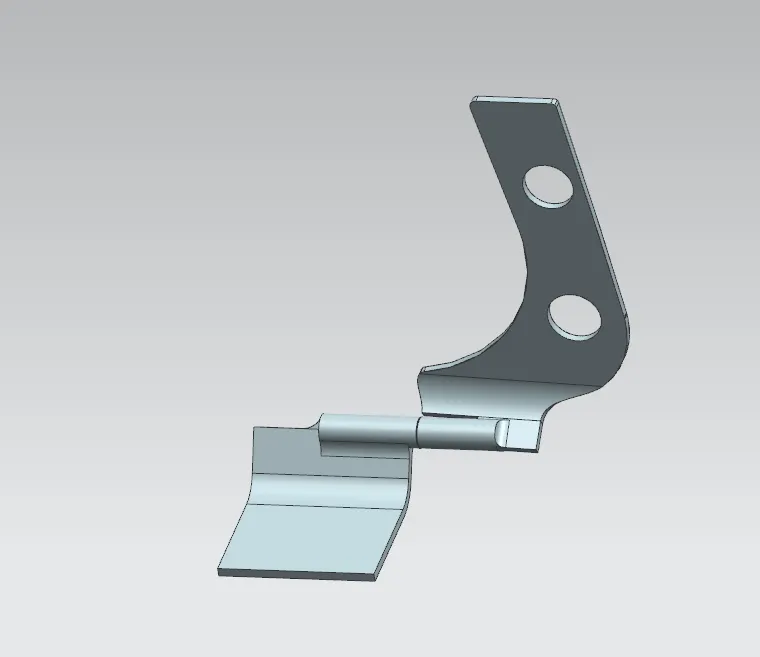
- Hinge Assembly: Hinges are used to connect the hood & cowl panel of an automobile. It enables the opening & closing operation of the hood. the hinge should be made strong enough to handle the weight of the hood and also to handle the force acting on it during the collision.
- Reinforcements for Latch, Striker and Hinge: Reinforcements are given to the Inner Panel so that the whole assembly will have more strength and will not get damaged easily when a collision happens.
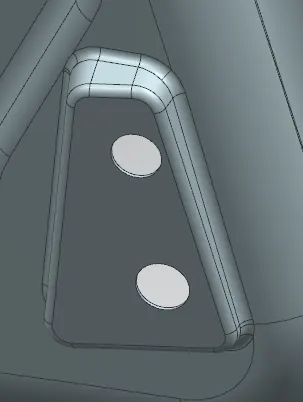
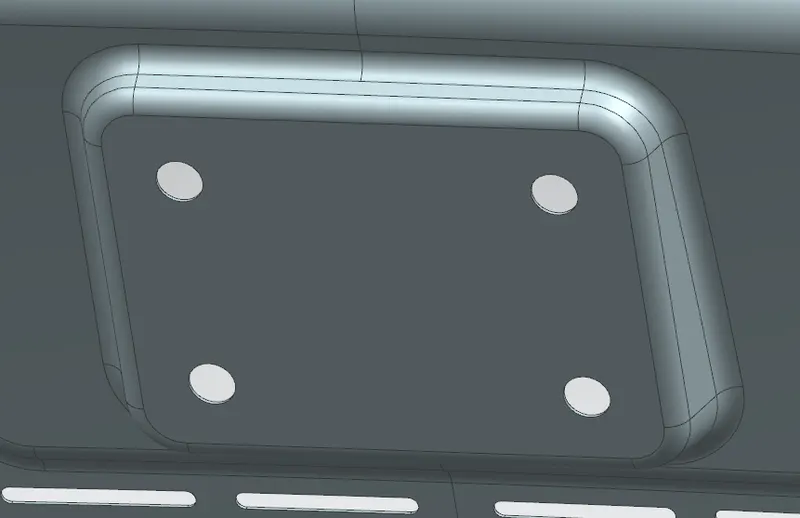
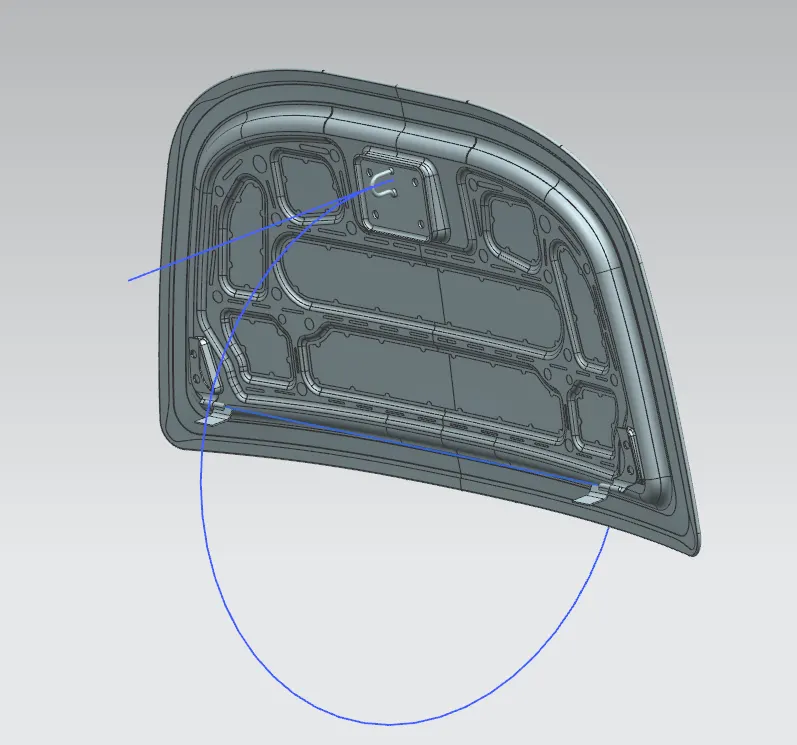
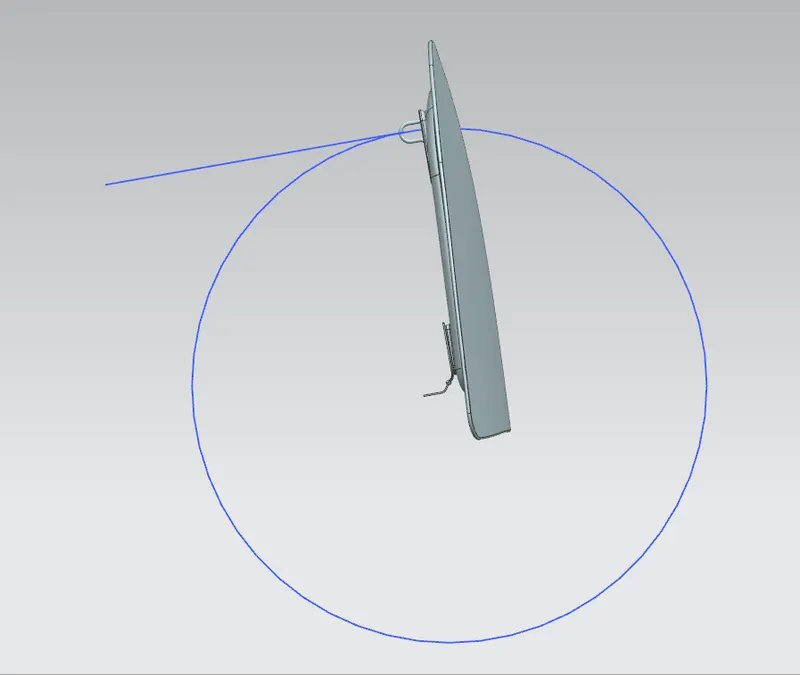
- Position of Hinge and Striker: The latch and striker have to be positioned tentatively, with the help of the hinge axis taken. Whenever the swinging part is designed its trajectory and positioning of components have to be checked. The hinge is positioned on the emboss surface using assembly constraints. By using the mirror assembly tool the other side of the hinge is placed exactly same the as before. Thereby sketch a hinge axis which is co-axial for both the hinges. Mark the middle point of the hinge axis. This hinge axis point is zero weight point. Now the striker is already positioned in the pre-determined area, this idea of placing can be capitalized on a previous car. This method is going to validate whether the position is correct or Wrong. Now the radius is taken as the distance between the hinge axis point and the striker midpoint. After drawing a circle two things can be inferred from the circle. The circle is the trajectory of the hood opening and closing. By drawing a line tangent to the point normal o the midpoint of the striker and inferring whether the striker is locally normal to the tangent. If it possesses local tangency then the latch and striker arrangement is validated to be correct.
The hinges should be usually placed on both sides of the hood in such a way that the strike fits precisely into the hole provided.
To ensure this the following conditions are as follows:
1. Both the hinges should be on the same axis.
2. The centre of the striker's circular trajectory should be always perpendicular to the hinge axis.
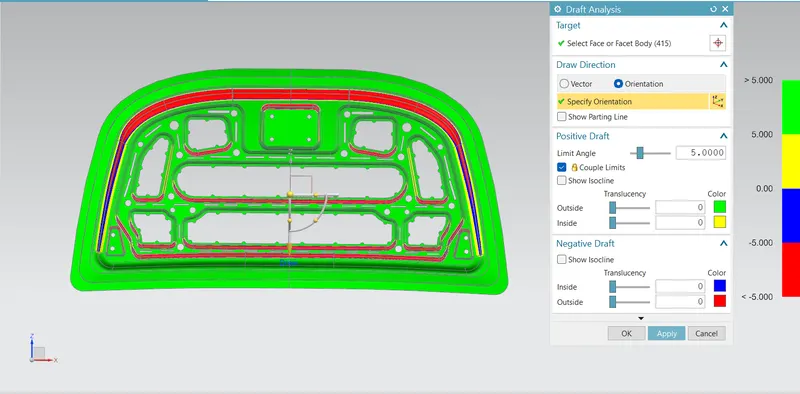
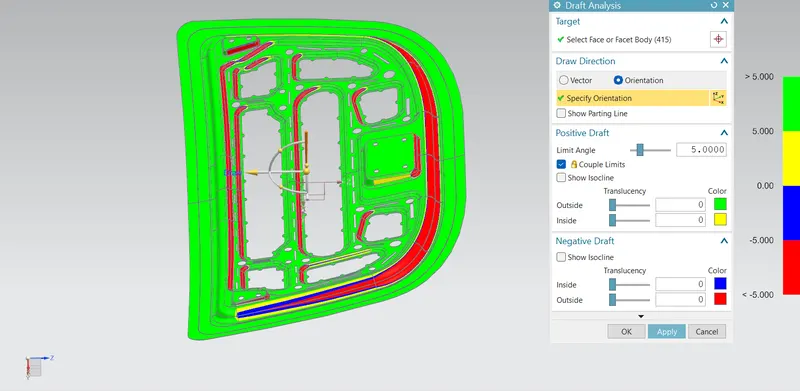
4. Draft Analysis: Once the design was ready, the inner panel of the hood was analysed for manufacturability. here draft analysis shows that all parts are cleared when the core is removed from the cavity. This command helps in analyzing the tooling feasibility of the product. This draft analysis is generally done for moulding, plastic and stamping parts. Our hood product involves more stamping process. Therefore it is mandatory to analyze whether all the draft angles are within the tolerance zone. The negative drafts can never be manufactured, which leads to the rejection of the design. The draft analysis command has four zones of criticality. In which the product design has to be in the green zone for manufacturability. The other zones indicate the negative draft present in the design. The design is to be free from negative drafts, abnormal blend radius, etc.
Results:
Below shown are the results of all the things we did for the creation of Hood Assembly with proper design of the Inner and Outer Panels and with all the engineering features required for proper designing. All the parts are assembled to form a proper Hood Assembly as we see in real cars.
Conclusion:
All the parts of the hood are designed based on the required conditions & given dimensions as that given in the Master Section. Thus the completion of the hood design & analysis for successful manufacturability we can conclude that the hood can be utilized for the vehicle.
Also, considering the safety of occupants & pedestrians the hood has been designed under the EuroNCAP safety regulations.