Hood design-Week 2
Challenge 3- Hood Design- Week 2
Aim
Design & Submit an ASSEMBLY of Hood Inner Panel, Outer Panel, Latch, Hinge and the Reinforcements.
Introduction
In recent years, the work has been done on the bumper and hood design of the vehicle front end to reduce the injuries to the pedestrians in the event of a pedestrian vehicle collision. The front portion of the vehicle gets damaged including bonnet when met with an accident. So, there is need to change the existing design of bonnet or by changing the material.
Bonnet forms a sub-segment of vehicle closures. Bonnet usually do not directly open onto the passenger cell which greatly reduces the importance (weighting) of certain of the functional requirements normally associated with closures such as passenger safety, air tightness, low cycle fatigue strength etc. The objective of these measures is to reduce the number of road accident fatalities and the severity of injuries sustained by pedestrians involved in a collision with a vehicle in urban traffic. Impact frequency and seriousness of injury has been studied for many years, resulting in rating systems and improved design.
Bonne system is an access panel to the engine compartment to enable maintenance of power train, drive belts, battery, fluid levels and lamp units. It is fundamentally a reinforced skin panel with many safety and quality requirements. While designing hood following parameters are considered-
- Pedestrian Safety
- Vehicle quality
- Occupant Safety
- Styling
- Manufacturing
Pedestrian Safety
Impact frequency and seriousness of injury has been studied for many years, resulting in rating systems and improved design. During vehicle and pedestrian collisions, bonnet zone accounts for a substantial proportion of the risk associated with pedestrian safety.
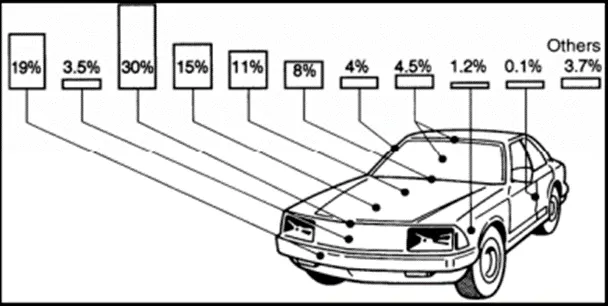
The height, weight and age of the pedestrian all play a role in the kinematics of the event and in his ability to survive. Most fatalities for the younger population are related to brain damage caused by head impact on the bonnet. For older people additional risks include rupture of arteries in the lower limbs and pelvis from bumper and bonnet leading edges. Some studies have produced test procedures and systems to rank and regulate vehicles for pedestrian safety. 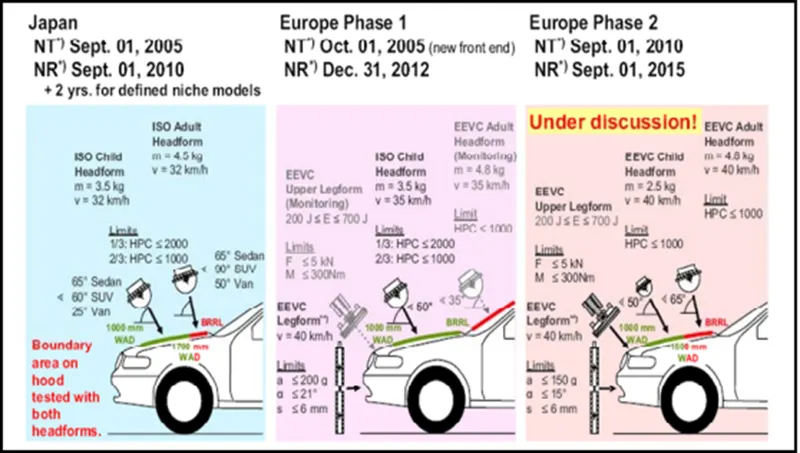
Evaluation of pedestrian safety for a bonnet must be carried out in the context of its surrounding elements:
- Vehicle styling, size (wrap around distance “WAD”) and under bonnet clearance to other elements (considered as hard points).
- Local bonnet stiffness is influenced by mounting point stiffness such as hinges, bump stops and latches.
- This is better understood by superimposing the kinematics of a dummy onto the test conditions
Hood Components
- Hood outer panel
Outer panels are the aesthetic elements of a car. Styling team provides the skin for the outer panel. It should be designed as per the safety norms considering pedestrian safety.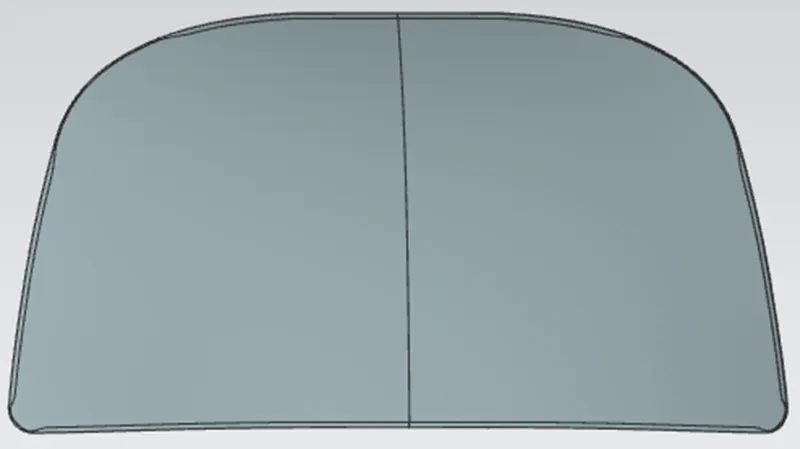
- Hood inner panel
Hood inner panel is used to give strength to outer panel. Striker and hinges are attached to inner panel by creating embosses. Inner and outer panel attached using hemming operations. It is designed in such a way that force should spread in outer direction so impact on the passenger is less after collision.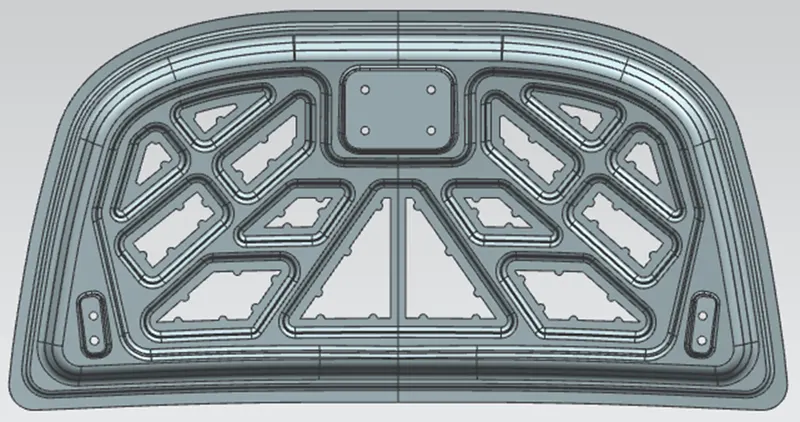
- Striker/Latch
- Hinges
- Reinforcements
It is used to add strength to sheet to compensate loss of strength in region where it is weak.
Latch Trajectory
Position of striker and hinges are co-related to each other. First position of Rotation axis of both hinges should be co-linear. If circle is drawn from the midpoint of the axis joining both hinges to the centre of the striker, then axis of the striker should be tangent to this circle. And this circle is Latch trajectory. First either striker or both hinges should be fixed and accordingly other part needs to be adjusted.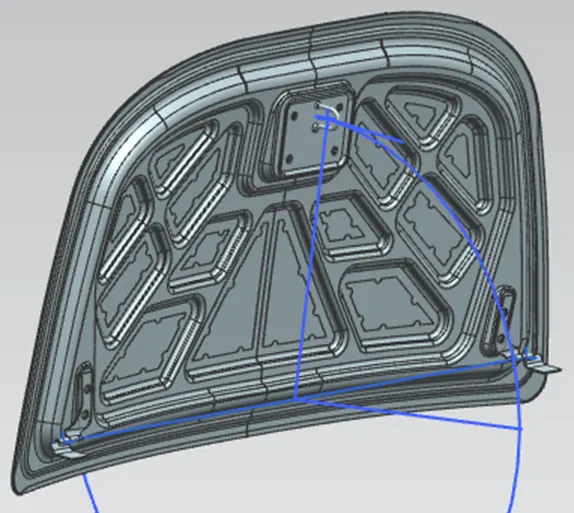
Mastic Data
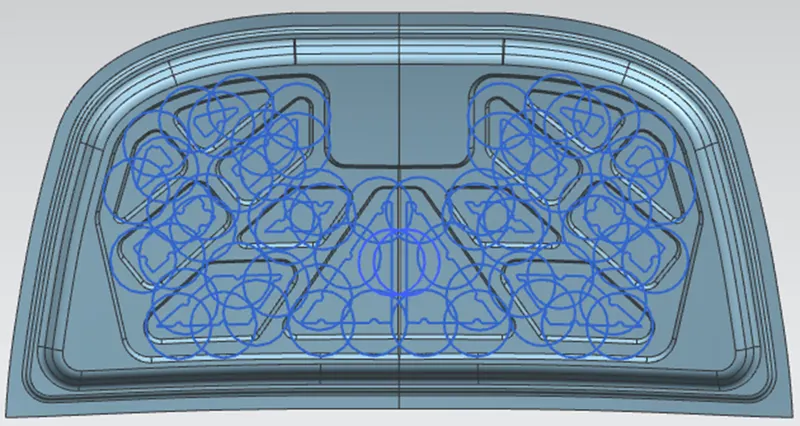
Inner and outer panel are joined by hemming process at the boundary. At the inner places hemming process is not possible, also other processes like welding and riveting can’t be used as they leave mark on the outside panel which looks aesthetically bad. If kept as it is there will a lot of vibration and noise. So, Mastic sealants are used to join them. These are elastic rubber component. When they are applied in between panels, it gives strength in 40mm radius region around it. So, they are placed in such away that it covers maximum panel area.
Emboss
Sheet metal embossing is a stamping process for producing raised or sunken designs or relief in sheet metal. This process can be made by means of matched male and female roller dies, or by-passing sheet or a strip of metal between rolls of the desired pattern. Embosses are created in inner panel to increase stiffness and give space to engine components. Embosses are in such shape that in frontal collision force is diverted away from passenger.
Deep-Drawing
Deep drawing is a sheet metal forming process in which a sheet metal blank is radially drawn into a forming die by the mechanical action of a punch. It is thus a shape transformation process with material retention. The process is considered "deep" drawing when the depth of the drawn part exceeds its diameter. This is achieved by redrawing the part through a series of dies. The flange region experiences a radial drawing stress and a tangential compressive stress due to the material retention property. These compressive stresses (hoop stresses) result in flange wrinkles.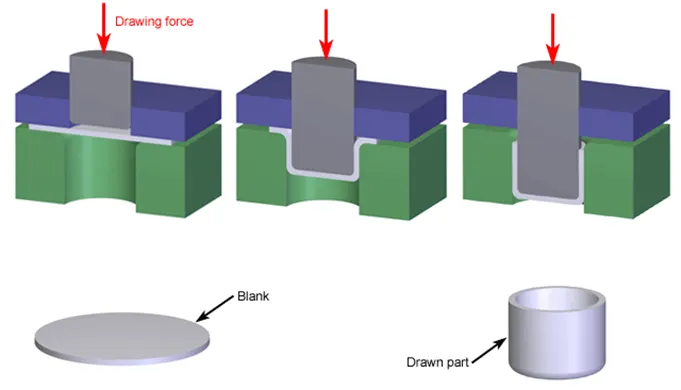
Hemming
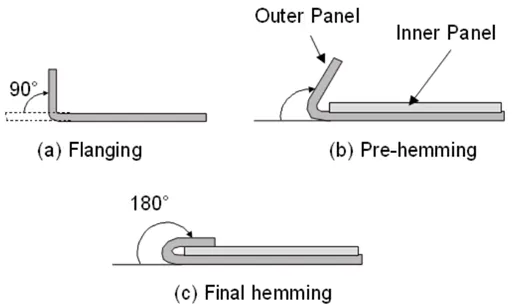
Hems are folds to the edge of a part to create a rounded, safe edge. They may be open, flat, or tear-dropped and tolerances depend on the hem’s radius, material thickness and features near the hem. The process of creating hems is called hemming. Hems are created by bending a flange of your part back on itself. This increases strength of the hemmed edge and also gets rid of any sharp edges.
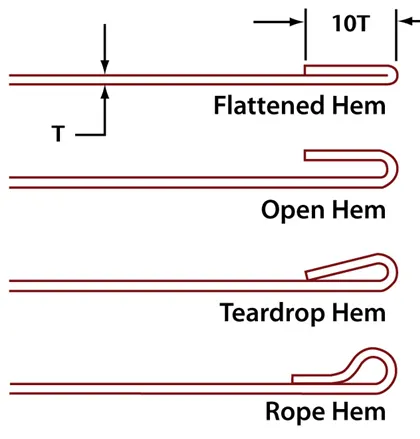
Design of Hood
INPUT
- Outer Panel Thickness = 0.75mm
- Inner Panel Thickness = 0.75mm
- Reinforcement Thickness = 1.5mm
- Master Section:
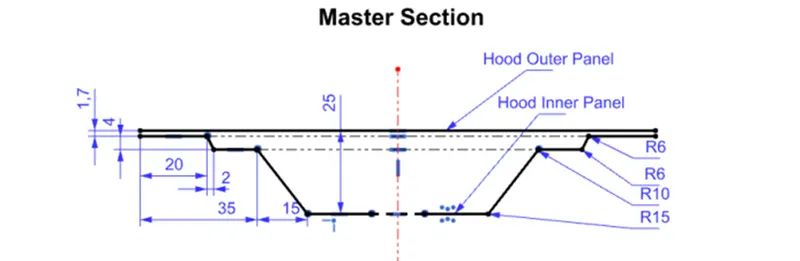
- Hemming Data:
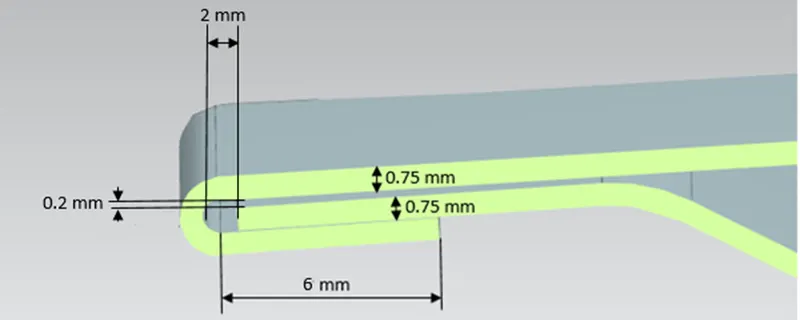
Procedure
- First create an assembly file and add all given components.
- From the given outer panel create new inner panel using various commands. Create flanges, offsets, embosses, trim surfaces using various commands by dividing panel sheet in half.
- Now create the emboss for the hinge and fix it. Create a latch trajectory to fix the striker position with respect to hinges. And create emboss for hinge also.
- Now create the hemming for outer panel from inner panel reference.
- Now mirror both inner and outer panel, sew them and give thickness to both panels.
- Create reinforcements for hinges and striker.
- Now create constraints for all parts and fix them.
Commands used
- Offset surface- Offset surface one or more surface to given distance
- Trim body- Trim body from given boundary curve or plane
- Offset curve in face- Offset curves along the faces on which they lie
- Through curve- It creates a body through multiple sections where the shape changes to pass through each section
- Trim sheet- Trims off a portion of a sheet body
- Law extension- Creates a law-controlled extension from a base sheet, dynamically or based on laws for distance and angle
- Trim & Extend- Trims or extends a set of edges or faces to the intersection with another set of edges or faces.
- Face blend- Adds tangent blend faces between selected sets of faces in circular, conic or law controlled.
- Edge blend- Rounds sharp edges between faces with constant or varying radius.
- Curve on surface- Creates a surface spline feature directly on a face
- Mirror Geometry- Copies geometries and mirrors them across a plane
- Sew- Combines sheet bodies by sewing common edge together or combines solid bodies by sewing common faces
- Thicken- Creates solid body by adding thickness to a set of faces
- Bridge curve- Creates tangent blend curve between two objects
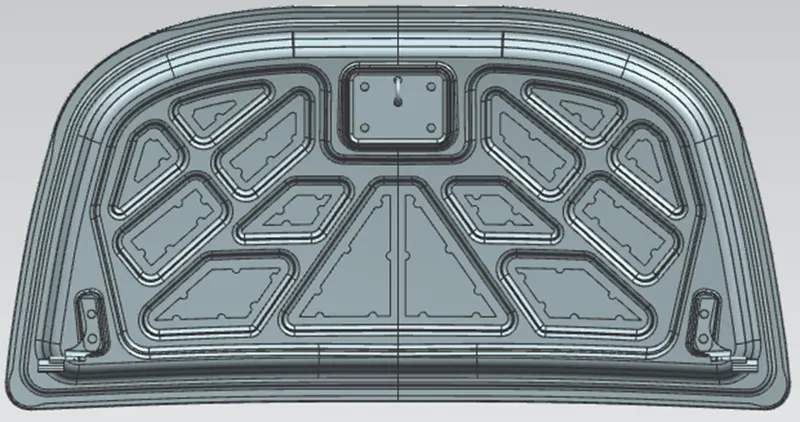
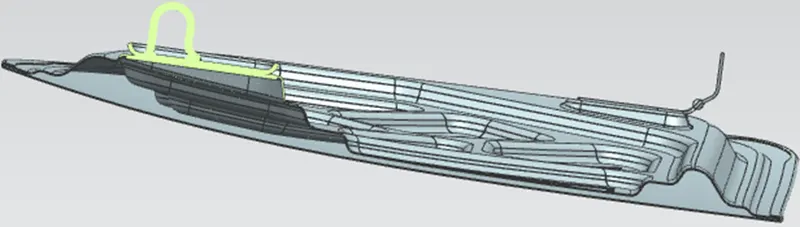
Output Images
Conclusion
Designed inner panel for car hood from given data and assembled Hood outer panel, Hood inner panel, Striker, Hinges and reinforcements in NX cad.